Alysrazor Tank Strategy Guide (Heroic Mode included)
Table of Contents
Introduction
This guide is intended to provide a comprehensive description of the encounter with Alysrazor in Firelands. It is mostly targeted to tanks who desire to have a short but detailed overview of what is expected of them during that fight.
This guide is updated for World of Warcraft WoD 6.1.2.
The encounter with Alysrazor, one of the first five bosses of Firelands, is broken down in four stages. Each stage has its own unique (but not very complicated) mechanics that will test a few abilities of the raid.
As a tank, the first stage will test your ability to properly move around an add and survive its various abilities. Stage Two and Stage Three do not involve tanking. Stage Four will require you to survive very high damage from the boss.
Overview of the Fight
The encounter with Alysrazor is fought in a round arena and is made up of 4 stages:
- Stage One lasts 3 minutes and sees a few raid members fly after Alysrazor to attack her while the rest of the raid deals with 2 types of adds in the arena.
- Stage Two lasts 30 seconds and requires the raid to regroup in the arena and avoid Alysrazor's damaging abilities.
- Stage Three lasts between 20 and 34 seconds (depending on your raid ability to handle some adds) during which an immobilised Alysrazor takes 50% more damage and DPS caster have mana-free casts.
- Stage Four lasts 25 seconds during which Alysrazor is freed from her bonds and does very damaging attacks on the raid.
Once Stage Four has finished, Stage One simply starts over. The fight goes on until Alysrazor is dead.
Prelude
The fight starts with a short sequence during which Alysrazor will deal high fire damage to the raid. She also knocks everyone back. Be wary of two things:
- avoid standing too close to the entrance as you might get knocked back in the fire wall she will create there;
- after she is done, she will fly over the arena, in a north to south fashion, and will deal high damage to anyone standing in front of her.
Stage One
During this stage, which lasts 3 minutes, Alysrazor will mostly be in the air, but she will sometimes fly low over the arena and do a conic attack. As a tank, you will spend the entire stage at the ground level, handling your Voracious Hatchling and feeding it Plump Lava Worms.
Voracious Hatchlings and Plump Lava Worms
Before delving into the specific task you will be assigned to, it is important that we present you with an overview of the arena and the various adds that will spawn:
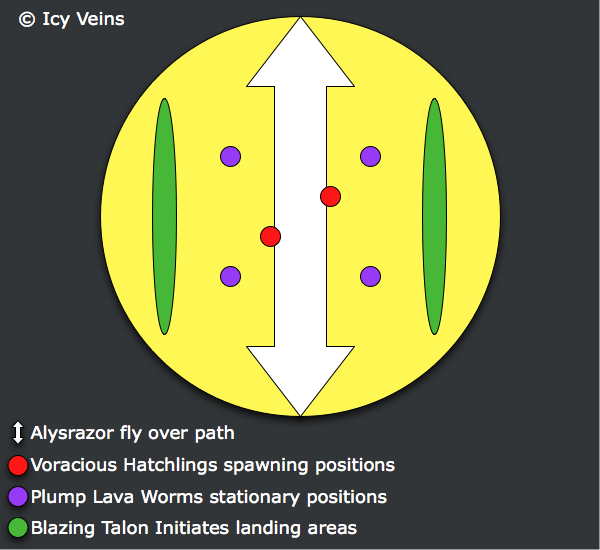
Approximately 20 seconds into Stage One, two Blazing Broodmothers will drop off two Molten Eggs. You need to stand close to the egg you will have been assigned to. After 10 seconds, each egg will hatch into a Voracious Hatchling. The first thing it does is cast Imprinted on its closest target (that should be you). This will ensure that you do not need to keep aggro on the hatchling and will give you 1000% increased damage against it, meaning that you should mostly kill it alone, with sporadic help from the DPS.
Their melee attack hits for every 1.5 seconds for approximately 15-20kk in 10-man difficulty and 30-35k in 25-man difficulty.
It is crucial that you do not die, otherwise, your hatchling will imprint on someone else, forcing the raid to sacrifice that player so that you can be can be imprinted again.
When you pick up the hatchling it is buffed with Satiated. After 15 seconds, the buff wears out and the hatchling becomes Hungry. When hungry, each of its melee attacks has a 20% change to cause a tantrum (Tantrum), increasing the hatchling's attack speed and damage by 50% for 10 seconds. To make the hatchling become satiated again for 15 seconds, you need to feed it a Plump Lava Worm (simply bring the hatchling close to the worm). Feeding a worm to a hatchling also interrupts a tantrum.
The main problem is that there are only 8 worms available per Stage One. To make matters even more complicated, only 4 worms spawn initially. Only when they are all dead do the next 4 worms spawn. The number of worms will most likely not be sufficient to keep the worm satiated for the entire duration of the phase. Since you will have at most 4 worms at your disposal (the other tank will need the 4 other worms), you should aim at feeding your hatchling at 80%, 60%, 40%, and 20% health, contending with its tantrums for a few seconds before every feeding.
You also need to be synchronised with the other tank so that the hatchlings feed roughly at the same time, enabling the second set of 4 worms to spawn as soon as the second feeding happened.
Additionally, each melee attack made by a hatchling has a chance to trigger Gushing Wound on anyone standing in a 10 yard 60 degree cone in front of the hatchling. The effect lasts 1 minute and is removed when the health of an afflicted player drops below 50%. Simply ask your healers to let your health drop when you are debuffed with Gushing Wounds. This ability seems to have a 30-second internal cooldown.
Positions and Damage to Avoid
The healers and the DPS players will be on the sides of the arena. To avoid afflicting them with Gushing Wounds, you will prefer to keep your hatchling in the middle of the arena.
Besides the damage done by the hatchlings, there are 3 other sources of damage in this Stage, all of which are avoidable:
- the worms perform a continuous fire breath attack, make sure to avoid it when maneuvering your hatchling;
- every minute, Alysrazor flies over the area (the path she takes is indicated in the diagram from the previous section) and deals heavy physical damage to anyone standing in front of her;
- small fiery balls will constantly be traveling on the ground and need to be avoided because they deal moderate fire damage every second to anyone within 3 yards.
Stage Two
Stage Two is a 30 second event, at ground level, during which the arena will look like that:
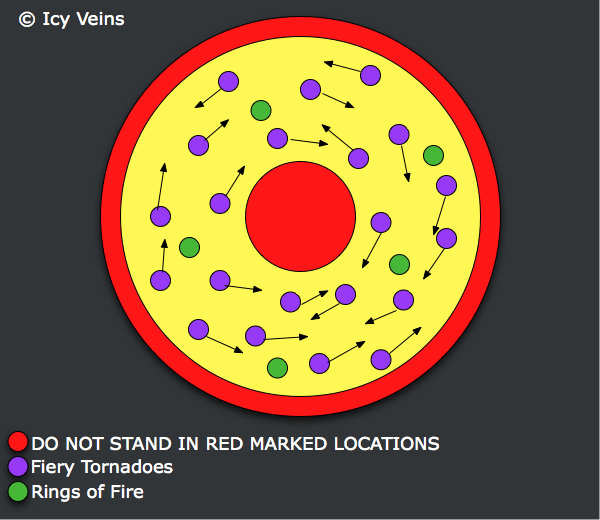
Standing at less than 15 yards or more than 60 yards from the center will result in taking very high (almost deadly) fire damage.
During this phase, the idea is to avoid all the Fiery Tornadoes that travel across the arena while trying to walk through the Rings of Fire, because they give a speed-enhancing buff. Use any ability that gives you a speed buff.
The tornadoes have a set travelling pattern. A method that works very well is to simply follow a tornado until you see another tornado, coming from the opposite direction, pass on your right or on your left. Then simply turn around and switch lane to follow this new tornado. Rinse and repeat.
Stage Three
After the intense Stage Two, Alysrazor burns out and crashes in the middle of the arena. She gets an energy bar of Molten Power. Initially it starts empty and gradually increases. When the energy bar reaches 50, Stage Three ends (34 seconds maximum with proper execution). She takes 50% increased damage during the entire duration of the stage.
Approximately 10 seconds into the Stage, two Blazing Talon Clawshapers fly in to help Alysrazor. A few seconds after landing, they will start channeling Ignition, each channel restoring 1 additional Molten Power per second.
You should aim at stunning these clawshapers before they start channeling. Then you need to interrupt their channel as often as possible.
Stage Four
As soon as she reaches 50 Molten Power, Alysrazor starts flying again but she remains low until she reaches 100 Molten Power (that takes exactly 25 seconds). During these 25 seconds, she needs to be tanked, preferably facing away from the raid, as he will use Blazing Claw on the tank every 1.5 second. Blazing Claw deals a massive amount of damage and stacks a debuff that increases damage taken. Because of the buff, a tank swap is advised half-way through the stage. Use defensive cooldowns to survive.
Additionally, she will also deal low fire damage every second to every raid member.
When she reaches 100 Molten Power, Alysrazor will deal moderate fire damage to all players and knock them back. Then, Stage One starts over.
Heroic Mode
The heroic mode of Alysrazor is very similar to the normal mode, and presents tanks with slightly different add mechanics, in addition to a positional challenge.
Differences from Normal Mode
Stage One is the only part of the fight which presents any differences from normal mode, while Stages Two, Three and Four remain the same. Other than everything dealing more damage, the following changes are relevant to tanks:
- Stage One lasts 4 minutes and 10 seconds, up from 3 minutes on normal mode. During this time, 6 Voracious Hatchlings will spawn (in pairs of two, at 1 minute and 25 second intervals), though they have considerably less health than in normal mode. The Plump Lava Worms function in the same way as during normal mode, allowing tanks to make use of 4 of them for each Voracious Hatchling.
- 40 seconds after the start of the fight, and 1 minute and 40 seconds after that, Alysrazor will cast Firestorm. This ability is different from the Prelude ability with the same name, and it covers the entire platform in what is essentially a fiery wind. This inflicts 85,000 Fire damage per second for 5 seconds to anyone not hiding behind a Molten Meteor (covered below). Firestorm damages players who are in the air, as well.
- Molten Meteors land in the center of the arena, dealing massive damage in a small radius. There are two Meteors (about 30 seconds apart) before each Firestorm cast. They have low health and begin rolling towards one of the arena's edges. They must be killed before reaching it, and doing so will cause the Meteor to stop moving and provide cover from Firestorm. They deal large amounts of damage in their melee range, so they should be killed by ranged DPS players. If a Meteor reaches an edge, it will split into 3 smaller and unkillable Meteors which will also travel around the arena, damaging players in their path. On reaching an edge, the small Meteors despawn.
Strategy Changes
Tanks will find themselves performing the encounter very similarly to normal mode, for the most part. Voracious Hatchlings function the same as in normal mode (from Imprinted to Satiated), with the only exception that they now have much lower health, and that there are 6 of them (spawning in waves of 2, 1 minute and 25 seconds apart).
Each tank will have two Plump Lava Worms available for each Hatchling. While this number of Worms per Hatchling is lower than in normal mode, this is not a problem, as Hatchlings die much faster in heroic mode.
The start of the encounter will see tanks picking up their Hatchlings, and aiming to have them killed (DPS players will not find very much time to help) by the time that the first Firestorm occurs. When this happens, tanks should make sure that they are hiding behind a Molten Meteor, on the opposite side of Alysrazor (who will be flying at the time), in order to avoid dying from Firestorm.
If the Hatchling does not die before Firestorm, you should keep in mind to face him away from everyone else stacking behind the Meteor, so that they do not all get damaged by the cleave. This may not always be possible, though.
Shortly after Firestorm has ended, a new set of Hatchlings will appear, which need to be handled in the exact same way as before. Stage One will end exactly as normal mode, and the fight will be the same from there on.
- How to Easily Get Multi-Player Required Achievements Solo
- AI Bot Warfare: (Mildly) Sabotage Bots by Talking to Them
- The Most Popular Specializations in Mythic+ in Dragonflight Season 3 Week 22
- Great Vault Requirements in Dragonflight Season 4
- Rare Mounts Available for Purchase in MoP Remix
- Clever Workaround for Death Knight Runeforging in MoP Remix
- Hunter Tier Sets and Bonuses in Dragonflight Season 4
- WoW Remix: MoP Overview Video
- Vanilla Nostalgia Thread
- Enhancement Shaman Leveling
- Holy Priest
- mana/health bar in the middle of my screen?
- Warlock Pet Customization Options Guide