

Atramedes Detailed Strategy Guide (Heroic Mode included)

Introduction
This guide is intended to provide a comprehensive description of the encounter with Atramedes in Blackwing Descent. It is targeted at anyone who desires to understand the fight mechanics.
This guide is updated for World of Warcraft WoD 6.1.2.
The Atramedes encounter is all about avoiding damage. Indeed, you will see in this guide that avoiding damage gives more time to kill the boss, thus leading to a much less strenuous kill. Once this basic principle is understood by the raiders, especially the DPS who are used to trying to top Recount, the fight is relatively easy.
General Information
Health Pool
Atramedes' health pool is the following:
- in 10-man normal difficulty: 26.1M;
- in 10-man heroic difficulty: 34.8M;
- in 25-man normal difficulty: 78.3M;
- in 25-man normal difficulty: 103M.
Enrage Timer
There is no set enrage timer. Instead, you have 10 Ancient Dwarven Shields (they look like gongs) at your disposal, 5 on each side of the room. It is necessary to use them frequently throughout the fight. The frequency at which you use them will depend on your raid members' ability to avoid getting hit by Atramedes' abilities. As each gong can be used only once, this set a soft enrage timer for the encounter, and this gives avoiding getting hit a much higher importance than maximising DPS. Ideally, you will use one gong per phase, allowing you to let the fight last 10 minutes.
Raid Composition
The following raid compositions are advised
- in 10-man normal difficulty: 1 tank, 3 healers, 6 dps;
- in 10-man heroic difficulty: 1 tank, 3 healers, 6 dps;
- in 25-man normal difficulty: 1 tank, 6 healers, 18 dps;
- in 25-man heroic difficulty: 1 tank, 6 healers, 18 dps.
Overview of the fight
Atramedes is a blind dragon. He uses sound to locate his enemies and that concept is largely reflected in the mechanics of the encounter.
The encounter itself consists of two alternating phases: Ground Phase (80 seconds), and Air Phase (40 seconds) during which the raid will essentially focus on avoiding Atramedes' abilities.
During the Ground Phase, the raid will have to avoid travelling disks (Sonar Pulse) that spawn regularly underneath Atramedes and travel towards raid members. Healers will need to heal through Modulation, an ability that does raid-wide, unavoidable damage. Twice, a player will be targeted by Sonic Breath and will need to run away from the raid while the breath is chasing them. For the last ability, Searing Flame, which happens once per Ground Phase, a designated player needs to use an Ancient Dwarven Shield (gong) to interrupt the cast.
During the Air Phase, the raid will be constantly on the move to avoid the abilities Atramedes will throw at them. Ranged DPS can try and DPS the boss while they move. Designated players will relay each other to kite a breath attack (Roaring Flame Breath).
Trash Groups
Two groups of four NPCs are guarding the room where you will be fighting Atramedes. Defeating them is necessary to gain access to the boss.
These two groups have similar, non-trivial mechanics. Each NPC has a specific ability (can be a spell, a buff or a debuff). When an NPC dies, he heals the remaining members of his group to full health, and transfers them his ability. This means that you need to kill the NPCs in each group in a precise order, so that you avoid spreading the most harmful ability first.
Unless you are up for a challenge, the two groups should be pulled separately. Otherwise, when an NPC dies, his ability is transferred to all the remaining NPCs alive, regardless of the group.
Right Side
The kill order should be the following:
- Spirit of Angerforge, who provides Stoneblood;
- Spirit of Thaurissan, who provides Avatar;
- Spirit of Ironstar, who provides Execution Sentence, the cast of that ability is always protected against interruptions by Shield of Light;
- Spirit of Burningeye, who provides Whirlwind.
Spirit of Angerforge and Spirit of Thaurissan provides the least harmful abilities so they should be killed first. Spirit of Burningeye should be killed last so that your melee DPS only deal with his Whirlwind ability once.
You need two tanks for handling the group, one tank will take Spirit of Angerforge and Spirit of Ironstar (1 and 3), and the other will take Spirit of Thaurissan and Spirit of Burningeye (2 and 4). The tank that takes Spirit of Burningeye needs to watch out from Whirlwind and move away from the NPC when that spell is cast.
While killing Spirit of Angerforge (1) and Spirit of Thaurissan (2), your DPS players need to be wary of Execution Sentence. When this ability is cast by Spirit of Ironstar (3), your DPS players need to switch to him and burn down the shield so that someone can interrupt the cast. Afterwards, they should switch back to their previous target.
Left Side
The kill order should be the following:
- Spirit of Corehammer, who provides your raid with Burden of the Crown;
- Spirit of Anvilrage, who provides Stormbolt;
- Spirit of Moltenfist, who provides Thunderclap;
- Spirit of Shadowforge, who provides Chain Lightning.
It is imperative to kill Spirit of Corehammer first. You have probably read in other places that he should be killed last, but if you actually do the fight, you will notice that Burden of the Crown is a buff that gets applied on your raid members, and not on the NPCs (like most people seem to think). By killing Spirit of Corehammer first, the other tree NPCs will get the ability to buff your raid members which is very beneficial.
The order in which you kill the last three NPCs is really a matter of taste, as the fight becomes easy once your raid is buffed with Burden of the Crown. In our kill order, the NPCs with the least harmful abilities are killed first.
As with the right side group, you will need two tanks. One will take Spirit of Corehammer and Spirit of Moltenfist (1 and 3), and the other will take Spirit of Anvilrage and Spirit of Shadowforge (2 and 4).
Stormbolt, Thunderclap and Chain Lightning are AoE abilities. Therefore, your raid should be spread out.
Sound Mechanics
Atramedes' abilities, in addition to dealing damage, add sound to the raid members. Initially, everyone is at 0 sound and this value increases every time they are hit. The increase depends on the ability and the amount of sound the player already has. Whenever someone's sound reaches 100, they are killed by Atramedes.
The only way to reset the sound of everyone in your raid group is to use an Ancient Dwarven Shield (gong). Ideally, you should never have to do that and the shields should be saved for dealing with specific abilities that we will present in the Ground Phase and the Air Phase sections.
Graphically, the amount of sound a player has is displayer by a sound counter (or sound bar) that looks like this in the default UI:

The small dot in the middle will grow as sound accumulates. If you want to display the numerical value for your sound count, you will need to configure your unit frame or boss addon.
Keeping their sound count at a minimum should be the main objective of every player in this encounter as this will:
- reduce the frequency at which Ancient Dwarven Shields (gongs) are used, thus giving you more time to defeat the boss;
- lessen the damage taken;
- lessen the subsequent sound increase, when players do not manage to avoid an ability.
Using invulnerabilities like ![]() Divine Shield or
Divine Shield or ![]() Ice Block does not
prevent a player from getting sound. Instead, if a player tries to bypass a
boss mechanics with such an ability, they will probably end up with 100 sound as
soon as the ability ends and will subsequently be killed by the boss.
Ice Block does not
prevent a player from getting sound. Instead, if a player tries to bypass a
boss mechanics with such an ability, they will probably end up with 100 sound as
soon as the ability ends and will subsequently be killed by the boss.
Ground Phase
The Ground Phase lasts 80 seconds and is the initial phase of the fight. It is crucial that the raid members, especially the DPS, understand that avoiding getting hit is a lot more important than setting a Recount record.
The positioning of the raid members is designed to deal with a specific ability of Atramedes. For this reason, we will explain positioning issues in the Strategy subsection.
Abilities
Atramedes has a rather weak melee attack which should pose no problem to your tank.
Modulation is cast 4 to 5 times during the Ground Phase. The damage it deals is not avoidable. Modulation adds no sound and cannot be cast within 6 seconds of Searing Flame.
Searing Flame is cast once per Ground Phase and is the second and last unavoidable source of damage and sound in the encounter. It ticks every 2 second and does not add sound. This ability will wipe your raid if it is not interrupted. The only way to do so is by using an Ancient Dwarven Shield (gong).
Roaring Flame is caused by the flames that appear on the ground after Searing Flame has been cast. These flames will stay for 30 seconds and they will add 5 sound to anyone passing through them.
Sonar Pulse is cast 4 to 6 times per Ground Phase and summons four disks which travel from Atramedes towards random raid members (actually, they might be travelling towards raid members with the highest amount of sound, but this is hard to verify). They do not deal damage, but add 3 sound twice a second if you stand in them.
Sonic Breath is cast twice per phase. It has a two second cast after which it follows the player with the most sound. The breath will chase the targeted player for 6 seconds. The more sound they have, the faster the breath will chase them. If the breath hits the targeted player, they will receive more sound, making it increasingly difficult to get away. Initially, Sonic Breath will add 22 sound. This ability cannot target the tank.
Below, you will find the list of abilities the damage of which scales with the amount of sound players have:
- Sonic Breath;
- Modulation.
Below, you will find the list of abilities for which the amount of sound added scales with the amount of sound players have:
- Sonic Breath;
- Searing Flame.
Strategy
Positioning for Sonic Breath and Sonar Pulse
The key to succeeding in the Ground Phase is to properly position the raid for dealing with Sonic Breath and Sonar Pulse. We advise you to use the following placement:
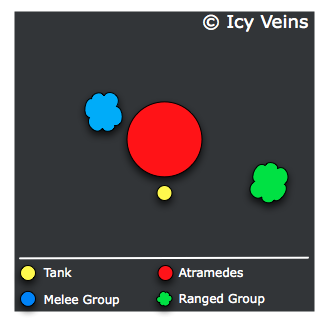
The idea is to separate the melee and the ranged DPS into two groups and distribute the healers between these groups. Whenever there is no movement, members of the same group should stack perfectly in order to make it easy to avoid Sonar Pulse.
When a player from the melee group is targeted by Sonic Breath, they need to move counter clockwise around the boss. If the melee group is properly positioned, there is no risk that the breath attack hits the tank. At the same time, since the breath will always lag behind the target player, the melee group should move away slightly to avoid getting hit when the Sonic Breath starts. The image below illustrates this movement phase:
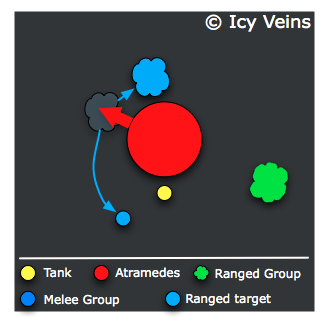
Notice how the targeted player needs to be rather far away from the boss when moving around him. Being closer causes the boss to spin faster.
The ranged group also needs to do the same:
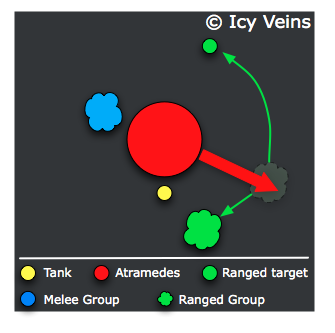
The advantage of having two groups is that it allows part of your raid to continue attacking during Sonic Breath. Also, in the case of a mistake, it will reduce the amount of players penalised.
In 10-man, if the two groups are unbalanced, for example with 1 melee DPS and 5 ranged DPS, it might be a waste to have the groups stand on opposite sides of the boss. In that case, it is better to have both groups on the same side of the boss. When Sonic Breath occurs, the target player and the other players move according to the same strategy presented above for the ranged DPS.
Alternative positions also work. It is possible to have the group rotate around the boss whenever Sonic Breath of Sonar Pulse happens or to use two spots where the raid will stand alternatively between each occurrence of Sonar Pulse or Sonic Breath. A raid leader should go for whichever positioning makes more sense to them. In any case, the two key points will always be to have members of the same group stack perfectly so that the disks from Sonar Pulse go in the same direction, which makes avoiding them easier, and to have the player targeted by Sonic Breath and their group move in opposite directions.
Dealing with Searing Flame
The second important ability of the Ground Phase is Searing Flame. It is necessary to use an Ancient Dwarven Shield (gong) to interrupt it. Otherwise, the stacking debuff you get from each application will wipe the raid. Boss mods such as DBM will warn you in advance that Searing Flame is coming. When this happens, the player that will have been assigned to this task (preferably a DPS) will need to move towards an Ancient Dwarven Shield and be ready to use it as soon as Atramedes starts casting Searing Flame.
In addition to interrupting Searing Flame, using an Ancient Dwarven Shield will also reset everyone's sound and make Atramedes enter Vertigo, a state during which he is disoriented and takes increased damage.
Searing Flame leaves flames on the ground (Roaring Flame) and players should obviously avoid standing in them.
Dealing with the Other Abilities
Nothing can be done about Modulation, besides healing the damage it causes.
The disks from Sonar Pulse must be avoided. This is made easy by the slow travel speed of the disks.
Tips and Tricks
Atramedes has a large hitbox. Melee DPS should stand as far as they can to make it easier to dodge Sonar Pulse.
Movement speed increases are useful to outrun Sonic Breath if the targeted player is already high on sound:
- Mages can use
 Blink;
 - Shamans can use
 Ghost Wolf (with the associated
Glyph of Ghost Wolf);
Ghost Wolf (with the associated
Glyph of Ghost Wolf); - Rogues can use
 Sprint;
 - Druids in
 Cat Form can use
  Dash and
  Stampeding Roar;
 - Priests can pull someone to them with
 Leap of Faith;
 - Holy Priests can increase someone else's speed through
 Body and Soul.
The disks from Sonar Pulse are growing larger as they travel, so it is a good idea not to position the ranged group too far away.
Once your raid gets used to dealing with Sonic Breath, they should only start stacking a few seconds before Sonic Breath and stop stacking after that. This will slightly increase your raid overall performance (DPS and healing) because it makes it easier to deal with Atramedes' other abilities (i.e., less movement is required from the raid).
Air Phase
When the Ground Phase ends, Atramades will take off and remain in the air for 40 seconds: this is the Air Phase during which the raid will be on the move almost constantly to avoid abilities while, for those who can, trying to deal some damage to Atramedes.
After 40 seconds, Atramedes will land and the Ground Phase will resume.
Abilities
Roaring Flame is dealt by flames that randomly spawn during the air phase. At a given location, the flames stay for 30 seconds. They deal damage and give 10 additional sound to whoever passes through them.
Roaring Flame Breath is a breath ability similar to Sonic Breath. As soon as the phase begins, the player with the highest amount of sound will be chased by a fire breath from Atramedes. The trail of flames left on the ground stays for 45 seconds and deal Roaring Flame to whoever stands in it. If the breath hits the targeted player, it will deal about 20k damage and add 10 sound. The travel speed of the breath increases with the amount of sound the targeted player has. It also increases naturally over time. Therefore, it eventually becomes necessary to stop it by hitting an Ancient Dwarven Shield (gong). When this happens, the breath goes back to its initial speed but now chases the player who hit the Ancient Dwarven Shield (gong).
Sonar Bomb is cast at the location of 5 raid members in 10-man difficulty or 8 raid members in 25-man difficulty. Each location is marked by a disk smilar to a Sonar Pulse. 3 seconds later, a bomb is dropped at each location and explodes, dealing damage, and adding 20 sound to the players that are still in the area delimited by the disk. This ability is cast in quick succession throughout the phase.
All the abilities of the Air Phase deal damage and add sound in a way that scales with the amount of sound a player currently has (with the exception of the damage dealt by the Roaring Flame Breath).
Strategy
Dealing with Sonar Bomb and Roaring Flame
Dealing with Sonar Bomb or Roaring Flame is easy. The raid members simply need to always be on the move to avoid Sonar Bomb and in doing so, they must avoid to walk through flames.
Dealing with Roaring Flame Breath
Roaring Flame Breath is more complicated to deal with. To do so efficiently, it is best to have this ability target players with speed enhancing abilities.
The first target will be the player with the highest amount of sound. This leaves some room for control as a player with speed enhancing abilities can easily increase their sound before the Air Phase begins by standing on the path of Sonar Pulse. In any case, the first targeted player should run around the room in a circular fashion so as to remain ahead of the breath for as long as possible.
When the breath is getting too close to the targeted player, a designated player with speed enhancing abilities needs to hit an Ancient Dwarven Shield (gong). The breath will then follow that player.
The following speed enhancing abilities can be used:
- Mages can use Blink;
- Shamans can use Ghost Wolf (with the associated
Glyph of Ghost Wolf);
- Rogues can use Sprint;
- Druids in Cat Form can use Dash and Stampeding Roar;
- Priests can pull someone to them with
Leap of Faith;
- Holy Priests can increase someone else's speed through Body and Soul.
Normally, with proper management of sound and selection of the second target, the raid only needs to use one Ancient Dwarven Shield during the Air Phase.
Tips and Tricks
A designated player should always try to hit the Ancient Dwarven Shield that is the furthest away from the player currently being targeted by Roaring Flame Breath. This will gain the raid precious seconds as the breath will need to travel additional distance to get to its new target.
Heroic Mode
In Heroic Mode, the fight remains largely unchanged in its execution. The only important difference is that twice per Ground Phase (sometimes only once, sometimes 3 times), an Obnoxious Fiend appears, runs towards a raid member (during which time, the Fiend is immune to attacks, snares and roots), and fixates itself on that raid member, repeatedly casting Obnoxious, which adds 10 sound to that player, and meleeing that player for about 10k. The Fiend has 232k health in 25-man difficulty and 155k health in 10-man difficulty and needs to be killed fast. Obnoxious casts can and should be interrupted so as to prevent the targeted player from increasing their sound level.
The enrage timer is tighter in Heroic Mode because Nefarian will destroy an additional Ancient Dwarven Shield every time you use one during the Ground Phase. This will basically leave you with 4 Ground Phases and 3 Air Phases to down the boss.
In addition, Atramedes has a little bit more health and all his abilities (except Roaring Flame Breath) deal more damage, add more sound and scale (in both sound and damage given) with the amount of sound a player already has. The timing of the abilities remains the same. You will find below the list of Atramedes' abilities, updated with Heroic Mode damage and sound:
- Modulation;
- Searing Flame;
- Roaring Flame (Ground Phase);
- Sonar Pulse;
- Sonic Breath;
- Roaring Flame (Air Phase);
- Sonar Bomb (they fall a LOT faster than in normal mode).
Learning the Fight
The alternation between the Ground Phase and the Air Phase is only based on the passing of time. Therefore, you can easily practice avoiding the different abilities without attacking the boss at all. If the raid members avoid everything that they are supposed to, raid-wide damage will be relatively easy to heal. Once you can easily survive 2 Ground Phases and 2 Air Phases, you are ready for the kill!