

Spine of Deathwing Tank Strategy Guide (Heroic Mode included)

Introduction
This guide is intended to provide a comprehensive description of the encounter with Spine of Deathwing in Dragon Soul. It is mostly targeted to tanks who desire to have a short but detailed overview of what is expected of them during that fight.
This guide is updated for World of Warcraft WoD 6.1.2.
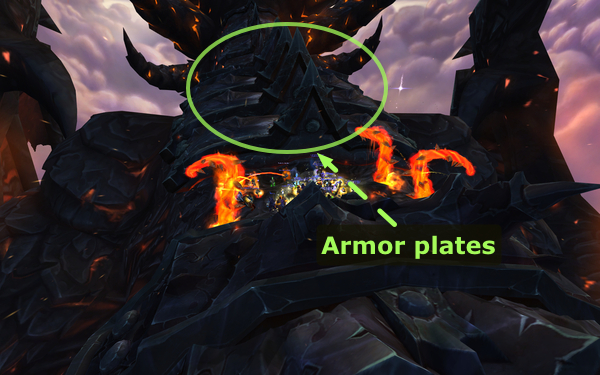
The Spine of Deathwing encounter takes place on Deathwing's back, as he is flying through the air. During this fight, your raid will have to handle many types of adds, with the final goal being to remove three of Deathwing's armor plates.
For tanks, the encounter presents little difficulty. The only concern is proper positioning of the adds.
Overview of the Fight
 Spine of Deathwing is a single phase encounter that takes place on
Deathwing's back, as he is flying through the air. Your raid will need to
properly deal with several types of adds in order to pry up and remove
3 armor plates from Deathwing's back. The idea is to open a big enough
hole in Deathwing's armor, so as to give Thrall a clear shot with the Dragon
Soul.
Spine of Deathwing is a single phase encounter that takes place on
Deathwing's back, as he is flying through the air. Your raid will need to
properly deal with several types of adds in order to pry up and remove
3 armor plates from Deathwing's back. The idea is to open a big enough
hole in Deathwing's armor, so as to give Thrall a clear shot with the Dragon
Soul.
The armor plates can only be removed sequentially, as removing one enables the raid to reach the next one. This causes the fight to become increasingly harder, as the number of adds you need to deal with increases after an armor plate has been removed.
Adds
You will be faced with 4 types of adds.
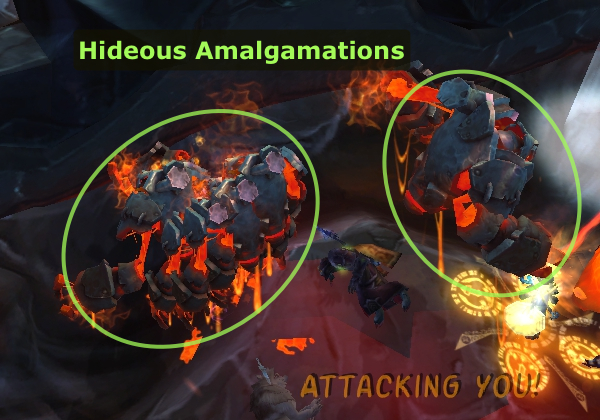
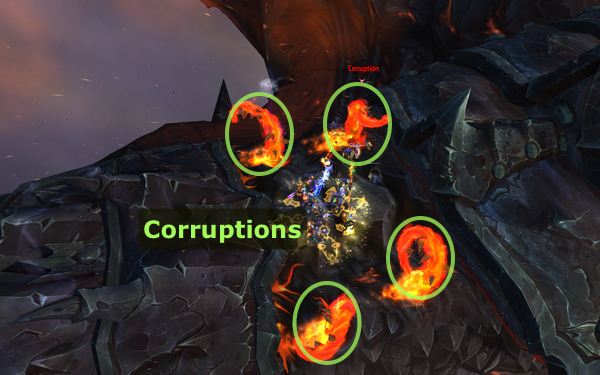
Initially, there are 4 Corruptions. Each armor plate that you remove gives room to 2 more Corruptions. There will always be at least one Corruption up: even if you kill them all, a new one will automatically respawn. When you kill a Corruption, it leaves a hole behind, out of which 1 Hideous Amalgamation and 1 Corrupted Blood appear.
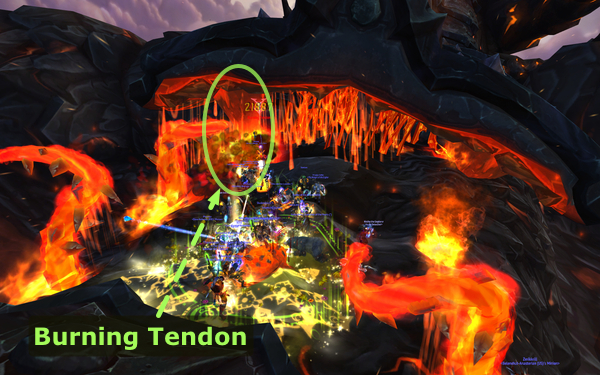
When you kill a Corrupted Blood, it respawns after a few seconds and it leaves a puddle on the ground that gives a buff to the Hideous Amalgamation. The idea is to stack this buff 9 times, at which point the Amalgamation should be killed. Doing so will cause the Amalgamation to pry up the closest armor plate, exposing a Burning Tendons.
If you successfully kill the Burning Tendon in the next 23 seconds, the armor plate will be successfully removed, otherwise you need to finish it off after prying up the armor plate again.

Strategy
As a tank, you will have to occasionally move into one of the void zones located on the sides of Deathwing's back (to perform a Barrel Roll and get rid of the Hideous Amalgamations). Your raid leader will instruct you when to do this, and which void zone to go to (simply follow the rest of the raid). After a few moments, you can return to the center of his back.
In LFR, this will not happen, and you can spend the entire duration of the fight performing your tanking duties.
Tank-specific Assignments
There are a few things you must do as a tank in this encounter:
- Pick up and tank the Hideous Amalgamation add close to Deathwing's armor plate.
- Taunt and tank any Corrupted Bloods (small adds) together with the
Amalgamation. DPS players will kill these adds next to the Amalgamation, which
will grant it stacks
 Absorbed Blood, a buff that increases its damage and
attack speed.
Absorbed Blood, a buff that increases its damage and
attack speed. - When the Amalgamation reaches 9 stacks of Absorbed Blood, make sure that it is as close as possible to the armor plate. DPS players will kill this add very quickly afterwards.
- The dying Amalgamation will channel a spell called
 Nuclear Blast.
Get at least 15 yards away from it before it finishes its cast, as this will
kill you otherwise.
Nuclear Blast.
Get at least 15 yards away from it before it finishes its cast, as this will
kill you otherwise.
In case your raid is using 2 tanks for the fight, the main tank will take the Hideous Amalgamation designated to pry up the armor plate while the other tank will take the rest of the Amalgamations (if they have not been removed by a Barrel Roll). The Corrupted Bloods will be spread among the tanks, possibly in a way that evens out the damage that the tanks take.
Heroic Mode
The Heroic mode of the Spine of Deathwing encounter will not prove too taxing for you as a tank, although there are a few things to keep in mind that differ from Normal mode.
Differences from Normal Mode
In addition to increased health of all mobs in the encounter as well as increased damage dealt by all abilities, the following differences are relevant to you as a tank:
- Each armor plate will have to loosened twice in order for your raid to manage to kill the Burning Tendons (because of their much increased health).
- The Hideous Amalgamations deal much higher melee damage than in Normal mode, and as such they must be handled slightly differently (see strategy section below).
- Each time a Hideous Amalgamation is killed, the entire raid will receive
a stack of a debuff,
 Degradation, which reduces maximum health
by 5%. Fortunately, throughout the fight you will also receive stacks
(maximum of 2 stacks) of a beneficial debuff,
Degradation, which reduces maximum health
by 5%. Fortunately, throughout the fight you will also receive stacks
(maximum of 2 stacks) of a beneficial debuff,  Blood of Neltharion, which
reduces damage taken by 20%.
Blood of Neltharion, which
reduces damage taken by 20%.
Strategy
As a tank, there are two things to keep in mind in terms of strategy:
- how to correctly position the Hideous Amalgamations (only for the main-tank);
- how to tank the Corrupted Bloods (only for the off-tank).
Positioning the Hideous Amalgamations
This section is only of interest to you if you are playing the main-tank in this encounter (i.e., you are tanking the Hideous Amalgamations and not the Corrupted Bloods).
Because the Hideous Amalgamations deal much increased damage in Heroic
mode, you will want to avoid stacking ![]() Absorbed Blood on them at all until
they are just about to die. This is made easy by the fact that the
Corrupted Bloods leave a puddle where they die and moving the Amalgamation
in this puddle is what actually grants it stacks of Absorbed Blood.
Absorbed Blood on them at all until
they are just about to die. This is made easy by the fact that the
Corrupted Bloods leave a puddle where they die and moving the Amalgamation
in this puddle is what actually grants it stacks of Absorbed Blood.
As a result, you should tank the Hideous Amalgamation away from any Corrupted Bloods (which will be killed in a single location by your raid). Once the Amalgamation is ready to be killed, you should drag it over the location where the Bloods were killed, immediately giving it 9 stacks of Absorbed Blood.
For each armor plate, you will have to kill two Hideous Amalgamations, because the Burning Tendon must be exposed twice in order to be killed. Both Amalgamations must die in the exact same place, in order to expose the same Burning Tendons. This is because under each armor plate, there are two separate tendons, one on the right and one on the left.
Handling Corrupted Bloods
This section is only of interest to you if you are playing the off-tank in this encounter (i.e., you are tanking the Corrupted Bloods and not the Hideous Amalgamations).
Firstly, you should tank all the Corrupted Bloods away from the
Hideous Amalgamations and have your raid members kill them there (this is
because you do not want the Hideous Amalgamations to gain any stacks of
![]() Absorbed Blood prematurely). You should tank the Corrupted Bloods near
to the armor plate.
Absorbed Blood prematurely). You should tank the Corrupted Bloods near
to the armor plate.
Corrupted Bloods deal more damage than in Normal mode (although their damage is still rather low). As a result, towards the end of the fight, when many Bloods are spawning, you will find it more beneficial to kite them around Deathwing's back rather than simply tanking them. Just run around in wide circles.
It is important to note that Paladins in your raid can help tremendously in this task by using Holy Wrath (with Glyph of Holy Wrath). This spell will stun all the bloods in a small area for 3 seconds.