

Valiona and Theralion Detailed Strategy Guide (Heroic Mode included)

Introduction
This guide is intended to provide a comprehensive description of the encounter with Valiona and Theralion in Bastion of Twilight. It is targeted at anyone who desires to understand the fight mechanics.
This guide is updated for World of Warcraft WoD 6.1.2.
The Valiona and Theralion encounter will require your raid members to move properly to deal with the various abilities these two dragons will use. This fight is not intense and is by no mean a gear check. With proper positioning, it should pose little difficulty to your raid.
General Information
Health Pool
Valiona and Theralion have the following shared health pool:
- in 10-man normal difficulty: 25.8M;
- in 10-man heroic difficulty: 48.1M;
- in 25-man normal difficulty: 78.3M;
- in 25-man heroic difficulty: 164M.
Enrage Timer
Valiona and Theralion have a 10 minute enrage timer. After this time they will go Berserk and kill your raid.
Raid Composition
The following raid compositions are advised:
- in 10-man normal difficulty: 1 tank, 3 healers and 6 DPS;
- in 10-man heroic difficulty: 1/2 tanks, 3 healers, 5/6 DPS;
- in 25-man normal difficulty: 1 tank, 6 healers, 18 DPS;
- in 25-man heroic difficulty: 2 tanks, 6/7 healers, 16/17 DPS.
Overview of the Fight
Valiona and Theralion are two dragons that your raid will fight during the encounter. There are two phases: Valiona Phase, during which Valiona is on the ground and Theralion is in the air, and Theralion Phase, during which Theralion is on the ground, and Valiona is in the air. These two phases alternate until Valiona and Theralion, which have a shared health pool and can both be damaged simultaneously, die or enrage. The first phase will always be a Valiona Phase, regardless of which dragon you choose to attack to start the encounter.
The alternation between the phases is time-dependant and as such can not be influenced by the raid actions. Valiona Phase lasts 100 seconds while Theralion Phase lasts 140 seconds.
Only the dragon currently on the ground requires tanking, while the flying dragon will cast various spells at the raid.
Twilight Realm
The Twilight Realm is a parallel dimension of the room where the encounter occurs. Players can be transported there after failing to dodge one of two abilities: Dazzling Destruction and Twilight Flames. These abilities are the only ones that can also deal damage to players inside the Twilight Realm, who stand in their area of effect.
Here is a screenshot of the Twilight Realm Theralion at the end of a Valiona Phase:
The 2 void zones you can see have been created by Dazzling Destruction, the ability that we used this time to enter the realm.
Players inside the realm need to look for exit portals, run to them, and click them to be transported back into the Normal Realm. The screenshot shows such a portal (Collapsing Twilight Portal), slightly north-west of the player's location.
Moving shadow orbs are scattered throughout the Twilight Realm and need to be avoided because they deal heavy Shadow damage.
In Normal mode, nothing happens inside the Twilight Realm. Players are advised to leave it as soon as possible because of Twilight Zone, a stacking debuff applied every 2 seconds. Only groups trying to get the Double Dragon achievement will willingly send players inside the Twilight Realm in order to kill inoffensive Twilight Fiends, which sometimes spawn there.
Valiona Phase
The Valiona Phase will always start the encounter, even if you start attacking Theralion first. During this phase, which lasts 1 minute and 40 seconds, your raid will need to remain spread out to avoid AoE damage from Theralion, while sometimes stacking or moving to deal with Valiona's abilities.
Abilities
Valiona:
- Valiona's melee attack occurs every 2 seconds and does approximately 25k damage in 10-man difficulty and 35-40k in 25-man difficulty.
- Blackout: two or three times during the Valiona Phase, she will place a debuff on a random raid member. The debuff absorbs a certain amount of healing, and can, ideally, be dispelled. It lasts 20 seconds. When the debuff wears off of the target, whether through reaching its absorption cap, being dispelled or simply running out, it will deal a large amount of Shadow damage to all players around the affected player, split among them. The ability has a 40 second cooldown.
- Devouring Flames: twice during the Valiona Phase, she will face a random direction and begin casting a breath attack. After 2.5 seconds, she will breathe Shadow damage in a large area in front of her, dealing massive damage to anyone being hit. The damage is lower the further you are from Valiona.
Theralion:
- Twilight Blast: every two seconds during the entire Valiona Phase, Theralion will cast a shadow blast to a random raid member, dealing damage to that player and to everyone within 8 yards. Twilight Blast cannot be cast while Dazzling Destruction is being cast.
- Dazzling Destruction: towards the end of the Valiona Phase, Theralion will cast this ability 3 times in a row. The ability has a 4 second cast during which two pink void zones on the ground mark the locations where the ability will hit. When the cast is over, Theralion will send two Shadow balls to the ground, one on each void zone. When a Shadow ball touches the ground, it deals damage to anyone standing inside the void zone, also sending them inside the Twilight Realm.
Strategy
The strategy for this phase is simple. Because Twilight Blast will indifferently target players at melee or at range, the raid should remain spread out around Valiona. The melee DPS can be in groups of two if they cannot spread properly. The following image shows proper positioning for 25-man difficulty:
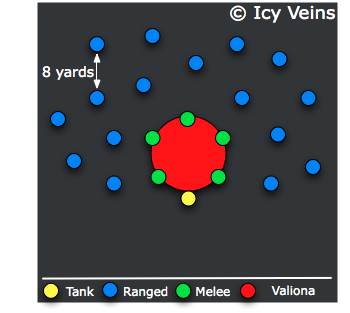
In 10-man difficulty, positioning is easier as there is more room to fit everyone close to Valiona.
When Valiona casts Blackout on a random raid member, everyone (with the exception of the tank) needs to stack a designated position, typically behind Valiona, in order to soak the damage.
After Blackout, the raid should spread again and prepare for Devouring Flames, which Valiona will cast a few seconds later. Devouring Flames is a very wide (almost 180 degrees) conic breath attack which exhales shadow flames, as shown in the image below:
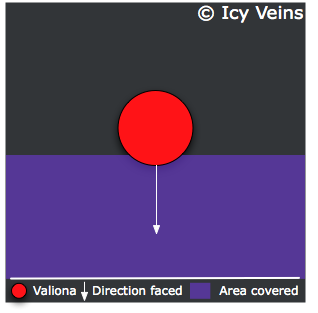
The area that will be covered by the breath cannot be known in advance as Valiona will simply turn to face a random direction before starting the cast. As soon as she starts casting, everyone in the direction of the breath should try and move out of the targeted area. Players that are too far into the area, should move even further from Valiona so as to reduce the amount of damage taken.
Transition
85 seconds into Valiona Phase (so 15 seconds before the end of the phase), Theralion will cast Dazzling Destruction 3 times, each time placing two rather large void zones on the ground. Players have about 5 seconds to move out of them before being sent into the Twilight Realm and damaged.
Dazzling Destruction is invisible to players in the Twilight Realm but it still damages them. Therefore, these players need to quickly transfer back to the Normal Realm, reducing the chance to get hit by the next Dazzling Destruction.
During this phase, Theralion stops casting Twilight Blast, and Valiona will occasionally cast a Blackout.
As the last void zones from Dazzling Destruction disappear, Valiona flies up while Theralion lands, which starts the Theralion Phase.
Tips and Tricks
Classes which can apply DoTs on both Valiona and Theralion are favored by this encounter:
- Fire Mages can use
 Living Bomb;
 - Shadow Priests and Balance Druids should apply and refresh their DoTs on both dragons.
On Blackout, the following classes can simply move 8 yards from everyone else and bypass the mechanics entirely:
- Mages can use
 Ice Block and
  Cauterize;
 - Rogues can use
 Cloak of Shadows and
  Cheat Death;
 - Paladins can use
 Divine Shield.
Theralion Phase
The Theralion Phase, which lasts 2 minutes and 20 seconds, will require precise positioning and movement from your raid, in order to deal with the various abilities the two dragons will throw at you.
Abilities
Theralion:
- Theralion's melee attack occurs every 2 seconds and does approximately 25k damage in 10-man difficulty and 35-40k in 25-man difficulty.
- Engulfing Magic: 4 times during the Theralion Phase, he will place a debuff on one random caster or healer (including hunters) in 10-man, and two random casters or healers (including hunters) in 25-man, lasting 20 seconds. For the duration of the debuff, the target will do 100% increased damage and healing, but all damage and healing done by them will be dealt to players within 10 yards of them as Shadow damage. The ability has a 35 second cooldown.
- Fabulous Flames: Every 15 seconds, Theralion will cast this ability on random raid members during this phase. He will target players at range in preference over players in melee range, provided that there are enough players at range. The ability will leave a large void zone on the ground, around the player's location, dealing large amounts of damage every second to anyone standing inside it.
Valiona:
- Twilight Meteorite: for the greater part of the Theralion Phase, Valiona will cast this ability on random raid members, every 6 seconds. The ability places a debuff on the target, which after 5 seconds will hit the player and a large amount of Shadow damage will be split between that player and anyone else within 6 yards. She stops using this ability 95 seconds into the Theralion Phase.
- Twilight Flames: towards the end of the Theralion Phase, once she has stopped casting Twilight Meteorite, Valiona will channel a deep breath, and then proceed to covering a third of the room in damaging flames. She will do this three times, and which third of the room (entrance, middle, exit) she will target is indicated by her positioning. While the breath itself deals no damage, the fire left on the floor deals moderate damage and sends whoever stands in it in the Twilight Realm, with the danger of landing on an orb, which will explode and deal a lot of damage.
Strategy
Positioning is just as important in this phase as it is for Valiona Phase. The idea is to have the melee group stacked behind the boss. That group should be made of at least 4 players in 10-man difficulty and 10 players in 25-man difficulty. Do not hesitate to ask a healer or a DPS caster to join that group if the raid is short on melee players. The remaining ranged DPS and healers should spread out around Theralion, 10 yards from him at least. In 25-man, the following positions would work:
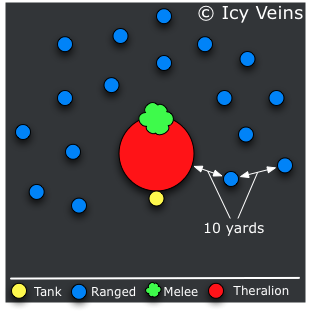
In 10-man, positions are the same but the ranged players have more room to spread out.
Twilight Meteorite is to be soaked by the melee group. If a ranged player is targeted by this ability, they have 5 seconds to move to the melee group.
Every 15 seconds, a ranged member will be targeted by Fabulous Flames which creates a damaging shadow zone on the ground. Anyone inside the radius affected by the shadow zone simply need to move out of it. It is possible for this ability to force the melee group or the tank to move, if the targeted ranged player is standing too close to Theralion (hence why DPS should be at least 10 yards away from Theralion).
When a ranged DPS or a healer is affected by Engulfing Magic, they should start by moving 10 yards away any nearby raid member before they can continue attacking or healing. DPS players affected by Engulfing Magic should use available cooldowns. Note that when not attacking or not healing, a player affected by Engulfing Magic will not damage nearby raid members. Players that have active DoTs or HoTs will damage surrounding players even if they are not casting and should move away promptly.
Transition
95 seconds into Theralion Phase (so 45 seconds before the end of the phase), Valiona will take a deep breath and cover the third of the room over which she is about to fly over with Twilight Flames. She does that three times in a row, with a 15 second interval. At this point, Valiona will stop casting Twilight Meteorite, which means that the melee group is not longer required to stack.
The flames deal damage to players standing in them, also sending them in the Twilight Realm, which makes it mandatory to properly avoid them.
Avoiding the flames is really straightforward. Valiona will start by positioning herself in line with the portion of the room she will cover in flames. Simply have someone assigned to watching Valiona for the last 45 seconds of the phase and shout entrance, middle, or exit, depending on what area Valiona is going to fly over.
After her third passage, Valiona will fly back to the center of the room and land while Theralion will take off, which marks the beginning of another Valiona Phase.
Tips and Tricks
Making good use of Engulfing Magic to boost damage and healing done, without causing damage to nearby raid members, will greatly ease the progression through the fight.
For Twilight Meteorite, some classes can just move away from everyone else and bypass that mechanics:
- Mages can use Ice Block when targeted and count onn
Cauterize to prevent them from dying;
- Rogues can use Cloak of Shadows and
Cheat Death;
- Retribution Paladins can use Divine Shield;
Additionally, Hunters can use ![]() Feign Death, which causes Valiona to
cancel her cast
and target someone else after a few seconds. Deterrence will make them
resist the damage, while
Feign Death, which causes Valiona to
cancel her cast
and target someone else after a few seconds. Deterrence will make them
resist the damage, while ![]() Disengage can be used as a means of reaching
the melee group.
Disengage can be used as a means of reaching
the melee group.
Heroic Mode
For most players, the Heroic version of the encounter will be exactly the same as the Normal version, with the exception that the enrage timer is tighter and the abilities do more damage.
For a few other players, the fight will be significantly different, as we explain in the next sections.
Changes
The main changes are detailed below.
- Every 15 seconds, a Twilight Sentry will spawn in the Twilight Realm. Each sentry continuously channels Rift Blast. Every 3 seconds, Rift Blast will damage a random raid member, regardless of whether that player is in the Twilight Realm or in the Normal Realm.
- Twilight Shift is a stacking debuff which Valiona and Theralion will place on the tank currently tanking them. This ability has a 20 second cooldown and because of all the other abilities Valiona and Theralion cast, the delay between two successive applications will sometimes be much greater than 20 seconds. On reaching 5 stacks, the debuff will wear out and trigger Shifting Reality, sending the tank and any other raid member within 6 yards into the Twilight Realm, and damaging these raid members as well as enemies within the Twilight Realm.
As you can see, the only change will deal with controlling the number of Twilight Sentries alive so that raid damage is minimised. To do so, your raid will have to employ a method of killing them inside the Twilight Realm, which we will detail in the next section.
The boss' health has been drastically increased. Considering that DPS players will need to spend some of their uptime to kill the Twilight Sentries, the enrage timer is very short. It is absolutely necessary to make good use of the temporary damage buff provided by Engulfing Magic.
Somes abilities have had their damage increased:
- Valiona and Theralion's melee attacks now do approximately 40k damage in 10-man difficulty and 65k damage in 25-man difficulty.
- Blackout damage has been increased.
- Devouring Flames damage has been increased.
- Twilight Blast damage has been increased.
- Fabulous Flames damage has been increased.
- Twilight Meteorite damage has been increased.
Engulfing Magic now targets 2 players in 10-man difficulty and 3 in 25-man difficulty.
Tanking strategy
The combination of Twilight Zone (which last 2 minutes) and Twilight Shift
results in a unique tank being sent to the Twilight Realm before dropping
stacks of Twilight Zone, which means that these stacks will keep increasing
over time, until it becomes very hard to manage (though a Protection
Paladin can solve this with ![]() Divine Shield)
Divine Shield)
Therefore, the advised strategy is to use 2 tanks. They take turns tanking the dragons, swapping when one tank is sent to the Twilight Realm.
In 10-man difficulty, where the enrage timer can feel tighter, it is possible to use only one tank and have a DPS taunt the boss and survive a few melee attacks while the tank makes it back from the Twilight Realm.
DPS players and healers need to go in the Twilight Realm from time to time to kill Twilight Sentries. For this reason, a tank is often required to announce that their stacks of Twilight Shift have reached 4, so that, if needed, some designated DPS players and healers can come and stack on them in order to be sent to the Twilight Realm at the application of the 5th stack.
Dealing with the Twilight Sentries
Because the increasing number of Twilight Sentries in the Twilight Realm will end up wiping the raid with Rift Blast, it is necessary to regularly go to the Twilight Realm and kill some sentries.
Players inside the Twilight Realm receive a tick of Twilight Zone every 2 seconds. In addition to dealing damage, these ticks stack a debuff which increases Shadow damage taken. These stacks limit the time a player can stay inside the realm. Also, it takes 2 minutes for the stacks to drop, which prevents players from returning to the Twilight Realm as soon as they have been healed to full in the Normal Realm.
The idea is to make two groups of players. These two groups will take turns to go inside the Twilight Realm, giving enough time for players to drop their stacks before having to return to the Twilight Realm. In 10-man difficulty, a group consists in 1 DPS and 1 healer, while in 25-man difficulty, a group consists in 3 DPS and 1 healer. As we will explain in the next section, Subtlety Rogues are, by far, the best suited DPS class to enter the Twilight Realm, and they should be given absolute priority over other classes.
The designated groups can enter the Twilight Realm through Shifting Reality, Dazzling Destruction, or Twilight Flames. Shifting Reality should be the default choice as it occurs approximately every 100 seconds, which creates a 200 second rotation for each group, giving a maximum of 80 seconds inside the realm and 120 seconds outside the realm to drop the stacks. Dazzling Destruction and Twilight Flames can be used when someone missed Shifting Reality or when Shifting Reality is being delayed by the Valiona and Theralion's other abilities.
Regarding how long players can stand in the realm, it depends on the role. Healers should typically stay until 20 stacks maximum, leaving a HoT on the players inside. DPS can stay until 25 stacks maximum, while the HoT they have received is still active. It is advised to start looking for an exit portal 5 stacks before the aimed limit.
Inside the Twilight Realm, it is imperative to avoid the moving white orbs that are spread throughout the area. They deal considerable damage and will instantly kill raid members who have stacks of Twilight Zone. There are inoffensive units called Twilight Fiends, which roam around the room and should be ignored.
Outside the Twilight Realm, players with high stacks of Twilight Zone should be given special attention by the healers because they will be taking additional damage until the stacks wear out. These players should also be especially wary of Twilight Flames. Being hit by them will send them back to the Twilight Realm, where they will have a hard time reaching an exit portal before dying. Worse, their position into the Normal Realm, at the moment they are hit by Twilight Flames, can coincide with that of an orb in the Twilight Realm, the explosion of which will kill them as soon as they are shifted.
When the boss' health reaches 20%, everyone inside the Twilight
Realm, should exit and DPS whichever dragon is on the ground.
![]() Heroism,
Heroism,
![]() Bloodlust, and
Bloodlust, and ![]() Time Warp should be used then. The idea is
to maximise the damage done by execute-like abilities, which only
become available below 20% for many classes.
Time Warp should be used then. The idea is
to maximise the damage done by execute-like abilities, which only
become available below 20% for many classes.
Tips and Tricks
Because DPS players need to exit the Twilight Realm towards the end of the fight to DPS Valiona and Theralion, in order to beat the tight enrage timer, the raid will take increasing damage from Rift Blast during the last minute or so. At this point, anyone targeted by Blackout should be sacrificed (or use a trick to bypass the mechanics of the ability, see the Tips and Trick section for Valiona Phase) to lessen the strain on the healers.
Similarly, if your raid starts falling behind in terms of healing, you can choose to have players sacrificed to Blackout even in the second Valiona Phase. They can always be resurrected.
Rogues are the best class to send in the Twilight Realm. They can stay there for the entire duration of the fight, if a healer occasionally comes to top them off. The more Rogues you have in your raid, the less players you need to send in the Twilight Realm. The following abilities really make them stand out from the rest:
- Recuperate (modified by Glyph of Recuperate) provides decent and continuous self-healing;
- Cloak of Shadows removes stacks of
Twilight Zone every 2 minutes;
 Feint (improved by Glyph of Feint) combined with
 Elusiveness greatly reduces the damage taken from
Twilight Zone (which is considered as AoE).
Elusiveness greatly reduces the damage taken from
Twilight Zone (which is considered as AoE).- Fleet Footed increases running;
 Sprint decreases the downtime caused by switching from one
sentry to another;
Sprint decreases the downtime caused by switching from one
sentry to another;- Preparation can be used to reset the cooldown of Sprint;
- Cheat Death allows
Rogues to make mistakes without grave consequences.
Mages are the second best class, because they can use ![]() Ice Block
to remove their stacks (due to the cooldown, it will only be usable twice
during the fight).
Ice Block
to remove their stacks (due to the cooldown, it will only be usable twice
during the fight).
Paladins can use ![]() Divine Shield to extend their stay in the Twilight
Realm.
Divine Shield to extend their stay in the Twilight
Realm.
Death Knights can use ![]() Anti-Magic Shell (improved by
Glyph of Anti-Magic Shell) to slow down the buildup of stacks of Twilight
Zone.
Anti-Magic Shell (improved by
Glyph of Anti-Magic Shell) to slow down the buildup of stacks of Twilight
Zone.
Learning the Fight
The two phases that make up the fight are alternating due the passing of time. Therefore, the raid can simply hold DPS and practice moving properly to deal with Valiona and Theralion's abilities. Once the raid can easily spend 4 minutes without anyone getting close to dying, a kill should be quickly obtained.