Al'Akir Detailed Strategy Guide (Heroic Mode included)
Table of Contents
Introduction
This guide is intended to provide a comprehensive description of the encounter with Al'Akir in Throne of the Four Winds. It is targeted at anyone who desires to understand the fight mechanics.
This guide is updated for World of Warcraft WoD 6.1.2.
Al'Akir is the final boss of the Throne of the Four Winds raid instance, and is a definite step up in difficulty both from Conclave of Winds as well as from most other tier 11 encounters.
General Information
Health Pool
Al'Akir's health pool is as follows:
- in 10-man normal difficulty: 24M;
- in 10-man heroic difficulty: 48.1M;
- in 25-man normal difficulty: 84M;
- in 25-man heroic difficulty: 168M.
Enrage Timer
Al'Akir has a 9 minute enrage timer. After this time he will go Berserk and kill your raid.
Raid Composition
The following raid compositions are advised:
- in 10-man normal difficulty: 1 tank, 3 healers and 6 dps;
- in 10-man heroic difficulty: 1 tank, 4 healers and 5 dps;
- in 25-man normal difficulty: 2 tanks, 7/8 healers and 15/16 dps;
- in 25-man heroic difficulty: 2 tanks, 7/8 healers and 15/16 dps.
Overview of the Fight
The Al'Akir encounter consists of three phases. The first phase lasts from 100% to 80% of the boss' health, the second phase lasts from 80% to 25% of the boss' health and the third and final phase begins when the boss reaches 25% health and ends when he is dead.
During the first two phases, you will face Al'Akir on his platform, while in the third phase, Al'Akir will shatter the platform and your raid will gain the ability to fly for the remainder of the encounter.
In the first phase, your raid will be faced with movement and positioning challenges, and the slightest mistake will cause a death and subsequently a wipe. During the second phase, your raid will have to control adds while executing a DPS burn on Al'Akir due to his soft enrage mechanics in this phase. In the third phase, your raid will need, once again, to make use of good movement and reactivity to finish off the boss.
Preliminary Concerns
It must be mentioned that, in order to engage Al'Akir, your raid must first have defeated the Conclave of Winds. In the same way that no trash preceds the Conclave of Winds, indeed there is none before Al'Akir either.
Al'Akir must be engaged and fought on his circular platform, located in the center of the Throne of the Four Winds instance. His platform is reachable by right clicking any of the four cyclones located on the other platforms in the instance.
Al'Akir will not aggro on proximity to players, and only when attacked. He has a massive hitbox, which allows players to melee him from seemingly very far away. This can cause problems with players accidentally attacking and thus engaging the boss, especially while attempting to click things such as Soulwells.
It is important to know that, both before the fight starts as well as during the fight, it is possible to fall off of Al'Akir's platform. If this happens before you enter combat, you will simply be sent back to the starting platform. If it happens during combat with Al'Akir, you will be teleported back up onto Al'Akir's platform. You do not take any damage in either case. Despite this fact, the location on Al'Akir's platform where you are placed is not under your control, and as such it may cause you to take damage from other sources.
If, however, you were taking damage already when you are thrown off or jump off, and you die off the platform, you cannot be resurrected. There are three ways to fall off of Al'Akir's platform: jumping off, moving too close to the edge and being transported off by means of a wind current, or being knocked off by one of Al'Akir's abilities.
As a rule, falling off the platform should be avoided, though in certain cases it may be preferable to another outcome.
A lot of the damage in this encounter is Nature damage, so having either a Hunter or a Shaman for Nature Resistance is crucial, and almost always a prerequisite of completing the encounter.
Summary of Abilities
Al'Akir retains some of his abilities throughout multiple phases. When this is the case, we will simply mention the ability in each phase.
Phase One
- Lightning Strike
- Squall Line
- Ice Storm
- Wind Burst
- Electrocute
Phase Two
- Squall Line
- Acid Rain
- Stormling adds, which cast Stormling
- Feedback
- Electrocute
Phase Three
- Lightning Clouds
- Lightning Rod
- Wind Burst
- Relentless Storm
- Lightning
Phase One
The first phase of this encounter is arguably the most difficult one, and the one most prone to deaths caused by unfortunate timings of abilities. Indeed, many players will claim that they died because they were "unlucky", but we will show you that this is not the case, and that for every potential situation there is a course of action which does not result in dying.
Abilities
Lightning Strike is an ability Al'Akir will cast roughly every 10 seconds, though this does vary sometimes. Lightning Strike will damage everyone standing in a 25 yard cone of a random target for a moderate amount of Nature damage for each affected target. In other words, the more people located in range of the target of Lightning Strike, the more damage the ability will do to them.
Squall Line is a wall of 7 cyclones which Al'Akir will spawn repeatedly during this phase, approximately once every 40 seconds. The wall spans from the center of the platform, where Al'Akir is located, to the edge of the platform. It will complete a full lap around the platform before disappearing, and anyone touched by it will be picked up and dragged some distance within the cyclones, also taking large amounts of damage and being incapacitated. Shortly before a Squall Line disappears, a new one spawns, so there is a brief period of time when there are two active. However, the Squall Line that is about to disappear loses consistency and no longer causes its negative effects to players.
There is always a gap in the wall, in varying locations, which players must aim to make their way through in order to avoid the aforementioned negative effects. Essentially, the gap can be located in the place of any of the 7 cyclones, and as such it can be anywhere from the edge of the platform to right up close to Al'Akir.
There is no fixed spawn location for Squall Lines, although they appear to prefer spawning on either the far right or far left side of where the tank is. Before spawning and dealing damage, there are about 5 seconds when the Squall Line is visible but not yet fully formed, giving players enough time to react accordingly.
Wind Burst is an ability that Al'Akir will repeatedly cast during the first phase, roughly every 25 seconds. It has a 5 second cast time, at the end of which Al'Akir will knock everyone on the platform back roughly 30 yards as well as damage them.
Ice Storm is an icy rain which Al'Akir will cast regularly, targeting random areas of his platform. The rain leaves frost on the ground, which slows and damages any players standing there.
Electrocute is an ability Al'Akir will channel into his main aggro target if this target is not in melee range. The spell will deal increasing Nature damage to the target (generally the tank), who must return to melee range to prevent it from damaging them further.
Raid Positioning
Proper raid positioning in Phase One is essential. The positioning is largely determined by Lightning Strike. In 10-man difficulty, positioning poses fewer problems than it does in 25-man, because of the reduced number of players on the same platform, but the general principles still apply.
As a raid leader, the aim is to position your raid in such a way that as few people as possible are affected by each Lightning Strike. Because it is not feasible to have your raid spread out so much that only one person is ever affected by it (because there is not enough room in 25-man, and because you cannot have everyone in range of a healer in 10-man), you will need to form groups of players who will then be properly spread out.
For both 10 and 25-man, an easy way to understand and direct your raid's positioning is by using the leaf patterns found on the floor of Al'Akir's platform. There are 8 such large leaves spread out all around the platform which constitute excellent markers for positioning.
10-man positioning
You can choose between having 4 or 5 groups of players, though we advise the use of 5. In this case, you will want to form pairs of players, located on 5 consecutive leaves. Each group should consist of two players, and no two healers should be in the same group. In the image below, we have numbered these locations 1 through 5.

Healers should be placed in groups 1, 3 and 5. Spreading the healers out is important because it means not all healers will have to move at the same time for Squall Line, and will be able to keep up healing. Following this positioning, groups 1, 3 and 5 will be in range of a single healer, while groups 2 and 4 will have access to two healers each.
25-man positioning
In 25-man, you will have to make use of the entire platform, but you also have more healers to spread around. You should form 8 groups of players as follows:
- 7 groups of 3 players each;
- 1 group of 4 players.
You should place a healer in each group, or, if you are using 7 healers, one group can be healerless. Use the image above and the leaf patterns on the floor to direct your positioning.
Because there are more players per group, Lightning Strike will indeed deal more damage (approximately 60,000 Nature damage per group of 3 players, before resistance), but each group will be in range of multiple healers, so this should not be a problem.
Strategy or Dealing with Abilities
Phase One of Al'Akir resembles a finely choreographed dance. Your entire raid must be prepared to move in reaction to Squall Line and Wind Burst, while maintaining their assigned positions with great strictness.
We will present the methods for dealing with Phase One abilities in ascending order of difficulty.
Ice Storm is almost entirely avoidable (with one exception, which we will mention later) and you should simply aim to move closer or farther away from Al'Akir so as not to be affected by it. Moving sideways is not advised because it will affect your raid's overall positioning for Lightning Strike.
Lightning Strike will pose very little problems if your raid has followed the positioning we advised above. This ability will cause damage to players, which cannot be avoided, but the damage is moderate and should amply be covered by the healers.
Because Squall Line, Wind Burst and to a lesser extent, Electrocute, interact extensively with each other, we will discuss them together.
Wind Burst requires that you move close to Al'Akir before the cast is finished to avoid being knocked off the platform. On its own, it poses no real problem, as the cast time is long and boss mods are very accurate in predicting it. Problems arise when Wind Burst is cast shortly before or after a Squall Line reaches your location. This is the cause of most deaths during Phase One and one of the main reasons for wiping. In order to provide players with the means to avoid damage and dying, we will list all the possible situations.
Wind Burst When Squall Line is Far Away/Has Already Passed
If Squall Line is far away from you, then simply move in for Wind Burst, wait to get knocked back and then move into the correct position for the Squall Line. If the Squall Line has already passed, simply move close to the boss.
Wind Burst When Squall Line is Close
If Squall Line is closing in on your position, and a Wind Burst is about to be cast, you have three options:
- Do not move left or right, only towards Al'Akir: if the gap in the Squall Line is at the outer edge of the platform, in most cases you will be able to simply run to Al'Akir, get knocked back by Wind Burst and already be in the correct location for Squall Line.
- Run to the Squall Line: if you feel you can run towards the incoming Squall Line and once you have gone through it, get close enough to Al'Akir that Wind Burst will not knock you off the platform, this is the recommended course of action.
- Run away from the Squall Line: if the incoming Squall Line is not close enough to enable you to run through it, and simply running in towards Al'Akir will not give you the correct positioning, you should run away from the incoming Squall Line and towards Al'Akir. This way, once Wind Burst has knocked you back, you should have ample time to positioning yourself for the gap within the Squall Line.
Making the right choice is not difficult once you gain a small amount of experience with the encounter. While it is not advised to move left or right so that Lightning Strike does not damage players unnecessarily, avoiding Squall Line is a top priority and constitutes an exception.
Tank Movement and Electrocute
Avoiding the Squall Line provides an additional challenge to the tank, because whenever he is not in melee range of Al'Akir, Al'Akir will cast Electrocute on him. Ideally, your tank would wait for Wind Burst to begin its cast, so that Al'Akir cannot also cast Electrocute, allowing him to move undamaged, and simply take a few ticks of Electrocute when returning to melee range. Sometimes, this is not possible and your tank will take more damage from Electrocute, and should use defensive cooldowns.
Ice Storm and Squall Line/Wind Burst
Sometimes, Ice Storm will block your path, either to Al'Akir himself or to or from the Squall Line. If this is the case, you will have to endure the damage and account for the movement speed reduction, and simply run across it. Some abilities, such as Hand of Freedom, can help overcome this obstacle.
Tips and Tricks
Most classes can make use of certain abilities to either bypass mechanics like Squall Line entirely, or simply to facilitate movement during this phase.
- Hand of Freedom and
 Divine Shield for Paladins;
  Heroic Leap or Intervene for Warriors;
 Blink for Mages;
 Dash for Druids;
 Disengage and Master's Call for Hunters;
 Sprint for Rogues;
 Ghost Wolf for Shamans;
- Demonic Circle for Warlocks.
Hunters can stay at the very edge of the platform as a Wind Burst is cast, get thrown off and disengage back onto the platform while in mid-air. While generally a futile exercise, it can prove to be an efficient means to avoid the Squall Line.
Lastly, when faced with a choice between getting caught by a Squall Line or getting knocked off the platform by Wind Burst, always choose the latter.
Phase Two
Phase Two begins when Al'Akir reaches 80% health and is a step down in difficulty from Phase One. It is a rather long phase and is, more than anything else, a DPS and healing check, where proper positioning and reactivity play a much smaller role than before.
Abilities
Squall Line remains present during this phase and acts exactly as it does during Phase One, and should indeed be dealt with in the same manner.
Acid Rain is Al'Akir's new ability in this phase. It is a stacking DoT that Al'Akir applies to all raid members every 20 seconds. It deals 500 Nature damage per stack, and it constitutes a soft enrage timer for this phase.
In addition to this, Al'Akir will summon adds, called Stormling, which do Nature damage in an area around themselves, and on dying apply a stacking debuff to Al'Akir, called Feedback. Feedback increases the damage that Al'Akir takes and is instrumental in bringing him to Phase Three before the raid becomes unhealable.
Electrocute remains active and unchanged during Phase Two.
Strategy
The first tasks your raid will have to perform are to DPS down Al'Akir while avoiding Squall Line as before, as well as healing up the raid to counter the damage from Acid Rain. Unfortunately, Al'Akir's health will take too long to reach 25% (unless you severely out-gear the encounter) and your raid will die to excessive stacks of Acid Raid. Because of this, your raid will need to make use of the Feedback debuff, which we will explain in detail below.
Stormlings and Feedback
Stormlings will spawn, roughly once every 20 seconds, all throughout this phase. The location where they are about to spawn is indicated by a pulsing lightning sphere. These adds should be picked up and tanked by your off-tank (which you have brought along specifically for this purpose) in 25-man difficulty, or your only tank in 10-man.
Because these adds damage players around them with Stormling, you should aim to have them tanked away from the raid so as to minimise damage. In 10-man, your melee can simply attack Al'Akir from farther away from the tank, while in 25-man, your off-tank should be tanking the adds at a safe distance.
Each time a Stormling dies, Al'Akir will gain a stack of Feedback. Feedback increases the damage Al'Akir takes by 10% per stack, and lasts for 30 seconds. Each new stack application resets the duration.
The concept of handling the adds and Feedback is simple. You want to kill a Stormling each time Al'Akir's debuff is about to run out, refreshing its duration and adding another stack, which will result in a very increased DPS to Al'Akir.
Tips and Tricks
Because the main problem, once Feedback stacks are being kept up, is either insufficient DPS or insufficient healing, we have prepared a list of tips and tricks your raid can utilise to make this phase easier.
Making Healing Easier
Firstly, you should aim to have your raid stacked up, in at most two groups
of ranged and melee, and keep the Stormlings away from these groups. This phase
allows for good AoE healing, as well as AoE damage mitigation such as
![]() Power Word: Barrier.
Power Word: Barrier.
Healing cooldowns should be saved for later on in the phase, when the stacks of Acid Rain are higher.
Secondly, some classes can drop their stacks of Acid Rain completely:
- Death Knights can use
 Anti-Magic Shell when there are a few seconds
left on the Acid Rain duration to prevent the application of a new stack and
thus have the debuff wear off.
Anti-Magic Shell when there are a few seconds
left on the Acid Rain duration to prevent the application of a new stack and
thus have the debuff wear off. - Paladins can use Divine Shield.
- Rogues can use
 Cloak of Shadows.
 - Mages can use
 Ice Block.
In addition to this, it may be worth having some raid members die and be Soulstoned or otherwise resurrected, or Ankh in case of Shamans, in order to reset their stacks. It may seem like a drastic measure, but using all the tools available at your disposal should never be scoffed at.
Increasing DPS
This phase is the only one where there is an increase of difficulty as the
phase goes on, so using ![]() Bloodlust or
Bloodlust or ![]() Heroism will be of great
benefit, especially since the raid will be quite stationary allowing for
maximum damage uptime.
Heroism will be of great
benefit, especially since the raid will be quite stationary allowing for
maximum damage uptime.
Phase Three
Phase Three is comparable in difficulty to the second phase, but is still arguably easier than the first phase. Al'Akir will destroy the platform on which you had been fighting him up to this point, and all raid members will get the ability to fly thanks to Eye of the Storm.
During this phase, you can fly up and down freely from Al'Akir's head all the way to his feet. In addition to this, you can also move sideways, and back and forward. You can, indeed, move all around Al'Akir's massive body.
There are three limits to the area where you can move:
- You cannot move above the level of Al'Akir's head; there is an invisible wall there.
- You cannot move below the level of Al'Akir's feet; there is a lightning field which will damage you severely.
- You cannot move too far away from Al'Akir as you will be caught in a Relentless Storm which acts much like a Squall Line in that it will incapacitate you and deal damage to you over a short amount of time, dragging you along.
Abilities
Wind Burst returns in this phase, though it is less problematic than it was during the first phase.
Lightning Clouds is an ability Al'Akir will cast every 15 seconds. It will target a random raid member and place a large cloud covering the entire (horizontal) level where that raid member was located. After 5 seconds, the cloud will begin dealing massive damage to anyone still inside it.
Lightning Rod places a debuff on a random raid member which causes them to deal damage to everyone around them (both vertically and horizontally) until the debuff runs out.
Lightning will damage random players and is unavoidable.
Strategy
The strategy for this phase is fairly simple, and as as long as you are consistently able to progress this far, a kill is not too distant.
The aim of this phase is to place Lightning Clouds correctly so that it does not damage your raid. You should begin the phase by having all of your raid fly up to the highest possible level, at Al'Akir's head. You should have a desginated person marked, to refer to for positioning.
When the first Lightning Clouds is cast, it will inevitably be cast at the level at which everyone is standing. Your entire raid should simply fly down roughly 15 yards to avoid any damage. Proceed like this (ever down) for each new Lightning Clouds.
The distance you can travel will enable your raid to deal with at least 10 Lightning Clouds before running out of space, which should be ample time to finish off the boss. If, however, your raid DPS is extremely low and you find yourself running out of space, you can use the following strategy:
Have your raid start at Al'Akir's head, and when the first Lightning Clouds is cast, move down towards Al'Akir's feet. For the second Lightning Clouds, move slightly up (towards his knees). By the time the third Lightning Clouds is cast, the first one (at Al'Akir's head) will have despawned, so it is safe to move up there again. For the fourth cast, move down slightly, and by the time of the fifth cast, Al'Akir's bottom area will once again be clear, and you can simply repeat this as many times as needed.
Note that this is less efficient because it requires a lot more movement from your raid which will lower your DPS overall.
Whoever is afflicted by Lightning Rod should move horizontally out of the raid and remain there while the debuff persists.
Ocassionally, Al'Akir will knock everyone back through Wind Burst. Because you do not want to stray too far away from Al'Akir and enter the Relentless Storm, you should aim to stay fairly close to his body, and move back in after Wind Burst.
Tips and Tricks
If you did not make use of ![]() Heroism or
Heroism or ![]() Bloodlust during the
second phase, you should use it now.
Bloodlust during the
second phase, you should use it now.
You can also opt to keep one or more Stormlings alive for this phase in order to stack Feedback on Al'Akir, though this is generally not needed and will only complicate the execution for a rather redundant DPS increase.
Heroic Mode
Differences from Normal Mode
The heroic version of the Al'Akir encounter does not differ much from its normal counterpart. There is a single (rather inconsequential) new ability, and the strategy remains largely the same. Below, we list the relevant differences.
Static Shock is an ability which Al'Akir will use to often interrupt any casters who are in his melee range. He uses this ability during Phases One and Two.
In both phases, Static Shock has no effects on melee players, and only concerns casters who are too close to Al'Akir's body. Quite simply, if you are a caster, you should stay at range and this ability will not affect you.
- Lightning Strike now persists in the cone area for 30 seconds and deals damage to all units within it, in the same way that the normal mode mechanic does.
- Stormling, in addition to dealing damage to all enemies within 10 yards, now also increases their nature damage taken by 25% for 2 seconds. Note that this debuff does not stack, however multiple Stormlings will apply multiple debuffs at the same time.
- Feedback duration in heroic mode is only 20 seconds, instead of 30 seconds in normal mode.
In addition to these ability changes, both Al'Akir and the Stormlings have had their health pools and damage increased, as follows:
- in 10-man difficulty Al'Akir has 48,000,000 health and Stormlings have 412,000 health.
- in 25-man difficulty Al'Akir has 168,000,000 health and Stormlings have 1,500,000 health.
Strategy
Phase One
The change to Lightning Strike has a few implications on raid positioning in 10-man, but leaves things unchanged in 25-man.
For 10-man, your raid should use 4 healers, spaced evenly around the platform (one healer on every other leaf). This will enable you to spread your entire raid out over the 8 leaves on the floor, having 6 raid members stand alone and the other 4 grouped into two groups.
For 10-man, whenever Lightning Strike affects an area of the floor, all players within the area should move out to either the right or the left and remain there until the Lightning Strike subsides.
For 25-man, it is advisable to have one person remain in the Lightning Strike and have the remaining two (or, sometimes, 3) move out to the sides. The reason for this is that if everyone leaves an area, they will over-crowd the adjacent groups and a Lightning Strike there would be devastating.
Aside from this change to 10-man positioning, and the need to move out of Lightning Strike, Phase One remains unchanged and the normal mode strategy applies.
Phase Two
The reduced duration of Feedback on heroic mode will require your raid to employ a more complex add killing technique. There are no other significant changes to Phase Two, and the Stormling change simply means that Stormlings should be kept away from the raid even more rigorously.
Because of the increased health of the Stormlings, extra DPS players may need to be assigned to handling them in both 10 and 25 man difficulties.
In 10-man, because your tank will be tanking both Al'Akir and the Stormlings, and will receive both Electrocute at times as well as 25% or 50% increased Nature damage taken, your tank and healers will have to be extremely careful and should not hesitate to use cooldowns.
In regards to handling the Feedback debuff, things are a bit more complicated. Because Stormlings take roughly 20 seconds to spawn, and the debuff wears off after 20 seconds, it is often the case that the debuff will run out before you manage to refresh it, dropping all previous stacks. This generally results in a wipe, but luckily it can be avoided with correct execution.
Assign one ranged DPS player in 10-man and 2-3 ranged DPS players in 25-man to be responsible for Stormlings and Feedback. It is best to have specific people assigned to this task, rather than having your whole raid contribute, because controlled DPS burns and stops are required, and coordination is much easier this way. If these assigned people are finding that more DPS is needed, they should not hesitate to ask for help.
In order to prevent the debuff wearing off of Al'Akir before it can be refreshed due to lack of Stormlings, you should allow for three Stormlings to spawn before you begin killing them. This way, the approximately 40 seconds you gain will act as a buffer from which you can then use 3-5 seconds for each reapplication of Feedback.
We have prepared a graph to illustrate Stormling spawns and Feedback stacks, which you can view below.
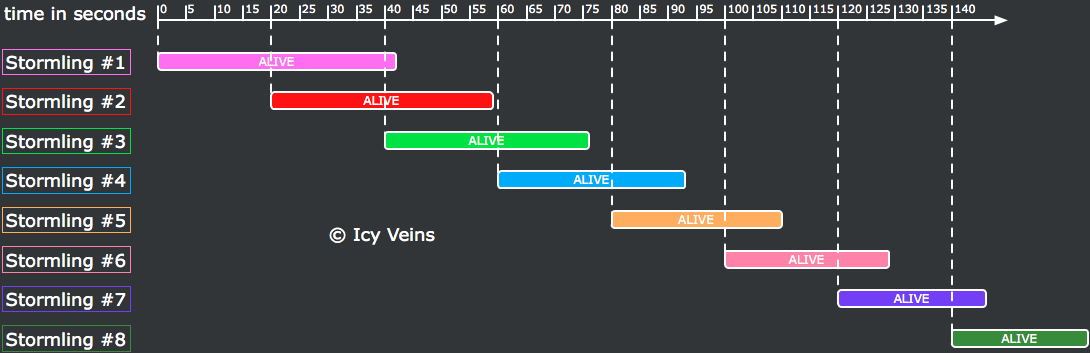
In other words, allow two Stormlings to spawn, and damage one of them down to about 20% health. Once the third Stormling spawns, kill the low hit point Stormling, beginning your Feedback stack applications. From this point on, you will want to kill another Stormling every 15-17 seconds (technically, up to 19 seconds, but that is too risky). This way, you are using the time you gave yourself by waiting for two Stormlings to spawn to offset the duration of Feedback in relation to Stormling spawn timers.
Phase Three
Phase Three remains largely unchanged. Because Al'Akir has considerably more health, this phase will last longer and as such your raid will run out of room if they simply aim to move from top to bottom to avoid Lightning Clouds. As such, the recommended movement is as follows:
- Start at the top;
- Move down once;
- Move down again;
- Move to the bottom;
- Move up once;
- Move up again;
- Move to the top.
Once the cycle has been successfully completed, your raid should simply repeat it until the boss is dead.
Note that, as mentioned, Al'Akir will damage random raid members with Lightning, which will require some additional healing.
Learning the Fight
Phase One is without a doubt the most difficult to learn. Luckily, this means that your raid will be able to practice it at length without having to progress through other phases first. This, together with the lack of any trash and quick run-time to Al'Akir makes this fight a rather easy learning experience.
While you may be tempted to use ![]() Heroism or
Heroism or ![]() Bloodlust to
facilitate Phase One, this is generally just a bandaid fix which we do not
recommend. Rather, you should keep going at it until your raid is progressing
past this phase because everyone is fully aware of what they need to do and
are doing it correctly.
Bloodlust to
facilitate Phase One, this is generally just a bandaid fix which we do not
recommend. Rather, you should keep going at it until your raid is progressing
past this phase because everyone is fully aware of what they need to do and
are doing it correctly.
- How to Easily Get Multi-Player Required Achievements Solo
- AI Bot Warfare: (Mildly) Sabotage Bots by Talking to Them
- The Most Popular Specializations in Mythic+ in Dragonflight Season 3 Week 22
- Great Vault Requirements in Dragonflight Season 4
- Rare Mounts Available for Purchase in MoP Remix
- Clever Workaround for Death Knight Runeforging in MoP Remix
- Hunter Tier Sets and Bonuses in Dragonflight Season 4
- WoW Remix: MoP Overview Video
- Vanilla Nostalgia Thread
- Enhancement Shaman Leveling
- Holy Priest
- mana/health bar in the middle of my screen?
- Warlock Pet Customization Options Guide