Alysrazor DPS Strategy Guide (Heroic Mode included)
Table of Contents
Introduction
This guide is intended to provide a comprehensive description of the encounter with Alysrazor in Firelands. It is mostly targeted to DPS who desire to have a short but detailed overview of what is expected of them during that fight.
This guide is updated for World of Warcraft WoD 6.1.2.
The encounter with Alysrazor, one of the first five bosses of Firelands, is broken down in four stages. Each stage has its own unique (but not very complicated) mechanics that will test a few abilities of the raid.
From a DPS point of view, the fight will only require you to attack some adds and the boss while avoiding a great majority of the enemies' damaging abilities.
Overview of the Fight
The encounter with Alysrazor is fought in a round arena and is made up of 4 stages:
- Stage One lasts 3 minutes and sees a few raid members fly after Alysrazor to attack her while the rest of the raid deals with 2 types of adds in the arena.
- Stage Two lasts 30 seconds and requires the raid to regroup in the arena and avoid Alysrazor's damaging abilities.
- Stage Three lasts between 20 and 34 seconds (depending on your raid ability to handle some adds) during which an immobilised Alysrazor takes 50% more damage and DPS caster have mana-free casts.
- Stage Four lasts 25 seconds during which Alysrazor is freed from her bonds and does very damaging attacks on the raid.
Once Stage Four has finished, Stage One simply starts over. The fight goes on until Alysrazor is dead.
Prelude
The fight starts with a short sequence during which Alysrazor will deal high fire damage to the raid. She also knocks everyone back. Be wary of two things:
- avoid standing too close to the entrance as you might get knocked back in the fire wall she will create there;
- after she is done, she will fly over the arena, in a north to south fashion, and will deal high damage to anyone standing in front of her.
Stage One
During this stage, which lasts 3 minutes, Alysrazor will mostly be in the air but she will sometimes fly low over the arena and do a conic attack. Some players will be granted the ability to fly so that they can follow Alysrazor and damage her while the rest of the raid will remain on the ground to deal with 2 types of adds.
This stage presents a lot of abilities, which can seem daunting at first. Fortunately, many of these abilities are independent from each other and will only concern a small part of the raid members.
We first present what a DPS players has to do at the ground level, before presenting what needs to be done in the air.
Ground
Assignment
For the entire duration of the stage, there will be adds at ground level. The diagram below describes their positions:
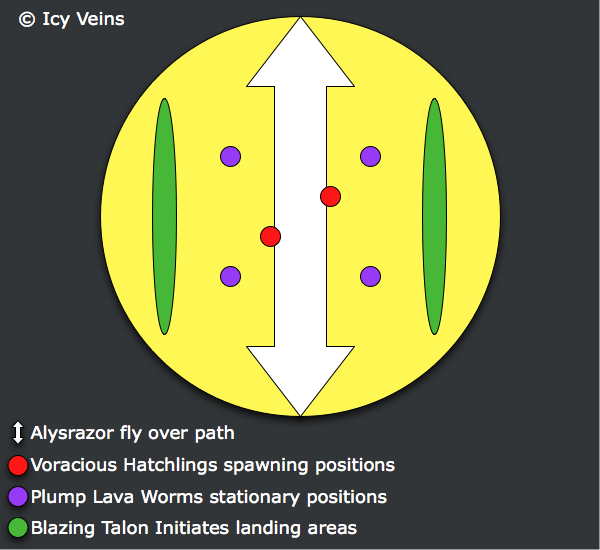
Your objective will be to kill the Blazing Talon Initiates on the west or east side, depending on where you have been assigned to go. You will stick to that side for the entire duration of the stage.
On each side, a Blazing Talon Initiate will land every 40 seconds, inside the area marked in the diagram above. When killing these adds, which have 481k health in 10-man difficulty and 1.4M in 25-man difficulty, are stationary, and do not require tanking, you need to be aware of two things:
- they continuously cast Brushfire, which creates fiery balls that move across the arena need to be avoided;
- after every cast of Brushfire, they cast Fieroblast, which needs to be interrupted (every time a Fieroblast is not interrupted, the next one is cast 10% faster and deals 10% more damage).
Note that while initiates cannot be interrupted when they cast Brushfire, they can and should be stunned, to reduce the number of fiery balls travelling around the arena.
Whenever there are no initiates up, you can help in two ways:
- damage the Voracious Hatchlings, the 2 adds that the tanks will be busy with;
- attack Alysrazor when she flies over the arena.
Avoiding Damage
Besides being targeted by Fieroblast when you or your fellow raid members fail to interrupt the cast of that spell, you should be taking no damage during this stage.
When attacking a Blazing Talon Initiate, you should always stand behind him (so between him and the edge of the arena). This will prevent the attacks from the other adds and Alysrazor from reaching you.
When helping on Alysrazor or the Voracious Hatchlings, you need to be aware of 3 potential sources of damage:
- Voracious Hatchlings deal damage to players in a 18-yard cone in front of them;
- Plumping Lava Worms (the stationary worms around the middle of the arena) continuously rotate while performing a fire breath attack;
- Alysrazor flies over the center of the arena (as indicated by the diagram in the previous section) every minute and deals high physical damage to everyone in front of her.
Air
The ability to fly is granted by picking up 3 feathers from Alysrazor. She drops them every time she flies over the arena (3 times per Stage One), including the first time, right at the beginning of the stage.
In the air, you need to follow Alysrazor. Every 4 seconds, she creates, behind her, a Ring of Fire and an increasing number of Incendiary Clouds. Both remain for 3 seconds before disappearing.
Passing through a Ring of Fire refreshes your ability to fly (which only lasts 30 seconds). It also stacks Blazing Power, increasing your haste by 8% and restoring a fraction of your mana/rage/energy/etc. at every application. Reaching 25 stacks of Blazing Power grants Alysra's Razor, increasing critical strike chance by 75% for 40 seconds.
Incendiary Clouds deal fire damage and simply need to be avoided. This becomes increasingly harder as more and more Incendiary Clouds will spawn.
Stage Two
Stage Two is a 30 second event, at ground level, during which the arena will look like that:
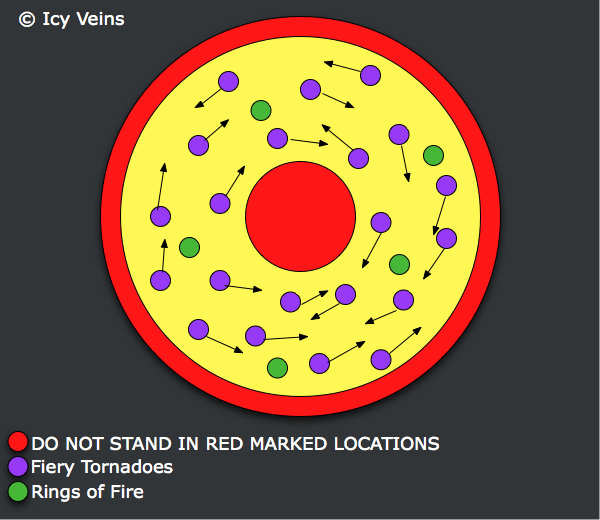
Standing at less than 15 yards or more than 60 yards from the center will result in taking very high (almost deadly) fire damage.
During this phase, the idea is to avoid all the Fiery Tornadoes that travel across the arena while trying to walk through the Rings of Fire, because they give a speed-enhancing buff. Use any ability that gives you a speed buff. If you were in the air in Stage One, then it is imperative that you pass through these rings as they refresh Blazing Power (which greatly benefits you in Stage Three).
The tornadoes have a set travelling pattern. A method that works very well is to simply follow a tornado until you see another tornado, coming from the opposite direction, pass on your right or on your left. Then simply turn around and switch lane to follow this new tornado. Rinse and repeat.
Stage Three
After the intense Stage Two, Alysrazor burns out and crashes in the middle of the arena. She gets an energy bar of Molten Power. Initially it starts empty and gradually increases. When the energy bar reaches 50, Stage Three ends (34 seconds maximum with proper execution).
During the stage, she gets 50% increased damage and spell caster get a mana refund of 10% of their entire mana pool every time they hit her (a dream for Arcane Mages). Obviously, this is the best time to use DPS cooldowns.
Approximately 10 seconds into the Stage, two Blazing Talon Clawshapers fly in to help Alysrazor. A few seconds after landing, they will start channeling Ignition, each channel restoring 1 additional Molten Power per second.
Tanks and DPS who are not suited for burst damage (Enhancement Shamans for example) should try to stun the clawshapers before they start channeling. Then they should interrupt the channel as often as possible.
Tips and Tricks
If you are a Fire Mage, a Shadow Priest, an Affliction Warlock, then you
should have been asked to fly during Stage One and should have been able to
keep your stacks of Blazing Power during Stage Two (as well as your
Alysra's Razor buff). This means that combined, with ![]() Heroism,
Heroism,
![]() Bloodlust, or
Bloodlust, or ![]() Time Warp, and the increased damage that the boss takes
during Stage Three, your DoTs tick incredibly faster than usually and
almost always deal critical damage. Therefore, this is the best time to use all
your damage increasing cooldowns.
Time Warp, and the increased damage that the boss takes
during Stage Three, your DoTs tick incredibly faster than usually and
almost always deal critical damage. Therefore, this is the best time to use all
your damage increasing cooldowns.
Shadow Priests and Affliction Warlocks have to slightly change their rotation to refresh their DoTs with higher priority than any other spell.
With 100% critical strike chance and increased haste, Fire Mages should spam
![]() Pyroblast to keep refreshing
Pyroblast to keep refreshing ![]() Mastery: Ignite. This makes the DoT deal
increasingly more damage to the point that creating a
Mastery: Ignite. This makes the DoT deal
increasingly more damage to the point that creating a ![]() Combustion out of it
deals extremely high damage (more haste equalling to more ticks).
Combustion out of it
deals extremely high damage (more haste equalling to more ticks).
Stage Four
As soon as she reaches 50 Molten Power, Alysrazor starts flying again but she remains low until she reaches 100 Molten Power (that takes exactly 25 seconds). Simply nuke her and do not stand in front of her. As soon as she reaches 100 Molten Power, she damages and knocks back everyone. Then Stage One restarts.
Heroic Mode
The heroic mode of Alysrazor is very similar to the normal mode, and only presents DPS players with an additional positional challenge.
Differences from Normal Mode
Stage One is the only part of the fight which presents any differences from normal mode, while Stages Two, Three and Four remain the same. Other than everything dealing more damage, the following changes are relevant to DPS players:
- During Stage One, 6 Voracious Hatchlings will spawn (in pairs of two, at 1 minute and 25 second intervals), though they have considerably less health than in normal mode.
- 40 seconds after the start of the fight, and 1 minute and 40 seconds after that, Alysrazor will cast Firestorm. This ability is different from the Prelude ability with the same name, and it covers the entire platform in what is essentially a fiery wind. This inflicts 85,000 Fire damage per second for 5 seconds to anyone not hiding behind a Molten Meteor (covered below). Firestorm damages players who are in the air, as well.
- Molten Meteors land in the center of the arena, dealing massive damage in a small radius. There are two Meteors (about 30 seconds apart) before each Firestorm cast. They have low health and begin rolling towards one of the arena's edges. They must be killed before reaching it, and doing so will cause the Meteor to stop moving and provide cover from Firestorm. They deal large amounts of damage in their melee range, so they should be killed by ranged DPS players. If a Meteor reaches an edge, it will split into 3 smaller and unkillable Meteors which will also travel around the arena, damaging players in their path. On reaching an edge, the small Meteors despawn.
Strategy Changes
The strategy for the encounter, from a DPS perspective, does not change much. DPS players who are on the ground will find themselves DPSing and interrupting Blazing Talon Initiates, helping out with DPS on Voracious Hatchlings, all while avoiding Lava Spew, Brushfire and the cleaves from Voracious Hatchlings.
Note that after the third pair of hatchlings have spawned in Phase One, there will be no more initiates, enabling you to focus on the hatchlings.
In addition to this, ranged DPS players should be very prompt in killing Molten Meteors, as soon as they appear, in preparation for Firestorm.
Note that you only need to kill one meteor to deal with Firestorm. Therefore, you can let the other meteor break onto the walls of the arena, to save DPS. In this case, ignore the first meteor and kill the second. Doing it the other way around would cause the smaller meteor from the second meteor to be still present in the arena during Firestorm.
Also, the third pair of meteors in Phase One are useless as there are only two Firestorms. Therefore, the raid can choose to simply ignore them.
DPS players who are in the air will notice that there are more Incendiary Clouds, and that these also deal more damage, but nothing else is different.
Whenever a Firestorm is about to be cast, DPS players from the ground and the air alike will have to take cover behind a Molten Meteor, ensuring that Alysrazor (who is flying in the air at the time) is on the opposite side of the Meteor from them. Once the 5 second Firestorm is over, everyone can simply resume their roles.
Tips and Tricks
- Comprehensive To-Do List for Dragonflight Season 4 Week 1
- Warglaives of Azzinoth Appearance Available This Week to Demon Hunters
- How to Easily Reach Revered with the Netherwing this Week
- Dragonflight Season 4 Has Partially Started
- War Within Map Size Comparison to Dragonflight and Other Zones
- Periodic Free Realm Transfers Coming to Season of Discovery
- Priest Hero Talent Feedback: April 22nd
- Final Amirdrassil Season 3 Raid DPS Log Rankings