Beth'tilac Tank Strategy Guide (Heroic Mode included)
Table of Contents
Introduction
This guide is intended to provide a comprehensive description of the encounter with Beth'tilac in Firelands. It is mostly targeted to tanks who desire to have a short but detailed overview of what is expected of them during that fight.
This guide is updated for World of Warcraft WoD 6.1.2.
The encounter against Beth'tilac, in the Firelands, will not provide too many challenges for tanks. The main issues of concern are add tanking and, towards the end, a tank swap.
Overview of the Fight
Beth'tilac is a fiery spider which uses a variety of adds to attack your raid. The encounter is split into two phases, henceforth referred to as Phase One and Phase Two. The area where you fight Beth'tilac is divided into two levels by a web which forms the ceiling of the room.
During Phase One, the boss will be stationary on top of her web (the "Beth'tilac level"), where a few of your raid members will need to climb up to and deal damage to her. A tank will be required on the Beth'tilac level, as the boss does melee. In the meantime, down below (the "ground level"), the rest of your raid will have to defeat three types of adds: Cinderweb Drones, Cinderweb Spinners and Cinderweb Spiderlings.
After Beth'tilac uses Smoldering Devastation (an ability which will be explained below) three times, she will enter Phase Two, lowering herself to the ground level where your entire raid can engage her. This phase is essentially a burn phase where you raid will have to contend with a soft enrage mechanic and a tank swap.
Phase One
Before starting the encounter, you will notice Beth'tilac dangling from a web that acts as a ceiling to the room. Upon attacking her, she will quickly retreat up onto her web, while Cinderweb Spinners will lower themselves to your raid by use of web filaments. In addition to this, your raid will be faced with two other types of adds: Cinderweb Drones and Cinderweb Spiderlings, which enter the fight from the edges of the encounter area, on the ground level.
Of these adds, only the Cinderweb Drones require tanking. Spiderlings have no aggro table and Spinners' melee attacks very weak and usually do not occur at all.
Your goal during this phase is to send a small contingent of players to damage Beth'tilac atop her web, while the rest of your raid handles the adds.
In order for your raid members to reach Beth'tilac, you will need to make use of the web filaments left behind after Cinderweb Spinners are killed. These can be mounted like any vehicle, and will each transport one player to Beth'tilac's level.
We will detail the fight strategy, both for tanks who are assigned to go up to Beth'tilac's level as well as for those who are staying on the ground level.
Enemies, Abilites and their Interaction
Beth'tilac
Beth'tilac will spend the entirety of this phase perched on top of her web. While there, she will constantly deal damage to anyone on the same level as her (so, on the web) with Ember Flare. In addition to this ability, Beth'tilac will also deal melee damage to her main aggro target on the same level as her.
If there is no one at her level, she will damage the entire raid with Venom Rain.
Beth'tilac has a melee attack, which hits for roughly 37,000 damage in both 10 and 25-man difficulty, and is performed about once every 2 seconds.
Smoldering Devastation is an ability which Beth'tilac will cast whenever her Fire Energy bar reaches 0. It deals an immense amount of damage to all enemies on her level, killing anyone who is hit by it. Your raid will need to leave Beth'tilac's level and return to the ground level when this ability is being cast. They will do so by jumping down through a gap within the web, located in the center. The spell's 8 second cast time makes it easy to avoid.
Meteor Burn is an ability which causes meteors to fall onto the web, damaging players in a small area and leaving a fire patch on the web which damages players standing in it.
Once Smoldering Devastation has been cast three times, the phase will end and Beth'tilac will descend from her web, triggering Phase Two.
Cinderweb Spinner
Cinderweb Spinners lower themselves into the fight from Beth'tilac's web, above the raid. They climb down on strings, and stop mid-way from the ground. If taunted, they will lower themselves altogether (and be in range of melee DPS). Once dead, the strings used by the Cinderweb Spinners can be interacted with, as with any vehicle, by raid members. Doing so will send the raid member up to Beth'tilac's level. Each string or filament has a single use.
Cinderweb Spiderling
Cinderweb Spiderlings' only ability is Seeping Venom, which they will use on any targets within 6 yards of them. The Cinderweb Spiderling will latch onto the respective raid member and deal Fire damage to them over 10 seconds.
The Spiderlings are small adds which spawn in packs. They skitter along the floor and do not have aggro tables. They will always head for Cinderweb Drones. If they reach the Drones, they will heal and buff them, which is not advised. This is detailed below.
Be mindful that, if any Spiderlings come within range of Beth'tilac when she descends from her web, at the end of Phase One, she will consume them and heal herself for 10% for each Spiderling.
Your raid's general aim is to slow and kill these adds before they reach a Cinderweb Drone, without being in their melee range.
Cinderweb Drone
Cinderweb Drones have the following abilities:
- A melee attack, which hits for roughly 12,000 damage in 10-man difficulty and 24,000 damage in 25-man difficulty, and is performed roughly once every 2 seconds;
- Boiling Spatter, which is a highly damaging frontal cone attack.
Cinderweb Drones are large adds which will spawn, one at a time, at roughly one minute intervals throughout Phase One. The very first spawn will occur about 40 seconds into the fight. Like Beth'tilac herself, Drones also have Fire Energy bars. The maximum capacity of their Fire Energy bar is 85, and it decreases steadily at one energy per second. When their bar fully depletes, they climb up to Beth'tilac and cast Leech Venom draining what ever is left of her own Energy Bar. After 20 seconds, they return to the ground level.
Drones should be killed before their Fire Energy Bar reaches 0 and should never be allowed to drain Beth'tilac's energy bar, as this will shorten the length of time until the next Smoldering Devastation and will speed up Phase One, considerably lessening the amount of DPS you can do the boss. Doing so will cause the boss to enter Phase Two with too much health, resulting in a wipe to the soft enrage mechanic.
In addition to these mechanics, they perform powerful melee attacks. Whenever they come in contact with a Cinderweb Spiderling, they will Consume it, healing themselves for 20% of their maximum health and gaining a stacking buff which increases their damage done and movement speed by 20% for each Spiderling consumed.
Your raid's general aim is to tank and kill these adds while preventing them from consuming any Spiderlings.
Strategy
We will divide the strategy section into two sections: one for tanks assigned to the ground level and one for tanks assigned to Beth'tilac's level.
Ground Level Tanking
Despite the seemingly chaotic nature of the encounter, tanking on the ground level is fairly simple.
To begin with, you should pull the boss and taunt as many Cinderweb Spinners as possible, so that they come down from their web filaments. During this time, you can also apply some DPS to these Spinners, while watching out for the first Drone spawns.
Once Cinderweb Drones spawn, you should pick them up and tank them facing away from the raid. It is advised to have a set tanking location, as some DPS players will have the task of slowing Spiderlings heading for the drone, and having a fixed location facilitates this.
Indeed, as mentioned above, Spiderlings should never be allowed to reach a Drone, as they will heal and buff it. As a tank, you should be prepared to move the Drone away if you notice Spiderlings coming too close.
Drones melee quite hard and their breath attack is very damaging as well, so be prepared to use defensive cooldowns.
Other than this, simply taunt down Spinners whenever you are not tanking a Drone and have some spare time, and that is all that Phase One requires you to do!
Beth'tilac Level Tanking
As mentioned above, Beth'tilac will damage your raid with Venom Rain as long as there is no one at her level. For this reason, your raid will assign some people to climb up to her level quickly, using the web filaments left behind by Cinderweb Spinners.
If you are assigned this task, then your duties during Phase One are as follows:
- Begin the fight by taunting down Cinderweb Spinners so that they descend to ground level, and attack them.
- Once at least two filaments are available (one for yourself and one for your healer), you should right click one and be taken up to Beth'tilac.
- Once on Beth'tilac's level, you should simply tank the boss until such a time that her Fire Energy bar becomes depleted. When this happens, you need to jump down from her web, through a gap located around the center.
After completing this sequence of events, when you find yourself at the ground level again, simply repeat the first step until web filaments become available again, and climb back up to repeat the cycle.
Phase Two
As soon as the third and last Smoldering Devastation has been cast, Beth'tilac will descend from her web and you will have entered Phase Two.
Abilities
During this phase, Beth'tilac will retain Ember Flare, dealing damage to all enemies on the ground level in the same way that she did during Phase One on her web. In addition to this, she gains the following abilities:
- Frenzy: a stacking buff which increases Beth'tilac's damage done by 5% per stack. A stack is added every 5 seconds. It acts as a soft enrage timer and this is the reason you want to have the boss as low on health as possible when entering this phase.
- The Widow's Kiss: Beth'tilac places a debuff on the main aggro target, lasting 20 seconds. For the duration of this debuff, the tank will gain a stack of The Widow's Kiss every two seconds, reducing healing taken by 10% per stack. This effect will cease stacking (and disappear entirely) when the initial debuff drops off, so after 20 seconds in total. In addition to this, the tank affected by this debuff will deal damage to allies within 10 yards.
- Consume: this passive ability causes Beth'tilac to be healed for 10% of her maximum health by consuming any Cinderweb Spiderlings that may come in melee range of her.
Strategy
Both the ground level tank(s) and the Beth'tilac level tank will need to be involved in this phase. Beth'tilac's The Widow's Kiss will require tank switching as well as some more specific positioning from the tanks.
Because the tanks affected by The Widow's Kiss deal damage to allies around them, they must ensure to never be close to other raid members. We have prepared an image that illustrates correct raid positioning.
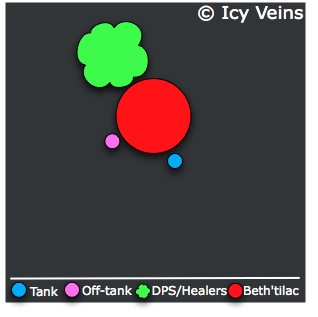
When a tank becomes affected by The Widow's Kiss, the other tank should taunt Beth'tilac, and this rotation should continue until the end of the fight. Due to the positions mentioned above, no one should ever be damaged by the AoE from The Widow's Kiss.
Defensive cooldowns should be used towards the end of the phase, when both melee and fire damage from Beth'tilac is greatly increased.
Heroic Mode
The heroic mode of Beth'tilac is a true test of both your raid's ability as well as gear. It provides very tough challenges for both DPS players and healers, and will require excellent execution to defeat.
Differences from Normal Mode
Before delving into the actual changes, it should be noted that all abilities deal more damage in heroic mode, and Beth'tilac as well as all of her adds have increased health. This will prove to be a brutal gear check for your healers, as well as for your DPS who will find it very hard to kill the boss before the soft enrage wipes the raid. Tanks, however, continue to have a relatively easy task.
The relevant changes from normal mode are:
- Cinderweb Drones will occasionally Fixate on random raid members (only those on the ground level are susceptible to this). This causes the Drone to attack that target, ignoring any aggro, for 10 seconds. During this time, the Drone deals 75% reduced damage.
- Cinderweb Spinners gain a new ability, Fiery Web Spin. If left hanging from their web filaments, they will occasionally cast this ability on random raid members, stunning them for 25 seconds. It is interruptible.
- A new type of add, called Engorged Broodling, will spawn regularly during the encounter. These adds fixate on random raid members and run to them at a high speed. When coming in melee content with a player, they detonate and explode for 50,000 Nature damage (Volatile Burst) in an 8 yard radius. This also leaves a poison puddle on the ground (Volatile Poison) which deals high nature damage to anyone standing in it (and also slows their movement speed).
Strategy Changes
From a tanking perspective, the fight does not change at all. The only difference in execution is that, as the ground level tank, you should tank the Cinderweb Drones in the center of the arena, in order to allow for better detonations of Engorged Broodlings (not something you ever need to concern yourself with).
Also remember that, occasionally, the Drones will fixate on random players and you will lose aggro, but they will return to you as soon as the fixation is over (10 seconds).
You should, at all times, avoid standing in the Volatile Poison puddles on the ground, as they deal large amounts of damage (though they should never be located in the center, if your raid is handling them properly).
The Beth'tilac level tank will notice no differences. Likewise, Phase Two remains unchanged, with the exception of Beth'tilac dealing more damage.
- Priest Hero Talent Feedback: April 22nd
- Final Amirdrassil Season 3 Raid DPS Log Rankings
- Season of Discovery Class Tuning: April 23rd
- Revival Catalyst Charges Will Reset Tomorrow
- Patch 10.2.7 Launches on May 7th
- MoP Remix Launches May 16th?
- Jewelry Can Have 2 Sockets in The War Within
- Updated Season 4 Awakened Raid Schedule