Guarm Strategy/Tactics for Normal/Heroic
Table of Contents
General Information
On this page, you will find a working strategy to defeat Guarm in Trial of Valor for both Normal and Heroic modes, which usually only differ by the tuning of the boss.
Here, we assume that you have read our descriptions of the abilities for this encounter.
The other pages of our Guarm guide can be accessed from the table of contents on the right.
About our Reviewer
This guide has been reviewed and approved by Pottm from Serenity.
Positioning
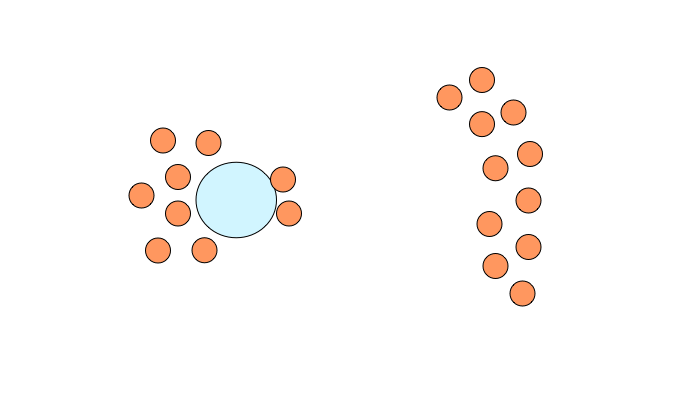
The fight against Guarm is all about positioning. We advise ranged raid members to position themselves at maximum range in front of Guarm while melee remain behind him. At all times, players should loosely spread out (5 yards), to reduce the effects of Licks. The image below shows how the raid should be positioned, with the boss facing the two tanks, the melee group behind and the ranged group far in front of the boss.

Positioning in this way will help dealing with both ![]() Flashing Fangs
and Guardian's Breath.
Flashing Fangs
and Guardian's Breath.
- When
 Flashing Fangs is cast, there is nothing to do, the boss
hits the tanks, but the melee and ranged groups have nothing to do.
 - When Guardian's Breath is cast, players should go stand in the damage area that they have been assigned to (Shadow, Frost, or Fire) and stick to it until the end of the encounter. We advise to decide ahead of time which groups/players will stand in which damage area. The positioning above makes it easy to move in once the cast starts.
![]() Headlong Charge does not require any positioning to avoid. Simply
move out of Guarm's path and you will be fine.
Headlong Charge does not require any positioning to avoid. Simply
move out of Guarm's path and you will be fine.
Regarding the timing of abilities, there are two things to note.
- A Lick (either
 Shadow Lick,
  Frost Lick, or
  Flame Lick) is always
cast before a Guardian's Breath, so while players move in to stand in the proper
breath, they still need to maintain a 5-yard distance.
  Headlong Charge is always cast a few seconds after a
 Roaring Leap, so it is important for players to be aware of this and reposition
following a Roaring Leap with the next Headlong Charge in mind.
Tank Concerns
The fight does not require tank swapping, but a second tank needs to always be next
to the main tank, because of ![]() Multi-Headed.
Multi-Headed.
Guarm should be kept in the position shown in the image above, in the previous
section. He needs to be picked back up after ![]() Roaring Leap and
Roaring Leap and ![]() Headlong Charge.
Headlong Charge.
Healing Concerns
Most of the damage in the fight is avoidable, so most of the healing concerns are
about healing avoidable damage that was not avoided and the tank damage from
melee attacks and ![]() Flashing Fangs.
Flashing Fangs.
Special care needs to be given to Licks.
- The healing absorption effect from
 Shadow Lick needs to be cancelled by healing the affected players.
 - The freeze/stun effect from
 Frost Lick needs to be dispelled (for mass dispels, ask a Shadow Priest for help).
 - The DoT effect from
 Flame Lick needs to be healed through.
Bloodlust/Heroism/Time Warp
We advise you to use ![]() Bloodlust/
Bloodlust/![]() Heroism/
Heroism/![]() Time Warp at the pull.
There will be a Guardian's Breath 15 seconds afterwards, but it is the first one, so people
do not have yet to stand in a specific breath, resulting in it being the easiest Guardian's Breath
to handle. There will be a
Time Warp at the pull.
There will be a Guardian's Breath 15 seconds afterwards, but it is the first one, so people
do not have yet to stand in a specific breath, resulting in it being the easiest Guardian's Breath
to handle. There will be a ![]() Headlong Charge towards the end of the effect, but it still
remains the best time to cast Bloodlust/Heroism/Time Warp.
Headlong Charge towards the end of the effect, but it still
remains the best time to cast Bloodlust/Heroism/Time Warp.
- How to Easily Get Multi-Player Required Achievements Solo
- AI Bot Warfare: (Mildly) Sabotage Bots by Talking to Them
- The Most Popular Specializations in Mythic+ in Dragonflight Season 3 Week 22
- Great Vault Requirements in Dragonflight Season 4
- Rare Mounts Available for Purchase in MoP Remix
- Clever Workaround for Death Knight Runeforging in MoP Remix
- Hunter Tier Sets and Bonuses in Dragonflight Season 4
- WoW Remix: MoP Overview Video
- Vanilla Nostalgia Thread
- Enhancement Shaman Leveling
- Holy Priest
- mana/health bar in the middle of my screen?
- Warlock Pet Customization Options Guide