Nefarian Healer Strategy Guide (Heroic Mode included)
Table of Contents
Introduction
This guide is intended to provide a comprehensive description of the encounter with Nefarian in Blackwing Descent. It is mostly targeted to healers who desire to have a short but detailed overview of what is expected of them during that fight.
This guide is updated for World of Warcraft WoD 6.1.2.
The Nefarian encounter is, at all points, very stressful to healers. However, understanding the mechanics of encounter as well as the avoidability and predictability of the incoming damage can make this fight much easier.
Healers will have to handle sustained, heavy tank damage for most of the encounter, coupled with bursts of raid damage.
Overview of the Fight
The fight against Nefarian is a three phase encounter. Phase One begins when your raid first engages Onyxia, and lasts until Onyxia dies. During this phase, your raid will have to face off against Nefarian and Onyxia together, and handle Onyxia's rather unique electricity resource (detailed below). In addition to this, several adds must be dealt with.
During Phase Two, the platform where you were fighting Nefarian and Onyxia will become covered in lava, and your raid members will need to jump up onto three metal pillars in order to avoid dying. Your raid will have to deal with three adds which must be interrupted and killed, while also receiving regular, unavoidable damage from Nefarian (who flies in the air and is not tanked). When all three adds are dead, or 3 minutes have gone by, Phase Two ends, and the lava subsides.
Phase Three is a balance between burning Nefarian and carefully controlling adds, which ends when Nefarian reaches 0% health or your raid wipes.
Nefarian and the adds from Phase One retain all of their Phase One abilities when going into Phase Three (where Nefarian gains an additional ability).
Phase One
During Phase One, your raid will have to face Onyxia, Nefarian and adds called Animated Bone Warriors.
We shall list the relevant abilities for this phase, and then discuss its strategy.
Abilities
Onyxia has the following abilities:
- Shadowflame Breath: a frontal cone breath attack.
- Tail Lash: a tail attack which also stuns for 2 seconds.
- Lightning Discharge: an ability which causes heavy Nature damage to players located at Onyxia's sides.
- Electrical Overload: Onyxia has an Electricity bar which gradually fills up over time. Electrical Overload happens when the bar reaches maximum capacity, and causes her to explode, wiping your raid.
Nefarian has the following abilities:
- Shadowflame Breath (identical to Onyxia's);
- Tail Lash (identical to Onyxia's);
- Electrocute: every time Nefarian loses 10% of his health, he deals a massive amount of unavoidable raid-wide Nature damage.
There are also 5 (10-man) or 10 (25-man) adds, called Animated Bone Warriors, which will either be off-tanked or kited. They are of no concern to you, as a healer.
The phase ends when Onyxia dies.
Strategy
During this phase, your raid's aim is to bring Nefarian down below 80% health (so, triggering two Electrocutes) and killing Onyxia before her Electricity bar reaches maximum.
Positioning
Your raid will first focus their DPS on Onyxia, and when she reaches low health, they will switch over to Nefarian. As a healer, this affects your positioning because you will employ two locations throughout the phase.
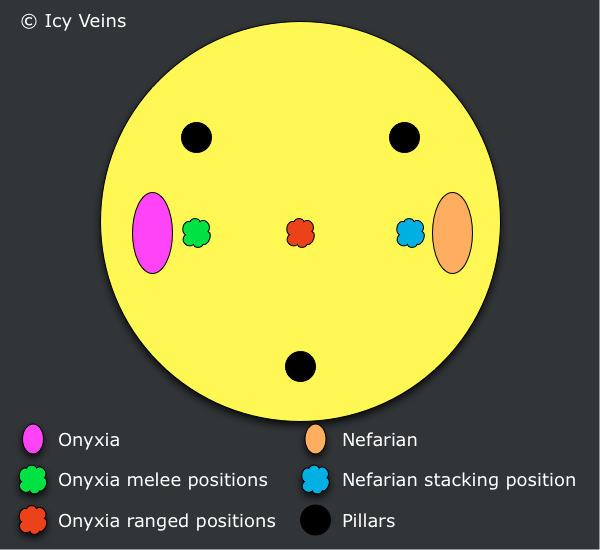
At first, Onyxia will be tanked over to the side, with her side facing the center of the arena. This will ensure that no one but the tank is damaged by her breath, and no one is damaged by her Tail Lash.
Your whole raid should stack in the center of the arena, where they will be safe from most sources of damage.
If you are assigned to heal the Onyxia tank, you may want to set up your location in her melee range (at her side).
Whenever Onyxia is about to cast Lightning Discharge, her tank will turn her so that her tail faces the center of the arena. While this may lead to the raid being hit by Tail Lash, it will ensure that no one gets damaged by Electrical Discharge, which is much more deadly. If you are in Onyxia's melee range, do not move with her.
Once Onyxia is brought to low health, everyone should switch over to Nefarian, and move within his melee range. The only exceptions to this are Onyxia's tank and their healer. By being at Nefarian's side, you and everyone else except for the tank will be safe from breath or tail damage.
Once Nefarian is low enough, your raid will quickly finish off Onyxia, triggering Phase Two.
Damage Sources
There are a great many sources of damage in this phase. Fortunately, most of the damage is avoidable, and any successful attempt will involve your raid avoiding it.
In addition to heavy tank damage from both melee attacks and Shadowflame Breath, all of which is unavoidable, you will have to heal through two Electrocutes. While the damage caused by this ability is extreme (remember, it happens each time Nefarian loses 10% health, so during this phase it will occur at 90% and 80% health), there is ample time in between the two Electrocutes, allowing you to heal the raid up with mana-efficient heals.
There may be some additional damage, to the add-tank, or to the kiters of the adds. This damage will be rather unpredictable, and will depend highly on your tank/kiter's ability to avoid it. The adds become inactive towards the end of the phase, at which point they will not cause any more damage.
Before an Electrocute is about to happen, you should aim to have the entire raid topped off, focusing especially on the tanks, as damage on them can be brutal when it is coupled with a Shadowflame Breath. It is advised that tanks have a cooldown up for this time.
Phase Two
Phase Two is extremely simple. The arena becomes flooded in lava, shortly after Onyxia dies. Nefarian flies up into the air (from where he does some random, unavoidable damage to a few raid members every couple of seconds).
In order to avoid damage from the lava, you will have to swim up to its surface and jump on top of one of the three metal pillars. Your raid leader will assign you to a pillar, and it is important that you stick to your assignment. In 10-man difficulty, you will be the only healer on your pillar, while in 25-man, 2 healers per pillar is to be expected.
Other than swimming out of the lava and on to your designated pillar in a timely fashion (the lava deals high damage), there is only one thing for you to keep in mind during this phase: Shadowflame Barrage, caused by Nefarian.
This ability will hit players at random, for moderate amounts of damage. It is unavoidable and must simply be healed through.
Each of the three pillars has a Chromatic Prototype on it. The add has no aggro table and does not cast melee attacks. Its only action is to cast Blast Nova regularly. This ability has a 4 second cast time and it must be interrupted each time it is cast, as it otherwise deals a large amount of raid-wide damage (which will most likely cause a wipe).
When all three Chromatic Prototype adds are dead, or 3 minutes from the end of Phase One, Phase Three begins.
Lastly, depending on your strategy, your raid leader may ask your DPS players to bring Nefarian down below 70% in order to cause another Electrocute. If this happens, you will have to make sure that your pillar is topped off prior to it.
Phase Three
Phase Three is very similar to Phase One, but is much simpler. You will once again face Nefarian, who will this time, most likely, be tanked in the center of the arena.
As a healer, you should position yourself at Nefarian's side (where the rest of the raid will be stacked, as well).
He retains the same abilities from Phase One (breath and tail attacks, Electrocute) while also regularly causing fire on the ground. This fire spreads, and spreads faster if it damages players. Essentially, this should be of no concern to you as it should be targeting the adds, which are being tanked by your off-tank. If the fire does, however, come close to your location, move to avoid it.
One tank will tank Nefarian, while the other will tank the Animated Bone Warriors. The adds will alternate between periods of activity and inactivity, and will sometimes not be in range of the off-tank. For these reasons, damage on the off-tank will be unpredictable, but when the adds do melee them, it will be very high - so it is advised that they are always kept topped off.
In terms of damage sources, the only real concern are the Electrocutes, as they are the only unavoidable damage outside of tank damage. It is advisable to have raid cooldowns up for as many of them as possible.
Various kinds of avoidable sources of damage continue to exist, such as Nefarian's breath and tail attacks, and the fire on the ground.
During this phase, your raid will most likely use
![]() Heroism/
Heroism/![]() Bloodlust/
Bloodlust/![]() Time Warp.
Time Warp.
Heroic Mode
The heroic mode of Nefarian is a most unforgiving encounter. It is very similar to the normal mode, with two key differences, as well as a few minor ones.
Differences from Normal Mode
In the following sections, we list the key differences from normal mode, as well as the less relevant differences.
To sum up, however, the fight will feel very similar to normal mode, throughout its entirety.
Stolen Power
During Phases One and Three, every 15 seconds, Nefarian casts Dominion on 1 random player in 10-man difficulty and 5 in 25-man difficulty (though it cannot target tanks). This acts like a mind control. Players affected by it have their action bar replaced by two buttons, corresponding to the following abilities:
- Free Your Mind: instantly breaks the player out of the mind control.
- Siphon Power: stacks a buff (Stolen Power) on the player. It has no cooldown and it is instant cast.
Stolen Power stacks up to a maximum of 150 stacks, and each stack provides a 3% increase to damage and healing done, for a grand total increase of 450%.
When a player is mind controlled, their character will begin to run towards a portal (a line linking the player to the portal will make this even clearer). When the player reaches the portal, he is instantly killed.
As such, while under the effects of Dominion, you have no control whatsoever over your character, except to break out of the mind control or stack Stolen Power. While useful for healers, Stolen Power is essential for DPS players, in order to beat the enrage timer.
As a healer, stacking Stolen Power is not generally advised, though it can be used successfully. We will detail this below, but as a rule, you will want to break out of the mind control as soon as possible.
Explosive Cinders
During Phase Two, every 20 seconds, Nefarian will cast Explosive Cinders on 1 random player in 10-man difficulty and 3 in 25-man difficulty. This places a debuff on the target. After 8 seconds, when the debuff wears out, the player explodes, dealing a moderate amount of damage to and knocking back any players within 8 yards.
Simply put, players affected by this will need to jump off their pillar and into the lava when their debuff is about to run out, have it explode away from other players, and then make their way back to the pillar.
It is a very simple and straightforward ability, but it can cause complications when it targets multiple healers on the same pillar.
Other Changes
There are a few other, minor, changes to abilities in the encounter:
- 6 (10-man) and 12 (25-man) Animated Bone Warriors spawn, up from 5/10. They also deactivate after 50 seconds, up from 33 seconds on normal mode.
- Blast Nova's cast time has been reduced to 1.5 seconds.
- Shadowblaze Spark is cast a higher frequency during Phase Three.
- Phase Two ends with the death of the first Chromatic Prototype, and Nefarian will land even while the other(s) are still alive. The 3 minute maximum duration of the phase still exist.
Additionally, all of the mobs in the encounter have increased health, and all of their abilities deal considerably more damage.
Strategy
The strategy for the encounter is extremely similar to normal mode, from positioning to assignments, in all phases. The only notable differences come from using Dominion to your advantage, and the potential complications during Phase Two, due to Explosive Cinders.
Dealing with Dominion
Regarding Dominion, you can stack Stolen Power, but only do so when there is no immediate damage incoming. For example, it's ok to stack Stolen Power immediately after an Electrocute, provided that you are not assigned to healing one of the tanks.
A few other things which you should keep in mind about Dominion are:
- Players who are under Dominion cannot be healed, nor do they receive damage from Nefarian or Onyxia, or any of the adds.
- Players who are under Dominion and whose portal path takes them in front of Nefarian should break their mind control immediately, as his breath will instantly kill DPS players on heroic mode.
- Players should pay attention to when the next Electrocute is about to occur, and break their Dominion early in case they are low on health, so that healers have enough time to heal them. Keep in mind that, provided you have enough time before reaching your portal (allowing you to stay under Dominion), it is possible to entirely bypass the damage from Electrocute.
- Players getting targeted twice (or more) in a row by Dominion should only cast Siphon Power once to refresh their 150 stacks (assuming they have 150 stacks already), and then break the mind control, to maximise their time DPSing.
Phase One
The strategy during Phase One remains identical to normal mode, with the obvious exception of dealing with Dominion as described above, though this does not influence anything in practice, especially for healers.
However, there are additional sources of potential damage: players who are mind controlled may get cleaved or otherwise damaged by AoE attacks from your non-mind-controlled raiders. This can and should always be avoided - but it is something for you to keep in mind. It's of particular usefuless to dispel raid members who just exited Dominion, as various debuffs may slow their attack speed.
Phase Two
During Phase Two, while having to keep a much closer eye on the casts of Blast Nova, you must also pay special attention to Explosive Cinders.
If you are targeted by this ability, wait until you have 3-4 seconds left on the debuff before moving out (into the lava) and then back once you have exploded. We recommend strafing out to left or right, off of the pillar, and then strafing back towards it. This makes it easier to jump back on the platform, as you can clearly see where it is and it does not affect your camera's angle.
Paladins (![]() Divine Shield) can get rid of the Explosive Cinders without
any negative effects (ie. it will not blow up the platform).
Divine Shield) can get rid of the Explosive Cinders without
any negative effects (ie. it will not blow up the platform).
Phase Three
Phase Three is arguably the simplest and easiest one for healers. Simply stand at Nefarian's side and heal your assigned target(s), while being prepared to move (switching sides) in case the fires from Shadowblaze Spark come too close.
- Crush Season 4 Mythic+ with Quazii Plater
- Black Temple Timewalking Cache Gear Cannot Be Catalyzed
- How to Upgrade Fyr'alath and Nasz'uro in Dragonflight Season 4
- Black Temple Timewalking Chest Has a Chance to Contain Ashes of Al'ar!
- Tama's Dragonflight Helper WeakAura Updated for Season 4
- Grim Batol Boss Model Updated in the War Within
- Timewalking Cache Hotfix, Items Sent Out to Affected Players
- Splintered Spark of Awakening Clarifications