Ragnaros Tank Strategy Guide (Heroic Mode included)
Table of Contents
Introduction
This guide is intended to provide a comprehensive description of the encounter with Ragnaros in Firelands. It is mostly targeted to tanks who desire to have a short but detailed overview of what is expected of them during that fight.
This guide is updated for World of Warcraft WoD 6.1.2.
Ragnaros is the 7th and final boss encounter in the Firelands raid instance. He is, by far, the most complex encounter, and arguably the most difficult one.
During this fight, tanks have the easiest task. Tanking the boss requires regular tank swapping while some transition phases require adds to be handled in a simple manner.
Overview of the Fight
The Ragnaros encounter is a complex fight, split into three phases, separated by two transitional phases. For ease of understanding, we will list all of the phases, their triggering and concluding factors, and the names we are going to use for them.
- Phase One lasts from 100% to 70% of Ragnaros' health.
- The First Transition Phase lasts until all the adds spawned during it (Sons of Flame) are dead, but no longer than 45 seconds.
- Phase Two lasts from the end of the First Transition Phase until Ragnaros has 40% health.
- The Second Transition Phase lasts until all Sons of Flame are dead, but no longer than 45 seconds.
- Phase Three lasts from the end of the Second Transition Phase until the boss reaches 10% health, at which point he is defeated.
Ragnaros is stationary for the entire duration of the encounter, and there is a mechanic in place which punishes the raid gravely if Ragnaros' tank is not in his melee range.
Phase One
Because of a stacking, damaging debuff applied by the boss on the tanks the fight requires the use of two tanks who will regularly taunt off of each other. Other than that, with proper positioning, most of the dangerous abilities can be easily avoided, making this phase rather simple.
Tanking Ragnaros
Ragnaros performs a melee attack, which hits for around 33,000 damage, in both 10 and 25-man difficulty, roughly every 2 seconds. This melee attack is retained throughout Phases Two and Phase Three.
Burning Wound is a stacking debuff placed by Ragnaros on his current tank. It deals around 6,000 Fire damage every 2 seconds, its duration is 20 seconds, and it stacks roughly every 5 seconds. Dealing with Burning Wound requires two tanks who have to taunt the boss off of each other, approximately every 4-5 stacks, to keep the damage done by this ability under control.
Burning Blast is a side effect of Burning Wound. This buff is applied on Ragnaros' current tank and its effect is increased as stacks of Burning Wound increase. Burning Blast will amount for a large portion of the damage done by the tanks on Ragnaros.
When not in melee range of Ragnaros, his tank is the target of Magma Blast, which inflicts a large amount of Fire damage that increases with each application. It eventually results in the death of the tank, if they remain at range for too long. Ragnaros' hitbox is so large that this ability should never damage the tanks.
Positioning
During Phase One, tanks need to remain as close as possible from Ragnaros and at least 6 yards away from their closest neighbors. The justifications for this positioning are the following:
- being close to Ragnaros enables the tanks to avoid entirely the Sulfuras Smash ability, as the lava waves it creates do not travel towards Ragnaros.
- being at least 6 yards away from everyone else ensures that Wrath of Ragnaros does not knock up anyone else than those targeted by this ability.
Hand of Ragnaros will regularly knock the tanks back. In this case, simply run back to to the boss while avoiding to walk in any fiery zone that would indicate that Ragnaros is going to smash the area shortly with Sulfuras Smash.
Damage
Besides the damage from Ragnaros on his tanks, which we have already detailed, the raid will regularly have to detonate traps (Magma Trap). These traps remain for the entire duration of the fight if they are not triggered, making it increasingly difficult to move around. One DPS player will be assigned to detonating the traps (Magma Trap Eruption), and will usually do so when everyone is rather high on health so as to avoid unfortunate deaths. In theory, tanks should not be too concerned about these traps as they deal rather moderate damage.
First Transition Phase
Splitting Blow marks the end of Phase One and the beginning of the First Transition Phase. After an 8-second cast, Ragnaros will strike the area indicated by a clearly visible ground effect with his hammer, then he will disappear in his lava pool for the entire duration of the transition phase.
When Ragnaros' hammer strikes the platform, 8 fiery balls will travel to locations clearly marked by fire jets (they appear well before the cast finishes). Once a fiery ball arrives at its destination, it transforms into a Son of Flame.
These 8 Sons of Flame, which have relatively low health, travel towards the hammer. They cannot be tanked or taunted and they slow down as their health decreases (Burning Speed). Whenever a Son of Flame reaches the hammer, it triggers Supernova, which will probably wipe the raid. Therefore, these adds must be killed before they can trigger Supernova.
Ideally, the raid leader will have assigned everyone 2 or 3 Sons to
focus on. Since tanks have a lower damage output than DPS, they should
try to slow their assigned Sons, preferably those closer to the
hammer. Unfortunately, Sons are immune to most slow abilities, forcing
players to resort to stun abilities. Death Knights can also use
![]() Death Grip.
Death Grip.
Additionally, Ragnaros will regularly target random raid members with Lava Bolt, which cannot be avoided.
Phase Two
Phase Two starts as soon as all the Sons of Flame are dead. If 45 seconds into the First Transition Phase, some Sons are still alive, Phase Two starts anyway.
This phase is very similar to Phase One, with one notable exception, which greatly affects positioning.
Tanking Ragnaros
Ragnaros retains his melee attack, Burning Wound, Burning Blast, and Magma Blast from Phase One, and no new tanking-related ability appears. Therefore, tanking Ragnaros is identical to what it was in Phase One.
Also, Magma Traps are no longer spawned by Ragnaros, removing the damage that their forced detonations were dealing.
Positioning
Wrath of Ragnaros and Hand of Ragnaros do not come back in Phase Two. Therefore, there is no knock back/up to expect. However, the 6-yard spacing must still be respected because of Molten Seed, a new ability that Ragnaros gains in Phase Two.
From time to time, Engulfing Flame will cover part of the platform with fire, forcing everyone, tanks included, to move.
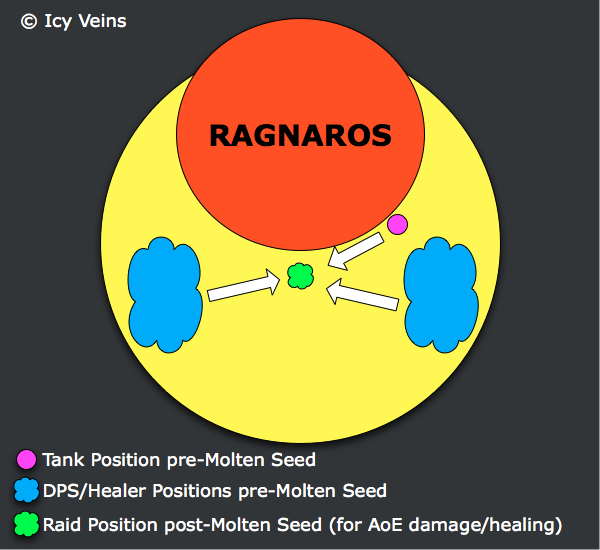
Dealing with Molten Seed
Dealing with Molten Seed requires precise movement from the raid, tanks included. This ability places a Molten Seed at the feet of 10 players in 10-man difficulty and 20 players in 25-man difficulty. This causes 40,000 Fire damage to all allies within 6 yards (hence why spreading out is important). Ragnaros casts this ability exactly every 60 seconds.
The locations where the Molten Seeds are placed explode after a short while, dealing, dealing 100,000 Fire damage to all raid members. This damage decreases the farther away from the Molten Inferno the player is. For this reason, the raid should prepare for Molten Seed by spreading out on the sides of the platform (on one side in 10-man), and then stack together in the middle (preferably close to the boss to prevent damage from Magma Blast and Sulfuras Smash), after Molten Seed has been cast, in order to reduce the damage taken by the explosions (since it is distance-related) and make healing more efficient.
Each explosion spawns a Molten Elemental. These adds do not have normal aggro tables. Instead, they fixate on random raid members. They have low health and do not melee hard. Since the raid is stacked up, the elementals will come to the stacking position and need to be AoE-ed down.
Once the elementals are dead, everyone goes back to their original position.
The diagram below illustrates the necessary movement (note that 10-man groups only need to use one side of the platform):
Dealing with Engulfing Flames
Approximately every minute, Ragnaros chooses a third of his platform to engulf in fire with Engulfing Flame. For this purpose, the platform is divided in three slices, from Ragnaros' position towards the exterior:

Players in the affected part of the platform must move away immediately to avoid taking massive amounts of damage.
This ability can sometimes be cast shortly after Molten Seed, potentially requiring the raid to move their stacking position further from the boss.
Second Transition Phase
The Second Transition Phase is identical to the First Transition Phase, with one exception: two Lava Scions will spawn. Each tank needs to pick up a Lava Scion (alternatively, one tank can pick them up both). They have relatively high health and melee for a moderate amount.
Lava Scions have an ability that they cast on random members, causing them to leave a trail of damaging fire patches behind them. Tanks cannot be targeted by this ability but they need to be careful not to make their Lava Scion walk in the fire patches, as they would get healed for 10% per second.
Despite the presence of the Lava Scions, tanks should still try to stun and knock back Sons of Flame, as they remain the priority targets in this phase. The Lava Scions will only be killed at the beginning of Phase Three.
Phase Three
Phase Three starts as soon as all the Sons of Flame are dead. If 45 seconds into the Second Transition Phase, some Sons are still alive, Phase Three starts anyway.
From Phase Two, Molten Seed disappears. Ragnaros now regularly summons adds called Living Meteors.
Tanking Ragnaros
Ragnaros retains his melee attack, Burning Wound, Burning Blast, and Magma Blast from Phase One and Two, and no new tanking-related ability appears. Therefore, tanking Ragnaros is identical to what it was in Phase One and Two.
Early in the phase, while the DPS have not yet killed the Lava Scions, tanks will need to contend with these adds while tanking Ragnaros. There are two possible strategies. Either each tank takes one Lava Scion, regardless of who is tanking Ragnaros, or one tank takes Ragnaros while the other takes the Scions (and when they swap, they exchange Ragnaros for the Scions).
Positioning
Ragnaros retains Engulfing Flame and Sulfuras Smash. Engulfing Flame needs to be dealt with in the same way as previously. Sulfuras Smash is more relevant in Phase Three as it was for Phase One and Two. Indeed, during Phase Three, adds called Living Meteors will regularly spawn and fixate on a random player (but not on a tank). To make things short, these adds are kited around by the DPS players and the healers. Standing within 4 yards of them results in an instant death. Therefore when avoiding Living Meteors coming your way, it is important to watch out for Sulfuras Smash and not stand where it will hit, nor in the path of the resulting lava waves.
Heroic Mode
The heroic mode of the Ragnaros encounter, while being by far the most challenging fight of this tier of content, is quite easy for tanks.
Differences From Normal Mode
The most noticeable difference from normal mode, for tanks, is the existence of an all-new, heroic-only Phase Four. This phase occurs after Ragnaros reaches 10% health. In addition to this, there are a few changes for each other phase, but they are of little consequence.
Phase One
- Each time a Magma Trap is detonated, the entire raid is debuffed with Magma Trap Vulnerability. This debuff lasts 45 seconds and it increases the damage taken from Magma Trap Eruption by 50%.
- All abilities in this phase deal considerably more damage.
First Transition Phase
- Son of Flame spawn locations are no longer fixed. Instead, the Sons can spawn in any random formation, and your raid must adapt to this on the fly.
- Sons of Flame have increased health, and all abilities do increased damage.
Phase Two
- Engulfing Flame is replaced by a new ability, called World in Flames. This ability essentially chains 4 Engulfing Flame eruptions together, over the course of around 12 seconds. The eruptions follow the exact same positions as Engulfing Flame, and the order in which these come is completely random.
- Molten Elementals gain a buff called Molten Power, which increases their damage done by 25% for each Molten Elemental in their proximity, and also grants them immunity to snares.
- All abilities in this phase deal considerably more damage, as do the adds. The adds also have increased health.
Second Transition Phase
As with the first transition phase, the spawn locations of Sons of Flame are random. Other than this, and increased health and damage done, there are no changes.
Phase Three
Phase Three is unchanged, with the exception of the fact that World in Flames is present here as well, in place of Engulfing Flame.
Phase Four
Phase Four is an entirely new phase, present only in heroic mode. Ragnaros submerges at 10% health, as in normal mode. However, he is shortly afterwards pulled back out by Cenarius, and you have to fight him once more.
At the start of the phase, Ragnaros is healed to 50% health, and he must be brought down to 0% to be killed. During this phase, your raid will have to deal with any Living Meteors which were spawned in Phase Three.
Ragnaros has the following abilities during this phase:
- Dreadflame is essentially fire on the ground. Ragnaros regularly casts this ability at random locations on the platform. The fire deals massive damage to anyone standing in it, and spreads, until it covers the entirety of the platform. Dreadflame fire patches can be extinguished by players affected by Deluge (covered below).
- Empower Sulfuras is an ability Ragnaros uses roughly every 50 seconds, throughout the phase. This ability allows him to imbue his weapon, causing his attacks to deal instant-wipe damage to the entire raid. During this time, he must be kited, which is made easier by Entrapping Roots (covered below).
- Superheated is a stacking debuff which Ragnaros applies on every raid member, for the entire duration of the phase. Each stack deals 4,000 Fire damage per second and increases Fire damage taken by 10%. This debuff can be reset through means of Breadth of Frost (covered below).
- Magma Geyser is an ability which Ragnaros uses to target any group of players which are clumped together (at least 4 players in 10-man and 10 players in 25-man). It deals a high amount of Fire damage, knocks players back and destroys any Breadth of Frost within 5 yards.
During this phase, three friendly NPCs come to your raid's aid: Cenarius, Malfurion Stormrage and Archdruid Hamuul Runetotem. They each provide your raid with various abilities which allow you to defeat Ragnaros.
- Cenarius casts Breadth of Frost about 15 seconds into the phase, and every 45 seconds after that. The first Breadth of Frost will expire as the third is being cast, and so on, such that there will always be, at most, two active at one time. The Breadth of Frost is a patch of ice on the ground. Any Living Meteor that touches the ice becomes stunned and takes 15000% increased damage. This destroys the Breadth of Frost. Breadth of Frost also grants players immunity from Superheated and resets any stacks of Superheated on the players.
- Malfurion Stormrage casts Cloudburst, only once, at the start of the phase. This allows designated raid members to gain the Deluge buff, which, in turn, allows them to deal with the Dreadflame.
- Archdruid Hamuul Runetotem casts Entrapping Roots. This places a green effect on the ground. If dragged over it, Ragnaros becomes entangled and is unable to move. This makes it easy to avoid anyone getting hit by him while Sulfuras is empowered.
Strategy
As a tank, the fight will greatly resemble normal mode, until Phase Four. After that time, you will have a few simple tasks to perform.
Phase One
Phase One remains unchanged, except that you will be taking more damage from all sources. Pay attention not to get knocked back into Magma Traps.
First Transition Phase
During this phase, more so than on normal mode, you will have to use your stun(s) efficiently on the Sons of Flame, and contribute with any DPS that you can muster.
They spawn random locations, so you have to be on the look-out for where you are most needed (or assigned).
Phase Two
During this phase, you will have two major tasks, other than tanking the boss: you will have to move properly for Molten Seed and you will have to avoid World in Flames.
For Molten Seed, your raid will stack up in a central location, and disperse just as the seeds are cast. This will ensure that no one is damaged by the seeds, that the subsequent explosions deal minimal damage and that the Elementals spawn together.
For your part, you will only have to position yourself in such a way that the Elemental which is attacking you is not near other Elementals, and apply some DPS to it if you can.
If you are a Death Knight tank, you should place a ![]() Death and Decay on
the location where the Elementals will spawn, so that it damages all of
them.
Death and Decay on
the location where the Elementals will spawn, so that it damages all of
them.
In the case of World in Flames, simply move away from Ragnaros when the flames are on the nearest location to him, and stay in his melee range, otherwise.
Second Transition Phase
The second transition phase is identical to its normal mode counterpart, with the exception of the random locations of Sons of Flame. Simply tank Lava Scions as assigned, and stun the Sons of Flame if possible.
Phase Three
With the exception of the World in Flames being present here as well, nothing changes from the normal mode. Keep in mind, however, that this phase is a massive DPS check for your raid, so any extra damage you can deal to Ragnaros at this time is extremely valuable.
Phase Four
As a tank, during Phase Four, you have very few things to keep track of. Understand that Ragnaros is now no longer stationary and can, thus, be moved.
Your concerns during this phase are:
- Do not get hit by any Living Meteors. They are the responsibility of DPS players, so do not concern yourselves with them too much.
- Use Breadth of Frost to reset your stacks of Superheated regularly. Keep in mind that if more than 3 (10-man) or 9 (25-man) players are in the same location, a Magma Geyser will occur, so only move to to the Breadth of Frost when it is safe (inform your raid of this).
- When Ragnaros channels Empower Sulfuras, quickly run away from him, and position yourself behind an Entrapping Roots area, so that the boss becomes entangled when running over it. After the buff from Empower Sulfuras expires, it is safe to tank him again.
- Always tank Ragnaros next to the Breadth of Frost which your raid is currently using, so that melee DPS players can attack the boss.
- Priest Hero Talent Feedback: April 22nd
- Final Amirdrassil Season 3 Raid DPS Log Rankings
- Season of Discovery Class Tuning: April 23rd
- Revival Catalyst Charges Will Reset Tomorrow
- Patch 10.2.7 Launches on May 7th
- MoP Remix Launches May 16th?
- Jewelry Can Have 2 Sockets in The War Within
- Updated Season 4 Awakened Raid Schedule