In a vibrant grove of eternal sunshine, the Everdawn Grove is besieged by corrupted beastmen. Their chieftain, Malgut the Fetid, threatens to destroy the great spirit of the grove, Akari the Everdawn Lord.
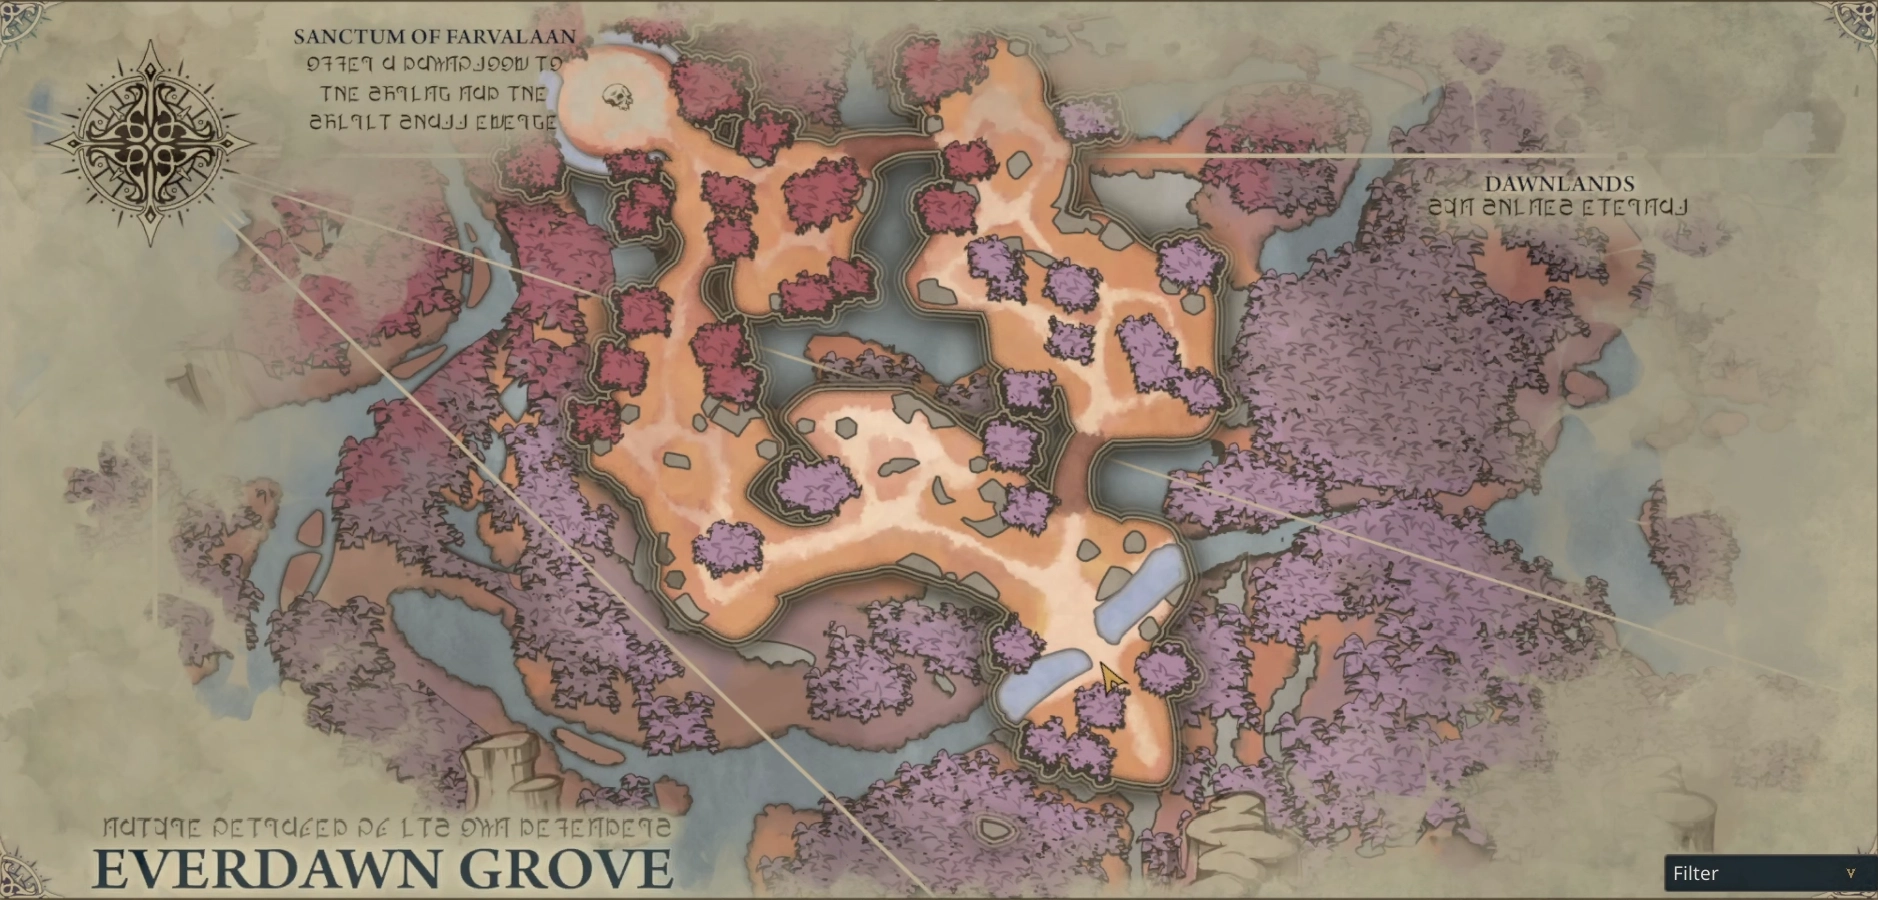
Everdawn Grove Map
Everdawn Grove Trash Mobs
| Enemy | Name | Score | Stunnable | Abilities |
|---|---|---|---|---|
 | Blighted Dawnbloom | 2 | Yes | Auto Attack Basic melee physical damage attack Blighted Ichor Deal damage to a random party member and nearby allies to target. Apply a high damage, stacking DoT. Glory On death, create a circle that heals targets inside over time. Heals enemies and allies |
 | Skittershard | 1 | Yes | Auto Attack Basic ranged physical damage attack Crystaline Corruption (Dispellable) (Adept+) On death, apply a party-wide, stacking DoT. 1 stack is removed each time the target receives a heal. |
 | Desecrator | 3 | Yes | Auto Attack Basic ranged physical damage attack Volley Channel a barrage of shots. Over the duration, create circles under random players that deal damage after a short delay. Infernal Explosive (Adept+) Throw a bomb near a random player. The bomb deals damage after a delay to those within the circle. If there is no target within the circle, deal heavy party-wide damage. |
 | Mangy Brute | 1 | Yes | Auto Attack Basic melee physical damage attack Bash Deal medium damage to target. |
 | Corrupted Totemic | 4 | Yes | Auto Attack Basic melee physical damage attack Shadow Lob (Interruptible) (Priority) Target a random player with a high damage attack. Restoration (Interruptible) After 3 seconds, restore life to self. Bloodstone Totem Summon a totem that continuously casts party-wide damage. Corrupted Prayer (Adept+) Create several ground effects that stun and deal heavy damage if a player steps in them. |
 | Outrunner | 2 | Yes | Auto Attack Basic melee physical damage attack Bola Throw Target a random party member, deal moderate physical damage and apply a slow. Charge (Adept+) Charges target if they go over a certain distance away, dealing moderate damage and knocking them up. |
 | Gorestained Butcher | 5 | No | Auto Attack Basic melee physical damage attack Furious Tanrum Channel, dealing party-wide, heavy damage over time. Mince (Adept+) Deal damage continuously to all targets in a small frontal cone while reducing the Gorestained Butcher’s movement speed. |
 | Horned Seer | 3 | Yes | Auto Attack Basic melee physical damage attack Pain Bolt (Interruptible) After 2 seconds, deal high damage to target. Orb of Blood (Interruptible) Target a random player and fire a slow moving projectile at them. On hit, if deals high damage and applies a debuff that increases damage taken by 20%. Sanguine Offering (Adept+) (Interruptible) (Priority) Summon several Orbs of Blood near random players that fire at them after a delay. |
 | Bloodstone Goliath | 5 | No | Auto Attack Basic melee physical damage attack Earthcore Upheaval Create a series of circles around the Goliath that triggers after a delay, beginning with the furthest ring from the Bloodstone Goliath. Players caught take heavy damage. Bloodstone Eruption (Adept+) Bloodstone Goliath erupts, dealing heavy damage that increases with each stack of Coalescing Bloodstone it has. Coalescing Bloodstone (Adept+) A stacking self-buff gained each time Bloodstone Goliath loses 10% of its max health. |
Notable Trash Enemy Abilities
Blighted Dawnblooms have a couple things to watch out for. Blighted Dawnblooms will target 1 party member with Blighted Ichor. If it’s on you, try to reposition to avoid hitting your teammates with it as it will apply a heavy damage, dispellable DoT. Their Glory ability requires repositioning the remaining enemies once the Blighted Dawnbloom dies. Glory places a healing AoE on the floor centered on the location it died. It will heal allies AND enemies.
Skittershards aren’t much to worry about until you reach Adept+. Once you reach Adept+, the Skittershards gain the Crystalline Corruption ability that applies a stacking DoT to all party members when a Skittershard dies. This is something for the healer to watch out for as the damage from the DoT can get out of hand fast when more than 3 stacks accumulate. Crystalline Corruption can be dispelled, and each stack can be removed with one tick of healing received on the target.
Desecrators have only one ability to worry about before Adept+: Volley. This ability is not kickable, but Desecrators are able to be stunned out of the channel. However, Volley’s AoE is avoidable and the stun cooldown might be better used for another purpose. In Adept+, Desecrators start casting Infernal Explosive. Infernal Explosive is a soak ability that only requires one person to soak to prevent high party-wide damage.
The Corrupted Totemic can summon a Bloodstone Totem that will periodically deal party-wide damage if left unchecked. Be sure to focus down the totem and interrupt their Restoration cast to prevent them from healing themselves. In Adept+, make sure to kick their Shadow Lob casts. Shadow Lob can easily one-shot in the higher difficulties. Letting the Corrupted Totemic cast Restoration can prolong an encounter with them, so it’s always a good idea to kick this ability to save time.
Outrunners aren’t much of an issue, even in Adept+ when then gain their Charge ability. Just be sure not to move too far away from where the tank is holding the Outrunners so that they don’t have the opportunity to use Charge. We want to avoid enemies leaving the clump that the tank worked so hard to gather together so we can easily cleave all enemies together.
Gorestained Butchers have a lot of health and are capable of a lot of damage. Always try to avoid pulling 2 Gorestained Butchers at once as their Furious Tantrum damage can get out of hand for the healer to deal with very quickly.
In Adept+, they will begin to use their Mince ability, something that the tank needs to avoid by kiting away. Make sure that you’re not in the path of where the tank is pulling the Gorestained Butcher as Mince does a high amount of damage to anyone in its path.
Horned Seers are casters whose spells can pack a punch. They have 3 spells that they cast: Shadow Bolt, Orb of Blood, and Sanguine Offering (Adept+).
- Their Shadow Bolt can do a lot of unavoidable damage to a single target.
- Orb of Blood ability that will do a high amount of damage to whoever is hit and applies a debuff that increases all damage dealt to the target by 20%. The Orb of Blood is aimed at where their target was at the start of the cast. As soon as you see the Orb of Blood being cast, you should be able to side-step it to avoid the damage from getting hit.
- In Adept+, the Horned Seers gain a new spell to cast: Sanguine Offering. This ability is like Orb of Blood, but much more chaotic and harder to avoid. Several Orbs of Blood will appear near random players that will fire after a delay. This ability is chaotic and harder to dodge than Orb of Blood, so it’s recommended to interrupt this cast when you see it.
The Bloodstone Goliaths have an avoidable ability, Earthcore Upheaval. This ability will summon a series of rings, from furthest to closest, and cause heavy damage and knocks up any party members hit. It is easier to avoid the closer you are to the Bloodstone Goliath. If you are a melee hero, there is a small area in the center of the rings that is safe, the center of where the Bloodstone Goliath began the cast.
In Adept+, Bloodstone Goliath will begin to accumulate Coalescing Bloodstone stacks for every 10% max health lost. These stacks increase the damage of their Bloodstone Eruption ability. This ability can become deadly if they have too many Coalescing Bloodstone stacks when Bloodstone Eruption detonates. Try to avoid focusing this target down too quickly, unless you are sure that your party can take them down before the Bloodstone Eruption detonates.
Route
We will go over one of the possible routes in Everdawn Grove. When choosing a route to take, we must remember to avoid pulling more than three caster mobs with priority interrupts and avoid overcapping the Kill Score requirement.

For a link to the interactive version of this route, click here.
| Pull | Pull Size | Kill Score | Enemies |
| 1 | 17 | 22 | 9 Skittershards, 4 Mangy Brutes, 3 Blighted Dawnblooms, 1 Desecrator |
| 2 | 10 | 20 | 5 Mangy Brutes, 2 Outrunners, 2 Horned Seers, 1 Desecrator, 1 Blighted Dawnblooms |
| 3 | 16 | 29 | 6 Outrunners, 6 Skittershards, 2 Mangy Brutes, 1 Bloodstone Goliath, 1 Corrupted Totemic |
| 4 | 11 | 26 | 3 Blighted Dawnblooms, 3 Outrunners, 2 Mangy Brutes, 1 Desecrator, 1 Corrupted Totemic, 1 Bloodstone Goliath |
| 5 | 10 | 13 | 3 Desecrators, 7 Skittershards |
| Total Score | 113/110 |
This guide will refer to the different pulls by their corresponding number on the above map and table.
- Try to stack the mobs on top of the Desecrator as they are ranged and won’t want to stack with the melee mobs. Make sure to soak the Infernal Explosive as this will deal high party-wide damage if left unattended.
- When the Blighted Dawnblooms are about to die, pull it off the Desecrator. The Blighted Dawnbloom’s yellow healing AoE, Glory, heals enemies and allies. The party should look to be within this AoE, when possible.
- In Adept+, healers need to pay attention to when the Skittershards die as their Crystalline Corruption stacking DoT can hit hard. Crystalline Corruption is dispellable and each stack can also be removed by any instance of healing.
- You may need to use Meiko’s Cyclone/ Helena’s Grand Melee to group these up since there are multiple ranged enemies in this pack.
- Avoid the Horned Seer’s Orb of Blood. Their Orb of Blood projectile is based on the target’s position on ability cast, so you should be able to side-step the ability before the projectile goes out. They will always turn to face their target directly.
- Prior to Adept+, there’s not too much to pay attention to. Kick the Corrupted Totemic’s Shadow Lob and Restoration. Avoid the Bloodstone Goliath’s Earthcore Upheaval ground AoE’s.
- In Adept+, make sure to kick the Corrupted Totemic’s Shadow Lob as this will deal high damage and is lethal at higher difficulties. In Adept+, the Bloodstone Goliath will begin to gain stacks of Coalescing Bloodstone for each 10% maximum health lost. Avoid focusing the Bloodstone Goliath down too fast to avoid a potential party-wipe when he detonates his stacks with Bloodstone Eruption.
- As with the first pull, healer needs to pay attention and prepare heals and/or dispels for when Skittershards apply their DoT on death.
- Make sure to soak the Infernal Explosive from the Desecrator as this will deal high party-wide damage if left unattended. Follow the same protocol from the previous pull regarding the Corrupted Totemic and Bloodstone Goliath.
- Soak the Infernal Explosives to avoid the potentially lethal, party-wide damage when left unattended. In Adept+, prepare heals/dispels for when Skittershards die. Jump down from the ledge once all enemies are defeated to begin the boss encounter.
Everdawn Grove Boss Guide
The Everdawn Grove boss fight is against Malgut the Fetid. This fight requires careful positioning throughout the encounter in order to prevent Akari the Everdawn Lord from dying. If Akari the Everdawn Lord dies, your party will wipe.
Malgut the Fetid’s Abilities
| Name | Recast | Interruptible | Description |
|---|---|---|---|
| Corrupting Shot | 60s | No | After 2 seconds, apply a debuff that deals damage over time and centers an AoE soak on the target. When the debuff expires or is dispelled, it detonates and deals damage divided among all party members within the AoE. |
| Umbral Eruption | 28s | No | Channels a crescent shaped attack on the target, pulsing heavy damage to all those within the affected area over its 4 second duration. |
| Crystal Volley | 23s | No | After channeling for 3 seconds, send out a cone attack centered on each party member that deals heavy damage. |
| Godrot Eclipse | 30s | No | Channel a devastating attack that deals lethal damage to all party members after 7.5 seconds. On hit, applies a debuff to any survivors that increases damage taken from Godrot Eclipse on the affected target. |
| Kill Shot | N/A | No | Once all party members die, send out a kill shot onto Akari the Everdawn Lord. Repeats until the target dies. |
| Summon Totems (Adept+) | 18.5s | No | Summon 2 totems that continuously casts damage to all party members. |
Akari the Everdawn Lord
An essential ally in the fight against Malgut the Fetid is Akari the Everdawn Lord. Akari the Everdawn Lord is the protective spirit of the grove manifested into the form of a stag. He follows a set path around the boss arena, going counter-clockwise in a steady pace. Akari the Everdawn Lord has his own health bar and can take damage from Malgut the Fetid’s Crystal Volley and Umbral Eruption abilities.
Akari the Everdawn Lord will help your party by targeting a party member with their Panicked Charge. This ability can stun Malgut the Fetid and kill any Corrupted Totems hit. The targeted party member should look to reposition while the charge indicator is blank and move out of the path of the charge once it’s set. The charge bar fills with white to indicate that it is no longer centered on the initial target and that Akari the Everdawn Lord will begin their Panicked Charge shortly.
Before the Fight
Make sure your healer has mana before engaging. Positioning is important to your survival and to the survival of Akari the Everdawn Lord. Avoid hitting Akari the Everdawn Lord with any abilities that center on you. Akari the Everdawn Lord is able to be healed, but it’s much better to avoid the damage dealt altogether.
If Akari the Everdawn Lord dies, Godrot Eclipse will be cast on repeat until the party wipes.
When you are the one being targeted by Akari the Everdawn Lord’s Panicked Charge, you are able to position it until the indicator bar turns white. You can safely move out of the Panicked Charge indicator at this point.
Remember: Keep yourself healthy by avoiding as much damage as possible. Dying can lead to a wipe.
Malgut the Fetid
Malgut the Fetid will always cast Corrupting Shot as their first ability. Whenever this is cast, make sure that all party members are within the soak’s AoE to avoid the target that Corrupting Shot is centered on from dying. Make sure to use your personal defensive for this mechanic. If your party has the Sinbinding Stone relic, this would be the best time to use it.
When Crystal Volley is cast, make sure that the ability doesn’t overlap on your party members or onto Akari the Everdawn Lord. Sometime Crystal Volley is cast after Akari the Everdawn Lord uses their Panicked Charge ability, so be prepared to reposition to the side that the stag was on when they began their Panicked Charge.
When Crystal Volley overlaps with Corrupting Shot, it’s best to spread out first before dispelling the soak. In this case, Corrupting Shot won’t detonate before Crystal Volley finishes its cast.
When Umbral Eruption is cast, the tank must position themselves opposite of Akari the Everdawn Lord to keep him in the safe zone. All other party members should look to be staying on the opposite side of the tank and with Akari the Everdawn Lord. When Umbral Eruption ends, Crystal Volley will be cast. Be ready to reposition to avoid hitting Akari the Everdawn Lord with the Crystal Volley.
Godrot Eclipse is an ability that needs to be interrupted by Akari the Everdawn Lord’s Panicked Charge. It cannot be stopped by any other means and the damage from it is unavoidable.
If Akari the Everdawn Lord dies, Godrot Eclipse will be cast on repeat until the party wipes.
Once you reach Adept+, the boss will begin to Summon Totems. It will summon two totems, one with a staggered/delayed spawn. It is generally recommended to focus one down and use Akari the Dawnlord’s Panicked Charge to destroy the other. If these totems are left alive, they will continually pulse high, unavoidable party-wide damage.