Fellowship is an online multiplayer dungeon crawler that draws from MMORPG classes, content, and progression, but with less grind and more action. If you’re new to tanking either in Fellowship or even in general, this guide will help you get started.
Core Basics of Tanking
Tanks within the “Holy Trinity” in MMOs are the team’s protector, acting as a shield (sometimes literally) between the enemies and the squishier Healer and DPS / Damage Dealer roles. Equipped with a larger health pool, stronger defenses and abilities focused on survivability, your job will be maintaining ‘Threat‘ or ‘Hate‘ from the enemies to keep their attacks focused on you and staying alive while doing so.
Today, tanking has also shifted into a leadership role within parties. Players will often expect their tank to know the route through the dungeon, coordinate interrupts, and ultimately lead the party to success.
For these reasons, tanking is often an intimidating role to step into, and a lot of tank mains over the years of MMOs have left big shoes to fill. There’s a lot of pressure regarding dying and almost assuredly causing a wipe as your Healers and DPS fall shortly after, combined with knowing everything you can before stepping into a dungeon.
However, these responsibilities make tanking a very rewarding experience — and through this guide, will hopefully be attainable for everyone.
Introducing Tanking in Fellowship
In Fellowship, dungeons have a timer to beat to get completion rewards. To beat the timer, you must kill enough mobs to reach 100% kill score and finally defeat the boss. Tanks have a massive impact on how quickly you finish a dungeon.
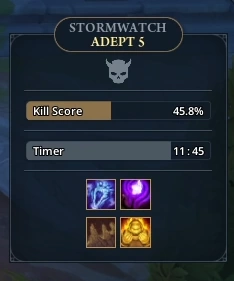
As a tank, you need to know your dungeons and aim for 100% kill score as efficiently as possible without dragging the party into unnecessary mobs. You’ll also have to gauge both your own and your group’s limits — larger pulls save time, but overdo it and a wipe will cost far more than you gained.
You’ll also want to be rotating your defensive cooldowns between packs no matter which tank you play, to spread the damage out and allow your healer to keep up with the damage you’re taking.
Finally, as a Tank in Fellowship you need to ensure you’re ‘kicking’ or interrupting as many spells as possible. DPS also have this responsibility, but a tank’s is the lowest cooldown so you’ll be catching the most. At higher difficulties, even the filler spells can hurt badly and should be kicked.
Which Tank to Play in Fellowship
Tanks in Fellowship have their own play styles and unique mechanics. There are currently two tanks available:
Helena is a traditional strength-based ‘sword and board’ tank. Her mechanic is Toughness, which increases her Damage Resistance (DR) as long as she can maintain it through her cooldown-reducing Veteran of War combos.
Meiko is an agility-based monk tank. Her mechanic involves Combos with her attacks that grant access to various Finishing Moves. She has less focus on DR, but has self-sustain / self-healing on most of her abilities, including when she deals damage.
Check out the guides for these tanks below!
Threat Management
Enemies will hit the player with the highest amount of ‘threat’ towards them. Threat is generated when dealing damage or healing players. Threat has a cap, so it does not grow infinitely. Additionally, the first person to make contact with a pack of enemies will generate a burst of threat. Tanks generate 350% more threat than other party members. This compensates for dealing less damage.
Ideally, you want to be the first person to pull a pack to get that initial burst of threat. Afterwards, you want to hit them with some kind of Area of Effect (AoE) attack to secure your position as the target. You can then move on to the next pack if chain-pulling.
Another common and effective way of pulling large groups of enemies – typically when your defensive cooldowns are available – is to mount up and run through multiple groups before stopping and facing them all at once. This gives you that burst of threat on every pack, and as long as you keep moving, you won’t take too much damage.
As long as you are always attacking and using your cooldowns, you should be able to sustain threat against most enemies. However, as you progress further into higher difficulties and your teammates start getting stronger gear, your DPS’s burst damage may rip aggro from you. In cases like this, every tank has a Taunt ability that automatically puts you at the top of the threat for the target, and forces them to attack you for some time.
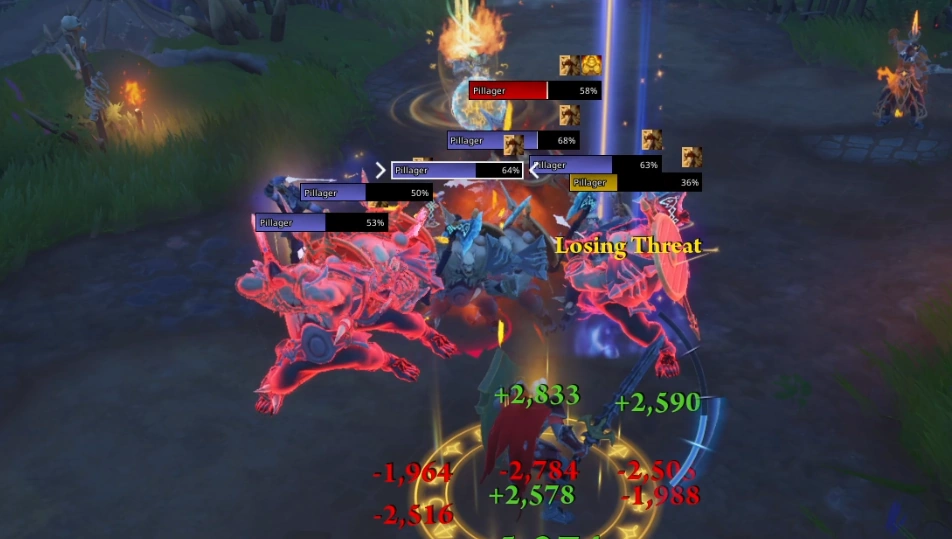
Enemies with blue HP bars are attacking you, yellow bars indicate you are losing threat, and red means they’re attacking another party member.
Surviving as a Tank — Mitigations and Cooldowns
If you were to pull a large pack of mobs, get off your mount and start fighting, you’d unfortunately drop dead in about three seconds flat. That’s because while each tank has a mechanic to help their survivability, they also have active abilities and cooldowns you need to cycle through.
Each tank has a shorter, constant mitigation to help their survivability, such as Meiko’s Stone Shield and Helena’s Shields Up. In larger pulls and boss fights, however, these often aren’t enough by themselves. Each tank will also have stronger defensive abilities with a longer effect and a longer cool-down between uses. These are abilities like Meiko’s Twin Souls: Bulwark and Helena’s Iron Wall.
A common mistake is pressing mitigations as an ’emergency’ when your health is low. Mitigation abilities should be used in anticipation of damage, not as a response to damage. Use them as soon as you stop to fight a group of enemies, or as the boss starts casting a high damage ability, not after.
Another common mistake is pressing all of the cooldowns at once in a panic. Mitigations should be spread out to last as long as possible. Stacking defensive abilities together is often unnecessary because generally one strong cooldown ability is enough to keep you alive with some healing. If they’re stacked together, you’ll find that the fight will keep going, and you won’t be able to keep yourself alive.
Don’t be shy to use your ultimate, either. In most scenarios, it will be more time-efficient to use your ultimate to pull and defeat a larger group of enemies than you normally would be able to, rather than waiting for the boss fight.
Tank Movement and Positioning
When navigating, there’s a lot to keep track of as a tank. It will be your job to keep enemies grouped, standing in your allies’ attacks and facing you, all while not standing in the fire. And if that wasn’t enough, you cannot block, parry or dodge if you’re not facing the enemy.
Before we get into those tactics, be aware of how you’re moving. You will always want to be strafing while facing enemies by using your mouse to lock onto where they are and using your movement keys to strafe rather than turn.
Many enemies like to teleport behind you and start backstabbing as well, or other scenarios, such as a puddle that you need to avoid is dropped onto you. ‘Backpedalling’ past or strafing sideways and turning will get them back in front.
You’ll always want to be opposite or at least away from your party. Enemies often have frontal cleaves and other AoEs, which increases the pressure on your healer and lowers your party’s DPS if not managed properly. Heroes like Mara have a bonus to backstabbing, and spellcasters can be interrupted if they’re forced to move.
Lastly, you can use movement to survive. If you’re no longer able to stand still and fight due to having no more defensives, try using a movement ability (or slowing the enemy movement) and ‘kiting’ the enemies. Keep travelling in a circle, far enough that they can’t hit you, until you and your healer stabilize. Just be mindful of your positioning and where more packs of enemies are!
Enemy Grouping
Grouping enemies makes it easier for your party to deal damage. This is because AoE attacks will hit more enemies more consistently, and allies will have an easier time attacking. This ultimately results in a faster dungeon.
In practice, the enemies will do everything in their power to stop you from doing that. There are three main types of enemies.
- Melee
- Casters
- Ranged
Melees are simple. They will follow you and attack you wherever you go. Ranged is the trickiest, as they will always stay put unless they cannot attack you. Casters act as ranged when casting spells, and melee when interrupted.
The simplest thing to do is drag melee enemies onto ranged and caster enemies. Position yourself ‘past’ the ranged enemies, and they will move onto them to attack you.
Casters can be kicked by either you or a helpful DPS, which silences them for 4 seconds. This will let you move them around, hopefully group everything up, or take them to a new pack of enemies for a chain pull.
Ranged can only be moved through forced movement or line of sight.
Every tank and some DPS have forced movement abilities, which are great for managing the positioning of large groups of packs. For example, Meiko’s Cyclone will bring everyone to her and interrupt their current ability, and Helena’s Grand Melee forces all enemies – including ranged – to melee her.
The other method is to intentionally break line of sight with the enemies, such as hiding behind a pillar or wall. Both casters and ranged will no longer be able to attack you, and move to a position where they can, grouping themselves up in the process.

Interrupting Casts and Crowd Control
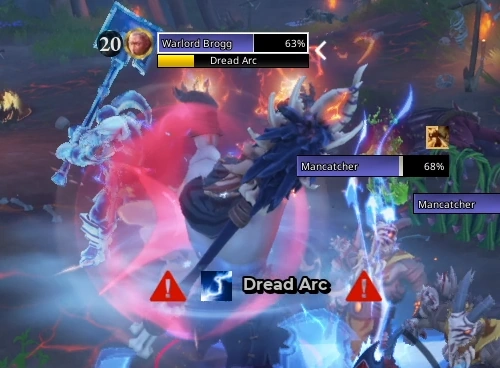
Even with careful mitigation usage, enemy spells can be devastating to the party. Spellcasters will often attack with filler spells that do damage to you (or a random target), and sometimes more dangerous spells. These spells are indicated by a yellow cast bar.
Every hero has an Interrupt ability that can stop these spells (often dubbed as ‘kicking’). When starting out, you should prioritize the most dangerous ones, but as you get to higher difficulties, even the filler spells start to hurt a lot more, so you will need to coordinate with your party. After you interrupt the enemy, they will not be able to cast for 4 seconds (except dedicated boss timers).
In Fellowship, you can target an enemy with an interrupt marker and a cooldown. By default, this is V. This will show your allies who you are targeting with your kick, and whether or not it’s ready.
Another way to interrupt casts is through Crowd Control (CC). In a pinch, any type of stun or forced movement will interrupt an enemy’s cast, such as Cyclone or Charge. This only works if the enemy is able to be CC’d.
Lastly, some enemies have some abilities indicated by a grey cast-bar. You can’t interrupt these abilities, but you CAN CC them. Sometimes these abilities can be powerful, so it’s worth doing if you have the opportunity.
Dungeon Curses
As you get to higher difficulties, the game adds certain modifiers to dungeons. Every dungeon is different (but not random). You should consider each curse carefully, as it will adjust how you approach the dungeon.
Binding Ice
An AoE centered around you will spawn damage and roots both players and enemies. Try to get it to hit the mobs, but be careful not to hit your party members.
Blood Shards
Enemies will explode causing a small amount of max HP damage on death to all party members, but give a stacking expertise buff.
Try to focus down a Low HP mob at the beginning of pulls to extend your blood shard stacks as long as possible.
Carnage
Some damage taken by the party is replicated as a stacking bleed that is only removed by reaching full HP, but players are healed based on damage dealt by all party members.
This is a healer modifier, but be sure to mitigate well or self-heal if you’re close to being full to cleanse yourself.
Empowered Minions
Certain monsters in the dungeon are Empowered, dealing 150% more damage and gaining 100% more maximum Health. Defeating these monsters grants the party a powerful buff to haste temporarily.
Take advantage of the empowered haste buff when you can, but make sure to path around particularly dangerous empowered mobs. The chicken relic is particularly useful against empowered mobs, but keep in mind that chickens give 0% progress, and you don’t get the buff.
Meteors
Meteors impact the ground that stun upon hitting, but players also receive Spirit Ability Charge when they impact the ground. These shoot dodge-able bullets as well.
Don’t get hit! Pay attention to the order they appear in, to make it a little easier to dodge.
Shadow Lords Trial
Instead of monsters granting dungeon % when slain, they will instead drop orbs based on their % values. When 30 orbs are collected, a Shadow Lord mini-boss spawns that grants 50% completion and a powerful 60-second buff.
Be careful not to summon the Shadow Lord during a large pull, and make sure to take advantage of the massive buff by trying to pull bigger than normal.
Stoneskin
Monster’s Health is increased by a percentage, but all enemies explode on death to give all nearby mobs a bleed that deals damage equal to 10% of the slain monster’s maximum HP. The damage over time does not stack, but can be replaced by a more potent application of stoneskin.
Try to chain pull and abuse the on-death damage of mobs, by dragging low-health enemies to the next pack of enemies. Keep in mind your healer’s resources if you do this!
Ultimatum
Bosses deal more damage and have more max HP, but players’ cooldowns are reduced by 10%.
Use those reduced cooldowns effectively, but get ready for the boss. Make sure to mitigate well!
You Will Die (And That’s a Good Thing!)
Tanking is not something you can practice on a training dummy, nor can any guide cover every situation perfectly. The only way to get better is by going into dungeons and pushing your limits. Trying different routes, or trying one extra pack of enemies than usual. Sometimes, you’ll die. And sometimes, it’ll be your fault! But if you take every death as a learning opportunity, you will become a great tank.
You can reflect on each scenario and what could have been done better. Perhaps a mitigation was too late, and you weren’t ready for a ton of damage. Or, too early, and you wasted something big on something small. Maybe a DPS ripped aggro and you couldn’t regain control of the pack, or you missed a kick and your healer exploded. Maybe this time around, 4 packs were one too many, and you know to step back down to 3 until you’re more geared. You can’t know these things until you try.
If you expose yourself to more of these situations, you will become used to them. Eventually, tanking will become instinct, and you’ll feel whether you can pull that one extra pack or not, and overall have a much better sense of you and your party’s capabilities.
Wishlist Fellowship
If you enjoyed your time with Fellowship during the open beta, or if you’re at all interested in playing, be sure to wishlist the game on Steam. The game launches into Early Access on October 16th.