Patch 7.5 is only a couple of weeks out! If you want to be ready for the Ultimate on day one, there’s no more time to slack. Here are some need-to-knows for beating M12S and getting your BiS.
PHASE ONE
Pre-Pull
All of phase one’s group mechanics (Mortal Roles, Grotesquerie Act 1 & Curtain Call, Slaughtershed) are split between supports and DPS. Additionally, the boss’s auto-attacks target the top two players in aggro, so off-tanks, make sure to keep your stance on.
Waymarkers
While waymarkers in phase one are mainly used for orientation, they are critically important during Slaughtershed. If the boss regrows normal arms during this phase, he will slam his fists on the 1 and 4 waymarkers, dealing a knockback. Positioning relative to those waymarkers is crucial for surviving the mechanic and finishing phase one.
Most Challenging Mechanics
Phase one is relatively simple compared to phase two, but there are two mechanics that can throw players for a loop.
GROTESQUERIE ACT 2
Act 2 will place every player in the middle as the boss circles you, leaving only a small gap on a cardinal to escape. Players with the alpha debuff will need to soak towers spawning from growths on the floor, and beta debuffs will need to soak towers spawned from other beta players. Some players can struggle remembering which tower it is they need to soak.
Here’s a tip: the tower you need to soak is always “two away” from your debuff number. So alpha 1 needs to soak the third growth tower, beta 4 needs to soak the second beta tower, and so on. Whether you’re counting up or down, just remembering “two away” will help you know which tower to take.
Slaughtershed
The final mechanic of the fight, the Lindwurm will explode both of his arms, leaving one role group to spread AOEs, and one to take a stack. During this, the boss’s arms will regrow into two possible variants. Dragon heads do half-room cleaves, and normal arms deal knockbacks (as mentioned in the waymarker section). The big mistake during this part is not looking out for which arm regrew first. If you can help it, check to see which arm spawns first before running to your stack or spread position. It only takes half a second to check, and it could save your run.

Check out our full guide here!
Phase Two
If you’ve gotten past phase one, congratulations! It only gets harder from here. Phase two will test your positioning and recall ability as you deal with a mechanic some players believe is Ultimate level.
Pre-Pull
You will need light parties and standard clockspots for initial positioning during Replication 2 and Idyllic Dream. The boss will also return to targeting the top player in aggro for attacks, so off-tanks, watch your enmity.
Waymarkers
Waymarkers for this fight are most crucial for Replication 1. If your party is using the DN method to solve the mechanic, your positioning will be based on waymarkers. Your placement on the markers is also quite tight, especially when the boss’s AOEs have the potential to overlap your spot. Pay attention!

Key Mechanics and PF Differences
Depending on your group, there are different ways to solve Replication 1, 2, and Idyllic Dream. We’ll focus on some of the key differences between each strategy.
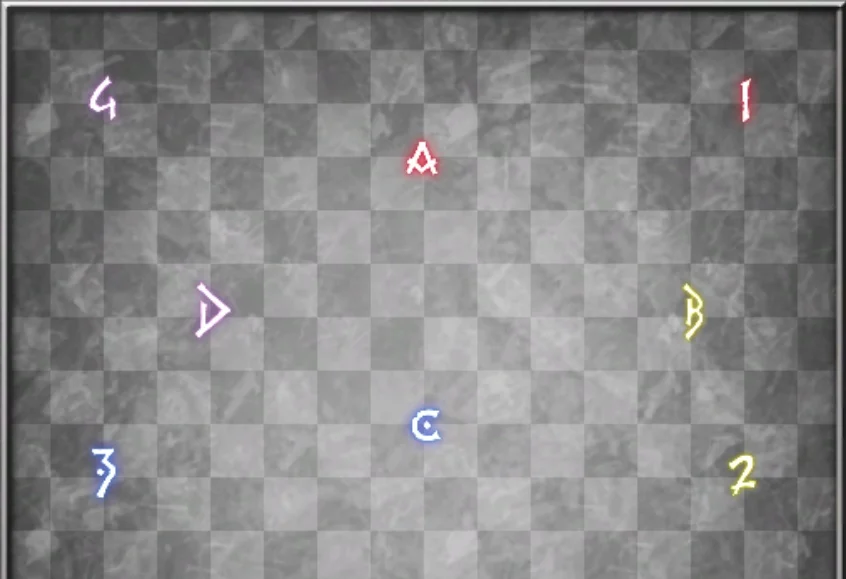
REPLICATION 1: DN vs CLONE RELATIVE
Replication 1 will start with clones attacking six players, leaving four with dark vuln debuffs, and two with fire vuln debuffs. Afterwards these clones will split, jump to a spot in an X pattern, and then repeat their attack. The goal is to position yourself to take an attack you are not vulnerable to. There are two ways PF approaches this: using the DN or Clone relative methods.
For DN, you find your position based on the waymarkers and using snake prio. Supports and the healer/ranged duo baiting fire find their clone by looking north, and going clockwise to the first waymarker they need. DPS look NW and go counterclockwise. Clone relative simplifies this, but it’s not always used so make sure you know how to do DN first. All clone relative requires is you find the clone you need, and then looking at it, go support relative left and DPS relative right onto the waymarkers. These two strategies are not compatible, so make sure you know how to do both.
REPLICATION 2: DN vs BANANA CODEX
Replication 2 involves players being locked to a clock position near their clones, and then grabbing a debuff from boss clones. Debuffs are ordered and placed correctly so the players can solve mechanics while dodging AOEs. The alternative to the DN strat for this mechanic is the Banana Codex method.
While both versions look near-identical for the first half of Rep 2, the key difference comes in the second half. DN is solved looking at true north. The placement of boss mechanics on either side of the Lindwurm goes cone, light party stacks, and defamations. After dodging snaking kick and defamations, the boss tether player (east) and the no tether player (west) will bait the netherwrath near or far (adjusting so the firefall splash players don’t get hit). Afterwards, players group up into melee (east) and ranged (west) groups, wait for the first defamations and cones to go out, before taking the E/W light party clones. After that the melee group goes back north to dodge the last cone and defamation.
Banana Codex meanwhile, treats D as relative north. In this case, the player at D takes the boss tether, and the player at B gets nothing. Clone mechanics are also ordered differently: light party stacks, cones, then defamations. After the snaking kick, cones and light party players bait the netherwrath while staying close to the boss’ hitbox. The rest of the players wait north exactly on the boss’s hitbox until the netherwrath resolves, then run to the close clone SW of the boss to take a stack. Cones and light party players bait the firefall splash again, and the remaining players run to the clone SE of the boss to take the final stack.
For more details on the Banana Codex method, check out Hector’s video:
IDYLLIC DREAM: CHAT MACROS MANDATORY
Idyllic Dream is the longest mechanic in the game, and borderline Ultimate-level in difficulty in terms of difficulty. Most parties use the uptime method, where defamations go NE and NW of the boss so melees can maintain uptime. Otherwise, PF solves this using the same method you can find in our guide.
The key thing to remember is someone in your party must have macros. The mechanic is more than three and a half minutes long, and no matter how good your memory is, the seven other people in your party may struggle. Make sure you have chat macros to call out the following: players’ clone starting positions (cardinals or intercardinals), safe position from clone cleaves (N or S), whether boss clones will do defamations or light party stacks first, and the safe platform when the boss steals a clone after towers.
If you can do all of that, you’re well on your way to clearing. If you clear soon, you might be geared up in time to do the next Ultimate on release. See you there, and thanks for reading!