Necromancer Fire Wraiths Endgame Build for Last Epoch (Patch 1.0)
Welcome to our Last Epoch Necromancer Fire Minions build guide for the Acolyte class. Here you will learn everything about the Necromancer play style, passives, skills, strengths, and weaknesses to conquer the world of Eterra.
Build Introduction
Summon an army of deadly Fire Wraiths and explosive Zombies to eliminate your foes, while draining their life-force to keep yourself healthy and full of Mana. Your Wraiths may not move, but their ranged attacks will melt the enemies before your eyes, especially when buffed with your shadowy necromantic magics!
 Great clear speed
- Very tanky at lower corruptions with constant leech
- Can kill enemies at long range to be extra safe
- Great boss damage

 Stop and start playstyle may not appeal to everyone
- Fair amount of buttons to press and things to keep track of

Skill Selection
Our main skill for this build, we will be using ![]() Summon Wraith. We convert them
to Fire and turn them into what is commonly referred to as Turret Wraiths.
Additionally, we supplement them with
Summon Wraith. We convert them
to Fire and turn them into what is commonly referred to as Turret Wraiths.
Additionally, we supplement them with ![]() Summon Volatile Zombie that automatically
summon and explode on our enemies. Both minions will be buffed
by
Summon Volatile Zombie that automatically
summon and explode on our enemies. Both minions will be buffed
by ![]() Dread Shade, amping the damage this build can put out. We will also be utilizing
Dread Shade, amping the damage this build can put out. We will also be utilizing
![]() Drain Life to keep ourselves healthy and refill our Mana.
Finally, we use
Drain Life to keep ourselves healthy and refill our Mana.
Finally, we use ![]() Transplant as our traversal skill to help us get around the
battlefield quicker, or to get out of dangerous situations.
Transplant as our traversal skill to help us get around the
battlefield quicker, or to get out of dangerous situations.

Class and Skill Passive Trees
Our base class is the Acolyte, which acts as a generic spell caster and summoner. Our character will be offered an opportunity to select a Mastery class once we have completed the first act of the campaign. Each base class has three possible masteries to choose from, for the Acolyte we have access to the Mastery Tree Passives for Necromancer, Lich and Warlock. Upon selecting a Mastery and placing 20 Passive Points into the Acolyte Tree, you'll then be able to place Passive Points into the other Mastery Trees.
For the Fire Wraith build, we will be choosing Necromancer as our mastery. We are looking to maximize our Wraiths' damage, as well as supplementing
that damage with ![]() Dread Shade and
Dread Shade and ![]() Summon Volatile Zombie. While
Summon Volatile Zombie. While ![]() Drain Life will occasionally be cast on enemies, we will mostly be
targeting our own Wraiths with it to refill our Mana. To this end, we will be utilizing the majority of our Passive Points in the Necromancer Passive tree.
Our passive points will be targeting augments for our Minions to boost their damage output and add survivability and utility to ourself. Each of the Passive
Trees and their points are broken down below.
Drain Life will occasionally be cast on enemies, we will mostly be
targeting our own Wraiths with it to refill our Mana. To this end, we will be utilizing the majority of our Passive Points in the Necromancer Passive tree.
Our passive points will be targeting augments for our Minions to boost their damage output and add survivability and utility to ourself. Each of the Passive
Trees and their points are broken down below.
Acolyte Passive Points

- 6 points into Forbidden Knowledge: Adds Flat Intelligence and Necrotic Resistances.
- 4 points into Bone Aura: Adds flat Armor for both the player and minions.
- 5 points into Dark Rituals: Increases our minion's Attack Speed and gives us the same bonus for 10 seconds after casting a Minion Skill.
- 5 point into Stolen Vitality: Adds Vitality and increases Minion Health.
Our base class is the Acolyte, which acts as a generic spell caster and summoner. Our character will be offered an opportunity to select a Mastery class once we have completed the first act of the campaign. Each base class has three possible masteries to choose from, for the Acolyte we have access to the Mastery Tree Passives for Necromancer, Lich and Warlock. Upon selecting a Mastery and placing 20 Passive Points into the Acolyte Tree, you'll then be able to place Passive Points into the other Mastery Trees.
For the Fire Wraith build, we will be choosing Necromancer as our mastery. We are looking to maximize our Wraiths' damage, as well as supplementing
that damage with ![]() Dread Shade and
Dread Shade and ![]() Summon Volatile Zombie. While
Summon Volatile Zombie. While ![]() Drain Life will occasionally be cast on enemies, we will mostly be
targeting our own Wraiths with it to refill our Mana. To this end, we will be utilizing the majority of our Passive Points in the Necromancer Passive tree.
Our passive points will be targeting augments for our Minions to boost their damage output and add survivability and utility to ourself. Each of the Passive
Trees and their points are broken down below.
Drain Life will occasionally be cast on enemies, we will mostly be
targeting our own Wraiths with it to refill our Mana. To this end, we will be utilizing the majority of our Passive Points in the Necromancer Passive tree.
Our passive points will be targeting augments for our Minions to boost their damage output and add survivability and utility to ourself. Each of the Passive
Trees and their points are broken down below.
Necromancer Passive Points
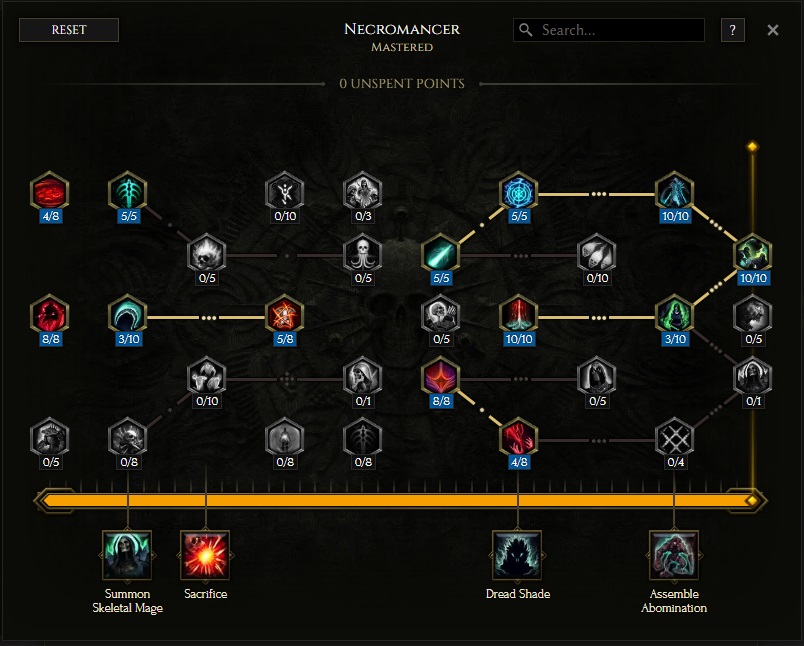
- 4 points into Elixir of Hunger: Adds Health and Grants Hunger buff for our minions when we use a potion.
- 8 points into Risen Army: Minion damage and attack speed.
- 3 points into Cursed Blood: Increases our Minion Damage.
- 5 points into Reclamation of Souls: Adds Ward Retention and provides us with Ward when a minion dies.
- 5 points into Aegisfall: 4-5 points is about the most we put into this. Our minions will still sustain over 200 stacks of Armor Shred on bosses, which is more than enough.
- 5 points into Frantic Summons: Increases Cast speed for us and our Minions.
- 8 points into Tyrant: Increased Health for us, at the cost of reduced health for our Minions.
- 5 points into Frantic Summons: Increases both our Attack and Cast Speed as well as our Minions.
- 4 points into Cling To Life: Adds Vitality for us and all Resistances for our Minions.
- 5 points into River of Bones: Increased Critical Strike Chance and Leech for us and our Minions.
- 10 points into Moonlight Pyre: Adds flat Fire and Necrotic Damage for our Minions.
- 10 points into Heresy: Adds Intelligence and increases our Minions' Critical Strike Chance.
- 3 points into Rite of Undeath: Increases our Elemental and Necrotic Resistances and increases our Minion's Necrotic and Elemental Damage.
- 10 points into Blades of the Forlorn: Taken for the increase in Minion Critical Strike Multiplier.
Our base class is the Acolyte, which acts as a generic spell caster and summoner. Our character will be offered an opportunity to select a Mastery class once we have completed the first act of the campaign. Each base class has three possible masteries to choose from, for the Acolyte we have access to the Mastery Tree Passives for Necromancer, Lich and Warlock. Upon selecting a Mastery and placing 20 Passive Points into the Acolyte Tree, you'll then be able to place Passive Points into the other Mastery Trees.
For the Fire Wraith build, we will be choosing Necromancer as our mastery. We are looking to maximize our Wraiths' damage, as well as supplementing
that damage with ![]() Dread Shade and
Dread Shade and ![]() Summon Volatile Zombie. While
Summon Volatile Zombie. While ![]() Drain Life will occasionally be cast on enemies, we will mostly be
targeting our own Wraiths with it to refill our Mana. To this end, we will be utilizing the majority of our Passive Points in the Necromancer Passive tree.
Our passive points will be targeting augments for our Minions to boost their damage output and add survivability and utility to ourself. Each of the Passive
Trees and their points are broken down below.
Drain Life will occasionally be cast on enemies, we will mostly be
targeting our own Wraiths with it to refill our Mana. To this end, we will be utilizing the majority of our Passive Points in the Necromancer Passive tree.
Our passive points will be targeting augments for our Minions to boost their damage output and add survivability and utility to ourself. Each of the Passive
Trees and their points are broken down below.
Lich Passive Points
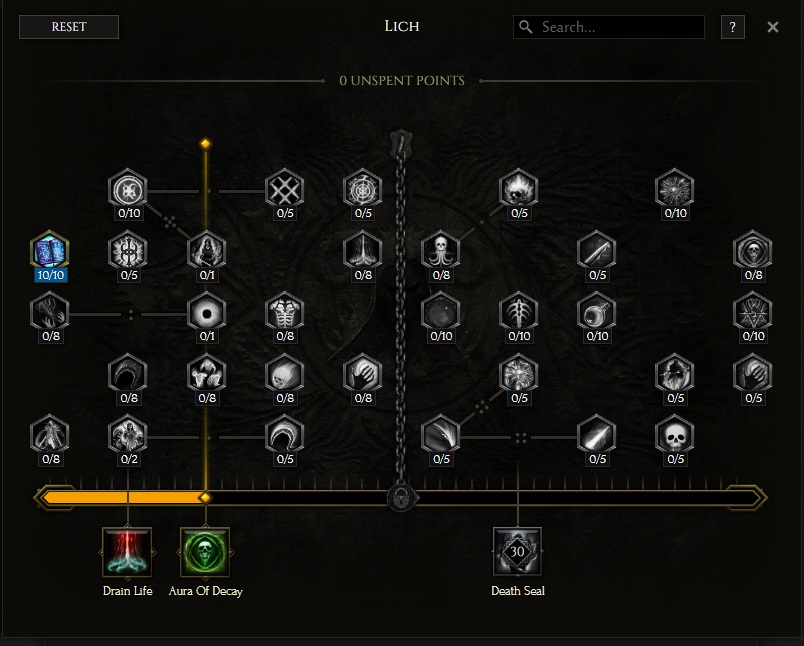
- 10 points into Apocrypha: Adds Intelligence and increases Mana Regen.
In this section, we will break down each skill and highlight the key passives we have selected to make the skill perform as best as possible in the build. While some of these skills do allow for some variation to exist depending on your own custom choices, we recommend utilizing the skill trees as presented until you have a strong understanding of the build itself.
Summon Wraith
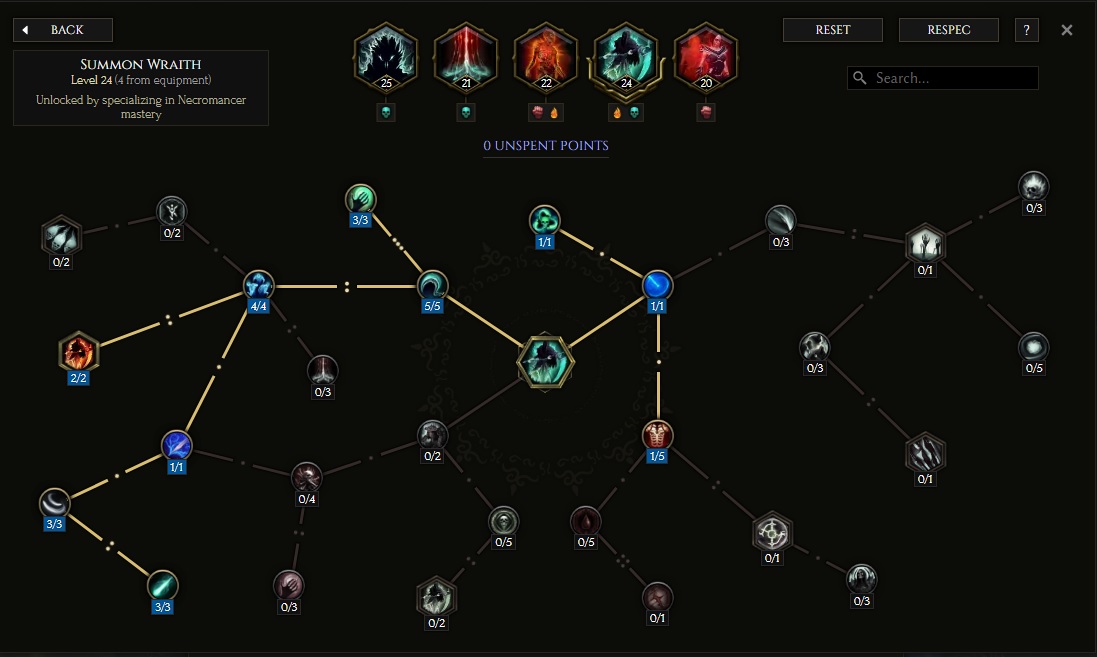
![]() Summon Wraith is our main damaging ability, and the one we cast the most. While we do give them some Health
and leech through some passives and gear elsewhere in the build, Wraith survival is not a priority since they will need
to be resummoned periodically anyway. Fire Wraiths are closer in functionality to how a Totem would work for Primalist, serving the
purpose of a turret rather than a permanent minion that follows you. While their damage is high, they are expendable.
Summon Wraith is our main damaging ability, and the one we cast the most. While we do give them some Health
and leech through some passives and gear elsewhere in the build, Wraith survival is not a priority since they will need
to be resummoned periodically anyway. Fire Wraiths are closer in functionality to how a Totem would work for Primalist, serving the
purpose of a turret rather than a permanent minion that follows you. While their damage is high, they are expendable.
Order of Skill Points
- 1 point into Locus Of Resurrection: Causes Wraiths to be summoned at your mouse cursor, instead of next to you.
- 1 point into Locus Of Death: Gives a massive damage buff, but causes Wraiths to be unable to move.
- 5 points into Reapers: Adds flat Necrotic Damage to their attacks.
- 4 points into Wraith Bringer: Increases Cast Speed and Mana Efficiency.
- 2 points into Flame Wraith: Gives us a chance to summon Flame Wraiths instead. We maximize this chance through some idols as well.
- 1 points into Spirit Link: Improves the base Critical Strike Chance of our minions.
- 3 point into Dawn of the Fall: Adds more base Critical Strike Chance and gives them leech on critical hits.
- 3 points into Dusk of the Living: Increases Critical Strike Multiplier.
- 3 points into Necrotic Hunger: Increases the Necrotic Damage and leech from Necrotic Damage.
- 1 points into Haunting: Increases Wraith's maximum Health.
If you do not have enough points from gear for all of the passives yet, you can skip the last points suggested, from the bottom up. The most important 20 points are listed first.
In this section, we will break down each skill and highlight the key passives we have selected to make the skill perform as best as possible in the build. While some of these skills do allow for some variation to exist depending on your own custom choices, we recommend utilizing the skill trees as presented until you have a strong understanding of the build itself.
Summon Bone Golem
![]() Dread Shade is a buff that massively improves the damage output of our minions. However, you may not feel the
need to cast it outside of Boss encounters, or some tough rares. Depending on your gear and Corruption level, your Wraiths'
base damage will likely be clearing echoes fast enough that it's not necessary. Still, the damage it
provides on bosses is quite dramatic, and we are taking passives to optimize this damage.
Dread Shade is a buff that massively improves the damage output of our minions. However, you may not feel the
need to cast it outside of Boss encounters, or some tough rares. Depending on your gear and Corruption level, your Wraiths'
base damage will likely be clearing echoes fast enough that it's not necessary. Still, the damage it
provides on bosses is quite dramatic, and we are taking passives to optimize this damage.
Order of Skill Points
- 3 points into Wisdom of the Dead: Increases Mana Efficiency.
- 1 point into Congregation of Shades: Increases our maximum Wraiths by 1.
- 3 points into Flesh Harvest: Increase the Buff Effect for every 3% of Health the targeted minion is missing.
- 1 point into Spectral Presence: Improves Dread Shade's area of effect.
- 3 points into Dying Coven: Increase the Cast Speed of affected minions.
- 4 points into Lingering Doom: Reduces the Health Decay on targeted minion, and adds flat Necrotic Damage to affected minions.
- 4 points into Grim Fate: Massively increases the area of effect and the damage provided, but increases health decay on targeted minion.
- 1 point into Symbiotic Apparition: Allows the buffs from
 Dread Shade to also effect you.
 - 2 points into Duskheart: Gives the effected minions a chance to inflict Damned on enemies.
- 3 points into Frenzied Phantom: Grants Frenzy to affected minions for a few seconds after being cast.
If you do not have enough points from gear for all of the passives yet, you can skip the last points suggested, from the bottom up. The most important 20 points are listed first.
In this section, we will break down each skill and highlight the key passives we have selected to make the skill perform as best as possible in the build. While some of these skills do allow for some variation to exist depending on your own custom choices, we recommend utilizing the skill trees as presented until you have a strong understanding of the build itself.
Summon Skeletal Mage
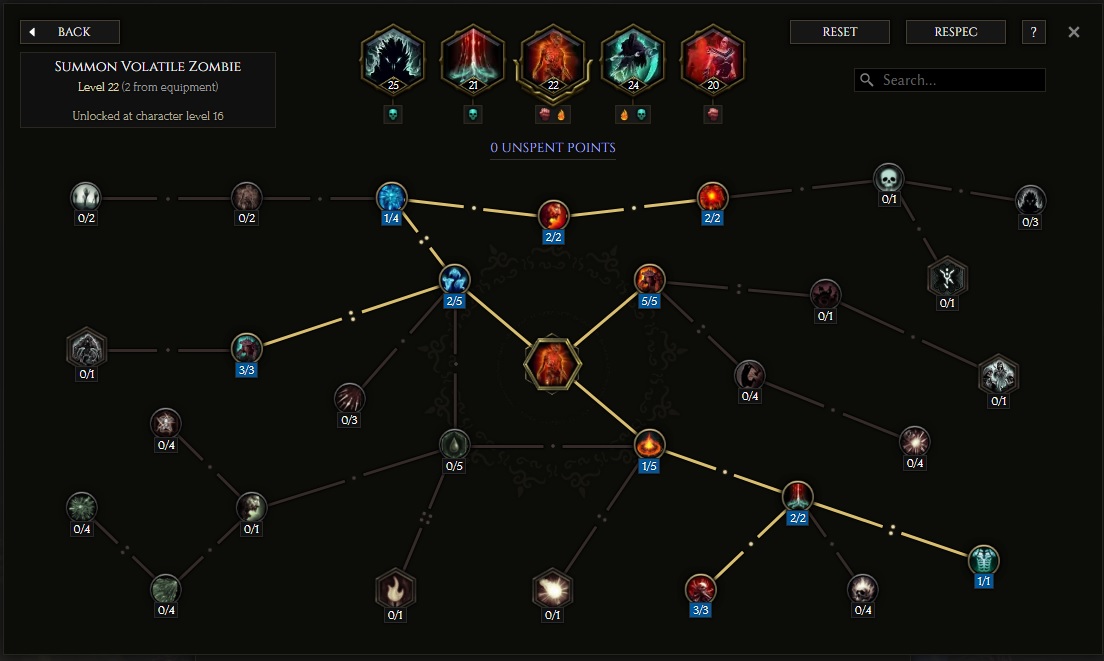
We use ![]() Summon Volatile Zombie as our secondary minions, but we will very rarely be casting them ourselves.
They will automatically summon a portion of the time when a minion dies. Only on boss fights, when you've got your
maximum amount of Wraith out and you have an active
Summon Volatile Zombie as our secondary minions, but we will very rarely be casting them ourselves.
They will automatically summon a portion of the time when a minion dies. Only on boss fights, when you've got your
maximum amount of Wraith out and you have an active ![]() Dread Shade and you have casted
Dread Shade and you have casted ![]() Drain Life, will
you have both the time and Mana required to manually cast
Drain Life, will
you have both the time and Mana required to manually cast ![]() Summon Volatile Zombie for some extra damage.
Summon Volatile Zombie for some extra damage.
Order of Skill Points
- 2 points into Forceful Commander: Increases Summoning Speed and Mana Efficiency.
- 1 point into Daunting Blast: Gives increased Stun Chance.
- 2 points into Ravenous : Large increase to damage against Bosses and Rares.
- 2 points into Pull of the Grave: Give our Zombies a kill threshold of 16%.
- 1 point into Path of Destruction: Increases Area of effect for our Zombies explosion.
- 2 points into Necromantic Fervor: Heals you for a portion of Zombie's max Health when they explode.
- 1 point into Vital Ward: Converts the healing from previous node to Ward.
- 3 points into Awakening Presence: Grants 30% chance to summon a Zombie whenever a minion dies.
- 5 point into Fervor: Increased Damage and Movement Speed for our Zombies.
In this section, we will break down each skill and highlight the key passives we have selected to make the skill perform as best as possible in the build. While some of these skills do allow for some variation to exist depending on your own custom choices, we recommend utilizing the skill trees as presented until you have a strong understanding of the build itself.
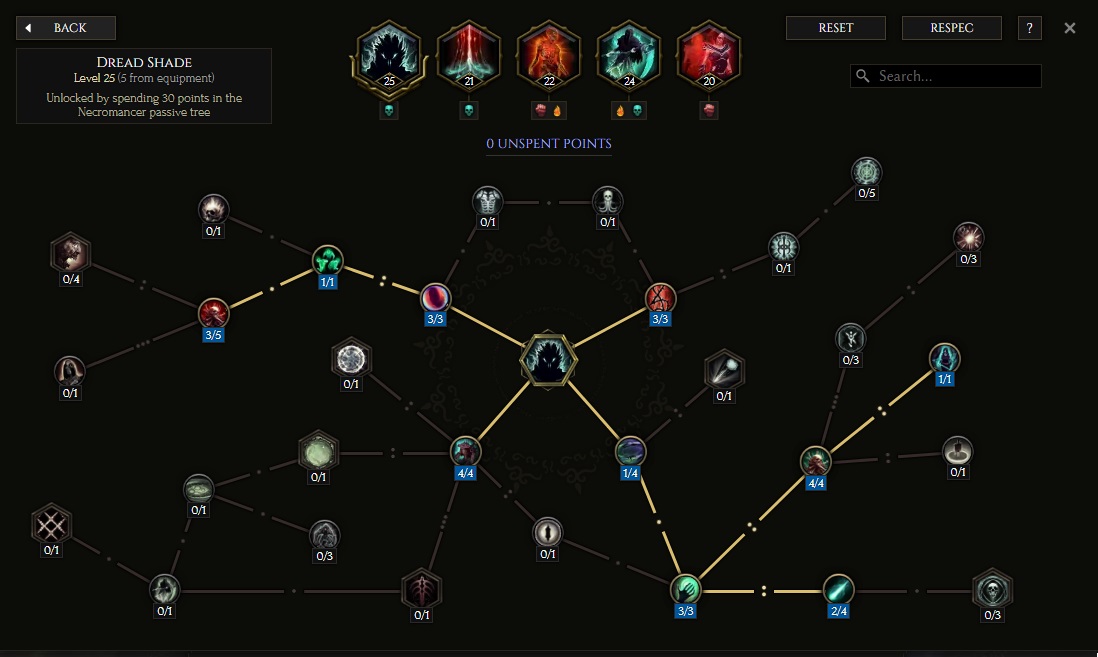
Dread Shade
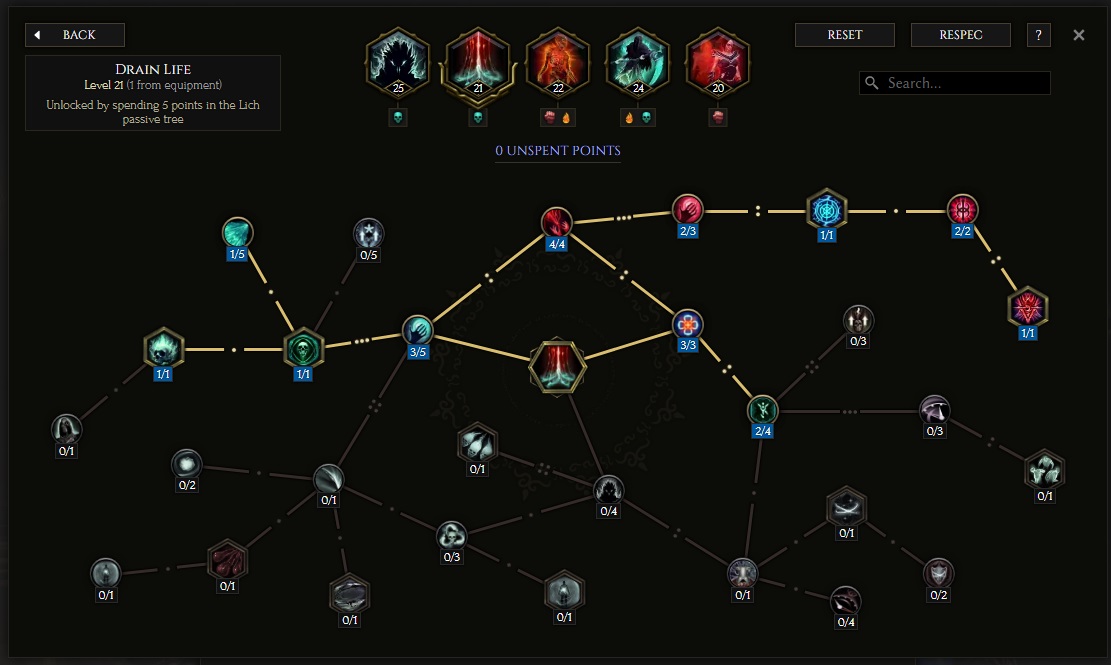
Casting all of our ![]() Summon Wraith can cost a lot of Mana. To fix this, we are taking passives to allow
Summon Wraith can cost a lot of Mana. To fix this, we are taking passives to allow ![]() Drain Life to be
cast on our own minions as well, giving us some much needed Mana on top of the normal health leech. Additionally, as we are
increasing the total number of targets affected by a large degree, you may sometimes be able to drain from both your own minions as well as enemies.
Drain Life to be
cast on our own minions as well, giving us some much needed Mana on top of the normal health leech. Additionally, as we are
increasing the total number of targets affected by a large degree, you may sometimes be able to drain from both your own minions as well as enemies.
Order of Skill Points
- 3 points into Empowered Drain: Increases the damage.
- 1 point into Soul Blast: Casts
 Soul Blast whenever a minion dies from
  Drain Life.
 - 1 point into Hecatomb: Allows us to target our minions, granting us Mana gained per second for each minion targeted.
- 4 points into Ravenous: Increases the amount of health leeched and increases damage against low health enemies.
- 3 points into Thoughtsteal: Reduces channel cost.
- 2 point into Insatiable: Increases Health Leech, but also increases channel cost.
- 1 point into Dark Shackles: Changes to a cast instead of a channel, giving us great mobility. Also increases the Mana cost significantly.
- 2 points into Enduring Night: Increases the duration of the Drain Life beam, but adds a higher Mana cost.
- 1 point into Grasp Of The Damned: Allows it to hit up to 10 additional targets, adds a Slow chance to the targets, and increases the Mana cost.
- 2 points into Condemnation: Applies a stacks of Damned each second. This is taken to increase the Necrotic Penetration on targets hit.
- 1 point into Malignant Discharge: Increases Necrotic Damage and area of effect of Soul Blast.
If you do not have enough points from gear for all of the passives yet, you can skip the last points suggested, from the bottom up. The most important 20 points are listed first.
In this section, we will break down each skill and highlight the key passives we have selected to make the skill perform as best as possible in the build. While some of these skills do allow for some variation to exist depending on your own custom choices, we recommend utilizing the skill trees as presented until you have a strong understanding of the build itself.
Transplant
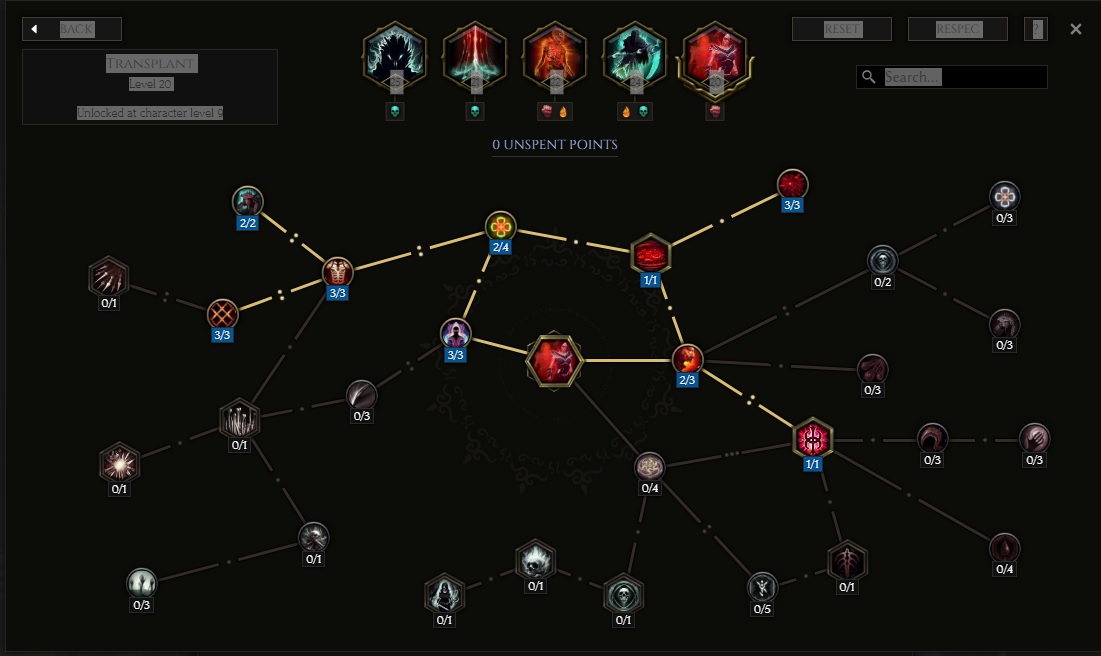
![]() Transplant is our traversal skill of choice. We are gaining a few survivability bonuses and some utility with our passives here. If you have acquired
the suggested experimental mod on your boots in the gear section, you will be able to transport some of your minions along with you when you use
Transplant is our traversal skill of choice. We are gaining a few survivability bonuses and some utility with our passives here. If you have acquired
the suggested experimental mod on your boots in the gear section, you will be able to transport some of your minions along with you when you use ![]() Transplant. This will
save you from having to re-summon Wraiths as you move through maps, making clearing echoes feel a lot smoother and faster.
Transplant. This will
save you from having to re-summon Wraiths as you move through maps, making clearing echoes feel a lot smoother and faster.
Order of Skill Points
- 2 points into Fleeting Form: Increases the Cast Speed and Cooldown Recovery Speed.
- 2 points into Anemia: Reduces the Health cost associated with Transplant.
- 3 points into Bone Armor: Grants you
 Bone Armor when you cast Transplant, providing Armor and reducing damage taken.
 - 3 points into Apostasy: Increased duration of Bone Armor.
- 2 points into Plated Bone: Bone Armor effects are increased by 20%. (This was removed, points will be redistributed when the build is updated.)
- 1 point into Sticky Blood: Detonations now cause a Blood Pool to form, slowing enemies that walk through them.
- 3 points into Siphon: Blood Pools now heal you for 9% of your maximum Health when you walk through them.
- 2 points into Acolyte's Fervor: Grants you Haste and Frenzy for a few seconds after casting Transplant.
- 1 point into Reign of Blood: Creates an additional body that detonates on arrival, adding another Blood Pool for us to heal inside of.
There is no extra points needed for this skill. If you happen to have a few extra at some point while gathering the recommended gear, you could fill out Anemia.
Build Mechanics and Playstyle
The main damage source for this build is ![]() Summon Wraith. While you can summon up to 18 Wraiths, how many you cast depends on the situation.
While clearing echoes, the amount of Wraiths you pull out will depend entirely on how difficult any given map feels for your given gear and the Corruption
you're playing at. Easier Echoes may only require you to summon half a dozen Wraiths in order to clear your screen, while harder Monolith maps and higher Corruption
may force you to summon maximum Wraiths in order to survive. On bosses, you want to make sure you have your maximum amount of Wraiths out at all times.
Summon Wraith. While you can summon up to 18 Wraiths, how many you cast depends on the situation.
While clearing echoes, the amount of Wraiths you pull out will depend entirely on how difficult any given map feels for your given gear and the Corruption
you're playing at. Easier Echoes may only require you to summon half a dozen Wraiths in order to clear your screen, while harder Monolith maps and higher Corruption
may force you to summon maximum Wraiths in order to survive. On bosses, you want to make sure you have your maximum amount of Wraiths out at all times.
Once you have your Wraith turrets set down, you'll want to cast ![]() Drain Life on them. When you cast it, you'll see a small blue circle on the ground; this
is the area that your Drain Life is targeting. Make sure you summon your Wraiths close enough together that they can all be hit by a single
Drain Life. For optimal play on bosses, you'd want them summoned on top of the enemy, ensuring the enemy is also effected by your Drain Life cast. This isn't
always possible, as most bosses will move around, but it's still something to aim for when possible.
Drain Life on them. When you cast it, you'll see a small blue circle on the ground; this
is the area that your Drain Life is targeting. Make sure you summon your Wraiths close enough together that they can all be hit by a single
Drain Life. For optimal play on bosses, you'd want them summoned on top of the enemy, ensuring the enemy is also effected by your Drain Life cast. This isn't
always possible, as most bosses will move around, but it's still something to aim for when possible.
Once summoned, ![]() Dread Shade should be applied to buff your Wraiths. When clearing echoes, you will likely find most enemies are already dead before you
reach this part, but it is important for bosses and tough rares. If you have reached this point and anything is still alive, and you have enough Mana, you
can start casting some
Dread Shade should be applied to buff your Wraiths. When clearing echoes, you will likely find most enemies are already dead before you
reach this part, but it is important for bosses and tough rares. If you have reached this point and anything is still alive, and you have enough Mana, you
can start casting some ![]() Summon Volatile Zombie for additional damage until you need to recast
Summon Volatile Zombie for additional damage until you need to recast ![]() Dread Shade or
Dread Shade or ![]() Summon Wraith.
Summon Wraith.
Known Bugs
While testing this build, we ran into a small, but annoying, bug a few times. If you ever find that your Fire Wraiths seem to be 'frozen' and not attacking
or taking damage, but still counting towards your max Wraith limit. You will want to remove the skill from your hotbar and re-add it, to unsummon the Wraiths.
This bug seems to happen when you change zones while ![]() Drain Life is still active on your minions. Try to wait for it finish it's duration before
zoning out, but it's easy to forget about it when going fast, so the fix has been included to avoid any aggravation.
Drain Life is still active on your minions. Try to wait for it finish it's duration before
zoning out, but it's easy to forget about it when going fast, so the fix has been included to avoid any aggravation.
Equipment and Gear Affixes
For our gearing requirements, there are some uniques included with Legendary Potential (LP). You do not need the exact LP level to make the build work, but it is included as a goal to aim for. Also, other than Aberrant Call, none of the uniques are required. They could be replaced with well rolled rare/exalted items and the build would work fine. For all gear pieces, the higher the tier of mod suggested, the more important it is to the build.
| Gear Slot | Implicits | Modifiers |
|---|---|---|
| Two-Handed Weapon | Aberrant Call | Legendary Potential Minion Melee Damage, Minion Spell Damage Increased Cast Speed |
| Head | Armor Spell Damage Minion Spell Damage |
Prefixes Shared Increased Critical Strike Chance Shared Fire Damage Suffixes Increased Health Increased Armor |
| Amulet | Logi's Hunger | Legendary Potential Health |
| Chest | Armor Damage Leeched as Health Minion Damage Leeched as Health |
Prefixes +4 Levels of Dread Shade Intelligence Suffixes Increased Health Increased Armor |
| Belt | Poison Resistance Cold Resistance |
Prefixes Ward gained and Ailment cleanse on Potion use Increased Minion Health Suffixes Hybrid Health Increased Health |
| Ring | Minion Damage Minion Health Minion Critical Strike Multiplier |
Prefixes Intelligence Increased Minion Damage Suffixes Critical Strike Avoidance Needed Resistances |
| Ring | Minion Damage Minion Health Minion Critical Strike Multiplier |
Prefixes Intelligence Increased Minion Damage Suffixes Health Needed Resistances |
| Gloves | Julra's Obsession | Legendary Potential Cast Speed Hybrid Health |
| Feet | Movement Speed Resistances |
Prefixes Movement Speed Increased Minion Damage, Minions teleported with you after Traversal skill Suffixes Hybrid Health Health |
| Relic | Twisted Heart of Uhkeiros |
Legendary Potential Health |
A loot filter made specifically for the gear table above may be copied by pressing the button below. Once in the Loot Filter portion of the in-game menu, choose the "Paste Clipboard Contents" option to import the code.
Copy Loot Filter to Clipboard
Uniques
Let's take a closer look at some of the suggested uniques for this build.
Aberrant Call
Aberrant Call: The only required unique for the build, as you will be unable to summon enough Wraiths otherwise. It also provides a lot of points for the skill, as well as a large damage increase. Legendary Potential is not required to start playing the build, however 1LP should be easy to acquire. A 2LP version may be a bit hard for some players, but the ideal version has been included in the planner as an end goal. If you can only get a 1LP version, we recommend aiming for adding the Minion Melee/Spell Damage affix first, though the Minion Bow/Spell Damage mod is fine as well. This item can be target farmed in the "The Stolen Lance" timeline, in 'Unique or Set Staff or Sceptre' echo reward nodes. Alternatively, Merchant Guild players should be able to purchase one relatively cheaply.
Logi's Hunger
Logi's Hunger: The base version of this item is somewhat rare in comparison to the other uniques listed. It is unlikely that you will find better than an LP1 version, and an LP0 will work just fine. The added skill points and base Critical Strike Chance for Minions are both nice bonuses. However, a well rolled rare/exalted amulet with any needed Resistances for implicits can work while you work towards obtaining one. This item drops from the Volcanic Shaman in the "Spirits of Fire" timeline.
Julra's Obsession
Julra's Obsession: This is guaranteed to drop with at least 1LP, though finding a 2LP version is quite rare. We recommend getting the Cast Speed affix added first, as this will affect your Fire Wraiths as well. The Resistances and Armor are all great for helping to cap your own resists, but the flat Spell Damage is a great addition to your Wraiths' damage. This item drops from Chronomancer Julra in the Temporal Sanctum Dungeon.
Twisted Heart of Uhkeiros
Twisted Heart of Uhkeiros: A popular, though also rare, item for many builds. Even though some of the unique mods are 'wasted' in that we don't use them, such as the Strength, the implicit has the largest Health increase available on any relic. Getting one with Legendary Potential can make up for the stats lost swapping from a regular exalted relic. Until you can acquire one with LP1, you may wish to use a regular Damned Souls relic with any needed Resistances, Minion stat increases, or Health. This item drops from Emperor of Corpses in the "Reign of Dragons" timeline.
Idols
Idol slots are gained throughout the campaign, unlocking small bonuses and unique affixes for the player to discover and augment their builds with. The Idol screen consists of a grid system for the player to fill out with different sized idols, eventually filling in every part of the grid. As the Idol shape increases (1x1, 1x2, 1x3, 1x4, etc.) it will open up different affixes for you to use. This can be a great way to add some more customization to your build.
For our build, we have a few different stats we're prioritizing. Most importantly, the prefix Chance to Summon Flame Wraith, is taken on two Adorned Immortal idols, along with Health suffixes. We only get a 22% chance to summon a Fire Wraiths from the skill tree, so we need the two mods here to total up to 78%, giving us a 100% chance to summon Fire Wraiths rather than their melee-counterparts. Luckily, the affix on an Adorned idol can roll up to 57%, so it shouldn't be too hard to hit 78% total between both of the idols.
In addition to this, we are using three Large Immortal Idols to increase our own Health pool and our minions' Critical Strike Chance, as well as a single affix that grants our minions a chance to apply Marked For Death on hit. As this debuff has an 8 second duration, and we have many Wraiths attacking quickly, we only need one affix with this for them to keep the debuff up consistently. Even a low roll of 3% should keep the debuff up almost 100% of the time on bosses, where it is most needed. At 25% Resistance Reduction, this is a huge increase in damage for a single affix.
You may use the remaining slots to fill in any Resistances still needed, more Health and/or Armor if your Resistances are settled, or even a fourth Large Immortal Idol with Increased Health and Minion Critical Strike Chance.
Blessing
Blessings are permanent buffs that are applied to your character. These come in two different powers, Standard and Grand. Grand blessings are significantly stronger than the Standard Blessings. In total, there are 10 Blessing Slots, one for each Monolith Timeline. When you complete a Monolith and defeat the final boss you will be awarded a choice of three blessing with a random value. For the purpose of this guide, we are highlighting five major slots that can be filled with our recommendations, leaving the others for some personal preference.
| Blessing Name | Affix | Timeline |
|---|---|---|
| Void Resistance | The Black Sun | |
| Total Mana | Ending the Storm | |
| Physical Resistance | The Age of Winter | |
| Endurance | Spirits of Fire | |
| Critical Strike Avoidance | Reign of Dragons |
Changelog
- 22 Apr. 2024: Updated and overhauled, focus on fire wraiths, 3 skills removed, 3 added. Passive and skill trees changed heavily.
- 22 Nov. 2023: Guide Added.


GhazzyTV is a professional content creator that knows all about theory crafting builds in Path of Exile and Last Epoch and has been teaching players how to build their characters for over 9 years. He is a huge Blizzard fan with thousands of hours invested into Diablo 3 and 4 and is a frequent World of Warcraft Classic player. His builds will be helpful content for new players and veterans alike. You can find his PoE Vault Guide Hub here and his LE Guide Hub here. You can follow him on Twitch, YouTube or Twitter.
- Last Epoch Season 4: Shattered Omens Adds Corruption Crafting, a New Pinnacle Boss, and More!
- Delaware Courts Just Proved Last Epoch’s Real Risk Isn’t Failure, But Success
- Last Epoch’s New Paradox: From “All Future Content Free” to Paid Classes
- Last Epoch Confirms Paid DLC Classes With Free Expansion
- Last Epoch Season 3 Overhauls Skills, UI, Monster Behavior & More
- Last Epoch Season 3 Adds Smarter Minions & Big Changes
- Lich & Necromancer Get New Skill, Buffs, and Dark New Builds in Last Epoch!
- Last Epoch Season 3 Explores the Ancient Era!