Welcome to our Last Epoch Runemaster Lightning Frost Claw build guide for the Mage class.
Here you will learn everything about the Runemaster play style, passives, skills, strengths, and weaknesses to conquer the world of Eterra.
The Lightning Frost Claw Runemaster build is an absolute powerhouse. It combines immense Ward generation alongside
huge burst damage to fell any and all enemies in your path. This build is designed to allow you to face tank most enemies
while unloading enough electricity to light up a small city.
Strengths
Massive Ward generation
High damage with both single target and AoE
Flexible toolkit
Weaknesses
Requires good positioning
Many uniques required for optimal setup, including Legendary Potential
2.
Skill Selection
Through a combination of Runic Invocation, Frost Claw, and Lightning Blast, the Lightning Frost Claw
Runemaster build is capable of defeating even the mightiest of foes you may come across. Lightning Blast is our default skill, and used
for its ability to quick clear mobs and regenerate Mana. Frost Claw is utilized as our Mana dump, as well as our burst for Boss
and Elite mobs. Runic Invocation is the icing on the cake, and is used alongside Frost Claw to further improve our burst damage.
This destructive lightning build is further enhanced through the combined usage of Frost Wall and
Flame Ward, bringing this version of Runemaster together to be quite the tank! By walking through your
Frost Wall, Flame Ward is automatically applied to your character, granting improved defenses and a massive
amount of Ward.
Our base class is Mage, which fills the role of spell caster and magic user in Last Epoch. Upon finishing Act 1
in the campaign, your character will be offered an opportunity to select an Advanced Mastery. Each base class has three
possible Masteries to choose from. For Mage, you can choose between Passive Trees for Sorcerer, Spellsword, and Runemaster. Upon
selecting a Mastery and placing 20 Passive Points into the Mage Tree, you'll then be able to place Passive Points into the Mastery Trees.
Runemaster is the Advanced Class used for this build, and also where the majority of our Passive Points will come from. The Runemaster Tree will
focus around picking nodes that increase our Lightning Damage (to include Lightning Penetration), Ward Generation, and Critical Strike Chance. A lesser amount of
Passive Points will come from Sorcerer, focusing purely on damage dealing nodes. Spellsword is not used for the Frost Claw Runemaster build. Each Passive
Tree and their points are broken down below.
3.1.
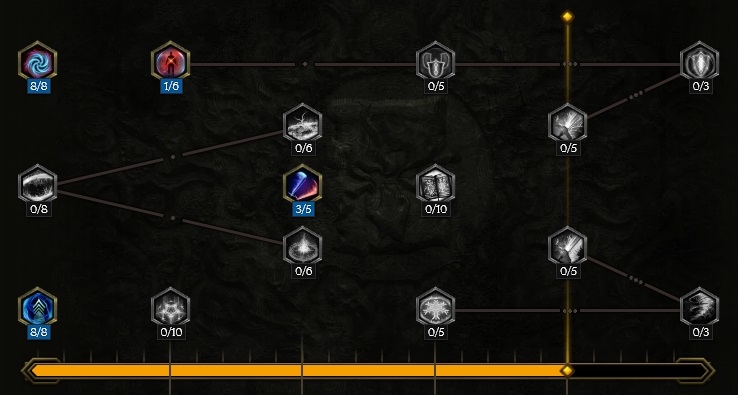
Mage Passive Points
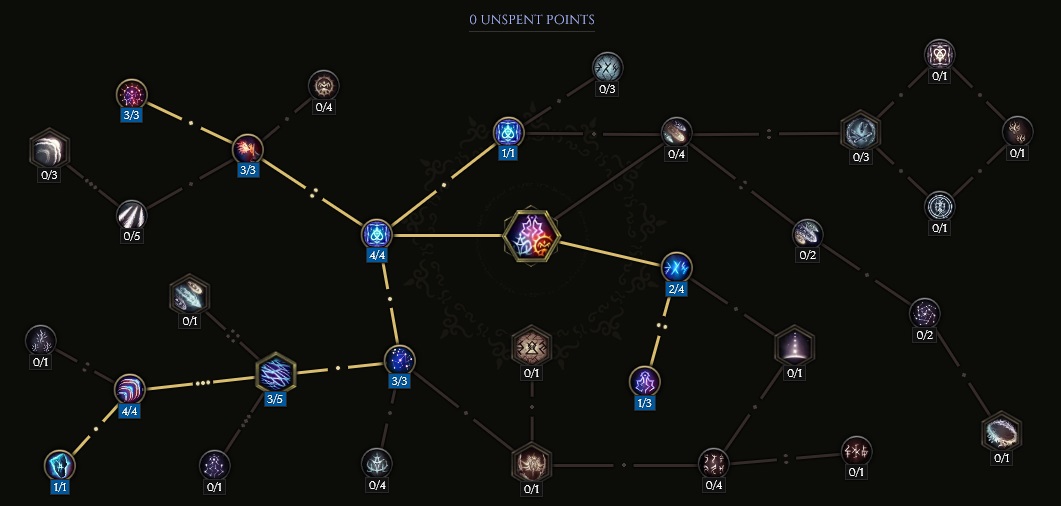
8 points into Scholar.
8 points into Arcanist.
1 point into Reactive Ward: Grants Ward after sustaining 30% of your total Health in damage.
3 points into Mage Flurry: Increased Casting Speed, and lower cooldown on Teleport.
Our base class is Mage, which fills the role of spell caster and magic user in Last Epoch. Upon finishing Act 1
in the campaign, your character will be offered an opportunity to select an Advanced Mastery. Each base class has three
possible Masteries to choose from. For Mage, you can choose between Passive Trees for Sorcerer, Spellsword, and Runemaster. Upon
selecting a Mastery and placing 20 Passive Points into the Mage Tree, you'll then be able to place Passive Points into the Mastery Trees.
Runemaster is the Advanced Class used for this build, and also where the majority of our Passive Points will come from. The Runemaster Tree will
focus around picking nodes that increase our Lightning Damage (to include Lightning Penetration), Ward Generation, and Critical Strike Chance. A lesser amount of
Passive Points will come from Sorcerer, focusing purely on damage dealing nodes. Spellsword is not used for the Frost Claw Runemaster build. Each Passive
Tree and their points are broken down below.
3.2.
Runemaster Passive Points
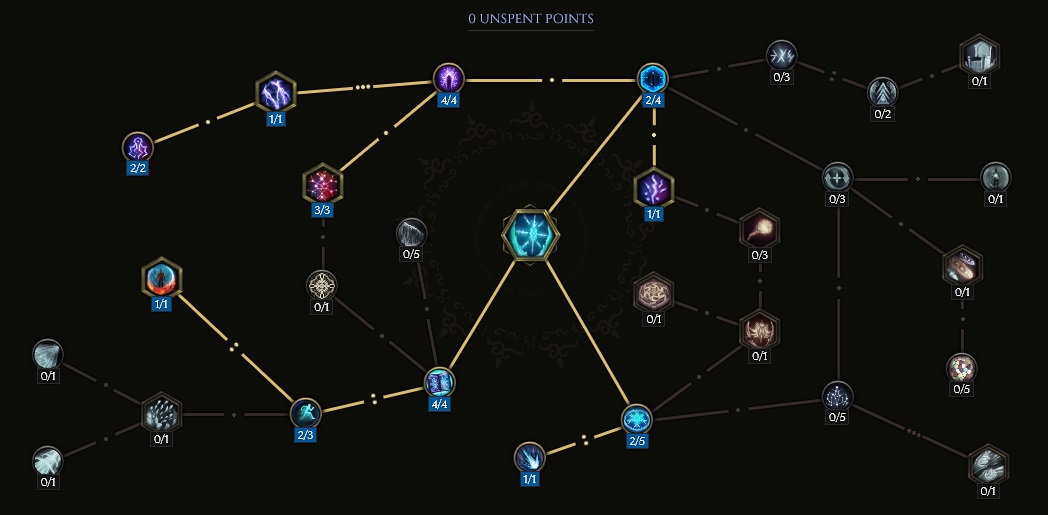
5 points into Unsealed Mana: Increased Cast Speed and Mana. At 5 points, gives bonus Ward from repeated usage of Lightning Blast.
8 points into Sphere of Protection: Improves defensives while enemies are Ignited, Shocked, or Chilled.
8 points into Arcane Focus: Ward gain on cast.
6 points into Inscribed Instruments: This build uses a Wand, so utilizes the Critical Strike Multiplier aspect of this node.
5 points into Decree of the Bountiful Ocean: Increased Mana Generation, this effect is doubled if you have at least a single Gon (Lightning) Rune.
8 points into Ancient Inscriptions.
5 points into Brand of Deception: Lightning Penetration, and at 5 points deals additional Lightning Damage over 3 seconds through Brand of Deception.
5 points into Order's Imposition: Increases damage dealt to enemies inflicted with Brand of Deception.
1 point into Runeword: Hurricane: Extra Lightning Damage.
4 points into Jagged Veil: Grants Ward upon landing a Critical Hit.
7 points into Celestial Doom: Increased Spell Damage and Ward Gain against Bosses when afflicted by Brand of Deception.
Our base class is Mage, which fills the role of spell caster and magic user in Last Epoch. Upon finishing Act 1
in the campaign, your character will be offered an opportunity to select an Advanced Mastery. Each base class has three
possible Masteries to choose from. For Mage, you can choose between Passive Trees for Sorcerer, Spellsword, and Runemaster. Upon
selecting a Mastery and placing 20 Passive Points into the Mage Tree, you'll then be able to place Passive Points into the Mastery Trees.
Runemaster is the Advanced Class used for this build, and also where the majority of our Passive Points will come from. The Runemaster Tree will
focus around picking nodes that increase our Lightning Damage (to include Lightning Penetration), Ward Generation, and Critical Strike Chance. A lesser amount of
Passive Points will come from Sorcerer, focusing purely on damage dealing nodes. Spellsword is not used for the Frost Claw Runemaster build. Each Passive
Tree and their points are broken down below.
3.3.
Sorcerer Passive Points
5 points into Arcane Momentum: Increased Cast Speed for continued usage of spells.
6 points into Essence of Celerity: Arcane Momentum stacks last longer, increase your Spell Damage, and grant increased Movement Speed.
8 points into Calculated Destruction: Increased Intelligence. At 5 points, grants Spell Critical Strike per Intelligence.
1 point into Ceraunomancer: Used to unlock the following node.
5 points into Rift Bolt: Lightning Penetration and Life Leech.
In this section, we will break down each skill and highlight the key passives we have selected to make the skill shine in the build.
While some of these skills do allow for some variation to exist depending on your own custom choices, we recommend utilizing the skill
trees as presented until you have a strong understanding of the build itself.
3.4.
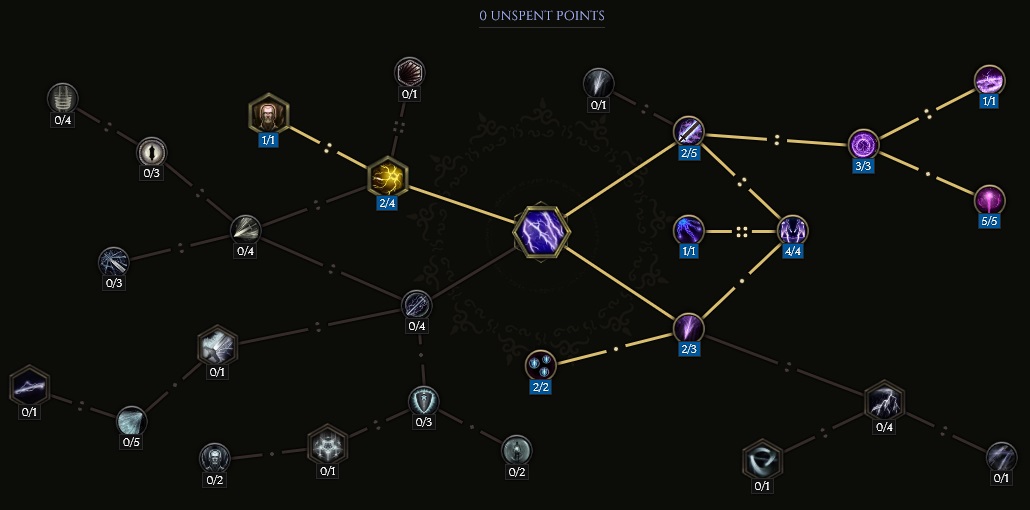
Lightning Blast
Lightning Blast is likely going to be your most-used skill in the entire build. Lightning Blast has a 25% chance to quad cast,
increasing it's damage by quite a bit and is capable of clearing your entire screen in a single button press. It also boasts great synergy with
the Unique Off-Hand Catalyst Fragment of the Enigma, which increases the damage and explosion radius of Spark Charge. This spell also auto-casts off
Frost Wall both through proximity and the player walking through it. With the consideration of Mana costs, this is the default spell to use in this kit
as it costs nothing to use and effectively becomes our filler action once we've blown our burst on a boss.
3.4.1.
Order of Skill Points
2 points into Arcing Power: Allows Lightning Blast to hit multiple targets.
2 points into Frontloaded.
4 points into Overcharge: Allows double casting chance.
1 point into Hypercharge: Allows quad casting chance.
3 points into Cloud Answer: Chance to inflict Spark Charge, which deals AoE damage around the enemy.
1 point into Final Spark: This explodes Spark Charge, dealing the damage instantly if you hit an enemy afflicted by the deuff with Lightning Bolt again.
5 points into Mortal Capacitor: Boosts Spark Charge damage.
2 points into Storm Razor.
2 points into Lightning Attunement: Chance to grant Lightning Aegis on cast, boosting damage and defensives.
1 point into Closed Circuit: Allows Lightning Blast to chain off yourself and allies, increasing Critical Chance and Damage.
Please note, you may not have as many skill points to use until you have the required targeted gear affixes.
1 point in Closed Circuit, 1 point in Lightning Attunement, and 1 point in Storm Razor can be
left out until you gain all 23 Passive Points for this build.
In this section, we will break down each skill and highlight the key passives we have selected to make the skill shine in the build.
While some of these skills do allow for some variation to exist depending on your own custom choices, we recommend utilizing the skill
trees as presented until you have a strong understanding of the build itself.
3.5.
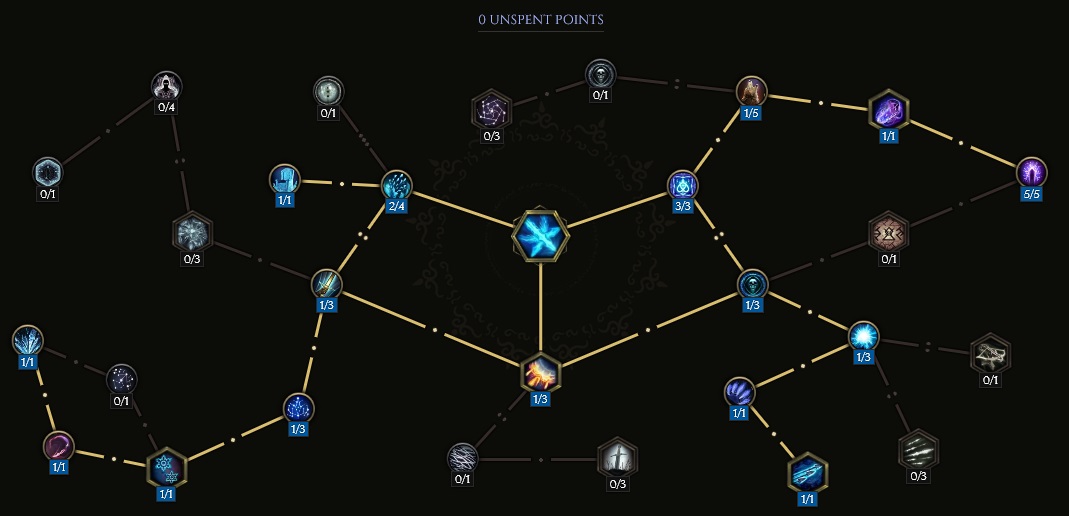
Frost Claw
Frost Claw is used as our Mana dump for this build. Most uses will be manually casted, but there is a chance you retaliate
when taking hits and cast it that way as well. The name is a bit misleading for this build, as the damage has been converted to Electric
rather than Frost. Through nodes in the bottom left of the Passive Tree, Frost Claw becomes a multi-hit attack, leaping both forward and
back to the caster. These nodes make it more effective for clearing, but also create a situation where every cast is a double hit if
you're close enough to the enemy, making quick work of Bosses and Elites. As a final note, this spell also generates a small amount
of Ward when used.
3.5.1.
Order of Skill Points
3 points into Gift of Winter: Reduces Mana cost.
1 point into Artor's Sceptre: Shock Chance.
1 point into Spark Artillery: Converts damage from Cold to Lightning.
5 points into Spark of Celerity: Reduces Mana cost.
1 point into Shiver Shell: Grants Ward on cast.
1 point into Glamdring: Only used to unlock further node progress.
1 point into Cold Star: Moderate sized boost to damage when above 1200 Ward.
1 point into On Through The Snow: Creates a second hit behind the initial placement of the spell.
1 point into Frozen Malice: The second hit from the previous node is now targeted on a close enemy.
1 point into A Crack in the Ice: This is the node that causes Frost Claw to return back to the player, detonating on the place the player is standing for a final hit.
2 points into Rending Cascade.
1 point into Frozen Reign: Reduced Mana cost and increased damage against Frozen enemies.
1 point into Fen of the Frozen: Adds Slow and Chill Chance.
1 point into Brightfrost: Chance to cleanse ailments on manual cast.
1 point into Hand of Morditas.
1 point into Volley of Glass: Removes the AoE effect, but each projectile is its own unique instance of damage. Nearly doubles Mana cost.
Due to our gear, we have more points than the standard allocation of 20 points. Until you have all 23 from gear, remove 3 points
from Spark of Celerity, but do take note that this spell will consume more Mana until you've fixed this.
In this section, we will break down each skill and highlight the key passives we have selected to make the skill shine in the build.
While some of these skills do allow for some variation to exist depending on your own custom choices, we recommend utilizing the skill
trees as presented until you have a strong understanding of the build itself.
3.6.
Runic Invocation
Runic Invocation is a unique spell. It can become 40 different spells depending on the configuration of Runes
you pull, based upon the last three damage types you've used. For this build specifically, all casts of Runic Invocation should
aim to be triple Lightning, which uses an AoE Lightning Damage spell that sits for a short amount of time at the targeted location and
periodically pulses. There are niche uses for other combinations, and those will be gone over below in the Playstyle section of the build.
This spell acts as an extra burst of damage, but also serves to proc Prism Shard off our suggested Helmet,
Prismatic Gaze. Casts of Runic Invocation will not be frequent, as we rely on a build up of stacks to maximize the damage on cast.
Each cast of Runic Invocation provides a nice chunk of Ward to boot.
4 stacks of Attuned Approach: Generates a large amount of Ward, crucial for on demand survivability.
3 points into Rune Slinger: Further improves Ward generation.
3 stacks of Inscribed Patterns: Mostly used for Ward gain, may occsionally provide extra Mana Regen when using
Traversal. Feel free to keep this at 1 point until later on, users discretion.
3 points into Runic Energy: This is what generates stacks between casts and provides a boost in damage.
4 points into Copied Scrolls: Place 1 point into this, take the singular point in Arcane Battery, then
come back and place the remaining 3 points into Copied Scrolls. These two nodes build up massive hit potential.
1 point into Elemental Lore: Lightning Penetration.
2 points into Transcriber of Power: Boosts damage based on number of Runes held after use.
1 point into Word of Lagon: Rewards the player for using Gon (Lightning) Runes by adding Shock
Chance and Critical Strike Chance to Runic Invocation.
3 points into Glyphcarver's Dominance: Increases the size of the spell by a substantial amount.
Due to our gear, we have more points than the standard allocation of 20 points. Until you have the 25 points from gear, remove 3 points from Glyphcarver's Dominance and
2 points from Copied Scrolls.
In this section, we will break down each skill and highlight the key passives we have selected to make the skill shine in the build.
While some of these skills do allow for some variation to exist depending on your own custom choices, we recommend utilizing the skill
trees as presented until you have a strong understanding of the build itself.
3.7.
Frost Wall
Frost Wall honestly does a ton of leg work for this build. This spell places a moderately large barrier on the ground
that does several things for us. For starters, the barricade will cast Lightning Blast at enemies that are close by periodically,
as well shocking them the first time you pass through it. Upon passing through your Frost Wall, you will proc Flame Ward as well.
This provides an on-demand defensive shield, increasing Armor and Ward by a substantial amount. This does place a cooldown on both Frost
Wall and Flame Ward, so keep that in mind.
3.8.
Order of Skill Points
4 points into Crystals of Protection: Doubles Ward and Mana Gain if you place your Frost Wall a short distance away before walking through it.
2 points into Boosted Kickoff: Mainly taken to path onto the next node.
1 point into Prepared Wards: Walking through your Frost Wall auto-procs your Flame Ward.
2 points into Biting Limit: Increased Shock Chance when enemies stand in your Frost Wall.
1 point into Crackling Barrier: Converts all sources of Cold to Lightning.
4 points into Lightning Rod: This node is how you get Frost Wall to cast Lightning Blast, which procs upon moving through the pillars.
1 point into Charged Pylons: Lightning Blast is now auto casted from the outer pillars.
2 points into Amplified Currents: Lightning Blast will now cast every time an enemy walks through Frost Wall's pillars.
3 points into Aspirant's Arrival: Boosts your next cast of Runic Invocation.
2 points into Marching Winter.
1 point into Chilled Touch.
Due to our gear, we have more points than the standard allocation of 20 points. Prior to getting the suggested 23 Skill Points, remove points entirely
from Marching Winter and Chilled Touch.
In this section, we will break down each skill and highlight the key passives we have selected to make the skill shine in the build.
While some of these skills do allow for some variation to exist depending on your own custom choices, we recommend utilizing the skill
trees as presented until you have a strong understanding of the build itself.
3.9.
Flame Ward
Flame Ward brings this Runemaster build together beautifully. This spell will turn your character into a seemingly impenetrable
tank, providing an immense boost to both Armor and Ward every time the spell goes off. You will never have to manually cast this, as it's
auto-casted by walking through your Frost Wall. Aim to keep Flame Ward near 100% uptime to ensure survivability.
3.9.1.
Order of Skill Points
3 points into Dilation: Increases the duration of both Flame Ward and Fire Aura.
1 point into Fire Aura: Creates an area around the player that deals damage to enemies over time.
1 point into Frost Ward: Converts Fire Damage to Cold Damage, as well as adding Freeze Rate to Fire Aura.
4 points into Frostguard.
1 point into Stalwart Defense.
5 points into Barrier.
2 points into Shrewd Shielding: Lowers Mana cost.
1 point into Mental Aegis: Only taken to proceed to the next node.
4 points into Warmth: Increases Mana Regeneration.
Due to our gear, we have more points than the standard allocation of 20 points. Prior to getting the extra 2 points from gear, remove 2 points from Frostguard.
The playstyle for Lightning Frost Claw is fast-paced, but requires a bit of resource management. The build revolves around expending burst through
Frost Claw, then going through a "filler phase" with Lightning Blast while you regain Mana reserves. During this time frame, the player should be strategically
placing their Frost Wall down in such a way to ensure it's close enough to the enemy for Lightning Blast to proc and close enough to the player so we actually
have the opportunity to run through it, yet it still needs to be far enough away for us to benefit from the passive Crystals of Protection. Runic Invocation
should be used upon reaching maximum stacks of Runic Energyafter you've passed through your Frost Wall, making sure to boost it through the passive
Aspirant's Arrival.
4.1.
Runic Invocations
Due to the nature of Runic Invocation, this will allow you access to several spells that
can be used for different situations. While Flame Rush will give us the ability to call more
than just standard Gon Runes, this build scales best with Lightning Damage, and Invocations
using Lightning Damage should be prioritized.
Ball Lightning (Gon Rune - Gon RuneGon Rune): Shoots a circular AoE at the target location. This will be our main
Invocation used, as it procs Prismatic Gaze and deals a substantial amount of damage for
both mapping and boss fights. This requires mobs be grouped together to be effective, though.
Sea of Sparks (Gon Rune - Gon Rune):
Places Lightning AoEs under targets which have a short delay before they
explode. This is useful if needing to eliminate low health mobs that may be spread out.
Echoes of Thunder (Rah Rune - Rah Rune -
Gon Rune): Great AoE damage that can immediately follow after using Flame Rush
and one cast of either Lightning Blast or Frost Claw.
Plasma Orb (Rah Rune - Gon Rune -
Rah Rune): Harder to conjure given the spells are our disposal, but can be useful if
speedrunning maps.
A full list of Invocations can be found by clicking the link below.
You may have noticed we've taken Flame Rush on our hotbar. While Teleport was a contender, this Traversal Skill does not pass through
your Frost Wall when used; it actually teleports (this may be less surprising to some of you) you past it and you never make contact, losing out
on several benefits. While Flame Rush may feel a bit clunkier, this also gives you the ability to benefit from affixes that provide boosts
from Channeling. Ultimately, it's up to you on which skill you decide to take.
5.
Equipment and Gear Affixes
For this build, we will be focusing on several main affixes for each piece of non-unique gear, as well as working towards acquiring the specific Uniques needed
to make this build operate correctly. Our equipment will focus on these specific affixes for the Implicits and Modifier stats.
Gear Slot
Implicits
Modifiers
Wand
Mad Alchemist's Ladle
Prefixes Intelligence
Off-hand Catalyst
Fragment of the Enigma
Prefixes Intelligence
Head
Armor
Prefixes Intelligence Lightning Critical Strike Multiplier Mana Spent Gained as Ward
Suffixes Health % Critical Strike Avoidance Flat Health
Amulet
Increased Cast Speed
Prefixes Critical Strike Multiplier Increased Mana Regeneration Lightning Damage
Suffixes Chance to Shred Armor on Hit Needed Resistances
Increased Cooldown Recovery Speed + to All Attributes
Prefixes Increased Mana Regen Intelligence
Suffixes Needed Resistances
Ring
Quicksilver Coil
Prefixes Intelligence
Suffixes Critical Strike Avoidance
Gloves
Armor Mana
Prefixes Mana Intelligence Cast Speed
Suffixes Chance to Apply Fraility on Hit Critical Strike Avoidance Needed Resistances
Feet
Movement Speed Armor
Prefixes Intelligence Movement Speed Vitality
Suffixes Hybrid Health Critical Strike Avoidance Flat Health
Relic
Twisted Heart of Uhkeiros
Prefixes Intelligence
A loot filter made specifically for the gear table above may be copied by pressing the button below. Once in
the Loot Filter portion of the in-game menu, choose the "Paste Clipboard Contents" option to import the code.
Copy Loot Filter to Clipboard
Press the Copy 📋 button to copy the following text to your clipboard
This build can be played with absolutely zero Uniques, however it is not suggested to do so once you begin climbing Corruption in
Empowered Monoliths. This build can and should use multiple Uniques, and they are listed in order of importance below.
6.1.
Twisted Heart of Uhkeiros
Twisted Heart of Uhkeiros: This relic is by far the most important part of ensuring your survivability. It
converts current Health into Ward any time you cast an Elemental Spell. Combined with the Blessing Grand Hunger of the Void,
you'll be able to continually generate Ward while also refilling your Health on each cast. This Relic can be target farmed in
Monolith Timeline "Reign of Dragons".
6.2.
Mad Alchemist's Ladle
Mad Alchemist's Ladle: Provides a massive boost in damage and should be taken over any other Wand. This is a fairly common drop, and
can be equipped early (Level 17) so it shouldn't be a problem to acquire.
6.3.
Fragment of the Enigma
Fragment of the Enigma: Provides a significant boost in damage to Spark Charge, scaling off Intelligence. This Catalyst can be found from
normal drops and is fairly common. Otherwise, target farm on the Monolith Timeline "The Stolen Lance" Echoes.
6.3.1.
Optional Gearing
Telf'un's Mirage: These boots work really well in tandem with Flame Rush
due to the Channeling perks. You must roll Intelligence
on them for them to be useful, otherwise use something else. They're fairly common as a drop,
but can be target farmed in Echoes in the Monolith Timeline "Spirits of Fire".
Unstable Core: Provides a Skill Level to all of our spells, but must have rolled Intelligence to be used. This is a rare drop, but can be target farmed in
the Monolith Timeline "Blood, Frost and Death".
Prismatic Gaze: We'll use Runic Invocation to set off Prism Shards from this Helmet. Rolling Intelligence on this Helmet is important. This is
a rare drop, so target farm it in the Monolith Timeline "The Black Sun".
Swaddling of the Erased: These are Weaver's Will Gloves, thus rely on a bit of luck moreso than normal to get proper rolls. Hope for Intelligence. They're a fairly common
drop, it's just a matter of acquiring the proper affixes.
Quicksilver Coil: The least important gear piece, this Ring should only be used if you roll Intelligence and, ideally, Critical Strike Avoidance. Fairly common of a drop,
however if you get the wrong affixes, you should use another Ring instead that better fits the stats of this build.
7.
Idols
Idol slots are gained through the campaign, unlocking small bonuses and unique affixes for the player to discover and augment their builds with. The Idol screen
consists of a grid system for the player to fill out with different sized Idols, eventually filling in every part of the grid. As the Idol shape increases (1x1, 1x2,
1x3, 1x4, etc.) the stronger an affix you might find for your build.
For this build we'll focus on Idols that provide Resistances we miss out on with our gearing. This will likely change from player to player, so
adapt your Idols appropriately. Noteworthy affixes to mention here are Increased Cast Speed while you have Lightning Aegis, flat increases to Lightning Damage, and
generic increases to Health.
8.
Blessing
Blessings are permanent buffs that are applied to your character. These come in two different powers, Standard and Grand. Grand blessings are significantly
stronger than the Standard Blessings. In total, there are 10 Blessing Slots, one for each Monolith Timeline. When you complete a Monolith and defeat the final boss you
will be awarded a choice of three blessing with a random value.
Blessing Name
Affix
Timeline
Grand Hunger of the Void
Spell Damage Leeched as Health
The Black Sun
Grand Mysteries of the Deep
Chance to Shred Lightning Resistance on Hit
Ending the Storm
Grand Resolve of Humanity
+ All Resistances
Reign of Dragons
Grand Bulwark of the Tundra
+ Armor %
The Age of Winter
The Blessings listed above cover the most important slots, with the remaining Blessing Slots being filled
with whatever the player may be lacking for stats.
9.
Changelog
27 Mar. 2024: Updated for 1.0.
12 Jan. 2024: Loot Filter added.
04 Oct. 2023: Guide Added.
Show more
Show less
ABOUT THE AUTHOR
EMP1241 is a Marine veteran who is currently pursuing higher education in Aerospace Engineering. He spends much of his
time outside of his studies playing ARPGs, Builders, and MOBAs. He is frequently seen on his
Twitch channel discussing science, space, or video games.
 Massive Ward generation

 Requires good positioning


 Teleport.
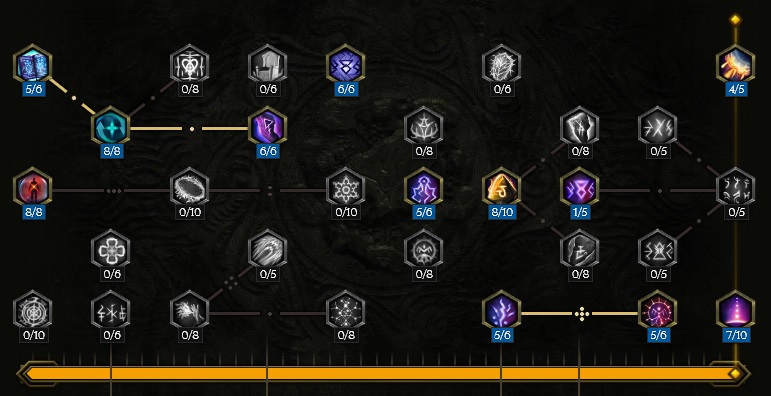
 Lightning Blast.
 Flame Ward.
 Runic Invocation.
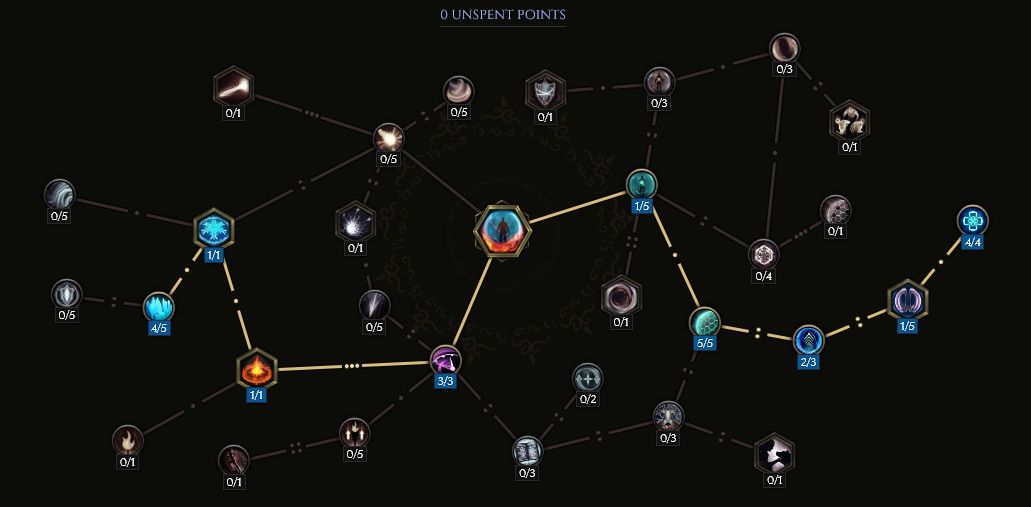
 Fire Aura: Creates an area around the player that deals damage to enemies over time.
 Ball Lightning (Gon Rune - Gon Rune
Gon Rune): Shoots a circular AoE at the target location. This will be our main
Invocation used, as it procs Prismatic Gaze and deals a substantial amount of damage for
both mapping and boss fights. This requires mobs be grouped together to be effective, though.
Ball Lightning (Gon Rune - Gon Rune
Gon Rune): Shoots a circular AoE at the target location. This will be our main
Invocation used, as it procs Prismatic Gaze and deals a substantial amount of damage for
both mapping and boss fights. This requires mobs be grouped together to be effective, though. Sea of Sparks (Gon Rune - Gon Rune):
Places Lightning AoEs under targets which have a short delay before they
explode. This is useful if needing to eliminate low health mobs that may be spread out.
Sea of Sparks (Gon Rune - Gon Rune):
Places Lightning AoEs under targets which have a short delay before they
explode. This is useful if needing to eliminate low health mobs that may be spread out. Echoes of Thunder (Rah Rune - Rah Rune -
Gon Rune): Great AoE damage that can immediately follow after using
Echoes of Thunder (Rah Rune - Rah Rune -
Gon Rune): Great AoE damage that can immediately follow after using  Flame Rush
and one cast of either
Flame Rush
and one cast of either  Frost Claw.
 Plasma Orb (Rah Rune - Gon Rune -
Rah Rune): Harder to conjure given the spells are our disposal, but can be useful if
speedrunning maps.
Plasma Orb (Rah Rune - Gon Rune -
Rah Rune): Harder to conjure given the spells are our disposal, but can be useful if
speedrunning maps.