


Build Introduction
The  Arc Lash Sorcerer build is ideal for players wanting a simple, yet effective, melee playstyle. This is the fastest Sorcerer build in terms of mobility, and the build is extremely effective at speed-farming all endgame activities in Diablo 4.
Compared to similar Lightning Sorcerer endgame builds that are ranked high on the tier list, like Ball Lightning and Charged Bolts, the Arc Lash Sorcerer has lower single-target damage. The Arc Lash Sorcerer clears easy content faster than any other build, but bosses can take longer to kill.
This endgame build guide assumes your character is at least Level 50. Check the Sorcerer Leveling Guide if you need help getting there.
Strengths and Weaknesses
- High sustained damage
- Simple playstyle
- Multiple defensive skills and crowd controls for survivability
- Damage reliant on Lucky Hit procs
- Requires melee range
- Lacks survivability when Defensive Skills or crowd controls are inactive
To see how this build compares to the other builds on our site, you can check out our build tier lists.
Skill Tree Points and Skill Bar
Arc Lash  Unstable Currents
  Teleport
  Flame Shield
  Ice Armor
  Lightning Spear
 The Skill Tree above shows the full allocation of 58 Skill Points for the Arc Lash Sorceress build. Make sure you obtain the 10 Skill Points available from Renown.
Enchantment Slots
Non-Ultimate Skills can be equipped in two available Enchantment Slots. A skill must have at least one skill point allocated to it in order to be used in the Enchantment Slot. Skill points that have been granted through gear work as well.
Slot  Fire Bolt in the first Enchantment Slot to activate Burning bonuses from
  Devouring Blaze and Paragon.
Slot Teleport in the second Enchantment Slot. Utilize the synergies in the Telestomp build variant for speed-farming.
Paragon
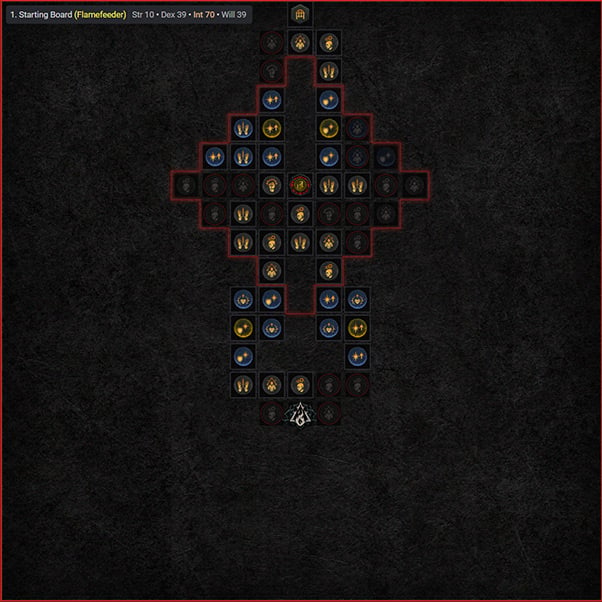
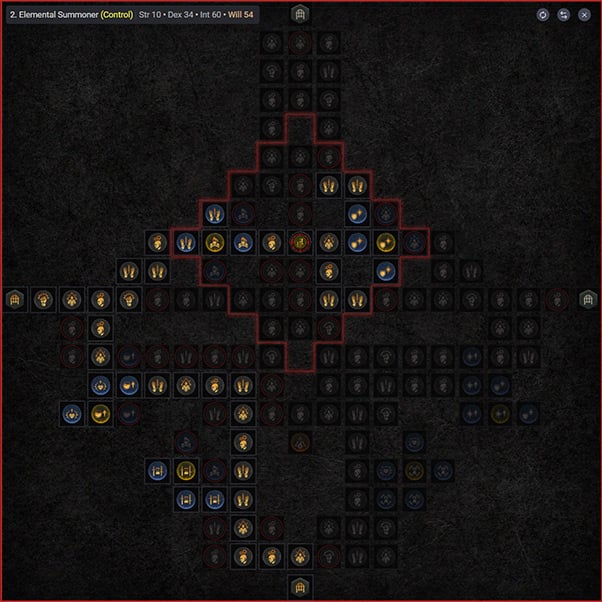
Paragon unlocks after reaching Level 50, and the progression system offers a considerable boost to character power. The images below provide a visual of each Paragon Board setup for the Arc Lash Sorcerer.
Important Notes:
- Make sure you select the correct Legendary Boards and rotate them into the correct orientation.
- Attach Legendary Boards in the correct order, as bonus requirements of Rare Nodes increase with their placement order.
- Additional bonus requirements on Rare Glyphs may not be obtainable until they gain increased radius range at Level 15.
1. Starting Board (Flamefeeder)
Socket ![]() Flamefeeder for increased damage to Burning targets. Prioritize leveling Flamefeeder to 15, as the increased radius is needed to allocate 25 Dexterity for the additional bonus.
Flamefeeder for increased damage to Burning targets. Prioritize leveling Flamefeeder to 15, as the increased radius is needed to allocate 25 Dexterity for the additional bonus.
2. Elemental Summoner (Control)
Attach the ![]() Elemental Summoner board without any rotations. Socket
Elemental Summoner board without any rotations. Socket ![]() Control and prioritize leveling it to 15 for the increased radius to gain the additional bonus. The Legendary Node on this board is not utilized.
Control and prioritize leveling it to 15 for the increased radius to gain the additional bonus. The Legendary Node on this board is not utilized.
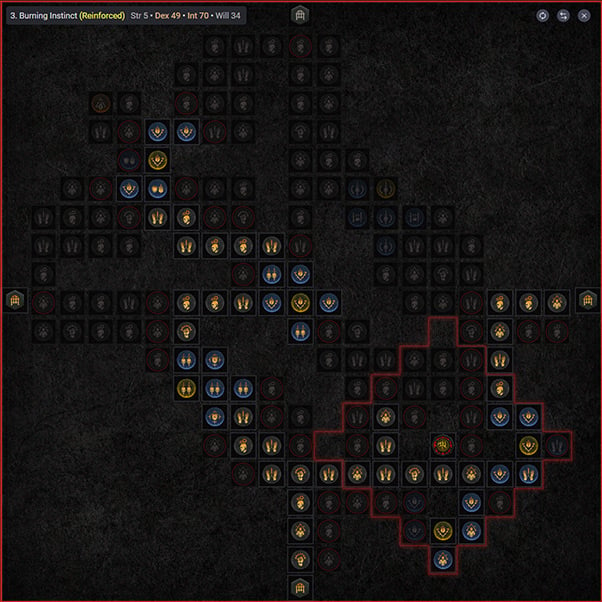
3. Burning Instinct (Reinforced)
Rotate the ![]() Burning Instinct board 3 times before attachment. Socket
Burning Instinct board 3 times before attachment. Socket ![]() Reinforced to boost the Damage Reduction stat on
Reinforced to boost the Damage Reduction stat on ![]() Smoldering Embers. Prioritize leveling Reinforced to 15 to gain increased radius, as it is needed to obtain the Damage Reduction in the additional bonus. The Legendary Node on this board is not utilized.
Smoldering Embers. Prioritize leveling Reinforced to 15 to gain increased radius, as it is needed to obtain the Damage Reduction in the additional bonus. The Legendary Node on this board is not utilized.
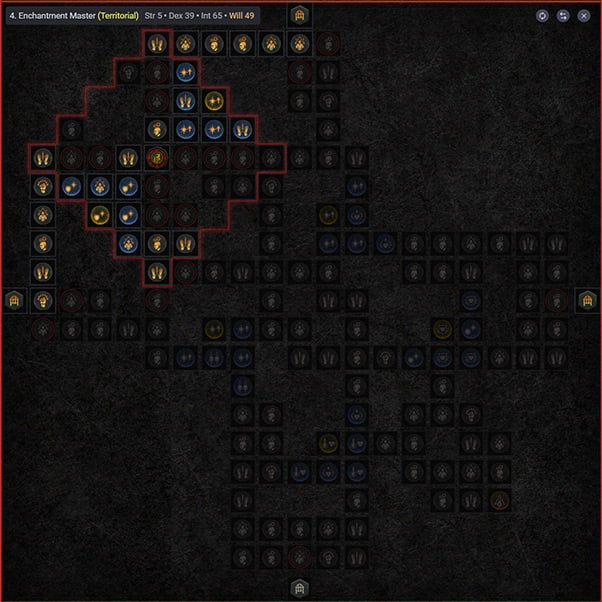
4. Enchantment Master (Territorial)
Attach the ![]() Enchantment Master board without any rotations. Socket
Enchantment Master board without any rotations. Socket ![]() Territorial and prioritize leveling it to 15 for the increased radius to obtain the additional bonus. The Legendary Node on this board is not utilized.
Territorial and prioritize leveling it to 15 for the increased radius to obtain the additional bonus. The Legendary Node on this board is not utilized.
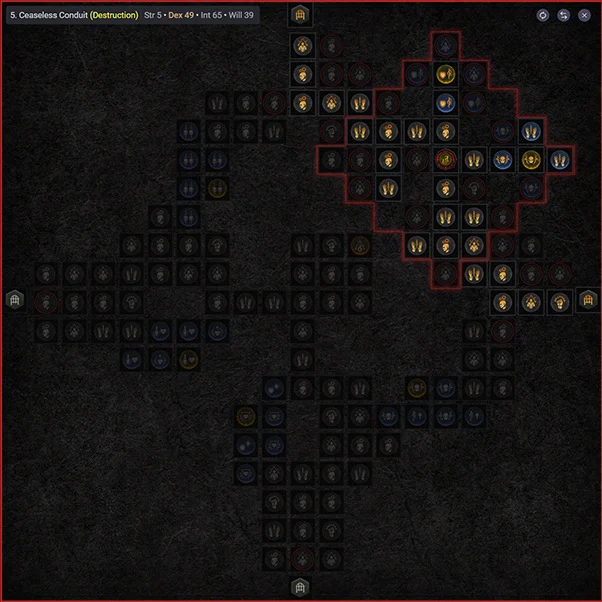
5. Ceaseless Conduit (Destruction)
Rotate the ![]() Ceaseless Conduit board 2 times before attachment. Socket
Ceaseless Conduit board 2 times before attachment. Socket ![]() Destruction for increased Critical Strike Damage and a separate damage multiplier. The Legendary Node on this board is not utilized.
Destruction for increased Critical Strike Damage and a separate damage multiplier. The Legendary Node on this board is not utilized.
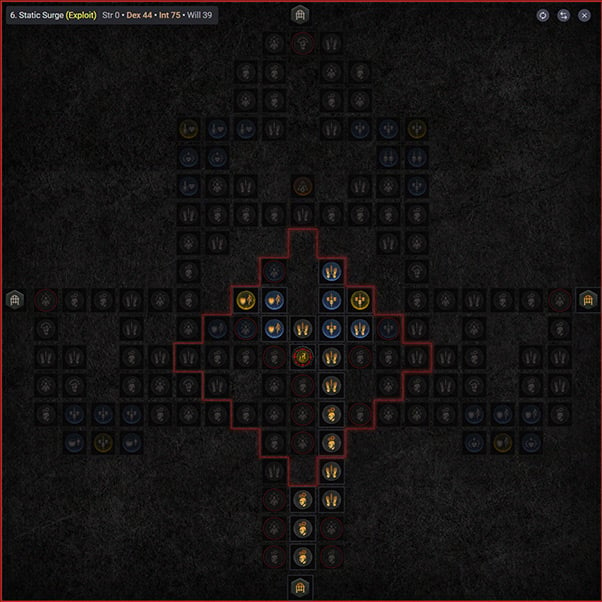
6. Static Surge (Exploit)
Rotate the ![]() Static Surge board 1 time before attachment. Socket
Static Surge board 1 time before attachment. Socket ![]() Exploit and prioritize leveling it to 15 for the increased radius to gain the additional bonus. The Legendary Node on this board is not utilized.
Exploit and prioritize leveling it to 15 for the increased radius to gain the additional bonus. The Legendary Node on this board is not utilized.
Paragon Board images courtesy of d4builds.gg. Click this link for the Paragon planner.
Gear, Gems, Elixirs, and Stats
Season 4 brings an incredible shift in character progression systems. The major rework to itemization and crafting in Patch 1.4.0 changes the core mechanics of Diablo 4, and the changes will remain in effect beyond Season 4. For further details, read the overview in the Tempering and Masterworking section.
Legendary Aspects
Listed below are all the best-in-slot Aspects for the Arc Lash Sorcerer build. Salvage Legendary Items with higher Aspect values to unlock them in the Codex of Power, and then imprint them onto Legendary Items with the preferred affixes.
| Gear Slot | Aspect Name | Legendary Aspect Power |
|---|---|---|
| Amulet (+50% bonus effect) |  Aspect of the Moonrise Aspect of the Moonrise | Damaging an enemy with a Basic Skill grants you 4% Attack Speed for 10 seconds, stacking up to 5 times. Upon reaching maximum stacks, you enter a Vampiric Bloodrage, gaining [40 -80%] Basic Skill damage and 15% Movement Speed for 10 seconds. |
| Ring Slot #1 (replaced by | Rapid Aspect | Basic Skills gain [15 – 30%] Attack Speed. |
| Ring Slot #2 |  Aspect of Adaptability Aspect of Adaptability | When cast below 50% Maximum Resource, Basic Skills generate 3 of your Primary Resource, once per cast. When cast at or above 50% Maximum Resource, Basic Skills deal [40 – 80%] increased damage. |
| Wand or Focus | Storm Swell Aspect | You deal x [21 – 30%] increased damage to Vulnerable enemies while you have a Barrier. |
| Wand or Focus | Aspect of Shredding Blades | Ice Blades’ chance to apply Vulnerable is increased by +20% and the Vulnerable duration is increased by 4 seconds. You gain x [15 – 25%] Vulnerable Damage. Note: Use only for the Vulnerable Damage. |
| Gloves (replaced by | Conceited Aspect | Deal [15 – 25%] increased damage while you have a Barrier active. |
Chest (replaced by  Raiment of the Infinite) Raiment of the Infinite) |  Aspect of Disobedience Aspect of Disobedience | You gain [0.6 – 1.1%] increased Armor for 4 seconds when you deal any form of damage, stacking up to [36 – 66%]. |
| Helm (replaced by | Snowveiled Aspect | Casting Ice Armor makes you Unstoppable and grants 30% bonus Armor for [3.0 – 5.0] seconds. |
| Pants (replaced by | Aspect of Might | Basic Skills grant 20% Damage Reduction for [2.0 – 6.0] seconds. |
| Boots (optional replacement with |  Hectic Aspect Hectic Aspect | After casting 5 Basic Skills, one of your active Cooldowns is reduced by [1 – 2] seconds. |
Gems
Listed below are the best Gems to socket into gear for each item type.
| Slot | Gems |
|---|---|
| Weapon | |
| Armor | |
| Jewelry | Any Resistance Gems needed or |
Elixirs
Visit the Alchemist in any main town to craft helpful Elixirs that increase stats and experience gain for 30 minutes. Make sure to forage plants and pick up the necessary crafting materials during your adventures; they randomly spawn around the world. Elixirs can also drop randomly from enemies and chests during many activities in Diablo 4. Listed below are the best Elixirs to consume, ranked by importance.
 Elixir of Precision provides the highest damage output increase, if not already capped at 100% Critical Strike Chance.
 Elixir of Advantage increases damage output, if not already capped at 100% Attack Speed bonus from gear and Paragon.
 Elixir of Fortitude is the best general purpose option for survivability. Increased Maximum Life grants larger Barriers from
  Protection and
  Ice Armor.
 Elixir of Iron Barbs can provide a high amount of Physical Damage Reduction. Armor becomes more effective as you approach the Armor cap (9,320 against monster level 100 and above).
 - Specific Resistance Elixirs can be utilized to survive against Uber Bosses with elemental attacks.
Return to the Alchemist again when you reach Level 20, 30, 45, 60, 70, 80 and 90, to upgrade your potion. The extra healing is essential to survival.
Stat Priority and Tempering Affixes
Listed below are the affixes to prioritize on gear for Arc Lash Sorcerers. Each line of affixes are listed in order of importance. Affixes on the same line are considered to be equally important, but their benefits may vary depending how much is stacked or other character stats. Bolded affixes are the most important targets for Masterworking upgrades.
A One-handed Weapon and Focus setup is preferred over a Staff for more beneficial utility affixes and a faster Weapon Speed. If you are utilizing any Lucky Hit effects, such as Ball Lightning Enchantment, equip a Wand. Otherwise, equip a Dagger for increased Damage to Close Enemies on the implicit stat.
The priority order of Resistances is Lightning > Poison > Fire > Cold > Shadow. Maximum Resistance is 70% by default for each element and can be increased to 85% by various sources.
If you are using ![]() Tal Rasha’s Iridescent Loop, temper 2 additional sources of elemental damage types from the Elemental Surge Manual onto weapon slots. Cold, Poison, or Shadow damage procs can be utilized to gain the 3rd and 4th Tal Rasha buff stacks. The Tal Rasha buff has a maximum stack limit of 4. Otherwise, there are no other useful tempers in the Weapon category.
Tal Rasha’s Iridescent Loop, temper 2 additional sources of elemental damage types from the Elemental Surge Manual onto weapon slots. Cold, Poison, or Shadow damage procs can be utilized to gain the 3rd and 4th Tal Rasha buff stacks. The Tal Rasha buff has a maximum stack limit of 4. Otherwise, there are no other useful tempers in the Weapon category.
If you are using a speed setup with Teleport Enchantment, temper the Evade Cooldown Reduction affix from the Natural Motion Manual onto your Boots and Amulet. Otherwise, temper the Movement Speed or Teleport Cooldown Reduction affixes.
Check the Tempering and Masterworking section for more details on Blacksmith upgrading.
| Slot | Gear Affixes | Tempering Affixes |
|---|---|---|
| Wand | 1. Maximum Life 2. Intelligence, Critical Strike Damage, Vulnerable Damage | |
| Focus | 1. Critical Strike Chance, Cooldown Reduction 2. Maximum Life, Intelligence | |
| Helm | 1. Cooldown Reduction 2. Resistances, Armor 3. Lucky Hit Chance, Maximum Life, Intelligence | |
| Chest | 1. Ranks to Defensive Skills 2. Mana per Second, Resistances, Armor 3. Maximum Life, Intelligence | |
| Gloves | 1. Critical Strike Chance, Attack Speed 2. Resistances, Armor 3. Lucky Hit Chance, Maximum Life, Intelligence, Critical Strike Damage, Vulnerable Damage | |
| Pants | 1. Ranks to Arc Lash 2. Resistances, Armor 3. Maximum Life, Intelligence | |
| Boots | Implicit Stat: Attacks Reduce Evade’s Cooldown 1. Movement Speed 2. Resistances, Armor 3. Maximum Life, Intelligence | Sorcerer Control (Utility): Stun Duration |
| Amulet | 1. Ranks to Devouring Blaze, Critical Strike Chance, Cooldown Reduction 2. Attack Speed 3. Movement Speed, Resistances, Armor | |
| Rings | 1. Critical Strike Chance, Attack Speed 2. Lucky Hit Chance, Maximum Life, Resistances 3. Intelligence, Critical Strike Damage, Vulnerable Damage |
Unique Items
Listed below are the recommended and optional Unique Items for the Arc Lash Sorcerer build. Each item description includes the most important affix to target for Masterworking upgrades.
- Raiment of the Infinite (highly recommended) synergizes well with this build to group and Stun enemies. Check the Telestomp Build Variant section for more details.
- Masterworking Priority: Ranks of the Glass Cannon Passive
 Tal Rasha’s Iridescent Loop (recommended) can provide up to a 60% damage multiplier with 4 elemental stacks.
 - Masterworking Priority: Cooldown Reduction
 Harlequin Crest (recommended) provides additional Ranks to
  Arc Lash and 20% Damage Reduction, if you are lucky enough to find this Uber Unique Item.
 - Masterworking Priority: Cooldown Reduction
 Tibault’s Will (recommended) provides a damage multiplier effect and a Damage Reduction from Close Enemies affix that is not usually obtainable in the Pants slot. Alternate activations of the damage buff with Teleport and Flame Shield.
 - Masterworking Priority: Damage Reduction from Close Enemies
 Paingorger’s Gauntlets (recommended) do not increase damage done by
  Unstable Currents procs or Ball Lightning Enchantment, but they provide a substantial damage increase to Arc Lash damage.
 - Masterworking Priority: Attack Speed or Critical Strike Chance
 Fists of Fate (optional) increases overall damage by 50% with a perfect 300% value on the unique effect. Unfortunately, they are still a minor damage loss compared to well-rolled Legendary Gloves with +4 Ranks to Arc Lash, Attack Speed, Critical Strike Chance, and an Offensive Aspect.
 - Masterworking Priority: Any affix except Lucky Hit Chance to Restore Primary Resource
 Flickerstep (optional) provides a Damage Reduction from Close Enemies affix that is not normally available in the Boots slot, and the unique effect is useful for more Unstable Currents uptime.
 - Masterworking Priority: Damage Reduction from Close Enemies
Season 4: Loot Reborn
The following list details the changes in the Season 4 Update (Patch 1.4.0) that may pertain to Arc Lash Sorcerers. Check the Changelog for all the other guide updates.
- Mastery Skills are now also considered Core Skills.
 Tal Rasha’s Iridescent Loop
 - Maximum stacks now capped at four.
- All Resistance variants increased from 8%/3% to 10%/4%.
- Tibault’s Will
- Damage increase while Unstoppable reduced from 20-40% to 10-20%.
- Damage increase persists for 1 second longer after being Unstoppable.
- Ice Armor
- Enhanced Ice Armor
- Mana Regeneration increased from 25% to 30%.
- Shimmering Ice Armor
- Previous – Enemies that hit you while Ice Armor is active have a 15% chance to become Frozen for 3.23 seconds.
- Now – While Ice Armor is active, you reduce its Cooldown by 1 second for every 50 Mana you spend.
- Mystical Ice Armor
- Previous – Damage against Vulnerable enemies contributes 50% more to Ice Armor’s Barrier.
- Now – While Ice Armor is active, you periodically Chill Close enemies for 20% and deal 15% increased damage to Frozen enemies.
 Shimmering Frost Nova
 - Previous – Frost Nova generates 4 Mana per enemy hit.
- Now – Frost Nova grants 3% Dodge Chance per enemy hit, up to 15%. Hitting a Boss gives the maximum amount. For the next 8 seconds, you keep this effect, and successful Dodges generate 20 Mana.
 Flame Shield
 - Enhanced Flame Shield
- Previous – Flame Shield grants 25% increased Movement Speed while active.
- Now – Flame Shield has a 50% larger burn radius.
- Mystical Flame Shield
- Previous – You gain 25% Mana Cost Reduction while Flame Shield is active.
- Now – After Flame Shield ends, surrounding enemies are Stunned for 3 seconds and your next Skill within 10 seconds is a guaranteed Critical Strike.
 Teleport
 - Enhanced Teleport
- Previous – Teleport’s Cooldown is decreased by 0.5 seconds per enemy hit, up to 3 seconds.
- Now – You gain 30% Movement Speed for 3 seconds after Teleporting.
- Mystical Teleport
- Previous – For 4 seconds after Teleporting, Crackling Energy hits 2 additional enemies.
- Now – Teleport deals 500% increased damage. It also forms a Crackling Energy for each enemy it hits, up to 3.
 Lightning Spear
 - Damage increased by 8% (.15 to .16).
 Shocking Impact
 - Damage increased by 100% (.2 to .4).
 Elemental Attunement
 - Cooldown reset chance increased from 5% to 7%.
 Devouring Blaze
 - Crowd Controlled enemies now provide the damage bonus instead of Immobilized.
 Conjuration Mastery
 - Previous – You gain 1% increased damage for each active conjuration.
- Now – You gain 1% increased damage, 1% Movement Speed, and 2% Mana Generation for each active Conjuration.
- Hectic Aspect
- Cooldown Reduction reduced from 2-4 seconds to 1-2 seconds.
- Aspect of Disobedience
- Armor stacks no longer fall off independently. They now refresh or reset at the same time.
- Armor gain changed to 25-40%.
 Aspect of the Bounding Conduit
 - Previous – Gain 15-30% Movement Speed for 3 seconds after Teleporting.
- Now – Teleport’s Cooldown is reduced by 1.0-2.5 seconds. After Teleporting, Crackling Energy hits 2 additional enemies for 5 seconds.
 Tactician
 - New Functionality: Now lasts 4 seconds longer for each Defensive Skill not on your Action Bar.
Advanced Information
Additional details are provided in the following sections for a more in-depth explanation of the Arc Lash Sorcerer. Read this advanced information after understanding the basic overview of the build in the previous sections.
Build Mechanics
Playing the Arc Lash Sorcerer is fairly simple, but requires careful management of Cooldowns. Arc Lash deals most of the overall damage output with multiple sources of increased Basic Skill damage, while rapidly activating other Shock Skills with Unstable Currents to supplement additional damage.
Skill Points are allocated into ![]() Destructive Charged Bolts, but not actually slotted into the Skill Bar. The 20% reduced enemy damage debuff is applied through auto-casted
Destructive Charged Bolts, but not actually slotted into the Skill Bar. The 20% reduced enemy damage debuff is applied through auto-casted ![]() Charged Bolts through
Charged Bolts through ![]() Unstable Currents. Hectic Aspect on Legendary Boots (or
Unstable Currents. Hectic Aspect on Legendary Boots (or ![]() Flickerstep) reduces Unstable Currents cooldown, so activate the Ultimate Skill often.
Flickerstep) reduces Unstable Currents cooldown, so activate the Ultimate Skill often.
Each cast of ![]() Arc Lash has a 25% chance of spawning
Arc Lash has a 25% chance of spawning ![]() Lightning Spear while
Lightning Spear while ![]() Unstable Currents is active. Lightning Spear counts as a Conjuration Skill to gain increased damage stacks from
Unstable Currents is active. Lightning Spear counts as a Conjuration Skill to gain increased damage stacks from ![]() Conjuration Mastery, and the spear applies Vulnerable on Critical Strike. Lightning Spear can also be casted manually from the Skill Bar to apply Vulnerable when Unstable Currents is not active.
Conjuration Mastery, and the spear applies Vulnerable on Critical Strike. Lightning Spear can also be casted manually from the Skill Bar to apply Vulnerable when Unstable Currents is not active.
Survivability is achieved through the use of three Defensive Skills, Flame Shield, Ice Armor and Shimmering Teleport. In addition, each Cooldown Skill casted grants a Barrier from ![]() Protection. Proper use of these Skills can keep a Sorcerer alive through the toughest battles, despite having a low Life pool.
Protection. Proper use of these Skills can keep a Sorcerer alive through the toughest battles, despite having a low Life pool.
Damage Rotation
Use the following rotation to optimize damage.
- Activate Unstable Currents often, as the Cooldown is reduced frequently.
- Cast Lightning Spear to apply Vulnerable when Unstable Currents is not active.
- Spam Arc Lash.
- Use Ice Armor, Teleport and Flame Shield to activate Barriers from Protection.
Telestomp with Raiment of the Infinite
![]() Raiment of the Infinite allows the Arc Lash Sorcerer to use 2 sources of
Raiment of the Infinite allows the Arc Lash Sorcerer to use 2 sources of ![]() Teleport offensively. Teleporting on top of enemies to Stun and group them up is called “Telestomping”. This playstyle can quickly clear groups of enemies and keep them Crowd Controlled (CC) for safety, perfect for speed-farming Helltides, Nightmare Dungeons, and The Pit!
Teleport offensively. Teleporting on top of enemies to Stun and group them up is called “Telestomping”. This playstyle can quickly clear groups of enemies and keep them Crowd Controlled (CC) for safety, perfect for speed-farming Helltides, Nightmare Dungeons, and The Pit!
Use the following setup for the Arc Lash Sorcerer.
- Equip
 Raiment of the Infinite to enable Telestomps. Target-farm Raiment of the Infinite from Varshan or Lord Zir for the best chances of it dropping.
 - Replace
 Ball Lightning with Teleport in the Enchantment Slots.
 - Equip Boots with the implicit effect, Attacks Reduce Evade’s Cooldown, which work with the Evade Teleport.
Tempering and Masterworking
The Season 4 update (Patch 1.4.0) introduces a rework for itemization. Tempering and Masterworking brings the biggest change to itemization since the release of Diablo 4, so make sure you understand the new systems explained in this section.
The amount of affixes on items has been changed to reflect its rarity: Normal Items have no affixes, Magic Items have 1 affix, Rare Items have 2 affixes, Legendary Items have 3 affixes, and Unique Items have 4 affixes. Upgrading a Rare Item to a Legendary Item by imprinting a Legendary Aspect from the Codex of Power will not add a third affix. Therefore, Legendary Items are superior to lower rarity items for a min-maxed character.
Greater Affixes are a newly added mechanic that increases the value of an affix by 50%. Ancestral Legendary Items and Unique Items can now drop with up to 4 Greater Affixes! Search for items with your preferred Greater Affixes to upgrade with Tempering and Masterworking.
Tempering and Masterworking is an important system, even mandatory in the endgame, for character progression. You are able to add 2 additional affixes on any Rare Item or Legendary Item, exclusive to the Tempering System. An Ancestral Legendary Item can have up to 5 total affixes! Unfortunately, Unique Items cannot be tempered to add affixes.
Masterworking uses new crafting materials found in The Pit to further enhance the stats of an item. These upgrades can be applied on an Ancestral Legendary Item that has its Tempering Slots filled out. Unique Items can be upgraded with Masterworking right away, as tempering does not apply to them. Each item has 12 upgrade slots. On upgrade Ranks 4, 8, and 12, a random affix is increased in value by 25%. Every other upgrade Rank applies a 5% increase to all affixes on an item. Attempt to apply the bonus 25% upgrade to your preferred affix multiple times by resetting the Masterworking Ranks to repeat the process.
Obol Gambling
Obol gambling is a great way to potentially find item upgrades or items missing from your build. Use Obols on your target equipment for a chance to receive Greater Affixes. Check out the new tool from Icy Veins for gambling Obols in the link below.
Obol Gambling Optimization ToolChangelog
- May 15th, 2024: Priority Affixes updated with game changes made since the Season 4 PTR.
- May 14th, 2024: Guide updated for Season 4 (Patch 1.4.0)
- March 5th, 2024:
- Guide updated for the Mid Season 3 Update (Patch 1.3.3).
- Skill Tree and Legendary Aspect sections reworked.
- February 7th, 2024: Paingorger’s Gauntlets and Aspect of Adaptability added.
- January 22nd, 2024: Guide updated for Season 3 (Patch 1.3.0).
- November 15th, 2023: Paragon Board images added.
- November 9th, 2023: Tal Rasha’s Iridescent Loop added to Unique Item section.
- November 1st, 2023: Resistances added to Stat Priority List and Gem sections.
- October 29th, 2023: Paragon video added.
- October 26th, 2023:
- Telestomp variant build section added.
- Minor adjustment to Aspect priority.
- New items, Flickerstep and Tibault’s Will, added to Unique Item section.
- October 17th, 2023: Guide updated for Season 2 (Patch 1.2.0).
- July 18th, 2023: Guide updated for Season 1.
 Destruction is now usable to increase Critical Strike Damage on Arc Lash and
  Ball Lightning, and has been included in the Paragon setup.
