Runemaster Lightning Web Endgame Build for Last Epoch (Patch 1.1)
Welcome to our Last Epoch Runemaster Lightning Web build guide for the Mage class. Here you will learn everything about the Runemaster play style, passives, skills, strengths, and weaknesses to conquer the world of Eterra.
Build Introduction
This Runemaster Lightning Web Build is built around dealing immense amounts of
damage and Ward generation. This build will require some skilled button manipulation
in order to master, but upon success will dismantle enemies on and off-screen.
Bossing is the least difficult part of the build, as ![]() Frost Claw will decimate the
enemy with Shred Armor and almost 600% Critical Multipliers and a 100% chance
to critically hit. Defensive scaling is strong, as the build passively can keep a base of almost
3000 Ward and a strong Health pool of over 2000. While in fights, you'll be seeing a Ward
gain in the 10's of thousands. Nothing can stand in your way, regarless of the Timeline
you choose to dominate.
Frost Claw will decimate the
enemy with Shred Armor and almost 600% Critical Multipliers and a 100% chance
to critically hit. Defensive scaling is strong, as the build passively can keep a base of almost
3000 Ward and a strong Health pool of over 2000. While in fights, you'll be seeing a Ward
gain in the 10's of thousands. Nothing can stand in your way, regarless of the Timeline
you choose to dominate.
1.1 Specific Changes: 1.1 Brings some welcomed changes to mana conservation and Items. We are attempting to hunt for the Lodestone Wand with -5 mana Cost, which upgrades when you kill a Harbinger. Until this can be aquired, a Crystal Wand will do just fine with -5 mana cost.
 Excellent clear both on and off screen
- Significant defensive scaling
- Engaging gameplay
- Bossing doesn't require Invocations

 Missing Invocations can be frustrating
- Clear speeds are tied to ability to Invoke properly
- Spell crit must be in the 90%+ to feel functional
- Significant button manipulation needed

Skill Selection
Our skill selection for this build focuses on generating Runes of Power with skills
that will scar the battlefield. We have two main generators, the first being ![]() Frost Claw
and the other being the unscaled
Frost Claw
and the other being the unscaled ![]() Lightning Blast. This lightning blast has been converted
to cold, which is imperative for invoking
Lightning Blast. This lightning blast has been converted
to cold, which is imperative for invoking ![]() Lightning Web with
Lightning Web with ![]() Runic Invocation.
Runic Invocation.
![]() Frost Wall is used to automate
Frost Wall is used to automate ![]() Flame Ward, clearing the slot needed
for our cold converted Lightning Blast. Althought 1.0 did bring a Cooldown to
the wall to automate Flame Ward, it does not impact the way we invocate with frost claw
and lightning blast.
Flame Ward, clearing the slot needed
for our cold converted Lightning Blast. Althought 1.0 did bring a Cooldown to
the wall to automate Flame Ward, it does not impact the way we invocate with frost claw
and lightning blast. ![]() Flame Rush will be our movement skill, but this
skill is automated to cast
Flame Rush will be our movement skill, but this
skill is automated to cast ![]() Runic Invocation.
Runic Invocation.

Class and Skill Passive Trees
Our base class is the Mage, which acts as a generic spell caster. Our character will be offered an opportunity to select an Advanced Mastery once we have completed the first act of the campaign. Each base class has three possible masteries to choose from. For the Mage, we have access to the Mastery Tree Passives for Sorcerer, Runemaster and Spellblade. Upon selecting a Mastery and placing 20 Passive Points into the Mage Tree, you'll then be able to place Passive Points into the Mastery Trees.
For this caster build, Runemaster is our advanced class. We will utilize the majority of our Passive Points the Runemaster Passive tree, with a smaller investment of points into Sorcerer to round out the build. Our passive points will be targeting a well rounded blend of damage and defensive generators, with some investments in mana regeneration. This will ensure we can not only maximize our damage output, but also generate significant defensive layering while we clear and kill. Each of the Passive Trees and their points are broken down below.
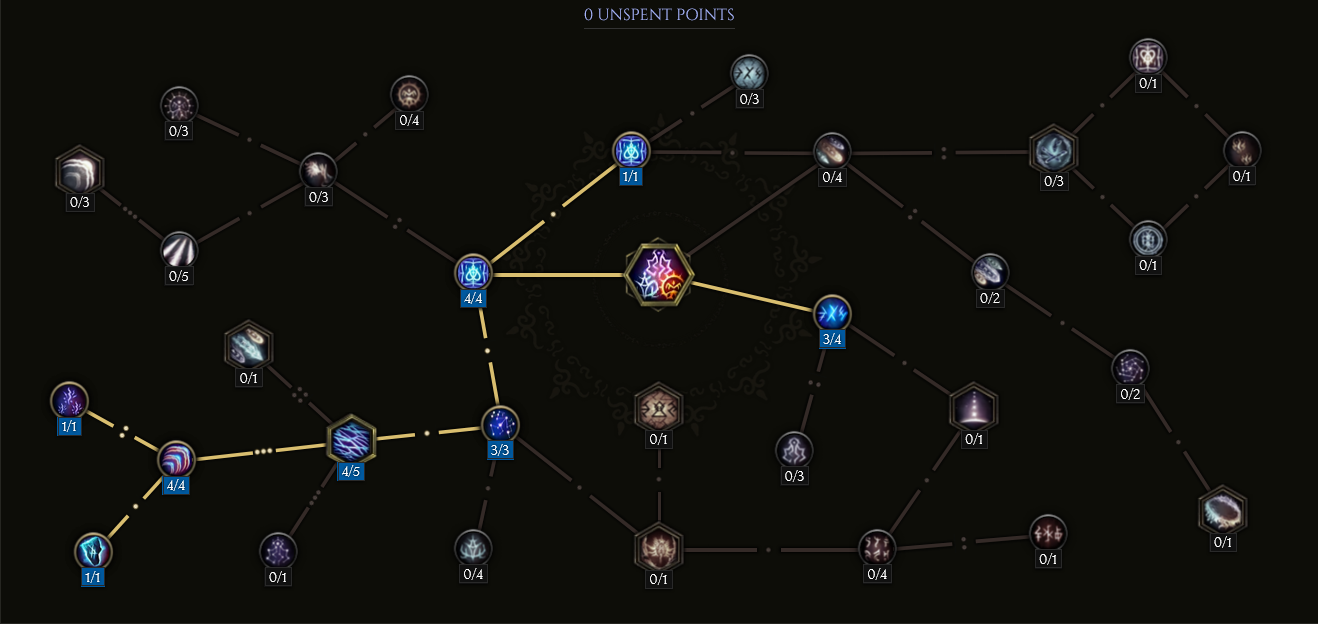
Mage Passive Points
- 8 points into Arcanist: This adds a base of Intelligence and Resist.
- 2 points into Reactive Ward: Gives us a boost of ward based on Max HP.
- 5 points into Mage Flurry: Increases our cast speeds.
- 5 points into Warden: Adds to our Ward Retention.
- 1 point into Rune of Winter: We use this to convert our
 Lightning Blast into a cold skill.
Our base class is the Mage, which acts as a generic spell caster. Our character will be offered an opportunity to select an Advanced Mastery once we have completed the first act of the campaign. Each base class has three possible masteries to choose from. For the Mage, we have access to the Mastery Tree Passives for Sorcerer, Runemaster and Spellblade. Upon selecting a Mastery and placing 20 Passive Points into the Mage Tree, you'll then be able to place Passive Points into the Mastery Trees.
For this caster build, Runemaster is our advanced class. We will utilize the majority of our Passive Points the Runemaster Passive tree, with a smaller investment of points into Sorcerer to round out the build. Our passive points will be targeting a well rounded blend of damage and defensive generators, with some investments in mana regeneration. This will ensure we can not only maximize our damage output, but also generate significant defensive layering while we clear and kill. Each of the Passive Trees and their points are broken down below.
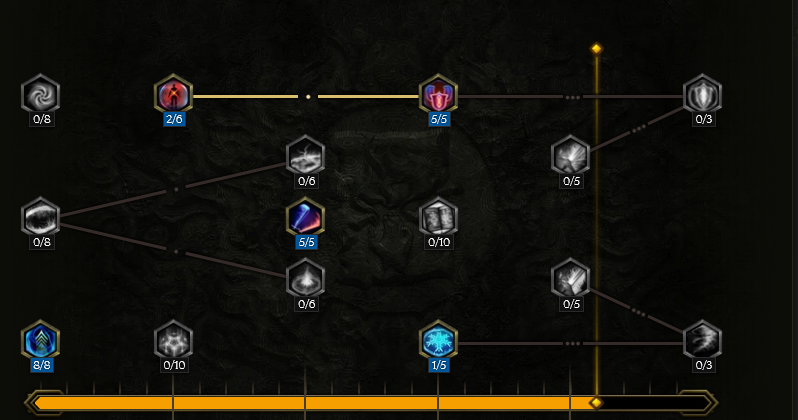
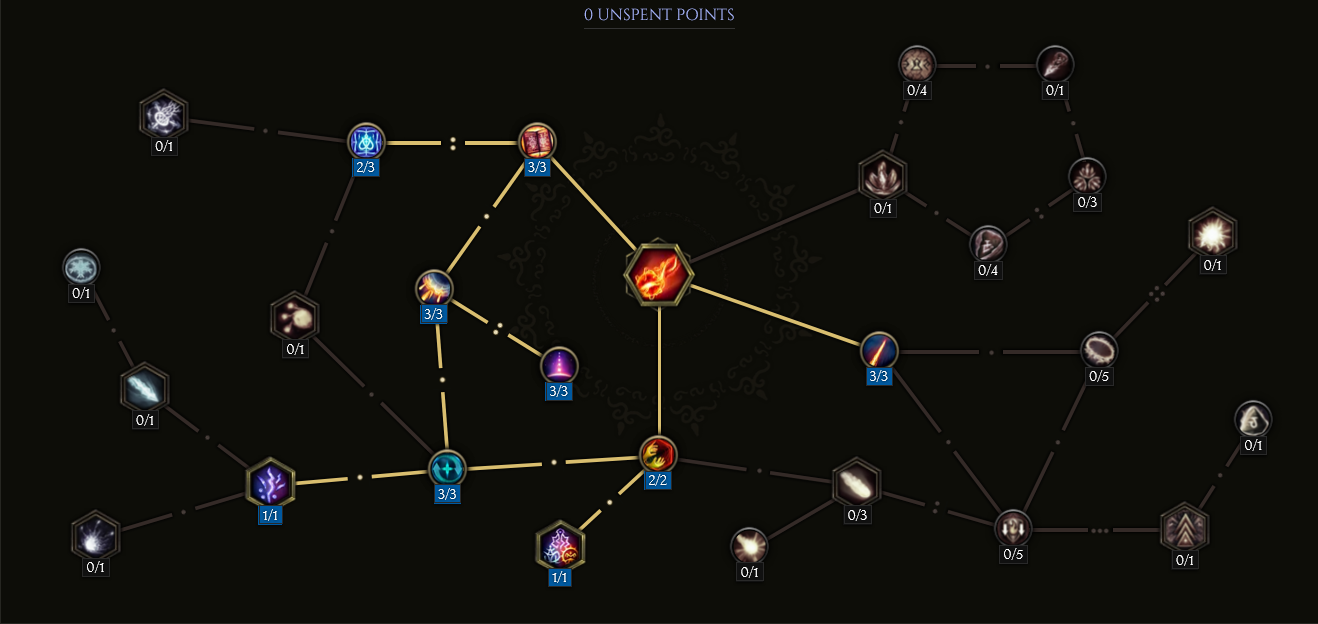
Runemaster Passive Points

- 1 points into Unsealed Mana: Increases base Cast Speed, and a boost of Ward and Mana every 3 seconds.
- 7 points into Quintessence of Triumph: We do 7% more Spell Damage, as long as we have more Ward then the enemy has Health.
- 8 points into Arcane Focus: We add to our base Intelligence and gain ward every time we cast a spell.
- 5 points into Runeword: Cataclysm: We do 15% more damage to enemies on Low Health. We also have Increased Critical Strike Chance.
- 6 points into Transcendence: Adds base HP and gives us 46 ward per second (with 60 Intelligence).
- 6 points into Rune of Renewal: Increases health and mana regen, the listed values are doubled at 50 Intelligence.
- 6 points into Mental Catalysis: Pushes our Intelligence further and gives us Reduced Damage taken from Crits.
- 6 points into Edict of the Scion: We gain mana whenever we use an area skill, like
 Frost Claw.
 - 6 points into Inscribed Instruments: Adds a whopping 72% to our Critical Strike Multiplier.
- 5 points into Decree of the Bountiful Ocean: We have 30% increased mana regeneration when we have an active Gon Rune.
- 5 points into Decree of the Burning Wind: We do more damage to Bosses and Rares if we have passed through a
 Frost Wall recently (4 seconds).
 - 5 points into Brand of Deception: We apply a hard hitting DOT, when we hit an enemy with a lightning skill costing 15 or more mana.
- 8 points into Ancient Inscriptions: Further add to our base Intelligence and reduce our Cooldowns by 1% every 4 points of Intelligence.
- 1 point into Runeword: Hurricane: We add 6 to our base lightning damage (20% chance on lightning skill USE.
- 5 points into Jagged Veil: Gain a more critical strike mulitplier PER 100 ward against bosses (up to 20%).
- 7 points into Celestial Doom: Deal 7% more spell damage to Bosses that are branded.
Our base class is the Mage, which acts as a generic spell caster. Our character will be offered an opportunity to select an Advanced Mastery once we have completed the first act of the campaign. Each base class has three possible masteries to choose from. For the Mage, we have access to the Mastery Tree Passives for Sorcerer, Runemaster and Spellblade. Upon selecting a Mastery and placing 20 Passive Points into the Mage Tree, you'll then be able to place Passive Points into the Mastery Trees.
For this caster build, Runemaster is our advanced class. We will utilize the majority of our Passive Points the Runemaster Passive tree, with a smaller investment of points into Sorcerer to round out the build. Our passive points will be targeting a well rounded blend of damage and defensive generators, with some investments in mana regeneration. This will ensure we can not only maximize our damage output, but also generate significant defensive layering while we clear and kill. Each of the Passive Trees and their points are broken down below.
Sorcerer Passive Points
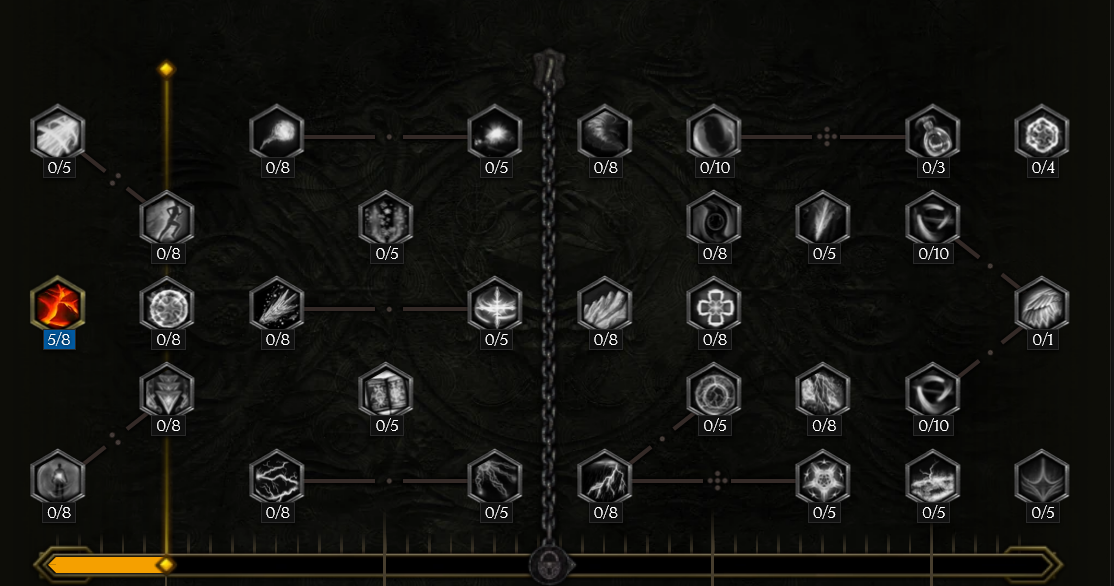
- 5 points into Calculated Destruction: We further add to our Intelligence and increase our Critical Strike Chance by 3% for every point of Intelligence.
In this section, we will break down each skill and highlight the key passives we have selected to make the skill shine in the build. While some of these skills do allow for some variation to exist depending on your own custom choices, we recommend utilizing the skill trees as presented until you have a strong understanding of the build itself.
Frost Claw
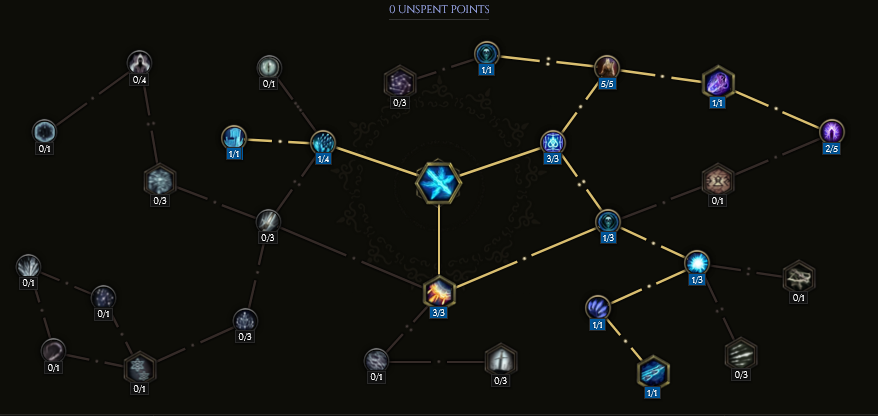
![]() Frost Claw is our main Boss killing mechanic and an integral part of generating the proper runes to invoke
Frost Claw is our main Boss killing mechanic and an integral part of generating the proper runes to invoke
![]() Lightning Web. It will generate significant amounts of Ward and Shred Armor. If geared properly,
it will also Critically Strike 100% of the time for an immense amount of DPS from our Critical Stirke Multiplier.
Lightning Web. It will generate significant amounts of Ward and Shred Armor. If geared properly,
it will also Critically Strike 100% of the time for an immense amount of DPS from our Critical Stirke Multiplier.
Order of Skill Points
- 3 points into Gift of Winter: Reduces mana cost and gives a chance to gain mana on cast.
- 1 point into Rending Cascade: Adds base critical strike chance.
- 1 point into Frozen Reign: Reduces the mana cost.
- 5 points into Artor's Sceptre: Add 20% more damage, and gives a 100% chance to Shock.
- 1 point into Spark Artillery: Converts the base damage and ailments to Lightning and Shock.
- 1 point into Fen of the Frozen: Gives a chance to Slow an enemy on hit.
- 1 point into Brightfrost: Increases the Cast Speed and purges one negative ailment per cast.
- 1 point into Hand of Morditas: Fires two extra projectiles at the expense of Mana.
- 1 point into Volley of Glass: This converts the Frost Claw to have a shotgun effect, allowing all projectiles to hit the same target.
- 3 points into Shiver Shell: Gain ward whenever Frost Claw is cast, and gives a chance to retaliate with it when hit by an enemy.
- 1 point into Frost Beyond Time: Increases the duration of Shock.
- 2 points into Spark of Celerity: Increases the projectile speed.
The skill points go above the stadard 20 points because ![]() Frost Claw is a base Elemental spell.
From the implicits on Twisted Heart of Uhkeiros, this gives the skill +1.
Frost Claw is a base Elemental spell.
From the implicits on Twisted Heart of Uhkeiros, this gives the skill +1.
In this section, we will break down each skill and highlight the key passives we have selected to make the skill shine in the build. While some of these skills do allow for some variation to exist depending on your own custom choices, we recommend utilizing the skill trees as presented until you have a strong understanding of the build itself.
Frost Wall
![]() Frost Wall is another method we can use to generate the required Gon Rune in order to invoke
Frost Wall is another method we can use to generate the required Gon Rune in order to invoke ![]() Lightning Web.
However, after 1.0 changes, we prefer to use
Lightning Web.
However, after 1.0 changes, we prefer to use ![]() Frost Claw to generate these runes. It will also be the ONLY way we can utilize
Frost Claw to generate these runes. It will also be the ONLY way we can utilize ![]() Flame Ward directly, we will still cast
Flame Ward directly, we will still cast ![]() Flame Ward when we are stunned.
Flame Ward when we are stunned.
Order of Skill Points
- 1 point into Biting Limit: This is a traversal node.
- 1 point into Crackling Barrier: Converts the base damage and ailments to lightning and Shock.
- 4 points into Crystals of Protection: Gain Mana and Ward when passing through the wall.
- 3 points into Boosted Kickoff: Gain both Haste and Frenzy when passing through the wall.
- 1 point into Purifying Gate: Purge all negative ailements when passing through the wall.
- 5 points into Marching Winter: Increases the walls AoE and increases the duration.
- 3 points into The Dark Cold: This is a set of traversal points.
- 1 point into Howling Rift: Recoup half the Mana cost of Frost Wall if we can cast the wall again, before 4.8 seconds
- 2 point into Chilled Touch: Deal 5% more damage against enemies that are Slow while the wall is active. This synergizes with Frost Claw since it is scaled to slow enemies.
The skill points go above the stadard 20 points because ![]() Frost Wall is a base Elemental spell.
From the implicits on Twisted Heart of Uhkeiros, this gives the skill +1.
Frost Wall is a base Elemental spell.
From the implicits on Twisted Heart of Uhkeiros, this gives the skill +1.
In this section, we will break down each skill and highlight the key passives we have selected to make the skill shine in the build. While some of these skills do allow for some variation to exist depending on your own custom choices, we recommend utilizing the skill trees as presented until you have a strong understanding of the build itself.
Flame Rush
![]() Flame Rush is one of our best tools we use to engage an enemy. This will not only cast
Flame Rush is one of our best tools we use to engage an enemy. This will not only cast ![]() Runic Invocation
upon completion, but give 18% damage reduction during and shorty after skill is used. It will also generate ward per second
while in the cast and give a burst of ward at the end. This can also be used to apply the ailment Brand of Deception
which will trigger the passive of the same name, Brand of Deception. The skill will also hit 3% harder per 40 Mana you have currently.
Runic Invocation
upon completion, but give 18% damage reduction during and shorty after skill is used. It will also generate ward per second
while in the cast and give a burst of ward at the end. This can also be used to apply the ailment Brand of Deception
which will trigger the passive of the same name, Brand of Deception. The skill will also hit 3% harder per 40 Mana you have currently.
Order of Skill Points
- 3 points into Blazing Flux: Decreases Mana cost and reduces the cooldown.
- 3 points into Runic Eclipse: Take reduced damage while in the traveling form.
- 3 points into Celestial Guidance: The effects of Runic Eclipse persist for a % of time the skill was channeled.
- 3 points into Lunar Protection: Gain Ward per second and a burst after exiting the channel.
- 1 point into Energy Equivalence: Converts the base damage to Lightning.
- 2 points into Fiery Overload: Gives the player Frenzy upon exiting the channel.
- 1 point into Epilogue: Cast
 Runic Invocation upon exiting the channel. Gon Runes will be generated per second by channeling.
 - 3 points into Manafused Current: Deal 3% more damage per 40 Mana available in your current Mana pool.
- 2 points into Solar Rush: Allows you to travel faster and further with
 Flame Rush.
The skill points go above the stadard 20 points because ![]() Flame Rush is a base Elemental spell.
From the implicits on Twisted Heart of Uhkeiros, this gives the skill +1.
Flame Rush is a base Elemental spell.
From the implicits on Twisted Heart of Uhkeiros, this gives the skill +1.
In this section, we will break down each skill and highlight the key passives we have selected to make the skill shine in the build. While some of these skills do allow for some variation to exist depending on your own custom choices, we recommend utilizing the skill trees as presented until you have a strong understanding of the build itself.
Flame Ward

![]() Flame Ward will have two major uses for us. The first is acting as a 'Mana Shield', as every point of Mana will protect 5
Health from 75% of incoming damage (mana is consumed when recieving damage) with Mental Aegis. The other is to act as a
mana battery with Warmth by increasing Mana Regeneration by 100%. We also take flat reduced 'hit' damage by 40%
with Barrier. This skill can only be triggered with
Flame Ward will have two major uses for us. The first is acting as a 'Mana Shield', as every point of Mana will protect 5
Health from 75% of incoming damage (mana is consumed when recieving damage) with Mental Aegis. The other is to act as a
mana battery with Warmth by increasing Mana Regeneration by 100%. We also take flat reduced 'hit' damage by 40%
with Barrier. This skill can only be triggered with ![]() Frost Wall, or being stunned.
Frost Wall, or being stunned.
Order of Skill Points
- 2 points into Stalwart Defense: Gain a burst of Ward when
 Flame Ward is triggered.
 - 2 points into Desperate Defense: 24% of our missing HP is gained as ward.
- 1 point into Astonish: We cast Flame Ward when we are stunned.
- 5 points into Barrier: Take 40% less hit damage when Flame Ward is active.
- 3 points into Shrewd Shielding: Decreases the Mana cost.
- 5 points into Mental Aegis: This enables the skill to be used as a mana shield.
- 4 points into Warmth: While active, player has 100% increased Mana Regeneration.
- 3 points into Dilation: This increases the duration and efficiency of Flame Ward.
The skill points go above the stadard 20 points because ![]() Flame Ward is a base Elemental spell.
From the implicits on Twisted Heart of Uhkeiros, this gives the skill +1 and +4 for the LP in the same Item.
If LP Cannot be aquired, skip the 3 points into Dilation and 1 point in Shrewd Shielding.
Flame Ward is a base Elemental spell.
From the implicits on Twisted Heart of Uhkeiros, this gives the skill +1 and +4 for the LP in the same Item.
If LP Cannot be aquired, skip the 3 points into Dilation and 1 point in Shrewd Shielding.
In this section, we will break down each skill and highlight the key passives we have selected to make the skill shine in the build. While some of these skills do allow for some variation to exist depending on your own custom choices, we recommend utilizing the skill trees as presented until you have a strong understanding of the build itself.
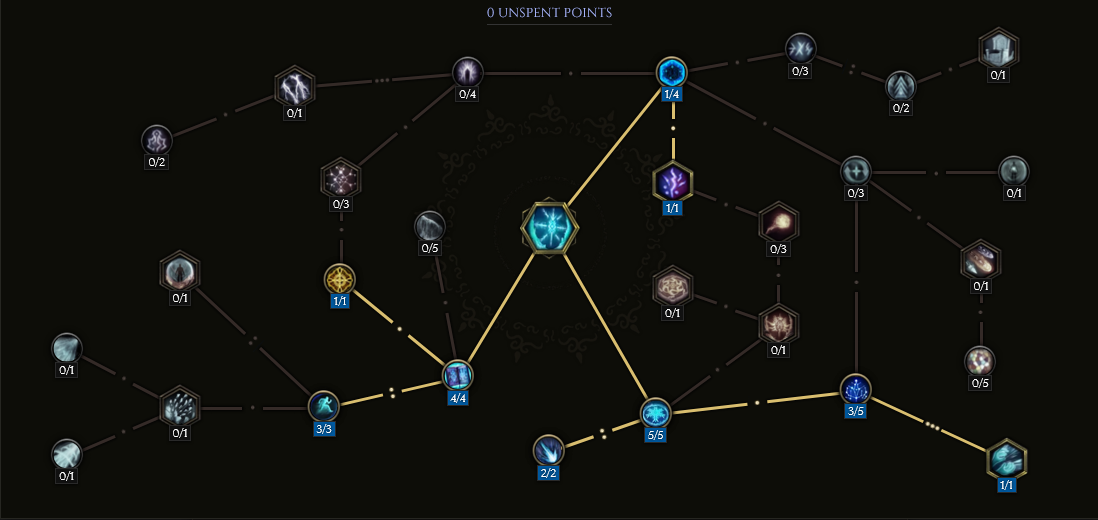
Runic Invocation
![]() Runic Invocation is an integral part of this Lightning Web Build. Invoking the correct spells is going to take
some practice. Knowing how to invoke a spell when you need it will make this build shine. Read ahead to
the List of Useful Runic Invocations in order to get the top five invocations to play with in this build. One could
easily just play with
Runic Invocation is an integral part of this Lightning Web Build. Invoking the correct spells is going to take
some practice. Knowing how to invoke a spell when you need it will make this build shine. Read ahead to
the List of Useful Runic Invocations in order to get the top five invocations to play with in this build. One could
easily just play with ![]() Lightning Web, but it really takes away from the depth of playstyle that made this build awesome.
Lightning Web, but it really takes away from the depth of playstyle that made this build awesome.
Order of Skill Points
- 4 points into Attuned Approach: Gain Ward and partial Mana refunded by a invoked skill.
- 3 points into Inscribed Patterns: Gain Ward per second while you have Gon Runes active.
- 4 points into Runic Energy: Gain 2% more damage per stack of Runic Energy.
- 4 points into Copied Scrolls: Have a chance to repeat the last Invocation casted by Runic Invocation.
- 1 point into Rune Powercore: While you have three runes, and the order is cycled, you gain a stack of Runic Energy.
- 1 point into Arcane Battery: Triple the amount of Runic Energy you can have from 15 to 45, but the effect is halved.
This takes us from doing 30% more damage to 45% more damage at max stacks. This build typically wont use Runic Invocation much on bosses, so
the stacks are preserved.
- 1 point into Elemental Lore: Gain 1% Elemental Penetration for Invocations per Intelligence we have.
- 3 points into Transcriber of Power: Gain a buff that adds Cast Speed and base Spell Damage after casting Runic Invocation.
The skill points go above the stadard 20 points because ![]() Runic Invocation is a base Elemental spell.
From the implicits on Twisted Heart of Uhkeiros, this gives the skill +1.
Runic Invocation is a base Elemental spell.
From the implicits on Twisted Heart of Uhkeiros, this gives the skill +1.
Build Mechanics and Playstyle
You must play this build with ![]() Lightning Blast on your bar.
Lightning Blast on your bar.
We specialize in Lightning, however we have a host of Invocations at our disposal depending on the moment.
This is where skill and pack recognition comes into play. We will typically clear with ![]() Lightning Web or
Lightning Web or
![]() Ball Lightning for tight non-mobile groups. However, some packs may require
Ball Lightning for tight non-mobile groups. However, some packs may require ![]() Sea of Sparks if they
are ranged and dispersed. Mobile packs that run at you might require
Sea of Sparks if they
are ranged and dispersed. Mobile packs that run at you might require ![]() Freezing Cascade.
Freezing Cascade. ![]() Covenant Arc
is also easily in our rotation which can be used to buff you with Frenzy if you're looking for a
boost in cast speed.
Covenant Arc
is also easily in our rotation which can be used to buff you with Frenzy if you're looking for a
boost in cast speed.
Understanding Invocation spells and their usages will be the make or break point
in becoming "good" at the build. You may find it easier to remember the Invocation spells based
on the sub skill that gave you a Rune. For example, remembering ![]() Lightning Web by saying "Claw-Blast-Claw", or
Frost Claww → Lightning Blast → Frost Claw.
Lightning Web by saying "Claw-Blast-Claw", or
Frost Claww → Lightning Blast → Frost Claw.
The build has a large amount of penetration for any Lightning Invocation. With well rolled gear, it can
be nearly 200%, causing ![]() Lightning Web to wipe every mob on and off the screen. The targeting for Lightning Web
is very aggressive and will target anything in the area outside your screen that has been spawned. If you see streaks of
lightning eject from your web, something is dying. Do not be afraid to arbitrarily cast the web, but do be wary of
the Health loss from Twisted Heart of Uhkeiros. Casting without hitting anything will give you Ward, but will not
replenish any Health. Health Leech is mandatory in this build due to the drain from
the unique relic, Twisted Heart of Uhkeiros.
Lightning Web to wipe every mob on and off the screen. The targeting for Lightning Web
is very aggressive and will target anything in the area outside your screen that has been spawned. If you see streaks of
lightning eject from your web, something is dying. Do not be afraid to arbitrarily cast the web, but do be wary of
the Health loss from Twisted Heart of Uhkeiros. Casting without hitting anything will give you Ward, but will not
replenish any Health. Health Leech is mandatory in this build due to the drain from
the unique relic, Twisted Heart of Uhkeiros.
Noteable Defensive Mechanics
![]() Flame Ward is our build would be most noteably known as "Mana Shield". Each point of Mana will protect
5 Health. This won't quite cover 100% of our Health, but the majority of it will be protected from 75% of incoming damage.
Taking damage will cost you Mana.
Flame Ward is our build would be most noteably known as "Mana Shield". Each point of Mana will protect
5 Health. This won't quite cover 100% of our Health, but the majority of it will be protected from 75% of incoming damage.
Taking damage will cost you Mana.
- It generates Ward with our Helmet and Chest Prefixes.
- We also gain ward from Shiver Shell.
We use the suffix for Reduced Bonus Damage Taken for Critical Strikes, which also gives Armor. In our case, the crit will hit, but for standard damage. This node already exists in high value in our tree, which is why we capitalize on it.
Mobility
![]() Flame Rush is one of the best ways to move from pack
to pack. Be aware that
Flame Rush is one of the best ways to move from pack
to pack. Be aware that ![]() Runic Invocation will trigger, and
depending for how long you hold the skill for, may end up having more
or less Gon Runes than you anticipated. Once you learn the skill
and its rune generation rate, you will be wiping enemies upon exit in
no time. Flame Rush will also give you Frenzy for 2 seconds
upon exit.
Runic Invocation will trigger, and
depending for how long you hold the skill for, may end up having more
or less Gon Runes than you anticipated. Once you learn the skill
and its rune generation rate, you will be wiping enemies upon exit in
no time. Flame Rush will also give you Frenzy for 2 seconds
upon exit.
List of Useful Runic Invocations
 Lightning Web → Gon Rune, Heo Rune, Gon Rune: Clears areas of enemies, can chain or fork; deals high damage, triggers Brand of Deception.
 Freezing Cascade → Heo Rune, Gon Rune, Heo Rune: Clear enemies running at you in a line; deals high damage, does not apply Brand of Deception.
 Ball Lightning → Gon Rune, Gon Rune, Gon Rune: Deals low damage; Easy way to trigger Brand of Deception.
 Sea of Sparks → Gon Rune, Gon Rune: Clear non-mobile ranged packs; deals high damage, triggers Brand of Deception.
 Covenant Arc → Heo Rune, Heo Rune, Gon Rune: Activates Frenzy; deals moderate damage.
Equipment and Gear Affixes
For this build, we will be focusing on several main affixes for each piece of non-unique gear, as well as working towards acquiring the specific Uniques needed to make this build operate correctly. Our equipment will focus on these specific affixes for the Implicits and Modifier stats.
| Gear Slot | Implicits | Modifiers |
|---|---|---|
| Wand | Mana Spell Damage Mana Spent Gained as Ward |
Prefixes + Critical Strike Multiplier Increased Spell Critical Strike Chance Suffixes Increased Stun Chance Lightning Penetration/Minion Lightning Penetration |
| Head | Armor Increased Critical Stirke Chance |
Prefixes Lightning Pen With Lightning Invocations Lightning Critical Strike Multiplier Suffixes Increased Armor Increased Health |
| Amulet | Lightning Resistance Spell Lightning Damage |
Prefixes Increased Mana Regen Critical Strike Multiplier Suffixes Shock on Hit Chance to Shred Armor on Hit |
| Chest | Armor Increased Mana Increased Mana Regen |
Prefixes Lightning Pen With Lightning Invocations Lightning Critical Strike Multiplier Suffixes Increased Armor Increased Health |
| Off-Hand Catalyst | Intelligence +% Spell Critical Strike Chance Ward Rentention |
Prefixes Critical Strike Mulitplier Increased Spell Critical Strike Chance Suffixes Needed Resistance Ward per Second |
| Belt | Ward Decay Threshold + Potion Slots |
Prefixes Increased Mana Regen Increased Lightning Damage Suffixes Increased Health Reduced Damage Taken from Critical Strikes |
| Gloves | Armor Mana Increased Mana Regen |
Prefixes Intelligence Increased Cast Speed Suffixes Hybrid Health Increasd Leech Rate |
| Ring | Ward Decay Threshold Necrotic Resistance |
Prefixes Increased Mana Regen Intelligence Suffixes Needed Resistances Health |
| Ring | Ward Decay Threshold Necrotic Resistance |
Prefixes Increased Mana Regen Intelligence Suffixes Needed Resistances Health |
| Boots | Armor Move Speed Resistance |
Prefixes Increased Movement Speed Intelligence Suffixes Reduced Damage Taken from Critical Strikes Hybrid Health |
| Relic | Twisted Heart of Uhkeiros | Critical Strike Multiplier + to Flame Ward |
A loot filter made specifically for the gear table above may be copied by pressing the button below. Once in the Loot Filter portion of the in-game menu, choose the "Paste Clipboard Contents" option to import the code.
Copy Loot Filter to Clipboard
Uniques
This builds only significant unique requirement is the Twisted Heart of Uhkeiros. This being the case, the build is not recommended to start without it. Although lower level content could be completed without it. If found with Legendary Potential, it would be best rolled with a high tier of Cast Speed and Critical Strike Multiplier.
Twisted Hear of Uhkeiros
Twisted Heart of Uhkeiros is a core part of the defenses of this build. Due to the sheer volume of elemental casts, we will generate massive amounts of Ward. Because these same skill will leech more than enough to keep that amount sacrificed by the Twisted Heart of Uhkeiros topped up, allowing you to be full HP and Maximum Ward generation. It also gives you up to 10% increased in your Health pool. It can be obtained from the Monolith Boss "The Emperor of Corpses" in the Timeline "Reign of Dragons".
Idols
Idol slots are gained through the campaign, unlocking small bonuses and unique affixes for the player to discover and augment their builds with. The Idol screen consists of a grid system for the player to fill out with different sized Idols, eventually filling in every part of the grid. As the Idol shape increases (1x1, 1x2, 1x3, 1x4, etc.) the stronger an affix you might find for your build.
The Idols selected for this Lightning Web build are fairly self-explanatory. In this build specifically, we target 3x1 Grand Glass Idols and 4x1 Ornate Glass Idols both sharing the same suffix of +#% Increased Armor/+#% Increased Mana. The passives for these differ however; with The Grand Glass Idol our target prefix will be +Mana. For the Ornate Glass Idol we are targetting the prefix +#% Mana Efficiency with Frost Claw/+#% Elemental Penetration with Frost Claw. For the remaining slots, Increased Health, + Health, Armor, and missing Resistances can be utilized here.
Blessing
Blessings are permanent buffs that are applied to your character. These come in two different powers, Standard and Grand. Grand blessings are significantly stronger than the Standard Blessings. In total, there are 10 Blessing Slots, one for each Monolith Timeline. When you complete a Monolith and defeat the final boss you will be awarded a choice of three blessing with a random value.
| Blessing Name | Affix | Timeline |
|---|---|---|
| #% of Spell Damage Leeched as Health | The Black Sun | |
| #% Increased Lightning Damage | Ending the Storm | |
| +#% Fire Resistance | Spirits of Fire | |
| +#% Physical Resitance | The Age of Winter | |
| +#% Necrotic Resistance | Reign of Dragons |
The Blessings listed above cover the most important slots, with the remaining Blessing Slots being filled with whatever the player may be lacking for stats.
Changelog
- 13 Jul. 2024: Updated for 1.1. Item Changes and Loot Filter. Playstyle Unchanged.
- 08 Mar. 2024: Updated for 1.0 changes with Frost Wall, New Loot Filter.
- 19 Jan. 2024: Loot Filter added.
- 29 Dec. 2023: Guide added.

EMP1241 is a Marine veteran who is currently pursuing higher education in Aerospace Engineering. He spends much of his time outside of his studies playing ARPGs, Builders, and MOBAs. He is frequently seen on his Twitch channel discussing science, space, or video games.
- Last Epoch’s New Paradox: From “All Future Content Free” to Paid Classes
- Last Epoch Confirms Paid DLC Classes With Free Expansion
- Last Epoch Season 3 Overhauls Skills, UI, Monster Behavior & More
- Last Epoch Season 3 Adds Smarter Minions & Big Changes
- Lich & Necromancer Get New Skill, Buffs, and Dark New Builds in Last Epoch!
- Last Epoch Season 3 Explores the Ancient Era!
- Last Epoch Reveals Major Content for Season 3!
- Last Epoch Season 3 Trailer Reveals Major Changes!