Build Introduction
The Rapid Fire and
Flurry Rogue has the flexibility of Double Core Skills to win any fight on the battlefield. If you used our Dual Core Rapid Fire Flurry Rogue Leveling Build, this is the perfect guide to transition into the endgame. This article adds the best-in-slot Legendary Aspects and Paragon setup to continue the build.
The major changes from the leveling build to this endgame build are:
Cold Imbuement instead of
Concealment for single target burst damage to kill Elites and Bosses.
Advanced Flurry and
Advanced Rapid Fire (if not already switched) for Evade synergies.
This Dual Core Skill build is perfect for players that want the best of both single target Damage Per Second (DPS) and Area of Effect (AoE) clearing. Rapid Fire deals high single target damage to snipe elite and bosses, while
Flurry hits every enemy around the Rogue with AoE damage.
Unlike builds using Shadow Imbuement or other Cooldowns to clear packs of enemies, this hybrid build has unlimited AoE available for every engagement. Another key advantage is from having both Cutthroat and Marksman Skills to activate damage increases from
Close Quarters Combat and
Tricks of the Trade. While the playstyle is a bit more involved than most others, Rapid Fire and Flurry Rogue is a competitive alternative to the current Twisting Blades build meta!
The only starting requirement for this endgame build guide is a character around level 50 in World Tier 3. Check our Rogue Leveling Guide if you need help getting there.
Strengths and Weaknesses
- Dual Core Skills for Single Target and AoE Damage
- Plenty of Crowd Control from Stuns and Freezes
- Fast Paced and Fun Playstyle
- Combo Point Builds Require Rotations
- Complex Playstyle Takes Practice
To see how this build compares to the other builds on our site, you can check out our build tier lists.
Video Guide and Gameplay Footage
Season of the Malignant
The following list details the changes in the Season 1 Patch Update that are specific to this build. Check the Changelog for all the other guide updates.
- Siphoning Strikes now also requires a Lucky Hit chance of 75%.
- Advanced Rapid Fire duration increased from 3 to 5 seconds.
- Enhanced Cold Imbue Lucky Hit Chance increased from 30% to 40%.
- Aspect of Retribution bonus damage to Stunned reduced from 20-40% to 10-20%.
- Aspect of Disobedience maximum stacks reduced from 100 to 60, reducing maximum Bonus Armor
- % from 25%-50% to 15%-30%.
- Vengeful Aspect Lucky Hit Chance increased from 30-50% to 40-60%.
In addition to the build specific changes, multiple sources of Critical Strike Damage and Vulnerable Damage were reduced globally for all classes. Rogues did not receive any major nerfs to damage directly to their class. The biggest direct change to Rogues is the addition of a Lucky Hit Chance requirement for Siphoning Strikes, significantly reducing their survivability. All other classes received much heavier nerfs, making Rogue a top pick for season 1.
Patch 1.1.1
The second major update for Season 1 brings a few buffs to Rogues in Patch 1.1.1, released on August 8th, 2023. The only change directly affecting the Dual Core Rapid Fire Flurry build is the Lucky Hit chance increase from 75% to 85% for Siphoning Strikes, reducing the nerf made at the beginning of Season 1.
Best Malignant Hearts Tier List for Dual Core Rapid Fire Flurry Rogue
The Season 1 theme introduces Malignant Hearts that provide build-altering bonuses. The hearts are divided into 4 categories, each with a color that needs to be socketed in the corresponding colored Malignant Socket on equipped jewelry. Wrathful Hearts are a special case due to their rarity, and can be placed in any Socket.
Always socket Malignant Hearts instead of a Skull in Jewelry. Malignant Hearts provide an Armor bonus that scales with its Item Power.
Listed below is the Malignant Hearts Tier List for Dual Core Rapid Fire Flurry Rogue, ranked by importance. Stats displayed reflect what a Level 20 character would receive as a drop.
Caged Heart of The Barber (Wrathful, Super-World Tier III): Critical Strikes and all subsequent damage within 2.0-4.0 seconds is absorbed by your target. Then, the absorbed damage erupts onto surrounding enemies. Stored damage is increased by 10% per second. – Fixed in Patch 1.1.1 to work with “on hit” effects and Lucky Hit chance. Check the Barber Variant section for the setup details.
Caged Heart of Revenge (Brutal, Defensive-World Tier III): 10-20% of incoming damage is instead suppressed. When you use a Defensive, Subterfuge or a Macabre skill, all suppressed damage is amplified by 250% and explodes, dealing up to 1360-2040 Fire damage to Nearby enemies. – The explosion does not need to be activated. This Brutal Heart is equipped solely for the Damage Reduction.
Caged Heart of Tempting Fate (Vicious, Offensive-World Tier III): You gain 40-60% Critical Strike Damage but your Non-Critical Strikes deal 20-15% less damage.
Caged Heart of the Dark Dance (Vicious, Offensive-World Tier III): Every 5 seconds while above 60% Life, Core Skills cost 68-51 Life instead of your Primary Resource. Skills that consume Life deal 10-20% increased damage.
Caged Heart of the Picana (Vicious, Offensive): Critical Strikes electrically charge the enemy for 0.75-2.50 seconds, causing lightning to arc between them and any other charged enemies dealing 68-136 Lightning damage.
Caged Heart of Cluster Munitions (Vicious, Offensive): Lucky Hit: You have up to a 20% chance to launch 3 Stun Grenades that deal 26-32 Physical damage and Stun enemies for 0.50 seconds.
Caged Heart of the Clipshot (Devious, Utility): Lucky Hit: Up to a 20-40% chance for your Cutthroat Skills to Slow by 40% for 3 seconds and your Marksman Skills to Knock Back enemies.
Skill Tree Points and Skill Bar
The following tables show the full allocation of Skill Points for the Rapid Fire Rogue build. The first table has the most important 52 points to start the build. The second table has the remaining 6 points that are allocated once you obtain all Skill Points from Renown.
Priority Skills | Cluster |
---|---|
![]() ![]() ![]() | ![]() |
![]() ![]() ![]() ![]() ![]() ![]() ![]() ![]() | ![]() |
![]() ![]() ![]() ![]() ![]() ![]() ![]() | ![]() |
![]() ![]() ![]() | ![]() |
![]() ![]() ![]() ![]() | ![]() |
![]() ![]() | ![]() |
![]() | ![]() |
Remaining Renown Points | Cluster |
---|---|
![]() | ![]() |
![]() | ![]() |
Alternative Skills
Cold Imbuement is preferred for massive burst damage against elites and tougher packs of enemies. Imbuement Skills can be swapped around depending on your preference.
Shadow Imbuement provides explosions when enemies are killed for additional AoE clearing and generates Energy when paired with
Consuming Shadows.
Poison Imbuement provides more sustained damage over time. It is especially beneficial during long boss fights.
Rapid Fire Flurry Rogue Specialization
Combo Points is the preferred Rogue Specialization for general farming due to the burst damage playstyle of Rapid Fire Rogue. Build Combo Points with Puncture to unleash additional damage and arrows for
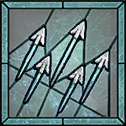
Rapid Fire. Combo Points can also be used to gain additional damage and an Attack Speed buff with
Flurry.

Paragon
The Paragon progression system unlocks at Level 50 and provides a vast amount of character power. On the Paragon Board, bonuses range from minor stats on Magic Nodes to more powerful Rare Glyphs and Legendary Nodes.
As you path towards Glyph Sockets and Legendary Nodes, you should prioritize Damage, Dexterity, Resistance, and Life for Normal and Magic Nodes. Glyph radius increases as you level them up. Therefore, if you cannot fulfill Additional Bonus requirements early on, skip allocating extra nodes for now.
Listed below are the Legendary Nodes and Rare Glyphs to use for the Rapid Fire Rogue build, sorted in the order obtained in Paragon.
Name | Effect |
---|---|
![]() | • For every 5 Dexterity purchased within range, you deal +2% increased Physical damage. • Additional Bonus (requires 40 Dexterity purchased in radius range): Physical damage increases the damage an enemy takes from you by 1%, up to 10%, for 15 seconds. |
![]() | Your Marksman Skills grant your next Cutthroat Skill 25% increased damage. Your Cutthroat Skills grant your next Marksman Skill 25% increased damage. |
![]() (moved to the 5th board later) | • For every 5 Strength purchased within range, you deal + [3.85%] increased damage to Vulnerable targets. • Additional Bonus (requires 25 Strength purchased in radius range): When an enemy is damaged by you, they become Vulnerable for 3 seconds. This cannot happen more than once every 20 seconds per enemy. |
![]() | Whenever you deal damage to a Vulnerable enemy, they take 1% increased damage from you for 6 seconds, up to 15%. |
![]() | Grants + [144%] bonus to all Magic nodes within range. • Additional Bonus (requires 40 Dexterity purchased in radius range): When you hit an enemy with an attack that applies a Crowd Control effect, they take x2%, up to x10%, increased damage from you for 20 seconds. |
![]() | You deal x5% increased damage for each Nearby enemy that is Crowd Controlled, up to x25%. |
![]() | • For every 5 Intelligence purchased within range, Core Skills deal +4% increased Critical Strike Damage. • Additional Bonus (requires 40 Intelligence purchased in radius range): Skills that Critically Strike restore 12% of their Energy cost. |
![]() | Your Ultimate Skills deal x30% increased damage and grant you x10% increased damage for 20 seconds when cast. (Legendary Nodes not used) |
![]() | For every 5 Intelligence purchased within range, you deal + [14.21%] increased damage to Crowd Controlled targets. • Additional Bonus (requires 25 Intelligence purchased in radius range): You deal x10% increased damage to Slowed or Chilled enemies or, instead, x20% increased damage to Stunned or Frozen enemies. |
Starting Board
- Path right and up to Prime. Purchase all 5 surrounding Magic Nodes.
- Continue up to the first Glyph Socket. Insert
Chip and purchase all Dexterity nodes in radius range for the Additional Bonus.
- Obtain Lawless nearby and purchase 3 Magic Nodes providing Armor.
- Obtain Skillful nearby and purchase 3 Magic Nodes providing Damage.
- Continue up the right side to the Board Attachment Gate at the top. Attach Tricks of the Trade after rotating the board clockwise 2 times. The Glyph Socket should be located in the top-left quadrant.
Tricks of the Trade (2nd Board)
- Path up and left to Brawler. Purchase all 5 surrounding Magic Nodes.
- Continue up and right to Tricks of the Trade.
- Path back left and up to Lawless. Purchase 3 Magic Nodes providing Armor.
- Continue up to the Glyph Socket. Insert
Exploit and purchase all Strength nodes in radius range.
Exploit needs to be at least level 15 for the increased radius range to fulfill its Additional Bonus. This Glyph is moved to the socket in the 5th board later.
- Obtain Focused nearby and purchase 3 Magic Nodes providing Damage to Elites.
- Continue up and left to Havoc. Purchase all 5 surrounding Magic Nodes.
- Take the shortest route to the Board Attachment Gate at the top. Attach Exploit Weakness without any rotations to the board. The Glyph Socket should be located in the bottom-left quadrant.
Exploit Weakness (3rd Board)
- Path up and left the Glyph Socket. Insert
Devious and purchase 40 Dexterity from nodes in radius range.
- Obtain Artifice nearby and purchase 3 Magic Nodes providing Vulnerable Damage.
- Obtain Dosage nearby.
- Path back right and up to Exploit. Purchase all 5 surrounding Magic Nodes.
- Continue up and left to Exploit Weakness.
- Path back right and up to Unassailable. Purchase all 5 surrounding Magic Nodes.
- Take the shortest route to the Board Attachment Gate on the right. Attach Cheap Shot after rotating the board clockwise 3 times. The Glyph Socket should be located in the top half.
Cheap Shot (4th Board)
- Path right to the Glyph Socket. Insert
Combat and purchase all Intelligence nodes in radius range.
Combat needs to be at least level 15 for the increased radius range to fulfill its Additional Bonus.
- Obtain Devious nearby and purchase 3 Magic Nodes providing Damage to Crowd Controlled Enemies.
- Obtain Wiles nearby and purchase 3 Magic Nodes providing Damage Reduction from Slowed Enemies.
- Path back left and down to Cheap Shot.
- Path back left and down to Oppress. Purchase all 5 surrounding Magic Nodes.
- Take the shortest route to the Board Attachment Gate on the bottom. Attach No Witnesses after rotating the board clockwise 1 time. The Glyph Socket should be located in the left half.
No Witnesses (5th Board)
The Legendary Node in this board is not used.
- Path down and right to Ruin. Purchase all 5 surrounding Magic Nodes.
- Continue down and left to the Glyph Socket. Take
Exploit out of the Tricks of the Trade board and put it into the recently obtained Glyph Socket. Purchase all Strength nodes in radius range. Put
Control into the Glyph Socket in the Tricks of the Trade board and purchase all Intelligence in radius range.
- Obtain Knowledge nearby, along with 3 Magic Nodes providing Damage.
- Obtain Training nearby.
Click this link and check the Paragon page on the planner for a visual of the entire tree.
Mechanics and Playstyle
Rapid Fire has high single target damage, but normally lacks Area of Effect (AoE) for clearing groups of enemies.
Aspect of Repeating does not provide enough additional targets, and
Shadow Imbuement has a cooldown that is not always available for every pack. Therefore,
Flurry is utilized in this build for unlimited AoE.
This hybrid build has an arsenal of both Cutthroat Skills (Flurry,
Shadow Step and
Dash) and Marksman Skills (
Rapid Fire and
Puncture) to activate damage increases from
Close Quarters Combat and
Tricks of the Trade.
Spam Flurry in the middle of a group of enemies to deal AoE damage, while Advanced Flurry Stuns them. Once you have a clear line of sight, snipe Elite enemies with
Rapid Fire.
Cold Imbuement and Crowd Control
Cold Imbuement is utilized for Crowd Control (CC) and multiple damage increases. The 25% chill applies to every hit from
Rapid Fire or
Flurry, meaning enemies become Frozen after just one cast. These multi-hit Core Skills easily activate the additional bonuses on
Mixed Cold Imbuement and
Frigid Finesse for some insane damage multipliers.
Elites are easy to kill after being Frozen, but bosses are initially immune to Crowd Controls. Cold Imbuement and
Advanced Flurry can still be used against bosses to eventually Stagger them. After fully Staggering a Boss, they are considered affected by all Crowd Control types for the Staggered duration.

Vulnerable
Fundamental Puncture easily applies Vulnerable to a target with a single Basic attack. Aim
Puncture at the toughest enemies in a pack. In group play, apply this debuff to Elites and Bosses so your teammates deal 20% more damage.
Animation Cancel Technique
An Evade can be used immediately after using Rapid Fire or
Flurry to cancel their casting animations. This technique is important to quickly dodge incoming attacks while activating
Advanced Flurry and
Advanced Rapid Fire. Boots with the implicit effect, attacks reduce Evade’s cooldown by 1.2 seconds, allow for an animation cancel after using 3 Basic Attacks and a Core Skill. Practice hitting Evade after every Core Skill to build muscle memory.

AoE Damage Rotation
Explode groups of mobs with the following rotation.
- (Optional)
Dash through tougher enemies to apply
Enhanced Dash if necessary.
- Evade through at least 1 enemy to prepare
Advanced Flurry.
- Build 3 Combo Points with
Puncture, activating
Tricks of the Trade for a damage bonus to your next Cutthroat Skill,
Flurry.
- Cast
Flurry to deal AoE damage and Stun enemies.
- Immediately animation cancel
Flurry with an Evade through another enemy to restart the rotation.
You lose all Crowd Control damage bonuses against Unstoppable Elites, making them much harder to defeat. Quickly kill any Elites within a group of enemies with the Single Target Damage Rotation (section directly below) before they become Unstoppable. Attempt to single them out or get next to them for Rapid Fire to hit. Otherwise, clear out some enemies with the AoE Rotation to create a line of sight.
Single Target Damage Rotation
Use the following rotation against Elites and Bosses for high single target Damage Per Second (DPS).
- Use Evade to activate
Advanced Rapid Fire.
- Build 3 Combo Points with
Puncture. Make sure you are close enough for
Fundamental Puncture to apply Vulnerable.
- Cast
Shadow Step on the toughest Elite to Stun them and activate
Tricks of the Trade for a damage bonus to your next Marksman Skill,
Rapid Fire. Alternatively,
Dash can be used through a Boss to apply
Enhanced Dash.
- Activate
Cold Imbuement for damage increases from
Mixed Cold Imbuement and
Frigid Finesse.
- Cast
Rapid Fire at the target.
- Immediately animation cancel
Rapid Fire with an Evade to restart the rotation.
Gear Choice and Stat Priority in the Endgame
Make sure to pick up all Rare Item drops that may be upgrades while you are farming with Double Core Rapid Fire and Flurry Rogue. Save Legendary Items with useful aspects in your stash to be used later for extraction and imprinting onto well rolled Rare Items.
When comparing weapons with similar item levels, Swords are preferred over Daggers for higher damage per hit and the Critical Strike Damage implicit. Crossbows are preferred over Bows for the Vulnerable Damage implicit.
Make sure you have Boots with the implicit effect, attacks reduce Evade’s cooldown by 1.2 seconds. The implicit effect is required for constant Evades to keep activating Advanced Rapid Fire and
Advanced Flurry. Upgrade Boots with at least 700 Item Power at the Blacksmith to get the max cooldown reduction value.
Stat Priority List
Listed below are the affixes to prioritize on gear for Rapid Fire Rogues. Each line of affixes are listed in order of importance. Affixes on the same line are considered to be equally important, since their exact values differ for each character. All stats have an effect that is dependent on how much is already stacked. Bolded stats are the most important and sometimes vital for the build to function properly.
Gear Slot | Important Affixes |
---|---|
Weapons | + DPS value, Critical Strike Damage, Vulnerable Damage + Dexterity, Damage to Close, Core Skill Damage, Critical Strike Damage with Imbued Skills + Damage to Injured, Crowd Controlled or Stunned Enemies |
Helm | + Basic Attack Speed, Cooldown Reduction, Armor + Maximum Life, Crowd Control Duration + Dexterity + Maximum Energy |
Chest | + Armor, Damage Reduction, DR from Close Enemies, DR from Distant Enemies + Maximum Life + Dexterity + Damage, Physical Damage |
Gloves | + Ranks of Rapid Fire, Ranks of Flurry, Attack Speed, Critical Strike Chance + Dexterity, Critical Strike Damage with Imbued Skills, Critical Strike Chance Against Injured Enemies + Damage to Injured Enemies |
Pants | + Armor, Damage Reduction, DR from Close Enemies, DR from Distant Enemies + Maximum Life, Dodge Chance, DC Against Close Enemies + Dexterity |
Boots | + Energy Cost Reduction + Movement Speed, Ranks of Dash + Dexterity, Dodge Chance, DC Against Distant Enemies + Damage Reduction while Injured |
Amulet | + Ranks of Frigid Finesse Passive + Cooldown Reduction, Armor, Movement Speed + Energy Cost Reduction + Damage Reduction, DR from Distant Enemies, DR from Close Enemies + % Dexterity + Crowd Control Duration + Critical Strike Chance Against Injured Enemies + Damage |
Rings | + Critical Strike Chance, Critical Strike Damage, Vulnerable Damage + Maximum Life, Resource Generation, Damage to Close Enemies, Critical Strike Damage with Imbued Skills + Maximum Energy + Physical Damage, Dazed, Injured, Crowd Controlled or Stunned Enemies |
Legendary Aspects and Codex of Power
Listed below are all the best-in-slot Aspects found on Legendary Items that are important for the Rapid Fire Rogue build. Aspects from the Codex of Power can be used if you cannot find the proper Legendary drops, but they have weaker effects. Extract Aspects from lower level Legendary Items and imprint them onto better Rare Items with preferred stats.
Frostbitten Aspect is utilized solely for the Critical Strike Damage against Frozen enemies. There are no Grenade Skills in this build.
Resource Aspects, such as Aspect of the Umbral and
Ravenous Aspect, help with Energy management early on. Unfortunately, they are limited to Ring slots and replace Offensive Aspects. Resource management is improved elsewhere in this build, so important separate damage multipliers are not lost.
Gear Slot | Aspect Name | Aspect Power |
---|---|---|
Ranged Weapon (+100% bonus effect) | ![]() | Skills deal up to [10 – 20%] increased damage based on your available Primary Resource when cast, receiving the maximum benefit while you have full Primary Resource. |
Amulet (+50 bonus effect) | ![]() | Distant enemies have a 8% chance to be Stunned for 2 seconds when they hit you. You deal [10 – 20%] increased damage to Stunned enemies. |
Dual-Wielded Weapon Slot #1 (replaced by Condemnation) | ![]() | Lucky Hit: Making an enemy Vulnerable has up to a [40 – 60%] chance to grant 3% increased Critical Strike Chance for 3 seconds, up to 9%. |
Dual-Wielded Weapon Slot #2, Rings or Gloves | ![]() | Attacking enemies with a Basic Skill increases the damage of your next Core Skill cast by [5 – 10%], up to 30%. |
Dual-Wielded Weapon Slot #2, Rings or Gloves | ![]() | Basic Skills gain [15 – 30%] Attack Speed. |
Dual-Wielded Weapon Slot #2, Rings or Gloves | ![]() | Critical Strikes with Core Skills increase your Attack Speed by [15 – 25%] for 3 seconds. |
Dual-Wielded Weapon Slot #2, Rings or Gloves | ![]() | Flurry damages enemies in a circle around you and deals [8 – 15%] increased damage. |
Helm or Chest | ![]() | Chilled enemies hit by your Grenade Skills have a chance equal to double your Critical Strike Chance to be instantly Frozen for 2 seconds. You deal [10–25%] increased Critical Strike Damage against Frozen enemies. |
Helm, Chest or Pants | ![]() | You gain [0.25 – 0.50%] increased Armor for 4 seconds when you deal any form of damage, stacking up to [15.00 – 30.00%]. |
Helm, Chest or Pants | ![]() | Basic Skills grant 20% Damage Reduction for [2 – 6] seconds |
Boots | ![]() | ![]() |
Unique Items
Condemnation
Condemnation – Your Core Skills deal [20 – 40%] increased damage when spending 3 Combo Points. Your Skills using this weapon have a 30% chance to generate 3 Combo Points.
This Unique Dagger synergies well with this Combo Points build for an additional damage multiplier.
Penitent Greaves (Recommended for Barber Variant)
Penitent Greaves – You leave behind a trail of frost that Chills enemies. You deal [7 – 10%] more damage to Chilled enemies.
These Boots provide a decent damage increase in the Unique Effect, but the rest of the affixes are a bit lacking. Legendary Boots with the implicit effect, attacks reduce Evade’s cooldown, are needed if you plan on utilizing the constant animation canceling playstyle. The Barber Variant of this build makes better use of Penitent Greaves.
Not Recommended Unique items
Listed below are the Unique Items not recommended for this build and the reasons they are not worthwhile.
Skyhunter – This Unique Bow is a huge DPS loss compared to a Legendary Crossbow with well-rolled affixes, a Vulnerable Damage implicit and an Offensive Aspect with +100% bonus effect on 2-Handed Weapons.
Asheara’s Khanjar – The Attack Speed bonus on this Unique Dagger is decent, but the rest of its affixes are lacking. A Legendary Sword with well-rolled affixes and an Offensive Aspect is more beneficial.
Grasp of Shadow – These Unique Gloves provide up to +3 Ranks for all Core Skills, but Legendary Gloves with +4 Ranks of
Rapid Fire and +4 Ranks of
Flurry are better. The summoned Shadow Clone attack does significantly less damage than the original attack being copied.
Temerity – These Unique Pants provide a consistent Barrier when paired with
Siphoning Strikes.
Conceited Aspect can also be used with this Barrier generation for increased damage, but this build already has enough Offensive Aspect choices. Using Temerity causes you to miss out on 4 Damage Reduction affixes and an Aspect from Legendary Pants, making them not worthwhile.
Gems
Listed below are the best Gems to socket into gear for each slot type for the Rapid Fire and Flurry Rogue build.
- Weapon:
Royal Emerald for Critical Strike Damage to Vulnerable Enemies.
- Armor:
Royal Ruby for Maximum Life or
Royal Topaz to prevent deaths from chain Crowd Controls.
- Jewelry: Malignant Hearts if playing Season 1. Otherwise,
Royal Skull for Armor.
Elixirs and Health Potions
Visit the Alchemist in any main town to craft helpful Elixirs that increase stats and experience gain for 30 minutes. Make sure to forage plants and pick up the necessary crafting materials during your adventures; they randomly spawn around the world. Craft a Precision Elixir or
Assault Elixir.
Return to the Alchemist again when you reach Level 20, 30, 45, 60, 70, 80 and 90, to upgrade your potion. The extra healing is essential to survival.
Barber Variant for Dual Core Rapid Fire Flurry Rogue
Caged Heart of The Barber is available in Season 1 of Diablo 4, and it significantly enhances the damage and AoE clearing of the Dual Core Rapid Fire Flurry build. The explosion from The Barber is Shadow Damage; therefore, it activates
Consuming Shadows for Energy generation. This allows
Rapid Fire and
Flurry to be spammed freely (as long as you are killing enemies), without the need for
Puncture.
Patch 1.1.1 Update: Caged Heart of The Barber has been fixed to work with “on hit” effects and Lucky Hit chance and no longer has any downsides other than the delay. Changes to Gear and active Skills are no longer necessary. Now, the only change to the setup is moving points from
Siphoning Strikes and
Precision Imbuement to gain
Consuming Shadows Level 3 (see Skill Tree section for Barber Variant).
How to Farm for Caged Heart of the Barber
August 9th, 2023 Hotfix Update: Wrathful Invokers can now drop from Elites, and they can easily be obtained while farming Nightmare Dungeons. Use the Wrathful Invokers at the end of Malignant Tunnels for a chance of Caged Heart of The Barber dropping. You no longer need to go out of your way to get Wrathful Hearts, but the previous strategy is still listed below if desired.
- Enter the Ravening Pit Malignant Tunnel in Dry Steppes.
- Circle around the first area of the Malignant Tunnel to check 3 Malignant Elites for the Wrathful affix. Killing a Wrathful Elite drops a Wrathful Heart that has a chance of being
Caged Heart of The Barber. Finishing non-Wrathful Malignant Elites is optional, as waiting for them to spawn takes some time.
- Check the 4th Malignant Elite in the next main room for another chance of a Wrathful Heart. There is no need to go further into the last 2 rooms.
- Leave dungeon through the Emote Wheel. Then open the World Map and click the Reset Dungeons button in the Journal tab. Re-enter the Ravening Pit to restart the farming strategy steps.

Skill Tree Points for Barber Dual Core Rapid Fire Flurry Rogue
The changes to the Skill Tree from the original version of the build are listed below.
- Move 1 Skill Point from
Precision Imbuement to
Shadow Crash.
- Move 3 Skill Points from
Siphoning Strikes to
Consuming Shadows.
Priority Skills | Cluster |
---|---|
![]() ![]() ![]() | ![]() |
![]() ![]() ![]() ![]() ![]() ![]() ![]() | ![]() |
![]() ![]() ![]() ![]() ![]() ![]() ![]() | ![]() |
![]() ![]() ![]() | ![]() |
![]() ![]() ![]() ![]() ![]() ![]() | ![]() |
![]() ![]() | ![]() |
![]() | ![]() |
Remaining Renown Points | Cluster |
---|---|
![]() | ![]() |
![]() | ![]() |
Changelog
- August 30th, 2023: Not Recommended Unique Items section added.
- August 9th, 2023: Barber Farming Strategy updated with new hotfix change.
- August 2nd, 2023: Patch 1.1.1 section added with another Siphoning Strike change.
- July 28th, 2023: Barber Variant added.
- July 18th, 2023: Guide updated for Season 1.