


Build Introduction
The Kratos Barb comes back with a vengeance in season 4 thanks to the new tempers. Do you like swinging chains around for huge damage and making the most use out of the Arsenal system? If so, this is the build for you!
Strengths and Weaknesses
- Strong AOE DPS
- Low ultimate Cooldown
- Not a triple shout setup
- Great Mobility
- Tons of weapon swapping, not able to spam skills
- Skill rotation is very important
- Lower defensiveness due to lack of Challenging Shout
To see how this build compares to the other builds on our site, you can check out our build tier lists.
Build Requirements
 Overkill
 Banished Lord’s Talisman
 Accelerating Aspect
 Weapon Master’s AspectAspect of Encroaching Wrath
Skill Bar and Skill Tree Points
 Death Blow
  Rallying Cry
  Leap
Leap  Iron Maelstrom
  Lunging Strike
  Upheaval
 Follow the points allocated in the image above for the complete 58 point build. The additional 10 skill points are completed using the Renown system.
Arsenal System and Weapon Selection
For the Walking Arsenal Build, we use the two-handed axe Technique to raise our damage against Vulnerable Enemies.
Barbarians have an unique mechanic in Diablo 4 where you can assign a weapon type to certain skills. For our Walking Arsenal build, we will be assigning the following weapons to our skills:
- Lunging Strike – Dual wield
- Upheaval – Bludgeoning
- Death Blow – Slashing
- Iron Maelstrom – Highest DPS 2-Handed Weapon
Paragon Board
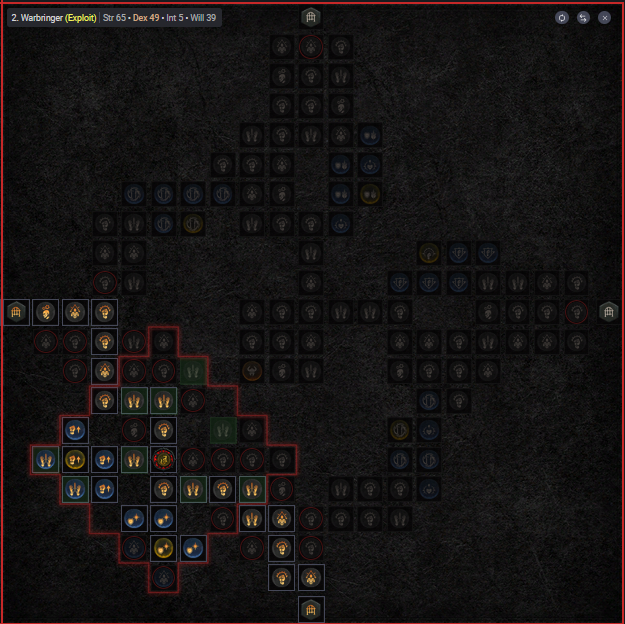
Starting Board

Warbringer
We do not rotate this board to attach it.
Carnage
Rotate this board twice before attaching it.

Blood Rage
We’ll connect this board to the north of the Carnage Board. Rotate this board twice before attaching it.

Decimator
We’ll connect this board to the west of the Carnage Board. Rotate this board once before attaching it.

Weapons Master
We’ll connect this final board to the south of the Carnage Board. Do not rotate this board before attaching it.

To view the paragon boards in their entirety CLICK HERE.
Gear, Gems, Elixirs, and Stats
The Season of Loot Reborn brings us an incredible shift in how gear and itemization are done. It is a major and will affect the game beyond Season 4’s confines. For further details, make sure to read our Tempering and Masterworking section below.
Legendary Aspects
Below you will find all of the best-in-slot Aspects found on Legendary items that are important for this build. Remember that with Patch 1.4.0 all Legendary powers can be added into your Codex once you salvage or extract the item. You can still find some aspects through dungeons as you could in previous seasons but now you have the option to upgrade these affixes if you find a higher roll of that affix. Let us go over what aspects you will need.
| Slot | Gems | Legendary Aspect / Unique Items | Aspect / Unique Effect |
| Helm |  Juggernaut’s Aspect Juggernaut’s Aspect | – Gain [X] Armor, but your Evade has a 100% increased Cooldown. | |
| Chest | Steadfast Berserker’s Aspect | – Lucky Hit: Up to a 35% chance to gain [X] Fortify whenever you deal direct damage while Berserking | |
| Gloves | N/A | Weapon Master’s Aspect | – Your Weapon Mastery Skills have an additional Charge. Lucky Hit: Damaging an enemy with a Weapon Mastery Skill has up to a [37-55%] chance to Stun them for 2 seconds. |
| Pants | – You deal [10-20%] increased damage while Unstoppable and for 5 seconds after. When you become Unstoppable, gain 50 of your Primary Resource | ||
| Boots | N/A | Relentless Berserker’s Aspect | – Lucky Hit: Damaging an enemy with a Core Skill has up to a [22-40%] chance to extend the duration of Berserking by 2 seconds. Double this duration if it was a Critical Strike. |
| Amulet | – After you spend 275 of your Primary Resource, your next Core Skill is guaranteed to Overpower. Your critical strikes that Overpower deal [20-60%] increased damage. | ||
| Ring 1 | – After spending 100 Fury within 3 seconds, your next cast of | ||
| Ring 2 | Earthstriker’s Aspect | – After swapping weapons 8 times, your next Non-Basic Skill will Overpower and deal [15-30%] increased Overpower damage. | |
| 2-Handed Bludgeoning Weapon | | – | |
| 2-Handed Slashing Weapon | Aspect of Encroaching Wrath | – After spending 100 Fury, your next Weapon Master Skills within 5 seconds deals [40-70%] increased damage. | |
| Dual Wield Weapon 1 | Edgemaster’s Aspect | – Skills deal up to [5-20%] increased damage based on your available Primary Resource when cast, receiving the maximum benefit while you have full Primary Resource | |
| Dual Wield Weapon 2 | Aspect of Inner Calm | – Deal [5-10%] increased damage. Triple this bonus after standing still for 3 seconds. |
Gems
Listed below are the best gems to socket into gear for each slot type.
| Weapon Gems | Armor Gems | Jewelry Gems |
For your jewelry, it may be necessary to change the ![]() Royal Diamond for another gem for a specific type such as
Royal Diamond for another gem for a specific type such as ![]() Royal Sapphire to ensure all of your resistances are capped at 70%
Royal Sapphire to ensure all of your resistances are capped at 70%
Which Elixirs Should You Use?
Visit the Alchemist in any main town to craft helpful Elixirs that increase stats, and experience gain for 30 minutes. Make sure to forage plants and pick up the necessary crafting materials during your adventures; they randomly spawn around the world. Use an Elixir providing any Resistance you need most, or the Elixir of Destruction which increases your Overpower damage. Craft the highest Elixir of Destruction you can
Return to the Alchemist again when you reach Level 20, 30, 45, 60, 70, 80 and 90, to upgrade your potion. The extra healing is essential to survival.
Gear Choice and Stat Priority
Below are the affixes to prioritize on gear. Each line of affixes is listed in order of importance. Tempering Manuals and their recommended affixes are provided in the second column, and the bolded yellow affixes are the most important targets for Masterworking upgrades. To masterwork, you will need rare materials that only drop from The Pit. Be sure to check our Tempering guide, our Masterworking guide, as well as our guide about The Pit for more details about these topics.
| Slot | Gear Affixes | Tempering Affixes |
| Helm | 1. Cooldown Reduction 2. Strength 3. Ranks to Death Blow | 1. Needed Resistance 2. Maximum Life |
| Chest | 1. Strength 2. Maximum Life 3. Needed Resistance | 1. Needed Resistance 2. Maximum Life |
| Gloves | 1. Critical Strike Chance 2. Lucky Hit Chance 3. Attack Speed | 1. Damage When Swapping Weapons 2. Lucky Hit: Chance to Stun for 2 Seconds |
| Pants | 1. Strength 2. Maximum Life 3. Needed Resistance | 1. Needed Resistance 2. Maximum Life |
| Boots | 1. Movement Speed 2. Strength 3. Maximum Life | 1. Movement Speed 2. Lucky Hit: Chance to Stun for 2 Seconds |
| Amulets | 1. Cooldown Reduction 2. Attack Sped 3. Movement Speed | 1. Damage When Swapping Weapons 2. Iron Maelstrom Cooldown Reduction |
| Rings | 1. Critical Strike Chance 2. Attack Speed 3. Lucky Hit Chance | 1. Damage When Swapping Weapons 2. Iron Maelstrom Cooldown Reduction |
| 2-Handed Bludgeoning Weapon | 1. Strength 2. Fury on Kill 3. Maximum Life | 1. Damage When Swapping Weapons 2. Upheaval Size |
| 2-Handed Slashing Weapon | 1. Strength 2. Fury on Kill 3. Maximum Life | 1. Damage When Swapping Weapons 2. Upheaval Size |
| Dual-Wield Weapons | 1. Strength 2. Critical Strike Damage 3. Maximum Life | 1. Damage When Swapping Weapons 2. Upheaval Size |
Rotation and Playstyle
This build requires a bit of finesse to make sure we’re maintaining our ![]() Walking Arsenal buff. Let’s run our skills down.
Walking Arsenal buff. Let’s run our skills down.
 Lunging Strike is used to generate Fury and proc the Dual-Wield Weapon buff for
  Walking Arsenal
 Upheaval is used to spend Fury and proc the 2-Handed Bludgeoning Weapon buff for Walking Arsenal
 Death Blow is used whenever it’s off cooldown to finish mobs and proc the 2-Handed Slashing Weapon buff for Walking Arsenal
- Use
 Leap for mobility and fury
 - Cast
 Iron Maelstrom whenever it is available to give yourself all three weapon buffs for Walking Arsenal and carve through packs and elites.
Uniques and Uber Uniques
Below you will find information on Uniques and Uber Uniques that are useful for this build. Moreover, if you are interested in target farming Uber Uniques, check out our How to Farm Uber Uniques guide.
Uniques
Below you will find the unique items useful to this build to provide more damage for specific abilities or overall utility.
 Tibault’s Will – Despite the nerfs to this item in Patch 1.4 this is still a powerful option to take for some added damage and a damage reduction line which is more rare on items in season 4
 Overkill – The idea 2-Handed Mace due to its potent increase to one of our main damaging skills Death Blow allowing for further resets and more AOE clear. If you acquire one, swap Accelerating Aspect for Aspect of Inner Calm on one of your dual-wield weapons.
 Banished Lord’s Talisman – Similar to Tibault’s, the nerfs don’t stop this amulet from being a strong option for this build for those who want to run a lot more offense. If you choose to use this, drop Aspect of Berserk Ripping and move Earthstriker’s Aspect to that ring instead.
 Ring of Red Furor – Mostly used to ensure our Death Blow critically strikes and helps ensure big boss hits and lethal strikes for resets. If used, replace the ring that had Aspect of Berserk Ripping. If using both banished lords and red ring, move Earthstriker’s Aspect to the remaining ring and drop
  Aspect of Berserk Fury entirely.
Uber Uniques
Here you will find the uber unique items that are useful to this build. If an uber unique is NOT listed here, it is not useful to this build and does not provide any meaningful increase or effect.
 Harlequin Crest – The most sought after helm in all Diablo 4. If you’re one of the fortunate ones to acquire this, it boosts all of your skills which for this build is a huge boon and provides some more cooldown and damage reduction which is more rare in Season 4.
 The Grandfather – An extremely powerful 2-Handed Slashing Weapon. Edgemaster’s Aspect is dropped entirely and replace with Aspect of Encroaching Wrath if you’re fortunate enough to loot one of these amazing swords.
Season 4: Loot Reborn
Unlike past seasons there is no overarching theme for season 4 as Blizzard is focused on the absolutely massive loot overhaul which is sure to change the game in big ways. There will also be a reputation to be gained with the new Ironwolves during Helltides and this faction grants several tempering manuals and even a resplendent spark! Below are the changes relevant to this build.
- Barbarian’s innate 10% Damage Reduction has been removed
- Banished Lord’s Talisman ‘s resource required to guarantee an Overpower reduced to 275 from 300. Damage bonus reduced from 80-120% to 20-60%
- Tibault’s Will damage bonus reduced from 20-40% to 10-20% but damage increase persists for 1 second longer after being Unstoppable
- Two-Handed Axe Technique’s damage to Vulnerable enemies reduced from 15% to 10%
 Blood Rage damage increased by Berserking bonus reduced from 25% to 10% and now caps at 30%
- Earthstriker’s Aspect damage bonus reduced from 35-50% to 15-30%
- Aspect of the Relentless Armsmaster Fury generation increased from 20-35% to 35-65%
Advanced Information
Below, you will find every additional piece of information you need to know for a more in-depth look at this build.
Mechanics and Playstyle
This build is a lot more involved than it might first appear. We want to benefit from the build’s namesake passive ![]() Walking Arsenal as much as possible. This requires us to swap weapons constantly, something that should come fairly easily. We’ll use
Walking Arsenal as much as possible. This requires us to swap weapons constantly, something that should come fairly easily. We’ll use ![]() Lunging Strike through our Dual Wield Weapons to proc this, use our 2-Handed Mace for
Lunging Strike through our Dual Wield Weapons to proc this, use our 2-Handed Mace for ![]() Upheaval and lastly use our 2-Handed Slashing Weapon for
Upheaval and lastly use our 2-Handed Slashing Weapon for ![]() Death Blow. Our ultimate skill of choice,
Death Blow. Our ultimate skill of choice, ![]() Iron Maelstrom should have an incredibly high uptime thanks to the new tempering system and its associated affixes which will provide us with a high damage ultimate that also activates our key passive for us by using all weapon types.
Iron Maelstrom should have an incredibly high uptime thanks to the new tempering system and its associated affixes which will provide us with a high damage ultimate that also activates our key passive for us by using all weapon types.
We will also use Earthstriker’s Aspect for even more damage. Though nerfed in Patch 1.4.0 this still retains a solid amount of power for this build. Be sure to snag Weapon Master’s Aspect to get a second charge on ![]() Death Blow to ensure we’ll always have it available. Once you have a solid
Death Blow to ensure we’ll always have it available. Once you have a solid ![]() Overkill we’ll want to use
Overkill we’ll want to use ![]() Death Blow more frequently due to the increased power this unique provides, especially on bosses and single target Elites. We use our
Death Blow more frequently due to the increased power this unique provides, especially on bosses and single target Elites. We use our ![]() Leap for mobility and to proc
Leap for mobility and to proc ![]() Aggressive Resistance for survival.
Aggressive Resistance for survival.
This build plays very differently from more traditional Barbarian builds as it forgoes the triple shout setup and only opts to use ![]() Rallying Cry for some faster move speed and resource gen to help cast more Upheavals and keep our arsenal bonuses going. This may appeal more to some players who have grown tired of the three shout meta.
Rallying Cry for some faster move speed and resource gen to help cast more Upheavals and keep our arsenal bonuses going. This may appeal more to some players who have grown tired of the three shout meta.
Paragon
We recommend using these Legendary nodes and Rare Glyphs to truly take this build into the endgame. Note that each Rare Glyph’s information listed below is for the Level 21 version.
| Rare Glyphs and Legendary Nodes | Effect |
| – Grants + [125%] bonus to all Magic Nodes within Range – Additional Bonus after 40 Strength points are purchased within the glyph’s range: You deal x8% increased damage while wielding Two-Handed Weapons | |
| – For every 5 Dexterity purchased within range, you deal + [8%] increased damage to Vulnerable targets – Additional Bonus after 25 Dexterity points are purchased within the glyph’s range: When an enemy is damaged by you, they become Vulnerable for 3 seconds. This cannot happen more than once every 20 seconds per enemy | |
| – For every 5 Strength purchased within range, you deal + [5.3%] increased Damage While Berserking – Additional Bonus after 40 Strength points are purchased within the glyph’s range: While Berserking, you take 10% reduced damage from Elites | |
| – For every 5 Dexterity purchased within range, you deal + [10%] increased damage to Close targets – Additional Bonus after 25 Dexterity points are purchased within the glyph’s range: You gain 15% Damage Reduction against Close Enemies | |
| – For every 5 Dexterity purchased within range, Skills that Swap to a different weapon deal + [16.5%] increased damage – Additional Bonus after 25 Dexterity points are purchased within the glyph’s range: Swapping weapons has an 18% chance to cause the Skill’s damage to Critically Strike | |
| – For every 5 Willpower purchased within range, you deal + [8%] increased damage while Fortified – Additional bonus after 25 Willpower points are purchased within the glyph’s range: You gain 10% Damage Reduction the more Fortify you have | |
| – While Berserking, Critical Strikes increase your Attack Speed by +2%, up to +16% for 6 seconds | |
| – Killing a Bleeding enemy has a 10% chance to grant Berserking for 5 seconds. Your damage is increased by x10% of your Damage While Berserking Bonus, up to x30% | |
| – Each time you make an enemy Vulnerable, your damage is increased by 10% for 5 seconds. Overpowering a Vulnerable enemy grants an additional x10% bonus for 5 seconds |
Starting Board
- We begin by heading right and picking up
 Brawn and its associated Magic nodes.
 - We head north from here and unlock the glyph socket to slot in
 Might.
 - Next we’ll grab enough strength including Raw Power and
 Iron Strength around the glyph radius to activate it.
 - We then head down to pick up
 Tenacity and its surrounding Magic nodes.
 - Finally we exit the board on the right side and connect Warbringer.
Warbringer
- A fairly straight forward board we head up and left to grab the socket immediately and slot in
 Exploit.
 - Next we head down to grab
 Conditioned and its all resist Magic nodes.
 - Then we will grab all the good Dexterity nodes to activate our glyph including Raw Power and the Magic nodes around it.
- Finally we head up and out to the left and connect the Carnage Board.
Carnage
- Don’t be intimidated this is the most complex and central board and we’ll be bouncing back and forth with it. We start by just heading left grabbing
 Berserker and then the legendary node itself, Carnage.
 - Now we will continue left from Carnage and unlock the socket, slotting in Ire.
- We grab as much strength in its radius as possible including the surrounding rare nodes Fierce and
 Brash.
 - First we make our way north picking up Enraged and the Magic nodes around it before connecting the Blood Rage board at the north gate. We will come back to Carnage after finishing the Blood Rage Board.
- After finishing Blood Rage, head south from Carnage and connect the Weapons Master Board to the southern gate.
- After finishing Weapons Master, head west from the glyph socket and connect the Decimator Board here and at long last we’re finished with this central and complex board.
Blood Rage
- We take a short detour up and right to grab Enraged and the surrounding Rare nodes.
- Now we head left and up to the board’s namesake glyph Blood Rage.
- Next we continue our trek left and up to unlock the glyph socket and slot in Territoria.
- Lastly we finish the board by snagging all the good rare nodes such as
 Grit and Revel and enough Dexterity to unlock the bonus of our glyph and then we head back to the Carnage Board.
Weapons Master
- A straight forward board where we dive immediately left and pick up Raw Power.
- Next we shoot for the glyph socket and slot in Mortal Draw.
- We pick up the remaining rare node Iron Strength and grab enough dexterity in the glyph radius to activate its secondary effects and then head back to Carnage once completed.
Decimator
- We head straight left and rush the socket here to slot in
 Undaunted.
 - We head left some more and make our way to the legendary node Decimator.
- Lastly we fill out the glyph radius with
 Demolish and Arrogance and all the Magic nodes nearby and thus completes our paragon journey!
Obol Gambling
A final point on acquiring gear in Season 4 and beyond is using your Obols to target farm specific slots instead of randomly spending them on random drops. Similar to Kadala in Diablo 3, you can use Obol vendors in town to try and get what you’re missing. With Patch 1.4.0 when a level 100 Character spends Obols, all gear from that vendor will be 925 item power, the highest in the game, allowing you to fill out gear with the affixes or Legendary Aspects you need.
Check out our Obol Gambling Tool HERE!
Changelog
- May 7th 2024: Ownership of page transferred, guide restructured, updated for Season 4
- March 5th 2024: Updates for Patch 1.3.3.
- January 21st 2024: Season 3 speculative changes.
- October 27th 2023: Build Creation Season 2.
