Kulle's Hidden Chambers Zone Event Guide
Kulle's Hidden Chamber is one of eight initial Zone Events spread across the world of Sanctuary in Diablo Immortal. Although you do not need to participate in this event at a specific time, you may only complete its objectives 10 times per day.
Kulle's Hidden Chambers Overview
Kulle's Hidden Chambers zone events takes place in the Library of Zoltun Kulle. The event is not time- or mob-bound; instead, it requires the collection of Lost Pages, spread semi-randomly across the area. (By 'semi-randomly' we mean that spawn locations are pre-determined, but you cannot tell which pages are up for collection at any given moment). Lost Pages are also not looted individually, making their collection somewhat competitive. The breakdown of the event is:
- When: Anytime, up to a 10 times per day cap.
- Where: Lost Pages are found at pre-determined locations in the
Library of Zoltun Kulle. Collecting 5 of them creates a
 Portal Tome, which is then
used for a chance at spawning valuable world bosses in the same zone.
Portal Tome, which is then
used for a chance at spawning valuable world bosses in the same zone. - Why:
 Enchanted Dust, chance for good loot (including
Legendary items) from server-wide World Boss
procs, the Fleshcraft Hydra and the Sandstone Golem.
Enchanted Dust, chance for good loot (including
Legendary items) from server-wide World Boss
procs, the Fleshcraft Hydra and the Sandstone Golem.
Kulle's Hidden Chambers Mechanics
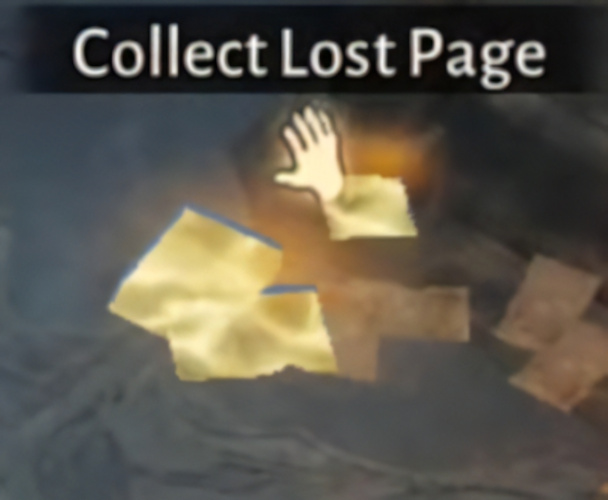
As mentioned above, Kulle's Hidden Chambers requires the collection of Hidden Pages, spread all across the Library of Zoltun Kulle. The spawn locations for the Hidden Pages are pre-determined, but which pages are up for collection is not. The Lost Pages look like a small stack of parchments strewn across the ground, surrounded by a golden glow that makes them more easily spotted.
Collecting 5 Lost Pages combines into a single
![]() Portal Tome; you can carry up to 5
Portal Tome; you can carry up to 5 ![]() Portal Tomes. Ideally,
you will create a group with people that have pre-farmed their Tomes, and
chain-open them to try and proc one of the two possible World Bosses
(see below).
Portal Tomes. Ideally,
you will create a group with people that have pre-farmed their Tomes, and
chain-open them to try and proc one of the two possible World Bosses
(see below).
Using a Portal Tome (by clicking on the magnifying glass icon next to the
'Kulle's Hidden Chambers' quest log entry, and then clicking 'Use') has a
chance to trigger one of six possible scenarios — 4 Portal Events and 2
World Bosses. Portal Events are one-room dungeon trials that reward you with
![]() Enchanted Dust and equipment. They should be soloed by the person that
spawned them, as entering another person's Portal will also deplete one of
your collected Tomes — and their reward is not worth it compared to the
potential of a World Boss spawn. That being said, all the possible outcomes of
popping a
Enchanted Dust and equipment. They should be soloed by the person that
spawned them, as entering another person's Portal will also deplete one of
your collected Tomes — and their reward is not worth it compared to the
potential of a World Boss spawn. That being said, all the possible outcomes of
popping a ![]() Portal Tome are:
Portal Tome are:
Portal Event: Crates Chamber
The objective set by this one-room dungeon is simply to destroy all the
containers in the area. When thoroughly smashed, they will net you 6
![]() Enchanted Dust and a smattering of
Enchanted Dust and a smattering of ![]() Gold. You will be notified
when all the crates are smashed, so you need not worry if you missed any.
Gold. You will be notified
when all the crates are smashed, so you need not worry if you missed any.
Portal Event: Magic Trials
The objective set by this one-room dungeon is to defeat 6 Skeletal
Guardians and 2 Rock Golems, summoned by an ever-mocking Echo of Zoltun Kulle
himself. This is a trivial trash fight; when you triumph, you will be rewarded
with a Treasure Chest containing ![]() Gold, items of varying quality (Common,
Magic, Rare,
with a chance for a Legendary), and 6
Gold, items of varying quality (Common,
Magic, Rare,
with a chance for a Legendary), and 6
![]() Enchanted Dust.
Enchanted Dust.
Portal Event: Countdown
The objective set by this one-room dungeon is defeat as many monsters as you can within a 1 minute and 15 seconds time limit. The following waves of monsters will spawn:
- Wave 1: 2 Skeletal Mages, 4 Skeletal Warriors.
- Wave 2: 6 Skeletal Sorcerers.
- Wave 3: 3 Toxic Lurkers, 3 Spiderlings.
- Wave 4: 3 Patchwork Maws, 3 Undone Bilespewers, 1 Malformed Crusher.
These trash enemies should be trivial to slaughter for any decently
equipped character. For each complete wave, you will get a corresponding
Treasure Chest at the end (after you kill them all, or if the timer runs out).
The Treasure Chests contain ![]() Gold, items of varying quality (Common,
Magic,
Rare, with a chance for a
Legendary), and 6+
Gold, items of varying quality (Common,
Magic,
Rare, with a chance for a
Legendary), and 6+ ![]() Enchanted Dust.
Enchanted Dust.
Portal Event: Ebony Construct
The objective set by this one-room dungeon is to defeat the Ebony Construct; this boss golem is summoned after you click the Cursed Chest. Similarly to the boss Sargoth from the Temple of Namari dungeon, the Ebony Construct has several notable abilities, and can roll with a semi-random combination of them:
- Orbiter — The Ebony Construct summons several orbs of electricity that move slowly around the battlefield, inflicting damage on players caught in their radius.
- Icy Ground — The Ebony Construct freezes the ground with slippery ice, reducing traction of player movement. Reduce movement to a minimum to counter this ability.
- Ground Slam — The Ebony Construct raises its fists; an orange circle telegraphs the imminent attack. Shortly thereafter, the golem slams its fists into the ground; players caught within its radius suffer heavy damage.
- Cleaving Attack — The Ebony Construct pulls its fists away; a red rectangle telegraphs the imminent attack. Shortly thereafter, the golem cleaves the marked area for moderate damage.
- Summon Guardians — The Ebony Construct summons 6 Skeletal Guardians and 2 Quicksand Golems to its aid.
- Summon Poison Hydras — The Ebony Construct summons 4 acid-spitting Hydras to its aid.
Once the Ebony Construct is slain, the Cursed Chest is cleansed. It
contains ![]() Gold, items of varying quality (Common,
Magic,
Rare, with a chance
for a Legendary), and 6+
Gold, items of varying quality (Common,
Magic,
Rare, with a chance
for a Legendary), and 6+ ![]() Enchanted Dust.
Enchanted Dust.
World Boss Spawn: Sandstone Golem
When you proc the Sandstone Golem World Boss, all players in the area will receive the on-screen message of the imminent spawn. Players have 3 minutes to reach the spawn location — the large arena in upper right corner of the map, past the corridors of the Hidden Alcove.
The Sandstone Golem has the following abilities to watch out for:
- Cleaving Attack — The Sandstone Golem swipes a wide, 120-degree area in front of it with its right hand, striking anyone within melee distance.
- Ground Slam — The Sandstone Golem stomps with its foot, dealing light damage in a large, circular radius centered around the point of impact.
- Charge: From Sandstone Golem's second health bar (Phase 2) onward, the boss will dash forward unpredictably, dealing damage and knocking back players in its path.
- Summon Golems: — From Sandstone Golem's second health bar (Phase 2) onward, the boss will summon several Quicksand Golems to its aid.
- Dark Pools: From Sandstone Golem's third health bar (Phase 3) onward, the boss will occasionally slam its fists into the ground; spots of the arena will be targeted by red circles. After a short delay (marked with a second circle expanding within the initial telegraph), a meteoric bombardment will occur, inflicting moderate damage. The Sandstone Golem unleashes a about a dozen bombardments, and they can stack. Avoid them as best you can.
Killing the Sandstone Golem will reward you with ![]() Gold, Experience, items of
varying quality (Common, Magic,
Rare, and with a good chance for a
Legendary),
and 6
Gold, Experience, items of
varying quality (Common, Magic,
Rare, and with a good chance for a
Legendary),
and 6 ![]() Enchanted Dust. At character level 49 and above, killing the
Sandstone Golem has a chance to yield the
Enchanted Dust. At character level 49 and above, killing the
Sandstone Golem has a chance to yield the ![]() Guilt of the Nameless vessel —
part of the Legacy of the Horadrim system.
Guilt of the Nameless vessel —
part of the Legacy of the Horadrim system.
World Boss Spawn: Fleshcraft Hydra
When you proc the Fleshcraft Hydra World Boss, all players in the area will receive the on-screren message of the imminent spawn. Players have 3 minutes to reach the spawn location — the large circular arena in north-western part of the area (open up the map and look directly up north of the Writhing Ingress Waypoint — you can't miss it).
The Fleshcraft Hydra has the following abilities to watch out for:
- Acid Cone: The Fleshcraft Hydra rears its heads and spits out a far-reaching cone of poison directly in front of it, covering an 80-degree radius. The boss does this attack twice in quick succession.
- Acid Cloud: The Fleshcraft Hydra focuses its heads over an area, continually spitting noxious gas over a massive circle telegraphed by a green outline. Players caught inside take damage over time until they leave its radius.
- Acid Cloud: The Fleshcraft Hydra focuses its heads over an area, continually spitting noxious gas over a massive circle telegraphed by a green outline. Players caught inside take damage over time until they leave its radius.
- Tail Swipe: From Fleshcraft Hydra's second health bar (Phase 2) onward, the boss marks an area with a green rectangular outline, telegraphing an imminent attack. Shortly thereafter, the Hydra swallows a player from the marked area, temporarily disabling their actions and movement.
- Charge: From Fleshcraft Hydra's third health bar (Phase 3) onward, the boss will make a sudden charging attack forward, knocking players back and leaving a trail of acid that deals heavy continuous damage. Leave the marked area asap.
Killing the Fleshcraft Hydra will reward you with ![]() Gold,
Experience, items of varying quality (Common,
Magic,
Rare, and with a good chance for a
Legendary), and 6
Gold,
Experience, items of varying quality (Common,
Magic,
Rare, and with a good chance for a
Legendary), and 6 ![]() Enchanted Dust.
At character level 49 and above, killing the Fleshcraft Hydra has a chance to
yield the
Enchanted Dust.
At character level 49 and above, killing the Fleshcraft Hydra has a chance to
yield the ![]() Zoltun Kulle's Ingenuity vessel — part of the
Legacy of the Horadrim system.
Zoltun Kulle's Ingenuity vessel — part of the
Legacy of the Horadrim system.
Kulle's Hidden Chambers Rewards
Kulle's Hidden Chambers is by far the best Zone Event to farm during the
downtime of the Haunted Carriage or the Ancient Nightmare
Events, even when taking its 10 rewards per day cap. On top of its decent base
reward (loot and 6-ish ![]() Enchanted Dust no matter the procced event), it
also offers plenty of Side Quests, Rare (Purple) and Unique
(Golden) Elite Monsters, and sheer trash density (good for daily Bestiary
completion) to further sweeten the deal. On top of this, you can benefit the
entire server by proccing World Bosses!
Enchanted Dust no matter the procced event), it
also offers plenty of Side Quests, Rare (Purple) and Unique
(Golden) Elite Monsters, and sheer trash density (good for daily Bestiary
completion) to further sweeten the deal. On top of this, you can benefit the
entire server by proccing World Bosses!
Other Zone Events
You can check out the guides for the other Zone Events by following the link below:
Changelog
- 08 Jul. 2022: Guide added.
This build is presented to you by Deadset, one of the very few professional Diablo 3 players. Deadset regularly publishes video guides on Youtube and streams on Twitch, where you can see how this and other builds play out in practice.
- Diablo Immortal x WoW Crossover Event: Frostmourne in Sanctuary!
- Icy Veins Seeking Writers for Zenless Zone Zero: Apply Today!
- Icy Veins Launches Genshin Impact Guides Section
- Icy Veins Podcast About Path of Exile
- ARPG Vault Discord Giveaway
- Diablo Immortal Destruction's Wake Update Notes: June 13th
- Icy Veins is Getting a New Look
- Diablo Immortal: Age of Falling Towers Content Update Notes