Beastmaster Cold Squirrels Endgame Build for Last Epoch (Patch 1.0)
Welcome to our Last Epoch Beastmaster Cold Squirrels build guide for the Primalist class. Here you will learn everything about the Beastmaster play style, passives, skills, strengths, and weaknesses to conquer the world of Eterra.
Build Introduction
Command an army of Squirrels to rip apart timeless gods! This build
takes advantage of the Unique helmet, ![]() Herald of the Scurry which converts
our Wolf Companions into a Squirrel variant. While these Companions are a bit weaker,
their sheer numbers and speed make up for this completely. Your Squirrels will be capable
of tearing into even the biggest of enemies with their frozen bite!
Herald of the Scurry which converts
our Wolf Companions into a Squirrel variant. While these Companions are a bit weaker,
their sheer numbers and speed make up for this completely. Your Squirrels will be capable
of tearing into even the biggest of enemies with their frozen bite!
 Fast clear speed
 - Great single target damage
- Extremely defensive build, while also not relying on the player to get near enemies to deal damage

 Helmet is absolutely required, which means this build may take some time to work into

Skill Selection
This is very much the typical minion build. We do very little ourselves,
focusing entirely on buffing, healing, and directing our Squirrel Companions to
victory. ![]() Summon Wolf is how we summon our Squirrel Army and enable them to deal
Cold Melee Damage.
Summon Wolf is how we summon our Squirrel Army and enable them to deal
Cold Melee Damage. ![]() Warcry and
Warcry and ![]() Summon Frenzy Totem are both used as offensive
support actions, increasing the Squirrel's Cold Damage and granting Haste
and Frenzy.
Summon Frenzy Totem are both used as offensive
support actions, increasing the Squirrel's Cold Damage and granting Haste
and Frenzy. ![]() Eterra's Blessing can be cast manually, but will also be automated
off the Frenzy Totem we summon and off using
Eterra's Blessing can be cast manually, but will also be automated
off the Frenzy Totem we summon and off using ![]() Fury Leap, healing your Squirrels and giving them a few speed boosts, alongside
acting as a cleanse for any nasty debuffs they may become afflicted with. Fury Leap is also taken to add mobility to the build
and allow us to give more manual commands to the Squirrels.
Fury Leap, healing your Squirrels and giving them a few speed boosts, alongside
acting as a cleanse for any nasty debuffs they may become afflicted with. Fury Leap is also taken to add mobility to the build
and allow us to give more manual commands to the Squirrels.

Class and Skill Passive Trees
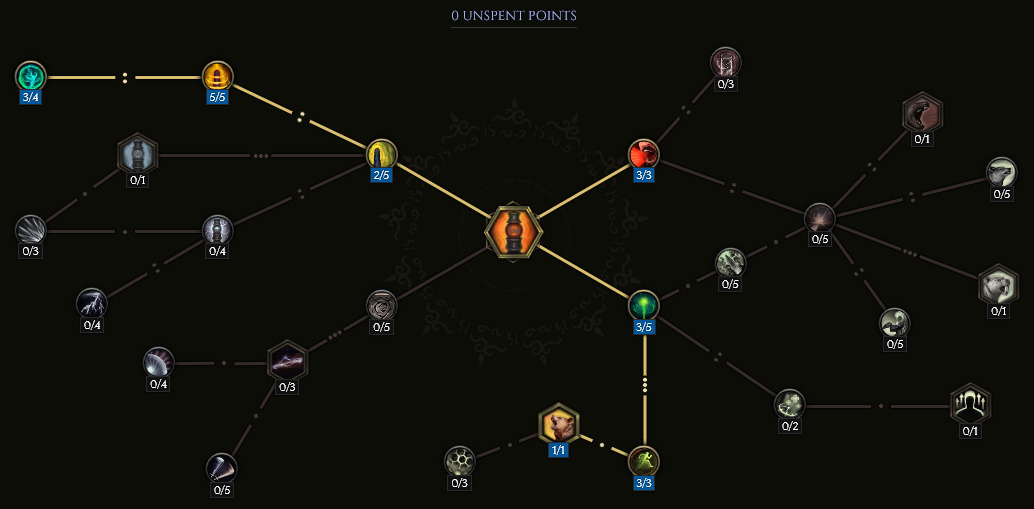
Our base class is the Primalist, which acts as a generic caster, brawler, or companion summoner. Our character will be offered an opportunity to select an Advanced Mastery once we have completed the first act of the campaign. Each base class has three possible masteries to choose from. For the Primalist, we have access to the Mastery Tree Passives for Beastmaster, Shaman and Druid. Upon selecting a Mastery and placing 20 Passive Points into the Primalist Tree, you'll then be able to place Passive Points into the Mastery Trees.
This build will be taking Beastmaster as its advanced class. We will utilize the majority of our Passive Points in the Beastmaster Passive Tree, increasing our Companion Limit, increasing Minion Damage, and boosting the defenses of our own character. Druid's tree will also be used, focusing mostly on Increased Minion Cold Damage.

Primalist Passive Points
- 8 point into Primal Strength: Increases our Strength and Health Regeneration.
- 1 point into Harmony of Blades: Enables dual wielding at the cost of taking 9% extra damage.
- 1 points into Hunter's Restoration: Small increase to Health and gains Health on Hit.
- 6 points into Survival of the Pack: Increases our Melee Damage and gives us Health Leech. Applies to Minions as well.
- 5 points into Hunter's Emanation: Increases our Minions Damage.
Our base class is the Primalist, which acts as a generic caster, brawler, or companion summoner. Our character will be offered an opportunity to select an Advanced Mastery once we have completed the first act of the campaign. Each base class has three possible masteries to choose from. For the Primalist, we have access to the Mastery Tree Passives for Beastmaster, Shaman and Druid. Upon selecting a Mastery and placing 20 Passive Points into the Primalist Tree, you'll then be able to place Passive Points into the Mastery Trees.
This build will be taking Beastmaster as its advanced class. We will utilize the majority of our Passive Points in the Beastmaster Passive Tree, increasing our Companion Limit, increasing Minion Damage, and boosting the defenses of our own character. Druid's tree will also be used, focusing mostly on Increased Minion Cold Damage.
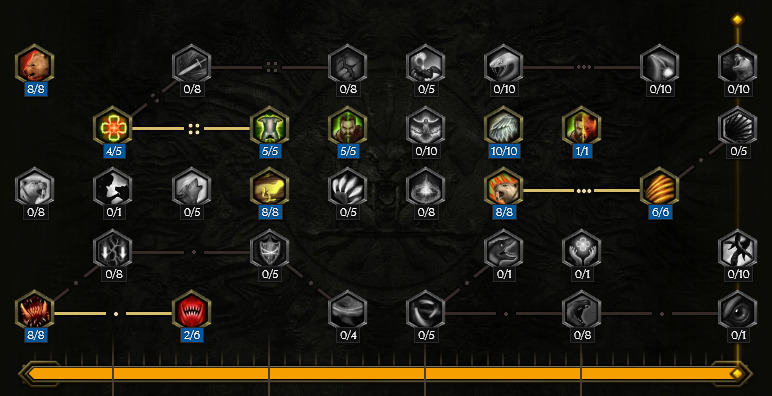
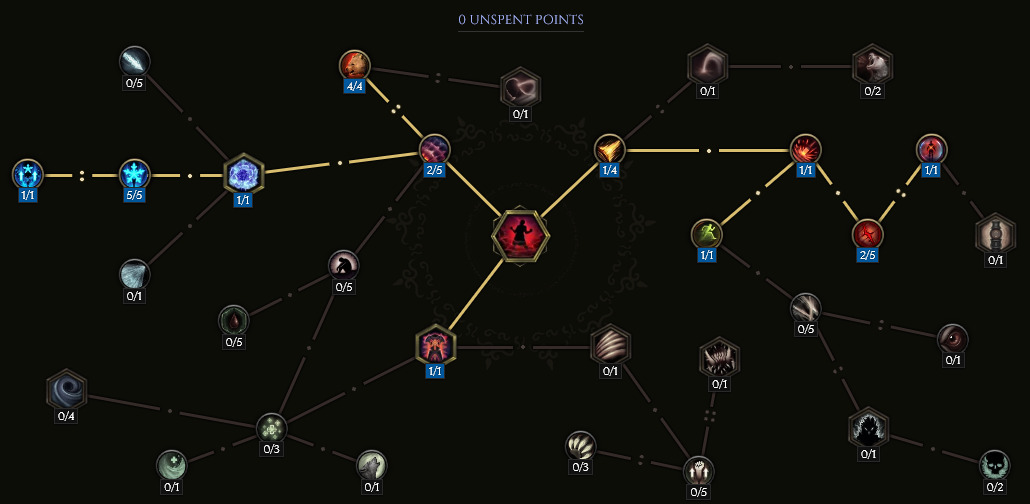
Beastmaster Passive Points
- 8 points into Ursine Strength: Increases our Strength and Damage Reduction.
- 8 points into Savagery: Increase Melee Damage for Squirrels.
- 4 points into Boar Heart: Grants us Aspect of the Boar on hit, reducing damage taken by 15%.
- 5 points into Porcine Constitution: Increases our Damage Reduction and Health Regen.
- 2 points into Lamprey Teeth: Adds Leech to the Squirrel's attacks.
- 8 points into The Chase: Increases our Minion's Attack, Cast and Movement speed.
- 5 points into Boar Heart: Increases our Strength and chance for Aspect of the Boar to trigger.
- 8 points into Cry of the Lynx: Increases our Critical Strike and adds Aspect of the Lynx buff, increased Critical Strike Chance and Stun Chance.
- 1 point into Nature's Embrace: Increases our Maximum companions by 1.
- 5 points into Serrated Claws: Increases Critical Strike Multiplier for you and Squirrels.
Our base class is the Primalist, which acts as a generic caster, brawler, or companion summoner. Our character will be offered an opportunity to select an Advanced Mastery once we have completed the first act of the campaign. Each base class has three possible masteries to choose from. For the Primalist, we have access to the Mastery Tree Passives for Beastmaster, Shaman and Druid. Upon selecting a Mastery and placing 20 Passive Points into the Primalist Tree, you'll then be able to place Passive Points into the Mastery Trees.
This build will be taking Beastmaster as its advanced class. We will utilize the majority of our Passive Points in the Beastmaster Passive Tree, increasing our Companion Limit, increasing Minion Damage, and boosting the defenses of our own character. Druid's tree will also be used, focusing mostly on Increased Minion Cold Damage.
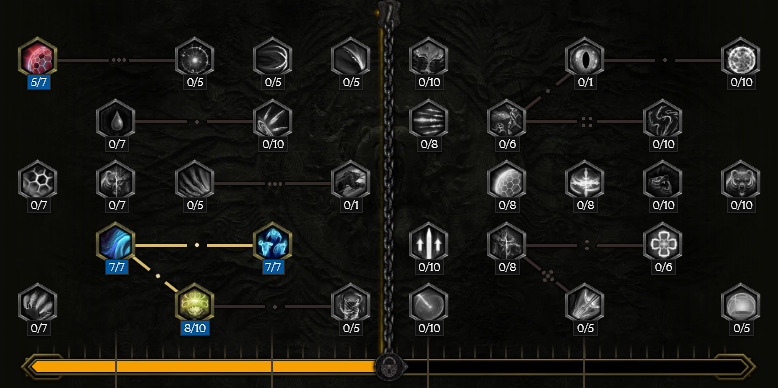
Druid Passive Points
- 5 points into Chitinous Plating: Increases our own Endurance and Armor, and adds Armor to our Squirrels.
- 7 points into Blessed Springs: Increases Cold Damage for Squirrels and Healing Effectiveness.
- 8 points into Blossoming Garden: Increases Healing Effectiveness, but also automates
 Eterra's Blessing
when we use
Eterra's Blessing
when we use  Fury Leap.
 - 7 points into River Spirits: Increases Cold Damage and Freeze Rate Multiplier for Squirrels, and allows them to apply Frostbite to enemies.
In this section, we will break down each skill and highlight the key passives we have selected to make the skill perform as best as possible in the build. While some of these skills do allow for some variation to exist depending on your own custom choices, we recommend utilizing the skill trees as presented until you have a strong understanding of the build itself.
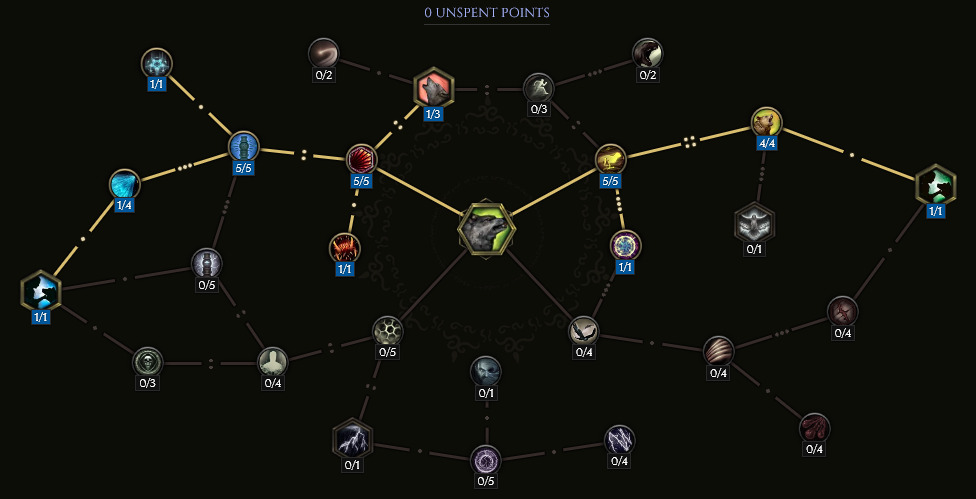
Summon Wolf
![]() Summon Wolf will be converted into summoning Squirrels through the Unique helmet,
Summon Wolf will be converted into summoning Squirrels through the Unique helmet, ![]() Herald of the Scurry.
However, all nodes in this tree will apply to our Squirrels, and this tree is how we enable them to deal Cold Damage.
Keep in mind, this build is gaining a ton of extra skill points from gear. If you're able to run two
Herald of the Scurry.
However, all nodes in this tree will apply to our Squirrels, and this tree is how we enable them to deal Cold Damage.
Keep in mind, this build is gaining a ton of extra skill points from gear. If you're able to run two ![]() Apogee of Frozen Light,
you will have even more skill points, and those may be placed where ever you choose to do so.
Apogee of Frozen Light,
you will have even more skill points, and those may be placed where ever you choose to do so.
Order of Skill Points
- 5 points into Savage Hunters: Squirrels deal 75% more damage.
- 5 points into Tundra Stalkers: Adds 10 Cold Damage to the Squirrel's Melee Attacks and increases Stun Chance by 100%.
- 1 point into Frozen Fangs: Squirrels gain access to
 Ice Bite, a melee attack dealing 40 Cold Damage.
 - 1 point into Legendary Bite: Squirrels deal more Melee Damage and gain base Critical Strike Chance at the cost of slight Attack Speed loss.
- 1 point into Winterborn: Pathing node, but does add extra chance to Chill, helping to gain the benefits
from
 Apogee of Frozen Light.
 - 1 point into Pack Hunters: Adds two Squirrels to your summon pool.
- 1 point into Victory Howl: Squirrels will have a small chance to use
 Sciurine Rage when they kill an enemy.
 - 5 points into On the Hunt: Increased Attack Speed and Movement Speed for Squirrels.
- 1 point into Relentless: Squirrels are immune to stuns.
- 4 points into Howl of Might: Adds more damage to the Squirrels' attacks.
- 1 point into Safety In Numbers: Adds two Squirrels to your summon pool.
In this section, we will break down each skill and highlight the key passives we have selected to make the skill perform as best as possible in the build. While some of these skills do allow for some variation to exist depending on your own custom choices, we recommend utilizing the skill trees as presented until you have a strong understanding of the build itself.

Fury Leap
![]() Fury Leap is the mobility skill for the build, and doubles as a way to direct your Squirrels
to attack specific targets, as they will leap with you! This skill does much more, as it also increases
the Melee Damage your Squirrels deal and pulls enemies together, allowing
Fury Leap is the mobility skill for the build, and doubles as a way to direct your Squirrels
to attack specific targets, as they will leap with you! This skill does much more, as it also increases
the Melee Damage your Squirrels deal and pulls enemies together, allowing ![]() Ice Bite to have an
easier time cleaving multiple enemies. Spamming this may not always be the play. While we have reduced
the Mana cost by quite a bit, this build can sometimes suffer from a lack of Mana. On top of that, this skill grants
us invincibility while we're jumping, so it can be used to cheese certain damaging mechanics.
Ice Bite to have an
easier time cleaving multiple enemies. Spamming this may not always be the play. While we have reduced
the Mana cost by quite a bit, this build can sometimes suffer from a lack of Mana. On top of that, this skill grants
us invincibility while we're jumping, so it can be used to cheese certain damaging mechanics.
Order of Skill Points
- 5 points into Warrior's Entrance: Using Fury Leap adds Melee Damage to your Squirrels for 3 seconds.
- 1 point into Pack Leader: This enables the Squirrels to Leap with you.
- 1 point into Frenzied Onslaught: Using Fury Leap buffs Squirrels (and yourself) with Frenzy.
- 2 points into Wings of Endurance: Heals you and your Squirrels when you land.
- 1 point into Battle Bloom: Fury Leap now cleanses you and your Squirrels on use.
- 3 points into Crater: Increases area by 75% and reduces the Mana cost by 6.
- 1 point into Heorot's Protection: You are invincibile while Leaping.
- 2 points into Panther Strike: Taken for the Cooldown Reduction.
- 3 points into Ambush Predator: Pathing node.
- 1 point into Gravity: Landing will pull enemies together.
In this section, we will break down each skill and highlight the key passives we have selected to make the skill perform as best as possible in the build. While some of these skills do allow for some variation to exist depending on your own custom choices, we recommend utilizing the skill trees as presented until you have a strong understanding of the build itself.
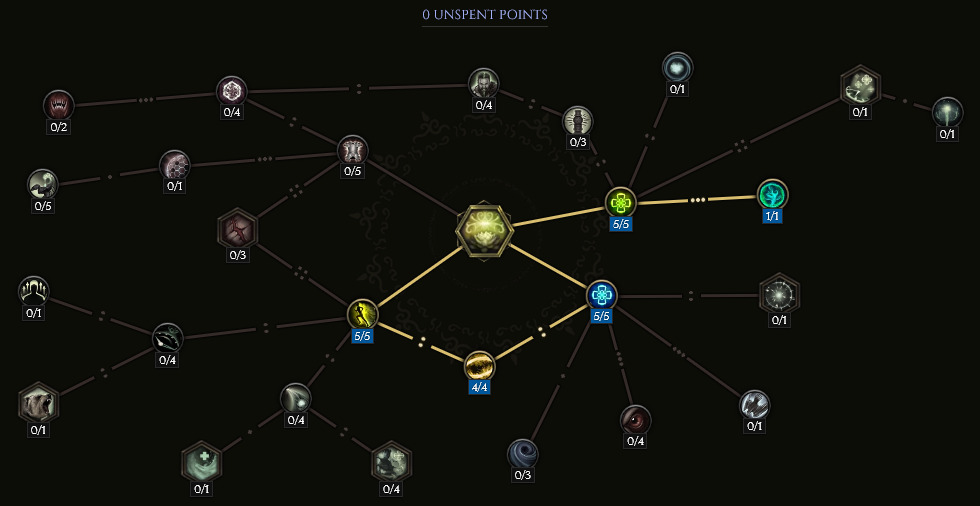
Eterra's Blessing
![]() Eterra's Blessing will mostly be automated in this build through both
Eterra's Blessing will mostly be automated in this build through both ![]() Fury Leap and
Fury Leap and ![]() Summon Frenzy Totem, however
feel free to use it manually. More importantly, Squirrels hit by Eterra's Blessing will gain increased damage, Movement Speed and Attack Speed for
4 seconds.
Summon Frenzy Totem, however
feel free to use it manually. More importantly, Squirrels hit by Eterra's Blessing will gain increased damage, Movement Speed and Attack Speed for
4 seconds.
Order of Skill Points
- 5 points into Ardent Touch: Eterra's Blessing now increases the Squirrels' Movement Speed and Attack Speed.
- 4 points into Overgrowth: Adds a 50% chance for Eterra's Blessing to become an AoE heal, centered on the target.
- 5 points into Conservation: 50% Mana Efficiency.
- 5 points into Improved Blessing: Increases Healing Effectiveness.
- 1 point into Purge: The heal will now cleanse debuffs and ailments.
In this section, we will break down each skill and highlight the key passives we have selected to make the skill perform as best as possible in the build. While some of these skills do allow for some variation to exist depending on your own custom choices, we recommend utilizing the skill trees as presented until you have a strong understanding of the build itself.
Summon Frenzy Totem
![]() Summon Frenzy Totem will act as a semi-passive DPS increase for the Squirrels. We disable
the ability for it to effect us in order to make the buffs provided by the totem stronger for the Squirrels.
Placing this nearby your Companions will result in Haste, Frenzy, and Increased Health Regen
for Squirrels, on top of the ability for automated
Summon Frenzy Totem will act as a semi-passive DPS increase for the Squirrels. We disable
the ability for it to effect us in order to make the buffs provided by the totem stronger for the Squirrels.
Placing this nearby your Companions will result in Haste, Frenzy, and Increased Health Regen
for Squirrels, on top of the ability for automated ![]() Eterra's Blessing activation.
Eterra's Blessing activation.
Order of Skill Points
- 3 points into Revitalizing Totem: Increased Health Regen.
- 3 points into Symbol of Haste: Grants Haste for 6 seconds.
- 1 point into Symbol of Selflessness: All buffs are increased by 30%, but can only effect the Squirrels.
- 3 points into Rabidity: Frenzy is now 24% more potent.
- 2 points into Reinforced Totem: Frenzy Totems now last longer.
- 5 points into Reach: Doubles the area of effectiveness for the Totem.
- 3 points into Healing Pulse: As long as we remain close to our own Totem, this has a chance to
automate Eterra's Blessing for us.
In this section, we will break down each skill and highlight the key passives we have selected to make the skill perform as best as possible in the build. While some of these skills do allow for some variation to exist depending on your own custom choices, we recommend utilizing the skill trees as presented until you have a strong understanding of the build itself.
Warcry
![]() Warcry would like to be used on cooldown for this build. It grants the Squirrels immense increases to their Cold Damage,
and greatly increases their chance to land a critical hit. While active, Squirrels will have a 100% chance to inflict Chill,
meaning you will have a definite period of time where the unique effect from
Warcry would like to be used on cooldown for this build. It grants the Squirrels immense increases to their Cold Damage,
and greatly increases their chance to land a critical hit. While active, Squirrels will have a 100% chance to inflict Chill,
meaning you will have a definite period of time where the unique effect from ![]() Apogee of Frozen Light can be taken advantage of.
As an added bonus, using Warcry makes us invulnerable for 1 second, similar to how
Apogee of Frozen Light can be taken advantage of.
As an added bonus, using Warcry makes us invulnerable for 1 second, similar to how ![]() Fury Leap works.
Fury Leap works.
Order of Skill Points
- 1 point into Juggernaut: Makes you invulnerable for 1 second.
- 2 points into Deep Roar: Increases the area of Warcry by 40%.
- 1 point into Jormun's Wrath: Converts Warcry into a Cold Skill.
- 5 points into Frost Claw: Increases Squirrel Cold Damage by 250% for 4 seconds.
- 1 point into Bringer of Winter: Increases Squirrel Critical Strike Chance by 100% and guarantees they inflict a stack of Chill on hit.
- 4 points into Battle Cry: Another 100% increase to land a critical hit.
- 1 point into Staggering Roar: Ignore this node, it is only for pathing.
- 1 point into Kinetic Scream: Again, only a pathing node.
- 2 points into Eviscerating Howl: Warcry inflicts Bleed, but this can be mostly ignored.
- 1 point into Shallow Breath: 50% Cooldown Reduction.
- 1 point into Hastily Advance: Grants us Haste for 1 second.
Build Mechanics and Playstyle
This entire build's focus is around our Squirrels. As such, we as the player do little to no damage ourselves. Instead, the focus is placed on Mana management and movement, ensuring our Squirrels are buffed when they need to be and attacking the high priority mobs on the map.
Summoning Squirrels will give you access to ![]() Sciurine Rage which can be used to manually give them a massive damage buff.
This will only be necessary against Bosses or extremely tough Rares. Outside of this, keep as much uptime on
Sciurine Rage which can be used to manually give them a massive damage buff.
This will only be necessary against Bosses or extremely tough Rares. Outside of this, keep as much uptime on ![]() Warcry as you possibly
can while making sure your Mana never drops too low.
Warcry as you possibly
can while making sure your Mana never drops too low. ![]() Fury Leap should always be prioritized to be used as our own mobility tool
and to ensure we're kept out of dangerous AoEs, however it does serve the purpose of directing your Squirrels to attack specific targets as
a group, as well as increasing their damage output.
Fury Leap should always be prioritized to be used as our own mobility tool
and to ensure we're kept out of dangerous AoEs, however it does serve the purpose of directing your Squirrels to attack specific targets as
a group, as well as increasing their damage output. ![]() Summon Frenzy Totem won't always be necessary, but it should be kept down
at all times when fighting Bosses. The Squirrels kill things so fast that you tend to leave range of the Totem pretty quickly. This
results in a waste of Mana; especially considering half the reason for the Totem is to automate
Summon Frenzy Totem won't always be necessary, but it should be kept down
at all times when fighting Bosses. The Squirrels kill things so fast that you tend to leave range of the Totem pretty quickly. This
results in a waste of Mana; especially considering half the reason for the Totem is to automate ![]() Eterra's Blessing; your
Squirrels will likely not need it for clearing maps.
Eterra's Blessing; your
Squirrels will likely not need it for clearing maps.
Overall this build is very hands off. The Squirrels will typically self-manage themselves just fine. Your number one concern with this build is staying alive, but you should have no issue in that regard either. Between Aspect of the Boar, capped Endurance, the removal of critical hit damage, and a substantial amount of Armor, your character will feel quite sufficient on their own.
Equipment and Gear Affixes
For this build, we will be focusing on several main affixes for each piece of non-unique gear, as well as working towards acquiring the specific uniques needed to make this build operate correctly. Our equipment will focus on these specific affixes for the Implicits and Modifier stats.
| Gear Slot | Implicits | Modifiers |
|---|---|---|
| One-Handed Axe | Legendary Potential Minion Melee Damage, Minion Spell Damage Cold Penetration, Minion Cold Penetration |
|
| One-Handed Axe | Melee Damage Minion Melee Damage Chance to apply Bleed on Hit |
Prefixes Parry Chance Mana, Increased Mana Regen Suffixes Minion Melee Damage, Minion Bow Damage Minion Melee Damage, Minion Spell Damage |
| Helmet | Legendary Potential Minion Critical Strike Multiplier |
|
| Chest | Armor Increased Health Increased Cooldown Recovery Speed |
Prefixes Minion Melee Critical Strike Chance Minion Critical Strike Multiplier Suffixes Health Increased Health |
| Gloves | Armor Armor Mitigation also applies to Damage Over Time |
Prefixes Strength Increased Minion Damage Suffixes Hybrid Health Armor, Reduced Bonus Damage taken from Critical Strikes |
| Ring | Increased Minion Damage, Increased Minion Health, Minion Critical Strike Multiplier | Prefixes Strength Increased Minion Damage Suffixes Endurance Health |
| Ring | Increased Minion Damage, Increased Minion Health, Minion Critical Strike Multiplier | Prefixes Strength Increased Minion Damage Suffixes Endurance Health |
| Amulet | Increased Minion Damage Increased Minion Critical Strike Chance |
Prefixes Increased Minion Damage Increased Minion Health Suffixes Health Needed Resistances |
| Belt | Poison Resistance Cold Resistance |
Prefixes Increased Minion Damage Increased Minion Damage Suffixes Hybrid Health Needed Resistances |
| Feet | Armor Increased Movement Speed Reduced Bonus Damage taken from Critical Strikes |
Prefixes Strength Increased Movement Speed Suffixes Armor, Reduced Damage taken from Critical Strikes Hybrid Health |
| Relic | Cold Melee Damage Minion Melee Cold Damage |
Prefixes Increased Minion Damage Increased Minion Health Suffixes Health Needed Resistances |
A loot filter made specifically for the gear table above may be copied by pressing the button below. Once in the Loot Filter portion of the in-game menu, choose the "Paste Clipboard Contents" option to import the code.
Copy Loot Filter to Clipboard
Uniques
This build is highly accessible, only requiring two items in order to convert Wolves to Squirrels and give us the required skill points to really make your Squirrels shine.
Herald of the Scurry
![]() Herald of the Scurry: This helmet is what the entire build is centered around. Can you run a Cold Wolves
build? Absolutely. Should you? It definitely won't have the same potential, but it can certainly be done in lower Corruption
prior to finding the helmet. This helmet is considered rare, but it can be target farmed in the Timeline "The Black Sun"
from Unique or Set Helmet echo rewards.
Herald of the Scurry: This helmet is what the entire build is centered around. Can you run a Cold Wolves
build? Absolutely. Should you? It definitely won't have the same potential, but it can certainly be done in lower Corruption
prior to finding the helmet. This helmet is considered rare, but it can be target farmed in the Timeline "The Black Sun"
from Unique or Set Helmet echo rewards.
Apogee of Frozen Light
![]() Apogee of Frozen Light: This weapon provides a substantial boost to the damage our Squirrels will deal
when it comes to Cold Damage. While the sword itself provides a More Damage multiplier, it also provides
Apogee of Frozen Light: This weapon provides a substantial boost to the damage our Squirrels will deal
when it comes to Cold Damage. While the sword itself provides a More Damage multiplier, it also provides ![]() Summon Wolf
with an additional 3 skill points needed to increase the Companion Limit and still take the required damage nodes. You
absolutely can run two of these; we included one to show the build is accessible and to provide a bit of defensive scaling
using an exalted off-hand weapon. Ideally if you run a second Apogee, you hit LP3. This can be target farmed in the Timeline
"Reign of Dragons" from Unique or Set Sword/Dagger echo rewards.
Summon Wolf
with an additional 3 skill points needed to increase the Companion Limit and still take the required damage nodes. You
absolutely can run two of these; we included one to show the build is accessible and to provide a bit of defensive scaling
using an exalted off-hand weapon. Ideally if you run a second Apogee, you hit LP3. This can be target farmed in the Timeline
"Reign of Dragons" from Unique or Set Sword/Dagger echo rewards.
Idols
Idol slots are gained through the campaign, unlocking small bonuses and unique affixes for the player to discover and augment their builds with. The Idol screen consists of a grid system for the player to fill out with different sized idols, eventually filling in every part of the grid. As the Idol shape increases (1x1, 1x2, 1x3, 1x4, etc.) the stronger an affix you might find for your build.
This build only really cares about two specific Idols. Two Grand Heorot Idols with Increased Health Regen and Increased Minion Melee Attack should be grabbed above anything else. Every other slot can be filled in with anything else, but ensure your Resistances are capped as a priority.
Blessing
Blessings are permanent buffs that are applied to your character. These come in two different powers, Standard and Grand. Grand blessings are significantly stronger than the Standard Blessings. In total, there are 10 Blessing Slots, one for each Monolith Timeline. When you complete a Monolith and defeat the final boss you will be awarded a choice of three blessing with a random value.
| Blessing Name | Affix | Timeline |
|---|---|---|
| Void Resistance | The Black Sun | |
| Lightning Resistance | Ending the Storm | |
| Chance to apply Shred Cold Resistance on Hit | The Age of Winter | |
| Increased Minion Damage | Spirits of Fire | |
| Minion All Resistances | Reign of Dragons |
Changelog
- 22 Apr. 2024: Guide Added.

GhazzyTV is a professional content creator that knows all about theory crafting builds in Path of Exile and Last Epoch and has been teaching players how to build their characters for over 9 years. He is a huge Blizzard fan with thousands of hours invested into Diablo 3 and 4 and is a frequent World of Warcraft Classic player. His builds will be helpful content for new players and veterans alike. You can find his PoE Vault Guide Hub here and his LE Guide Hub here. You can follow him on Twitch, YouTube or Twitter.
- Last Epoch - New Content Roadmap!
- Last Epoch - Players Favorite Legendary Items
- Patch 1.0.7 Update: Multiplayer, Skills and More!
- Patch 1.0.6 Update: Camera Setting, Controller Keybinds, Bug Fixes, and More!
- Eleventh Hour Games on Real-Money Trading and Exploits in Last Epoch
- Patch 1.0.5 Update: Many Bug Fixes, Including Loot Filter Toggle Sensitivity, and Other Improvements!
- The First 30 Days of Last Epoch!
- 1.0 Launch Retrospective: A Message From Eleventh Hour Games