Beastmaster Spirit Wolf Endgame Build for Last Epoch (Patch 1.0)
Welcome to our Last Epoch Beastmaster Spirit Wolf build guide for the Primalist class. Here you will learn everything about the Beastmaster play style, passives, skills, strengths, and weaknesses to conquer the world of Eterra.
Build Introduction
If you like playing with dogs, this is the guide for you! Call forth
the spirit of the wolf to mow down hordes of enemies in front of you.
You are not a traditional minion player, as you will be leaping straight
into the action, inflicting mass amounts of area damage and stunning even
the biggest of foes. This build revolves around ![]() Summon Wolf and
Summon Wolf and
![]() Swipe. With the sub-skill of Wild Calling
we call the spirits from all six of our wolves.
Swipe. With the sub-skill of Wild Calling
we call the spirits from all six of our wolves.
 Excellent single target lockdown
 - Good area clear
- Above average defensive scaling
- Can be invulnerable with Movement Skill

 Optimal gear required for deep Corruption
 - Max Life is lower than other Primalists
- Must use four skills for maximum DPS

Skill Selection
Our skill selection for this build focuses around summoning companions,
maximizing the number of wolves we can have out at once. This count is normally four,
but we are using a blend of passives and unique items to have a total of six. We
have have a blazing attack speed rate of 200%+, with 45% of our
![]() Swipe attacks calling forth a spirit from each wolf,
enabling you to clear out hordes of enemies far from the frontline. The build has
some automation with
Swipe attacks calling forth a spirit from each wolf,
enabling you to clear out hordes of enemies far from the frontline. The build has
some automation with ![]() Fury Leap triggering our
Fury Leap triggering our ![]() Upheaval,
further automated so that an Upheaval Totems is summoned. This totem
will automatically cast your
Upheaval,
further automated so that an Upheaval Totems is summoned. This totem
will automatically cast your ![]() Upheaval. This allows us to play
with an unscaled
Upheaval. This allows us to play
with an unscaled ![]() Warcry, which we can use to stun any and all enemies for a
short time. We rely on our
Warcry, which we can use to stun any and all enemies for a
short time. We rely on our ![]() Summon Frenzy Totem to take down bigger
foes or packs of difficult enemies. The combo of
Summon Frenzy Totem to take down bigger
foes or packs of difficult enemies. The combo of ![]() Summon Wolf and
Summon Wolf and
![]() Howl will give both you and your companions a massive boost in DPS.
Howl will give both you and your companions a massive boost in DPS.

Class and Skill Passive Trees
Our base class is the Primalist, which acts as a generic brawler and summoner. Our character will be offered an opportunity to select an Advanced Mastery once we have completed the first act of the campaign. Each base class has three possible masteries to choose from. For the Primalist, we have access to the Mastery Tree Passives for Beastmaster, Druid and Shaman. Upon selecting a Mastery and placing 20 Passive Points into the Primalist Tree, you'll then be able to place Passive Points into the Mastery Trees.
For this companion build, Beastmaster is our advanced class. We will utilize the majority of our Passive Points the Beastmaster Passive tree, with a smaller investment of points into Shaman to round out the build. Our passive points will be targeting damage, sustain and damage mitigation for ourselves and our wolves. This will boost our companions and our own survivability and damage output. Each of the Passive Trees and their points are broken down below.
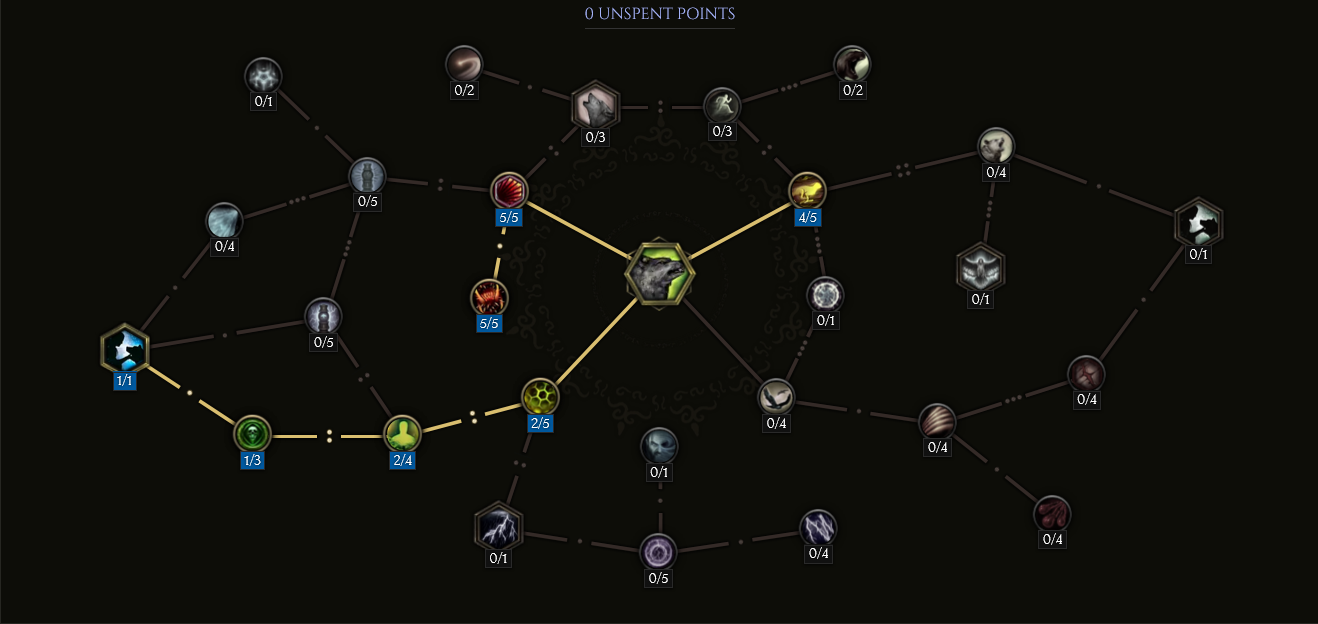
Primalist Passive Points
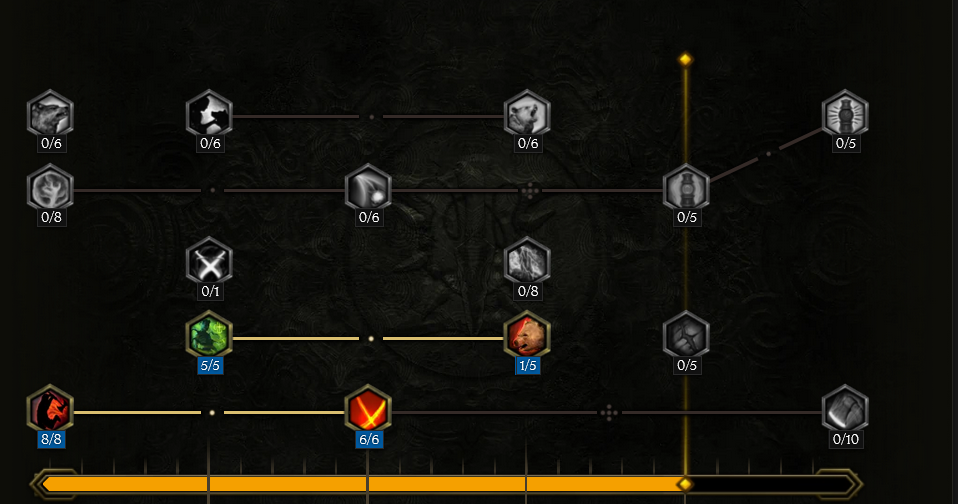
- 8 points into Primal Strength: Increases our armor, subsequently also increasing our Companion Life and Damage.
- 5 points into Hunter's Restoration: Increases our health pool and heals us for 40 HP on any hit we land every 3 seconds.
- 6 points into Survival of the Pack: Increases the damage and life leech for both us and our Companions.
- 1 point into Hunter's Emanation: Allows our Hunter's Restoration to effect all our Companions as well.
Our base class is the Primalist, which acts as a generic brawler and summoner. Our character will be offered an opportunity to select an Advanced Mastery once we have completed the first act of the campaign. Each base class has three possible masteries to choose from. For the Primalist, we have access to the Mastery Tree Passives for Beastmaster, Druid and Shaman. Upon selecting a Mastery and placing 20 Passive Points into the Primalist Tree, you'll then be able to place Passive Points into the Mastery Trees.
For this companion build, Beastmaster is our advanced class. We will utilize the majority of our Passive Points the Beastmaster Passive tree, with a smaller investment of points into Shaman to round out the build. Our passive points will be targeting damage, sustain and damage mitigation for ourselves and our wolves. This will boost our companions and our own survivability and damage output. Each of the Passive Trees and their points are broken down below.
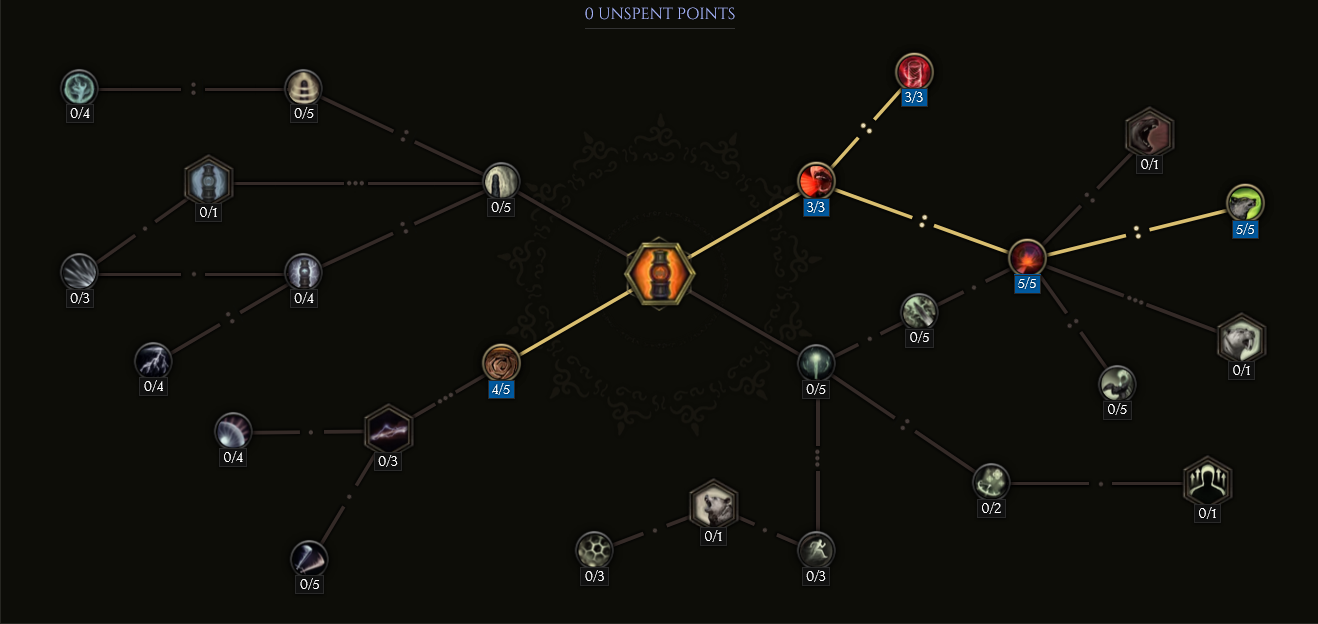
Beastmaster Passive Points
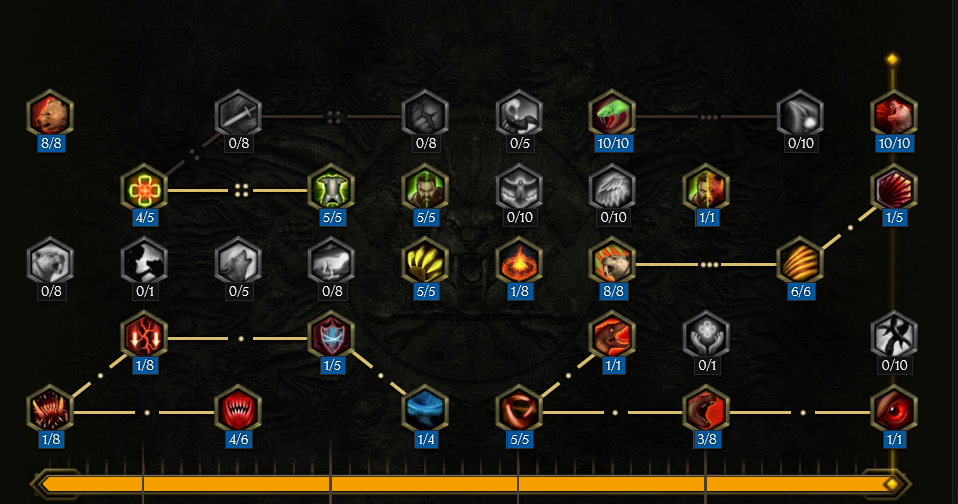
- 8 points into Ursine Strength: Increasing our armor, subsequently also increasing our Companion's Life and Damage.
- 1 point into Savagery: Opens a path into Hunters of the Deep and Lamprey Teeth.
- 1 point into Ambush: Continues our pathing into Hunters of the Deep, but also gives us the Aspect of the Shark effect.
- 1 point into Rending Maw: This continues our pathing into Hunters of the Deep, but also gives us a 20% chance to Shred Armor.
- 1 point into Hunters of the Deep: This gives the bonuses from Ambush and Rending Maw to our
 Summon Wolf.
 - 4 points into Boar Heart: Gives us a 15% damage reduction when we are hit.
- 4 points into Lamprey Teeth: This is both you and your companions primary health sustain node. Giving you and them a flat 6% damage leeched as health, as well as giving your Companions an increase of 80% to all health leech.
- 5 points into Porcine Constitution: This amplifies the effects of damage reduction from the Boar Heart node, giving an additional 15% to damage reduction.
- 5 points into Boar Heart: Gives us a 20% chance to gain the effects from Boar Heart whenever we hit an enemy with
 Swipe.
 - 5 points into Axe and Claw: This node adds flat melee damage to both us and our Companions.
- 1 point into Life in the Wilderness: This increases our companions survivability by giving them our current value of Endurance.
- 1 point into Nature's Embrace: Increases our Companion count by 1, giving us an additional wolf.
- 5 points into The Circle Of Life: This grants us and our Companions a 25% to gain Aspect of the Shark on kill, and gain 35 health on any kill.
- 1 point into Dragon Slayer: This will alow us the same chance to gain the bonus from The Circle Of Life when we hit a rare enemy or boss.
- 3 points into Ocean Maw: This will increase all effects from Aspect of the Shark buff, and increase its duration by 45%.
- 1 point into Feeding Frenzy: This alter the way Aspect of the Shark functions, now allowing it to stack 10 times, with reduced effect. However, after the third stack, the drawback from reduced effect are negated.
- 3 points into Cry of the Lynx: Three points are initially alloted but this passive will be maxed. This gives us and our Companions increased Critical Strike Chance
when we use our Summon Wolf active skill, which is
 Howl.
Howl. - 1 point into Serrated Claws: One point is initially alloted, but this passive will be maxed. This gives you and your Companions an increase to their Critical Strike Mulitiplier.
- 10 points into Viper Fangs: This gives a 30% chance to trigger Aspect of the Viper, which give you and your companions 50% increase to attack speed.
- 1 point into Critical Bite: This gives you and your Companions more sustain, by leeching 3% of Critcal Strike damage as health, when you have Cry of the Lynx active.
- 10 points into Ancient Might: This you you and your Companions 10 to their base damage. This also gives us 10 strength, increasing our armor. Subsequently this also increases our Companions Life and Damage.
- 5 points into Cry of the Lynx: Finishing out this passive, further adding increased Critical Strike Chance when we use our Summon Wolf active skill, which is Howl.
- 5 points into Serrated Claws: Finishing out this passive, which will add an addtional 50% to both you and your companions critical strike multiplier.
Our base class is the Primalist, which acts as a generic brawler and summoner. Our character will be offered an opportunity to select an Advanced Mastery once we have completed the first act of the campaign. Each base class has three possible masteries to choose from. For the Primalist, we have access to the Mastery Tree Passives for Beastmaster, Druid and Shaman. Upon selecting a Mastery and placing 20 Passive Points into the Primalist Tree, you'll then be able to place Passive Points into the Mastery Trees.
For this companion build, Beastmaster is our advanced class. We will utilize the majority of our Passive Points the Beastmaster Passive tree, with a smaller investment of points into Shaman to round out the build. Our passive points will be targeting damage, sustain and damage mitigation for ourselves and our wolves. This will boost our companions and our own survivability and damage output. Each of the Passive Trees and their points are broken down below.
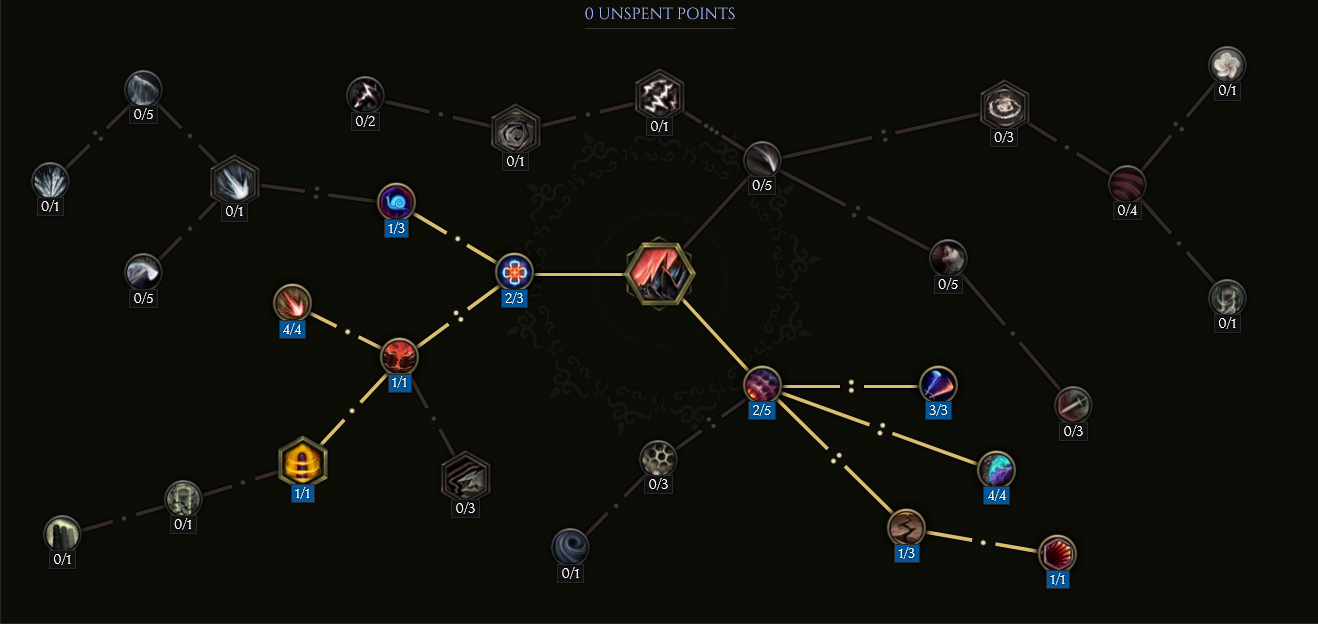
Shaman Passive Points
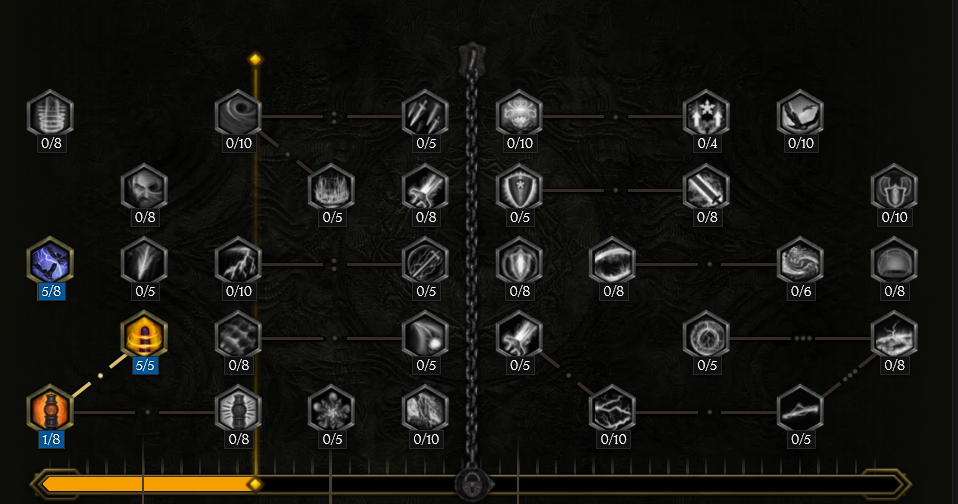
- 5 points into Sky Warrior: This reduces our cooldown for
 Fury Leap. In addition, this gives you and your Companions increased damage.
 - 1 point into Silent Protector: This is a travel point to get to the passive Totemic Fury.
- 5 points into Totemic Fury: This will give you a 25% increase to Attack Speed whenever we have a totem active. This can either be the
 Summon Frenzy Totem
or the Upheaval Totems which is automatically created when we use Fury Leap.
Summon Frenzy Totem
or the Upheaval Totems which is automatically created when we use Fury Leap.
In this section, we will break down each skill and highlight the key passives we have selected to make the skill shine in the build. While some of these skills do allow for some variation to exist depending on your own custom choices, we recommend utilizing the skill trees as presented until you have a strong understanding of the build itself.
Swipe
This skill is our primary method of attack. This is the skill that will also trigger Wild Calling, which
will clear swaths of enemies from the front. For much of the content you will see, only ![]() Fury Leap and
Fury Leap and ![]() Swipe
will be needed. However, it is important to know that some difficult engagements will need both
Swipe
will be needed. However, it is important to know that some difficult engagements will need both ![]() Howl and
Howl and ![]() Summon Frenzy Totem
to be used. In the heat of battle, if you see yourself getting overrun or you have mispositioned yourself, you can use
Summon Frenzy Totem
to be used. In the heat of battle, if you see yourself getting overrun or you have mispositioned yourself, you can use ![]() Warcry to reset the fight.
Warcry to reset the fight.
Order of Skill Points
- 5 points into Aspect of the Panther: Gives us five stacks of Aspect of the Panther.
- 3 points into Wild Calling: This enables our wolves to send forth a spirit wolf from all wolves under you control.
- 1 point into Feline Hunter: This gives us a flat 12% increased to your attack speed.
- 2 points into Lion's Strength: This adds an additional two stacks of Aspect of the Panther.
- 3 point into Sabertooth's Endurance: This is a traversal passive to get to Twin Fangs.
- 3 points into Twin Fangs: This enables each stack of Aspect of the Panther to give 12% to our Critical Strike Multiplier.
- 2 point into Way of the Hunt: This node gives us 10% more damage, but also allows us to leech 4% of the damage from Swipe as health.
- 1 points into Wengarian Reach: This is a traversal passive, but also adds 6% more damage and increases the area of damage from Swipe by 18%.
- 1 point into Culling.
- 3 Points into Trapper: This node adds significantly more damage when the enemy is Slowed. One of our weapon suffix's should have Chance to Slow on Hit.
Due to our gear, we have more points than the standard allocation of 20 points. The following nodes can be left at 3 and 1 skill points until you have acquired more from your gear bonuses: 3 points for Aspect of the Panther and 1 point for Twin Fangs, totalling 4 points.
In this section, we will break down each skill and highlight the key passives we have selected to make the skill shine in the build. While some of these skills do allow for some variation to exist depending on your own custom choices, we recommend utilizing the skill trees as presented until you have a strong understanding of the build itself.
Summon Wolf
![]() Summon Wolf summons wolves, which add significant clear and damage to our
Summon Wolf summons wolves, which add significant clear and damage to our ![]() Swipe with Wild Calling. Individually, your wolves
can and will kill on their own accord, however, their damage is addative to ours. They use your endurance and have sigificant sustain thanks to the
passives in our Bestmaster tree and the unique ring
Swipe with Wild Calling. Individually, your wolves
can and will kill on their own accord, however, their damage is addative to ours. They use your endurance and have sigificant sustain thanks to the
passives in our Bestmaster tree and the unique ring ![]() Ribbons of Blood. We use their secondary skill
Ribbons of Blood. We use their secondary skill ![]() Howl in order to get a massive damage output. Wild Calling is a unique
node in
Howl in order to get a massive damage output. Wild Calling is a unique
node in ![]() Swipe, because it scales from our damage and our wolves damage. We maximize their damage in this tree, as well as their survivability.
Swipe, because it scales from our damage and our wolves damage. We maximize their damage in this tree, as well as their survivability.
Order of Skill Points
- 4 points in Lupine Endurance: This gives our wolves a large boost in their health pool.
- 2 points in Wolfen Recovery: This increases our wolves passive health regen by 150%.
- 1 points in Earthborn: Adding 100 base to the wolves armor and giving them additional 5% health leech.
- 1 points in Pack Hunters: This node will add our fifth wolf. This will increase our dps significantly, as it is another source of Wild Calling damage.
- 5 points in Savage Hunters: This node adds 75% damage to our wolves.
- 1 points in Legendary Bite: This passive gives our wolves even more damage, as well as stun and Critical Strike Chance.
- 5 points in On the Hunt: This enables our wolves to move and attack 40% faster.
- 4 points in Howl of Might: This gives a massive damage boost to our wolves, thats trippled when they howl for a total damage gain of 120% more damage.
- 1 point in Safety In Numbers: This allows us summon up to the maximum number of companions, or 6 wolves.
If you do not have the
 Artor's Legacy rolled with LP +2 to Summon Wolf, you can use
  The Fang to
allocate this node.
The Fang to
allocate this node.
In this section, we will break down each skill and highlight the key passives we have selected to make the skill shine in the build. While some of these skills do allow for some variation to exist depending on your own custom choices, we recommend utilizing the skill trees as presented until you have a strong understanding of the build itself.
Summon Frenzy Totem
![]() Summon Frenzy Totem is one of our strongest skills we can use when clearing or killing more difficult content. Not only does this
give you and your wolves significant flat base damage, it will also all but gaurantee you and your wolves will critically strike enemies.
Summon Frenzy Totem is one of our strongest skills we can use when clearing or killing more difficult content. Not only does this
give you and your wolves significant flat base damage, it will also all but gaurantee you and your wolves will critically strike enemies.
Order of Skill Points
- 3 points into Rabidity: Increases the effects of Frenzy applied by the Totem.
- 3 points into Reckless Frenzy: This node adds 12% more damage and adds 8% to our attack speed. We also take more damage, but this is mitigated by our leech and Endurance.
- 5 points into Bestial Frenzy: This node adds 20 base physical damage to all of our Companions.
- 5 points into Lead The Pack: When the totem is active, Howl, you and the wolves will have an increase of 250%
to Critical Strike Chance.
- 1 point into Furious Cry: This will reset your wolves Howl ability when Frenzy Totem is used.
- 5 points into Grounded: This will now summon the Totem in front of the player. This also adds 20 base damage to your Swipe,
subsequently, increasing the damage to Wild Calling.
In this section, we will break down each skill and highlight the key passives we have selected to make the skill shine in the build. While some of these skills do allow for some variation to exist depending on your own custom choices, we recommend utilizing the skill trees as presented until you have a strong understanding of the build itself.
Upheaval
![]() Upheaval will not directly interfaced with. This will be automatically casted when we use
Upheaval will not directly interfaced with. This will be automatically casted when we use ![]() Fury Leap. We will still have
significant use for
Fury Leap. We will still have
significant use for ![]() Upheaval, as it is a tremendous utility skill we use. It slows enemies, gives us attack speed from Totemic Fury,
and thanks to Upheaval Totems, it can clear left over trash we leave behind.
Upheaval, as it is a tremendous utility skill we use. It slows enemies, gives us attack speed from Totemic Fury,
and thanks to Upheaval Totems, it can clear left over trash we leave behind.
Order of Skill Points
- 2 points into Inexhaustible: This adds a chance for Upheaval to shred the enemies armor.
- 1 point into Maiming Rubble: We give upheaval a 15% chance to Slow, however, this is doubled while using a two-handed weapon.
- 1 points into Mantle Strike: This node will ensure Upheaval cannot be dodged, but more importantly adds 2% to it's base Critical Strike Chance.
- 4 points into Crust Rupture: Adds 100% to Upheaval's Critical Strike Multiplier.
- 1 point into Upheaval Totems: This allows us to create a Totem when we land from Fury Leap. The Totem will automatically engage enemies.
- 5 points into Terrain Delving.
- 4 point into Glacial Crash: This adds 40% Physical Penetration for Upheaval, however, this value is doubled when using a two-handed weapon.
- 3 point into Terraforming Clash: Travel passive for Earthbreaker.
- 1 points into Earthbreaker: This adds significantly more damage to Upheaval.
In this section, we will break down each skill and highlight the key passives we have selected to make the skill shine in the build. While some of these skills do allow for some variation to exist depending on your own custom choices, we recommend utilizing the skill trees as presented until you have a strong understanding of the build itself.
Fury Leap
![]() Fury Leap is our primary method for starting any fight. Not only are you immune to all damage while leaping, it provides you and your Companions
a flat damage bonus and will also buff you and the Companions with Frenzy. Leap also gives you boost of healing and cleansing any ailments on you and
the Companions. In terms of automation, Leap will cast
Fury Leap is our primary method for starting any fight. Not only are you immune to all damage while leaping, it provides you and your Companions
a flat damage bonus and will also buff you and the Companions with Frenzy. Leap also gives you boost of healing and cleansing any ailments on you and
the Companions. In terms of automation, Leap will cast ![]() Upheaval upon landing, which then triggers Upheaval Totems, giving you a Totem that casts
Upheaval upon landing, which then triggers Upheaval Totems, giving you a Totem that casts ![]() Upheaval for
you automatically.
Upheaval for
you automatically.
Order of Skill Points
- 5 points into Warrior's Entrance: Gives you and your Companions 15 bonus damage for 3 seconds.
- 1 point into Pack Leader: This allows your wolves to leap with you, so you are never in any fight alone.
- 1 point into Frenzied Onslaught: This node allows you and your companions to have Frenzy when you land.
- 2 points into Wings of Endurance: Restores 100 health to you and all your companions.
- 1 point into Battle Bloom: This node will purge all ailments from you and your companions.
- 1 point into Wind Hammer: This is a traversal point.
- 3 points into Brutal Impact: This will allow Fury Leap to have a larger Critical Strike Mulitplier.
- 1 point into Violent Upheaval: This node allows us to automate
 Upheaval when using Fury Leap.
 - 4 points into Panther Strike: Reduces the cooldown for Fury Leap by 24% and adds more damage by the same value.
- 1 point into Heorot's Protection: We are immune to all damage while leaping (in the air).
Build Mechanics and Playstyle
The playstyle for this Companion build is fairly straight-forward. We are a brawler
that relies heavily on damage reduction. This reduction will come from our first unique
used in this build, chest armor called ![]() Titan Heart. This will give us large
amounts of armor, health and 15% less damage taken. The remainder of
this damage reduction comes from our passive tree and well-rolled Endurance suffixes
from our gear, with a goal of being at or near the Endurance cap of 60%. We also require the
unique helm,
Titan Heart. This will give us large
amounts of armor, health and 15% less damage taken. The remainder of
this damage reduction comes from our passive tree and well-rolled Endurance suffixes
from our gear, with a goal of being at or near the Endurance cap of 60%. We also require the
unique helm, ![]() Artor's Legacy, which gives us a sixth and final wolf to the build.
Finally, we use the
the unique amulet,
Artor's Legacy, which gives us a sixth and final wolf to the build.
Finally, we use the
the unique amulet, ![]() Death Rattle, which will add a significant boost to our wolves
critical strike mulitplier. If you are lacking the LP roll in
Death Rattle, which will add a significant boost to our wolves
critical strike mulitplier. If you are lacking the LP roll in ![]() Artor's Legacy with +2 Summon wolf
then you will need the
Artor's Legacy with +2 Summon wolf
then you will need the ![]() The Fang. This amulet will allow us to summon wolves up to
our total Companion limit. This is normally provided by the
The Fang. This amulet will allow us to summon wolves up to
our total Companion limit. This is normally provided by the ![]() Summon Wolf node
Safety In Numbers, however we go the opposite direction of this node, and
scale the wolves' into damage instead. We also heavily rely on our Armor values which should
mitigate 50% or more of incoming damage. Leech provides a significant source of
sustain for this build. When it comes to Resistances, all are either capped or near-capped, with
the exception of Poison Resistance. While you should be wary of rogue poison puddles
on the ground, our health pool and Endurance and our glove base with the implicit of Armor Mitigation also
applies to DoT, should be enough to deal with these issues.
Summon Wolf node
Safety In Numbers, however we go the opposite direction of this node, and
scale the wolves' into damage instead. We also heavily rely on our Armor values which should
mitigate 50% or more of incoming damage. Leech provides a significant source of
sustain for this build. When it comes to Resistances, all are either capped or near-capped, with
the exception of Poison Resistance. While you should be wary of rogue poison puddles
on the ground, our health pool and Endurance and our glove base with the implicit of Armor Mitigation also
applies to DoT, should be enough to deal with these issues.
There is no set rotation of skills. It is possible to walk into a pack and use ![]() Swipe
to clear it out. However, it would be best to
Swipe
to clear it out. However, it would be best to ![]() Fury Leap into any pack first
in order to gain the buffs from a Totem and the buffs from the Leap itself. On more difficult
packs or bosses,
Fury Leap into any pack first
in order to gain the buffs from a Totem and the buffs from the Leap itself. On more difficult
packs or bosses, ![]() Summon Frenzy Totem should be used in unison with
Summon Frenzy Totem should be used in unison with ![]() Howl. Be sure to use
Howl. Be sure to use
![]() Howl first, before the Frenzy totem, so you dont waste the refreash for Howl.
Howl first, before the Frenzy totem, so you dont waste the refreash for Howl.
This build is designed to be relaxed, there shouldn't be too much button mashing happening. You are just a Beastmaster on a walk with his wolves.
Equipment and Gear Affixes
For this build, we will be focusing on several main affixes for each piece of non-unique gear, as well as working towards acquiring the specific Uniques needed to make this build operate correctly. Our equipment will focus on these specific affixes for the Implicits and Modifier stats.
| Gear Slot | Implicits | Modifiers |
|---|---|---|
| Two-Handed Axe | Melee Damage Increased Physical Damage Increased Minion Physical Damage |
Prefixes Increased Melee Attack Speed +# Melee Critical Strike Chance Suffixes Minon Melee Damage/Minion Spell Damage Minion Melee Damage/Minion Bow Damage |
| Chest | Increased Health Minion Melee Critical Strike Chance |
|
| Helmet | +# Level of Summon Wolf Increased Health |
|
| Amulet | Increased Minion Damage Increased Minion Health |
|
| Belt | Armor +4 Potion Slots |
Prefixes Increased Minion Damage Increased Physical Damage Suffixes Hybrid Health Armor/Reduced Bonus Damage Taken from Critical Strikes |
| Ring | Increased Critical Strike Chance | Prefixes Strength Increased Critical Strike Chance Suffixes Needed Resistances |
| Ring | Increased Minion Damage Strength |
|
| Gloves | Armor #% of Armor Mitigation also applies to DoT |
Prefixes Increased Melee Attack Speed Critical Strike Chance Suffixes Physical Resistance Increased Leech Rate |
| Feet | Movement Speed Resistances Armor |
Prefixes Movement Speed Strength Suffixes Hybrid Health Increased Armor |
| Relic | Endurance | Prefixes Levels of Swipe Strength Suffixes Needed Resistances |
A loot filter made specifically for the gear table above may be copied by pressing the button below. Once in the Loot Filter portion of the in-game menu, choose the "Paste Clipboard Contents" option to import the code.
Copy Loot Filter to Clipboard
Uniques
Now, let's look at the required Uniques for this build. All of them are labled as common, and they should not require a significant struggle to obtain.
Titan Heart
![]() Titan Heart: This unique chest enables significant defenses for our build and
can be target farmed on the Monolith Timeline "Blood, Frost and Death". If Legendary Potential
can be found for the gear, the priority on rolls is %Increased Health followed by Strength.
Titan Heart: This unique chest enables significant defenses for our build and
can be target farmed on the Monolith Timeline "Blood, Frost and Death". If Legendary Potential
can be found for the gear, the priority on rolls is %Increased Health followed by Strength.
Death Rattle
![]() Death Rattle: This amulet adds a large Critical Strike Multiplier to our Wolves and their
spirits. It can be target farmed on the Monolith timeline "The Age of Winter". If found
with Legendary Potential, it is best served with Minion Health and Minion Damage.
Death Rattle: This amulet adds a large Critical Strike Multiplier to our Wolves and their
spirits. It can be target farmed on the Monolith timeline "The Age of Winter". If found
with Legendary Potential, it is best served with Minion Health and Minion Damage.
Artor's Legacy
![]() Artor's Legacy: This helmet gives us our sixth wolf, and gives us a serious boost to
Attack Speed. It can be target farmed on the Monolith timeline "The Black Sun". If you
can aquire Legendary Potential, you would be best served rolling it with at least +2 Level
of Summon Wolf. With this, you can put a point into Safety In Numbers allowing us
to remove
Artor's Legacy: This helmet gives us our sixth wolf, and gives us a serious boost to
Attack Speed. It can be target farmed on the Monolith timeline "The Black Sun". If you
can aquire Legendary Potential, you would be best served rolling it with at least +2 Level
of Summon Wolf. With this, you can put a point into Safety In Numbers allowing us
to remove ![]() The Fang. We can then replace it with
The Fang. We can then replace it with ![]() Death Rattle which would
be best rolled with Minion Health and Minion Damage to make up for the amplified damage they take.
Death Rattle which would
be best rolled with Minion Health and Minion Damage to make up for the amplified damage they take.
Ribbons of Blood
![]() Ribbons of Blood: This ring will increase your health, and give your wolves base phyisical damage.
They will also now be crit immune, and have a massive gain to leech rate and % leech.It can be target
farmed on the Monolith Boss The Abomination in the timeline "Fall of the Outcasts". If found
with Legendary Potential, it is best served with Minion Damage and Strength.
Ribbons of Blood: This ring will increase your health, and give your wolves base phyisical damage.
They will also now be crit immune, and have a massive gain to leech rate and % leech.It can be target
farmed on the Monolith Boss The Abomination in the timeline "Fall of the Outcasts". If found
with Legendary Potential, it is best served with Minion Damage and Strength.
Idols
Idol slots are gained through the campaign, unlocking small bonuses and unique affixes for the player to discover and augment their builds with. The Idol screen consists of a grid system for the player to fill out with different sized idols, eventually filling in every part of the grid. As the Idol shape increases (1x1, 1x2, 1x3, 1x4, etc.) the stronger an affix you might find for your build.
For this particular build, we will be focusing on increasing the Health and resistances for our character; an attribute that is mostly missing from our classes passives. We also use these to give our minions base critical strike chance, and some physical resistance for ourselves, which we will need.
We will 2 Large Nomad Idols Both with the Prefix of Increased Health and the Suffix of Increased Melee Damage/increased Minion Melee Damage. We will use 2 Huge Nomad Idols with the same Prefix of Minion Melee Critical Strike chance and the Suffix of Cold Resistance (if needed) and Increased Melee Damage/Increased Minion Melee Damage. We will also use a Grand Heorot Idol with the Prefix of Chance to gain Haste for 3 Seconds when you Summon a Totem and the Suffix of Physical Resistance. The remaining can be used to fill out Resistance gaps.
Blessing
Blessings are buffs that are permanently applied to your character until you decide to select another blessing, by re-running that same coresponding Monolith Timeline. These come in two different powers, Standard and Grand. Grand blessings are significantly stronger than the Standard Blessings, and can only be obtained by defeating the Monolith Timeline boss in Empowered Monoliths. In total, there are 10 Blessing Slots, one for each Monolith Timeline. When you complete a Monolith and defeat the final boss you will be awarded a choice of three blessing with a random value.
| Blessing Name | Affix | Timeline |
|---|---|---|
| Increased Leech Rate | The Black Sun | |
| Lightning Resistance | Ending the Storm | |
| Increased Armor | The Age of Winter | |
| Endurance | Spirits of Fire | |
| Chance to apply Slow on Hit | Reign of Dragons |
Changelog
- 19 Mar. 2024: No major changes for 1.0. Min/Max further with new affixes to 1.0.
- 27 Dec. 2023: Added Unique Scaling option for LP requirements (Helm specifically)
- 15 Nov. 2023: Guide Added.

EMP1241 is a Marine veteran who is currently pursuing higher education in Aerospace Engineering. He spends much of his time outside of his studies playing ARPGs, Builders, and MOBAs. He is frequently seen on his Twitch channel discussing science, space, or video games.
- Patch 1.0.7 Update: Multiplayer, Skills and More!
- Patch 1.0.6 Update: Camera Setting, Controller Keybinds, Bug Fixes, and More!
- Eleventh Hour Games on Real-Money Trading and Exploits in Last Epoch
- Patch 1.0.5 Update: Many Bug Fixes, Including Loot Filter Toggle Sensitivity, and Other Improvements!
- The First 30 Days of Last Epoch!
- 1.0 Launch Retrospective: A Message From Eleventh Hour Games
- Patch 1.0.4 Update: More In-Game Changes, Bug Fixes, and Improvements
- Last Epoch Mid-Cycle Balance Survey Recap