Bladedancer Sync Strike Endgame Build for Last Epoch (Patch 1.0)
Welcome to our Last Epoch Bladedancer Sync Strike build guide for the Rogue class. Here you will learn everything about the Bladedancer play style, passives, skills, strengths, and weaknesses to conquer the world of Eterra.
Build Introduction
This Bladedancer is an extremely elusive character with the power eliminate swaths of enemies in a
single strike, and any left over trash will be handled quickly by her shadows. This build is all about
speed and efficiency, quickly clearing echoes and leaving trails of destruction in her wake of shadows.
She relies on two specific mechanics to function properly; Mana Efficiency with ![]() Synchronized Strike
and Increased Cooldown Recovery Speed.
Synchronized Strike
and Increased Cooldown Recovery Speed.
 Fast clear
 - Simple skill rotation
- Fun playstyle

 Must constantly remain on the move
 - Requires optimal Idols for Corruption pushing

Skill Selection
This Bladedancer is not difficult to run with simple automations that allow for smooth and fairly simple skill rotations. In this build we focus on picking up Dexterity, Damage Reduction and picking up Critical Stike multipliers. We also pick up increased damage to our shadows, as they will be doing a significant portion of the damage in this build.

Class and Skill Passive Trees
Our base class is Rogue, which fills the roll of an elusive fighter in Last Epoch. Upon finishing Act 1 in the campaign, your character will be offered an opportunity to select an Advanced Mastery. Each base class has three possible Masteries to choose from. For Rogue, you can choose between Passive Trees for Bladedancer, Marksman, and Falconer. Upon selecting a Mastery and placing 20 Passive Points into the Rogue Tree, you'll then be able to place Passive Points into the Mastery Trees.
Bladedancer is the Advanced Class used for this build, and also where the majority of our Passive Points will come from. The Bladedancer Tree will focus around picking nodes that increase our damage and give us a strong defensive layer to work with. A lesser amount of Passive Points will come from Falconer, which will focus on rounding out some more of our defensive stats. Each Passive Tree and their points are broken down below.
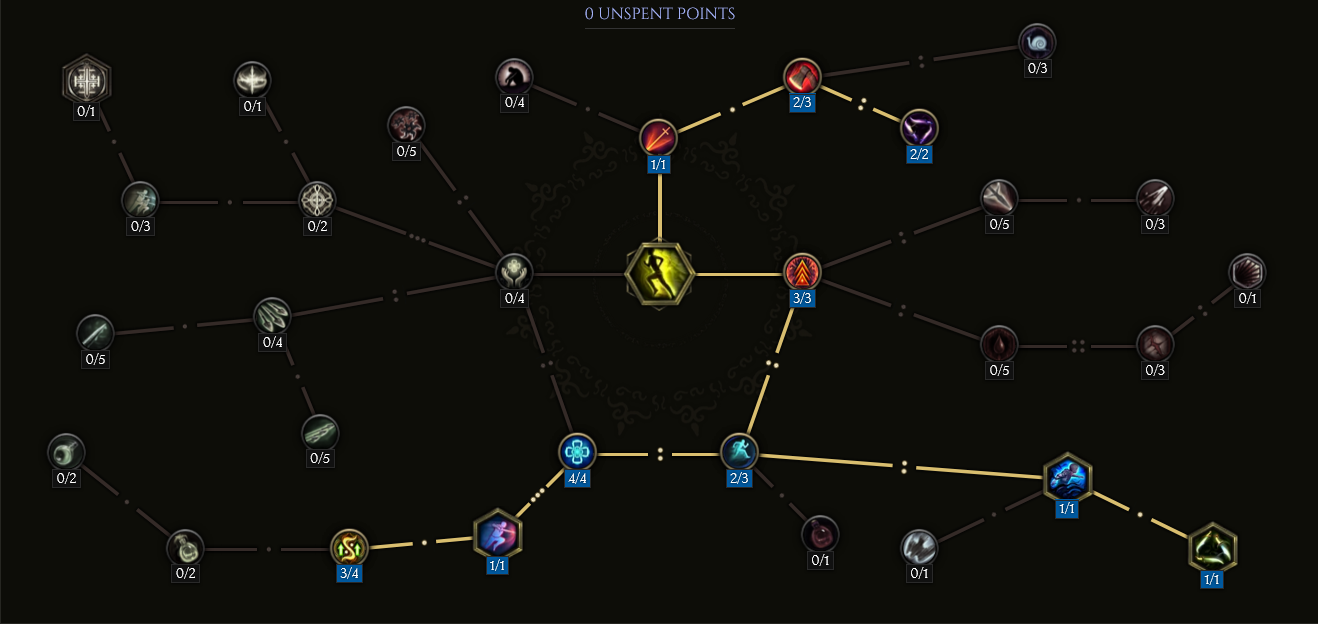
Rogue Passive Points
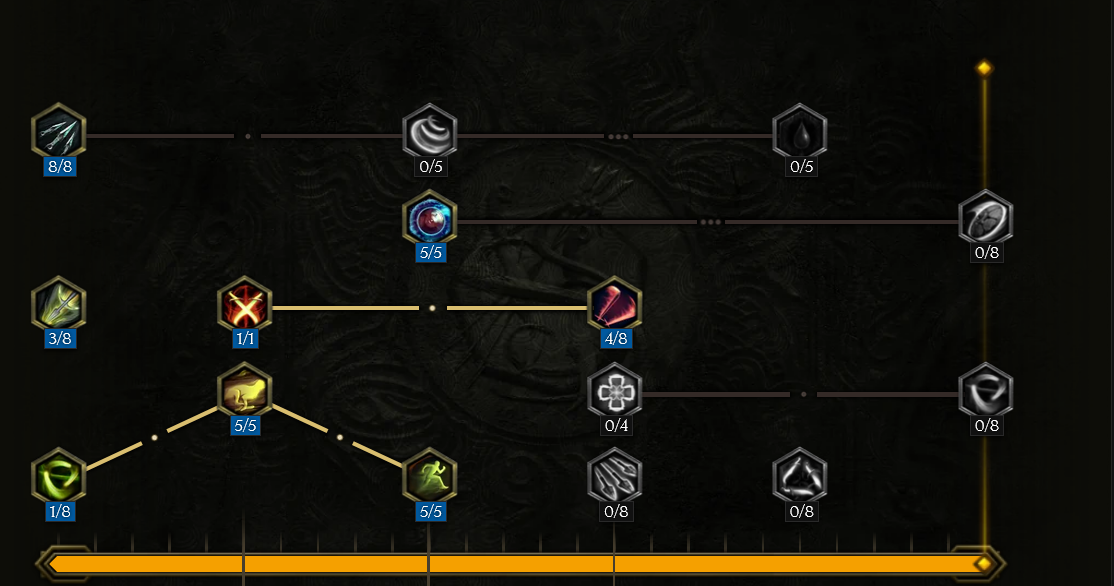
- 3 points in Steady Hand: This node will start to build up our Dexterity and base Health.
- 8 points in Swift Assassin: Early, this node will help us with Attack Speed, which will become less important. However we still use this node for the flat increase to our Physical Damage.
- 1 point in Guile: This is a traversal node to move further into this tree.
- 5 points in Evasion: This is a massive Damage Reduction node, as we take 25% less damage when moving and an increase to our Dodge Rating by 25%.
- 5 points in Agility: This node gives us a 25% chance to have Haste when we hit an enemy, and do 1% increased damage for each 1% Movement Speed.
- 1 point in Twin Blade: This node will allow us to equip the additional dagger we need in our Off-Hand.
- 4 points in Duelist: This is a defesive node, this increases our Dodge Rating. It also increases our damage by the same amount.
Our base class is Rogue, which fills the roll of an elusive fighter in Last Epoch. Upon finishing Act 1 in the campaign, your character will be offered an opportunity to select an Advanced Mastery. Each base class has three possible Masteries to choose from. For Rogue, you can choose between Passive Trees for Bladedancer, Marksman, and Falconer. Upon selecting a Mastery and placing 20 Passive Points into the Rogue Tree, you'll then be able to place Passive Points into the Mastery Trees.
Bladedancer is the Advanced Class used for this build, and also where the majority of our Passive Points will come from. The Bladedancer Tree will focus around picking nodes that increase our damage and give us a strong defensive layer to work with. A lesser amount of Passive Points will come from Falconer, which will focus on rounding out some more of our defensive stats. Each Passive Tree and their points are broken down below.
Bladedancer Passive Points
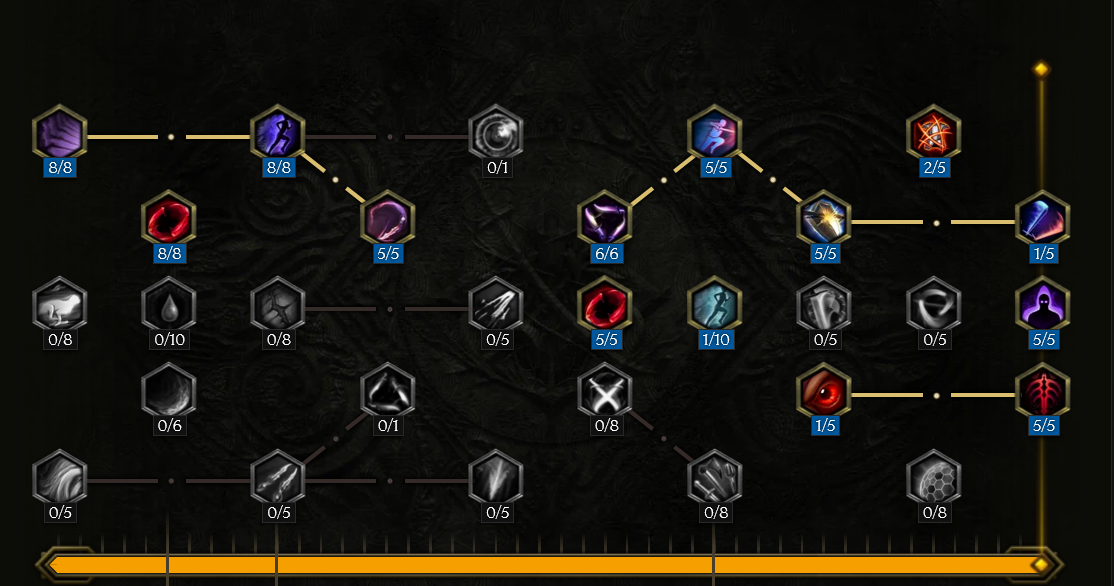
- 8 points in Cloak of Shadows: This node furthers our base to Dexterity and increases our Gancing Blow chance.
- 8 points in Once: This node will increase both our Melee Physical and Throwing Physical Damage base by 16.
- 8 points in Shroud of Dusk: We add a significant chance to gain Dusk Shroud when hit, while increasing our base HP.
- 5 points in Veil of Night: You gain a significant chance to gain Dusk Shroud on hit.
- 5 points in Blood Dance: This node will give us Melee Health Leech, as well as an increased leech rate.
- 6 points in Asuvon's Pact: We have a significant increase to damage while at full hp.
- 1 point in Argent Veil: When we dip below 70% hp, we have a 100% chance to dodge the next hit. 15 second cooldown.
- 5 points in Perfection: We gain up to 10 stacks of Perfection, will are empower our next defensive node.
- 5 points in Confidence: We gain 50 armor and 50 dodge rating for each stack of Perfection (up to 10).
- 1 point in Critical Eye: This node increases our Critical Strike two ways; increasing our base chance and inflicting Critical Vulnerability.
- 5 points in Shadow Master: This node will increase our Shadow's damage by 100% and add one to our maximum shadows.
- 5 points in All In: This node increases our Critical Strike Multiplier by a whopping 75%, but reduces non-critical strikes damage.
- 1 point in Exuberance: This node is taken to give us two stacks of Perfection per melee attack, instead of the standard one.
- 2 points in Hooked Blades: We take this node to Shred Armor and increase the effect by 25%.
Our base class is Rogue, which fills the roll of an elusive fighter in Last Epoch. Upon finishing Act 1 in the campaign, your character will be offered an opportunity to select an Advanced Mastery. Each base class has three possible Masteries to choose from. For Rogue, you can choose between Passive Trees for Bladedancer, Marksman, and Falconer. Upon selecting a Mastery and placing 20 Passive Points into the Rogue Tree, you'll then be able to place Passive Points into the Mastery Trees.
Bladedancer is the Advanced Class used for this build, and also where the majority of our Passive Points will come from. The Bladedancer Tree will focus around picking nodes that increase our damage and give us a strong defensive layer to work with. A lesser amount of Passive Points will come from Falconer, which will focus on rounding out some more of our defensive stats. Each Passive Tree and their points are broken down below.
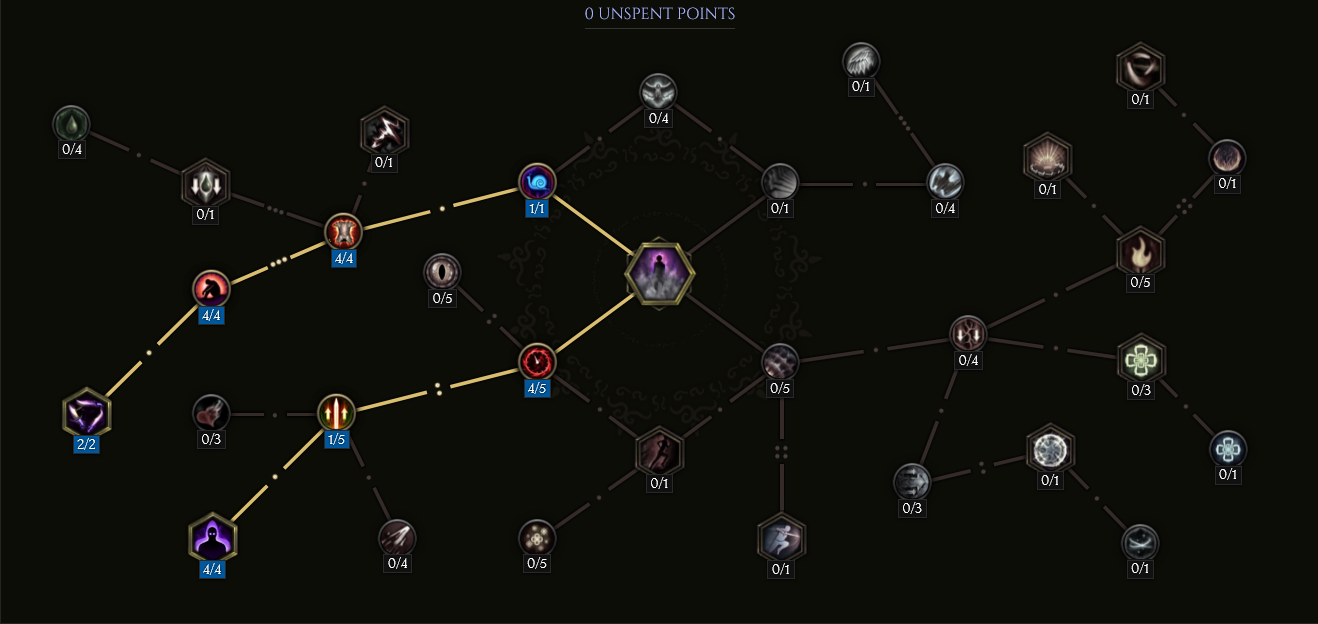
Falconer Passive Points

- 5 points into Raptor's Wings: Gives us a chance to gain haste on hit, adding more damage while we have haste.
- 2 point into Wilderness Scout: Gives us base HP and Dodge Rating.
- 5 points into Outlander's Tenacity: Gives us base dodge rating, and 15% of our max HP as Endurace Threshold.
- 4 points into Stamina of the Rover: Increases dodge rating, mana regeneration, and gives us mana when we dodge.
In this section, we will break down each skill and highlight the key passives we have selected to make the skill shine in the build. While some of these skills do allow for some variation to exist depending on your own custom choices, we recommend utilizing the skill trees as presented until you have a strong understanding of the build itself.
Umbral Blades
![]() Umbral Blades is one of the strongest, if not the
strongest skill for the Rogue. This skill will have automation from
our Shadows. These blades will also trigger
Umbral Blades is one of the strongest, if not the
strongest skill for the Rogue. This skill will have automation from
our Shadows. These blades will also trigger ![]() Shadow Daggers,
which are arguably the strongest ailment in the game. These daggers
have a 100% chance to critical strike at a 450% damage scaler with a
base of 90 Physical Damage. This skill can be used directly by the player,
however it is automated in the build. We rely mostly on our ability to
Shadow Daggers,
which are arguably the strongest ailment in the game. These daggers
have a 100% chance to critical strike at a 450% damage scaler with a
base of 90 Physical Damage. This skill can be used directly by the player,
however it is automated in the build. We rely mostly on our ability to
![]() Shift at a constant rate. You will read about this automation further
in the build.
Shift at a constant rate. You will read about this automation further
in the build.
Order of Skill Points
- 2 points into Dawnfall: This node gives us a defensive layer with Dusk Shroud, but also boosts our damage with each Dusk Shroud we have with Edge of Obscurity.
- 1 point into Sword Thrower: This node is what starts to make
 Umbral Blades hit
very hard. Its drawbacks are negated by our ability to
Umbral Blades hit
very hard. Its drawbacks are negated by our ability to  Create Shadow.
 - 1 point into Lethal Darkness: Inflicts a stack of
 Shadow Daggers on hit.
 - 1 point into Cacophony of Steel: This causes our blades to spin in place, making the
Umbral Blades hit three times per second with
 Bladestorm. However, the real damage comes
from applying Shadow Daggers.
Bladestorm. However, the real damage comes
from applying Shadow Daggers. - 4 points into Steel Torrent: This node increases the duration and size of the Bladestorm
from Cacophony of Steel.
- 1 point into Loathing: We take this node in order to have the Bladestorm home in on enemies.
It is slow, but effective when used in packs from our Shadows.
- 3 points into Edge of Obscurity: This adds 6% more damage per Dusk Shroud we have, and this value is doubled while we are inside of Smoke Cloud.
- 1 point into Umbral Remnant: This is where our Shadows become extrememly lethal; upon their
expiration, they turn into a Bladestorm. This instace uses all the same benefits as
before, but increased because we have scaled our Shadow Damage.
- 5 points into Jagged Carvings: We add 20 base Physical Damage to Umbral Blades.
- 1 point into Precision Cuts: We take this node for the ability to have Umbral Blades
go exactly where we want, when we self cast.
In this section, we will break down each skill and highlight the key passives we have selected to make the skill shine in the build. While some of these skills do allow for some variation to exist depending on your own custom choices, we recommend utilizing the skill trees as presented until you have a strong understanding of the build itself.
Shadow Cascade

![]() Shadow Cascade is the second part of our automation in the build.
This skill gives us and our shadows a ranged attack that can proc
Shadow Cascade is the second part of our automation in the build.
This skill gives us and our shadows a ranged attack that can proc ![]() Shadow Daggers
on hit. It also it necessary, because after we
Shadow Daggers
on hit. It also it necessary, because after we ![]() Shift our shadows will use
Shift our shadows will use
![]() Shadow Cascade, causing them to expire and turn into
Shadow Cascade, causing them to expire and turn into ![]() Bladestorm as listed before.
This skill does not need to be on the skill bar, and we elect to use
Bladestorm as listed before.
This skill does not need to be on the skill bar, and we elect to use
![]() Decoy in its place for crowd control or luring enemies into our Smoke Cloud.
Decoy in its place for crowd control or luring enemies into our Smoke Cloud.
Order of Skill Points
- 3 points in Dismantle: Initially, two points will be put in. We need to rush into Shadow Elegance, once the points are allocated, you can put the third point in here.
- 1 point in Crushing Darkness: Take this node for the 30% more damage, but also to traverse through the tree.
- 4 points in Dagger Dance: This node allows us to have Dagger Throw when
we use
 Shadow Cascade. This also counts for our shadows.
 - 1 point in Porcupine's Wrath: We take this node for a signifant boost in damage for Dagger Throw and increases the amount of daggers thrown from 4 to 7, but lose the melee function of the skill.
- 1 point in Shadow Elegance: This node is what will apply Shadow Daggers from us and our Shadows. The Shadow Clones have a 20%
chance to apply Shadow Daggers, but there's a 100% chance from the player.
- 1 point in Onslaught: This node is imperative in order to restore Mana. Since this skill will be used constantly, we need to kill the Mana cost as much as possible.
- 2 points in Fight In The Shadows: This node will give us up to 24 Mana when Shadow Cascade
is used, gaining 6 Mana per Shadow. With only the singular Shadow, this will make the
skill cost 6 Mana, completely manageable with standard Mana Regeneration.
- 1 point in Flow State: Deal an added 30% more damage, effective due to dual wielding daggers.
- 2 points in Daggerflow: This node effectively adds off-screen clear for our Dagger Throw.
- 4 points in Shadow Torrent: While using full Shadow Clones (4), Shadow Cascade will have 48% more damage.
In this section, we will break down each skill and highlight the key passives we have selected to make the skill shine in the build. While some of these skills do allow for some variation to exist depending on your own custom choices, we recommend utilizing the skill trees as presented until you have a strong understanding of the build itself.
Synchronized Strike
![]() Synchronized Strike is our biggest hit in the build, however this
is due to the instantaniously applied ailement of
Synchronized Strike is our biggest hit in the build, however this
is due to the instantaniously applied ailement of ![]() Shadow Daggers that are applied on the strike.
Since we have four Shadow Clones mimicing our strike, the strike applies five stacks of
Shadow Daggers that are applied on the strike.
Since we have four Shadow Clones mimicing our strike, the strike applies five stacks of
![]() Shadow Daggers to enemies in an AoE. However, it only takes four
stacks of
Shadow Daggers to enemies in an AoE. However, it only takes four
stacks of ![]() Shadow Daggers to trigger the large hit.
Any enemy that doesn't die instantly to this strike will still have a lingering
stack on them. This skill rotation always causes another stack of the ailment to carry over.
Shadow Daggers to trigger the large hit.
Any enemy that doesn't die instantly to this strike will still have a lingering
stack on them. This skill rotation always causes another stack of the ailment to carry over.
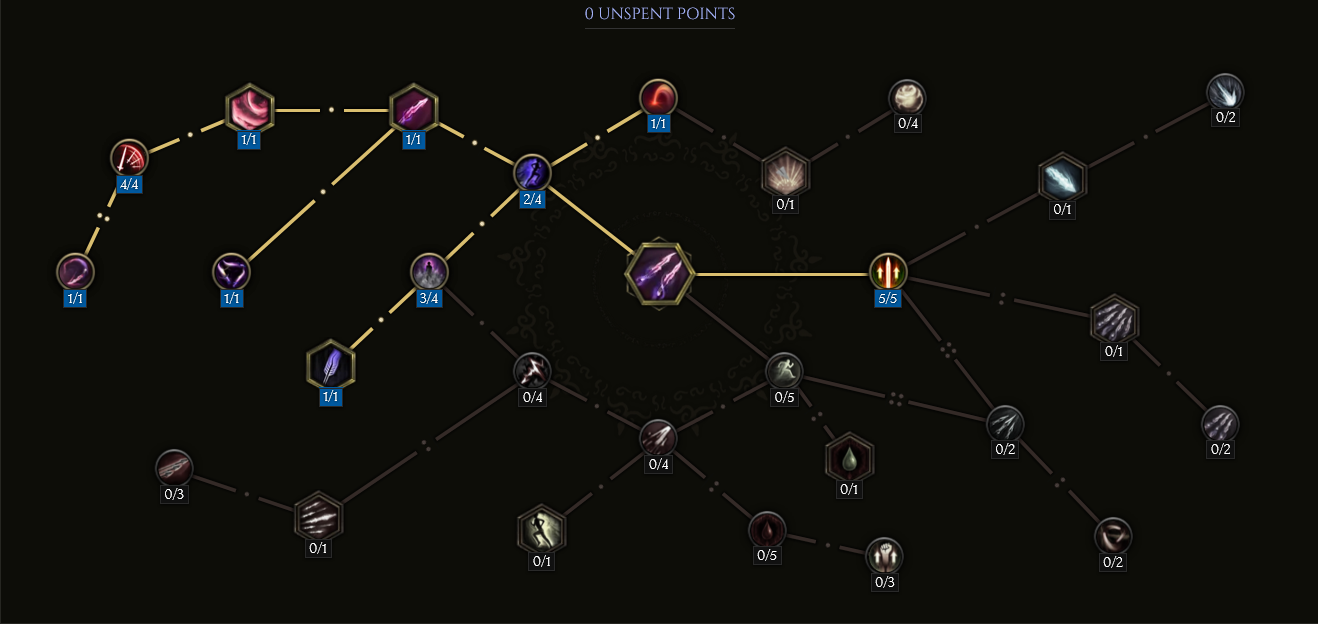
Order of Skill Points
- 3 points in Dynamics: This node is extremely important, as it works in tandem with the prefix Mana Efficiency with Synchronized Strike on our armor. With both the prefix and this node we can reduce the Mana cost by up to 70%. This is required since we will be using this quite often as can be seen in the demo video.
- 2 points in Art of the Blade: This node is more traversal than anything.
- 1 point in Perfect Coordination: We take this in order to have our shadows hit the same area
that we do, this ensures that whatever we hit in the AoE will have the final triggered ailement for our
Shadow Daggers.
- 5 points in Coordinated Cuts: Indirectly adding damage with Armor Shred is
a nice bonus to our already hard hitting Shadow Daggers.
- 1 point in Umbral Assassination: This is where the magic happens, as the strike will now apply the incredibly
potent ailment of Shadow Daggers from ourselves and two Shadows.
- 2 points in Growing Darkness: This will increase the area of our strike to hit in a larger AoE, nice for pack clears.
- 5 points in Foreshadowing: This causes any Shadow created in the last 4 seconds of
 Synchronized Strike
to have 200% increased damage. The Shadows for Synchornized Strike count.
Synchronized Strike
to have 200% increased damage. The Shadows for Synchornized Strike count. - 1 point in Dark Allies: We add two more Shadows to the strike, which now ensure the final effect
of our ailment, Shadow Daggers, will instantly be applied.
In this section, we will break down each skill and highlight the key passives we have selected to make the skill shine in the build. While some of these skills do allow for some variation to exist depending on your own custom choices, we recommend utilizing the skill trees as presented until you have a strong understanding of the build itself.
Shift
![]() Shift will be the bread and butter for just about everything we do in this
build. It will massively buff our defenses, and trigger all of our damage. It also will apply
Shift will be the bread and butter for just about everything we do in this
build. It will massively buff our defenses, and trigger all of our damage. It also will apply ![]() Shadow Daggers
on any enemy it hits. This is how we will move around the Echo, as this is the primary
reason we use the
Shadow Daggers
on any enemy it hits. This is how we will move around the Echo, as this is the primary
reason we use the ![]() Smoke Weaver unique daggers.
Smoke Weaver unique daggers.
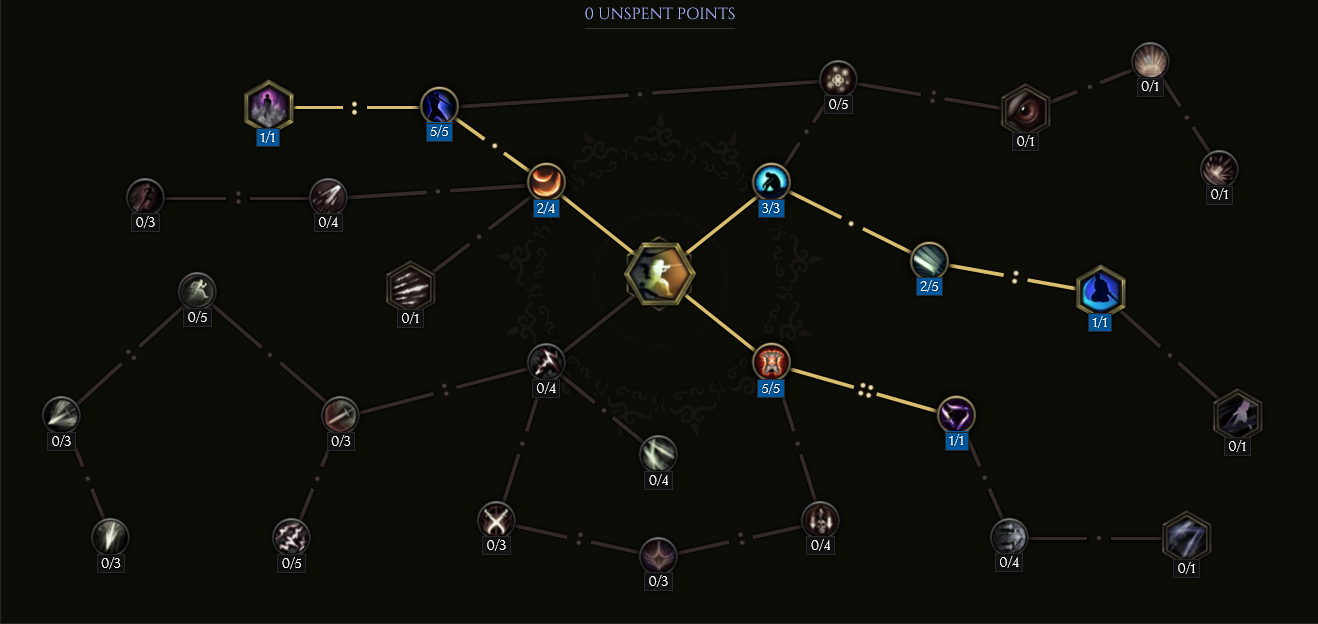
Order of Skill Points
- 3 points in Velocity: This help us spam our movement skill, which will increase our defenses and proc our damage dealing skill at a rapid rate.
- 2 points in Momentum: We use this node to move further into the tree, however, the movement speed buff is nice.
- 1 point in Lasting Presence: This node is great for our Mana, and also our damage,
as this Shadow will use Shadow Cascade.
- 1 points in Dancing Shadows: This node is what makes the previous node functional,
as well as after using Synchronized Strike, we Shift away causing all the shadows to use
Shadow Cascade.
- 4 points in Swift Recovery: This node gives us 16 Mana whenever we Shift, helping
alleviate any Mana issues we encounter. Indirectly, we gain 22 Mana each use from the Shadow using Shadow Cascade.
This gives
 Shift a net cost of only 3 Mana.
 - 1 point in Shadowslip: We are impervious to any damage while Shifting. Considering we are able to Shift every other second or so, this makes us invulnerable most the time. While not invulnerable we have a capped Dodge Rate of 85% 1 second after Shifting.
- 3 points in Elusive: This node will give you about 4000 Dodge Rating after Shifting, this is a massive bost to our defenses.
- 1 point in Unseen Strike: This is a traversal node.
- 2 points in Broad Sweep: This node increases the width we damage along the path, this
includes applying the ailment Shadow Daggers in the next node we take.
- 2 points in Hidden Blades: We apply Shadow Daggers whenever we pass through an enemy with Shift.
In this section, we will break down each skill and highlight the key passives we have selected to make the skill shine in the build. While some of these skills do allow for some variation to exist depending on your own custom choices, we recommend utilizing the skill trees as presented until you have a strong understanding of the build itself.
Smoke Bomb
![]() Smoke Bomb is used mostly during a dangerous encounter or a boss fights.
It can be used freely to clear packs, as this skill will also apply the ailment
Smoke Bomb is used mostly during a dangerous encounter or a boss fights.
It can be used freely to clear packs, as this skill will also apply the ailment ![]() Shadow Daggers.
Use this in cohesion with your unscaled
Shadow Daggers.
Use this in cohesion with your unscaled ![]() Decoy to have enemies run into the smoke cloud.
Decoy to have enemies run into the smoke cloud.
Order of Skill Points
- 1 point in Thick Smoke: This node applies a stack of Slow every second they are in the cloud.
- 4 points in Eroding Fumes: We Shred Armor from the enemy every second they are in the cloud.
- 4 points in Swirling Fog: We double the rate of both Shred Armor and Slow, now being two times a second.
- 2 points in Knives in the Dark: Stacks of Slow now have a 70% chance to apply Shadow Daggers.
Since this now happens two times a second, it is a very good chance to apply at least 1 stack of Shadow Daggers
every second. In practice, this would normally apply 2 stacks of the ailment every second, and killing all packs in just 2-3 seconds.
- 4 points in Lingering Fumes: This causes the smoke cloud to last longer. The default is 4 seconds; this increases it to 5.6 seconds.
- 1 point in Smoke Blades: We don't normally stand in the cloud, but if we do, we gain stacks of Smoke Blades that increase our damage.
- 4 points in Umbral Assault: We generate a Shadow every second the cloud lingers, these shadows are exactly like our other Shadows, they can use Shadow Cascade.
Build Mechanics and Playstyle
This build will require two at least decently rolled ![]() Smoke Weaver. This is the only way to get our
Smoke Weaver. This is the only way to get our
![]() Shift down to an acceptable spam rate to keep and cap our Dodge in the 80+%.
Shift down to an acceptable spam rate to keep and cap our Dodge in the 80+%.
Our big damage will come from ![]() Synchronized Strike, but only indirectly.
Shadow Daggers are what really push our damage. Since we are using Dark Allies,
we have a total of four Shadows that jump with us, each applying Umbral Assassination.
This means you will instantly be able to apply five stacks (four from shadows, one from the player) to a group or individual.
Once we Shift away, these Shadows will dissipate, but not before casting
Synchronized Strike, but only indirectly.
Shadow Daggers are what really push our damage. Since we are using Dark Allies,
we have a total of four Shadows that jump with us, each applying Umbral Assassination.
This means you will instantly be able to apply five stacks (four from shadows, one from the player) to a group or individual.
Once we Shift away, these Shadows will dissipate, but not before casting ![]() Shadow Cascade,
which have a 100% chance from you to apply another stack of Shadow Daggers,
and a 20% from the Shadows to apply it. Once they cast their cascade, they will then drop
Shadow Cascade,
which have a 100% chance from you to apply another stack of Shadow Daggers,
and a 20% from the Shadows to apply it. Once they cast their cascade, they will then drop
![]() Umbral Blades that will spin and home into enemies from Cacophony of Steel and Loathing.
These will also apply
Umbral Blades that will spin and home into enemies from Cacophony of Steel and Loathing.
These will also apply ![]() Shadow Daggers with Lethal Darkness. This will at
least ensure an AoE of targets see anywhere from 8 stacks of Shadow Daggers, perhaps more if the
Shadow Daggers with Lethal Darkness. This will at
least ensure an AoE of targets see anywhere from 8 stacks of Shadow Daggers, perhaps more if the
![]() Shadow Cascade from the shadows rolled in your favor from Shadow Elegance.
Shadow Cascade from the shadows rolled in your favor from Shadow Elegance.
With this setup, we will always be Shifting (holding it down) unless you're bossing
or facing a difficult encounter, where positioning should be taken more into consideration.
We have enough Mana recovery from ![]() Shift with Fight In The Shadows and
Onslaught. We are able to use
Shift with Fight In The Shadows and
Onslaught. We are able to use ![]() Synchronized Strike for every
Synchronized Strike for every ![]() Shift.
So our rotation is
Shift.
So our rotation is ![]() Synchronized Strike →
Synchronized Strike → ![]() Shift. If you ever need it, dropping a Smoke Bomb
can be done any time you feel like you need extra Shadow Clones and Shadow Daggers. Most of the time, Sync and Shift
will be more than enough. The unscaled
Shift. If you ever need it, dropping a Smoke Bomb
can be done any time you feel like you need extra Shadow Clones and Shadow Daggers. Most of the time, Sync and Shift
will be more than enough. The unscaled ![]() Decoy is really only used in difficult
encounters or bossing, to control the enemy in a different direction for setup
to draw them into your
Decoy is really only used in difficult
encounters or bossing, to control the enemy in a different direction for setup
to draw them into your ![]() Smoke Bomb.
Smoke Bomb.
Noteable Defensive Mechanics
Our Dodge is our major defensive mechanic, however we will rely on our Endurance
from time to time. We will get hit, it is inevitable, which is why we have the Blessing
![]() Grand Wrath of Rahyeh. This will allow us to soak life from our
Grand Wrath of Rahyeh. This will allow us to soak life from our ![]() Umbral Blades
spinning on enemies. Adding this to our Critical Strike Avoidance, which should be capped,
we can stay pretty comfortable when engaged in fights. With nearly capped Resistances adding to
our EHP, our final defensive layer is Health, which should be between 1700 and 2000.
However, none of these defensive layers should make a player think they should not practice
evading obvious damage mechanics. As one pushes into deeper Corruption, this will become more prevalent.
Umbral Blades
spinning on enemies. Adding this to our Critical Strike Avoidance, which should be capped,
we can stay pretty comfortable when engaged in fights. With nearly capped Resistances adding to
our EHP, our final defensive layer is Health, which should be between 1700 and 2000.
However, none of these defensive layers should make a player think they should not practice
evading obvious damage mechanics. As one pushes into deeper Corruption, this will become more prevalent.
Mobility
Using ![]() Shift as a mobility skill should be spammed on a continuous basis,
however, it is important to note that the unique weapon
Shift as a mobility skill should be spammed on a continuous basis,
however, it is important to note that the unique weapon ![]() Smoke Weaver has drastically reduced
the range of our
Smoke Weaver has drastically reduced
the range of our ![]() Shift. This skill should still be used continuously when in
combat conditions, as it is our primary way of building and maintaining extremely high defensive layering.
Shift. This skill should still be used continuously when in
combat conditions, as it is our primary way of building and maintaining extremely high defensive layering.
Equipment and Gear Affixes
For this build, we will be focusing on several main affixes for each piece of non-unique gear, as well as working towards acquiring the specific Uniques needed to make this build operate correctly. Our equipment will focus on these specific affixes for the Implicits and Modifier stats.
| Gear Slot | Implicits | Modifiers |
|---|---|---|
| Dagger | +# Melee Physical Damage Critical Strike Multiplier |
|
| Dagger | +# Melee Physical Damage Critical Strike Multiplier |
|
| Helmet | Armor Increased Cooldown Recovery Increased Stun Chance |
Prefixes % Physical Penetration with Shadow Daggers Dexterity Suffixes + Health % Increased Health |
| Amulet | Physical Resistance Necrotic Resistance |
Prefixes + Throwing Damage +% Critical Strike Multiplier Suffixes Needed Resistance % Increased Dodge Rating |
| Chest | Armor +% Endurance Increased Mana Regen |
Prefixes +% Mana Efficiency for Synchronized Strike % Physical Penetration with Shadow Daggers Suffixes + Health % Increased Health |
| Belt | Poison Resistance Cold Resistance Potion Slots |
Prefixes + Throwing Damage % Increased Physical Damage Suffixes Increased Cooldown Recovery +% Critical Strike Avoidance |
| Gloves | Armor #% of Armor Mitigation also applies to Damage over Time |
Prefixes + Throwing Damage Dexterity Suffixes + Armor Hybrid Health |
| Ring | Increased Cooldown Recovery + All attributes |
Prefixes + Throwing Damage and Reduced Throwing Mana Cost Prefix Suffixes + Health Needed Resistance |
| Ring | Increased Cooldown Recovery + All attributes |
Prefixes + Throwing Damage and Reduced Throwing Mana Cost Prefix Suffixes + Health Needed Resistance |
| Boots | Armor Movement Speed Fire Resistance |
Prefixes Dexterity Movement Speed Suffixes Hybrid Health Increased Cooldown Recovery |
| Relic | Increased Dodge Rating | Prefixes +% Critical Strike Multiplier + Throwing Damage Suffixes Needed Resistances or Life |
A loot filter made specifically for the gear table above may be copied by pressing the button below. Once in the Loot Filter portion of the in-game menu, choose the "Paste Clipboard Contents" option to import the code.
Copy Loot Filter to Clipboard
Uniques
Below we have listed the required uniques to make the builld work, alongside an explanation of what they do for this particular build.
Smokeweavers
![]() Smoke Weaver We use two of these unique items in this build and it will be required to run this build effectively.
Smoke Weaver We use two of these unique items in this build and it will be required to run this build effectively.
![]() Shift is heavily relied upon, which is why we also try and reduce cooldowns anywhere we can in the gear. It will
also give a significant boost to our primary defensive mechanics, Dodge. If found with LP, it would be best rolled with
Critical Strike Mulitplier and +# Melee Physical Damage.
Shift is heavily relied upon, which is why we also try and reduce cooldowns anywhere we can in the gear. It will
also give a significant boost to our primary defensive mechanics, Dodge. If found with LP, it would be best rolled with
Critical Strike Mulitplier and +# Melee Physical Damage.
Idols
Idol slots are gained through the campaign, unlocking small bonuses and unique affixes for the player to discover and augment their builds with. The Idol screen consists of a grid system for the player to fill out with different sized Idols, eventually filling in every part of the grid. As the Idol shape increases (1x1, 1x2, 1x3, 1x4, etc.) the stronger an affix you might find for your build.
The Idols selected for this Sync Strike Shift build 3x1 in size and are focused primarily on Increased Damage for Skills used by Shadows and Physical Penetration with Shadow Daggers. These nodes are imperative to pushing your damage into significant values. The remainder of the idols should be used for increaing health and fixing resistances where needed.
- +% Phyiscal Penetration with Shadow Daggers
- +% Increased Damage for Skills used by Shadows
These idols can have a relatively large spread 11%-24% on the former, and 17%-40% for the later. Clearly, priotizing better rolls will be paramount, however, a player may have to mix and match to get the primary benefits from an class specific idol.
Blessing
Blessings are permanent buffs that are applied to your character. These come in two different powers, Standard and Grand. Grand blessings are significantly stronger than the Standard Blessings. In total, there are 10 Blessing Slots, one for each Monolith Timeline. When you complete a Monolith and defeat the final boss you will be awarded a choice of three blessing with a random value.
| Blessing Name | Affix | Timeline |
|---|---|---|
| % of Throwing Damage Leeched as Health | The Black Sun | |
| +% Lightning Resistance | Ending the Storm | |
| +% Endurance | Spirits of Fire | |
| #% Increased Armor | The Age of Winter | |
| +% Critical Strike Avoidance | Reign of Dragons |
The Blessings listed above cover the most important slots, with the remaining Blessing Slots being filled with whatever the player may be lacking for stats.
Changelog
- 08 Mar. 2024: New Loot Filter added, Updated for 1.0
- 21 Jan. 2024: Loot Filter added.
- 30 Nov. 2023: Guide added.

EMP1241 is a Marine veteran who is currently pursuing higher education in Aerospace Engineering. He spends much of his time outside of his studies playing ARPGs, Builders, and MOBAs. He is frequently seen on his Twitch channel discussing science, space, or video games.
- Patch 1.0.7 Update: Multiplayer, Skills and More!
- Patch 1.0.6 Update: Camera Setting, Controller Keybinds, Bug Fixes, and More!
- Eleventh Hour Games on Real-Money Trading and Exploits in Last Epoch
- Patch 1.0.5 Update: Many Bug Fixes, Including Loot Filter Toggle Sensitivity, and Other Improvements!
- The First 30 Days of Last Epoch!
- 1.0 Launch Retrospective: A Message From Eleventh Hour Games
- Patch 1.0.4 Update: More In-Game Changes, Bug Fixes, and Improvements
- Last Epoch Mid-Cycle Balance Survey Recap