Druid Bleed Swarmblade Endgame Build for Last Epoch (Patch 1.0)
Welcome to our Last Epoch Druid Bleed Swarmblade build guide for the Primalist class. Here you will learn everything about the Druid play style, passives, skills, strengths, and weaknesses to conquer the world of Eterra.
Build Introduction
Take on the form of the fearsome Swarmblade, a blood thirsty bug with an army of locusts (and squirrels!) at your command. Let your swarm of minions inflict a thousand tiny cuts on your enemies, before consuming your locusts to empower yourself and wade through the battlefield, obliterating everything in your path!
Credit and thanks to our community member Funkimonki Last Epoch Tools for bringing the original build concept to me.
 Amazing clear speed
 - Very high boss damage
- Decently tanky

 Tricky rotation of abilities
 - Requires ramp time for highest boss damage

Skill Selection
This skill transforms your Druid into a massive bug form using ![]() Swarmblade Form.
In this form, your skill bar will change to include the following abilities;
Swarmblade Form.
In this form, your skill bar will change to include the following abilities;
![]() Summon Hive which summons hives and spawns Locusts, Dive which is a forward dash,
Armblade Slash which is a melee-range attack, and Swarm Strike which performs an AoE around you
and consumes any Locusts it hits to create an on-going aura that damages enemies.
Summon Hive which summons hives and spawns Locusts, Dive which is a forward dash,
Armblade Slash which is a melee-range attack, and Swarm Strike which performs an AoE around you
and consumes any Locusts it hits to create an on-going aura that damages enemies.

Class and Skill Passive Trees
Our base class is the Primalist, which acts as a generic caster, brawler, or companion summoner. Our character will be offered an opportunity to select an Advanced Mastery once we have completed the first act of the campaign. Each base class has three possible masteries to choose from. For the Primalist, we have access to the Mastery Tree Passives for Beastmaster, Shaman and Druid. Upon selecting a Mastery and placing 20 Passive Points into the Primalist Tree, you'll then be able to place Passive Points into the other Mastery Trees.
For this build, we will be picking Druid as our advanced class. We will utilize the majority of our Passive Points in the Druid Passive Tree. Our Passive Points will be targeting nodes to increase damage while transformed into Swarmblade and boosting our survivability. Each of the Passive Trees and their points are broken down below.
Primalist Passive Points
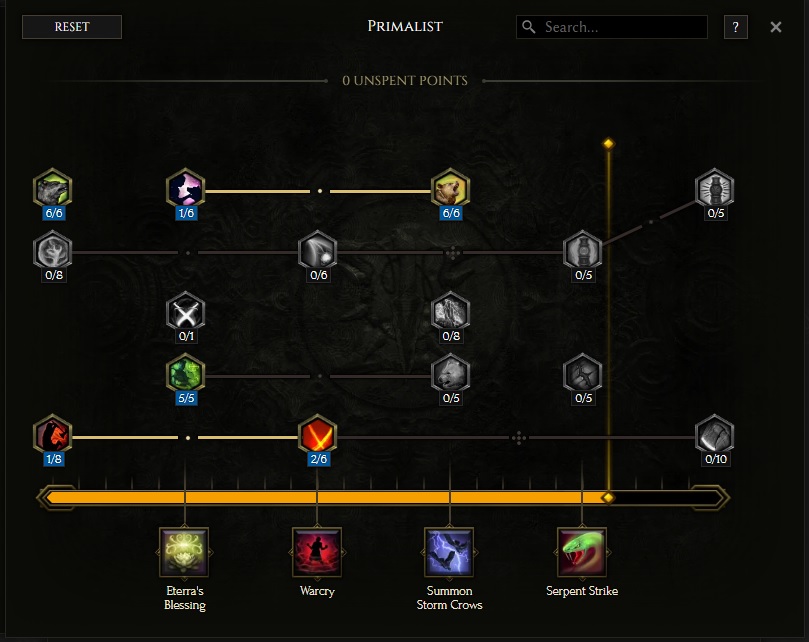
- 6 points into Gift of the Wilderness: Increases our Health and Minion Health.
- 5 points into Hunter's Restoration: Increased Health and Health restored on hit every 3 seconds.
- 1 point into Primal Medicine: Increased Minion Damage and a portion of healing potions applied to minions.
- 1 point into Primal Strength: Strength and Health Regeneration, but we mainly take this to unlock the next node.
- 2 points into Survival of the Pack: Increased Melee Damage and Melee Life Leech for us and our minions.
- 6 points into Ancient Call: Added Health, Companion Health and faster Revival Speed.
Our base class is the Primalist, which acts as a generic caster, brawler, or companion summoner. Our character will be offered an opportunity to select an Advanced Mastery once we have completed the first act of the campaign. Each base class has three possible masteries to choose from. For the Primalist, we have access to the Mastery Tree Passives for Beastmaster, Shaman and Druid. Upon selecting a Mastery and placing 20 Passive Points into the Primalist Tree, you'll then be able to place Passive Points into the Mastery Trees.
For this build, we will be picking Druid as our advanced class. We will utilize the majority of our Passive Points in the Druid Passive Tree. Our Passive Points will be targeting nodes to increase damage while transformed into Swarmblade and boosting our survivability. Each of the Passive Trees and their points are broken down below.
Beastmaster Passive Points
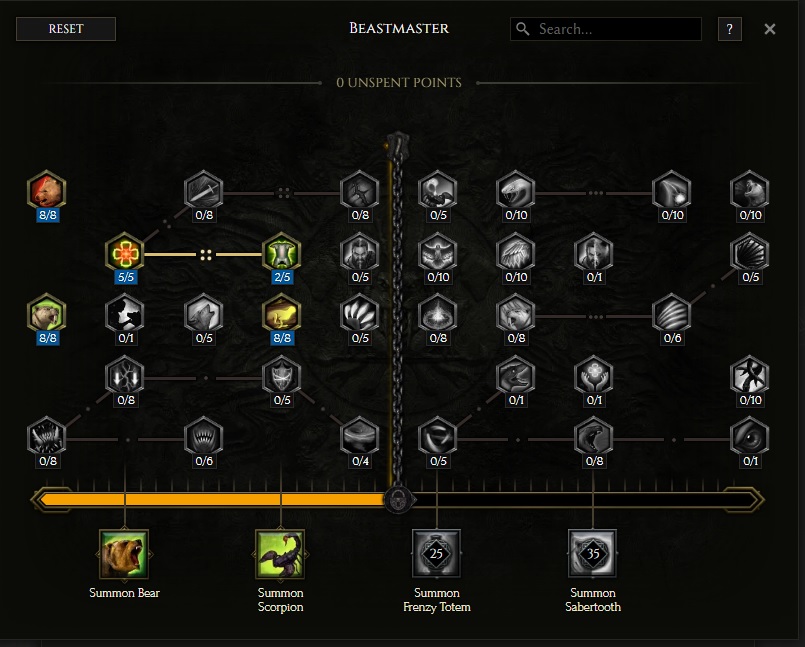
- 8 points into Ursine Strength: Gain Strength and Damage Reduction.
- 8 points into Feline Bond: Added Dodge Rating for us and our Minions, as well as increased Companion Revive Range
- 5 points into Boar Heart: Grants us Aspect of the Boar when hit by a melee attack.
- 8 points into The Chase: Increases Minion Attack and Cast Speed, Minion Movespeed and increased Companion Revive Speed.
- 2 points into Porcine Constitution: Aspect of the Boar grants additional damage reduction and health regen.
Our base class is the Primalist, which acts as generic caster, brawler, or companion summoner. Our character will be offered an opportunity to select an Advanced Mastery once we have completed the first act of the campaign. Each base class has three possible masteries to choose from. For the Primalist, we have access to the Mastery Tree Passives for Beastmaster, Shaman and Druid. Upon selecting a Mastery and placing 20 Passive Points into the Primalist Tree, you'll then be able to place Passive Points into the Mastery Trees.
For this build, we will be picking Druid as our advanced class. We will utilize the majority of our Passive Points in the Druid Passive Tree. Our Passive Points will be targeting nodes to increase damage while transformed into Swarmblade and boosting our survivability. Each of the Passive Trees and their points are broken down below.
Druid Passive Points
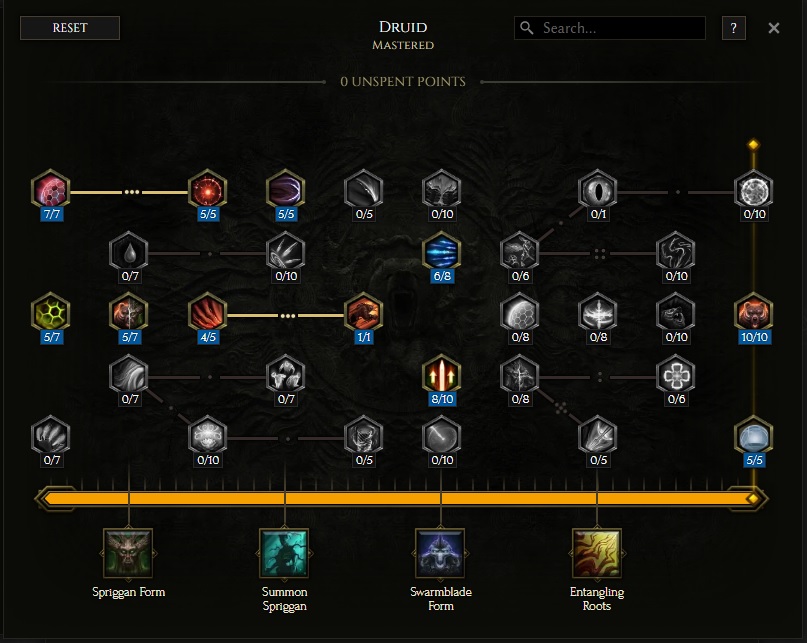
- 7 points into Chitinous Plating: Increases our Endurance and Armor.
- 5 points into Spirit Warden: Added flat Health and Mana.
- 5 points into Druidic Prowess: Added Strength and Attunement, as well as +1 to all our stats.
- 5 points into Thicket of Thorns: Chance to cast
 Thorn Shield when we are hit, as well as increased Armor.
 - 4 points into Focused Wrath: Increased Damage while transformed and, more importantly, reduced Rage Decay.
- 5 points into Wind in the Leaves: Increases both ours, and our minion's, Attack and Cast Speed.
- 1 point into Rancour: No Rage Decay when out of combat. Take note, using abilities will count as combat.
- 6 points into Piercing Gale: Cold Penetration for us and our Minions, but we take this node for the 6 point bonus, adding Attack and Movement Speed for Locusts.
- 8 points into Force of Nature: Adds Physical Damage for melee and spell damage for us and our minions.
- 10 points into Hideskin: Adds Flat Health and gives additional Endurance Threshold based on our Maximum Health.
- 5 points into Impervious: Increases our Damage Reduction.
In this section, we will break down each skill and highlight the key passives we have selected to make the skill perform as best as possible in the build. While some of these skills do allow for some variation to exist depending on your own custom choices, we recommend utilizing the skill trees as presented until you have a strong understanding of the build itself.
Swarmblade Form
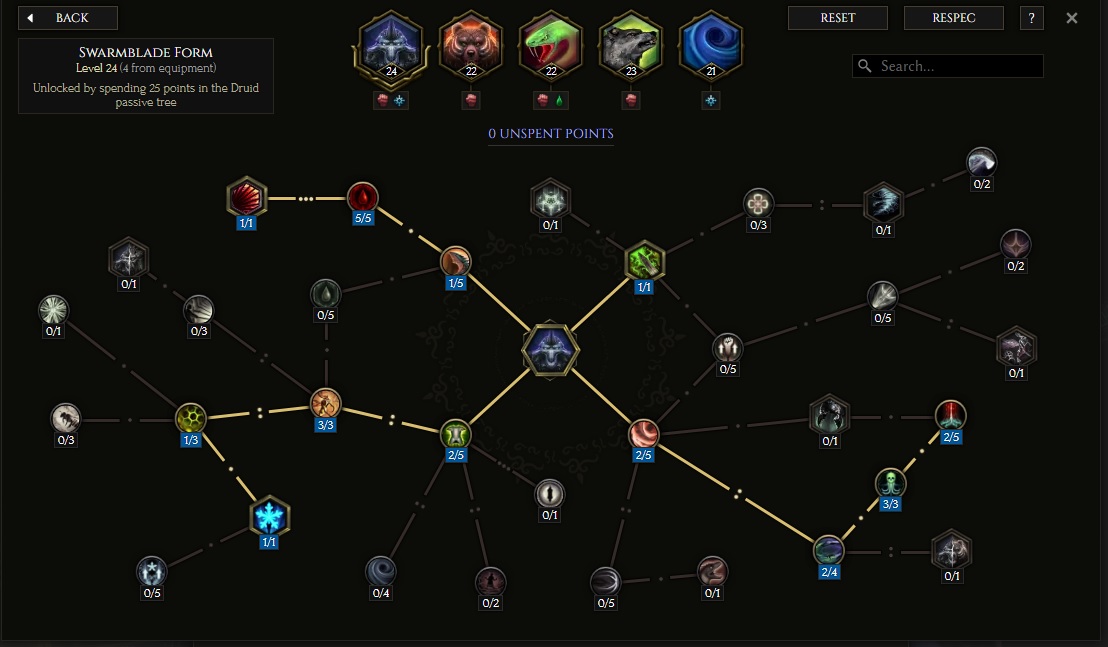
We want to spend as much time as possible in ![]() Swarmblade Form. When we are in this form, we
command our horde of Locusts and Squirrels to soften the enemy, applying Bleed that we consume
to create a high damage Locust Swarm to annihilate enemies.
Swarmblade Form. When we are in this form, we
command our horde of Locusts and Squirrels to soften the enemy, applying Bleed that we consume
to create a high damage Locust Swarm to annihilate enemies.
Due to the passive Bloodlust Swarm, we will get unbelievable amounts of increased damage from consuming all Bleed stacks. This node is the keystone of the entire build, allowing the build to consistently reach over 1,000 stacks consumed on Bosses, adding over 30,000% Increased Damage. Therefore, any other Increased Damage modifiers are very low priority, as they stack additively with this bonus and are extremely low impact. We instead focus on survivability for us and our minions, as well as stacking as much Bleed as we can, as fast as possible.
Order of Skill Points
- 1 point into Wasp Flight: Increases our Attack and Cast Speed.
- 5 points into Death by a Thousand Wings: Increases Bleed chance from Armblade and Dive as well as the Locusts' Bleed Chance.
- 1 points into Bloodlust Swarm: The most important node in the entire build. This is what lets us reach the absurd damage numbers on Locust Swarm.
- 2 points into Slashing Spiral: Increased area for Swarm Strike, Locust Swarm and our Locust's Melee attacks.
- 4 points into Neverending Drove: Increased Locust Swarm Duration and hit damage for Swarm Strike.
- 2 points into Locust Agility: Added flat Dodge Rating and Armor for us and our Locusts while we are in Swarmblade form.
- 3 points into Grand Colony: Increases the maximum amount of Locusts we can have, and how many Locusts each Hive can spawn.
- 3 points into Plague of Locusts: Adds more damage for Locust Swarm, which applies multiplicatively to the Increased Damage multipliers.
- 3 points into Vampiric Mandibles: Leeches a portion of damage dealt by Locust Swarm. This heals us for a ton while we have a high damage Locust Swarm active
- 1 point into Viper's Call: This makes our Armblade Slashes adopt the nodes from the
 Serpent Strike skill tree.
If you do not have the four extra levels to ![]() Swarmblade Form yet, you can remove up to a point from each of the last 3 abilities listed, and
up to one more from Plague of Locusts.
Swarmblade Form yet, you can remove up to a point from each of the last 3 abilities listed, and
up to one more from Plague of Locusts.
In this section, we will break down each skill and highlight the key passives we have selected to make the skill perform as best as possible in the build. While some of these skills do allow for some variation to exist depending on your own custom choices, we recommend utilizing the skill trees as presented until you have a strong understanding of the build itself.
Werebear Form
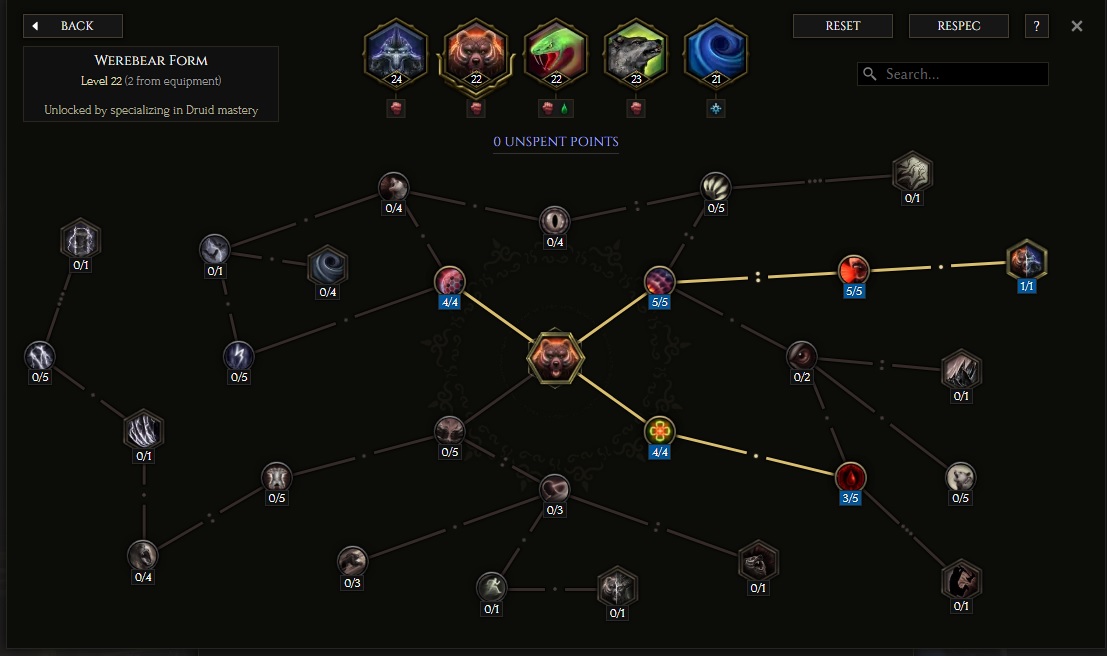
We mainly use ![]() Werebear Form to cover us temporarily whenever
Werebear Form to cover us temporarily whenever ![]() Swarmblade Form's rage
runs out. We are only briefly in this form until the ability to transform back is off cooldown, so we want to
make sure we are tanky during that time and have Locusts already spawned when we transform back, thanks to
the Barrage of the Swarm node.
Swarmblade Form's rage
runs out. We are only briefly in this form until the ability to transform back is off cooldown, so we want to
make sure we are tanky during that time and have Locusts already spawned when we transform back, thanks to
the Barrage of the Swarm node.
In Werebear, we have access to ![]() Rampage, a channeled movement ability,
Rampage, a channeled movement ability, ![]() Maul, an AoE attack,
Roar, which Stuns and knocks enemies backwards, and
Maul, an AoE attack,
Roar, which Stuns and knocks enemies backwards, and ![]() Swipe, which operates the same as the
normal Swipe skill.
Swipe, which operates the same as the
normal Swipe skill.
Order of Skill Points
- 5 points into Territorial: Increased Area for Roar and Maul.
- 5 points into Enrage: Rage and Health gain for each enemy hit by Roar.
- 1 point into Barrage of the Swarm: Lets you swap directly back to
 Swarmblade Form
and spawn Locusts for each enemy stunned when you transform back.
Swarmblade Form
and spawn Locusts for each enemy stunned when you transform back. - 4 points into Ursine Heart: Add Endurance and Endurance Threshold while in Werebear Form.
- 4 points into Invigoration: Health and Rage gained on kill or when you hit a rare or boss enemy.
- 3 points into Bloodthirst: Increased Bleed Chance while in Werebear.
If you do not have the extra levels yet, you can remove points from Bloodthirst.
In this section, we will break down each skill and highlight the key passives we have selected to make the skill perform as best as possible in the build. While some of these skills do allow for some variation to exist depending on your own custom choices, we recommend utilizing the skill trees as presented until you have a strong understanding of the build itself.
Summon Wolf
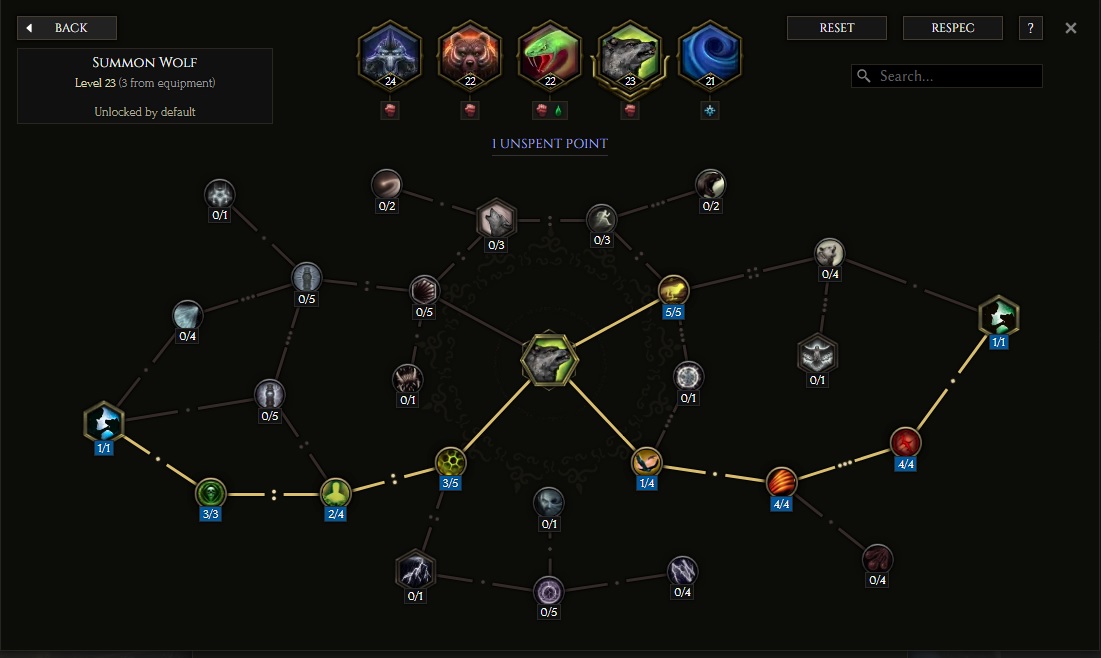
Our only permanent minions, which we double and transform into Squirrels thanks to the Unique Helmet, ![]() Herald of the Scurry. We focus our
points on helping keep them alive, maximizing how many of them we get, and increasing how many Bleed stacks they can apply to enemies.
Between some Minion Health mods on gear, leech effects from gear and passives, and increased Revive Range and Speed, the Squirrels end up being
surprisingly easy to keep alive.
Herald of the Scurry. We focus our
points on helping keep them alive, maximizing how many of them we get, and increasing how many Bleed stacks they can apply to enemies.
Between some Minion Health mods on gear, leech effects from gear and passives, and increased Revive Range and Speed, the Squirrels end up being
surprisingly easy to keep alive.
Order of Skill Points
- 1 point into Canine Agility: Added Dodge Rating for our Squirrels and us.
- 4 points into Serrated Claws: Increased Melee Bleed Chance for our Squirrels.
- 4 points into Crippling Wounds: Increased Bleed Duration for our Squirrels and Chance to Slow on hit or when hit.
- 1 point into Safety In Numbers: Addes an extra wolf, which becomes two bonus squirrels.
- 3 point into Lupine Endurance: Increased Health for the Squirrels.
- 2 points into Wolfen Recovery: Flat and Increased Health Regen for your Squirrels.
- 3 points into Earthborn: Flat armor and Physical Damage Leech for your Squirrels.
- 1 point into Pack Hunters: Adds an extra wolf, which becomes two bonus Squirrels.
- 5 points into On the Hunt: Adds Attack Speed and Movement Speed for our Squirrels.
If you don't have the 3 extra levels for the skill yet, you can remove 2 points from Earthborn and 1 point from Lupine Endurance.
In this section, we will break down each skill and highlight the key passives we have selected to make the skill perform as best as possible in the build. While some of these skills do allow for some variation to exist depending on your own custom choices, we recommend utilizing the skill trees as presented until you have a strong understanding of the build itself.
Serpent Strike
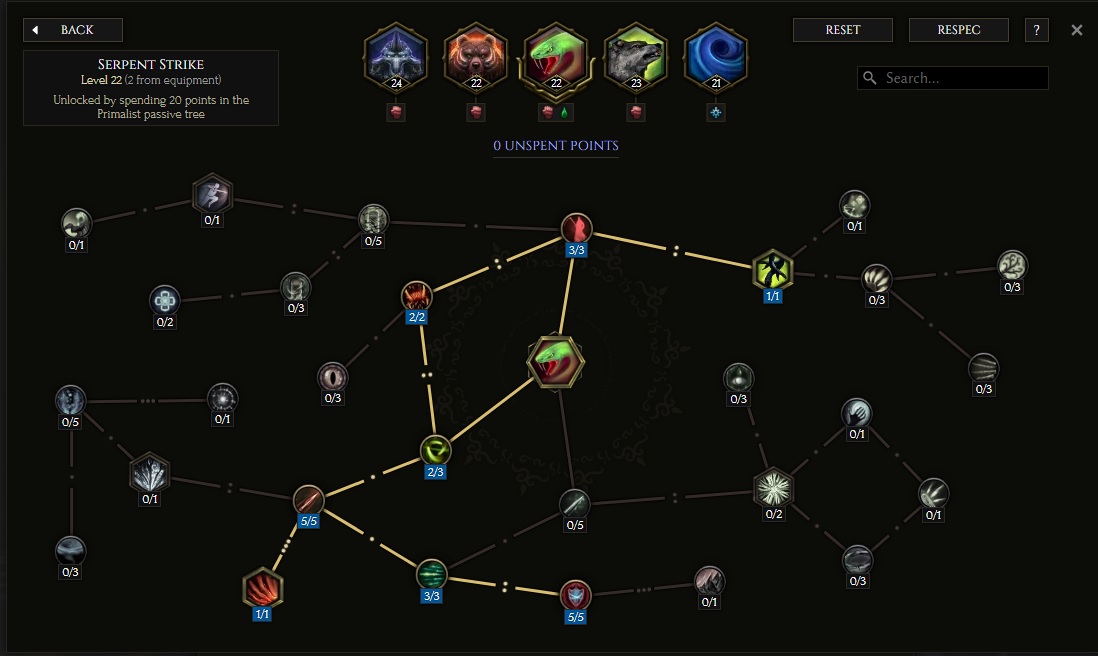
This skill, as well as ![]() Maelstrom are not super important to the build. You can play this build with just the first three skills
specialized and it will be 90% as effective. However, since the Armblade slash in
Maelstrom are not super important to the build. You can play this build with just the first three skills
specialized and it will be 90% as effective. However, since the Armblade slash in ![]() Swarmblade Form can benefit from the
Swarmblade Form can benefit from the ![]() Serpent Strike
tree, we gain a few small, but noticeable, bonuses from speccing into the tree as well. We gain a Kill Threshold, Armor Shred, and
we can pump a bit of extra Bleed stacks from our own attacks. However, the vast majority of Bleed stacks will be generated by our minions.
Serpent Strike
tree, we gain a few small, but noticeable, bonuses from speccing into the tree as well. We gain a Kill Threshold, Armor Shred, and
we can pump a bit of extra Bleed stacks from our own attacks. However, the vast majority of Bleed stacks will be generated by our minions.
Order of Skill Points
- 2 points into Slither: Added Dodge Rating whenever we use Serpent Strike.
- 5 points into Gouging Spear: Increased Bleed Chance.
- 1 point into Swirling Carnage: Added Bleed Chance for each stack of
 Maelstrom.
 - 3 points into Hydra Strikes: Increased Attack Speed.
- 5 points into Corrosive Venom: Armor Shred chance.
- 3 points into Culling Point: Adds an 18% Kill Threshold.
- 2 points into Devour Prey: Health gained on kill or crit.
- 1 point into Primal Serpent: Adds a chance to summon a temporary minion when we kill an enemy or hit a rare or boss.
If you don't have the extra levels yet, you can take 1 point out of Slither and Primal Serpent.
In this section, we will break down each skill and highlight the key passives we have selected to make the skill perform as best as possible in the build. While some of these skills do allow for some variation to exist depending on your own custom choices, we recommend utilizing the skill trees as presented until you have a strong understanding of the build itself.
Serpent Strike
As stated previously, this skill is not super important to the build. We run it simply for the passive chance to trigger on kills, adding a bit more damage. You will not directly cast this ability, as the rotation between forms is already enough button presses and you don't spend any time in Human Form to cast it anyways.
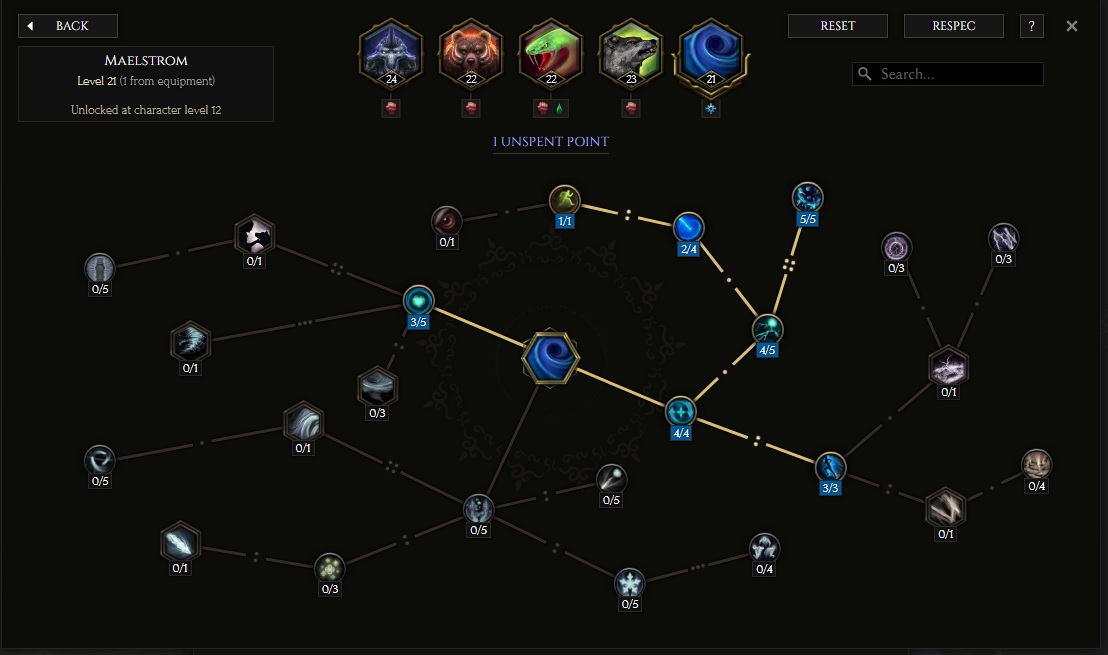
Order of Skill Points
- 4 points into Whirlpool: Increased Stack Duration.
- 4 points into Turbulence: More damage for Maelstrom.
- 5 points into Gathering Storm: Chance to cast Maelstrom on kill, which is how we generate any stacks at all.
- 2 points into Calm: Reduced Mana cost.
- 1 point into Windswept: Grants Haste whenever you have 6 or more stacks.
- 3 points into Sleet-Footed: Added Dodge Rating per Maelstrom stack.
- 3 points into Turmoil: Increased area for Maelstrom.
You can remove the point in Windswept if you don't have the extra point from gear yet. If you get extra points from something, you can put them into Turmoil for a larger Maelstrom.
Build Mechanics and Playstyle
While we are capable of extremely high damage numbers, when clearing echoes you will be limited by how tanky enemies are that you come across. Most enemies will die before they've gotten many Bleed stacks on them, but if you learn to time your Swarm Strikes just before they die, you will still have a high enough damage Locust Swarm active to run through everything until you need to refresh it.
The basic playstyle rotation is to summon all three of your hives before engaging the enemies. Wait a moment for the Locusts to spawn, then send all your minions to attack the tankiest enemy you can see. As they get low on Health, or you see that there is a good amount of Bleed stacks on them, you'll want to position to consume the most amount of Bleed stacks and Locusts at the same time with Swarm Strike. This will trigger Locust Swarm, ideally killing everything with a single tick of damage, letting you just run straight through every enemy for a bit. If you avoided casting any other abilities while Locust Swarm was active, your rage will still be high enough to repeat the above process, as it will not decay if you have not cast any abilities recently.
Once your Rage runs out, you'll want to swap into ![]() Werebear Form. Most of what you do as you wait for the Swarmblade transform ability to come back up doesn't
really matter, just stay alive. The one exception is that you want to make sure you use Roar correctly before you transform back.
The Barrage of the Swarm node says that each enemy stunned by Roar when you transform back spawns a Locust for you. If you cast Roar and then
wait a second to transform, they will no longer be stunned. If you hit Roar in a panic when you first transformed to Werebear, just wait for it to be off cooldown
and cast it again right before you transform back. Also, try to hit at least six enemies with Roar, when possible.
Werebear Form. Most of what you do as you wait for the Swarmblade transform ability to come back up doesn't
really matter, just stay alive. The one exception is that you want to make sure you use Roar correctly before you transform back.
The Barrage of the Swarm node says that each enemy stunned by Roar when you transform back spawns a Locust for you. If you cast Roar and then
wait a second to transform, they will no longer be stunned. If you hit Roar in a panic when you first transformed to Werebear, just wait for it to be off cooldown
and cast it again right before you transform back. Also, try to hit at least six enemies with Roar, when possible.
If you are attempting the above rotation and feel like it's not working for you, we suggest you go to the training dummies near the Arena to practice the rotation a bit. Specifically, the one furthest to the left, as it's aggressive by default and your minions will automatically attack it. If you watch the enemy's Bleed stacks, you'll get a feel for how many max stacks your minions can hit and how long it takes to stack it. Maximizing how many stacks they have before you consume them with Swarm Strike is the key to maximizing your damage, especially on bosses. See how high you can get your Locust Swarm damage to tick for! The build has a potential for at least 3.3 million on a tick, tested with gear very similar to what is listed in this build.
Equipment and Gear Affixes
For this build, we will be focusing on several main affixes for each piece of non-unique gear, as well as working towards acquiring the specific uniques needed to make this build operate correctly. Our equipment will focus on these specific affixes for the Implicits and Modifier stats.
| Gear Slot | Implicits | Modifiers |
|---|---|---|
| One-Handed Axe | Chance to apply Bleed on Hit Melee Damage Minion Melee Damage |
Prefixes Increased Melee Attack Speed Flat Physical Melee Damage Suffixes Chance to apply Shred Armor Chance to apply Frailty |
| Shield | Block Chance and Effectiveness Poison Resistance |
Prefixes Increased Minion Health Block Chance Suffixes Armor/Reduced Damage from Crits Flat Armor |
| Helmet | Legendary Potential Chance to apply Bleed on Minion Hit Shared Increased Bleed Duration |
|
| Chest | Legendary Potential Level of Swarmblade Form Chance to apply Bleed on Minion Hit |
|
| Gloves | Armor % of Armor applies to Damage Over Time |
Prefixes Strength Increased Area for Area skills Suffixes Hybrid Health Armor Increased Armor |
| Ring | Needed Resistances Increased Cooldown Recovery Speed All Attributes |
Prefixes Strength Increased Minion Health Suffixes Health Needed Resistances |
| Amulet | Physical and Necrotic Resistances | Prefixes Physical Penetration Increased Area for Area Skills Suffixes Health Needed Resistances Chance to apply Frailty on Hit |
| Belt | Legendary Potential Hybrid Health Increased Health |
|
| Feet | Armor Movement Speed Reduced Bonus Damage from Critical Strikes |
Prefixes Strength Movement Speed Suffixes Hybrid Health Increased Armor |
| Relic | Weaver's Will Needed Resistances Health Strength |
A loot filter made specifically for the gear table above may be copied by pressing the button below. Once in the Loot Filter portion of the in-game menu, choose the "Paste Clipboard Contents" option to import the code.
Copy Loot Filter to Clipboard
Uniques
Now, let's look at the required Uniques for this build.
Herald of the Scurry
![]() Herald of the Scurry: While it might seem that the Helmet is necessary for the build to function, it can be played with regular Wolves.
They will just stack up less bleed stacks. This is a big decrease to our damage, which is why it is preferred to have it, but if you are leveling
with the build and trying to farm the gear, this item is not strictly necessary. It should still be one of the first items you go
for, even without Legendary Potential.
Herald of the Scurry: While it might seem that the Helmet is necessary for the build to function, it can be played with regular Wolves.
They will just stack up less bleed stacks. This is a big decrease to our damage, which is why it is preferred to have it, but if you are leveling
with the build and trying to farm the gear, this item is not strictly necessary. It should still be one of the first items you go
for, even without Legendary Potential.
Doublet of Onos Tull
![]() Doublet of Onos Tull: Similar to the Helmet, the Doublet is simply a large increase in damage. We want to stack as much bleed chance
and duration for our minions as possible. However, the Doublet is a very common item, and finding one with 1 or 2 Legendary Potential
shouldn't be too hard or too expensive (if you are in Merchant's Guild). This should be the first item with Legendary Potential you
try to get, and you'll see large increase in damage if you can hit the suggested affixes on it.
Doublet of Onos Tull: Similar to the Helmet, the Doublet is simply a large increase in damage. We want to stack as much bleed chance
and duration for our minions as possible. However, the Doublet is a very common item, and finding one with 1 or 2 Legendary Potential
shouldn't be too hard or too expensive (if you are in Merchant's Guild). This should be the first item with Legendary Potential you
try to get, and you'll see large increase in damage if you can hit the suggested affixes on it.
Thorn Slinger
![]() Thorn Slinger: The extra level to Physical Skills is important for us to get all the passives in
Thorn Slinger: The extra level to Physical Skills is important for us to get all the passives in ![]() Swarmblade Form that we want.
All of the nodes taken in that skill tree are very good and add worthwhile abilities.
Swarmblade Form that we want.
All of the nodes taken in that skill tree are very good and add worthwhile abilities.
Dedication of an Erased Primalist
![]() Dedication of an Erased Primalist: Similar to
Dedication of an Erased Primalist: Similar to ![]() Thorn Slinger, we run this to
get all the necessary skill points. The Weaver's Will mechanic can make it very random which affixes
you'll get, but aim for fixing any Resistances you need, which will likely be Physical
Resistance if you are following the rest of the guide, and then
improving survivability when possible. If you are in Merchant's Guild, you can either buy
base versions and roll them yourself, or try to find one that already
has some of the affixes you need. If you are Circle of Fortune, you could replace this with
your best rare or exalted Relic until you find a suitable one yourself.
Thorn Slinger, we run this to
get all the necessary skill points. The Weaver's Will mechanic can make it very random which affixes
you'll get, but aim for fixing any Resistances you need, which will likely be Physical
Resistance if you are following the rest of the guide, and then
improving survivability when possible. If you are in Merchant's Guild, you can either buy
base versions and roll them yourself, or try to find one that already
has some of the affixes you need. If you are Circle of Fortune, you could replace this with
your best rare or exalted Relic until you find a suitable one yourself.
Idols
Idol slots are gained through the campaign, unlocking small bonuses and unique affixes for the player to discover and augment their builds with. The Idol screen consists of a grid system for the player to fill out with different sized idols, eventually filling in every part of the grid. As the Idol shape increases (1x1, 1x2, 1x3, 1x4, etc.) the stronger an affix you might find for your build.
When farming for gear, you can use your Idol Slots as flex spots to fix any resistances you may need. As your resistances improve on your base gear, you can start replacing your idols with the ones below.
Size: 3×1
Modifiers
- Increased Damage over Time while Transformed (less important)
- Chance to apply Bleed on Minion Hit (most important)
Size: 2×2
Modifiers
- Shared Increased Bleed Duration
- Chance to apply Bleed on Minion Hit
Blessing
Blessings are permanent buffs that are permanently applied to your character. These come in two different powers, Standard and Grand. Grand blessings are significantly stronger than the Standard Blessings. In total, there are 10 Blessing Slots, one for each Monolith Timeline. When you complete a Monolith and defeat the final boss you will be awarded a choice of three blessing with a random value.
| Blessing Name | Affix | Timeline |
|---|---|---|
| Void Resistance | The Black Sun | |
| Lightning Resistance | Ending the Storm | |
| Increased Armor | The Age of Winter | |
| Flat Armor | Spirits of Fire | |
| Increases All Resistance | Reign of Dragons |
The Blessings listed above cover the most important slots, with the remaining Blessing Slots being filled with whatever the player may be trying to target farm.
Changelog
- 29 Mar. 2024: Guide added.

Lexyu is a professional content creator focused on theorycrafting and playtesting many ARPGS. He is also known for his skillful gameplay, such as playing Bazooka Wizard in Diablo 3. Since 2013, he has been creating in-depth guides to teach gamers how to succeed. Check out his social platforms through Discord to join the discussion in the community!
- Patch 1.0.7 Update: Multiplayer, Skills and More!
- Patch 1.0.6 Update: Camera Setting, Controller Keybinds, Bug Fixes, and More!
- Eleventh Hour Games on Real-Money Trading and Exploits in Last Epoch
- Patch 1.0.5 Update: Many Bug Fixes, Including Loot Filter Toggle Sensitivity, and Other Improvements!
- The First 30 Days of Last Epoch!
- 1.0 Launch Retrospective: A Message From Eleventh Hour Games
- Patch 1.0.4 Update: More In-Game Changes, Bug Fixes, and Improvements
- Last Epoch Mid-Cycle Balance Survey Recap