Druid Lightning Swarmblade Endgame Build for Last Epoch (Patch 1.1)
Welcome to our Last Epoch Druid Lightning Swarmblade build guide for the Primalist class. Here you will learn everything about the Druid play style, passives, skills, strengths, and weaknesses to conquer the world of Eterra.
Build Introduction
Calling forth powerful storms with rage and fury, the Lightning Bug Druid leaves destruction in his wake. Passively, this Druid decimates areas around him with strikes of lightning. When engaging in direct combat, these strikes intensify exponentially, wiping even the biggest monsters from the map. This character excels in both single target and AoE damage. Defensively, this Druid dwarfs other classes with massive amounts of Armor, Endurace, Dodge and Damage Reduction.
 Great clear speed/Bossing
- Simple Skill Rotation
- Defensively Sound

 Movement ability is lacking
- High Corruption Gaited behind RNG LP and T7 Exalts
- No useful Human Form Interaction (Must always be shapeshifted)

Skill Selection
Almost all of our skills will be used to scale our main damage dealer, Lightning Spell Damage. In a
rather unique approach to ![]() Serpent Strike, we scale this to pump massive amounts of Dodge and Shred. We
will also cull enemies at 18% or less Health while using our
Serpent Strike, we scale this to pump massive amounts of Dodge and Shred. We
will also cull enemies at 18% or less Health while using our ![]() Armblade Slash. When our
Armblade Slash. When our ![]() Tornado is
summoned, it casts deadly
Tornado is
summoned, it casts deadly ![]() Storm Bolts. These can be summoned by simply attacking (when in form) with our Slash, and
Viper's Call allows us to now utilize our
Storm Bolts. These can be summoned by simply attacking (when in form) with our Slash, and
Viper's Call allows us to now utilize our ![]() Serpent Strike. We further scale this lightning
damage with
Serpent Strike. We further scale this lightning
damage with ![]() Gathering Storm, allowing us to tap into our high mana pool in order to add base damage to the
Gathering Storm, allowing us to tap into our high mana pool in order to add base damage to the ![]() Storm Bolt.
While
Storm Bolt.
While ![]() Maelstrom is passive to us, it will also cast slightly less powerful Storm Bolts, but adding Haste
and Frenzy.
Maelstrom is passive to us, it will also cast slightly less powerful Storm Bolts, but adding Haste
and Frenzy.

Class and Skill Passive Trees
Our base class is the Primalist, which acts as a generic caster, brawler, or companion summoner. Our character will be offered an opportunity to select an Advanced Mastery once we have completed the first act of the campaign. Each base class has three possible masteries to choose from. For the Primalist, we have access to the Mastery Tree Passives for Beastmaster, Shaman and Druid. Upon selecting a Mastery and placing 20 Passive Points into the Primalist Tree, you'll then be able to place Passive Points into the other Mastery Trees.
For this build, we will be picking Druid as our advanced class. We will utilize the majority of our Passive Points in the Druid Passive Tree. Our Passive Points will be targeting nodes to increase damage while transformed into Swarmblade and boost our survivability. Each of the Passive Trees and their points are broken down below.
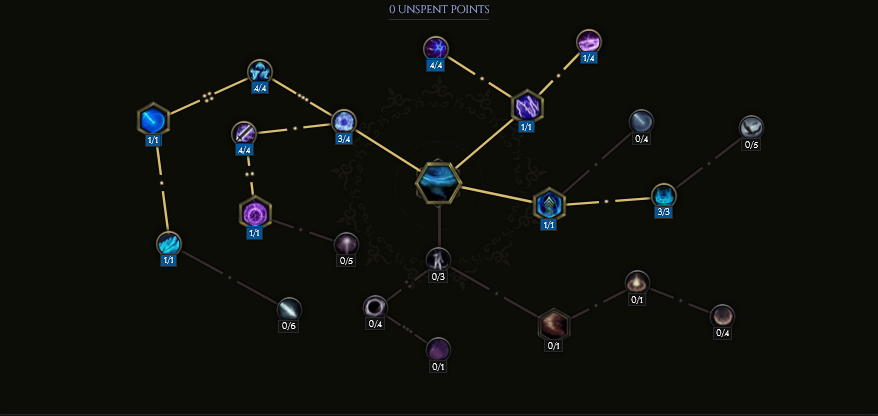
Primalist Passive Points
- 8 points into Natural Attunement: Large gains to Attunement, as well as some Resistances.
- 5 points into Hunter's Restoration: Increased Health by 10% and heal for 40 Health every 3 seconds we hit.
- 1 point into Harmony of Blades: Allows dual wielding.
- 6 points into Wisdom of the Wild: Increases our Spell Damage.
Our base class is the Primalist, which acts as a generic caster, brawler, or companion summoner. Our character will be offered an opportunity to select an Advanced Mastery once we have completed the first act of the campaign. Each base class has three possible masteries to choose from. For the Primalist, we have access to the Mastery Tree Passives for Beastmaster, Shaman and Druid. Upon selecting a Mastery and placing 20 Passive Points into the Primalist Tree, you'll then be able to place Passive Points into the other Mastery Trees.
For this build, we will be picking Druid as our advanced class. We will utilize the majority of our Passive Points in the Druid Passive Tree. Our Passive Points will be targeting nodes to increase damage while transformed into Swarmblade and boost our survivability. Each of the Passive Trees and their points are broken down below.
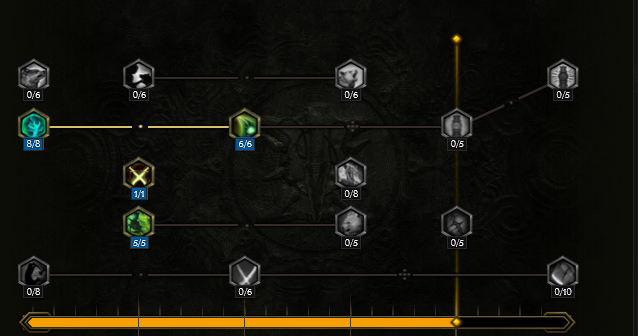
Druid Passive Points
- 7 points into Chitinous Plating: Massive gain to Endurance and base Armor.
- 5 points into Primordial Resonance: An increase in damage, and Lightning Penetration when we are transformed.
- 7 points into Druidic Prowess: Gains to all attributes, but mostly in Strength and Attunement.
- 3 points into Focused Wrath: Traversal Point.
- 5 points into Wind in the Leaves: Large increases to our attack speed.
- 5 points into Bush Stalker: 50% increased chance to critical strike, but leech on crit is a big pickup for us here.
- 1 point into Rancour: When out of combat, smelling the roses, our Rage does not decay.
- 9 points into Harmonious Wisdom: Large increases to our Attunment, boosting our Mana. We also gain 3% Crit Avoid per 5 Attunement.
- 8 points into Rageborn: Gain large amounts of Critical Strike Chance, and gain 3 Rage when we Crit.
- 10 points into Hideskin: Massive boost to our base Health, and gain 10% of our Maximum HP as Endurace Threshold.
- 3 points into Impervious: We have a 20% chance to gain a stack of Impervious, which reduces all damage by 4% per stack. (up to 12% reduction)
Our base class is the Primalist, which acts as a generic caster, brawler, or companion summoner. Our character will be offered an opportunity to select an Advanced Mastery once we have completed the first act of the campaign. Each base class has three possible masteries to choose from. For the Primalist, we have access to the Mastery Tree Passives for Beastmaster, Shaman and Druid. Upon selecting a Mastery and placing 20 Passive Points into the Primalist Tree, you'll then be able to place Passive Points into the other Mastery Trees.
For this build, we will be picking Druid as our advanced class. We will utilize the majority of our Passive Points in the Druid Passive Tree. Our Passive Points will be targeting nodes to increase damage while transformed into Swarmblade and boost our survivability. Each of the Passive Trees and their points are broken down below.
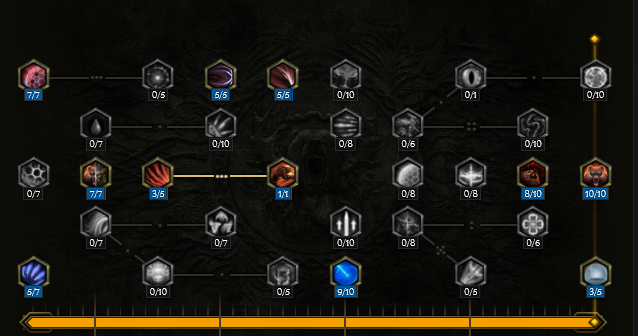
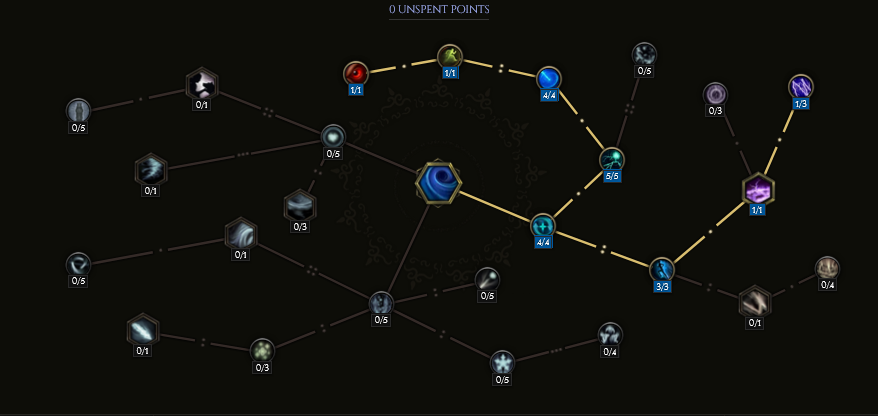
Beastmaster Passive Points
- 8 points into Ursine Strength: Adds base Strength, and gives us 16% flat Damage reduction from nearby (melee) enemies.
- 1 point into Savagery: Pathing Node.
- 1 point into Ambush: Pathing Node.
- 5 points into Boar Heart: Gives us an addition 15% damage reduction from all sources when hit by a melee attack.
- 5 points into Porcine Constitution: Gives an additional 15% Damage Reduction to Boar Heart.
- 5 points into Boar Heart: This allows us to get the benefits from Boar Heart when we land a melee attack. (This was removed in patch 1.1. The points will be reallocated when the build is updated for launch.)
Our base class is the Primalist, which acts as a generic caster, brawler, or companion summoner. Our character will be offered an opportunity to select an Advanced Mastery once we have completed the first act of the campaign. Each base class has three possible masteries to choose from. For the Primalist, we have access to the Mastery Tree Passives for Beastmaster, Shaman and Druid. Upon selecting a Mastery and placing 20 Passive Points into the Primalist Tree, you'll then be able to place Passive Points into the other Mastery Trees.
For this build, we will be picking Druid as our advanced class. We will utilize the majority of our Passive Points in the Druid Passive Tree. Our Passive Points will be targeting nodes to increase damage while transformed into Swarmblade and boost our survivability. Each of the Passive Trees and their points are broken down below.
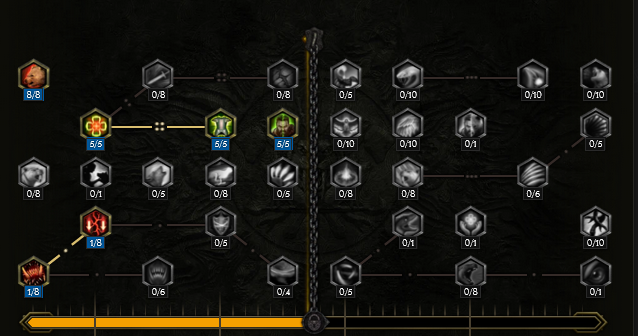
Shaman Passive Points
CRITICAL NOTE:These 5 points should be allocated somewhere between Druid and Beastmaster Passives (around level 40), as the ![]() Tornado is your damage mechanic.
Tornado is your damage mechanic.
- 5 points into Shamanic Infusion: This adds Attunment and Lightning Penetration for us. More importantly, it gives us the ability
to scale
 Tornado.
In this section, we will break down each skill and highlight the key passives we have selected to make the skill shine in the build. While some of these skills do allow for some variation to exist depending on your own custom choices, we recommend utilizing the skill trees as presented until you have a strong understanding of the build itself.
Gathering Storm

![]() Gathering Storm is one of the news and most welcomed additions to our repertoire of skills for the Primalist. We scale this skill
specifically in order to amplify the damage output from our
Gathering Storm is one of the news and most welcomed additions to our repertoire of skills for the Primalist. We scale this skill
specifically in order to amplify the damage output from our ![]() Storm Bolt. It is important to note, since we wont be directly using
Storm Bolt. It is important to note, since we wont be directly using ![]() Gathering Storm,
we wont ever gain or expend Storm Stacks, a subskill of Gathering Storm. So we only target the nodes we can use for Storm Bolt passively.
Gathering Storm,
we wont ever gain or expend Storm Stacks, a subskill of Gathering Storm. So we only target the nodes we can use for Storm Bolt passively.
Order of Skill Points
- 1 point into Windfury Blows: Pathing Node.
- 4 points into Thunderous Strikes: Gives Storm Bolt Lightning Penetration.
- 1 point into Excited Bolts: This will add 3% more base damage to
 Storm Bolt PER 10 current Mana. This is
the main reason we try to stack so much base mana into our build.
Storm Bolt PER 10 current Mana. This is
the main reason we try to stack so much base mana into our build. - 1 point into Looming Clouds: Pathing Node.
- 4 points into Concentrated Storm: Storm Bolts deal 32% more damage.
- 2 points into In the Eye of the Storm: Pathing Node.
- 1 point into Rending Vortex: Storm Bolt has 1% Base Critical Chance per stack of
 Maelstrom you have.
 - 3 points into Jolting Strikes: Storm Bolts have a chance to Shock enemies, reducing their Lightning Resistance, and increasing their chance to be stunned.
- 2 points into Tempest Weapon: Our unique Tempest Maw, will now give us +18 to our base spell damage for Storm Bolt.
- 1 point into Lightning Strikes Twice: Our Storm Bolts have a 20% chance to be repeated when they hit a Boss or Rare.
In this section, we will break down each skill and highlight the key passives we have selected to make the skill shine in the build. While some of these skills do allow for some variation to exist depending on your own custom choices, we recommend utilizing the skill trees as presented until you have a strong understanding of the build itself.
Tornado
![]() Tornado is our main damage driver, because of this we are sure to scale everything we can towards it. Lacking in lightning critical
strike chance, or Critical Multipliers will hurt us. We take large base damage increases to the subskill
Tornado is our main damage driver, because of this we are sure to scale everything we can towards it. Lacking in lightning critical
strike chance, or Critical Multipliers will hurt us. We take large base damage increases to the subskill ![]() Storm Bolt via
Storm Bolt via ![]() Gathering Storm.
Tornado should almost always be immidiately activated once we start attacking with
Gathering Storm.
Tornado should almost always be immidiately activated once we start attacking with ![]() Armblade Slash, and will begin to tear apart
enemies in the vacinity. This, like the others, is passively activated, and will only require us to be in form.
Armblade Slash, and will begin to tear apart
enemies in the vacinity. This, like the others, is passively activated, and will only require us to be in form.
Order of Skill Points
- 1 point into Charged Storm: Causes Tornado, to cast Storm Bolt.
- 3 points into Lasting Storm: Tornadoes last longer.
- 4 points into Debris: Causes Tornadoes to do 88% more damage.
- 4 points into Hurricane: Pathing Node.
- 1 point into Eye of the Storm: Can now only cast 1 Tornado that attaches to you, but its does 100% more damage.
- 1 point into Aspect of the Storm: This gives you 10% increased movespeed, when Tornado is active.
- 4 points into Frequent Lightning: This will cause the Tornado to cast more than double the amount of Storm Bolts.
- 3 points into Storm Dervish: Aspect of the Storm now gives 21% increase to your attack speed as well.
- 1 point into Snap Gale: Gives the Tornado 10% more damage.
- 1 point into Churning Orbs: Does not directly buff damage, but casts a "hit" spell, that will proc our items and skills for armor shred and health/Rage on Critical Hit.
- 1 point into Overcast Skies: Increased the Area of Effect for our Tornado's Storm Bolt, hitting targets further away.
4 additional points are allocated from our gear. Without this gear we would need to remove points. Removing the point from Churning Orbs, Overcast Skies, and 2 points from Storm Dervish. This will cause the most minimal disruption in damage output.
In this section, we will break down each skill and highlight the key passives we have selected to make the skill shine in the build. While some of these skills do allow for some variation to exist depending on your own custom choices, we recommend utilizing the skill trees as presented until you have a strong understanding of the build itself.
Swarmblade Form

![]() Swarmblade Form is the beginning and the end of our build. Without this skill, almost all of our other skills are
useless. When we are out of form we will lose significant defesive modifiers and have a difficult time doing damage. All of our
skills revolve around this form, thus, staying in form is imperative.
Swarmblade Form is the beginning and the end of our build. Without this skill, almost all of our other skills are
useless. When we are out of form we will lose significant defesive modifiers and have a difficult time doing damage. All of our
skills revolve around this form, thus, staying in form is imperative.
Order of Skill Points
- 1 point into Viper's Call: This node allows you to use the passives from the
 Serpent Strike tree with
  Armblade Slash.
 - 2 points into Endless Pressure: You gain Health and Rage on kill, or per hit on a boss or rare enemy.
- 1 point into Windfury Strikes: Getting 6 stacks of Howling Cascade, a sub-skill of this node, will cast Tornado.
- 2 points into Army of the Tempest: This node cuts the required 6 stacks to 4 to produce a Tornado. This also almost doubles the damage
of Tornados when produced this way.
- 1 point into Earth Stinger: Pathing Node.
- 5 points into Needle-Like Sting: This increases your base critical strike damage of everything you do.
- 2 points into Grasshopper's Frenzy: You gain Rage when you or your
 Summon Locust critically strike an enemy.
 - 2 points into Locust Agility: Give you base Armor and Dodge Rating when in
 Swarmblade Form.
 - 4 points into Water Strider: Whenever you
 Dive, you gain 4 stacks of Maelstrom.
In this section, we will break down each skill and highlight the key passives we have selected to make the skill shine in the build. While some of these skills do allow for some variation to exist depending on your own custom choices, we recommend utilizing the skill trees as presented until you have a strong understanding of the build itself.
Maelstrom
![]() Maelstrom is one of our most key skills, which is also enabled passively through automation while in form.
At 6 or more stacks, it will keep us hasted, helping our movement speeds issues, and keep us frenzied, which will add even more attack speed
keeping our
Maelstrom is one of our most key skills, which is also enabled passively through automation while in form.
At 6 or more stacks, it will keep us hasted, helping our movement speeds issues, and keep us frenzied, which will add even more attack speed
keeping our ![]() Tornado's spinning, and casting
Tornado's spinning, and casting ![]() Storm Bolt. It will also passively cast its own Storm Bolt, and the more stacks
of Maelstrom we have, will give all of our hits a massive chance to stun.
Storm Bolt. It will also passively cast its own Storm Bolt, and the more stacks
of Maelstrom we have, will give all of our hits a massive chance to stun.
Order of Skill Points
- 4 points into Whirlpool: This node increased the stack duration of Maelstrom.
- 1 points into Turbulence: Pathing Node.
- 2 points into Calm: Reduces Mana (Rage) cost of Maelstrom.
- 1 point into Windswept: While at 6 or more stacks, you have Haste.
- 1 point into Windfury: While at 6 or more stacks, you gain Frenzy.
- 3 points into Sleet-Footed: Gain 36 to your base dodge rating, per stack of Maelstrom.
- 1 point into Power of the Storm: While at 6 or more stacks, you cast Storm Bolt every second.
- 2 points into Energized: You hit two additional targets with Storm Bolt from the node above.
- 1 point into Cyclone: Pathing Node.
- 4 points into Essence of Debris: Each stack of Maelstrom increases you Stun chance by 60%.
In this section, we will break down each skill and highlight the key passives we have selected to make the skill shine in the build. While some of these skills do allow for some variation to exist depending on your own custom choices, we recommend utilizing the skill trees as presented until you have a strong understanding of the build itself.
Serpent Strike
![]() Serpent Strike is one of our key enabling skills. Like the rest of our skills, it acts passively for us, and in human form will
not function. The skill allows us to gain massive amounts of defensive dodge, it will also allow us to instantly kill enemies with 18% of their
HP.
Serpent Strike is one of our key enabling skills. Like the rest of our skills, it acts passively for us, and in human form will
not function. The skill allows us to gain massive amounts of defensive dodge, it will also allow us to instantly kill enemies with 18% of their
HP.
Order of Skill Points
- 3 points into Slither: Whenever you use Armblade Slash (not hit), you gain 12%. This effect stacks in the last 4 seconds.
- 2 points into Gouging Spear: Pathing Node.
- 1 point into Frostwyrm's Fury: Pathing Node.
- 3 points into Coldfang: Pathing Node.
- 1 point into Shroud of Winter: For every 10% of your Cold Resistance, you gain a buff than increases base dodge rating per use of Armblade Slash.
- 3 points into Culling Point: You instantly kill enemies at or below 18% Health.
- 3 points into Hydra Strikes: Gain Attack Speed.
- 4 points into Corrosive Venom: 80% chance to Shred Armor on enemies hit by Armblade Slash.
Build Mechanics and Playstyle
This build has a simple skill rotation when geared properly, and has large damaging area of effects. You should almost always be hasted and frenzied
due to ![]() Maelstrom always on a high count. You should also, almost always be in form. This ensures maximum uptime to our main damage system.
Maelstrom always on a high count. You should also, almost always be in form. This ensures maximum uptime to our main damage system.
![]() Armblade Slash will be our spam attacking ability, using
Armblade Slash will be our spam attacking ability, using ![]() Dive whenever it is off cooldown.
By continously diving, we constantly generate stacks of
Dive whenever it is off cooldown.
By continously diving, we constantly generate stacks of ![]() Maelstrom, which in turn keep us hasted and frenzied. Spamming Arm Slash,
will constantly spaw
Maelstrom, which in turn keep us hasted and frenzied. Spamming Arm Slash,
will constantly spaw ![]() Tornado, which will cause our scaled
Tornado, which will cause our scaled ![]() Gathering Storm (Storm Bolt), to hit multiple targets at high crit multipliers.
Gathering Storm (Storm Bolt), to hit multiple targets at high crit multipliers.
Defensively, this build will commonly be seen with 50%-60% armor mitigation with a dodge rating from 75%-82%. These numbers depend on gearing, attack speed, and level of the character. Health pools should settle around 3000-3500, and mana should be above 700. The most lacking aspect of the build is movement. It is not as fast as other Druids, and Dive does not have an impressive range. With all of this, the build can face tank most encounters, but, as always, a player should practice good behaviors and dodge high damage mechanics.
Equipment and Gear Affixes
This build will be ran in Low Life in order to enable Corruption climbing. Other than the Low Life aspect, most other gear options will focus on scaling Intelligence, Minion stats, and our own personal Health and Resistances.
| Gear Slot | Implicits | Modifiers |
|---|---|---|
| Sceptre | Culnivar's Claim | Legendary Potential Increased Melee Attack Speed Critical Strike Multiplier |
| One-Handed Axe | Tempest Maw | Legendary Potential Increased Melee Attack Speed Critical Strike Multiplier |
| Head | Armor Increased Health #% of Damage Leeched as Health |
Prefixes Critical Strike Multiplier when Transformed Mana Suffixes Increased Health Critical Strike Avoidance |
| Amulet | Physical Resistance Necrotic Resistance |
Prefixes Mana Critical Strike Multiplier Suffixes Health + Stun Avoidance Needed Resistances |
| Chest | Armor Spell Damage Minion Spell Damage |
Prefixes Level of Tornado Critical Strike Multiplier when Transformed Suffixes Increased Health Increased Armor |
| Belt | Poison Resistance Cold Resistance |
Prefixes Increased Lightning Damage Cleanse on Potion Use Suffixes Hybrid Health Health + Stun Avoidance |
| Gloves | Armor Armor Mitigation Applies to Damage Over Time |
Prefixes Mana Increased Melee Attack Speed Suffixes Chance to Shred Armor on Hit Hybrid Health |
| Ring | Increased Cooldown Recovery All Attributes |
Prefixes Increased Spell Damage Attunement Suffixes Endurance Needed Resistances |
| Ring | Increased Cooldown Recovery All Attributes |
Prefixes Increased Spell Damage Attunement Suffixes Endurance Needed Resistances |
| Feet | Movement Speed Fire Resistance |
Prefixes Increased Movement Speed Attunement Suffixes Hybrid Health Needed Resistances |
| Relic | Stormcarved Testament | Legendary Potential Attunement Critical Strike Multiplier |
A loot filter made specifically for the gear table above may be copied by pressing the button below. Once in the Loot Filter portion of the in-game menu, choose the "Paste Clipboard Contents" option to import the code.
Copy Loot Filter to Clipboard
Uniques
The uniques taken for this build are taken to ensure we keep and maintain maximum critical strike potential. We also utilize the passive in our ![]() Gathering Storm Skill,
Tempest Weapon, which is one reason we take Tempest Maw.
Gathering Storm Skill,
Tempest Weapon, which is one reason we take Tempest Maw.
Stormcarved Testament
Stormcarved Testament: This unique will empower our Lightning Damage as well as add a large chunk to our mana pool. This also gives you a chance to summon
a ![]() Summon Storm Totem, this works in unison with our Tempest Maw. This unique relic can be target farmed from the Boss Lagon, in the Monolith Timeline "Ending the Storm Timeline".
Summon Storm Totem, this works in unison with our Tempest Maw. This unique relic can be target farmed from the Boss Lagon, in the Monolith Timeline "Ending the Storm Timeline".
Culnivar's Claim
Culnivar's Claim: Gives a massive boost to our Lightning Spell Damage, which is our primary damage dealer. It also helps us our Critical Strike chance, keeping it at or near 100% at all times when transformed. Target farm for this Sceptre is the Monolith Timeline "The Stolen Lance".
Tempest Maw
Tempest Maw: The Tempest Maw adds cohesion and some automation by allowing us to ![]() Summon Storm Sprite when we summon a Storm Totem from
our Stormcarved Testament. This weapon can be farmed in the Monolith Timeline "Reign of Dragons".
Summon Storm Sprite when we summon a Storm Totem from
our Stormcarved Testament. This weapon can be farmed in the Monolith Timeline "Reign of Dragons".
Idols
Idol slots are gained through the campaign, unlocking small bonuses and unique affixes for the player to discover and augment their builds with. The Idol screen consists of a grid system for the player to fill out with different sized Idols, eventually filling in every part of the grid. As the Idol shape increases (1x1, 1x2, 1x3, 1x4, etc.) the stronger an affix you might find for your build.
Most Idols for this build will have health increases for us. This can be accomplished with either Stout Lagonian Idols or Large Nomad Idols. We will need to find Critical Strike Avoidance at least one of our Large Nomad Idols. The other suffixes can be increasing our lightning critical strike chance. Two Grand Heorot Idols will be used to increase our spell damage when transformed, and increased our cold/lightning damage.
Blessing
Blessings are permanent buffs that are applied to your character. These come in two different powers, Standard and Grand. Grand blessings are significantly stronger than the Standard Blessings. In total, there are 10 Blessing Slots, one for each Monolith Timeline. When you complete a Monolith and defeat the final boss you will be awarded a choice of three blessing with a random value.
| Blessing Name | Affix | Timeline |
|---|---|---|
| Spell Damage Leeched as Health | The Black Sun | |
| All Resistnaces | Reign of Dragons | |
| + Armor | Spirits of Fire | |
| Increased Armor | The Age of Winter | |
| Shred Lightning Resistance on Hit | Ending the Storm |
Changelog
- 12 May 2024: Build was overhauled for 1.0, with changes to skills, Items, Idols and passives. Updated Loot filter, and build planner added.
- 30 Nov. 2023: Guide added.

EMP1241 is a Marine veteran who is currently pursuing higher education in Aerospace Engineering. He spends much of his time outside of his studies playing ARPGs, Builders, and MOBAs. He is frequently seen on his Twitch channel discussing science, space, or video games.
- Last Epoch’s New Paradox: From “All Future Content Free” to Paid Classes
- Last Epoch Confirms Paid DLC Classes With Free Expansion
- Last Epoch Season 3 Overhauls Skills, UI, Monster Behavior & More
- Last Epoch Season 3 Adds Smarter Minions & Big Changes
- Lich & Necromancer Get New Skill, Buffs, and Dark New Builds in Last Epoch!
- Last Epoch Season 3 Explores the Ancient Era!
- Last Epoch Reveals Major Content for Season 3!
- Last Epoch Season 3 Trailer Reveals Major Changes!