Falconer Bleed Bomb Endgame Build for Last Epoch (Patch 1.0)
Welcome to our Last Epoch Falconer Bleed Bomb build guide for the Rogue class. Here you will learn everything about the Falconer play style, passives, skills, strengths, and weaknesses to conquer the world of Eterra.
Build Introduction
The Mastery may be called Falconer, but this bird acts more like a shark. Immobolize your enemies with spear traps, enfeeble them with caltrops, then send your Falcon into attack mode, dealing massive amounts of damage scaling off the amount of blood your Falcon consumes.
 Traversal skill doubles as a defensive skill
 - Fast movement through maps
- Great burst damage
- Tanky, does not rely on Dodge

 Requires specific gear to pop off
 - Burst requires set up

Skill Selection
The functionality for this build revolves around ![]() Net, as we automate
Net, as we automate
![]() Puncture off this, as well as usage of Caltrops through the node
Trickster Artist. All three of these forms of damage will apply stacks of
Bleed to targets at either melee or mid-range.
Puncture off this, as well as usage of Caltrops through the node
Trickster Artist. All three of these forms of damage will apply stacks of
Bleed to targets at either melee or mid-range. ![]() Dive Bomb is taken
to essentially pop these Bleed stacks; your Falcon will consume the Bleed and boost its own damage as
well as instantly apply all the damage the Bleed would have done as a DoT, instantly.
Dive Bomb is taken
to essentially pop these Bleed stacks; your Falcon will consume the Bleed and boost its own damage as
well as instantly apply all the damage the Bleed would have done as a DoT, instantly.
![]() Falconry is mandatory, as this skill is needed to employ the Falcon as a minion in
the first place, however there are many perks to this skill. It is mostly used to buff the global
capabilities of the Falcon and enables a Kill Threshold.
Falconry is mandatory, as this skill is needed to employ the Falcon as a minion in
the first place, however there are many perks to this skill. It is mostly used to buff the global
capabilities of the Falcon and enables a Kill Threshold.
For mobility and defensive layering, we will be taking the new and improved ![]() Smoke Bomb.
This can now be used as a proper traversal skill. This improves our Bleed Chance while in the cloud
and is used to gain stacks of Dusk Shroud which will cap our chance to recieve a
Glancing Blow. As long as
Smoke Bomb.
This can now be used as a proper traversal skill. This improves our Bleed Chance while in the cloud
and is used to gain stacks of Dusk Shroud which will cap our chance to recieve a
Glancing Blow. As long as ![]() Dive Bomb is used within the smoke cloud, we can
make Smoke Bomb permanent, as the node Cloud Gatherer extends the duration of the cloud
by 40%, while the node that turns it Smoke Bomb into a traversal skill, Cloaked Incursion,
cuts the cooldown in half down to 5 seconds.
Dive Bomb is used within the smoke cloud, we can
make Smoke Bomb permanent, as the node Cloud Gatherer extends the duration of the cloud
by 40%, while the node that turns it Smoke Bomb into a traversal skill, Cloaked Incursion,
cuts the cooldown in half down to 5 seconds.

Class and Skill Passive Trees
Our base class is the Rogue, which acts as a generic brawler and marksman. Our character will be offered an opportunity to select an Advanced Mastery once we have completed the first act of the campaign. Each base class has three possible masteries to choose from. For the Rogue, we have access to the Mastery Tree Passives for Bladedancer, Falconer and Marksman. Upon selecting a Mastery and placing 20 Passive Points into the Rogue Tree, you'll then be able to place Passive Points into the Mastery Trees.
For this build, we will be picking Falconer as our advanced class. We will utilize the majority of our Passive Points in the Falconer Passive Tree. Our Passive Points will be aiming to improve our defenses through Armor and Glancing Blows. The nodes taken in Bladedancer are mostly used for converting Dodge into Glancing Blows. Each of the Passive Trees and their points are broken down below.
Rogue Passive Points
- 8 points into Swift Assassin: Increased attack speed and added physical damage.
- 8 points into Steady Hand: Dexterity and Base Health.
- 5 points into Dodge and Parry: Increased Dodge Rating and Glancing Blow chance.
Our base class is the Rogue, which acts as a generic brawler and marksman. Our character will be offered an opportunity to select an Advanced Mastery once we have completed the first act of the campaign. Each base class has three possible masteries to choose from. For the Rogue, we have access to the Mastery Tree Passives for Bladedancer, Falconer and Marksman. Upon selecting a Mastery and placing 20 Passive Points into the Rogue Tree, you'll then be able to place Passive Points into the Mastery Trees.
For this build, we will be picking Falconer as our advanced class. We will utilize the majority of our Passive Points in the Falconer Passive Tree. Our Passive Points will be aiming to improve our defenses through Armor and Glancing Blows. The nodes taken in Bladedancer are mostly used for converting Dodge into Glancing Blows. Each of the Passive Trees and their points are broken down below.
Falconer Passive Points
- 5 points into Handler: +5% base Crit Chance and increased damage for the Falcon.
- 5 poinst into Crimson Skies: Grants a chance to gain a stack of Crimson Shroud when the Falcon hits an enemy.
- 1 point into Wilderness Scout: Base health and Dodge Rating.
- 5 points into Outlander's Tenacity: Gain 15% of maximum Health as Endurance.
- 3 points into Expert Duelist: Mostly traversal node, but does increase the damage we deal with
 Puncture.
 - 6 points into Tactician: Adds base damage to the falcon.
- 6 points into Sharpest Point: Taken for the Bleed Chance with Spear, as well as the increased range with Puncture.
- 6 points into Evasion Tactics: Increases Armor, Dexterity, and Dodge Rating.
- 5 points into Relentless Talons: Provides Health gain per hit with the Falcon, as well as increased Falcon damage.
- 1 point into Intuitive Connection: Allows
 Dive Bomb and
  Falconry to be casted instantly.
 - 1 point into Final Souvenir: Traversal node; we can not Dodge due to the Bladedancer tree.
- 6 points into Leog's Strategem: Allows Caltrops to inflict Frailty from
 Net.
Net. - 6 points into Stymphalian Feathers: Boosts Armor by 6 per 2 Dexterity. Additionally, we increase Armor by 2% per enemy attacked by our Falcon in the last 4 seconds. (This effect can stack)
- 6 points into Tailwind: Reduces the damage we take while moving, and increases Movement Speed and Dodge Rating. The value is doubled if the Falcon has hit an enemy.
Our base class is the Rogue, which acts as a generic brawler and marksman. Our character will be offered an opportunity to select an Advanced Mastery once we have completed the first act of the campaign. Each base class has three possible masteries to choose from. For the Rogue, we have access to the Mastery Tree Passives for Bladedancer, Falconer and Marksman. Upon selecting a Mastery and placing 20 Passive Points into the Rogue Tree, you'll then be able to place Passive Points into the Mastery Trees.
For this build, we will be picking Falconer as our advanced class. We will utilize the majority of our Passive Points in the Falconer Passive Tree. Our Passive Points will be aiming to improve our defenses through Armor and Glancing Blows. The nodes taken in Bladedancer are mostly used for converting Dodge into Glancing Blows. Each of the Passive Trees and their points are broken down below.
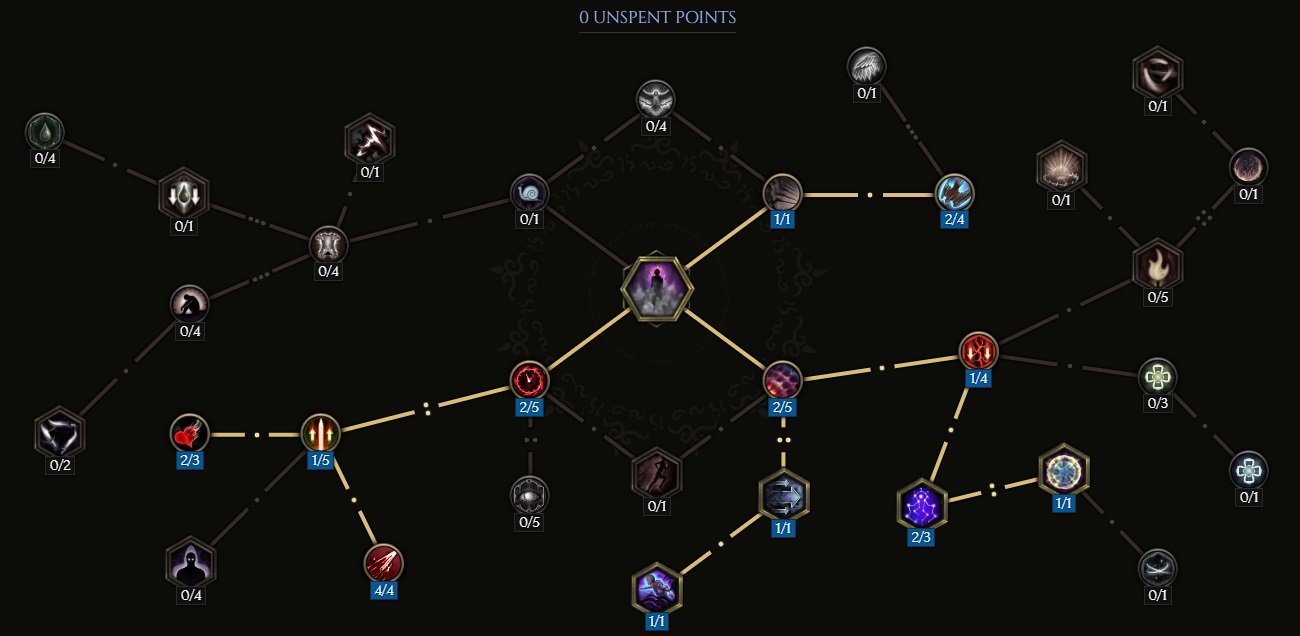
Bladedancer Passive Points
- 5 points into Pursuit: Increased our Movement Speed.
- 8 points into Cloak of Shadows: Increases Dexterity and Glancing Blows Chance.
- 8 points into Shroud of Dusk: 32% chance to gain Dusk Shroud when hit.
- 8 points into Scarlet Stream: Melee and Throwing hits have a chance to cause Bleed.
- 1 point into Apostacy: All Dodge is converted to Glancing Blow Chance. You can no longer Dodge, unless its from Silver Shroud.
In this section, we will break down each skill and highlight the key passives we have selected to make the skill shine in the build. While some of these skills do allow for some variation to exist depending on your own custom choices, we recommend utilizing the skill trees as presented until you have a strong understanding of the build itself.
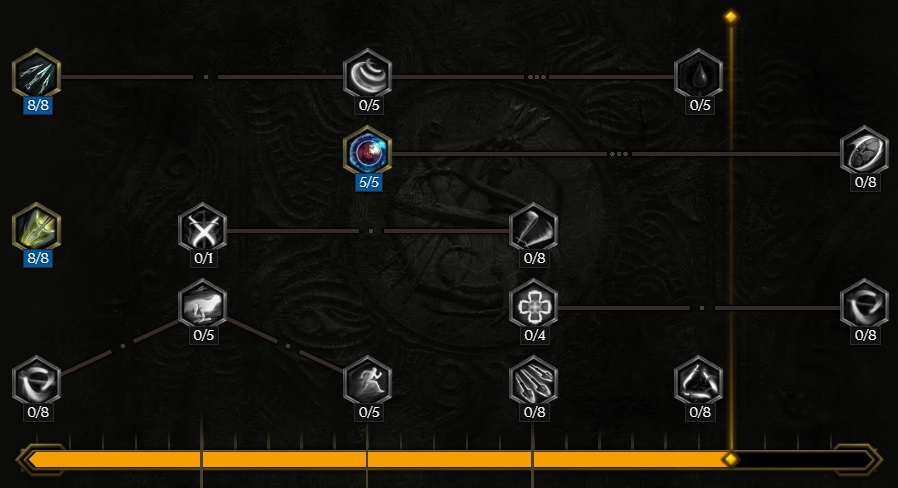
Net
The foundation of this build, ![]() Net is used to automate a few things and
will be the main source of Bleed for the build. Bleed is essentially
how we will make the Falcon do damage with
Net is used to automate a few things and
will be the main source of Bleed for the build. Bleed is essentially
how we will make the Falcon do damage with ![]() Dive Bomb. Both Caltrops and
Dive Bomb. Both Caltrops and ![]() Puncture
automate off this, allowing you to stack Bleed very quickly. On top of this, Netting an enemy
will force the Falcon to deal 40% more damage to them.
Puncture
automate off this, allowing you to stack Bleed very quickly. On top of this, Netting an enemy
will force the Falcon to deal 40% more damage to them.
Order of Skill Points
- 4 points into Rending Wires: 200% Chance for Net to inflict Bleed.
- 1 point into Barbed Net: Net applies one extra stack of Bleed on hit.
- 1 point into Bold Throw: Net no longer moves us.
- 1 point into Net Trap: Net now places traps down and will release at nearby enemies when triggered.
- 1 point into Spear Trap: Net now uses Puncture when triggered. How we use Puncture, this costs no extra Mana.
- 1 point into Trickster Artist: When you throw a Net, you now also drop Caltrops at your feet. These do have an initial hit component and can inflict Bleed.
- 3 points into Zone of Control: Caltrops are now 45% larger.
- 3 points into Advanced Engineering: Increases the area for Net.
- 1 point into Surprise Snare: Net can no longer be Dodged by enemies.
- 4 points into Exposed Bait: Your Falcon now deals an extra 40% damage to Netted enemies.
In this section, we will break down each skill and highlight the key passives we have selected to make the skill shine in the build. While some of these skills do allow for some variation to exist depending on your own custom choices, we recommend utilizing the skill trees as presented until you have a strong understanding of the build itself.
Puncture

![]() Puncture has one singular usage; applying ailments. You will never use this
manually, it triggers off
Puncture has one singular usage; applying ailments. You will never use this
manually, it triggers off ![]() Net. When triggered, Puncture will apply Bleed,
stacks of Shred Armor, and stacks of Shred Physical Resistance.
Net. When triggered, Puncture will apply Bleed,
stacks of Shred Armor, and stacks of Shred Physical Resistance.
Order of Skill Points
- 5 points into Perforate: Adds 100% Bleed Chance.
- 5 points into Splinter: Shreds Physical Resistance on hit.
- 2 points into Cross Forward: Increases the range of Puncture by 30%.
- 5 points with Shatter: Adds Chance to Shred Armor on hit.
- 3 points into Timing: More damage, good for lower Health mobs.
In this section, we will break down each skill and highlight the key passives we have selected to make the skill shine in the build. While some of these skills do allow for some variation to exist depending on your own custom choices, we recommend utilizing the skill trees as presented until you have a strong understanding of the build itself.
Falconry
![]() Falconry is a mandatory grab to make the Falcon part of the build work. Through this
skill we will enable the Falcon to deal more damage globally, enable the Falcon to deal
our own ailment chances at an increased rate, add a Kill Threshold, and regain resources on Falcon kills.
Falconry is a mandatory grab to make the Falcon part of the build work. Through this
skill we will enable the Falcon to deal more damage globally, enable the Falcon to deal
our own ailment chances at an increased rate, add a Kill Threshold, and regain resources on Falcon kills.
Order of Skill Points
- 1 points into Falconer's Journey: Your Falcon will do 1% more damage per level you are, and 1% per Dexterity.
- 3 points into Side by Side: When you hit an enemy with Net, the skill reduces the cooldown on Falconry.
- 4 points into Avian Stamina: The active portion of the ability hits additional times.
- 1 point into Hunter's Spoils: You gain Health and Mana when your Falcon kills an enemy or hits a Boss or Rare enemy.
- 2 points into Bird of Prey: Falcon strikes now instantly kill an enemy at 16% or less health.
- 2 points into The Blood Dance: When your Falcon kills an enemy, it will hit two more enemies.
- 1 point into Trained to Hunt: Your highest increased global damage now applies to the Falcon at 75% its value.
- 3 point into Is it a bird?: The Falcon has 12% more damage, the value is doubled for the active skill.
- 1 point into Agile Prey: The Falcon will do more damage to moving enemies.
- 4 points into Rending Talons: Our own ailment chances will apply to the bird at a 200% rate.
In this section, we will break down each skill and highlight the key passives we have selected to make the skill shine in the build. While some of these skills do allow for some variation to exist depending on your own custom choices, we recommend utilizing the skill trees as presented until you have a strong understanding of the build itself.
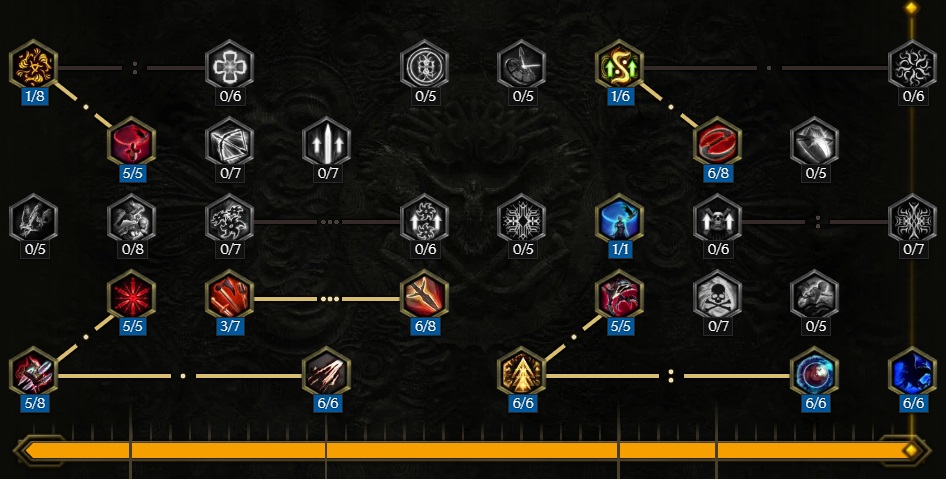
Dive Bomb
![]() Dive Bomb is the nuke that we have been building up to with every other skill.
There's two important nodes here; Exsanguinating Strike and Devastating Dive.
The former will take all the Bleed stacks on an enemy and force them to pop instantly, using the stacks
as a source of fuel for a damage increase for the Dive Bomb damage, while the latter just makes the skill hit incredibly hard
and increases the chance for it to Stun.
Dive Bomb is the nuke that we have been building up to with every other skill.
There's two important nodes here; Exsanguinating Strike and Devastating Dive.
The former will take all the Bleed stacks on an enemy and force them to pop instantly, using the stacks
as a source of fuel for a damage increase for the Dive Bomb damage, while the latter just makes the skill hit incredibly hard
and increases the chance for it to Stun.
There is one node in this tree that is used for defensive purposes, and that is
Cloud Gatherer. If Dive Bomb lands inside of an active ![]() Smoke Bomb,
it will extend the Smoke Bomb's duration long enough to where it is possible to have 100% uptime on
the skill.
Smoke Bomb,
it will extend the Smoke Bomb's duration long enough to where it is possible to have 100% uptime on
the skill.
Order of Skill Points
- 3 points into Hindering Beak Strike: Traversal node.
- 2 points into Flesh Tearing Talons: Shreds two Physical Resistance stacks off enemies hit.
- 1 point into Exsanguinating Strike: This is what causes Dive Bomb to consume Bleed stacks.
- 4 points into Rushing Wings: There is normally a short delay to get your Falcon to use this skill; this removes it.
- 4 points into Devastating Dive: Huge damage gain, and a significant increase to Stun chance. This does increase the cooldown duration by quite a bit, so we need to reduce it through other nodes in the tree.
- 4 points into Rush of the Hunt: 48% Cooldown Recovery Speed.
- 3 points into United Assault: Every use of Net will reduce the cooldown on Dive Bomb.
- 2 points into Focused Hunter: Decreases the Mana Cost significantly and adds more damage.
- 1 point into Cloud Gatherer: Extends
 Smoke Bomb duration if Dive Bomb lands inside of it while active.
In this section, we will break down each skill and highlight the key passives we have selected to make the skill shine in the build. While some of these skills do allow for some variation to exist depending on your own custom choices, we recommend utilizing the skill trees as presented until you have a strong understanding of the build itself.
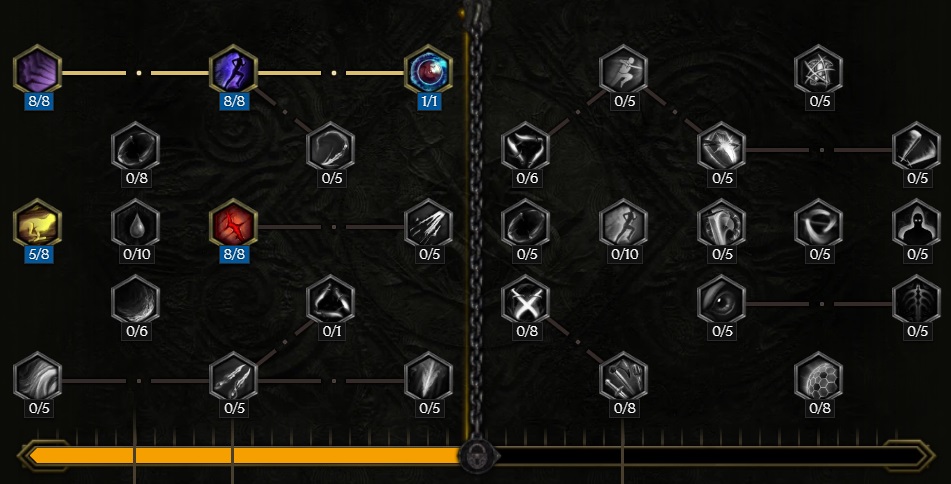
Shift
![]() Smoke Bomb got a new paint of coat with 1.0. It can now be used as a traversal skill! This creates more
than just mobility though; it ensures we can land inside of a group of mobs and instantly increase our Glancing
Blow chance to 100% and boost our Bleed and Leech abilities. Only two points were taken in Rapid Concealment
on purpose; generally, that amount will bump you to 100% Glancing Blows if you have all other item requirements.
Take points out of Blood Bandit if you are undergeared. The Glancing Blow Chance is more important than the Leech.
Smoke Bomb got a new paint of coat with 1.0. It can now be used as a traversal skill! This creates more
than just mobility though; it ensures we can land inside of a group of mobs and instantly increase our Glancing
Blow chance to 100% and boost our Bleed and Leech abilities. Only two points were taken in Rapid Concealment
on purpose; generally, that amount will bump you to 100% Glancing Blows if you have all other item requirements.
Take points out of Blood Bandit if you are undergeared. The Glancing Blow Chance is more important than the Leech.
We have also taken the ability to generate Silver Shroud, and it is the only way we can Dodge attacks.
this is especially useful if you are in dire need to dodge a lethal attack and can't get away in time.
Taking the node past this will allow ![]() Smoke Bomb to cleanse.
Smoke Bomb to cleanse.
Order of Skill Points
- 2 points into Generosity: Traversal node, but does give us more room to move around inside of Smoke Bomb.
- 1 point into Escape Tactics: Changes Smoke Bomb into a movement skill, and we are immune during it.
- 1 point into Cloaked Incursion: You now leap forward with Smoke Bomb; it gains the Traversal tag, and has its cooldown reduced by 50%.
- 1 point into Enfeeblement: Traversal node.
- 2 points into Moonlight Bomb: Applies Silver Shroud on use, allowing us to Dodge the next mechanic for free.
- 1 point into Cleansing Steam: Cleanses all ailments on you on use.
- 2 points into Lingering Fumes: Traversal node.
- 1 point into Smoke Blades: Traversal node.
- 4 points into Hidden Blows: While inside of Smoke Bomb, you gain 200% Bleed Chance for Puncture.
- 2 points into Blood Bandit: Adds Leech to our attacks.
Build Mechanics and Playstyle
This build has the functions of a DoT build and a pure damage minion build
all in one package. We'll be scaling our Falcon to deal damage based on our own Bleed Damage, which
results in very high damage numbers with ![]() Dive Bomb. In order to make this happen, we will be
taking
Dive Bomb. In order to make this happen, we will be
taking ![]() Net and automating
Net and automating ![]() Puncture and Caltrops off it. All three of these attacks have a hit component
on them, which means they will all cause Bleed. At the same time, our Falcon's hits will also be causing Bleed stacks.
Jump into combat, throw a few Nets, and set off
Puncture and Caltrops off it. All three of these attacks have a hit component
on them, which means they will all cause Bleed. At the same time, our Falcon's hits will also be causing Bleed stacks.
Jump into combat, throw a few Nets, and set off ![]() Falconry. At minimum, you want at least 30 stacks of Bleed
on the target to initiate Dive Bomb. This build surpasses that by quite a bit, easily, however 30 is all that is
needed to get the damage bonus off Dive Bomb. More stacks will not be wasted. The Falcon will still cause these
to immediately deal damage.
Falconry. At minimum, you want at least 30 stacks of Bleed
on the target to initiate Dive Bomb. This build surpasses that by quite a bit, easily, however 30 is all that is
needed to get the damage bonus off Dive Bomb. More stacks will not be wasted. The Falcon will still cause these
to immediately deal damage.
Since all Falcon skills are instant casted, you never have to drop uptime from throwing Nets. This is good, because assuming
you have jumped towards the enemy with ![]() Smoke Bomb and they are inside of the cloud, using
Smoke Bomb and they are inside of the cloud, using ![]() Dive Bomb
will extend its duration, while
Dive Bomb
will extend its duration, while ![]() Net itself will drop the cooldown on Dive Bomb every time you throw one.
This makes for a very cyclical rotation where you can just sit in your Smoke Bomb and continue to drop Dive Bombs on
the enemy until it dies.
Net itself will drop the cooldown on Dive Bomb every time you throw one.
This makes for a very cyclical rotation where you can just sit in your Smoke Bomb and continue to drop Dive Bombs on
the enemy until it dies.
The goal of this build is to protect you from all ranges. Caltrops will drop immediately beneath you,
dealing damage in melee range. ![]() Net and
Net and ![]() Puncture can both be used at mid-range, and
work to immobilize enemies before they can even reach you. The Falcon is able to attack from all ranges,
but most importantly serves to deal damage, if needed, at far range, taking care of enemies before they
even know you're there. However, for optimal DPS, this build does prefer close range encounters in order to proc
the Bleed off Caltrops.
Puncture can both be used at mid-range, and
work to immobilize enemies before they can even reach you. The Falcon is able to attack from all ranges,
but most importantly serves to deal damage, if needed, at far range, taking care of enemies before they
even know you're there. However, for optimal DPS, this build does prefer close range encounters in order to proc
the Bleed off Caltrops.
Equipment and Gear Affixes
Until the release of full gear information on 1.0 and we are able to update the build accordingly, we will only be providing stat and attribute goals to make the build function. This build has been tested in an early access version of the game, within the Closed Testing Client. This portion of the guide will be updated with specific gear affixes and a loot filter as soon as possible.
In order to run this build smoothly, the following stat thresholds should be met:
- At least 100 Dexterity; this is for Health sustain.
- 100% Glancing Blows Chance, with Dusk Shroud.
- The two new armor pieces, Falconry Helm and Falconry Armor. Both of these supply the Falcon with flat damage increases.
- The Weaver's Will item,
 Advent of the Erased, rolled with Dexterity and health, preferably. Bonus points if you also get Movement Speed.
 - The Unique items
 Blood Roost and
  The Fang.
 - A tier 5 affix for Throwing Damage and -3 Mana Cost for Throwing Attacks. Just one is enough to sustain the entire build.
- An Exalted Spear with Parry Chance, Increased Physical Damage, Added Melee Minion Melee/Bow Damage, and Added Minion Melee/Spell Damage.
| Gear Slot | Implicits | Modifiers |
|---|---|---|
| Spear | Melee Damage Chance to Shred Armor on Melee Hit |
Prefixes Increased Physical Damage Parry Chance Suffixes Minion Melee Damage/Minion Bow Damage Minion Melee Damage/Minion Spell Damage |
| Head | Armor Dexterity Melee and Throwing Damage for your Falcon |
Prefixes Increased Damage with Dive Bomb, Increased Area with Dive Bomb Health Gained when you recieve a Glancing Blow Suffixes Added Health Increased Health |
| Amulet | Legendary Potential Increased Minion Damage Health, Stun Avoidance |
|
| Chest | Armor Dexterity Melee and Throwing Damage for your Falcon |
Prefixes +2 Level of Dive Bomb, Increased Minion Damage Dexterity Suffixes Armor, Reduced Bonus Damage Taken from Critical Strikes Increased Health |
| Belt | Armor | Prefixes Increased Minion Damage Increased Physical Damage Suffixes Needed Resistances Hybrid Health |
| Gloves | Legendary Potential Increased Minion Damage Increased Throwing Attack Speed |
|
| Ring | Mana Mana Regen |
Prefixes Dexterity Throwing Damage, -3 Throwing Mana Cost Suffixes Health Needed Resistances |
| Ring | Mana Mana Regen |
Prefixes Dexterity Increased Minion Damage Suffixes Health Needed Resistances |
| Feet | Prefixes Dexterity Increased Movement Speed Suffixes Hybrid Health |
|
| Relic | Fire Resistance Chance to Bleed on Hit |
Prefixes Dexterity Increased Minion Damage Suffixes Health Needed Resistances |
A loot filter made specifically for the gear table above may be copied by pressing the button below. Once in the Loot Filter portion of the in-game menu, choose the "Paste Clipboard Contents" option to import the code.
Copy Loot Filter to Clipboard
Uniques
This build requires the ![]() Blood Roost and
Blood Roost and ![]() The Fang in order to run smoothly.
The Fang in order to run smoothly.
Blood Roost
![]() Blood Roost: These gloves were made for this build. If you get this high rolled, your Falcon will grab your Bleed
Chance at a rate of 300% what you have. This is massive just by itself. It also has the potential to add 3 skill points to
Blood Roost: These gloves were made for this build. If you get this high rolled, your Falcon will grab your Bleed
Chance at a rate of 300% what you have. This is massive just by itself. It also has the potential to add 3 skill points to
![]() Falconry. Defensively, these gloves will provide you with an abundant amount of Health every time your Falcon
hits an enemy, scaling off your own Dexterity, which is why it is so important to have high Dexterity in the build.
These gloves are semi-rare, but can be target farmed in the Monolith Timeline "Ending the Storm" in Set or Unique Echo Rewards.
Falconry. Defensively, these gloves will provide you with an abundant amount of Health every time your Falcon
hits an enemy, scaling off your own Dexterity, which is why it is so important to have high Dexterity in the build.
These gloves are semi-rare, but can be target farmed in the Monolith Timeline "Ending the Storm" in Set or Unique Echo Rewards.
The Fang
![]() The Fang: A simple, and extremely easy to acquire, necklace. It is expected you find Legendary Potential on this due
to the accessibility of it, which makes it even better. If found with Legendary Potential, aim for Increased Minion Damage and
Health with Stun Avoidance.
The Fang: A simple, and extremely easy to acquire, necklace. It is expected you find Legendary Potential on this due
to the accessibility of it, which makes it even better. If found with Legendary Potential, aim for Increased Minion Damage and
Health with Stun Avoidance.
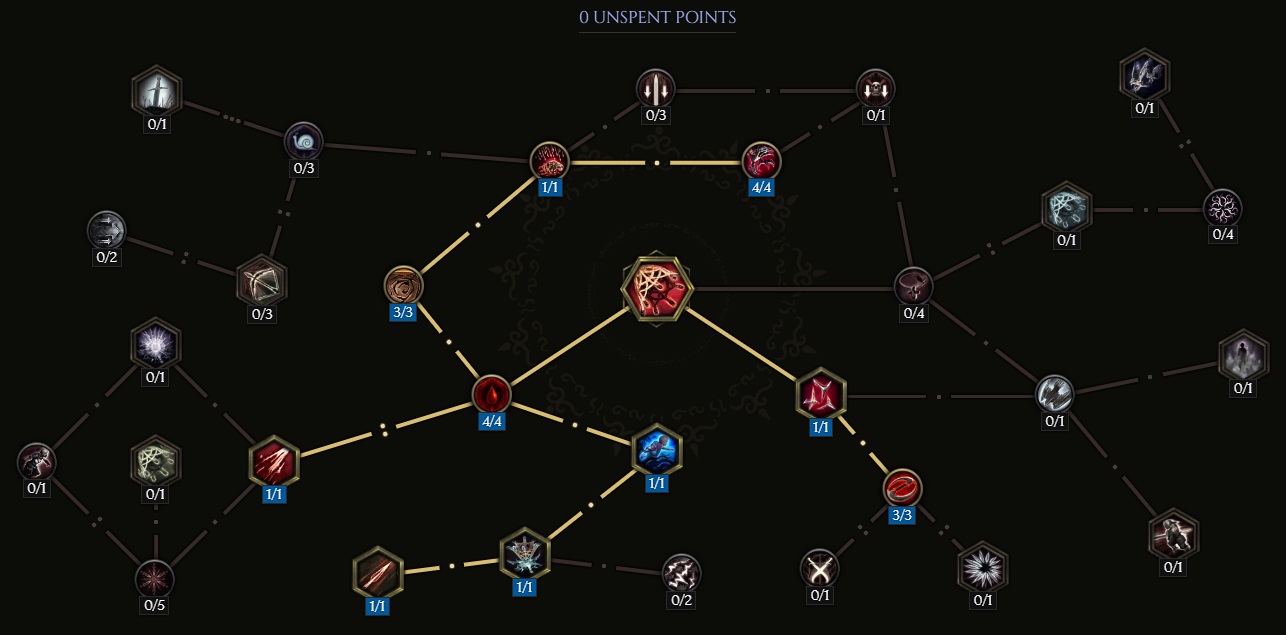
Idols
Idol slots are gained through the campaign, unlocking small bonuses and unique affixes for the player to discover and augment their builds with. The Idol screen consists of a grid system for the player to fill out with different sized idols, eventually filling in every part of the grid. As the Idol shape increases (1x1, 1x2,1x3, 1x4, etc.) the stronger an affix you might find for your build.
For this build, focus on getting as many Large Shadow idols as you can with Chance to Shred Armor on Throwing Hit, as well as Increased Shred Armor Effect. The remaining slots should focus entirely on Health or needed Resistances.
Blessing
Blessings are permanent buffs that are applied to your character. These come in two different powers, Standard and Grand. Grand blessings are significantly stronger than the Standard Blessings. In total, there are 10 Blessing Slots, one for each Monolith Timeline. When you complete a Monolith and defeat the final boss you will be awarded a choice of three blessing with a random value.
| Blessing Name | Affix | Timeline |
|---|---|---|
| Added Health | The Black Sun | |
| Increased Armor | The Age of Winter | |
| All Resistances | Reign of Dragons | |
| Added Armor | Spirits of Fire | |
| Mana | Ending the Storm |
Changelog
- 13 Mar. 2024: Build Planner added.
- 20 Feb. 2024: Guide added.

GhazzyTV is a professional content creator that knows all about theory crafting builds in Path of Exile and Last Epoch and has been teaching players how to build their characters for over 9 years. He is a huge Blizzard fan with thousands of hours invested into Diablo 3 and 4 and is a frequent World of Warcraft Classic player. His builds will be helpful content for new players and veterans alike. You can find his PoE Vault Guide Hub here and his LE Guide Hub here. You can follow him on Twitch, YouTube or Twitter.
- Patch 1.0.7 Update: Multiplayer, Skills and More!
- Patch 1.0.6 Update: Camera Setting, Controller Keybinds, Bug Fixes, and More!
- Eleventh Hour Games on Real-Money Trading and Exploits in Last Epoch
- Patch 1.0.5 Update: Many Bug Fixes, Including Loot Filter Toggle Sensitivity, and Other Improvements!
- The First 30 Days of Last Epoch!
- 1.0 Launch Retrospective: A Message From Eleventh Hour Games
- Patch 1.0.4 Update: More In-Game Changes, Bug Fixes, and Improvements
- Last Epoch Mid-Cycle Balance Survey Recap