Falconer Fire Trap Ballista Endgame Build for Last Epoch (Patch 1.0)
Welcome to our Last Epoch Falconer Fire Trap Ballista build guide for the Rogue class. Here you will learn everything about the Falconer play style, passives, skills, strengths, and weaknesses to conquer the world of Eterra.
Build Introduction
Embracing the playstyle of a trapper, we utilize mines to trigger multiple effects. These effects are both offensive and defensive in nature. Most interactions are automated in this build, making the build simple and easy to run for a player of any caliber. Deep corruption is your thing? This build reached 470 in testing, and lays waste to Tier 4 Julra in about 30 seconds in moderately rolled gear.
 Mana sustain is not an issue
 - Synergestic skills, make playing simple and easy
- Clears High-Level content well

 Must be moving to be safe
 - Burst damage is behind random chance mechanic
- Ballista AoE determined by Dexterity

Skill Selection
![]() Explosive Trap is our primary method of attack, and with our other two triggered skills,
should wipe up any trash mobs in a flash of flames. Enemies who linger will be utterly demolished
by our
Explosive Trap is our primary method of attack, and with our other two triggered skills,
should wipe up any trash mobs in a flash of flames. Enemies who linger will be utterly demolished
by our ![]() Ballista. Upon expiring or being refreshed, these Ballistas will explode in a large area,
dealing massive damage to anything nearby due to this build scaling Critical Strike Multiplier.
Ballista. Upon expiring or being refreshed, these Ballistas will explode in a large area,
dealing massive damage to anything nearby due to this build scaling Critical Strike Multiplier.
The build uses ![]() Explosive Trap for a few reasons; the most important reason
is to ensure we get both
Explosive Trap for a few reasons; the most important reason
is to ensure we get both ![]() Acid Flask out and
Acid Flask out and ![]() Ballistas down. In order
to deal a bit more personal damage, we will also be triggering
Ballistas down. In order
to deal a bit more personal damage, we will also be triggering ![]() Dragonfire off
the Unique
Dragonfire off
the Unique ![]() Dragonsong Bow. This is a hard hitting Fire Spell that will turn enemies into
piles of molten bone marrow. Defensively, this build gains a substantial amount of Dusk Shroud from our
Explosive Traps, which will keep our Dodge Rate high.
Dragonsong Bow. This is a hard hitting Fire Spell that will turn enemies into
piles of molten bone marrow. Defensively, this build gains a substantial amount of Dusk Shroud from our
Explosive Traps, which will keep our Dodge Rate high.

Class and Skill Passive Trees
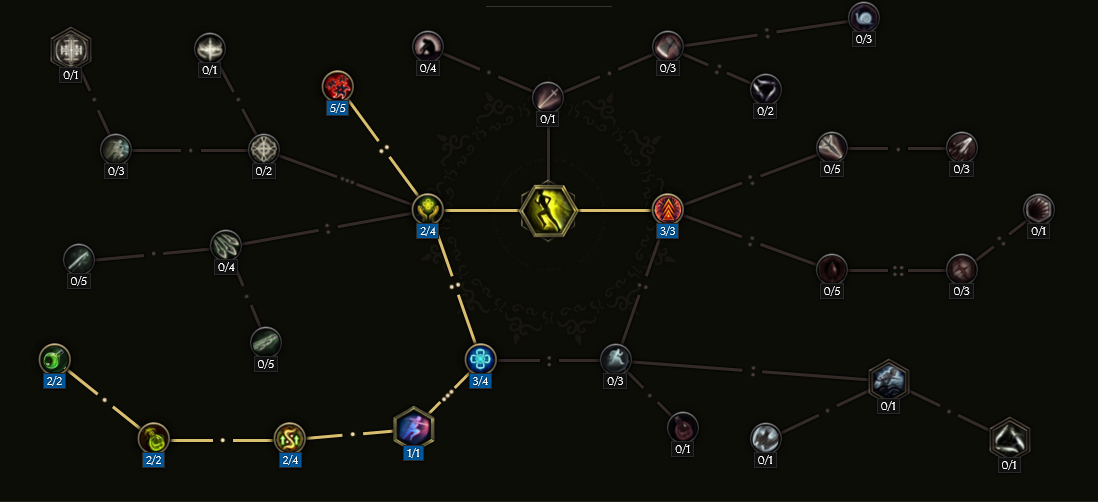
Our base class is the Rogue, which acts as a generic brawler and marksman. Our character will be offered an opportunity to select an Advanced Mastery once we have completed the first act of the campaign. Each base class has three possible masteries to choose from. For the Rogue, we have access to the Mastery Tree Passives for Bladedancer, Falconer and Marksman. Upon selecting a Mastery and placing 20 Passive Points into the Rogue Tree, you'll then be able to place Passive Points into the Mastery Trees.
For this build we will be picking Falconer as our advanced class. We will utilize the majority of our Passive Points in the Falconer Passive Tree. Our passive trees will focus on scaling Dexterity, Mana Gain, and Defensive Scaling. Each of the Passive Trees and their points are broken down below.
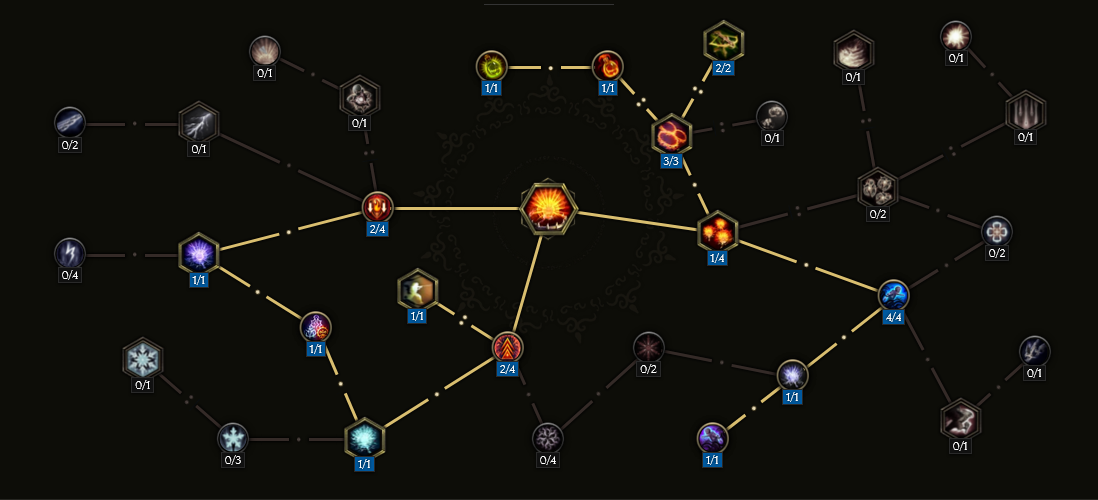
Rogue Passive Points
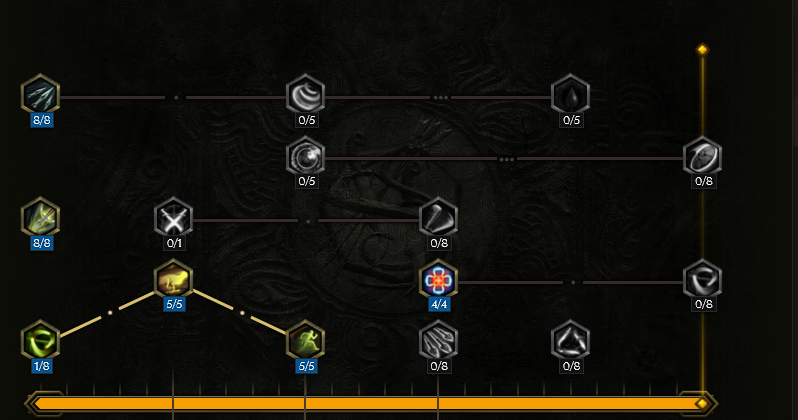
- 8 points into Swift Assassin: Increased Attack Speed and added Physical Damage.
- 8 points into Steady Hand: Dexterity and Base Health.
- 1 point into Guile: Pathing node.
- 5 points into Evasion: 25% mitigation while moving and 25% increased Dodge Rating.
- 5 points into Agility: 25% chance to get Haste on hit and increased damage scaling off Movement Speed.
- 4 points into Sapping Strikes: We gain Mana when we throw our
 Explosive Trap's, so long as we
have the correct rings to give us 0 mana cost to throwing skills (-8 mana in total).
Explosive Trap's, so long as we
have the correct rings to give us 0 mana cost to throwing skills (-8 mana in total).
Our base class is the Rogue, which acts as a generic brawler and marksman. Our character will be offered an opportunity to select an Advanced Mastery once we have completed the first act of the campaign. Each base class has three possible masteries to choose from. For the Rogue, we have access to the Mastery Tree Passives for Bladedancer, Falconer and Marksman. Upon selecting a Mastery and placing 20 Passive Points into the Rogue Tree, you'll then be able to place Passive Points into the Mastery Trees.
For this build we will be picking Falconer as our advanced class. We will utilize the majority of our Passive Points in the Falconer Passive Tree. Our passive trees will focus on scaling Dexterity, Mana Gain, and Defensive Scaling. Each of the Passive Trees and their points are broken down below.
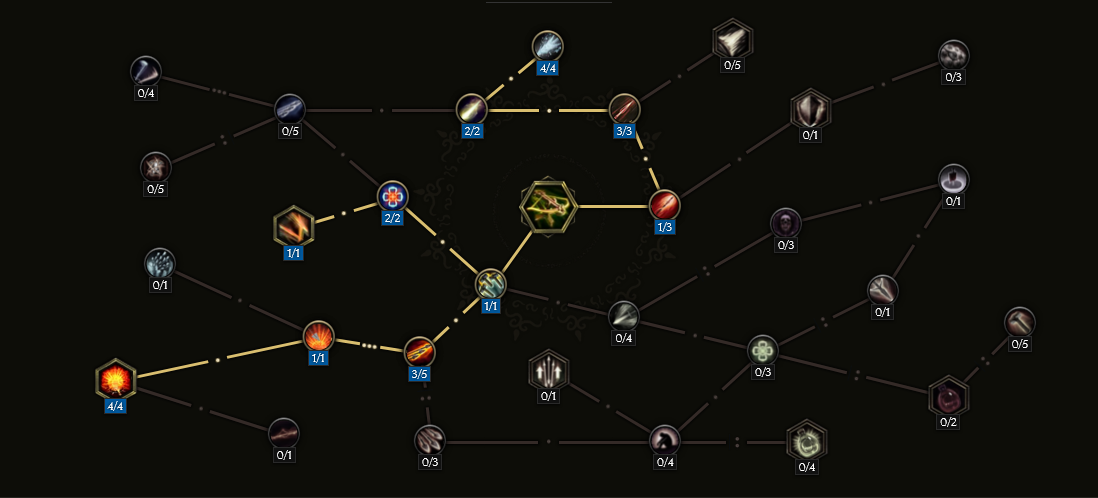
Falconer Passive Points
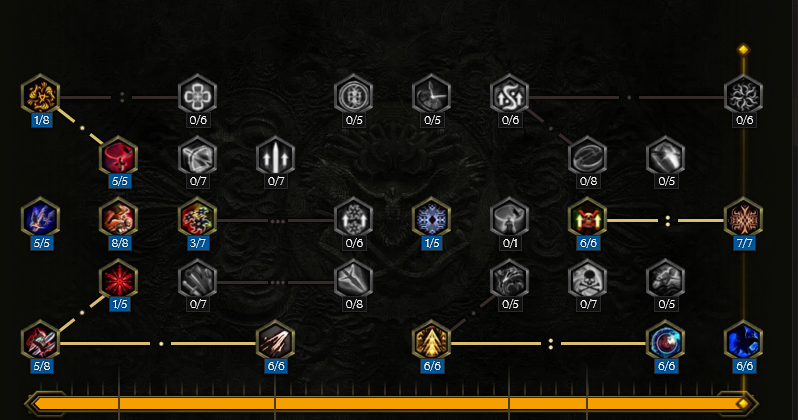
- 5 points into Handler: +5% base Crit Chance for the Falcon.
- 5 poinst into Raptor's Wings: 10% chance to gain Haste when you or the Falcon hits and enemy.
- 1 points into Wilderness Scout: Base health and Dodge Rating.
- 5 points into Outlander's Tenacity: Gain 15% of maximum Health as Endurance.
- 1 point into Crimson Skies: We have a chance to gain Crimson Shroud, helping to protect us from Damage Over Time.
- 8 points into Agile Hunt: Adds base Dexterity and gives our Falcon 1 Throwing Damage per 4 Dexterity.
- 3 points into Peltast: Throwing Speed increase.
- 6 points into Tactician: Adds base damage to the Falcon and Ballistas.
- 1 point into Coordinated Fade: Allows us to gain Silver Shroud when we use Explosive Trap.
- 6 points into Needle Like Precision: Critical Strike Chance and Multiplier for the player and the falcon.
- 7 points into Finesse Them: Converts a portion our Critical Stike Avoidance to Critical Strike Multiplier for the Falcon.
- 6 points into Evasion Tactics: Adds Dexterity, increases Armor, and increases Dodge Rating.
- 6 points into Stymphalian Feathers: Gives us 6 points of Armor per 2 Dexterity. Additionally, we increase Armor by 2% per enemy attacked by our falcon in the last 4 seconds.
- 6 points into Tailwind: Adds 6% Damage Reduction, 6% Movement Speed and 6% Increased Dodge Rating. The value is doubled if the Falcon has hit an enemy.
Our base class is the Rogue, which acts as a generic brawler and marksman. Our character will be offered an opportunity to select an Advanced Mastery once we have completed the first act of the campaign. Each base class has three possible masteries to choose from. For the Rogue, we have access to the Mastery Tree Passives for Bladedancer, Falconer and Marksman. Upon selecting a Mastery and placing 20 Passive Points into the Rogue Tree, you'll then be able to place Passive Points into the Mastery Trees.
For this build we will be picking Falconer as our advanced class. We will utilize the majority of our Passive Points in the Falconer Passive Tree. Our passive trees will focus on scaling Dexterity, Mana Gain, and Defensive Scaling. Each of the Passive Trees and their points are broken down below.
Bladedancer Passive Points
- 8 points into Cloak of Shadows: Adds Dexterity and a small amount of Glancing Blow.
Our base class is the Rogue, which acts as a generic brawler and marksman. Our character will be offered an opportunity to select an Advanced Mastery once we have completed the first act of the campaign. Each base class has three possible masteries to choose from. For the Rogue, we have access to the Mastery Tree Passives for Bladedancer, Falconer and Marksman. Upon selecting a Mastery and placing 20 Passive Points into the Rogue Tree, you'll then be able to place Passive Points into the Mastery Trees.
For this build we will be picking Falconer as our advanced class. We will utilize the majority of our Passive Points in the Falconer Passive Tree. Our passive trees will focus on scaling Dexterity, Mana Gain, and Defensive Scaling. Each of the Passive Trees and their points are broken down below.
Marksman Passive Points
- 8 points into Focus Fire: Adds Dexterity and reduces the enemies Dodge Rating.
In this section, we will break down each skill and highlight the key passives we have selected to make the skill shine in the build. While some of these skills do allow for some variation to exist depending on your own custom choices, we recommend utilizing the skill trees as presented until you have a strong understanding of the build itself.
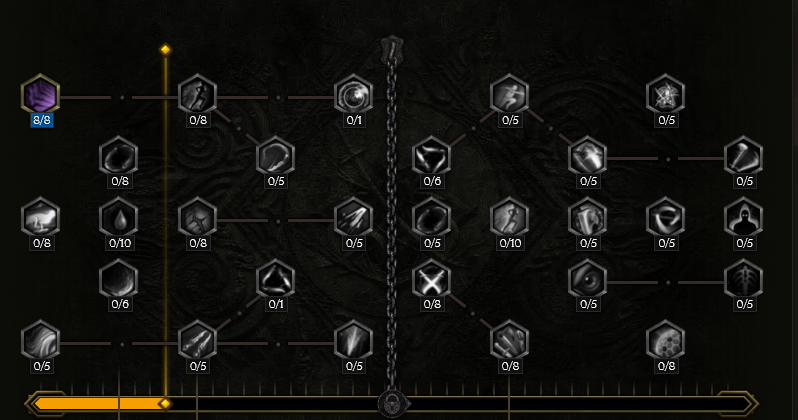
Explosive Trap
![]() Explosive Trap is the our main damage skill. It will trigger multiple damaging effects
an debuffs on the enemies that enable our damage further. Additionally, this also
gives us a defensive layer with Dusk Shroud.
Explosive Trap is the our main damage skill. It will trigger multiple damaging effects
an debuffs on the enemies that enable our damage further. Additionally, this also
gives us a defensive layer with Dusk Shroud.
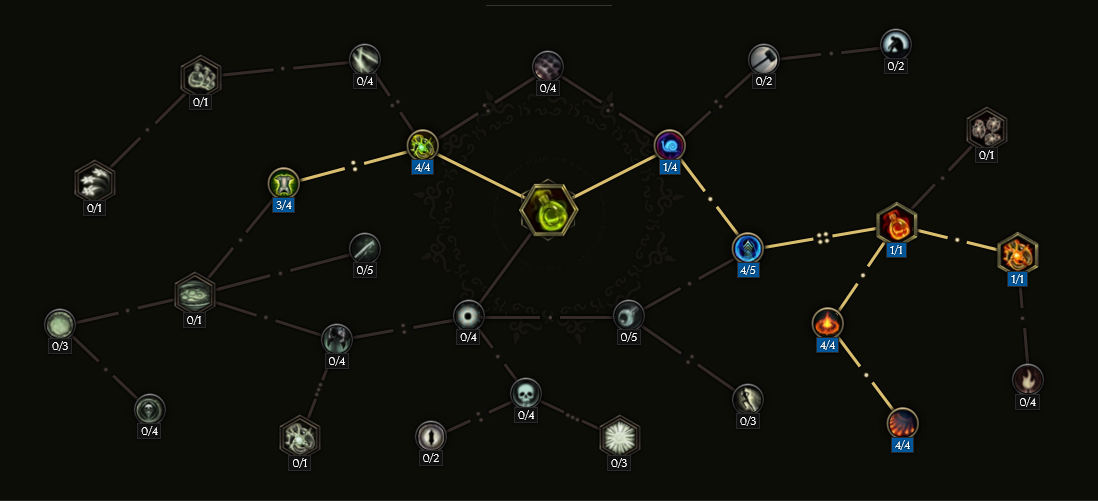
Order of Skill Points
- 1 point into Minefield: Allows more mines to be placed.
- 3 points into Trap Sprinkler: We gain a 30% chance to drop a fresh mine when the thrown one explodes.
- 2 points into Siege Engineering: This gives us a 20% chance to drop a
 Ballista when a
mine explodes.
Ballista when a
mine explodes. - 4 points into Jelkhor's Blueprint: Increased Throwing Speed, and reduces cost of Mana.
- 1 point into Smoke Traps: We gain Dusk Shroud when throwing mines.
- 1 point into Umbral Saboteur: We add 1 damage to our Explosive Trap base damage, per stack of Dusk Shroud on us.
- 2 points into Tinkerer's Design: Increased the area of the detonation and triggering of mines.
- 1 point into Coldsnap Mines: Pathing node.
- 1 point into Trapas: We throw a unconverted mine when ever we throw a converted mine.
- 1 point into Static Mines: Adds another converted mine, maximizing amount of mines thrown in a single cast.
- 1 point into Trapuchet: Mines will now be trown in a large AoE from the Trap Sprinkler node.
- 1 point into Instrument of the Alchemist: This causes
 Acid Flask to be thrown when
Trap Sprinkler triggers.
Acid Flask to be thrown when
Trap Sprinkler triggers. - 2 points into Ash Compartment: This adds damage to our Explosive Trap and allows us to apply
Fire Resistance Shred.
- 1 point into Adaptive Fuse: This causes the mines to explode instantly on fast moving monsters, and do more damage to moving enemies.
In this section, we will break down each skill and highlight the key passives we have selected to make the skill shine in the build. While some of these skills do allow for some variation to exist depending on your own custom choices, we recommend utilizing the skill trees as presented until you have a strong understanding of the build itself.
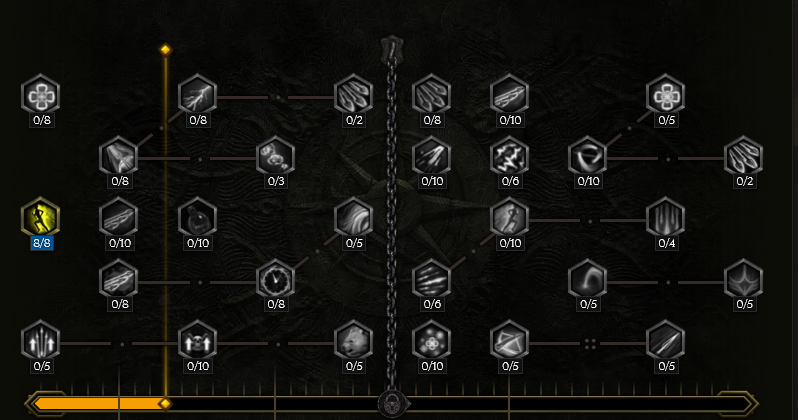
Ballista
![]() Ballista will be automated on our
Ballista will be automated on our ![]() Explosive Trap, however, a player can manually
cast this in order to ensure a maximum DPS swing in your favor. A player can do this risk free, considering
our Traps are now free, and we gain Mana when throwing Traps. Ballista is our major killing component; they
are scaled to hit hard, in a decently sized area. The scale their damage with us, and Dexterity. We
all but ensure they Critically Strike with two of our Uniques. Both
Explosive Trap, however, a player can manually
cast this in order to ensure a maximum DPS swing in your favor. A player can do this risk free, considering
our Traps are now free, and we gain Mana when throwing Traps. Ballista is our major killing component; they
are scaled to hit hard, in a decently sized area. The scale their damage with us, and Dexterity. We
all but ensure they Critically Strike with two of our Uniques. Both ![]() Logi's Hunger and
Logi's Hunger and ![]() Melvern's Writ
both add up to 3% base Critical Strike Chance.
Melvern's Writ
both add up to 3% base Critical Strike Chance.
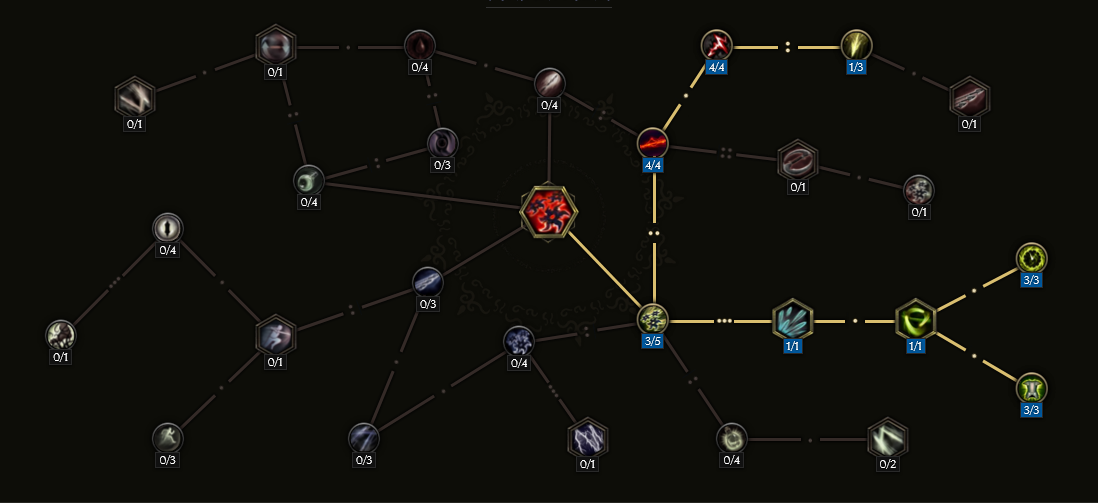
Order of Skill Points
- 1 point into Shared Enhancements: This is a pathing node.
- 3 points into Heavy Bolts: Gives the Ballista 36% more damage.
- 2 points into Sharpened Tips: Adds 6% to the base Critical Strike Chance of the Ballista.
- 4 points into Perfect Aim: We give the Ballista 100% of our Critical Strike Chance and Critical Strike Mulitplier.
- 1 point into Agile Engineering: This is a pathing node.
- 3 points into Flaming Shots: This is a pathing node.
- 1 point into Explosive Delivery: This is a pathing node.
- 4 points into Armed Construction: The Ballista gains 8% more damage and 4% more area per Dexterity we have. This should be around 110 or so, depending if you you we able to aquire Legendary Potential.
- 2 points into Efficient Construction: This decreases the Mana cost significantly.
- 1 point into Practical Build: This adds 40% more damage to the Ballista.
In this section, we will break down each skill and highlight the key passives we have selected to make the skill shine in the build. While some of these skills do allow for some variation to exist depending on your own custom choices, we recommend utilizing the skill trees as presented until you have a strong understanding of the build itself.
Acid Flask
![]() Acid Flask will be fully automated with both
Acid Flask will be fully automated with both ![]() Shift and
Shift and ![]() Explosive Trap. There is
no reason to have this on the bar. Acid Flask will help efficiently clear packs and Shred the Fire Resistance
from enemies. This is used in cohession with the rest of our damage, which is almost exclusively fire.
Explosive Trap. There is
no reason to have this on the bar. Acid Flask will help efficiently clear packs and Shred the Fire Resistance
from enemies. This is used in cohession with the rest of our damage, which is almost exclusively fire.
Order of Skill Points
- 1 point into Hindering Mixture: This is a pathing node.
- 4 point into Alchemical Proficiency: This reduces the Mana cost significantly.
- 1 point into Explosive Flask: This converts Acid Flask to Fire.
- 4 point into Firebomb Cocktail: Adds significant damage Acid Flask.
- 4 point into Piercing Debris: Adds 200% Critical Strike Chance and Critical Strike Multiplier to the Acid Flask.
- 4 point into Corrosive: Acid Flask gains 40% more damage.
- 3 point into Tempered Glass: Shreds 300% Armor from enemies hit by Acid Flask.
- 1 point into Smoulder: This causes us to convert the node from Tempered Glass to now Shred the Fire Resistance of enemies.
In this section, we will break down each skill and highlight the key passives we have selected to make the skill shine in the build. While some of these skills do allow for some variation to exist depending on your own custom choices, we recommend utilizing the skill trees as presented until you have a strong understanding of the build itself.
Shurikens
![]() Shurikens is automated from
Shurikens is automated from ![]() Shift and will not to be on the bar, nor casted manually. They
will passively add Armor and give us a high probability to critically strike enemies that are near to us. Thus
giving us a high chance to trigger our
Shift and will not to be on the bar, nor casted manually. They
will passively add Armor and give us a high probability to critically strike enemies that are near to us. Thus
giving us a high chance to trigger our ![]() Dragonfire from our bow.
Dragonfire from our bow.
Order of Skill Points
- 3 points into Alacrity: Pathing node.
- 1 point into Fan of Blades: Pathing node.
- 1 point into Blade Shield: This causes the Shurikens to circle the player.
- 3 points into Bladed Armor: 30% increased Armor per Shuriken circling you.
- 3 points into Floating Blades: Increases the duration of the Blade Shield effect.
- 4 points into Ethereal Blades: Gives Shurikens 100% pierce chance, so they do not disipate when they hit an enemy.
- 4 points into Jagged Edges: This gives Shurikens a +4% base Critical Strike Chance,
helping us reach crit more enemies, resulting in more procs of
 Dragonfire.
 - 1 point into Massacre: Increased the Critical Strike Multiplier of Shurikens.
In this section, we will break down each skill and highlight the key passives we have selected to make the skill shine in the build. While some of these skills do allow for some variation to exist depending on your own custom choices, we recommend utilizing the skill trees as presented until you have a strong understanding of the build itself.
Shift
![]() Shift will be our movement skill that keeps us moving quickly around the
battlefield. It automates
Shift will be our movement skill that keeps us moving quickly around the
battlefield. It automates ![]() Shurikens and is essential to keeping our Armor Mitigation
in and between skirmishes. It is also a handy tool for trash clear, as our Acid Flask do pack
a serious punch.
Shurikens and is essential to keeping our Armor Mitigation
in and between skirmishes. It is also a handy tool for trash clear, as our Acid Flask do pack
a serious punch.
Order of Skill Points
- 2 point into Shadow Recuperation: Heals for 30 Health when we Shift.
- 5 point into Sleight of Hand: We throw
 Shurikens when we Shift.
 - 3 points into Velocity: Reduces the cooldown and Mana cost of Shift.
- 3 points into Swift Recovery: We gain Mana when we Shift, even more when we are below half HP.
- 1 points into Shadowslip: We are invulnerable while in the animation of Shift.
- 2 points into Elusive: We gain significant Dodge Rating after we shift.
- 2 points into Parting Gift: We have 100% chance to drop an Acid Flask where we Shift from.
- 2 points into Arrival Gift: We have 100% chance to drop an Acid Flask where we Shift to.
Build Mechanics and Playstyle
The playstyle for this Falconer is fast, constantly using ![]() Shift between
periods of throwing
Shift between
periods of throwing ![]() Explosive Trap's. This will ensure not only is you Armor is topped up, but
also makes it so you have Dusk Shroud and, if off cooldown from Coordinated Fade,
Silver Shroud.
Explosive Trap's. This will ensure not only is you Armor is topped up, but
also makes it so you have Dusk Shroud and, if off cooldown from Coordinated Fade,
Silver Shroud.
Majority of packs will fall victim to your ![]() Explosive Trap,
Explosive Trap, ![]() Acid Flask, or
Acid Flask, or ![]() Dragonfire.
Those who remain will be decimated by a moderately sized AoE explosion from
Dragonfire.
Those who remain will be decimated by a moderately sized AoE explosion from ![]() Ballista. This build is
not designed to face tank; thanks to Dodge Rating, majority of common attacks will be evaded.
Well timed instances of Coordinated Fade, will make sure the biggest hits are evaded,
no matter the enemy.
Ballista. This build is
not designed to face tank; thanks to Dodge Rating, majority of common attacks will be evaded.
Well timed instances of Coordinated Fade, will make sure the biggest hits are evaded,
no matter the enemy.
Equipment and Gear Affixes
For this build, we will be focusing on several main affixes for each piece of non-unique gear, as well as working towards acquiring the specific Uniques needed to make this build operate correctly. Our equipment will focus on these specific affixes for the Implicits and Modifier stats.
| Gear Slot | Implicits | Modifiers |
|---|---|---|
| Bow | Legendary Potential Increased Critical Strike Chance, Increased Bow Attack Speed Critical Strike Mulitplier Minion Melee Damage, Minion Bow Damage |
|
| Quiver | Physical Resistance Necrotic Resistance |
Prefixes Dexterity Increased Fire Damage SuffixesNeeded Resistances |
| Helmet | Armor Fire Resistance Critical Strike Multiplier |
Prefixes Dexterity Increased Damage while wielding a Bow Suffixes Critical Strike Avoidance Increased Health |
| Chest | Legendary Potential Increased Health Dexterity |
|
| Amulet | Legendary Potential Critical Strike Multiplier Increased Minion Damage |
|
| Belt | Armor | Prefixes Throwing Damage Increased Fire Damage Suffixes Critical Strike Avoidance Hybrid Health |
| Ring | Increased Critical Strike Chance | Prefixes Throwing Damage, Reduced Throwing Cost Mana Increased Throwing Attack Speed Suffixes Critical Strike Avoidance Needed Resistances |
| Ring | Increased Critical Strike Chance | Prefixes Increased Throwing Attack Speed Throwing Damage, Reduced Throwing Cost Mana Suffixes Critical Strike Avoidance Needed Resistances |
| Gloves | Armor Armor Mitigation also applies to Damage Over Time |
Prefixes Throwing Attack Speed Throwing Damage Suffixes Critical Strike Avoidance Hybrid Health |
| Feet | Movement Speed Fire Resistance Armor |
Prefixes Increased Movement Speed Dexterity Suffixes Hybrid Health Critical Strike Avoidance Sealed Affix Haste after you use a Traversal Skill |
| Relic | Legendary Potential Dexterity Critical Strike Multiplier |
A loot filter made specifically for the gear table above may be copied by pressing the button below. Once in the Loot Filter portion of the in-game menu, choose the "Paste Clipboard Contents" option to import the code.
Copy Loot Filter to Clipboard
Uniques
This build requires the ![]() Dragonsong,
Dragonsong, ![]() Woven Flesh,
Woven Flesh, ![]() Logi's Hunger and
Logi's Hunger and ![]() Melvern's Writ in order to run smoothly.
Melvern's Writ in order to run smoothly.
Dragonsong
![]() Dragonsong: This bow serves multiple purposes. First, it adds base damage to everything
that we do. Second, it gives us +2 to any fire skills we have, it also inscreases the speed of those skills. Third, it gives us a large
base chance to crit with any fire skills we use. Lastly, it will cast
Dragonsong: This bow serves multiple purposes. First, it adds base damage to everything
that we do. Second, it gives us +2 to any fire skills we have, it also inscreases the speed of those skills. Third, it gives us a large
base chance to crit with any fire skills we use. Lastly, it will cast ![]() Dragonfire, up to 34% of the time
when we crit an enemy. It is a very hard hitting sub-skill, that will wipe trash off the map.The Target
farm this item in "Fall of the Outcasts".
Dragonfire, up to 34% of the time
when we crit an enemy. It is a very hard hitting sub-skill, that will wipe trash off the map.The Target
farm this item in "Fall of the Outcasts".
Woven Flesh
![]() Woven Flesh: This is a massive increase to our Falcon's damage output. It will add 100% Critical Strike
Avoidance. In this build, we stack considerable amount of Critical Avoidance in order to gain massive Critical Multipliers from the
Finesse Them node, which gives the Falcon and Ballista's a portion of your Critical Strike Avoidance as
Critical Strike Multiplier. Target farm for this item would the Abomination boss, in the Monolith Timeline "Fall of the Outcasts".
Woven Flesh: This is a massive increase to our Falcon's damage output. It will add 100% Critical Strike
Avoidance. In this build, we stack considerable amount of Critical Avoidance in order to gain massive Critical Multipliers from the
Finesse Them node, which gives the Falcon and Ballista's a portion of your Critical Strike Avoidance as
Critical Strike Multiplier. Target farm for this item would the Abomination boss, in the Monolith Timeline "Fall of the Outcasts".
Logi's Hunger
![]() Logi's Hunger: Is a great offensive and defensive tool we can take advantage of. Not only will it give
our Ballistas up to 3% base Critical Strike Chance, it will also give us that same benefit. Since virtually all
our skills are tagged with Fire. We also, leech up to 8% fire damage as health on Crit. We also gain +2 to our
Logi's Hunger: Is a great offensive and defensive tool we can take advantage of. Not only will it give
our Ballistas up to 3% base Critical Strike Chance, it will also give us that same benefit. Since virtually all
our skills are tagged with Fire. We also, leech up to 8% fire damage as health on Crit. We also gain +2 to our
![]() Ballista, since we have converted it to Fire. Target farm for this item would be the Volcanic Shaman
in the Monolith Timeline "Spirits of Fire".
Ballista, since we have converted it to Fire. Target farm for this item would be the Volcanic Shaman
in the Monolith Timeline "Spirits of Fire".
Melvern's Writ
![]() Melvern's Writ is a rare relic unique that will give your Ballistas up to 90% increased damage. It
will also give them up to 3% base Critical Strike Chance. Target farm for this item would the Unique or Set relic
Reward, in the Monolith Timeline "The Last Ruin".
Melvern's Writ is a rare relic unique that will give your Ballistas up to 90% increased damage. It
will also give them up to 3% base Critical Strike Chance. Target farm for this item would the Unique or Set relic
Reward, in the Monolith Timeline "The Last Ruin".
Idols
Idol slots are gained through the campaign, unlocking small bonuses and unique affixes for the player to discover and augment their builds with. The Idol screen consists of a grid system for the player to fill out with different sized idols, eventually filling in every part of the grid. As the Idol shape increases (1x1, 1x2,1x3, 1x4, etc.) the stronger an affix you might find for your build.
Two Large Shadow Idols with Increased Health and Shared Increased Fire Damage should be used, but can be substituted with Elemental Resistances or Ward on Shift if you need to cap defenses. Two Huge Shadow Idols are also required, with +1 to Max Traps, Increased Throwing Attack Speed and Shared Increased Fire Damage. For the remaining slots, use two Stout Idols with Increased Critical Strike Chance and Health. There will be room for two small Idols; be sure to use these to fix Resistances if needed.
Blessing
Blessings are permanent buffs that are applied to your character. These come in two different powers, Standard and Grand. Grand blessings are significantly stronger than the Standard Blessings. In total, there are 10 Blessing Slots, one for each Monolith Timeline. When you complete a Monolith and defeat the final boss you will be awarded a choice of three blessing with a random value.
| Blessing Name | Affix | Timeline |
|---|---|---|
| Critical Strike Mulitplier | The Black Sun | |
| Lightning Resistance | Ending the Storm | |
| Critical Strike Avoidance | Reign of Dragons | |
| Cold Resistance | The Age of Winter | |
| Endurance | Spirits of Fire |
Changelog
- 25 Mar. 2024: Guide added.

EMP1241 is a Marine veteran who is currently pursuing higher education in Aerospace Engineering. He spends much of his time outside of his studies playing ARPGs, Builders, and MOBAs. He is frequently seen on his Twitch channel discussing science, space, or video games.
- Patch 1.0.7 Update: Multiplayer, Skills and More!
- Patch 1.0.6 Update: Camera Setting, Controller Keybinds, Bug Fixes, and More!
- Eleventh Hour Games on Real-Money Trading and Exploits in Last Epoch
- Patch 1.0.5 Update: Many Bug Fixes, Including Loot Filter Toggle Sensitivity, and Other Improvements!
- The First 30 Days of Last Epoch!
- 1.0 Launch Retrospective: A Message From Eleventh Hour Games
- Patch 1.0.4 Update: More In-Game Changes, Bug Fixes, and Improvements
- Last Epoch Mid-Cycle Balance Survey Recap