Forge Guard Multistrike Forged Minions Endgame Build for Last Epoch (Patch 1.0)
Welcome to our Last Epoch Forge Guard Multistrike Forged Minions build guide for the Sentinel class. Here you will learn everything about the Forge Guard play style, passives, skills, strengths, and weaknesses to conquer the world of Eterra.
Build Introduction
Conjured from the soul of your forge, you draw forth weapons and armor to do your dirty work while you purge the land of its filth. In this minion build we will be using Manifest Armor to do most of our heavy lifting. Our Forged weapons are not to be trifled with either, as their sheer numbers can zerg down enemy packs quickly. 1.0 brought some welcomed affix changes that further empowered this build, and with that the changes are slight, but well received.
 Fun and fast minion playstyle
 - Significant defensive layering
- Automations make build simple

 Defenses and offesnses fail without minions
 - Build feels weak without mid-high end gear
- Positioning matters

Skill Selection
This build is a minion build. We focus on having rapid
attacks with ![]() Multistrike to cast
Multistrike to cast ![]() Forge Strike
many times in a single encounter. We also heavily rely on our
Forge Strike
many times in a single encounter. We also heavily rely on our
![]() Manifest Armor to dish out significant damage as well as our sword minions.
We are the support in this build! We summon, heal, and survive
through mass amounts of armor, heals and passive regeneration. With the right gear,
you can hold on to your minions coat tails and ride their wake of distruction.
Manifest Armor to dish out significant damage as well as our sword minions.
We are the support in this build! We summon, heal, and survive
through mass amounts of armor, heals and passive regeneration. With the right gear,
you can hold on to your minions coat tails and ride their wake of distruction.
There is alternate scaling available, replacing ![]() Ring Of Shields
with
Ring Of Shields
with ![]() Sigils Of Hope. Ring of Shields is recommended until ample defensive gear can be
aquired. However, a player may choose to skip the Sigils all together due to the constant micro
required.
Sigils Of Hope. Ring of Shields is recommended until ample defensive gear can be
aquired. However, a player may choose to skip the Sigils all together due to the constant micro
required.

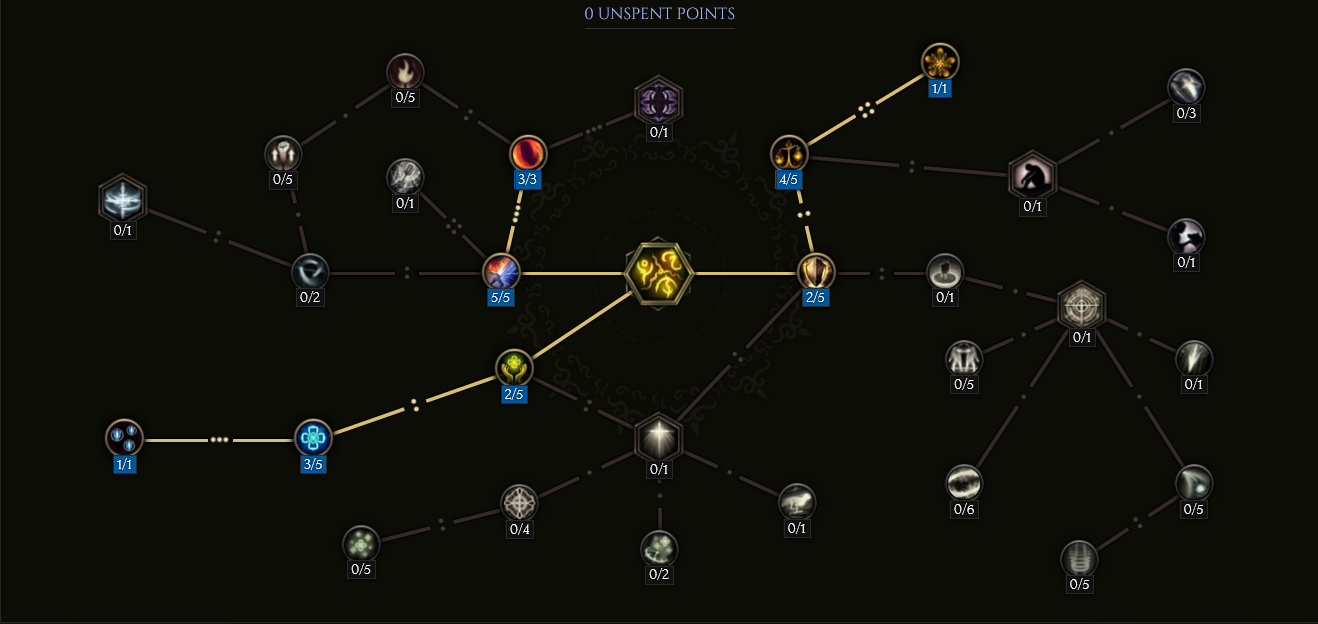
Class and Skill Passive Trees
Our base class is Sentinel, which fills the role of a knight in Last Epoch. Upon finishing Act 1 in the campaign, your character will be offered an opportunity to select an Advanced Mastery. Each base class has three possible Masteries to choose from. For Sentinel, you can choose between Passive Trees for Paladin, Forge Guard, and Void Knight. Upon selecting a Mastery and placing 20 Passive Points into the Sentinel Tree, you'll then be able to place Passive Points into the Mastery Trees.
Forge Guard is the Advanced Class used for this build, and also where the majority of our Passive Points will come from. The Forge Guard Tree will focus around picking nodes that increase our Minion Damage and Armor, Attunement, Strength and Attack Speed. A lesser amount of Passive Points will come from Paladin, focusing mainly on Attunement, Resistances, and defensive scalers. Void Knight is not used for the Forged Minion build. Each Passive Tree and their points are broken down below.
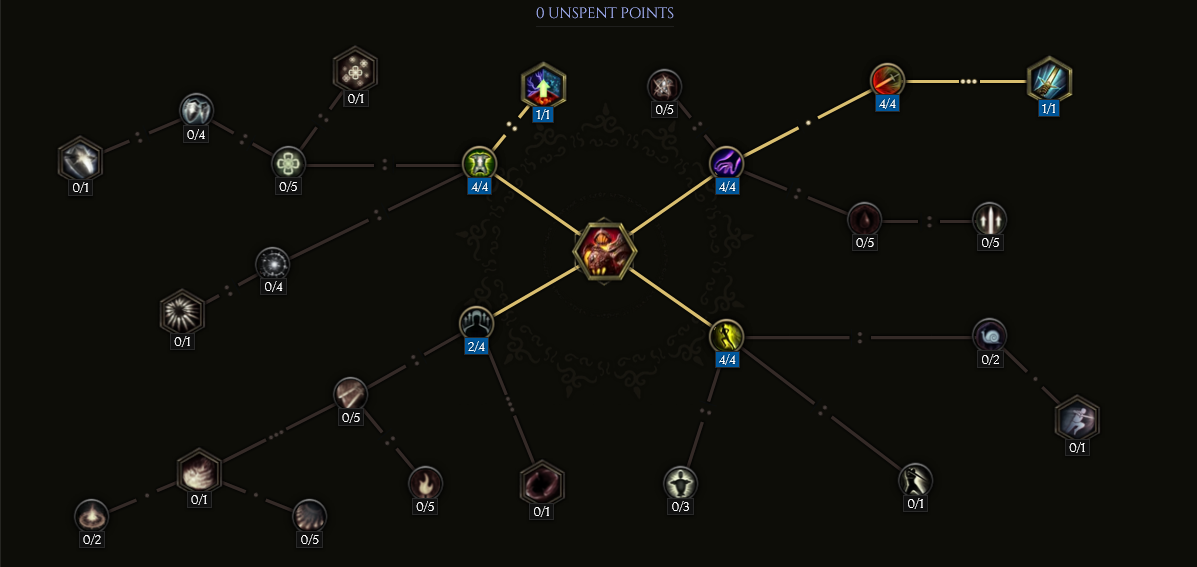
Sentinel Passive Points
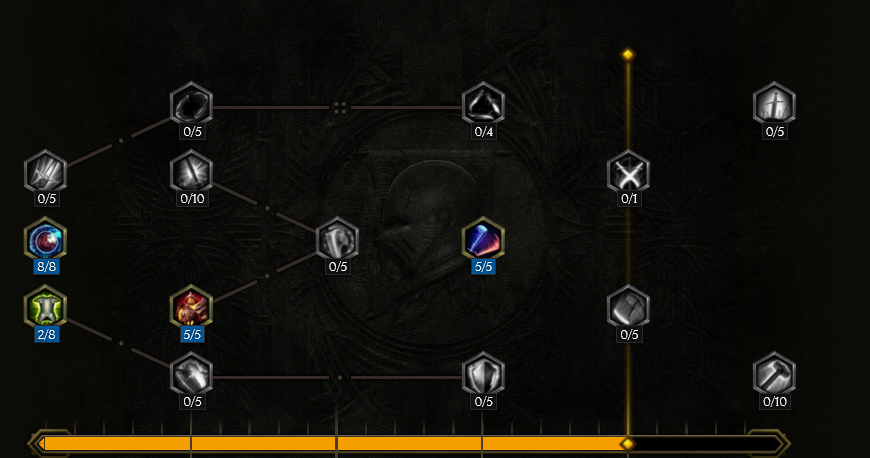
- 8 points into Juggernaut: This node gives us Strength, which gives us armor and our minions damage. This also has resistances.
- 2 points into Fearless: We will collect some Vitality, for base HP and Regen.
- 5 points into Armour Clad: This gives us some base armor but also 10% reduced damage from melee enemies.
- 5 points into Time and Faith: This will give us 25 health and 10
mana every time we use
 Multistrike. This happens relatively quickly with our attack speed.
Our base class is Sentinel, which fills the role of a knight in Last Epoch. Upon finishing Act 1 in the campaign, your character will be offered an opportunity to select an Advanced Mastery. Each base class has three possible Masteries to choose from. For Sentinel, you can choose between Passive Trees for Paladin, Forge Guard, and Void Knight. Upon selecting a Mastery and placing 20 Passive Points into the Sentinel Tree, you'll then be able to place Passive Points into the Mastery Trees.
Forge Guard is the Advanced Class used for this build, and also where the majority of our Passive Points will come from. The Forge Guard Tree will focus around picking nodes that increase our Minion Damage and Armor, Attunement, Strength and Attack Speed. A lesser amount of Passive Points will come from Paladin, focusing mainly on Attunement, Resistances, and defensive scalers. Void Knight is not used for the Forged Minion build. Each Passive Tree and their points are broken down below.
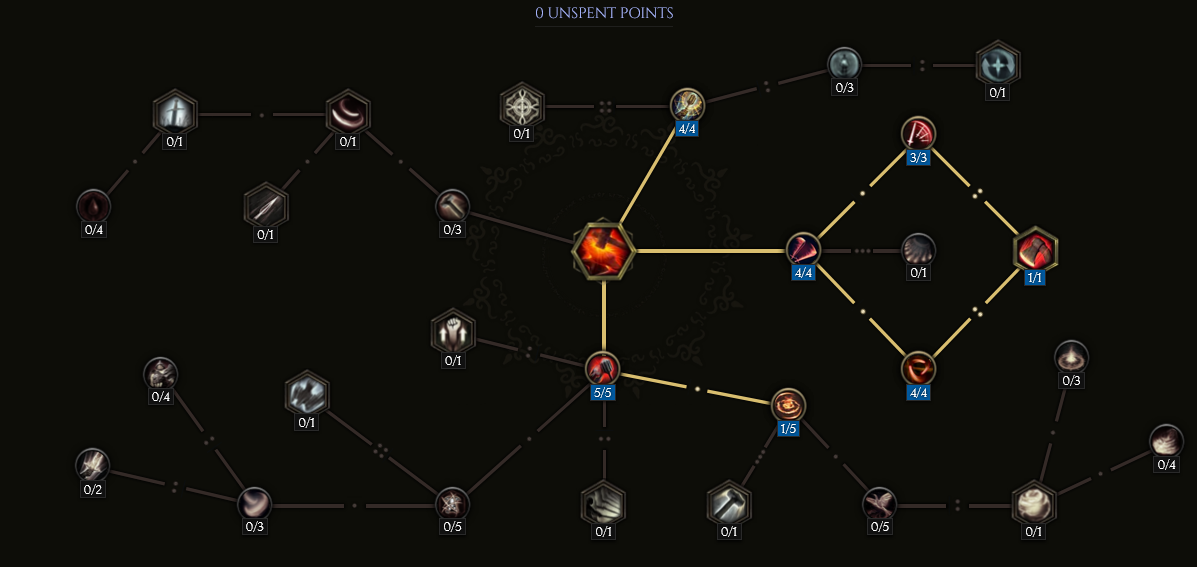
Forge Guard Passive Points
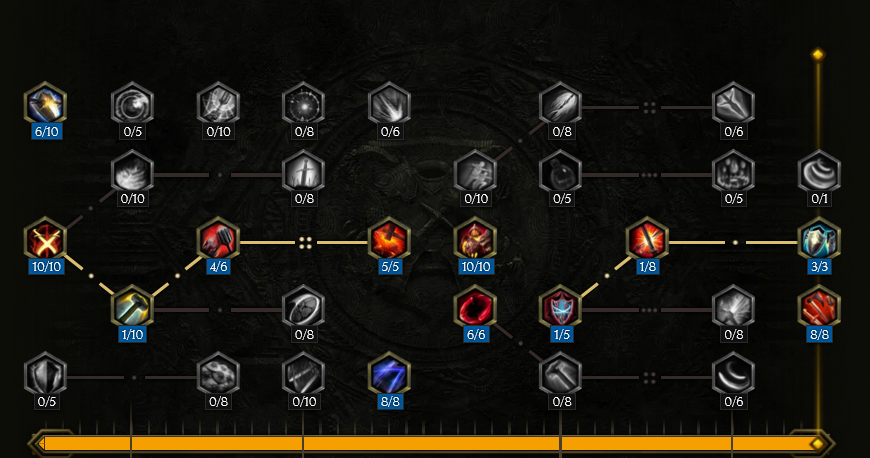
- 10 points into Weapons Master: This node starts our tree building, but adds significant Strength to our character.
- 6 points into Battle Hardened: We get a significant gain to Armor and Physical Resistance when we are hit.
- 1 point into Peltast: This is a traversal point.
- 4 points into Shield Breaker: This is a traversal point.
- 5 points into Hammer and Anvil: We take 25% less damage, and do 25% less damage, but our damage is secondary to the minions.
- 8 points into Iron Attunement: We gain Attunement, which adds Minion HP and Minion Damage. This node also buffs both minions and our Armor.
- 10 points into Folded Steel: We add significant Melee Physical Damage to both our
 Manifest Armor and
 Summon Forged Weapon, and add +2 to our maximum amount of forged weapons.
 - 6 points into Might: Further adding to Strength, which gives Minion Damage (but not life, like Attunement) and increasing our base HP.
- 8 points into Molded by the Forge: Increases Attack Speed (two-handed sword), which allows us to attack with
Multistrike very quickly. This allows us to cast
 Forge Strike quickly as well.
 - 1 point into Flawless Defender: This is a traversal node.
- 1 point into Osprixbane: This is a traversal node.
- 3 points into Shield Crafter: When we are hit, we have a 3% chance to cast
 Ring Of Shields,
moreover, we also increase our minions health and armor by 150%.
Ring Of Shields,
moreover, we also increase our minions health and armor by 150%.
Our base class is Sentinel, which fills the role of a knight in Last Epoch. Upon finishing Act 1 in the campaign, your character will be offered an opportunity to select an Advanced Mastery. Each base class has three possible Masteries to choose from. For Sentinel, you can choose between Passive Trees for Paladin, Forge Guard, and Void Knight. Upon selecting a Mastery and placing 20 Passive Points into the Sentinel Tree, you'll then be able to place Passive Points into the Mastery Trees.
Forge Guard is the Advanced Class used for this build, and also where the majority of our Passive Points will come from. The Forge Guard Tree will focus around picking nodes that increase our Minion Damage and Armor, Attunement, Strength and Attack Speed. A lesser amount of Passive Points will come from Paladin, focusing mainly on Attunement, Resistances, and defensive scalers. Void Knight is not used for the Forged Minion build. Each Passive Tree and their points are broken down below.
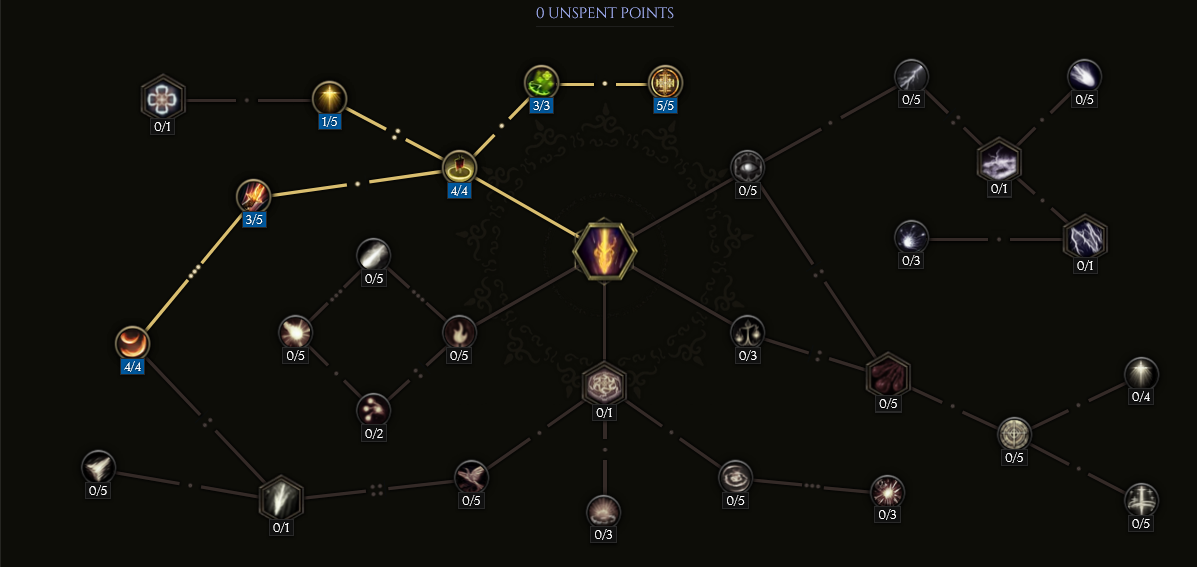
Paladin Passive Points
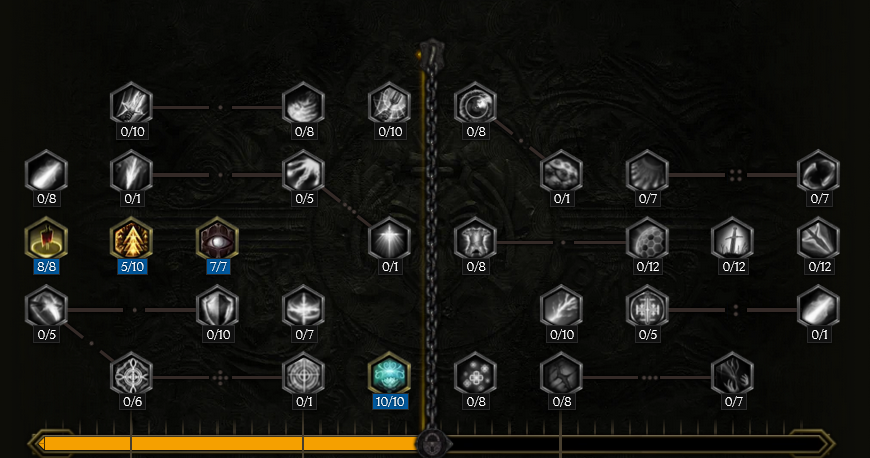
- 8 points into Defiance: Rounds our Resistances out, provides extra Attunement for minions.
- 5 points into Valor: This aids the healing we receive from
 Smite, and gives us base HP.
 - 7 points into Blinding Light. This blinds the enemies with our attacks, which helps prevent critical strikes on you. We also add to our Endurance %.
- 10 points into Dedication: Further adds to our Attunement scaling, increasing minion damage and health.
In this section, we will break down each skill and highlight the key passives we have selected to make the skill shine in the build. While some of these skills do allow for some variation to exist depending on your own custom choices, we recommend utilizing the skill trees as presented until you have a strong understanding of the build itself.
Multistrike
![]() Multistrike will be our primary method of "attack". We will do nominal damage however the real damage come from
the dropping of
Multistrike will be our primary method of "attack". We will do nominal damage however the real damage come from
the dropping of ![]() Forge Strike which has a chance to summon
Forge Strike which has a chance to summon ![]() Summon Forged Weapon. This and our
Summon Forged Weapon. This and our ![]() Manifest Armor is where our damage
will actually come from. Every thing we do is supplimentary to them, however, we do have some crowd control with the stun that comes from Anvil Blow
in the
Manifest Armor is where our damage
will actually come from. Every thing we do is supplimentary to them, however, we do have some crowd control with the stun that comes from Anvil Blow
in the ![]() Forge Strike node. We will be healing ourselves and the minions constantly with
Forge Strike node. We will be healing ourselves and the minions constantly with ![]() Smite by
using this.
Smite by
using this.
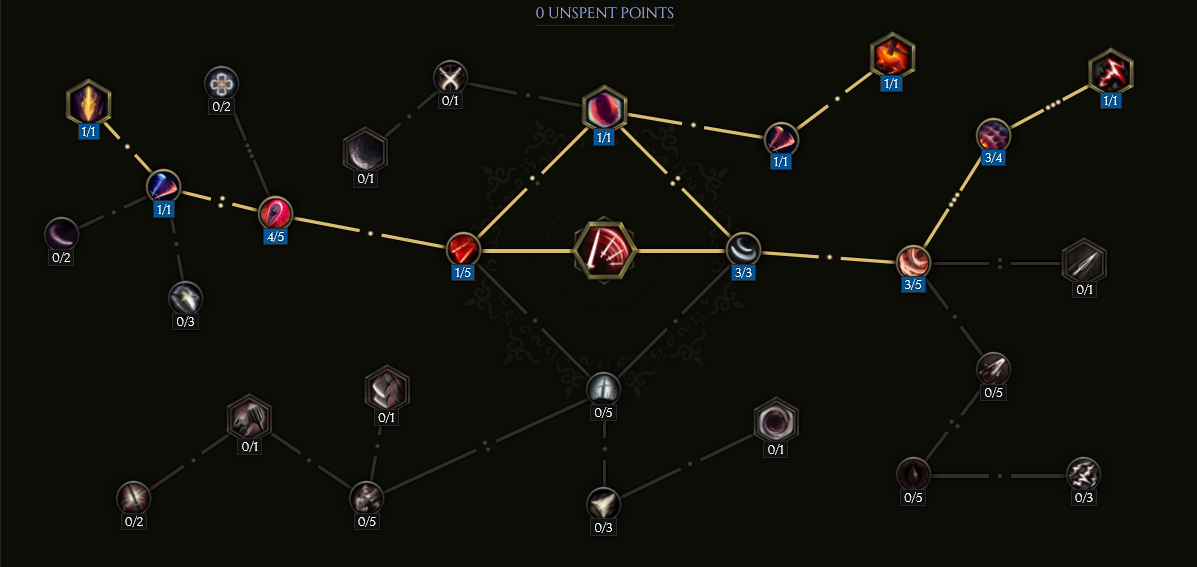
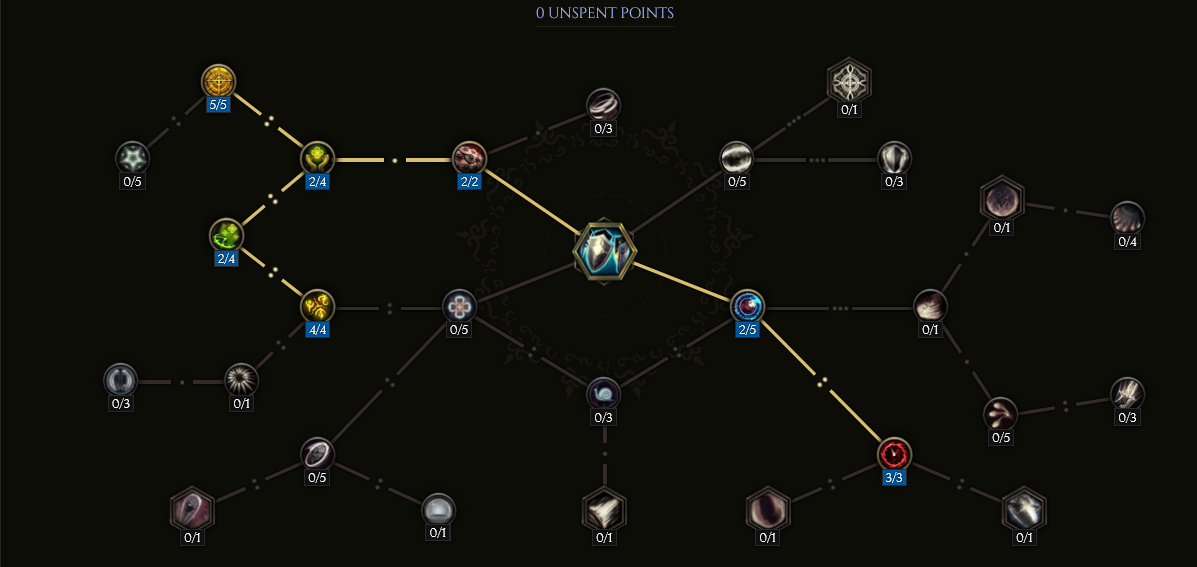
Order of Skill Points
- 3 points into Relentless Advance: Since this skill will be summoning our minions, we need to be sure we do this as fast as possible.
- 1 point into Perfect Steel. Stacks will be explained later, but for now this is a traversal node.
- 1 point into Doctrine of the Anvil. Adding another stack, but also a traversal node.
- 1 point into Fiery Justice: This is where the build attomation comes into play.
When we reach maximum stacks, we will use Forge Strike, which has a chance to spawn
minions, and will do significant area damage and chance to stun.
- 1 points into Way of the Sword: Increases the duration of the stacks, which helps us as we move from pack to pack.
- 4 points into Guarding Stance: We generate 150 armor per stack, by default this is 2
stacks, however we add an additional 2 stacks from the above nodes. Be aware, that after casting Forge Strike
these stacks will fall off, and you lose the bonus armor. However, we generate these stacks so quickly, it doesn't matter much.
- 1 point into Flanking Strikes: This will ensure, that even if you have generated 0 stacks, you still have 1 for the next node we take.
- 1 point into Hallowed Arsenal: This is how we support our minions, by healing them with Smite, but only when we Multistrike with Armament.
It is important to note that when you are fighting a solo enemy, there is no way for this additional sword to proc, as "double dipping" damage does not happen.
The only way to have Smite go off, is to back up and "miss" with Multistrike, however, you will not generate a
stack. The player must learn to balance this timing between "Healing" and "Summoning". This is the most difficult (not that hard) part of the build.
- 3 points in Determination: This is a traversal node.
- 3 points in Sweeping Blows: This increases the effective area of the "Swords".
- 1 point in Victory Strikes: If an enemy dies to Multistrike, you will create another "Sword".
In this section, we will break down each skill and highlight the key passives we have selected to make the skill shine in the build. While some of these skills do allow for some variation to exist depending on your own custom choices, we recommend utilizing the skill trees as presented until you have a strong understanding of the build itself.
Forge Strike
![]() Forge Strike can be used manually in order to quickly summon minions by using it directly when you have stacks from
Forge Strike can be used manually in order to quickly summon minions by using it directly when you have stacks from ![]() Multistrike.
Generally, however, this wont be done much. This skill is what scales and casts our minion "Swords".
Multistrike.
Generally, however, this wont be done much. This skill is what scales and casts our minion "Swords".
Order of Skill Points
- 4 points into Forged by Fire. This adds a base of 40 base Fire Damage to our Summon Forged Weapon.
- 4 points into Well Forged Weapons: This gives us an additional four minions and adds 60% to their duration.
- 4 points into Lightforge: Increases Forged Weapons Attack Speed.
- 3 points into Mass Production: This adds a % chance to summon our minions when Forge Strike is automatically casted from Multistrike.
- 5 points into Heavy Strike. This adds 40% more damage to our minions and increases our stuns chance with Forge Strike.
- 1 points into Engines of War: This node will cause our normally modestly ranged Summon Forged Weapon, to hit whole packs in a single hit.
- 1 Point into Forgemaster: Another bonus node: This node will give you a 20% chance to summon an axe that will cleave swaths of enemies in a single blow.
In this section, we will break down each skill and highlight the key passives we have selected to make the skill shine in the build. While some of these skills do allow for some variation to exist depending on your own custom choices, we recommend utilizing the skill trees as presented until you have a strong understanding of the build itself.
Manifest Armor
![]() Manifest Armor is our builds heaviest hitter. He has massive scaling into defensive armor, which
conveniently add significant physical damage to hit attacks. He will retaliate passively with
Manifest Armor is our builds heaviest hitter. He has massive scaling into defensive armor, which
conveniently add significant physical damage to hit attacks. He will retaliate passively with ![]() Fire Nova
but more importantly, he is scaled with massive attack speed and critical strike multipliers. It won't be uncommon
to see him wipe an area by himself. Be sure to use your "A" key in order to tell him and the minions where to go.
Fire Nova
but more importantly, he is scaled with massive attack speed and critical strike multipliers. It won't be uncommon
to see him wipe an area by himself. Be sure to use your "A" key in order to tell him and the minions where to go.
Order of Skill Points
- 4 points into Iron Grasp: You can leave 1 point into this until later, we just want to rush the end of this branch.
- 4 points into Redistributed Steel: Weakens the Summon, but doubles damage output.
- 1 point into Titan Sword: He now uses the
 Odachi you are using, and all of its modifiers.
 - 4 points into Platemail. The minion will now obtain the stats of your chest armor at 160% of its affix values (EG:100 Armor for you = 160 Armor for him).
- 1 point into Force of Impact: This is a major damage bonus for him. For every 10 armor (includes the 160% bonus) he gains +1 to Melee Physical Damage.
- 2 points into Great Helm: He will gain a massive bonus to Armor, given you are using
 Sunforged Greathelm.
 - 4 points into Steel Greaves: The minions will gain massive critical strike mulipliers, but will be very susciptible to damage with the
 Suloron's Step.
In this section, we will break down each skill and highlight the key passives we have selected to make the skill shine in the build. While some of these skills do allow for some variation to exist depending on your own custom choices, we recommend utilizing the skill trees as presented until you have a strong understanding of the build itself.
Smite
![]() Smite is our best way to support our minions and ourselves. We also give ourselves a significant boost in attack speed and amplify
our health and mana regeneration. This is a must in order to keep our
Smite is our best way to support our minions and ourselves. We also give ourselves a significant boost in attack speed and amplify
our health and mana regeneration. This is a must in order to keep our ![]() Manifest Armor and ourselves topped off in HP.
Manifest Armor and ourselves topped off in HP.
Order of Skill Points
- 4 points into Holy Wave: We increase the area at which our Smite will heal us and our minions.
- 3 points into Righteous Fury: This is more of a traversal node, but we do see moderate gains in fire damage.
- 4 points into Righteous Flurry: This node ensures we continue to spawn and heal as fast as possible.
- 3 point into Soothing Balm: Here we increase both our minions and our own Health and Mana Regeneration.
- 5 points into Grace: This node allows us to give maximum heals to our minions and our self.
- 1 point into Panacea: You have a chance to cleanse ailments on you when effected by smite.
In this section, we will break down each skill and highlight the key passives we have selected to make the skill shine in the build. While some of these skills do allow for some variation to exist depending on your own custom choices, we recommend utilizing the skill trees as presented until you have a strong understanding of the build itself.
Ring of Shields
![]() Ring Of Shields is used as a strong defensive layer. They will heal you and your minions,
give massive buffs to armor and block incoming projectiles. This skill has a chance to automatically
cast when you are hit, and does not put the skill on cooldown. It is not uncommon to see several
shields around you at some point (15,20 or even 30).
Ring Of Shields is used as a strong defensive layer. They will heal you and your minions,
give massive buffs to armor and block incoming projectiles. This skill has a chance to automatically
cast when you are hit, and does not put the skill on cooldown. It is not uncommon to see several
shields around you at some point (15,20 or even 30).
Order of Skill Points
- 3 points into Warrior's Renewal: When we attack with Multistrike after using
 Lunge, we reduce the cooldown by up to 24%.
 - 2 points into Ambuscade: This is a pathing node.
- 1 point into Double Strike: This gives us two charges of Lunge, so we are always ready to jump into the next pack.
- 2 points into Initiate's Onslaught. This is a pathing node.
- 1 point into Cull the Weak: This helps in finishing a boss, but mostly a pathing node.
- 4 points into Reckless Skirmish: We gain Frenzy when we kill with Lunge.
- 5 points into Dawn Charge: We gain 40% of our missing Health when we use Lunge.
- 2 points into Endless Will: We empower our Warrior's Renewal node further, and gain Health when we trigger it.
- 1 point into Lead the Charge: This node will give us Haste when we use Lunge for up to 3 seconds.
Alternative Scaling
This is an additive section for those looking to push the build further into corruption. Without proper attunement scaling or Mana management, this will add a level of difficutly that newer players may not be interested in facing. While some of these skills do allow for some variation to exist depending on your own custom choices, we recommend utilizing the skill trees as presented until you have a strong understanding of the build itself.
Sigils of Hope
The ![]() Sigils Of Hope alternative scaling, would add
a noteable gain to minion damage and self survivability.
However, this route does take away from automation, and
would leave you with a non-scaled use of
Sigils Of Hope alternative scaling, would add
a noteable gain to minion damage and self survivability.
However, this route does take away from automation, and
would leave you with a non-scaled use of ![]() Lunge and
Lunge and ![]() Ring Of Shields.
This could cause the rate of play to feel "clunky" and a player
may reserve to only use
Ring Of Shields.
This could cause the rate of play to feel "clunky" and a player
may reserve to only use ![]() Sigils Of Hope when bossing.
Since
Sigils Of Hope when bossing.
Since ![]() Forge Strike does not need to be in the skill
bar to function, we would use this free slot for
Forge Strike does not need to be in the skill
bar to function, we would use this free slot for ![]() Lunge.
Lunge.
Order of Skill Points
- 5 points into Empowering Sigils: At maximum Sigils (5), this is an 125% increase in damage to you and your minions.
- 3 points into Decree of Flame: This will add a total 30 (3 from base, 3 from node) base Fire Damage to you and your minions at maximum Sigils.
- 2 points into Iron Sigils: This adds 150 to our Endurance Threshold at maximum Sigils.
- 4 points into Enduring Hope. Will have the Sigils last a total of 23 seconds.
- 1 point into Tetragram: We add +1 to our maximum Sigils, making it a total of four with this node.
- 2 points into Invigorate: A traversal node, but also adds
healing effectivness, ensuring Smite heals more.
- 3 points into Quiet Mind: This will help keep the Mana cost down.
Note: If Mana becomes a significant issue you should respec in the Smite
node, taking 2 points from Immolate and placing them into Soothing Balm.
- 1 point into Polygram: This adds our fifth and final Sigil.
Build Mechanics and Playstyle
This build will revive some Witch feelings
from Path of Exile's Animate Weapon and Animate Guardian.
Although not quite as eloquent as the Witch,
the Forge Guard relies on massive amounts of Armor, heals
and Damage Reduction to survive. The majority of damage will
come from our 13 minions. With some decent gear and a
little luck, we will run through any content
the game can throw at you. This is a medium paced build
where we will be using our unscaled ![]() Lunge most of the time from pack to pack.
Our minions from
Lunge most of the time from pack to pack.
Our minions from ![]() Summon Forged Weapon and
Summon Forged Weapon and
![]() Manifest Armor are fast enough to keep up
and you should be able to sustain most encounters
thanks to some new item bases in 1.0.
It is still recommended, as always, to manually avoid high
damage mechanics.
Manifest Armor are fast enough to keep up
and you should be able to sustain most encounters
thanks to some new item bases in 1.0.
It is still recommended, as always, to manually avoid high
damage mechanics.
This build uses ![]() Multistrike to proc
Multistrike to proc ![]() Forge Strike
several times in a singular encounter. The
Forge Strike
several times in a singular encounter. The ![]() Forge Strike
then gives us a chance to summon a
Forge Strike
then gives us a chance to summon a ![]() Summon Forged Weapon
on a singular enemy. Hitting multiple enemies with it will
obviously cause more to form. Mathematically, we have a 100% chance
to proc when hit three enemies or more. However RNG doesn't
always work like that; When it come to bosses or rares, we have a
much higher chance to summon a weapon. This is up to a maximum of
12
Summon Forged Weapon
on a singular enemy. Hitting multiple enemies with it will
obviously cause more to form. Mathematically, we have a 100% chance
to proc when hit three enemies or more. However RNG doesn't
always work like that; When it come to bosses or rares, we have a
much higher chance to summon a weapon. This is up to a maximum of
12 ![]() Summon Forged Weapon's. These minions will last for 32
seconds, and can be resummoned at rapid rate, and will reset
their lifespan. You also have a chance when you forge a
weapon to summon a great axe with the Forgemaster node.
These axe's with the Engines of War node will
have 110% increased AOE cleave, plus our generic sword minions
will have 60% increased area cleave. The
Summon Forged Weapon's. These minions will last for 32
seconds, and can be resummoned at rapid rate, and will reset
their lifespan. You also have a chance when you forge a
weapon to summon a great axe with the Forgemaster node.
These axe's with the Engines of War node will
have 110% increased AOE cleave, plus our generic sword minions
will have 60% increased area cleave. The ![]() Multistrike
will also proc
Multistrike
will also proc ![]() Smite, which we use mostly for healing
(minions and us) however. We also use
Smite, which we use mostly for healing
(minions and us) however. We also use ![]() Smite
to pump our attack speed by 20% with Righteous Flurry. This
is not to pump OUR dps, but to increases the rate at which
we drop
Smite
to pump our attack speed by 20% with Righteous Flurry. This
is not to pump OUR dps, but to increases the rate at which
we drop ![]() Forge Strike on the enemies heads. Which keeps
our minions fresh and ready to slay at a constant rate.
Forge Strike on the enemies heads. Which keeps
our minions fresh and ready to slay at a constant rate.
Minion Scaling
![]() Manifest Armor uses the stats from various pieces
of gear that we roll on his skill tree. We specifically are
targeting him to use our gloves, sword, body Boots and helm. However,
with amplified gains for the stats on each corresponding item. We do
give him a significant buff to damage with Redistributed Steel
and Force of Impact. This can be significant to us (him),
because for every 10 points of Armor we have on our chest, he gets +1
Melee Physical Damage. Since he is using our Odachi,
he is gaining the multipliers and Attack Speed.
Keeping him alive is relatively simple because of our
Manifest Armor uses the stats from various pieces
of gear that we roll on his skill tree. We specifically are
targeting him to use our gloves, sword, body Boots and helm. However,
with amplified gains for the stats on each corresponding item. We do
give him a significant buff to damage with Redistributed Steel
and Force of Impact. This can be significant to us (him),
because for every 10 points of Armor we have on our chest, he gets +1
Melee Physical Damage. Since he is using our Odachi,
he is gaining the multipliers and Attack Speed.
Keeping him alive is relatively simple because of our
![]() Ribbons of Blood. The gloves we use have Melee Attack Speed,
and Increased Leech Rate; for Manifest Armor this applies at
more than double of the face value of the affixes. His
Attack Speed can, and will, get rediculous. This is why we must
have Solarum Bracers, for the implicit affix of Critical
Strike Chance. He also gets to take advantage of
Ribbons of Blood. The gloves we use have Melee Attack Speed,
and Increased Leech Rate; for Manifest Armor this applies at
more than double of the face value of the affixes. His
Attack Speed can, and will, get rediculous. This is why we must
have Solarum Bracers, for the implicit affix of Critical
Strike Chance. He also gets to take advantage of ![]() Logi's Hunger,
which will give him another flat 3% critical Strike chance.
Adding this to the massive multiplier gains from
Logi's Hunger,
which will give him another flat 3% critical Strike chance.
Adding this to the massive multiplier gains from ![]() Suloron's Step this minion
hit very hard.
Suloron's Step this minion
hit very hard. ![]() Summon Forged Weapon
only take the benefit from the our sword, the amulet,
and Ribbons of Blood.
Summon Forged Weapon
only take the benefit from the our sword, the amulet,
and Ribbons of Blood.
Noteable Defensive Mechanics
We are mostly reliant on Armor from our ![]() Sunforged Greathelm,
and exalted chest. The new Champion Regalia chest will help us take care
of those pesky DoTs we can run into from time to time. It would not
be uncommon to see your Armor hit the 10,000 to 15,000 range.
You will continuously see yourself at the Armor cap of 85%
thanks to the unique modifiers in the
Sunforged Greathelm,
and exalted chest. The new Champion Regalia chest will help us take care
of those pesky DoTs we can run into from time to time. It would not
be uncommon to see your Armor hit the 10,000 to 15,000 range.
You will continuously see yourself at the Armor cap of 85%
thanks to the unique modifiers in the ![]() Sunforged Greathelm
which gives 10%-12% increased Armor per
Sunforged Greathelm
which gives 10%-12% increased Armor per ![]() Summon Forged Weapon
and 2 - 5 HP regen per
Summon Forged Weapon
and 2 - 5 HP regen per ![]() Summon Forged Weapon. Considering
this is up to 12 weapons, and it is very common to have all 12,
this is a significant boost in Regen and Armor. We also constantly
heal with
Summon Forged Weapon. Considering
this is up to 12 weapons, and it is very common to have all 12,
this is a significant boost in Regen and Armor. We also constantly
heal with ![]() Multistrike, as it is constantly casting the heal of
Multistrike, as it is constantly casting the heal of
![]() Smite. As always, it is still smart to dodge obvious high damage mechanics when
possible.
Smite. As always, it is still smart to dodge obvious high damage mechanics when
possible. ![]() Smite is used for us and our minions as well.
Since we engage at a melee distance, the majority of
Smite is used for us and our minions as well.
Since we engage at a melee distance, the majority of ![]() Smite's
will hit us and them, keeping everyone's life pools topped.
Smite's
will hit us and them, keeping everyone's life pools topped.
Equipment and Gear Affixes
For this build, we will be focusing on several main affixes for each piece of non-unique gear, as well as working towards acquiring the specific Uniques needed to make this build operate correctly. Our equipment will focus on these specific affixes for the Implicits and Modifier stats.
| Gear Slot | Implicits | Modifiers |
|---|---|---|
| Two-handed Sword | Melee Damage Melee Critical Strike Multiplier |
Prefixes Melee Critical Strike Chance Increased Melee Attack Speed Suffixes Flat minion Melee Damage/Minion Spell Damage Physical Penatration/Minion Physical Penatration |
| Head | - | |
| Amulet | Minion Damage Chance to Apply Shred Armor on Hit |
|
| Chest | Armor % of Armor Mitigation also applies to DoT's |
Prefixes Strength Attunement Suffixes Increased Health Armor/Reduced Bonus Damage Taken From Critical Strikes |
| Belt | Armor + Potion Slots |
Prefixes Increased Minion Health Increased Minion Damage Suffixes Hybrid Health Armor/Reduced Bonus Damage Taken From Critical Strikes |
| Gloves | Armor Increased Critical Strike Chance |
Prefixes Increased Melee Attack Speed Increased Critical Strike Chance Suffixes Hybrid Health Increasd Leech Rate |
| Ring | Increased Minion Damage Attunement |
|
| Ring | Increased Minion Damage Increased Minion Health Minion Critical Strike Multiplier |
Prefixes Increased Minion Damage Attunement Suffixes Needed Resistances |
| Feet | Physical Resistance Hybrid Health |
|
| Relic | Cold Resistance Lightning Resistance |
Prefixes Increased Minion Damage Attunement Suffixes Health Physical Resistance |
A loot filter made specifically for the gear table above may be copied by pressing the button below. Once in the Loot Filter portion of the in-game menu, choose the "Paste Clipboard Contents" option to import the code.
Copy Loot Filter to Clipboard
Uniques
As you begin pushing Empowered Monoliths, you may find yourself falling struggling to keep up. We have provided the top Unique options for the build, listed in the order of importance.
We do highly encourage you take the ![]() Sunforged Greathelm as soon as possible to increase survivability.
Without this helmet, you may find your Manifest Armor falling over depending on the encounter or modifiers.
Sunforged Greathelm as soon as possible to increase survivability.
Without this helmet, you may find your Manifest Armor falling over depending on the encounter or modifiers.
Ribbons of Blood
![]() Ribbons of Blood This ring is mandatory, as it gives all of your
minions the ability to never receive a critical strike.
It also amplifies the base damage for the minions, and gives them a
significant boost in survivability with leech and increases to that rate.
It also gives you up to 10% increased in your health pool. It's also easy
to obtain with a 50% drop rate from The Abomination in the Monolith
Timeline "Fall of the Outcasts".
Ribbons of Blood This ring is mandatory, as it gives all of your
minions the ability to never receive a critical strike.
It also amplifies the base damage for the minions, and gives them a
significant boost in survivability with leech and increases to that rate.
It also gives you up to 10% increased in your health pool. It's also easy
to obtain with a 50% drop rate from The Abomination in the Monolith
Timeline "Fall of the Outcasts".
Logi's Hunger
![]() Logi's Hunger This amulet will enable very high Crit chances from all your
minions. Since our minions are scaled well with base damage, this amulet will ensure
we see as many crits as possible.It's a rare drop and can be obtained rate from
The Volcanic Shaman in the Monolith Timeline "Sprits of Fire".
Logi's Hunger This amulet will enable very high Crit chances from all your
minions. Since our minions are scaled well with base damage, this amulet will ensure
we see as many crits as possible.It's a rare drop and can be obtained rate from
The Volcanic Shaman in the Monolith Timeline "Sprits of Fire".
Suloron's Step
![]() Suloron's Step These boots will give you and your
Suloron's Step These boots will give you and your ![]() Manifest Armor massive
critical strike mulitpliers.You can target farm this in the Monolith Timeline "Spirits of Fire"
on the Unique or Set Boots reward echoes.
Manifest Armor massive
critical strike mulitpliers.You can target farm this in the Monolith Timeline "Spirits of Fire"
on the Unique or Set Boots reward echoes.
Sunforged Greathelm
![]() Sunforged Greathelm This one our biggest defensive items in this build.
It can be farmed in the Monolith Timeline "The Black Sun" on the Unique or
Set Helmet reward echoes.
Sunforged Greathelm This one our biggest defensive items in this build.
It can be farmed in the Monolith Timeline "The Black Sun" on the Unique or
Set Helmet reward echoes.
Idols
Idol slots are gained through the campaign, unlocking small bonuses and unique affixes for the player to discover and augment their builds with. The Idol screen consists of a grid system for the player to fill out with different sized Idols, eventually filling in every part of the grid. As the Idol shape increases (1x1, 1x2, 1x3, 1x4, etc.) the stronger an affix you might find for your build.
The Idols selected for this Attumenent based Minions build are fairly self-explanatory. However, it is fair to note that there is a wide gambit of idols a player could choose. In this build specifically, a player can use idols to suppliment missing resistances or boost health. The following affixes such as + Armor, % Health, Resistances, and Shared Physical Damage should be focused.
Blessing
Blessings are permanent buffs that are applied to your character. These come in two different powers, Standard and Grand. Grand blessings are significantly stronger than the Standard Blessings. In total, there are 10 Blessing Slots, one for each Monolith Timeline. When you complete a Monolith and defeat the final boss you will be awarded a choice of three blessing with a random value.
| Blessing Name | Affix | Timeline |
|---|---|---|
| Void Resistance | The Black Sun | |
| Increased Health Regen | Ending the Storm | |
| Increased Minion Damage | Spirits of Fire | |
| Chance to Shred Physical Resistance on Hit | The Age of Winter | |
| Increased Physical Damage | Reign of Dragons |
Changelog
- 19 Mar. 2024: Updated for 1.0. Changes to affixes and base item types. Swap boots and amulet uniques. Ring of Shields Added for Defesive Scalers.
- 21 Jan. 2024: Added loot filter.
- 09 Jan. 2024: Amended verbiage for Unique descriptions. (Death Rattle Discription was missing)
- 30 Oct. 2023: Guide Added.

EMP1241 is a Marine veteran who is currently pursuing higher education in Aerospace Engineering. He spends much of his time outside of his studies playing ARPGs, Builders, and MOBAs. He is frequently seen on his Twitch channel discussing science, space, or video games.
- Patch 1.0.7 Update: Multiplayer, Skills and More!
- Patch 1.0.6 Update: Camera Setting, Controller Keybinds, Bug Fixes, and More!
- Eleventh Hour Games on Real-Money Trading and Exploits in Last Epoch
- Patch 1.0.5 Update: Many Bug Fixes, Including Loot Filter Toggle Sensitivity, and Other Improvements!
- The First 30 Days of Last Epoch!
- 1.0 Launch Retrospective: A Message From Eleventh Hour Games
- Patch 1.0.4 Update: More In-Game Changes, Bug Fixes, and Improvements
- Last Epoch Mid-Cycle Balance Survey Recap