Forge Guard Warpath Forged Minions Endgame Build for Last Epoch (Patch 1.0)
Welcome to our Last Epoch Forge Guard Warpath Forged Minions build guide for the Sentinel class. Here you will learn everything about the Forge Guard play style, passives, skills, strengths, and weaknesses to conquer the world of Eterra.
Build Introduction
The Forged Minions Forge Guard build combines the iconic spin-to-win playstyle with Forge Guard's signature Forged Minions to bring your enemies to their knees. Shred the defenses of your foes with Warpath while your molten army of Forged Minions take care of everything for you!
 Relaxed playstyle; easily played with one hand
 - High mobility
- Setup can be done prior to entering combat
- On-demand healing for yourself and minions

 Dependent on Minions for damage
 - Must stay within melee range to keep ailments on enemies
- Minions must be controlled manually to live during certain attack patterns

Skill Selection
This build focuses around Forged Weapons (![]() Forge Strike) and
Forge Strike) and
![]() Manifest Armor to deal damage. Almost the entirety of the build
is based around channeling
Manifest Armor to deal damage. Almost the entirety of the build
is based around channeling ![]() Warpath, as this will periodically summon
Forged Weapons for you.
Warpath, as this will periodically summon
Forged Weapons for you. ![]() Void Cleave is taken as a way to buff our minions
and debuff enemies. To round the build out, we use
Void Cleave is taken as a way to buff our minions
and debuff enemies. To round the build out, we use ![]() Healing Hands as
our traversal skill and it is automated off our melee attacks to heal ourselves and our
minions at the same time.
Healing Hands as
our traversal skill and it is automated off our melee attacks to heal ourselves and our
minions at the same time.

Class and Skill Passive Trees
Our base class is Sentinel, which fills the role of a knight in Last Epoch. Upon finishing Act 1 in the campaign, your character will be offered an opportunity to select an Advanced Mastery. Each base class has three possible Masteries to choose from. For Sentinel, you can choose between Passive Trees for Paladin, Forge Guard, and Void Knight. Upon selecting a Mastery and placing 20 Passive Points into the Sentinel Tree, you'll then be able to place Passive Points into the Mastery Trees.
Forge Guard is the Advanced Class used for this build, and also where the majority of our Passive Points will come from. The Forge Guard Tree will focus around picking nodes that increase our Minion Damage, Attunement, and allows us to summon extra Forged Weapons. A similar amount of Passive Points will come from Paladin, focusing mainly on increasing healing potential and Attunement, but also rounding out our Resistances. Void Knight is not used for this build.
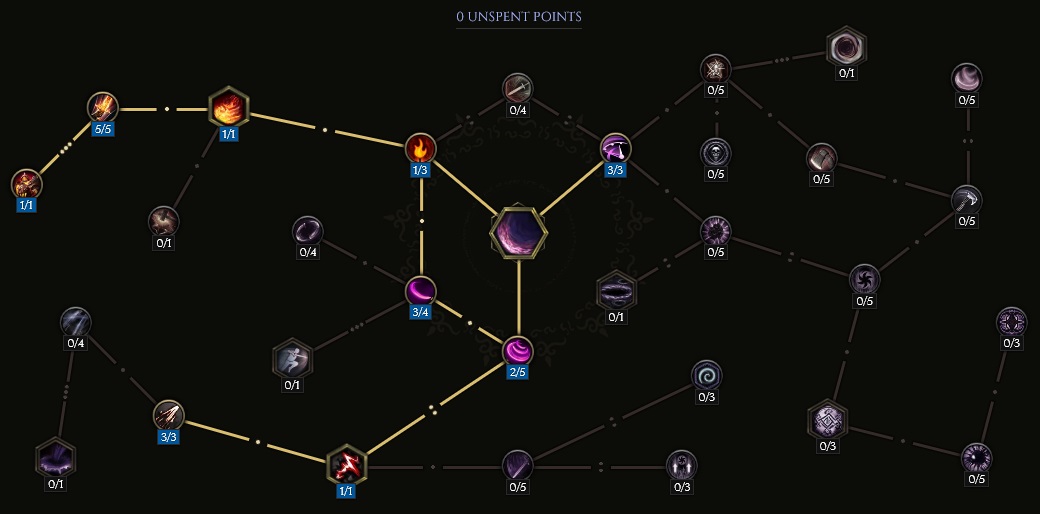
Sentinel Passive Points
- 8 points into Juggernaut: Strength and Resistances.
- 5 points into Armour Clad: 10% damage reduction if within melee range.
- 2 points into Relentless: Some Stun Avoidance, mostly taken for the 20 points in the Tree, but Stun Avoidance will help us to continue channeling without interruption.
- 5 points into Valiant Charge: Additive Health and cooldown reduction for Movement skills.
Our base class is Sentinel, which fills the role of a knight in Last Epoch. Upon finishing Act 1 in the campaign, your character will be offered an opportunity to select an Advanced Mastery. Each base class has three possible Masteries to choose from. For Sentinel, you can choose between Passive Trees for Paladin, Forge Guard, and Void Knight. Upon selecting a Mastery and placing 20 Passive Points into the Sentinel Tree, you'll then be able to place Passive Points into the Mastery Trees.
Forge Guard is the Advanced Class used for this build, and also where the majority of our Passive Points will come from. The Forge Guard Tree will focus around picking nodes that increase our Minion Damage, Attunement, and allows us to summon extra Forged Weapons. A similar amount of Passive Points will come from Paladin, focusing mainly on increasing healing potential and Attunement, but also rounding out our Resistances. Void Knight is not used for this build.
Forge Guard Passive Points
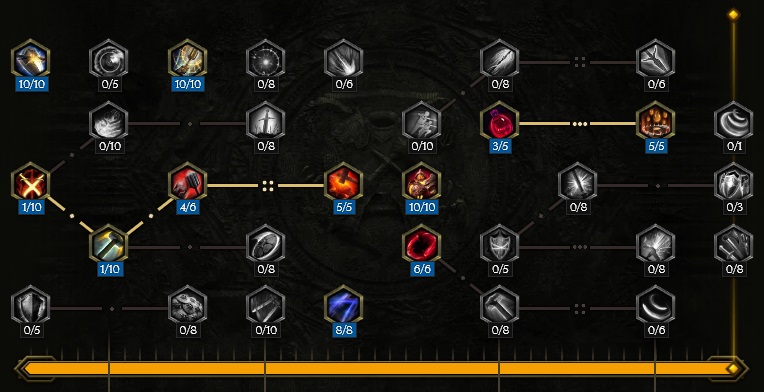
- 1 point into Weapons Master: Taken to traverse the tree.
- 10 points into Battle Hardened: Substantial survivability boost while being attacked.
- 1 point into Peltast: Taken to traverse the tree.
- 10 points into Guardian: Taken for the additive Health.
- 4 points into Shield Breaker: Taken to traverse the tree.
- 5 points into Hammer and Anvil: We do not throw in this build, so this just adds a flat 25% Damage Reduction 100% of the time to your character.
- 8 points into Iron Attunement: Scales minion damage and Armor.
- 10 points into Folded Steel: A substantial boost to minion power. A single point in this provides an extra two Forged Minions to summon.
- 6 points into Might: Strength boost.
- 3 points into Infinite Bulwark: Taken to proceed to the next node.
- 5 points into Liquid Iron: This is important, as it reduces how much damage is dealt to us by DoTs, and will help us survive when we need to heal our Minions.
Our base class is Sentinel, which fills the role of a knight in Last Epoch. Upon finishing Act 1 in the campaign, your character will be offered an opportunity to select an Advanced Mastery. Each base class has three possible Masteries to choose from. For Sentinel, you can choose between Passive Trees for Paladin, Forge Guard, and Void Knight. Upon selecting a Mastery and placing 20 Passive Points into the Sentinel Tree, you'll then be able to place Passive Points into the Mastery Trees.
Forge Guard is the Advanced Class used for this build, and also where the majority of our Passive Points will come from. The Forge Guard Tree will focus around picking nodes that increase our Minion Damage, Attunement, and allows us to summon extra Forged Weapons. A similar amount of Passive Points will come from Paladin, focusing mainly on increasing healing potential and Attunement, but also rounding out our Resistances. Void Knight is not used for this build.
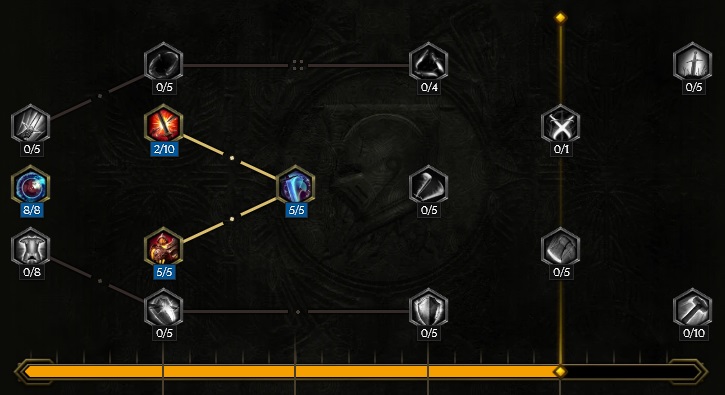
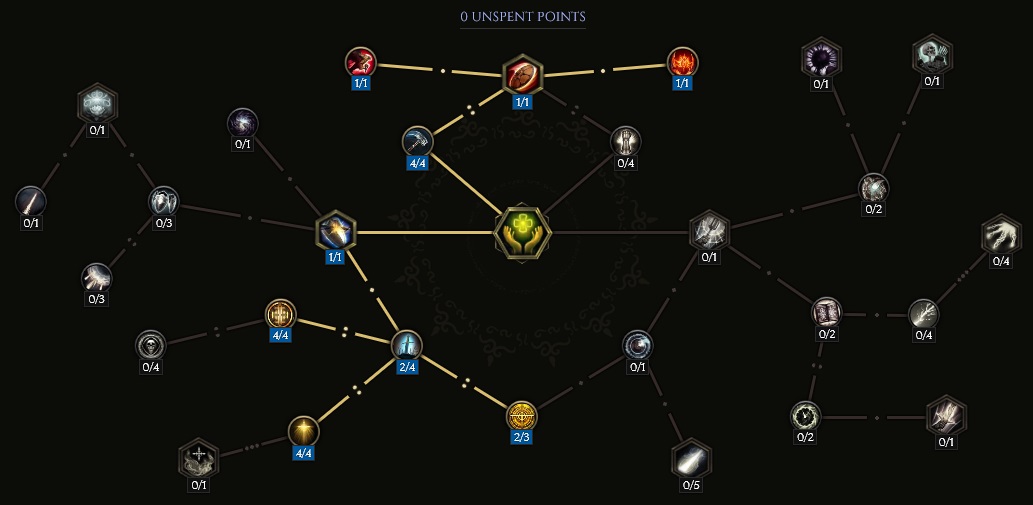
Paladin Passive Points
- 8 points into Defiance: Rounds our Resistances out, provides extra Attunement for minions.
- 5 points into Valor: Picked up specifically
 Healing Hands and the additive Health.
 - 7 points into Blinding Light: Endurance and the chance to Blind enemies on hit with
 Warpath.
 - 10 point into Dedication: Taken for the Attunement.
In this section, we will break down each skill and highlight the key passives we have selected to make the skill shine in the build. While some of these skills do allow for some variation to exist depending on your own custom choices, we recommend utilizing the skill trees as presented until you have a strong understanding of the build itself.
Warpath

![]() Warpath is the MVP of this build. For starters, Warpath is creating our Forged Minions for us, completely removing the need
to manually cast
Warpath is the MVP of this build. For starters, Warpath is creating our Forged Minions for us, completely removing the need
to manually cast ![]() Forge Strike. With Moving Forge, you will very comfortably be able to cap on Forged Weapons, that being
12 of them. On top of this, it provides us a way to shred Armor and Fire Resistance from mobs simply by existing
within melee range. There's a drawback on this skill normally, where it prohibits Mana regeneration while spinning. We circumvent
this a bit with Dark Nexus, however it is still very possible to run out of Mana if you're spamming either
Forge Strike. With Moving Forge, you will very comfortably be able to cap on Forged Weapons, that being
12 of them. On top of this, it provides us a way to shred Armor and Fire Resistance from mobs simply by existing
within melee range. There's a drawback on this skill normally, where it prohibits Mana regeneration while spinning. We circumvent
this a bit with Dark Nexus, however it is still very possible to run out of Mana if you're spamming either
![]() Void Cleave or
Void Cleave or ![]() Healing Hands.
Healing Hands.
Order of Skill Points
- 2 points into Unchained: Reduction in Mana cost
- 1 point into Reckless Spin: Reduces Warpath down to 0 Mana cost, but reduces Fire, Lightning and Cold Resistances by 30%.
- 2 points into Molten Path: Adds a small chance to Shred Armor.
- 2 points into Way of the Executioner: Traversal node.
- 1 point into Forgemaster Stance: This is what allows us to summon Forged Weapons.
- 5 points into Moving Forge: Increases summon frequency, and it's how we manage to summon 12 swords at once.
- 1 point into Iron Reach: Traversal node.
- 2 points into Whirling Steel: Traversal node.
- 1 point into Battlemaster's Blade: Traversal node.
- 5 points into Dark Nexus: The whole point of the previous nodes, this allows Warpath to generate Mana for us every three seconds.
This is required to maintain Forged Minions, but also have access to
 Sigils Of Hope on demand.
 - 3 points into Quicksilver Wind: Boosts Movement Speed while channeling by 30%. This is extremely important as you climb Corruption.
In this section, we will break down each skill and highlight the key passives we have selected to make the skill shine in the build. While some of these skills do allow for some variation to exist depending on your own custom choices, we recommend utilizing the skill trees as presented until you have a strong understanding of the build itself.
Forge Strike
![]() Forge Strike will never be used manually. Instead, the nodes we select are all used to buff the Forged Minions created
by
Forge Strike will never be used manually. Instead, the nodes we select are all used to buff the Forged Minions created
by ![]() Warpath. This skill does not need to be placed on your hotbar, and instead, you can place
Warpath. This skill does not need to be placed on your hotbar, and instead, you can place ![]() Rebuke as a way to have
an emergency button when you can't avoid lethal damage. This reduces damage by 80% while channeled.
Realistically, there's not too many nodes that actually affect the Forged Weapons themselves, so we're a bit limited
on what we can actually do here.
Rebuke as a way to have
an emergency button when you can't avoid lethal damage. This reduces damage by 80% while channeled.
Realistically, there's not too many nodes that actually affect the Forged Weapons themselves, so we're a bit limited
on what we can actually do here.
Order of Skill Points
- 4 points into Forged by Fire: +40 Fire Damage.
- 4 points into Well Forged Weapons: Adds a whopping four Forged Weapons to our arsenal.
- 1 point into Forgemaster: Adds a chance to summon an axe instead of a sword, increasing cleave.
- 4 points into Lightforge: Increases Forged Weapons Attack Speed.
- 5 points into Heavy Strike: Increases Forged Weapon damage.
- 2 points into Engines of War: Forged Weapons have an additional 40% area for their attacks.
In this section, we will break down each skill and highlight the key passives we have selected to make the skill shine in the build. While some of these skills do allow for some variation to exist depending on your own custom choices, we recommend utilizing the skill trees as presented until you have a strong understanding of the build itself.
Manifest Armor

![]() Manifest Armor summons a set of possessed armor to fight by our side. This guy can do a lot, but for the simplicity of this
build, we'll only be focusing on what's relevant. The Manifest Armor will apply Ignite stacks, as well as fill is as our body guard
when fighting against boss mobs. This thing is pretty tanky, however, you may need to micro-manage his movement slightly.
While our Forged Weapons will just continue to summon for free, Manifest Armor costs Mana and the AI will not move him
out of harms way. Make sure your minion command button is mapped somewhere easy to reach.
Manifest Armor summons a set of possessed armor to fight by our side. This guy can do a lot, but for the simplicity of this
build, we'll only be focusing on what's relevant. The Manifest Armor will apply Ignite stacks, as well as fill is as our body guard
when fighting against boss mobs. This thing is pretty tanky, however, you may need to micro-manage his movement slightly.
While our Forged Weapons will just continue to summon for free, Manifest Armor costs Mana and the AI will not move him
out of harms way. Make sure your minion command button is mapped somewhere easy to reach.
![]() Manifest Armor has a lot of nodes which mimic (and even boost the effect of) your own gear, so keep
this in mind early on while gearing, if your Manifested Armor is feeling a bit weak it may be because of the
gear your own character is wearing.
Manifest Armor has a lot of nodes which mimic (and even boost the effect of) your own gear, so keep
this in mind early on while gearing, if your Manifested Armor is feeling a bit weak it may be because of the
gear your own character is wearing.
This build has added the ability for ![]() Manifest Armor to use Whirlwind Strike, giving him
a bit of AoE damage on a 10 second cooldown. On top of this, the Minion is immune to Stun and
has a chance to taunt nearby enemies every second, keeping us safe from mobs in the process.
Manifest Armor to use Whirlwind Strike, giving him
a bit of AoE damage on a 10 second cooldown. On top of this, the Minion is immune to Stun and
has a chance to taunt nearby enemies every second, keeping us safe from mobs in the process.
Order of Skill Points
- 1 points into Iron Grasp: Taken to traverse the tree, but adds a bit of our Glove stats to the Manifest Armor.
- 4 points into Redistributed Steel: Weakens the Armor, but provides a large boost in damage.
- 1 point into Titan Sword: Your Armor gains a sword, which scales with the stats of your own.
- 4 points into Platemail: The Armor mimics our own chest piece at a rate of 160%.
- 1 point into Force of Impact: With the Champion Regalia we've grabbed, this adds up to an extra 86 base damage to the Armor's attacks.
- 4 points into Great Helm: The Armor mimics our helment at a rate of 240%.
- 1 point into Whirlwind: Manifest Armor will now attack with an AoE spin attack.
- 3 points into Warstomp: Adds the ability for the Minion to taunt.
- 1 point into Thick Padding: Manifest Armor now has Stun immunity.
In this section, we will break down each skill and highlight the key passives we have selected to make the skill shine in the build. While some of these skills do allow for some variation to exist depending on your own custom choices, we recommend utilizing the skill trees as presented until you have a strong understanding of the build itself.
Void Cleave
![]() Void Cleave acts as a firestarter for this build, pun intended. While it can, and should, be used to hit enemies with,
it has a more important purpose. It provides a substantial boost to any minion hit by it by adding Ignite Chance
and Fire Damage to your allies. On top of this, Void Cleave inflicts Critical Vulnerability to enemies hit,
opening them up to devastating attacks from all Forged Minions.
Void Cleave acts as a firestarter for this build, pun intended. While it can, and should, be used to hit enemies with,
it has a more important purpose. It provides a substantial boost to any minion hit by it by adding Ignite Chance
and Fire Damage to your allies. On top of this, Void Cleave inflicts Critical Vulnerability to enemies hit,
opening them up to devastating attacks from all Forged Minions.
Void Cleave can be used while channeling ![]() Warpath. It will disrupt the channel briefly, but
then continue, so long as the button for Warpath is held down the entire time. Be wary if you're low on Mana, as Warpath
won't start up while at negative.
Warpath. It will disrupt the channel briefly, but
then continue, so long as the button for Warpath is held down the entire time. Be wary if you're low on Mana, as Warpath
won't start up while at negative.
Order of Skill Points
- 1 point into Riftflame: Taken for pathing.
- 1 point into Hellish Chasm: Converts all of Void Cleave's damage to Fire.
- 5 points into Molten Blades: One of the nodes required to turn Void Cleave into a minion buffing action.
- 1 point into Scorching Path: The other node required to turn Void Cleave into a minion buffing action. However, this one forces you to actually hit the minions themselves with Void Cleave and not just make contact with the enemy. Ideally, you hit both, as Void Cleave will apply boosted stacks of Armor Shred to foes.
- 3 points into Dark Pathway: 30% cooldown reduction.
- 3 points into Abyssal Walker: Taken to give Void Cleave a bit of movement.
- 2 points into Into the Depths: Increases the Area in which Void Cleave hits.
- 1 point into Precognition: Taken mainly for traversing the tree, but it also ensures the attack will always hit enemies.
- 3 points into Rift Maker: Each use of Void Cleave will inflict three stacks of Critical Vulnerability.
In this section, we will break down each skill and highlight the key passives we have selected to make the skill shine in the build. While some of these skills do allow for some variation to exist depending on your own custom choices, we recommend utilizing the skill trees as presented until you have a strong understanding of the build itself.
Healing Hands
![]() Healing Hands solves a lot of problems for this build. It acts as both the sustain and
the traversal skill for the build. One of the biggest weaknesses of Forge Guard Minion builds is the fact
that any sort of prolonged exposure to DoT/Channeled boss abilities will likely kill them. And while they still
will if left to their own devices, Healing Hands offers a way for us to combat the damage being dealt to them while
still keeping damage output high.
Healing Hands solves a lot of problems for this build. It acts as both the sustain and
the traversal skill for the build. One of the biggest weaknesses of Forge Guard Minion builds is the fact
that any sort of prolonged exposure to DoT/Channeled boss abilities will likely kill them. And while they still
will if left to their own devices, Healing Hands offers a way for us to combat the damage being dealt to them while
still keeping damage output high.
This skill will proc off melee hits, but specifically all ![]() Void Cleave hits and the initial hit of
Void Cleave hits and the initial hit of ![]() Warpath.
While Warpath is a bit of a problem child for
Warpath.
While Warpath is a bit of a problem child for ![]() Healing Hands automation, it works well with this setup because we're
constantly starting and stopping the channel in order to buff our Minions. The healing off these two melee attacks is
reduced quite a bit, so if you need a bigger heal, manually cast Healing Hands and utilize it as a traversal skill.
You are immune to damage while doing this, making it a safe way to either get out of danger or leap back to your
Forged army in order to heal them.
Healing Hands automation, it works well with this setup because we're
constantly starting and stopping the channel in order to buff our Minions. The healing off these two melee attacks is
reduced quite a bit, so if you need a bigger heal, manually cast Healing Hands and utilize it as a traversal skill.
You are immune to damage while doing this, making it a safe way to either get out of danger or leap back to your
Forged army in order to heal them.
Order of Skill Points
- 4 points into Cleric's Hammer: Automates Healing Hands off Melee hits.
- 1 point into Rahyeh's Chariot: Turns manual usage of Healing Hands into a Traversal skill.
- 1 point into Sun Shroud: Immune to damage while moving with Healing Hands.
- 1 point into Cloud Voyager: As long as you heal a single minion, most of the cooldown on Healing Hands is removed.
- 1 point into Divine Barrier: Grants Ward per Attunement on heal.
- 2 points into Prayer of the Fallen: Increased Healing Effectiveness.
- 2 points into Blessed Parish: Increases the Heal Area and reduces Mana cost on use.
- 4 points into Urgent Healing: Adds 140 healing to the initial heal.
- 4 points into Vow of Restoration: Provides an additional 80 healing each second for three seconds.
Build Mechanics and Playstyle
This version of Forged Minion is very much the typical "spin-to-win" playstyle most people are used to in a standard ARPG. It's been given a unique spin on things with the addition of Forged Minions, requiring a few extra choices to make rather than just avoiding AoEs and watching your enemies crumble.
Prior to engaging in combat, especially in Empowered Monoliths, we highly suggest you summon all 12 Forged Weapons
and your Manifest Armor. Running into combat without these is a sure-fire way to die nearly immediately. Once they're
summoned, just spin towards your enemies and enhance your Minions with ![]() Void Cleave. Since we're
able to generate Mana while channeling
Void Cleave. Since we're
able to generate Mana while channeling ![]() Warpath, we are fully capable of maintaining our
Warpath, we are fully capable of maintaining our ![]() Void Cleave
whenever applicable without running dry. This is mainly thanks to the massive Mana pool we start with that has been
scaled with Attunement.
Void Cleave
whenever applicable without running dry. This is mainly thanks to the massive Mana pool we start with that has been
scaled with Attunement.
![]() Healing Hands has multi-use in this build, acting as both the sustain and the Traversal skill for the build.
It works phenominally with the set up we have, providing us a way to heal the
Healing Hands has multi-use in this build, acting as both the sustain and the Traversal skill for the build.
It works phenominally with the set up we have, providing us a way to heal the ![]() Manifest Armor with every
Manifest Armor with every ![]() Void Cleave.
Manually using Healing Hands will move us to the target location, and while moving we are essentially invincible. This is
fantastic support, as we can move to our Minions on the fly to keep them topped up while in combat, regardless of how far away from
use they are.
Void Cleave.
Manually using Healing Hands will move us to the target location, and while moving we are essentially invincible. This is
fantastic support, as we can move to our Minions on the fly to keep them topped up while in combat, regardless of how far away from
use they are.
While the map clearing in this build is decent, the main power comes from Boss killing. At lower Corruption (around 200) it wouldn't be shocking, with decent gear drops, to kill things like Orobyss in a matter of seconds. The same thing applies to Julra, up to Tier 3. Tier 4 Julra is possible, but will be tricky and require Minion movement manipulation in order to be successful.
Equipment and Gear Affixes
For this build, we will be focusing on several main affixes for each piece of non-unique gear, as well as working towards acquiring the specific Uniques needed to make this build operate correctly. Our equipment will focus on these specific affixes for the Implicits and Modifier stats.
| Gear Slot | Implicits | Modifiers |
|---|---|---|
| Two-handed Axe | Melee Damage Melee Fire Damage Fire Penetration |
Prefixes Melee Fire Damage Melee Critical Strike Chance Suffixes Chance to Shred Armor on Hit Fire Penetration, Minion Fire Penetration |
| Head | Legendary Potential +4 Levels to Manifest Armor, Increased Minion Damage Increased Minion Health |
|
| Amulet | Legendary Potential Increased Minion Damage |
|
| Chest | Armor Armor Mitigation also applies to Damage Over Time |
Prefixes Attunement +2 Levels of Warpath, Increased Melee Damage Suffixes Armor Increased Health |
| Belt | Increased Movement Speed | Prefixes Increased Minion Damage Increased Minion Health Suffixes Hybrid Health Needed Resistances |
| Gloves | Armor Void Resistance |
Prefixes Increased Minion Damage Attunement Suffixes Chance to Shred Armor on Hit Hybrid Health |
| Ring | Legendary Potential Increased Minion Damage Increased Minion Health |
|
| Ring | Increased Minion Damage Increased Minion Health Minion Critical Strike Multiplier |
Prefixes Increased Minion Damage Increased Minion Health Suffixes Needed Resistances Health |
| Feet | Movement Speed Armor Reduced Bonus Damage Taken from Critical Strikes |
Prefixes Attunement Increased Movement Speed Suffixes Hybrid Health Armor, Reduced Bonus Damage Taken from Critical Strikes |
| Relic | Cold Resistance Lightning Resistance |
Prefixes Increased Minion Damage Attunement Suffixes Health Increased all Resistances While Channeling |
A loot filter made specifically for the gear table above may be copied by pressing the button below. Once in the Loot Filter portion of the in-game menu, choose the "Paste Clipboard Contents" option to import the code.
Copy Loot Filter to Clipboard
Uniques
While this build is very simple, and technically can be played without a single unique, we've included three that we felt should be
required, just to ensure you're able to climb the Monolith properly. All three items are fairly easy to get, with ![]() Death Rattle
being the hardest.
Death Rattle
being the hardest.
Ribbons of Blood
![]() Ribbons of Blood: Provides Leech for your minions and removes the
chance of your minions being hit by a critical attack. On top of this, the ring is incredibly easy to target farm,
as it's a 50% drop rate from The Abomination in the Monolith Timeline "Fall of the Outcasts". With such a high drop rate,
aiming for Legendary Potential on this should be a top priority.
Ribbons of Blood: Provides Leech for your minions and removes the
chance of your minions being hit by a critical attack. On top of this, the ring is incredibly easy to target farm,
as it's a 50% drop rate from The Abomination in the Monolith Timeline "Fall of the Outcasts". With such a high drop rate,
aiming for Legendary Potential on this should be a top priority.
Peak of the Mountain
![]() Peak of the Mountain: Our Manifest Armor is grabbing stats at an increased rate from our Helmet, making Peak of the
Mountain the perfect option. This will boost the Manifest Armor to 100% crit rate. The +4 Levels to Manifest Armor we want on this
will allow your Minion to taunt and make him immune to Stuns. Peak of the Mountain will drop from any tier of Lightless Arbor,
so it is very easy to farm.
Peak of the Mountain: Our Manifest Armor is grabbing stats at an increased rate from our Helmet, making Peak of the
Mountain the perfect option. This will boost the Manifest Armor to 100% crit rate. The +4 Levels to Manifest Armor we want on this
will allow your Minion to taunt and make him immune to Stuns. Peak of the Mountain will drop from any tier of Lightless Arbor,
so it is very easy to farm.
Death Rattle
![]() Death Rattle: This amulet is taken specifically to bolster the Critical Multiplier of
our Forged Minions. Be mindful of the roll on Minions taking Increased Damage. 30% extra damage taken
is quite a lot, so you will likely want to farm one of these until you get one closer to 10%. Until then, run a
Turqoise Amulet.
Death Rattle: This amulet is taken specifically to bolster the Critical Multiplier of
our Forged Minions. Be mindful of the roll on Minions taking Increased Damage. 30% extra damage taken
is quite a lot, so you will likely want to farm one of these until you get one closer to 10%. Until then, run a
Turqoise Amulet.
Idols
Idol slots are gained through the campaign, unlocking small bonuses and unique affixes for the player to discover and augment their builds with. The Idol screen consists of a grid system for the player to fill out with different sized Idols, eventually filling in every part of the grid. As the Idol shape increases (1x1, 1x2, 1x3, 1x4, etc.) the stronger an affix you might find for your build.
The Idol slots used for this build are probably the most accessible portion of the build. Grab as many Stout Lagonian Idols as you can with double Health affixes. For the few remaining slots available, fill them with Small Lagonian Idols with Armor and Shared Fire Damage.
Blessing
Blessings are permanent buffs that are applied to your character. These come in two different powers, Standard and Grand. Grand blessings are significantly stronger than the Standard Blessings. In total, there are 10 Blessing Slots, one for each Monolith Timeline. When you complete a Monolith and defeat the final boss you will be awarded a choice of three blessing with a random value.
| Blessing Name | Affix | Timeline |
|---|---|---|
| Health | The Black Sun | |
| Increased Mana | Ending the Storm | |
| Chance to Shred Fire Resistance on Hit | Spirits of Fire | |
| Increased Armor | The Age of Winter | |
| All Minion Resistances | Reign of Dragons |
Changelog
- 13 Mar. 2024: Build Planner added.
- 01 Mar. 2024: Updated for 1.0. Removed Sigils of Hope, added Healing Hands.
- 26 Jan. 2024: Build rework. Build now focuses more on minion damage as well as their survivability.
- 12 Jan. 2024: Loot Filter added.
- 15 Oct. 2023: Guide Added.

GhazzyTV is a professional content creator that knows all about theory crafting builds in Path of Exile and Last Epoch and has been teaching players how to build their characters for over 9 years. He is a huge Blizzard fan with thousands of hours invested into Diablo 3 and 4 and is a frequent World of Warcraft Classic player. His builds will be helpful content for new players and veterans alike. You can find his PoE Vault Guide Hub here and his LE Guide Hub here. You can follow him on Twitch, YouTube or Twitter.
- Patch 1.0.7 Update: Multiplayer, Skills and More!
- Patch 1.0.6 Update: Camera Setting, Controller Keybinds, Bug Fixes, and More!
- Eleventh Hour Games on Real-Money Trading and Exploits in Last Epoch
- Patch 1.0.5 Update: Many Bug Fixes, Including Loot Filter Toggle Sensitivity, and Other Improvements!
- The First 30 Days of Last Epoch!
- 1.0 Launch Retrospective: A Message From Eleventh Hour Games
- Patch 1.0.4 Update: More In-Game Changes, Bug Fixes, and Improvements
- Last Epoch Mid-Cycle Balance Survey Recap