Lich Chaos Bolts Harvest Endgame Build for Last Epoch (Patch 1.0)
Welcome to our Last Epoch Lich Chaos Bolts Harvest build guide for the Acolyte class. Here you will learn everything about the Lich play style, passives, skills, strengths, and weaknesses to conquer the world of Eterra.
Build Introduction
Unleash necrotic fire as Death, mowing down enemies with phantom scythes. Chaos Bolts have a reputation to uphold; each eruption from these deadly fireballs will cause an explosion of effects. The bolts will cast curses, rip the life from enemies, and harvest their souls all at the same time.
 Reaper Form makes you invincible while active
 - Ranged gameplay with targeted AoE damage
- Fast Movement Speed and great mobility options

 Losing Reaper Form drops damage output
 - High gearing requirements to function due to needing Dexterity

Skill Selection
![]() Chaos Bolts are the transportation vessel for this build. These
Necrotic fireballs are used for the purpose of automating
Chaos Bolts are the transportation vessel for this build. These
Necrotic fireballs are used for the purpose of automating ![]() Harvest,
Harvest, ![]() Bone Curse
and
Bone Curse
and ![]() Rip Blood.
Rip Blood. ![]() Harvest is our main damage dealer in the build, while
Harvest is our main damage dealer in the build, while
![]() Rip Blood is used as a way for us to sustain ourselves, either through
Ward or Health, depending on where you are in the gearing process.
Rip Blood is used as a way for us to sustain ourselves, either through
Ward or Health, depending on where you are in the gearing process.
![]() Bone Curse will automate itself with a 6 second cooldown, increasing damage dealt
substantially and increasing clear speed.
Bone Curse will automate itself with a 6 second cooldown, increasing damage dealt
substantially and increasing clear speed.
The build uses ![]() Reaper Form for a few reasons; Cast Speed increase,
a boost to Necrotic Damage, increased Movement Speed on kill, and larger
increases to Critical Hit and Critical Multiplier while Transformed.
Reaper Form for a few reasons; Cast Speed increase,
a boost to Necrotic Damage, increased Movement Speed on kill, and larger
increases to Critical Hit and Critical Multiplier while Transformed.
While it is not specialized, the build will utilize ![]() Transplant for movement.
This is preferred over
Transplant for movement.
This is preferred over ![]() Reap as Transplant has further reach and is more
instant than the alternative.
Reap as Transplant has further reach and is more
instant than the alternative.
You will notice doubled up skills on our skill row; this is normal.
The build uses minimal skills and automates most everything. Feel free to
place things how you want, as long as ![]() Reaper Form,
Reaper Form, ![]() Chaos Bolts
and
Chaos Bolts
and ![]() Transplant are on your hotbar.
Transplant are on your hotbar.

Class and Skill Passive Trees
Our base class is the Acolyte, which acts as a generic spell caster and summoner. Our character will be offered an opportunity to select an Advanced Mastery once we have completed the first act of the campaign. Each base class has three possible masteries to choose from. For the Acolyte, we have access to the Mastery Tree Passives for Necromancers, Lich and Warlock. Upon selecting a Mastery and placing 20 Passive Points into the Acolyte Tree, you'll then be able to place Passive Points into the Mastery Trees.
Lich as our advanced class for the build. We will utilize the majority of our Passive
Points for the Lich Passive tree, with minimal points in the Acolyte tree. The Lich passives will focus
around increases to Necrotic Damage, Cast Speed and Critical Hit modifiers. To help round the build out and unlock
![]() Chaos Bolts, we will be taking additional points in the Warlock tree. These points will focus on defensive gains
and our Mana pool.
Chaos Bolts, we will be taking additional points in the Warlock tree. These points will focus on defensive gains
and our Mana pool.
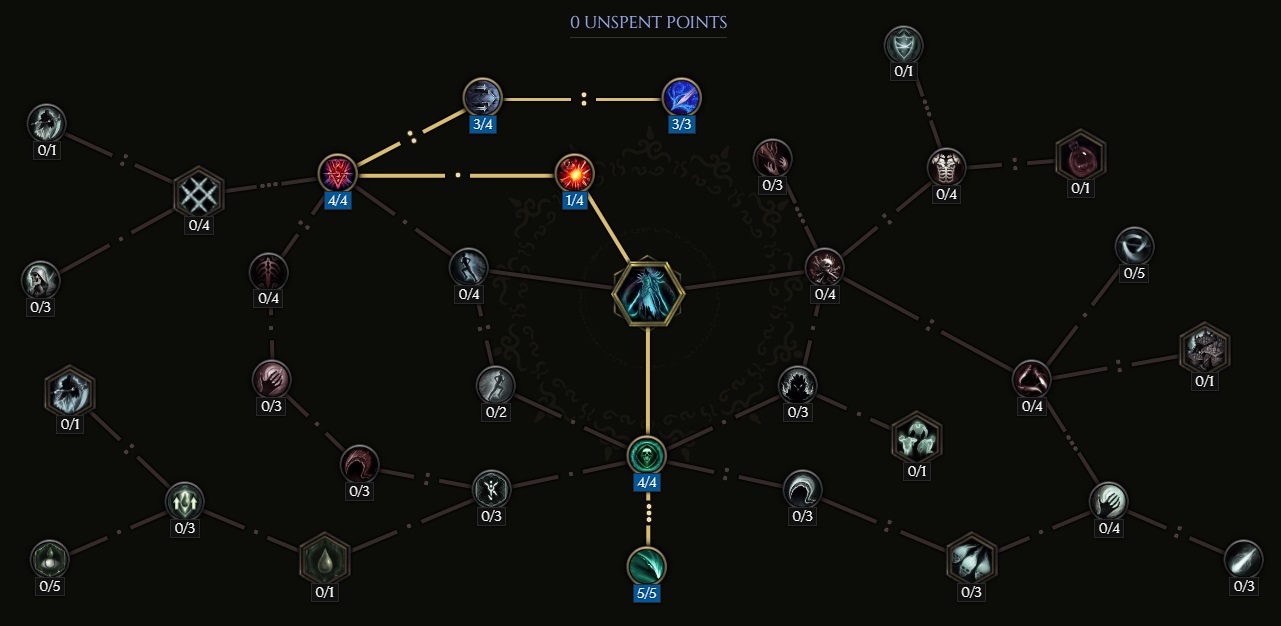
Acolyte Passive Points
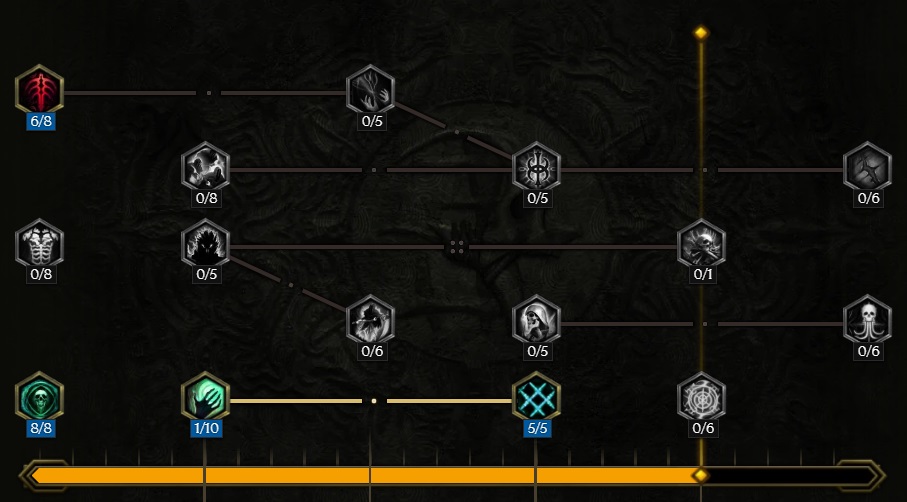
- 8 points into Forbidden Knowledge: Intelligence and Necrotic Resistance.
- 6 points into Blood Aura: Increased damage for you and Golems.
- 1 point into Mania of Mortality: Traversal node.
- 5 points into Unnatural Preservation: Large gains to Ward Retention, Necrotic Resistance, and Poison Resistance.
Our base class is the Acolyte, which acts as a generic spell caster and summoner. Our character will be offered an opportunity to select an Advanced Mastery once we have completed the first act of the campaign. Each base class has three possible masteries to choose from. For the Acolyte, we have access to the Mastery Tree Passives for Necromancers, Lich and Warlock. Upon selecting a Mastery and placing 20 Passive Points into the Acolyte Tree, you'll then be able to place Passive Points into the Mastery Trees.
Lich as our advanced class for the build. We will utilize the majority of our Passive
Points for the Lich Passive tree, with minimal points in the Acolyte tree. The Lich passives will focus
around increases to Necrotic Damage, Cast Speed and Critical Hit modifiers. To help round the build out and unlock
![]() Chaos Bolts, we will be taking additional points in the Warlock tree. These points will focus on defensive gains
and our Mana pool.
Chaos Bolts, we will be taking additional points in the Warlock tree. These points will focus on defensive gains
and our Mana pool.
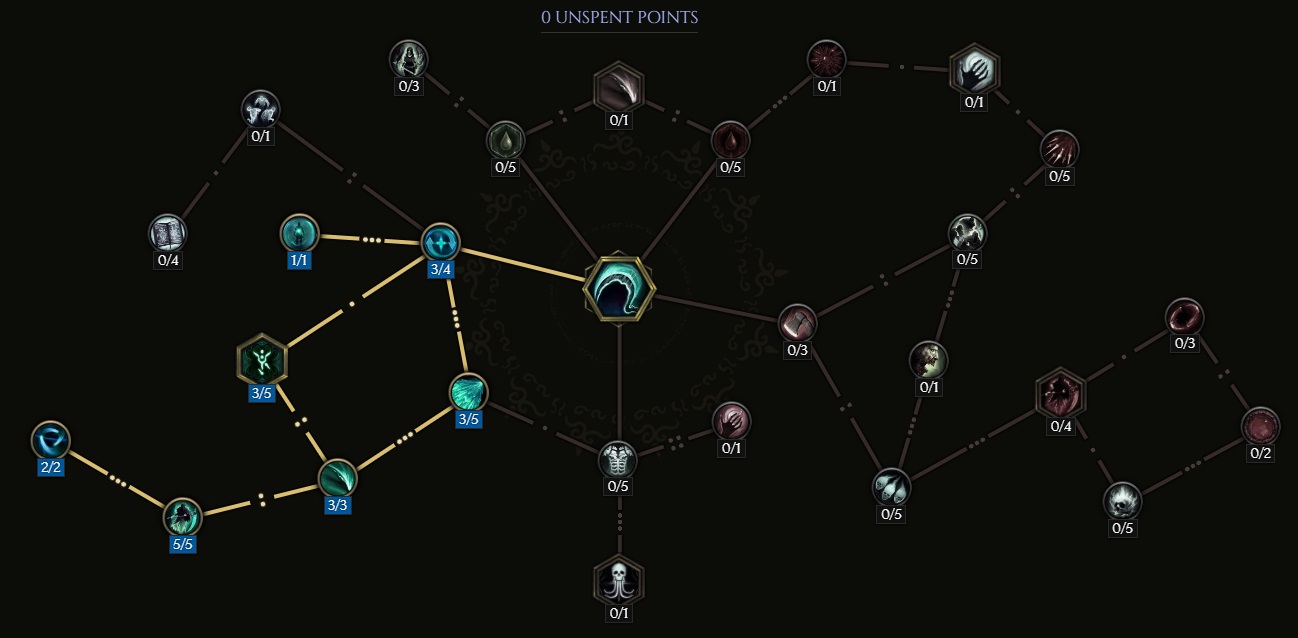
Lich Passive Points
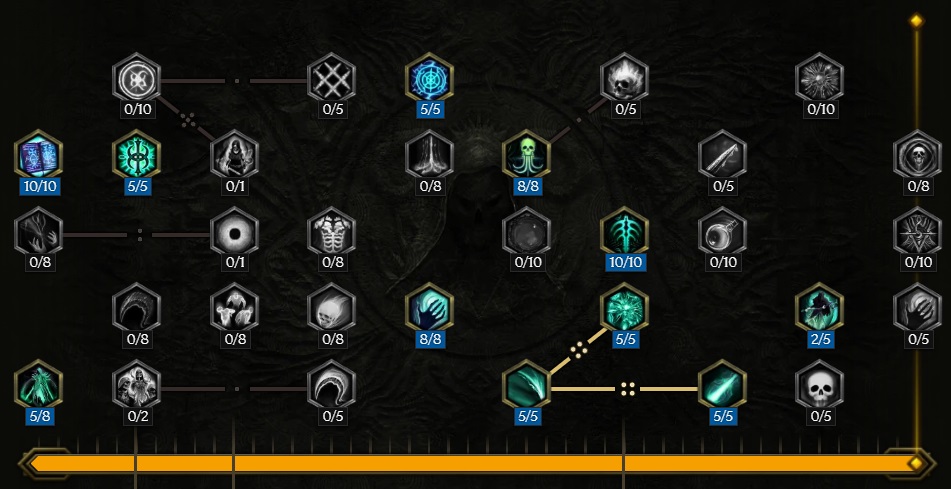
- 10 points into Apocrypha: Intelligence and Mana Regen.
- 5 poinst into Dance with Death: Increased damage, with a larger bonus at low Health.
- 5 points into Grasp of Fate: Increased Necrotic Damage.
- 5 points into Mental Cacophony: Mana and Ward Retention.
- 8 points into Crippling Insight: Intelligence gain..
- 8 points into Three Plagues: Necrotic Penetration.
- 5 points into Deathbringer: Increased Cast Speed and Critical Strike Chance.
- 5 points into Darkguard: Increased Critical Strike Chance, as well as Ward generated per Critical Hit.
- 10 points into Necrotic Energy: Added Melee Necrotic Damage.
- 5 points into Clairvoyant Insight: Critical Strike Multiplier.
- 2 points into Ageless Ascetic: Bonuses to Cast Speed, Movement Speed, and Damage Leech.
Our base class is the Acolyte, which acts as a generic spell caster and summoner. Our character will be offered an opportunity to select an Advanced Mastery once we have completed the first act of the campaign. Each base class has three possible masteries to choose from. For the Acolyte, we have access to the Mastery Tree Passives for Necromancers, Lich and Warlock. Upon selecting a Mastery and placing 20 Passive Points into the Acolyte Tree, you'll then be able to place Passive Points into the Mastery Trees.
Lich as our advanced class for the build. We will utilize the majority of our Passive
Points for the Lich Passive tree, with minimal points in the Acolyte tree. The Lich passives will focus
around increases to Necrotic Damage, Cast Speed and Critical Hit modifiers. To help round the build out and unlock
![]() Chaos Bolts, we will be taking additional points in the Warlock tree. These points will focus on defensive gains
and our Mana pool.
Chaos Bolts, we will be taking additional points in the Warlock tree. These points will focus on defensive gains
and our Mana pool.
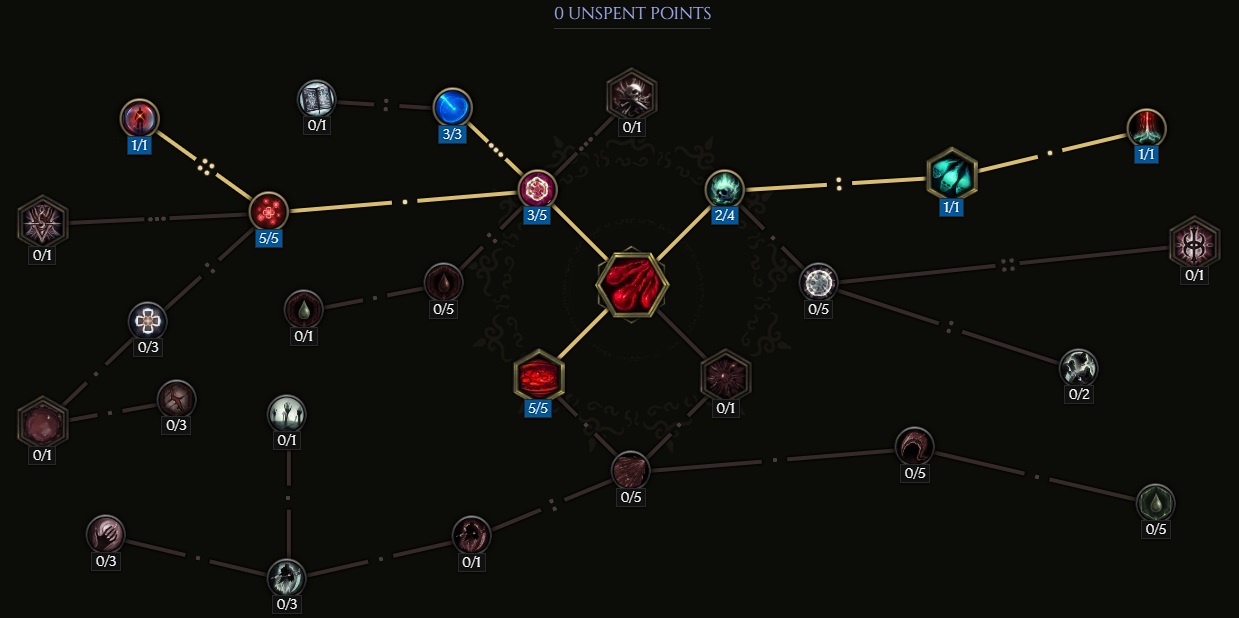
Warlock Passive Points
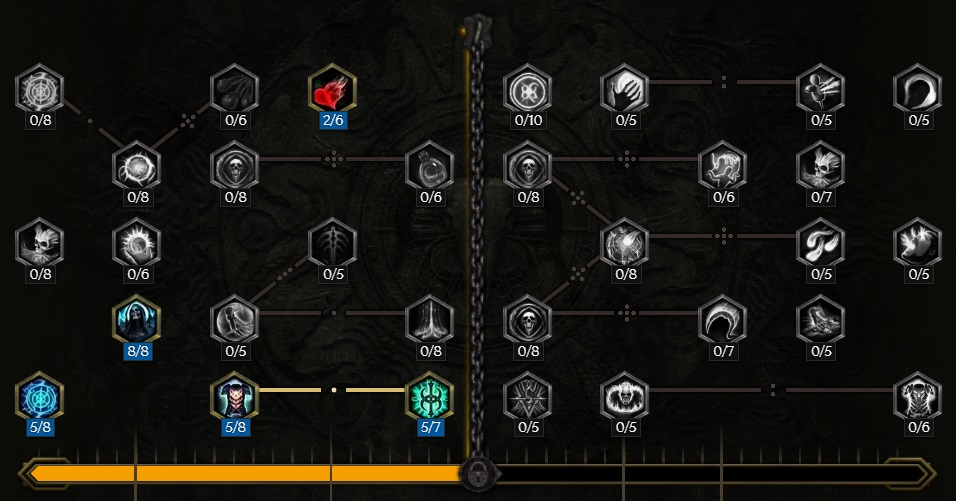
- 5 points into Soul Stealer: Increased Mana Regen, but also provides a chance per Curse on the target to gain Mana on hit.
- 8 points into Occultist's Mind: Intelligence gains, and added Mana per Intelligence point.
- 5 points into Harrowing Armor: Taken specifically for the increased Armor per Curse on the target bonus.
- 5 points into Dark Protections: Ward per second, as well as 2% less damage per Curse on the enemy.
- 2 points into Spirit Leech: Extra Leech, with a bonus against Cursed enemies.
In this section, we will break down each skill and highlight the key passives we have selected to make the skill shine in the build. While some of these skills do allow for some variation to exist depending on your own custom choices, we recommend utilizing the skill trees as presented until you have a strong understanding of the build itself.
Chaos Bolts
![]() Chaos Bolts automates nearly our entire build for us. Through this skill, we automate the casting
of
Chaos Bolts automates nearly our entire build for us. Through this skill, we automate the casting
of ![]() Rip Blood,
Rip Blood, ![]() Bone Curse, and most importantly
Bone Curse, and most importantly ![]() Harvest. This is the only manually casted
damage-dealing skill used in the entire build. Our main focus for Chaos Bolts will be to increase Cast Speed.
Harvest. This is the only manually casted
damage-dealing skill used in the entire build. Our main focus for Chaos Bolts will be to increase Cast Speed.
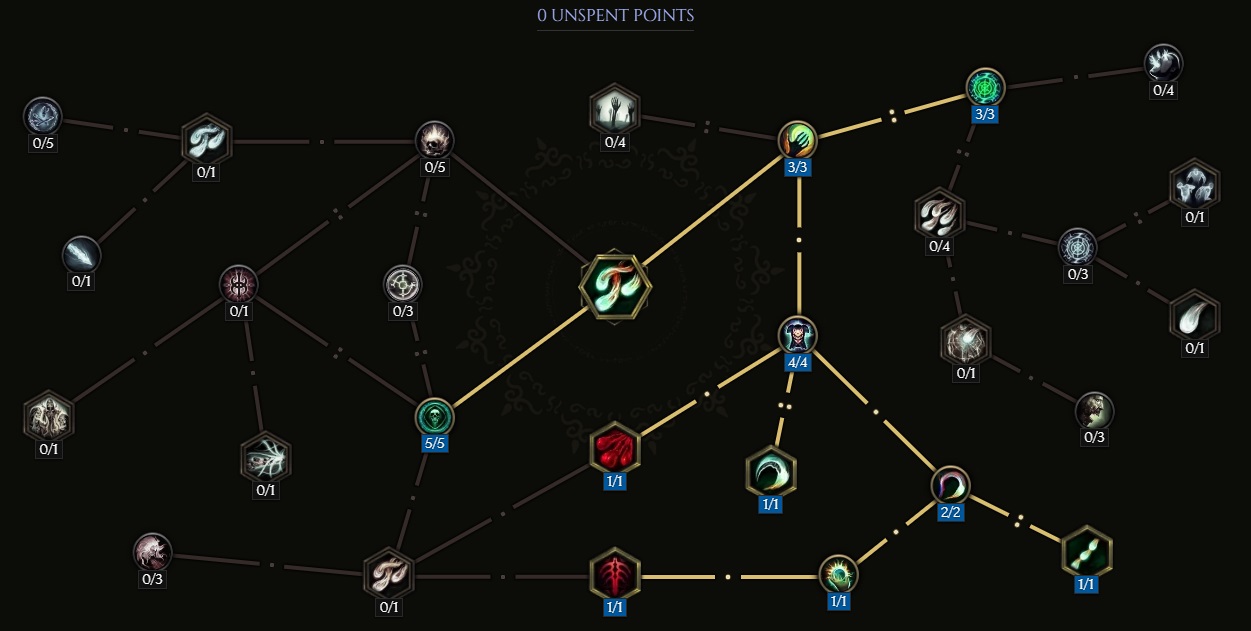
Order of Skill Points
- 3 points into Abrupt Chaos: Increased Casting Speed, and Chaos Bolts travel faster.
- 4 points into Doom's Vindication: Damage boosts, and a bonus to damage against Cursed enemies.
- 1 point into Reaper of Mayhem: Grants a chance to proc
 Harvest per Dexterity. For this build, we
will aim for around 30 - 40 Dexterity.
Harvest per Dexterity. For this build, we
will aim for around 30 - 40 Dexterity. - 1 point into Exacted Libation: Grants a chance to proc
 Rip Blood per Intelligence For this build, we
will have more than 100 Intelligence and this should proc at the highest rate possible.
Rip Blood per Intelligence For this build, we
will have more than 100 Intelligence and this should proc at the highest rate possible. - 2 points into Devour the Damned: Health and Mana gains per hit against Cursed enemies.
- 1 point into Cursed Blood: Refreshes Curse duration on Hit, and refunds more Health per Curse on an enemy.
- 1 point into Another Affliction: Automates
 Bone Curse when you hit a Cursed enemy with Chaos Bolts.
 - 1 point into Seed of Chaos : Adds a 10% chance to recast Chaos Bolts when you hit a Cursed enemy, but only if they're at least 5 meters away.
- 3 points into Pandemonium: 39% chance for larger Chaos Bolts to be cast.
In this section, we will break down each skill and highlight the key passives we have selected to make the skill shine in the build. While some of these skills do allow for some variation to exist depending on your own custom choices, we recommend utilizing the skill trees as presented until you have a strong understanding of the build itself.
Harvest
![]() Harvest is the main damage dealer in this build. It is proc'd off Chaos Bolts, and can proc
three times a second. The proc chance scales off Dexterity, and will come entirely from gear affixes. Due to
how this skill procs, there's a careful balance between Cast Speed and Dexterity that needs to be taken into
consideration in order to maximize DPS output. The higher your Cast Speed, theoretically will lower the necessity for Dexterity
as you will be hitting that three casts a second threshold much easier. Early in the gearing process, more Dexterity
will be preferred in order to make sure you get Harvest off as needed. Later on you can pull some Dexterity off gear
and replace it with other necessary attributes, such as Intelligence, which adds 1 Melee Necrotic Damage to the base
value of Harvest per point, rather than the normal scaling of 4% Increased Damage most other skills use.
Harvest is the main damage dealer in this build. It is proc'd off Chaos Bolts, and can proc
three times a second. The proc chance scales off Dexterity, and will come entirely from gear affixes. Due to
how this skill procs, there's a careful balance between Cast Speed and Dexterity that needs to be taken into
consideration in order to maximize DPS output. The higher your Cast Speed, theoretically will lower the necessity for Dexterity
as you will be hitting that three casts a second threshold much easier. Early in the gearing process, more Dexterity
will be preferred in order to make sure you get Harvest off as needed. Later on you can pull some Dexterity off gear
and replace it with other necessary attributes, such as Intelligence, which adds 1 Melee Necrotic Damage to the base
value of Harvest per point, rather than the normal scaling of 4% Increased Damage most other skills use.
No matter what, it is unlikely you will want less than 30 Dexterity to make the build feel smooth. Below this amount of Dexterity, the rotation may feel clunky, and the damage output will most likely not be consistent.
Order of Skill Points
- 3 points into Mind Harvest: Adds Ward generation when you hit Cursed enemies.
- 1 point in Mirror Soul: Grants Ward based on maximum Health when you hit a Cursed enemy.
- 3 points in Great Scythe: Increases the area that Harvest deals damage in.
- 3 points into Symbol of Loss: Harvest deals extra damage against Cursed enemies.
- 3 points in Spectral Whetstone: Adds base Critical Strike Chance to Harvest.
- 5 points in Learned Weakness: Increases global Critical Strike Chance by 50%.
- 2 points in Steal Youth: Extra Movement Speed when you land critical hits.
In this section, we will break down each skill and highlight the key passives we have selected to make the skill shine in the build. While some of these skills do allow for some variation to exist depending on your own custom choices, we recommend utilizing the skill trees as presented until you have a strong understanding of the build itself.
Rip Blood
In order to add sustain to the build, ![]() Rip Blood is proc'd off
Rip Blood is proc'd off ![]() Chaos Bolts. By the time you are
ready for Empowered Monoliths, your Intelligence should be somewhere above 80, if not at 100. This will ensure consistent
Blood Rip casts. Blood Rip costs zero Mana, so it won't cut into our resources at all. It is just a nice bonus to
add to the build. Early on, before you get enough Leech, you may want to run Rip Blood as a source of Health. However,
later on, you should invest the singular point into Arcane Fortress in order to build up our Ward shield.
It is up to the player on making this distinction and when they are comfortable making the change. For an example, we have alloted
points specifically with Ward generation in mind.
Chaos Bolts. By the time you are
ready for Empowered Monoliths, your Intelligence should be somewhere above 80, if not at 100. This will ensure consistent
Blood Rip casts. Blood Rip costs zero Mana, so it won't cut into our resources at all. It is just a nice bonus to
add to the build. Early on, before you get enough Leech, you may want to run Rip Blood as a source of Health. However,
later on, you should invest the singular point into Arcane Fortress in order to build up our Ward shield.
It is up to the player on making this distinction and when they are comfortable making the change. For an example, we have alloted
points specifically with Ward generation in mind.
Order of Skill Points
- 2 points into Arcane Absorption: Traversal node.
- 1 point into Rip Spirit: Rip Blood is converted to Necrotic.
- 1 point into Arcane Fortress: Blood Orbs now grant Ward instead of Health.
- 3 points into Hemomancer: Traversal node.
- 3 points into Thirst: Reduces the Mana cost to zero.
- 5 points into Splatter: Rip Blood has a 100% chance to splatter and deal AoE damage.
- 5 points into Quenching: Blood Orbs travel faster and grant more Ward.
- 1 point into Hematology: Blood Orbs grants more Ward per Intelligence.
In this section, we will break down each skill and highlight the key passives we have selected to make the skill shine in the build. While some of these skills do allow for some variation to exist depending on your own custom choices, we recommend utilizing the skill trees as presented until you have a strong understanding of the build itself.
Bone Curse

![]() Bone Curse is yet another automated spell cast from
Bone Curse is yet another automated spell cast from ![]() Chaos Bolts. The requirements for this
is not based off main attribute points like
Chaos Bolts. The requirements for this
is not based off main attribute points like ![]() Rip Blood and
Rip Blood and ![]() Harvest were. Instead, this
relies on an enemy already being Cursed through other means. Since the majority of curses are out of our reach as Lich,
we will be relying on
Harvest were. Instead, this
relies on an enemy already being Cursed through other means. Since the majority of curses are out of our reach as Lich,
we will be relying on ![]() Mortality's Grasp to inflict Marked For Death. There is a 6 second cooldown
on Bone Curse automating off Chaos Bolts, so even a low roll on the unique gloves is more than fine to take advantage
of the effect.
Mortality's Grasp to inflict Marked For Death. There is a 6 second cooldown
on Bone Curse automating off Chaos Bolts, so even a low roll on the unique gloves is more than fine to take advantage
of the effect.
The purpose of ![]() Bone Curse is to add Kill Threshold, apply Marked For Death in an AoE
to all nearby enemies, and to provide a damage increase to hits dealt while Bone Curse is active. This skill will
greatly speed up our mapping speed, allowing us to mow down mobs quickly.
Bone Curse is to add Kill Threshold, apply Marked For Death in an AoE
to all nearby enemies, and to provide a damage increase to hits dealt while Bone Curse is active. This skill will
greatly speed up our mapping speed, allowing us to mow down mobs quickly.
Order of Skill Points
- 5 points into Conflation: Amplifies the size of Bone Curse by 150%.
- 1 point into Sigil of Mortality: Casts Marked For Death on enemies hit by Bone Curse.
- 4 points into Reaper's Mark: Marked for Death now lasts longer.
- 1 point into Misery: Converts Bone Curse into a Necrotic spell.
- 5 points into Iron Maiden: 50% more damage.
- 3 points into Brittle Bones: Additional damage and Killl Threshold.
- 2 points into Crippling Anguish: Adds a 4 second Slow to enemies hit by Bone Curse.
In this section, we will break down each skill and highlight the key passives we have selected to make the skill shine in the build. While some of these skills do allow for some variation to exist depending on your own custom choices, we recommend utilizing the skill trees as presented until you have a strong understanding of the build itself.
Reaper Form
![]() Reaper Form, while a transformation skill, is mainly used as a way for us to increase our stats.
This ability will bolster our Critical Hit Chance and Critical Multiplier, increase our base damage, increase our
Cast Speed, and also provide us the ability to increase our Movement Speed after kills.
Reaper Form, while a transformation skill, is mainly used as a way for us to increase our stats.
This ability will bolster our Critical Hit Chance and Critical Multiplier, increase our base damage, increase our
Cast Speed, and also provide us the ability to increase our Movement Speed after kills.
Order of Skill Points
- 1 point into Mistress of Decay: Slows the decay ramp up from having Reaper Form active.
- 1 point into Soul for a Soul: Traversal node.
- 4 points into Reaper's Curse: Increases damage and Critical Hit Chance. Adds the drawback of losing Health on kill.
- 2 points into Death Comes Quickly: 50% chance to gain Swiftness on kill. You can get 10 stacks of this at maximum.
- 3 points into Rapid Destruction: 30% Cast Speed increase.
- 4 points into Deathtouch Scythe: Added Necrotic Damage.
- 5 points into Executioner: Additional Critical Multiplier.
Build Mechanics and Playstyle
The playstyle for this Lich build is classic caster gameplay, with a twist. Rather than deal damage with spells,
most of the damage dealt by this build will actually be melee-based. ![]() Chaos Bolts have a popcorn effect;
a single Chaos Bolt can proc
Chaos Bolts have a popcorn effect;
a single Chaos Bolt can proc ![]() Bone Curse,
Bone Curse, ![]() Rip Blood and
Rip Blood and ![]() Harvest. While the popcorn effect
has a cooldown for all three automated spells, it is quite the effective method for both clearing mob packs as
well as keeping our Health and Ward sustained. For a more detailed explanation on these three effects, be sure to
read the description in the skill box located above this section.
Harvest. While the popcorn effect
has a cooldown for all three automated spells, it is quite the effective method for both clearing mob packs as
well as keeping our Health and Ward sustained. For a more detailed explanation on these three effects, be sure to
read the description in the skill box located above this section.
Some things to note:
 Reaper Form has a limited duration. Eventually you will
either run out of mobs, or be unable to keep up with the rate of decay
on the skill. Your goal should be to move as swiftly as possible through
maps in order to clear the echo before Reaper Form runs out. The stacks
on Swiftness will be your best friend, as a large group of mobs can
give you close to max stacks instantly, and they last 30 seconds... or around
the same time frame where Reaper Form will begin to become hard to maintain.
As long as there is a constant supply of enemies, these stacks should be easy to maintain.
Be careful once you drop the transformation. You can still kill mobs just fine, however
you will deal a bit less damage, and have less Cast Speed. If climbing Corruption, this
is even more important to consider.
Reaper Form has a limited duration. Eventually you will
either run out of mobs, or be unable to keep up with the rate of decay
on the skill. Your goal should be to move as swiftly as possible through
maps in order to clear the echo before Reaper Form runs out. The stacks
on Swiftness will be your best friend, as a large group of mobs can
give you close to max stacks instantly, and they last 30 seconds... or around
the same time frame where Reaper Form will begin to become hard to maintain.
As long as there is a constant supply of enemies, these stacks should be easy to maintain.
Be careful once you drop the transformation. You can still kill mobs just fine, however
you will deal a bit less damage, and have less Cast Speed. If climbing Corruption, this
is even more important to consider.- This build is very gear dependent. Not because the pieces are rare, but because it has many stat requirements to make the build smooth. This build should not be leveled with. Only begin to work towards it once you are able to either target farm through Prophecies in The Circle of Fortune, or can buy specialized pieces specific to this build with the Merchant's Guild.
- Manual casting of Bone Curse is an option! While
 Mortality's Grasp is a great addition
to the build for the application of Marked For Death, you may decide that immediate application
of a curse is more important to mow down a group of threatening enemies quickly.
Mortality's Grasp is a great addition
to the build for the application of Marked For Death, you may decide that immediate application
of a curse is more important to mow down a group of threatening enemies quickly.
Equipment and Gear Affixes
In order to run this build smoothly, the following stat thresholds should be met:
- 100 or more Intelligence.
- At least 35 Dexterity.
- An increase of 90% Cast Speed, while in Reaper Form.
- As close to 100% Critical Rate on Harvest with as much Critical Multiplier as you can get.
- At least 40% increased Movement Speed, without the Swiftness stacks from Reaper Form.
- The Unique items Mortality's Grasp,
 Twisted Heart of Uhkeiros,
  Siphon of Anguish and
  Boneclamor Barbute.
| Gear Slot | Implicits | Modifiers |
|---|---|---|
| One-handed Axe | Melee Necrotic Damage Increased Melee Necrotic Damage Increased Minion Necrotic Damage |
Prefixes Melee Critical Strike Chance Critical Strike Multiplier Suffixes Chance to Shred Armor Chance to apply Frailty on Melee Hit |
| Off-hand Catalyst | Intelligence Ward per Second Ward Retention |
Prefixes Increased Cast Speed Increased Necrotic Damage Suffixes Needed Resistances |
| Head | Legendary Potential Intelligence Chance for 3 additional projectiles when you directly cast Chaos Bolts |
|
| Amulet | Brass Amulet | Prefixes Necrotic ResistanceCritical Strike Multiplier Suffixes Needed Resistances Chance to Shred Armor on Hit |
| Chest | Armor Increased Cast Speed |
Prefixes Increased Necrotic Damage While Transformed Dexterity Suffixes Increased Health Health |
| Belt | Mana | Prefixes Increased Necrotic Damage Increased Mana Regen Suffixes Critical Strike Avoidance Hybrid Health |
| Gloves | Legendary Potential Dexterity Hybrid Health |
|
| Ring | Legendary Potential Dexterity Increased Necrotic Damage |
|
| Ring | Increased Movement Speed | Prefixes Intelligence Increased Necrotic Damage Suffixes Needed Resistances |
| Feet | Armor Increased Movement Speed Ward Decay Threshold |
Prefixes Intelligence Increased Movement Speed Suffixes Health Hybrid Health |
| Relic | Legendary Potential Increased Cast Speed |
A loot filter made specifically for the gear table above may be copied by pressing the button below. Once in the Loot Filter portion of the in-game menu, choose the "Paste Clipboard Contents" option to import the code.
Copy Loot Filter to Clipboard
Uniques
This build requires every single Unique item that appears in this section, however ![]() Twisted Heart of Uhkeiros is non-negotiable. There
is no substitute.
Twisted Heart of Uhkeiros is non-negotiable. There
is no substitute.
Twisted Heart of Uhkeiros
![]() Twisted Heart of Uhkeiros: This is where a large portion of our Ward generation will come from. Every cast of
Twisted Heart of Uhkeiros: This is where a large portion of our Ward generation will come from. Every cast of
![]() Chaos Bolts will trigger the effect, so it is important to make sure you have the ability to leech Health back
and sustain ourselves. If you can not, due to gear, drop the Ward from
Chaos Bolts will trigger the effect, so it is important to make sure you have the ability to leech Health back
and sustain ourselves. If you can not, due to gear, drop the Ward from ![]() Rip Blood and allow it to heal you instead.
You can be target farm this in the Monolith Timeline "Reign of Dragons".
Rip Blood and allow it to heal you instead.
You can be target farm this in the Monolith Timeline "Reign of Dragons".
Mortality's Grasp
![]() Mortality's Grasp: This is one of the only ways to automate a curse on enemies. Without these gloves, you
will be forced to manually apply
Mortality's Grasp: This is one of the only ways to automate a curse on enemies. Without these gloves, you
will be forced to manually apply ![]() Bone Curse which may feel clunky while clearing maps, and cut into the short amount
of time we have in
Bone Curse which may feel clunky while clearing maps, and cut into the short amount
of time we have in ![]() Reaper Form. Keep in mind, these gloves also supply a large amount of Health as well, boosting our
defensives and Ward generation. Farm these gloves in the Monolith timeline "Ending the Storm".
Reaper Form. Keep in mind, these gloves also supply a large amount of Health as well, boosting our
defensives and Ward generation. Farm these gloves in the Monolith timeline "Ending the Storm".
Siphon of Anguish
![]() Siphon of Anguish: Adds a form of Leech to the build, helping us to sustain the Health drain from the unique effect of
Siphon of Anguish: Adds a form of Leech to the build, helping us to sustain the Health drain from the unique effect of ![]() Twisted Heart of Uhkeiros.
These drop extremely often from Orobyss encounters, and the goal here should be LP2.
Twisted Heart of Uhkeiros.
These drop extremely often from Orobyss encounters, and the goal here should be LP2.
Boneclamor Barbute
![]() Boneclamor Barbute: This Helmet is mainly used for the amount of attribute points it provides, namely Dexterity. It also
adds Ward per second based on our Necrotic Resistance, which should be relatively high due to our class trees and this helmet combined.
Target farm for this item in the Monolith Timeline "The Black Sun".
Boneclamor Barbute: This Helmet is mainly used for the amount of attribute points it provides, namely Dexterity. It also
adds Ward per second based on our Necrotic Resistance, which should be relatively high due to our class trees and this helmet combined.
Target farm for this item in the Monolith Timeline "The Black Sun".
Idols
Idol slots are gained through the campaign, unlocking small bonuses and unique affixes for the player to discover and augment their builds with. The Idol screen consists of a grid system for the player to fill out with different sized idols, eventually filling in every part of the grid. As the Idol shape increases (1x1, 1x2, 1x3, 1x4, etc.) the stronger an affix you might find for your build.
This build does not require any hard idols to obtain. Focus on any Idol that supplies Ward Retention, health, or missing Resistances.
Blessing
Blessings are permanent buffs that are applied to your character. These come in two different powers, Standard and Grand. Grand blessings are significantly stronger than the Standard Blessings. In total, there are 10 Blessing Slots, one for each Monolith Timeline. When you complete a Monolith and defeat the final boss you will be awarded a choice of three blessing with a random value.
| Blessing Name | Affix | Timeline |
|---|---|---|
| Critical Multiplier | The Black Sun | |
| Chance to Shred Necrotic Resistance | Spirits of Fire | |
| Critical Avoidance | Reign of Dragons |
All remaining Blessings can and should be used to fill in gaps in Resistances or to bolster other aspects of our defensive layering, depending on what gear drops you have gotten.
Changelog
- 13 Mar. 2024: Build Planner added.
- 19 Feb. 2024: Guide Added.

GhazzyTV is a professional content creator that knows all about theory crafting builds in Path of Exile and Last Epoch and has been teaching players how to build their characters for over 9 years. He is a huge Blizzard fan with thousands of hours invested into Diablo 3 and 4 and is a frequent World of Warcraft Classic player. His builds will be helpful content for new players and veterans alike. You can find his PoE Vault Guide Hub here and his LE Guide Hub here. You can follow him on Twitch, YouTube or Twitter.
- Patch 1.0.7 Update: Multiplayer, Skills and More!
- Patch 1.0.6 Update: Camera Setting, Controller Keybinds, Bug Fixes, and More!
- Eleventh Hour Games on Real-Money Trading and Exploits in Last Epoch
- Patch 1.0.5 Update: Many Bug Fixes, Including Loot Filter Toggle Sensitivity, and Other Improvements!
- The First 30 Days of Last Epoch!
- 1.0 Launch Retrospective: A Message From Eleventh Hour Games
- Patch 1.0.4 Update: More In-Game Changes, Bug Fixes, and Improvements
- Last Epoch Mid-Cycle Balance Survey Recap