Marksman Cinder Strike Dragonfire Endgame Build for Last Epoch (Patch 1.0)
Welcome to our Last Epoch Marksman Cinder Strike Dragonfire build guide for the Rogue class. Here you will learn everything about the Marksman play style, passives, skills, strengths, and weaknesses to conquer the world of Eterra.
Build Introduction
Attack with the fury of a dragon, scorching the battlefield with
fiery, explosive arrows and the heat from the unique bow,
![]() Dragonsong. Leave naught but ash in your wake with
the fast-paced gameplay of this Cinder Strike build.
Dragonsong. Leave naught but ash in your wake with
the fast-paced gameplay of this Cinder Strike build.
 Dodge, Glancing Blows, Ward and Leech Life for sustain
 - High Attack Speed creates a fun rotation loop
- Low input required
- Not Mana dependent

 Requires melee-range combat for optimal performance
 - Low eHP when considering DoT and lethal one shot damage instances

Skill Selection
This build revolves around Critical Hit Rate, of which we have plenty of.
![]() Cinder Strike will be utilized as our spam skill.
Burning Daggers will automate off hits from, creating more instances for
us to proc
Cinder Strike will be utilized as our spam skill.
Burning Daggers will automate off hits from, creating more instances for
us to proc ![]() Dragonfire, which has a chance to activate off critical hits
from any action.
Dragonfire, which has a chance to activate off critical hits
from any action.
To bolster the offensive and defensive capabilities of the build,
we use ![]() Shurikens as a defensive layer, but they are also capable of
setting off
Shurikens as a defensive layer, but they are also capable of
setting off ![]() Dragonfire as well.
Dragonfire as well. ![]() Hail of Arrows is mostly
used to apply Armor Shred,
Fire Resistance Shred and Frailty, but also
supplies us with stacks of Dusk Shroud for standing within the AoE.
Hail of Arrows is mostly
used to apply Armor Shred,
Fire Resistance Shred and Frailty, but also
supplies us with stacks of Dusk Shroud for standing within the AoE.
![]() Smoke Bomb is used similar to
Smoke Bomb is used similar to ![]() Shurikens, as the
main purpose is defensive layering with Dodge, Glancing Blows, and Ward generation, but
also gives a large increase in Critical Hit Rate.
Shurikens, as the
main purpose is defensive layering with Dodge, Glancing Blows, and Ward generation, but
also gives a large increase in Critical Hit Rate. ![]() Shift is taken to provide
a moment of invulnerability and also to automate Shurikens.
Shift is taken to provide
a moment of invulnerability and also to automate Shurikens.

Class and Skill Passive Trees
Our base class is Rogue, which fills the role of a stealthy melee or ranged user in Last Epoch. Upon finishing Act 1 in the campaign, your character will be offered an opportunity to select an Advanced Mastery. Each base class has three possible Masteries to choose from. For Rogue, you can choose between Passive Trees for Bladedancer and Marksman. Upon selecting a Mastery and placing 20 Passive Points into the Rogue Tree, you'll then be able to place Passive Points into the Mastery Trees.
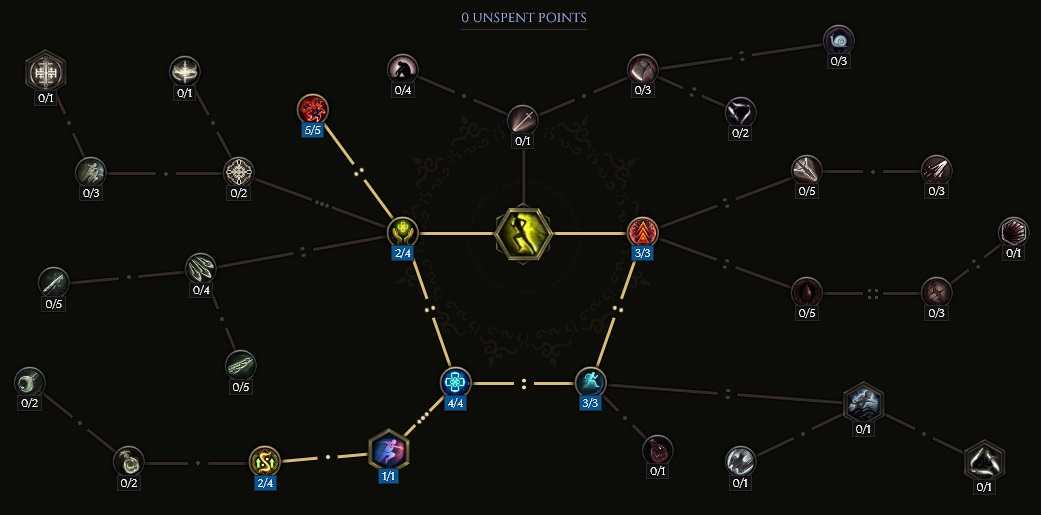
Marksman is the Advanced Class used for this build, and also where the majority of our Passive Points will come from. The Marksman Tree will focus around picking nodes that increase our Dexterity, Critical Chance and Multiplier, and our survivability through both Dodge and Ward. A lesser amount of Passive Points will come from Bladedancer, focusing entirely on Dexterity. Each Passive Tree and their points are broken down below.
Rogue Passive Points
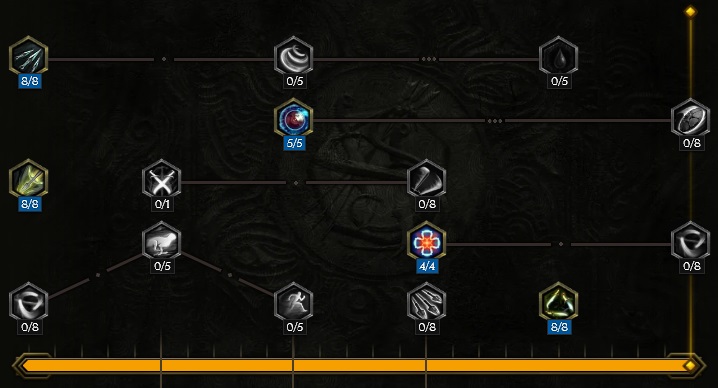
- 8 points into Swift Assassin: Attack Speed, used for
 Dragonfire procs.
 - 8 points into Steady Hand: Dexterity gains.
- 5 points into Dodge and Parry: As the name implies, provides Dodge Rating and damage reduction through Glancing Blows.
- 4 points into Sapping Strikes: Taken to offset the Health drain from gearing choices.
- 8 points into Critical Precision: 96% increased Critical Strike Chance for using a bow.
Our base class is Rogue, which fills the role of a stealthy melee or ranged user in Last Epoch. Upon finishing Act 1 in the campaign, your character will be offered an opportunity to select an Advanced Mastery. Each base class has three possible Masteries to choose from. For Rogue, you can choose between Passive Trees for Bladedancer and Marksman. Upon selecting a Mastery and placing 20 Passive Points into the Rogue Tree, you'll then be able to place Passive Points into the Mastery Trees.
Marksman is the Advanced Class used for this build, and also where the majority of our Passive Points will come from. The Marksman Tree will focus around picking nodes that increase our Dexterity, Critical Chance and Multiplier, and our survivability through both Dodge and Ward. A lesser amount of Passive Points will come from Bladedancer, focusing entirely on Dexterity. Each Passive Tree and their points are broken down below.
Marksman Passive Points
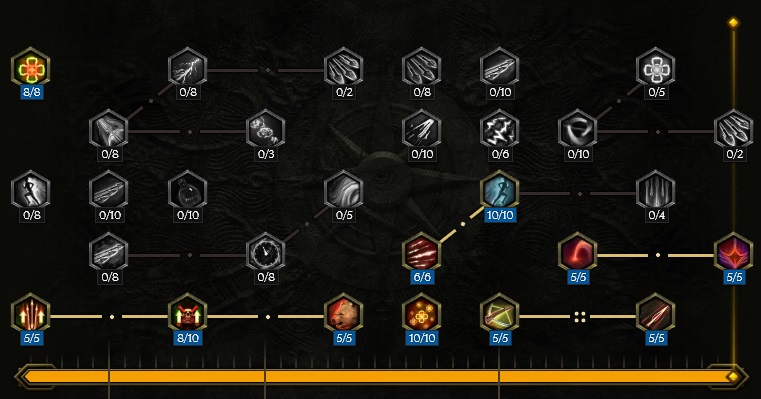
- 8 points into Draining Arrows: Taken to increase the proc rate of Dragonfire.
- 5 points into Assassin's Quiver: Provides a bump in Dexterity, but also makes enemies easier to hit.
- 8 points into Wound Maker: Simple, boosts DoT damage with Frostbite.
- 5 points into Heightened Senses: This node and the next couple will all deal with defensive layering. Thief's Quiver will provide us with Leech from all Bow Damage.
- 6 points into Arrow Storm: Huge increase in Attack Speed, great for bursts of damage.
- 10 points into Covering Fire: One of the most important nodes in the build; Silver Shroud stacks force a Dodge the next time we're hit, and for each point into this node, the Dodge grants us 100 Ward, totaling 1000 Ward gain. If used properly, this can be used to bully boss mechanics to keep uptime and sustain damage.
- 10 points into Thief's Quiver: Main form of sustain in the build.
- 5 points into Sharpshooter: Increases Bow Damage for ranged gameplay.
- 5 points into Death from Afar: Armor Shred and Stun Chance synergy with the previous node. This is great for map clearing.
- 5 points into Barrage of Pain: Continued attacking will increase Critical Hit Chance.
- 5 points into Perfect Aim: Similar to the previous node, but increases Critical Strike Multiplier and provides Health on Crit.
Our base class is Rogue, which fills the role of a stealthy melee or ranged user in Last Epoch. Upon finishing Act 1 in the campaign, your character will be offered an opportunity to select an Advanced Mastery. Each base class has three possible Masteries to choose from. For Rogue, you can choose between Passive Trees for Bladedancer and Marksman. Upon selecting a Mastery and placing 20 Passive Points into the Rogue Tree, you'll then be able to place Passive Points into the Mastery Trees.
Marksman is the Advanced Class used for this build, and also where the majority of our Passive Points will come from. The Marksman Tree will focus around picking nodes that increase our Dexterity, Critical Chance and Multiplier, and our survivability through both Dodge and Ward. A lesser amount of Passive Points will come from Bladedancer, focusing entirely on Dexterity. Each Passive Tree and their points are broken down below.
Bladedancer Passive Points
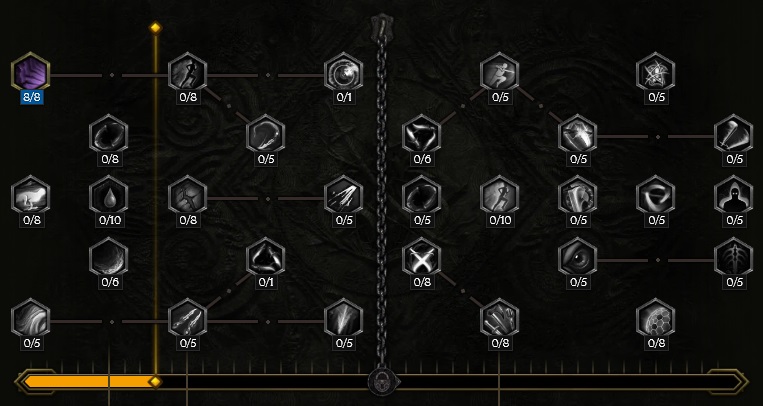
- 8 points into Cloak of Shadows: Dexterity gains.
In this section, we will break down each skill and highlight the key passives we have selected to make the skill shine in the build. While some of these skills do allow for some variation to exist depending on your own custom choices, we recommend utilizing the skill trees as presented until you have a strong understanding of the build itself.
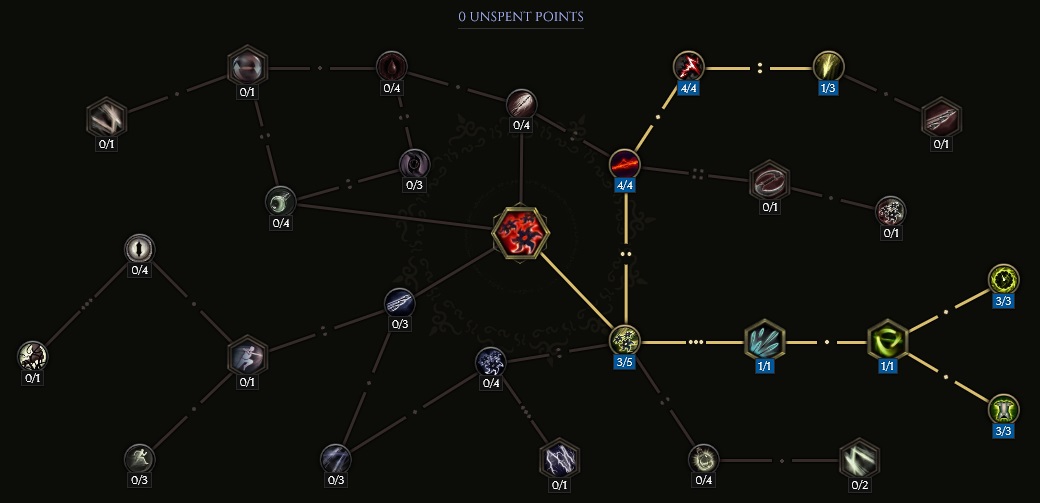
Cinder Strike
![]() Cinder Strike is our main spam skill; it isn't used to deal damage directly, only to land critical
hits on enemies through the skill itself and the Burning Daggers that automate off it. Each hit will also shred Fire
Resistance from the enemies it hits. THere's big bonuses in this tree for prolonged combat; each hit will provide the
player with a stack of Oil Coating that last for 4 seconds. Each stack increases Fire Damage and Fire Penetration
from all sources.
Cinder Strike is our main spam skill; it isn't used to deal damage directly, only to land critical
hits on enemies through the skill itself and the Burning Daggers that automate off it. Each hit will also shred Fire
Resistance from the enemies it hits. THere's big bonuses in this tree for prolonged combat; each hit will provide the
player with a stack of Oil Coating that last for 4 seconds. Each stack increases Fire Damage and Fire Penetration
from all sources.
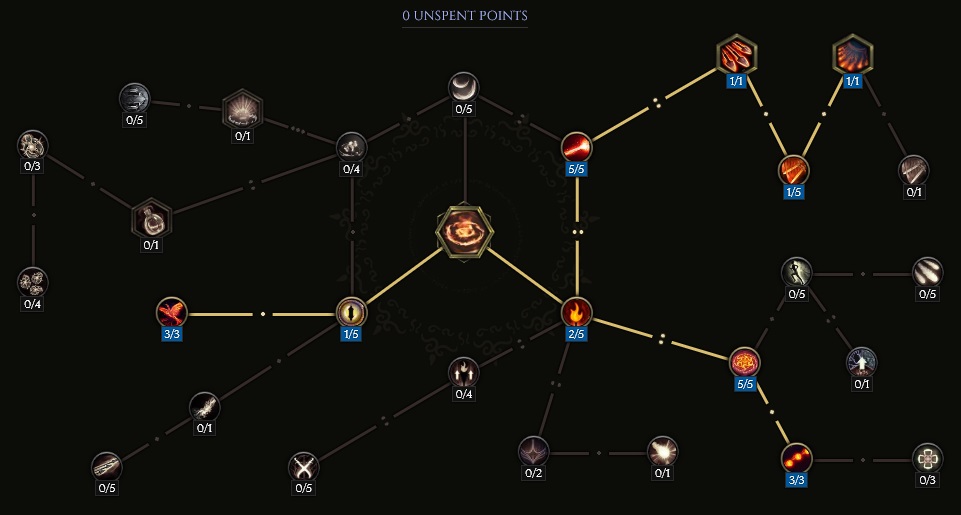
Order of Skill Points
- 1 point into Soot and Ash: Taken for pathing. Blind does not do much for us, since the build operates at 100% Critical Strike Avoidance.
- 3 points into Eagerness: Increases the Attack Speed for the second and third hits.
- 2 points into Ignition: Adds a small chance to Ignite enemies.
- 5 points into Kindling: Each hit shreds a single stack of Fire Resistance.
- 1 point into Burning Dagger: When you land a hit with Cinder Strike, you also attack with a Burning Dagger.
- 1 point into Flaming Fury: Taken for pathing. Mana is not an issue in the build, so expending it here won't change anything.
- 1 point into Firebreathing: The first hit of Cinder Strike throws five Burning Daggers.
- 5 points into Oil Coating: Hits with Cinder Strike grant a stack of Oil Coating and increase Fire Damage for a short period of time.
- 3 points into Combustible: At three stacks of Oil Coating, you gain 30% Fire Penetration.
In this section, we will break down each skill and highlight the key passives we have selected to make the skill shine in the build. While some of these skills do allow for some variation to exist depending on your own custom choices, we recommend utilizing the skill trees as presented until you have a strong understanding of the build itself.
Shift
![]() Shift's main purpose is traversal for this build, but also provides multiple layers of defense to
ensure we stay alive in the heat of battle. After Shifting, we will summon
Shift's main purpose is traversal for this build, but also provides multiple layers of defense to
ensure we stay alive in the heat of battle. After Shifting, we will summon ![]() Shurikens to float around us, boosting our Armor and dealing
damage to nearby enemies. The critical hits landed by Shuriken are capable of setting off
Shurikens to float around us, boosting our Armor and dealing
damage to nearby enemies. The critical hits landed by Shuriken are capable of setting off ![]() Dragonfire, so
keep that in mind, as shifting into a mob group may be the play to increase clear speed. Shifting will also briefly grant
us more Movement Speed when used.
Dragonfire, so
keep that in mind, as shifting into a mob group may be the play to increase clear speed. Shifting will also briefly grant
us more Movement Speed when used.
Order of Skill Points
- 3 points into Velocity: Cooldown reduction and a lower Mana cost.
- 2 points into Shadow Recuperation: Each time we Shift, we heal for a small amount.
- 5 points into Sleight of Hand: Automates Shuriken's, boosting Armor.
- 4 points into Swift Recovery: Refunds Mana cost.
- 1 point into Shadowslip: Creates a moment of Invulnerabilty while Shifting, allowing you to Shift through certain attacks and completely avoid damage.
- 3 points into Momentum: 50% Movement Speed boost after Shifting.
- 2 points into Elusive: For one second after using Shift, you gain increased Dodge Rating scaling off Dexterity.
In this section, we will break down each skill and highlight the key passives we have selected to make the skill shine in the build. While some of these skills do allow for some variation to exist depending on your own custom choices, we recommend utilizing the skill trees as presented until you have a strong understanding of the build itself.
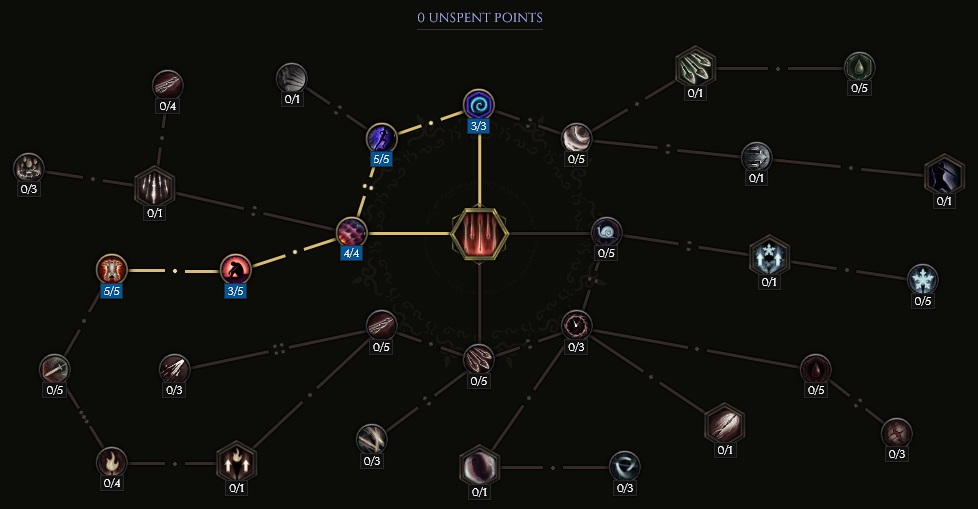
Shurikens
![]() Shurikens is used entirely for survival purposes in this build. You'll never press in manually, it is automated
off of
Shurikens is used entirely for survival purposes in this build. You'll never press in manually, it is automated
off of ![]() Shift and provides a boost in Armor while the Shurikens rotate around you. There's a couple damage
nodes taken, but they are more or less just so the points were not wasted. Shurikens can, and will, proc
Shift and provides a boost in Armor while the Shurikens rotate around you. There's a couple damage
nodes taken, but they are more or less just so the points were not wasted. Shurikens can, and will, proc ![]() Dragonfire,
so keep that in mind when deciding on wether to fight from range or in melee distance.
Dragonfire,
so keep that in mind when deciding on wether to fight from range or in melee distance.
Order of Skill Points
- 3 points into Alacrity: Purely for pathing.
- 1 point into Fan of Blades: Also a pathing node.
- 1 point into Blade Shield: This is what makes the shurikens float around you.
- 3 points into Floating Blades: Increases the duration from 3 seconds to roughly 4.5 seconds.
- 3 points into Bladed Armor: Provides a boost of 150% Armor when auto-cast by
 Shift.
 - 4 points into Ethereal Blades: Normally, Shurikens disappear when they strike an enemy. This keeps them spinning even when they make contact with an enemy.
- 2 points into Jagged Edges: Increases base Critical Hit Rate, ensuring a high rate of Dragonfire procs.
- 1 point into Massacre: Increases Crit Multiplier, as the last point.
In this section, we will break down each skill and highlight the key passives we have selected to make the skill shine in the build. While some of these skills do allow for some variation to exist depending on your own custom choices, we recommend utilizing the skill trees as presented until you have a strong understanding of the build itself.
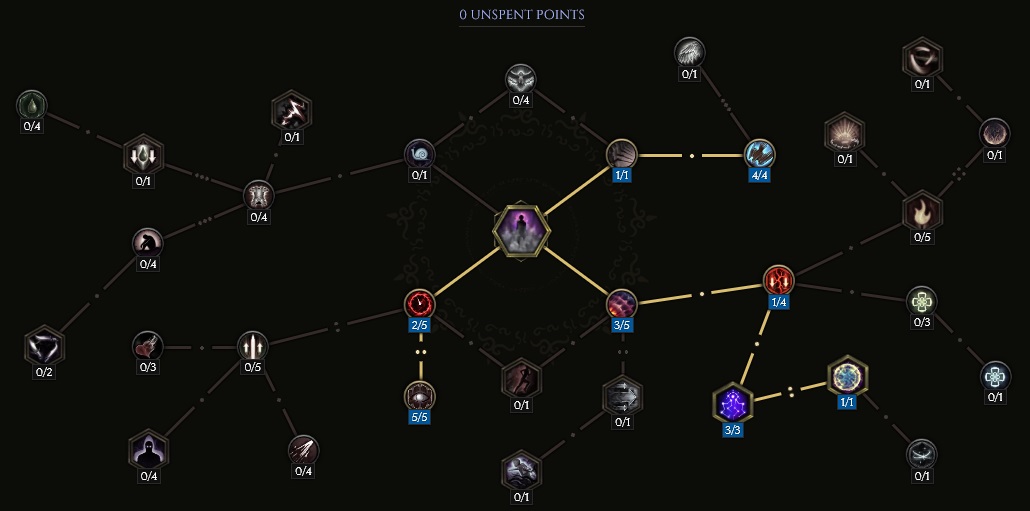
Smoke Bomb
![]() Smoke Bomb is mostly used defensively for the build, supplying Silver Shroud stacks (allowing
for the generation of 1300 Ward on demand) and increasing Dodge Rate and Glancing Blows Chance while inside
of the smoke. It does have a use outside of this though, in the fact it will cleanse ailments on use; this
will cleanse the Ignite stacks generated off
Smoke Bomb is mostly used defensively for the build, supplying Silver Shroud stacks (allowing
for the generation of 1300 Ward on demand) and increasing Dodge Rate and Glancing Blows Chance while inside
of the smoke. It does have a use outside of this though, in the fact it will cleanse ailments on use; this
will cleanse the Ignite stacks generated off ![]() Immolator's Oblation, so keep that in mind.
Immolator's Oblation, so keep that in mind.
Order of Skill Points
- 3 points into Generosity: Doubles the area of Smoke Bomb.
- 1 point into Enfeeblement: Defensive node, reducing enemy damage with Frailty.
- 3 points into Moonlight Bomb: Forces a dodge on the next damage instance, generating 300 Ward.
- 1 point into Cleansing Steam: Ailment cleanse, good for getting rid of DoTs.
- 1 point into Shrouded in Darkness: Generates Dusk Shroud, providing Glancing Blow Chance and Dodge Rating, for standing in the Smoke Cloud.
- 4 points into Rapid Concealment: Increases the rate at which we gain Dusk Shroud.
- 2 points into Lingering Fumes: Duration increased by 20%.
- 5 points into Shadow Hunter: Increases the base Critical Strike Chance of the build by 10% while inside of the smoke.
In this section, we will break down each skill and highlight the key passives we have selected to make the skill shine in the build. While some of these skills do allow for some variation to exist depending on your own custom choices, we recommend utilizing the skill trees as presented until you have a strong understanding of the build itself.
Hail of Arrows
![]() Hail of Arrows is used to ensure maximum damage from
Hail of Arrows is used to ensure maximum damage from ![]() Dragonfire by helping keep up
Armor Shred stacks on enemies. If you stand in it, it will also apply stacks of Dusk Shroud; just like
Dragonfire by helping keep up
Armor Shred stacks on enemies. If you stand in it, it will also apply stacks of Dusk Shroud; just like ![]() Smoke Bomb,
this will boost Dodge Rate and Glancing Blows Chance. This is the only real Mana spender in the build,
but it lasts a long time, so use it freely.
Smoke Bomb,
this will boost Dodge Rate and Glancing Blows Chance. This is the only real Mana spender in the build,
but it lasts a long time, so use it freely.
Order of Skill Points
- 4 points into Volley: Doubles the radius of Hail of Arrows.
- 3 point into Blighted Arrows: Chance to apply Frailty stacks.
- 5 points into Sundering Rain: One stack of Armor Shred per second an enemy stands in the AoE.
- 5 points into Blot Out the Sun: Dusk Shroud generation. This only applies if Hail of Arrows is stood inside of.
- 3 points into Steady: Increases the duration by 30%.
Build Mechanics and Playstyle
This build is all about dealing critical hits to proc ![]() Dragonfire. While the build can be played
at range, and even has some nodes in the Marksman Tree to facilitate this, this build shines when in melee
range. The range on Dragonfire isn't exactly large, so keep that in mind.
Dragonfire. While the build can be played
at range, and even has some nodes in the Marksman Tree to facilitate this, this build shines when in melee
range. The range on Dragonfire isn't exactly large, so keep that in mind. ![]() Cinder Strike and Burning Daggers will be the
main source of crits, and this attack is utilized for both AoE and single-target damage.
Cinder Strike and Burning Daggers will be the
main source of crits, and this attack is utilized for both AoE and single-target damage. ![]() Shurikens can
offer an alternative way to proc the conal spell, but requires using
Shurikens can
offer an alternative way to proc the conal spell, but requires using ![]() Shift to get up close and personal
with enemies, so be wary of one-shot mechanics or lethal mobs that may be around when you decide to do this.
Shift to get up close and personal
with enemies, so be wary of one-shot mechanics or lethal mobs that may be around when you decide to do this.
The base rotation for this build is simple; spam ![]() Cinder Strike, keep
Cinder Strike, keep ![]() Hail of Arrows active on enemies
at all times, and use
Hail of Arrows active on enemies
at all times, and use ![]() Smoke Bomb when necessary for defensive purposes or to cleanse unwanted ailments. Be wary, this will also
cleanse the Ignite stacks from
Smoke Bomb when necessary for defensive purposes or to cleanse unwanted ailments. Be wary, this will also
cleanse the Ignite stacks from ![]() Immolator's Oblation.
Immolator's Oblation.
Equipment and Gear Affixes
For this build, we will be focusing on several main affixes for each piece of non-unique gear, as well as working towards acquiring the specific Uniques needed to make this build operate correctly. Our equipment will focus on these specific affixes for the Implicits and Modifier stats.
| Gear Slot | Implicits | Modifiers |
|---|---|---|
| Bow | Legendary Potential Critical Strike Multiplier Critical Strike Chance, Increased Bow Attack Speed |
|
| Quiver | Legendary Potential Increased Fire Damage |
|
| Head | Armor Fire Resistance Critical Strike Multiplier |
Prefixes Dexterity Increased Damage while wielding a Bow Suffixes Increased Health Health |
| Amulet | Physical Resistance Necrotic Resistance |
Prefixes Critical Strike Multiplier Increased Fire Damage Suffixes Needed Resistances |
| Chest | Armor Endurance Increased Mana Regen |
Prefixes Increased Damage While Wielding a Bow Dexterity Suffixes Dodge Rating Increased Dodge Rating |
| Belt | Legendary Potential Hybrid Health |
|
| Gloves | Armor Void Resistance |
Prefixes Dexterity Increased Critical Hit Chance Suffixes Hybrid Health Dodge Rating |
| Ring | Fire Resistance Increased Fire Damage |
Prefixes Increased Fire Damage Dexterity Suffixes Needed Resistances Dodge Rating |
| Ring | Fire Resistance Increased Fire Damage |
Prefixes Increased Fire Damage Dexterity Suffixes Needed Resistances Health |
| Feet | Increased Dodge Rating Increased Movement Speed Increased effect of Haste on You |
Prefixes Dexterity Increased Movement Speed Suffixes Dodge Rating Increased Dodge Rating |
| Relic | Legendary Potential Increased Fire Damage Critical Strike Multiplier |
A loot filter made specifically for the gear table above may be copied by pressing the button below. Once in the Loot Filter portion of the in-game menu, choose the "Paste Clipboard Contents" option to import the code.
Copy Loot Filter to Clipboard
Uniques
This build will require several uniques to function. Keep in mind, before you have them, it may be wise to swap to a different build, as this one will fall apart. The bow is non-negotiable, as this is where all the damage comes from, while the relic and belt are just as necessary due to the scaling they provide. The quiver can be replaced with an exalted, but you will take a hit to your defensive layering doing so.
Dragonsong
![]() Dragonsong: This bow allows us to proc
Dragonsong: This bow allows us to proc ![]() Dragonfire and provides
a substantial boost to base Critical Hit Rate on
Dragonfire and provides
a substantial boost to base Critical Hit Rate on ![]() Cinder Strike. Farm for this bow
in the Monoloth Timeline "Fall of the Outcasts".
Cinder Strike. Farm for this bow
in the Monoloth Timeline "Fall of the Outcasts".
Pillager's Gold
![]() Pillager's Gold: Enables you to throw extra Burning Daggers on hit, which adds
one extra chance to crit every second. This can be target farmed on the Monolith Timeline
"The Black Sun".
Pillager's Gold: Enables you to throw extra Burning Daggers on hit, which adds
one extra chance to crit every second. This can be target farmed on the Monolith Timeline
"The Black Sun".
Immolator's Oblation
![]() Immolator's Oblation: Provides base scaling for Fire Spell Damage, but will Ignite
us every time we use
Immolator's Oblation: Provides base scaling for Fire Spell Damage, but will Ignite
us every time we use ![]() Cinder Strike or
Cinder Strike or ![]() Hail of Arrows. This is a rare drop from
killing Fire Lich Cremorus who is the final boss in the dungeon Soulfire Bastion.
Hail of Arrows. This is a rare drop from
killing Fire Lich Cremorus who is the final boss in the dungeon Soulfire Bastion.
Arrowguard
![]() Arrowguard: Strictly for defensive layering. Aim for a high roll on Glancing
Blows, otherwise you may find enemies hitting way harder than they should be. This can
be target farmed on the Monolith Timeline "Fall of the Outcasts".
Arrowguard: Strictly for defensive layering. Aim for a high roll on Glancing
Blows, otherwise you may find enemies hitting way harder than they should be. This can
be target farmed on the Monolith Timeline "Fall of the Outcasts".
Idols
Idol slots are gained through the campaign, unlocking small bonuses and unique affixes for the player to discover and augment their builds with. The Idol screen consists of a grid system for the player to fill out with different sized Idols, eventually filling in every part of the grid. As the Idol shape increases (1x1, 1x2, 1x3, 1x4, etc.) the stronger an affix you might find for your build.
This build will want four Large Shadow Idols, rolling Dodge Rating and Increased Damage While Wielding a Bow. The remainder of the slots should be filled in with Health increases through Stout Lagonian Idols.
Blessing
Blessings are permanent buffs that are applied to your character. These come in two different powers, Standard and Grand. Grand blessings are significantly stronger than the Standard Blessings. In total, there are 10 Blessing Slots, one for each Monolith Timeline. When you complete a Monolith and defeat the final boss you will be awarded a choice of three blessing with a random value.
| Blessing Name | Affix | Timeline |
|---|---|---|
| Critical Hit Multiplier | The Black Sun | |
| Critical Strike Avoidance | Reign of Dragons | |
| Increased Fire Damage | Spirits of Fire |
The Blessings listed above cover the most important slots, with the remaining Blessing Slots being filled with whatever the player may be lacking for stats.
Changelog
- 13 Mar. 2024: Build Planner added.
- 10 Mar. 2024: Updated for 1.0.
- 12 Jan. 2024: Loot Filter added.
- 31 Dec. 2023: Guide added.

GhazzyTV is a professional content creator that knows all about theory crafting builds in Path of Exile and Last Epoch and has been teaching players how to build their characters for over 9 years. He is a huge Blizzard fan with thousands of hours invested into Diablo 3 and 4 and is a frequent World of Warcraft Classic player. His builds will be helpful content for new players and veterans alike. You can find his PoE Vault Guide Hub here and his LE Guide Hub here. You can follow him on Twitch, YouTube or Twitter.
- Patch 1.0.7 Update: Multiplayer, Skills and More!
- Patch 1.0.6 Update: Camera Setting, Controller Keybinds, Bug Fixes, and More!
- Eleventh Hour Games on Real-Money Trading and Exploits in Last Epoch
- Patch 1.0.5 Update: Many Bug Fixes, Including Loot Filter Toggle Sensitivity, and Other Improvements!
- The First 30 Days of Last Epoch!
- 1.0 Launch Retrospective: A Message From Eleventh Hour Games
- Patch 1.0.4 Update: More In-Game Changes, Bug Fixes, and Improvements
- Last Epoch Mid-Cycle Balance Survey Recap