Necromancer Minion Autobomber Endgame Build for Last Epoch (Patch 1.0)
Welcome to our Last Epoch Necromancer Minion Autobomber build guide for the Acolyte class. Here you will learn everything about the Necromancer play style, passives, skills, strengths, and weaknesses to conquer the world of Eterra.
Build Introduction
The Minion Autobomber has arrived! Control an army of self-summoning undead that get sacrificed in order to deal explosive Necrotic Damage to enemies. This build has near-full automation, perfect for climbing Corruption with minimal effort.
 Fully automated autobomber style gameplay
 - Can use Low Life
- Bone Golems used as frontliner for safety

 Fully reliant on Minions for damage and survival

Skill Selection
In order to begin creating an autobomber army, you will need a few
specific summons. ![]() Summon Skeletal Mage will act as your backline,
firing balls of Necrotic energy at enemies, but also ripping apart
your Skeleton Warriors with Profane Oblation to deal immense amounts of
damage.
Summon Skeletal Mage will act as your backline,
firing balls of Necrotic energy at enemies, but also ripping apart
your Skeleton Warriors with Profane Oblation to deal immense amounts of
damage. ![]() Summon Skeleton will force only Warriors, ensuring every Skeleton
runs into melee range of mobs, but will also have a decently high chance of
resummoning themselves on death. For further automation,
Summon Skeleton will force only Warriors, ensuring every Skeleton
runs into melee range of mobs, but will also have a decently high chance of
resummoning themselves on death. For further automation, ![]() Summon Volatile Zombie
is taken. These summons will auto-ressurect through the Unique Ring,
Summon Volatile Zombie
is taken. These summons will auto-ressurect through the Unique Ring, ![]() Cycle of Putrescence,
but also have a chance of summoning off any Minion death. On top of this, each time a
Zombie dies, it will create a Skeleton Vanguard which will eventually die and has a chance to spawn
another Zombie.
Cycle of Putrescence,
but also have a chance of summoning off any Minion death. On top of this, each time a
Zombie dies, it will create a Skeleton Vanguard which will eventually die and has a chance to spawn
another Zombie. ![]() Summon Bone Golem will have a singular purpose, to act as body guards for
us and take agro on enemies.
Summon Bone Golem will have a singular purpose, to act as body guards for
us and take agro on enemies.
The only manual usage of skills will be ![]() Transplant, which is not specialized in and
will only be used for movement, and
Transplant, which is not specialized in and
will only be used for movement, and ![]() Dread Shade, which should be placed onto a Skeletal Mage.
This ensures our Skeletal Mages will get buffed due to the aura radius on the skill.
Dread Shade, which should be placed onto a Skeletal Mage.
This ensures our Skeletal Mages will get buffed due to the aura radius on the skill.

Class and Skill Passive Trees
Our base class is Acolyte, which fills the role of mixed spell caster and minion summoner in Last Epoch. Upon finishing Act 1 in the campaign, your character will be offered an opportunity to select an Advanced Mastery. Each base class has three possible Masteries to choose from. For Acolyte, you can choose between Passive Trees for Lich, Necromancer, and Warlock. Upon selecting a Mastery and placing 20 Passive Points into the Mage Tree, you'll then be able to place Passive Points into the Mastery Trees.
Necromancer is the Advanced Class used for this build, and also where the majority of our Passive Points will come from. The Necromancer Tree will focus around picking nodes that increase our Minion's survivability through Health and Resistances, as well as increases to Minion Cast Speed, Critical Hit Rate, Critical Multiplier, and Necrotic Damage. Passive Trees for both Warlock and Lich will not be used for this build.
Acolyte Passive Points
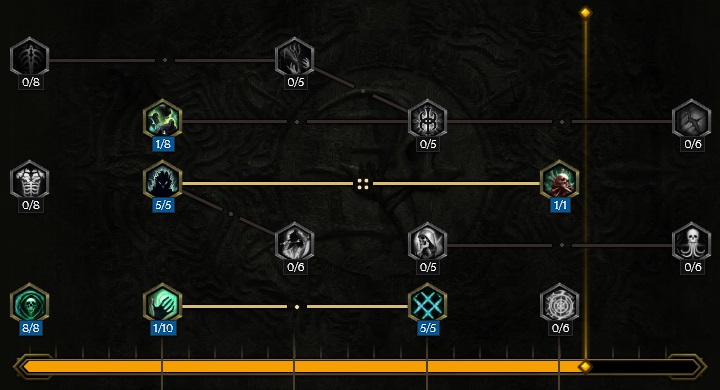
- 8 points into Forbidden Knowledge: Boost to Necrotic Resistance and Intelligence.
- 5 points into Dark Rituals: Taken specifically for Minion Cast Speed.
- 1 points into Stolen Vitality: Taken to proceed into the Passive Tree.
- 1 point into Mania of Mortality: Taken to proceed into the Passive Tree.
- 5 points into Unnatural Preservation: Taken for Ward Retention, but also supplies important Resistances.
- 1 point into Soul Aegis: Minion Armor scaling off our own character's level.
Our base class is Acolyte, which fills the role of mixed spell caster and minion summoner in Last Epoch. Upon finishing Act 1 in the campaign, your character will be offered an opportunity to select an Advanced Mastery. Each base class has three possible Masteries to choose from. For Acolyte, you can choose between Passive Trees for Lich, Necromancer, and Warlock. Upon selecting a Mastery and placing 20 Passive Points into the Mage Tree, you'll then be able to place Passive Points into the Mastery Trees.
Necromancer is the Advanced Class used for this build, and also where the majority of our Passive Points will come from. The Necromancer Tree will focus around picking nodes that increase our Minion's survivability through Health and Resistances, as well as increases to Minion Cast Speed, Critical Hit Rate, Critical Multiplier, and Necrotic Damage. Passive Trees for both Warlock and Lich will not be used for this build.
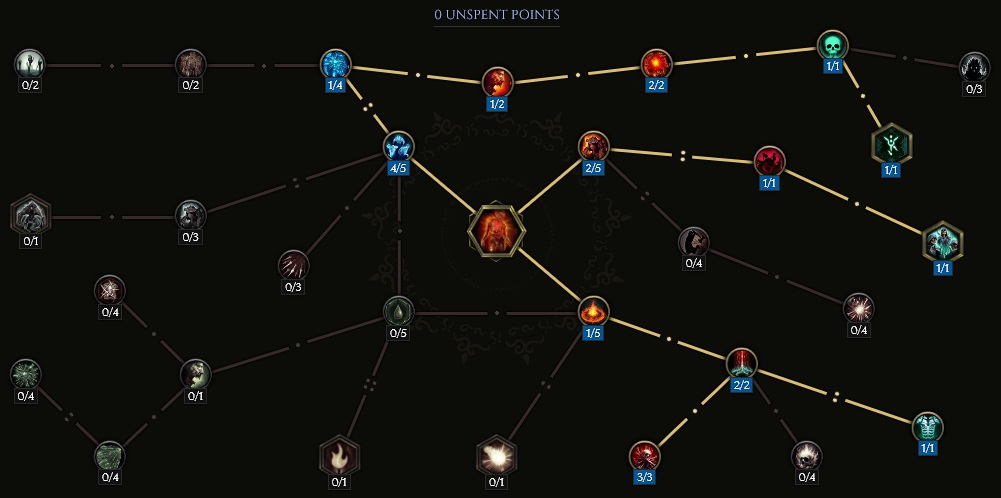
Necromancer Passive Points
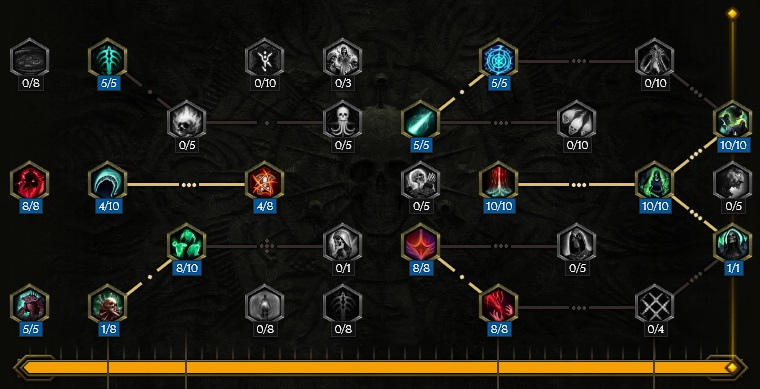
- 8 points into Risen Army: Minion Damage and Cast Speed.
- 5 points into Grave Thorns: Increased Minion health and Armor.
- 4 points into Cursed Blood: Increases Minion Necrotic Damage.
- 1 point into Blood Armour: Traversal node.
- 5 points into Reclamation of Souls: Taken for Ward Retention and the Ward gain on Minion death.
- 8 points into Mortal Tether: Significant boost Minion Health.
- 4 point into Aegisfall: Provides 100% Chance to Shred Armor on Minion Hit.
- 5 points into Frantic Summons: Minion Cast Speed boost.
- 8 points into Tyrant: 24% increased Health, converted into Ward.
- 8 points into Cling To Life: Vitality, used for Ward, and extra Resistances for Minions.
- 10 points into Moonlight Pyre: Adds flat Necrotic to your Minions.
- 5 points into River of Bones: Provides Minions with a source of Leech and Critical Hit Rate.
- 10 points into Rite of Undeath: Major increases to Resistances and Necrotic Damage for minions.
- 10 points into Blades of the Forlorn: Crit Multipler for Minions.
- 1 point into Disciples of Necromancy: Adds an additional Skeletal Mage to our summon pool.
In this section, we will break down each skill and highlight the key passives we have selected to make the skill shine in the build. While some of these skills do allow for some variation to exist depending on your own custom choices, we recommend utilizing the skill trees as presented until you have a strong understanding of the build itself.
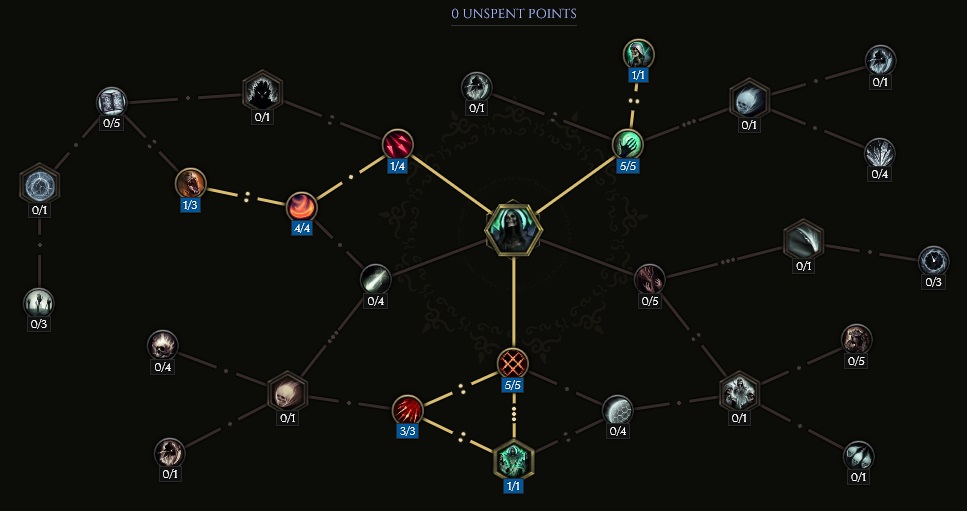
Summon Bone Golem
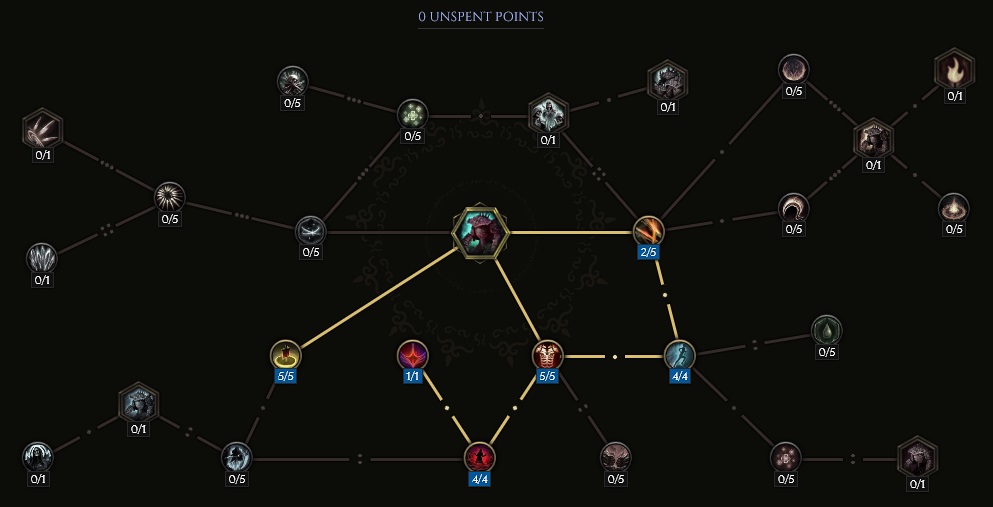
![]() Summon Bone Golem is used purely as a defensive tool in this build. Every node taken for this
tanky brutes focuses on either on defensive scaling or Movement Speed in order to allow them to
keep up. Their AI is a little jank, so the added Movement Speed acts as a bit of a work around for this.
Summon Bone Golem is used purely as a defensive tool in this build. Every node taken for this
tanky brutes focuses on either on defensive scaling or Movement Speed in order to allow them to
keep up. Their AI is a little jank, so the added Movement Speed acts as a bit of a work around for this.
Order of Skill Points
- 5 points into Amalgam of Sentinels: Adds a massive amount of Health and Armor to your Golem.
- 4 points into Tower of Bones: Increases the Golem's size and increases its Threat Generation.
- 1 point into Fragments of the Fallen: Boosts your Golems Size and Damage output. If your Golem dies, resummoning it will provide it an even bigger buff for 15 seconds upon summon.
- 5 points into Amalgam of Primalists: Provides an Armor boost for the Golem and all nearby Minions.
- 4 points into Unnatural Speed: Increases Movement Speed for itself and all nearby Minions.
- 2 points into Amalgam of Rogues: Increased Attack Speed and Movement Speed.
In this section, we will break down each skill and highlight the key passives we have selected to make the skill shine in the build. While some of these skills do allow for some variation to exist depending on your own custom choices, we recommend utilizing the skill trees as presented until you have a strong understanding of the build itself.
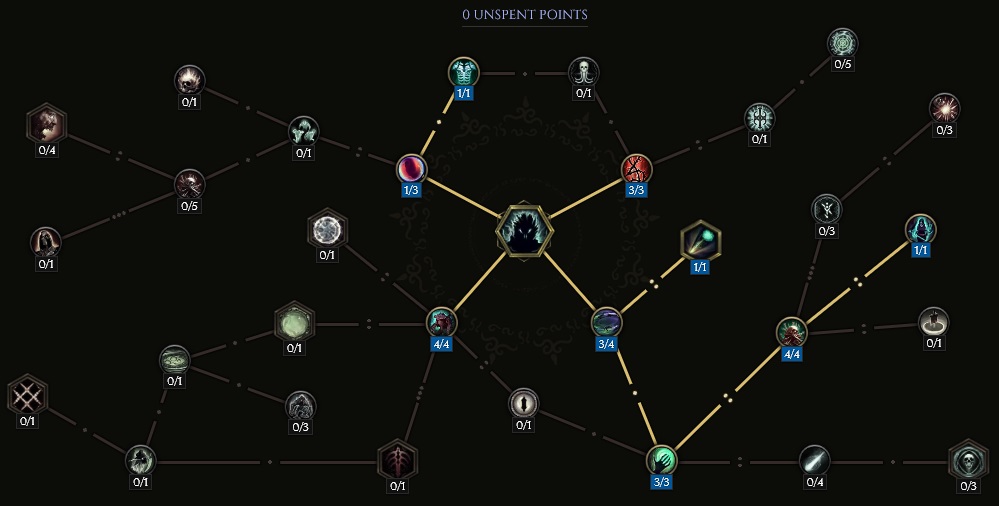
Summon Skeleton
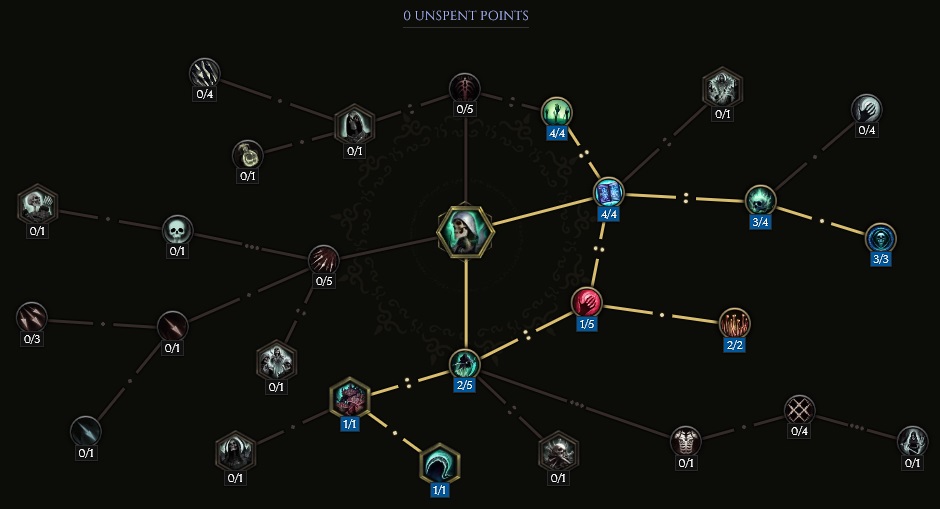
![]() Summon Skeleton is taken in order to use Warriors as fodder for our Skeletal Mages to explode using Profane Oblation.
Each time they die, they have a chance to both resummon themselves as well as summon a Volatile Zombie. On top of this,
each time a Skeleton dies, you gain a large portion of your Mana back, helping to sustain the Zombies you create. Skeleton Warriors
play a huge part in creating the "autobomber" aspect of the build, and at the end of the day their sole purpose is to be
used as ammo.
Summon Skeleton is taken in order to use Warriors as fodder for our Skeletal Mages to explode using Profane Oblation.
Each time they die, they have a chance to both resummon themselves as well as summon a Volatile Zombie. On top of this,
each time a Skeleton dies, you gain a large portion of your Mana back, helping to sustain the Zombies you create. Skeleton Warriors
play a huge part in creating the "autobomber" aspect of the build, and at the end of the day their sole purpose is to be
used as ammo.
Order of Skill Points
- 2 points into Necrotic Conviction: Purely used for traversing the Skill Tree.
- 1 point into Hollow Walkers: Adds an extra Skeleton to your summon pool.
- 1 point into Shambling Steel: Removes Archers. This is important, as we need the Skeletons to be in melee range in order to be sacrificed. This forces Warriors only, who will run into melee range for you.
- 4 points into Unbound Necromancy: Skeletons cost significantly less Mana to summon.
- 4 points into Immortal: When a Skeleton dies, it has a 40% chance to reanimate itself.
- 3 points into Soul Catcher: Ward gain when a Skeleton dies.
- 3 points into Mind Catcher: When a Skeleton dies, you gain 15 Mana.
In this section, we will break down each skill and highlight the key passives we have selected to make the skill shine in the build. While some of these skills do allow for some variation to exist depending on your own custom choices, we recommend utilizing the skill trees as presented until you have a strong understanding of the build itself.
Summon Volatile Zombie
![]() Summon Volatile Zombie will act as a permanently regenerating source of damage for this build. Zombies will
resummon from any Minion that dies, as well as from the Unique Ring,
Summon Volatile Zombie will act as a permanently regenerating source of damage for this build. Zombies will
resummon from any Minion that dies, as well as from the Unique Ring, ![]() Cycle of Putrescence. Upon dying,
Zombies will apply Marked For Death, provide you with Ward, and kill any enemy that is at 16% Health or lower.
They also force a summon of a Skeleton Vanguard, creating a near-never ending cycle of Minions.
Cycle of Putrescence. Upon dying,
Zombies will apply Marked For Death, provide you with Ward, and kill any enemy that is at 16% Health or lower.
They also force a summon of a Skeleton Vanguard, creating a near-never ending cycle of Minions.
Volatile Zombies will never be manually summoned. If you need to start your cycle of minion explosions, either use a potion and take advantage of the affix we recommend that will summon them on potion use or wait for your Skeleton Warriors to start dying to automate summoning a single Zombie.
Order of Skill Points
- 4 points into Forceful Commander: Reduces the Mana cost significantly.
- 1 point into Daunting Blast:Taken to proceed through the Passive Tree.
- 1 point into Ravenous : Increases damage to Boss monsters.
- 2 points into Pull of the Grave: Zombies now have a 16% Kill Threshold.
- 1 point into Horrific Vessels: The Zombies no longer deal Physical or Fire Damage and are converted to necrotic.
- 1 point into Corpse Bane: Zombies now apply the Curse, Marked for Death.
- 2 points into Fervor: Increased Damage and Movement Speed.
- 1 point into Ferocious Horde: Zombies now move faster the lower their Health is.
- 1 point into Shepherd of Thralls: Increases the explosion radius and summons a Skeletal Vanguard when the Zombie dies.
- 1 point into Path of Destruction: Increased explosion area.
- 2 points into Necromantic Fervor: Adds Healing when a Zombie explodes, which will be converted into Ward.
- 3 points into Awakening Presence: Volatile Zombies have a chance to resummon any time another Minion dies.
- 1 point into Vital Ward: The Healing from Necromantic Fervor is converted into Ward.
In this section, we will break down each skill and highlight the key passives we have selected to make the skill shine in the build. While some of these skills do allow for some variation to exist depending on your own custom choices, we recommend utilizing the skill trees as presented until you have a strong understanding of the build itself.
Summon Skeletal Mage
If Skeleton Warriors are the ammo for the build, your Skeletal Mages are the firing squad. ![]() Summon Skeletal Mage
is used alongside
Summon Skeletal Mage
is used alongside ![]() Summon Volatile Zombie to deal damage and force the automation portion of the build. Your Mages
will cast Profane Oblation on Skeleton Warriors and Skeleton Vanguards when they're close to enemies, dealing
a ton of Necrotic Damage. When there is no Skeletons to rip apart, your Mages will still attack enemies themselves, providing
a bit of extra damage to the build.
Summon Volatile Zombie to deal damage and force the automation portion of the build. Your Mages
will cast Profane Oblation on Skeleton Warriors and Skeleton Vanguards when they're close to enemies, dealing
a ton of Necrotic Damage. When there is no Skeletons to rip apart, your Mages will still attack enemies themselves, providing
a bit of extra damage to the build.
Order of Skill Points
- 5 points into Celer Mortis: Adds Base Critical Hit Rate and Movement Speed to Mages.
- 3 points into Grey Merchant: Adds Critical Multiplier to Mage attacks and Mages will now heal themselves when they land a crit.
- 1 point into Order of Death: Adds an extra Mage to your summon pool.
- 5 points into Gravetide: Adds 15 Spell Damage.
- 1 point into Underlings: Mages will now cast Profane Oblation on Warriors and Vanguards, killing them in the process.
- 1 point into Splintered Dominion: Adds a small chance for extra projectiles to be cast.
- 4 points into Argonautic Speed: Increases the Cast Speed of your Mages.
- 1 point into Ossein Frenzy: Adds a small chance for Mages to Frenzy when they hit an enemy.
In this section, we will break down each skill and highlight the key passives we have selected to make the skill shine in the build. While some of these skills do allow for some variation to exist depending on your own custom choices, we recommend utilizing the skill trees as presented until you have a strong understanding of the build itself.
Dread Shade
![]() Dread Shade is used specifically to boost your Skeletal Mages' damage. Through the Passive Tree, we've killed the
Health Decay this skill normally places onto the afflicted Minion. Instead, you can now only have a single Dread
Shade active at once. This should be placed onto one of your Skeletal Mages, which will in turn buff all three of them through
the aura coming off the one it is attached to.
Dread Shade is used specifically to boost your Skeletal Mages' damage. Through the Passive Tree, we've killed the
Health Decay this skill normally places onto the afflicted Minion. Instead, you can now only have a single Dread
Shade active at once. This should be placed onto one of your Skeletal Mages, which will in turn buff all three of them through
the aura coming off the one it is attached to.
Order of Skill Points
- 3 points into Spectral Presence: Increases the area of Dread Shade's aura.
- 1 point into Lone Watcher: Dread Shade no longer drains Health, but only one can be active at a time.
- 3 points into Dying Coven: Increased Cast Speed granted by Dread Shade.
- 4 points into Grim Fate: Dread Shade now covers an even larger area and Minions effected by it deal more damage.
- 1 point into Symbiotic Apparition: Dread Shade's aura now effects the player.
- 4 points into Lingering Doom: Adds falt Necrotic Damage to your Minions.
- 3 points into Flesh Harvest: Increases Dread Shade's buffs, scaling off missing Health of the Minion.
- 1 point into Wisdom of the Dead: Taken in order to reach the next node.
- 1 point into Martyrdom: Grants Armor per Vitality for your Minions.
Build Mechanics and Playstyle
This build combines Minion gameplay with neat interactions of automation, to create a Minion Autobomber build.
This isn't a true autobomber that some of you may have played in other games, but it is as close as you will
get in Last Epoch. The interactions between Skeleton Warriors, Volatile Zombies, Skeleton Vanguards, and specific gear pieces
create almost like a popcorn effect, where we get a cycle of never-ending undead to continually blow up on enemies without
us doing any of the work aside from keeping ![]() Dread Shade active on our Skeletal Mages.
Dread Shade active on our Skeletal Mages.
The main damage dealers in this build will be ![]() Summon Volatile Zombie, which will explode when they get close to an enemy dealing
massive amounts of Necrotic Damage and inflicting enemies hit with Marked For Death, and Profane Oblation, which is a
Spell used by the Skeletal Mages that take either a Skeleton Warrior or Skeleton Vanguard and rip the Minion apart, dealing
Necrotic Spell Damage to nearby enemies. Profane Oblation is extremely heavy hitting; 70 Base Necrotic Damage scaling at a rate of 350% for
Added Damage Effectiveness. This requires Minion Spell Damage, and is not based on the player's Spell Damage stat.
Summon Volatile Zombie, which will explode when they get close to an enemy dealing
massive amounts of Necrotic Damage and inflicting enemies hit with Marked For Death, and Profane Oblation, which is a
Spell used by the Skeletal Mages that take either a Skeleton Warrior or Skeleton Vanguard and rip the Minion apart, dealing
Necrotic Spell Damage to nearby enemies. Profane Oblation is extremely heavy hitting; 70 Base Necrotic Damage scaling at a rate of 350% for
Added Damage Effectiveness. This requires Minion Spell Damage, and is not based on the player's Spell Damage stat.
Equipment and Gear Affixes
This build will be ran in Low Life in order to enable Corruption climbing. Other than the Low Life aspect, most other gear options will focus on scaling Intelligence, Minion stats, and our own personal Health and Resistances.
| Gear Slot | Implicits | Modifiers |
|---|---|---|
| One-handed Axe | Melee Necrotic Damage Increased Melee Necrotic Damage Increased Minion Necrotic Damage |
Prefixes Parry Chance Mana, Increased Mana Regen Suffixes Minion Spell Damage, Minion Bow Damage Necrotic Penetration |
| Off-hand Catalyst | Intelligence Ward per Second Ward Retention |
Prefixes Increased Minion Damage Increased Minion Health Suffixes Needed Resistances |
| Head | Armor Spell Damage Minion Spell Damage |
Prefixes Increased Critical Strike Chance, Increased Minion Critical Strike Chance Intelligence Suffixes Increased Health Needed Resistances |
| Amulet | Increased Minion Damage Increased Minion Critical Strike Chance |
Prefixes Increased Minion Damage Increased Minion Damage Suffixes Health Needed Resistances |
| Chest | Legendary Potential Intelligence Critical Strike Chance for Skeletons, Critical Strike Chance for Skeletal Mages |
|
| Belt | Poison Resistance Cold Resistance |
Prefixes Increased Minion Damage Increased Minion Health Suffixes Hybrid Health Critical Strike Avoidance Sealed Affix Volatile Zombies Summoned on Potion Use, Increased Minion Damage |
| Gloves | Armor Increased Cooldown Recovery |
Prefixes Increased Minion Damage Intelligence Suffixes Health Hybrid Health |
| Ring | Legendary Potential Intelligence Increased Minion Damage |
|
| Ring | Increased Minion Damage Minion Critical Strike Multiplier Increased Minion Health |
Prefixes Increased Minion Damage Intelligence Suffixes Health Needed Resistances |
| Feet | Legendary Potential Increased Minion Damage, Minions Teleported around you after you use a Traversal Skill |
|
| Relic | Weaver's Will Intelligence Increased Minion Damage |
A loot filter made specifically for the gear table above may be copied by pressing the button below. Once in the Loot Filter portion of the in-game menu, choose the "Paste Clipboard Contents" option to import the code.
Copy Loot Filter to Clipboard
Uniques
The uniques taken for this build are taken in order to go Low Life, with the exception of the Ring, which is being used to ensure that no matter what, we maintain at least one Volatile Zombie.
Exsanguinous
![]() Exsanguinous: One part of how we will generate Ward, this chest piece drains Health while converting the amount of missing
Health we have into Ward. This unique chest piece can be target farmed in the Monolith Timeline "Blood, Frost, and Death".
Exsanguinous: One part of how we will generate Ward, this chest piece drains Health while converting the amount of missing
Health we have into Ward. This unique chest piece can be target farmed in the Monolith Timeline "Blood, Frost, and Death".
Last Steps of the Living
![]() Last Steps of the Living: Just as
Last Steps of the Living: Just as ![]() Exsanguinous does, these boots also drain Health in exchange for supplying Ward
for the amount of missing Health. When both of these items are combined, they will be converting around 30% of your Health per second into
Ward. Target farm on the Monolith Timeline "Blood, Frost, and Death".
Exsanguinous does, these boots also drain Health in exchange for supplying Ward
for the amount of missing Health. When both of these items are combined, they will be converting around 30% of your Health per second into
Ward. Target farm on the Monolith Timeline "Blood, Frost, and Death".
Cycle of Putrescence
![]() Cycle of Putrescence: This ring serves to make sure that no matter what happens, we always have a Volatile Zombie active. They
also provide a decent boost to Minion Spell Damage, one of the priority stats for this build. These rings can be farmed in the Monolith Timeline
"The Age of Winter".
Cycle of Putrescence: This ring serves to make sure that no matter what happens, we always have a Volatile Zombie active. They
also provide a decent boost to Minion Spell Damage, one of the priority stats for this build. These rings can be farmed in the Monolith Timeline
"The Age of Winter".
Idols
Idol slots are gained through the campaign, unlocking small bonuses and unique affixes for the player to discover and augment their builds with. The Idol screen consists of a grid system for the player to fill out with different sized Idols, eventually filling in every part of the grid. As the Idol shape increases (1x1, 1x2, 1x3, 1x4, etc.) the stronger an affix you might find for your build.
All Idols for this build should focus on Health increases for us. This can be accomplished with either Stout Lagonian Idols or Large Immortal Idols.
Blessing
Blessings are permanent buffs that are applied to your character. These come in two different powers, Standard and Grand. Grand blessings are significantly stronger than the Standard Blessings. In total, there are 10 Blessing Slots, one for each Monolith Timeline. When you complete a Monolith and defeat the final boss you will be awarded a choice of three blessing with a random value.
| Blessing Name | Affix | Timeline |
|---|---|---|
| Ward per Second | Ending the Storm | |
| Critical Strike Avoidance | Reign of Dragons | |
| Increased Minion Damage | Spirits of Fire |
All other open slots can be used for Resistances you may be lacking, and will be determined by the gear you drop.
Changelog
- 13 Mar. 2024: Build Planner added.
- 05 Mar. 2024: Guide added.

GhazzyTV is a professional content creator that knows all about theory crafting builds in Path of Exile and Last Epoch and has been teaching players how to build their characters for over 9 years. He is a huge Blizzard fan with thousands of hours invested into Diablo 3 and 4 and is a frequent World of Warcraft Classic player. His builds will be helpful content for new players and veterans alike. You can find his PoE Vault Guide Hub here and his LE Guide Hub here. You can follow him on Twitch, YouTube or Twitter.
- Patch 1.0.7 Update: Multiplayer, Skills and More!
- Patch 1.0.6 Update: Camera Setting, Controller Keybinds, Bug Fixes, and More!
- Eleventh Hour Games on Real-Money Trading and Exploits in Last Epoch
- Patch 1.0.5 Update: Many Bug Fixes, Including Loot Filter Toggle Sensitivity, and Other Improvements!
- The First 30 Days of Last Epoch!
- 1.0 Launch Retrospective: A Message From Eleventh Hour Games
- Patch 1.0.4 Update: More In-Game Changes, Bug Fixes, and Improvements
- Last Epoch Mid-Cycle Balance Survey Recap