Necromancer Skeletal Frost Mage Endgame Build for Last Epoch (Patch 1.0)
Welcome to our Last Epoch Necromancer Skeletal Frost Mage build guide for the Acolyte class. Here you will learn everything about the Necromancer play style, passives, skills, strengths, and weaknesses to conquer the world of Eterra.
Build Introduction
Control a Skeletal Frost Mage that will impale foes with a barrage of Ice Shards. Afflict your Frost Mage with spectral Shades, boosting the damage it deals, but killing it in the process. Rather than an army of the undead, this Necromancer has chosen a single servant; the Cryomancer.
 Low Mana requirements
 - Low input requirements; build is accessible for all types of players
- 100% Critical Hit Chance, big numbers will fill the screen

 Some players may find gameplay style boring
 - Reliant on Cryomancer for damage, player has no way of dealing damage themselves

Skill Selection
This entire build will focus around your Skeletal Mage. In order to pump up the
damage, we've decided to inflict the Mage with both ![]() Dread Shade and
Dread Shade and
![]() Infernal Shade. Both of these will actively drain Health from the Skeletal Mage,
however each time he deals damage, he will heal himself for a substantial amount, making
minion maintenance a piece of cake.
Infernal Shade. Both of these will actively drain Health from the Skeletal Mage,
however each time he deals damage, he will heal himself for a substantial amount, making
minion maintenance a piece of cake.
![]() Transplant and
Transplant and ![]() Bone Curse are taken mostly for quality of life enhancements,
allowing for better mobility, but also providing decent defensive and offensive buffs when used.
Bone Curse are taken mostly for quality of life enhancements,
allowing for better mobility, but also providing decent defensive and offensive buffs when used.

Class and Skill Passive Trees
Our base class is Acolyte, which fills the role of mixed spell caster and minion summoner in Last Epoch. Upon finishing Act 1 in the campaign, your character will be offered an opportunity to select an Advanced Mastery. Each base class has three possible Masteries to choose from. For Acolyte, you can choose between Passive Trees for Lich, Necromancer, and Warlock. Upon selecting a Mastery and placing 20 Passive Points into the Mage Tree, you'll then be able to place Passive Points into the Mastery Trees.
Necromancer is the Advanced Class used for this build, and also where the majority of our Passive Points will come from. The Necromancer Tree will focus around picking nodes that increase our minion's Health, Cast Speed, Cold Damage, and it's ability to Leech Health. A lesser amount of Passive Points will come from Lich, focusing purely on Intelligence gains. Each Passive Tree and their points are broken down below.
Acolyte Passive Points
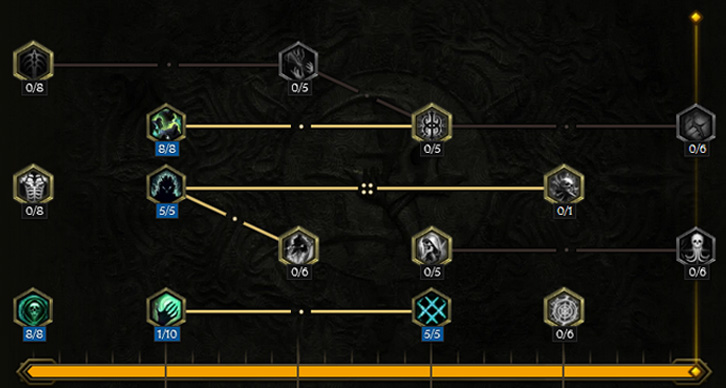
- 8 points into Forbidden Knowledge: Boost to Necrotic Resistance and Intelligence, which scales our kit.
- 5 points into Dark Rituals: Taken specifically for Minion Cast Speed.
- 8 points into Stolen Vitality: Increased Minion Health, but also boosts Vitality which results in higher Ward generation.
- 1 point into Mania of Mortality: Traversal node.
- 5 points into Unnatural Preservation: Taken for Ward Retention, but also supplies important Resistances.
Our base class is Acolyte, which fills the role of mixed spell caster and minion summoner in Last Epoch. Upon finishing Act 1 in the campaign, your character will be offered an opportunity to select an Advanced Mastery. Each base class has three possible Masteries to choose from. For Acolyte, you can choose between Passive Trees for Lich, Necromancer, and Warlock. Upon selecting a Mastery and placing 20 Passive Points into the Mage Tree, you'll then be able to place Passive Points into the Mastery Trees.
Necromancer is the Advanced Class used for this build, and also where the majority of our Passive Points will come from. The Necromancer Tree will focus around picking nodes that increase our minion's Health, Cast Speed, Cold Damage, and it's ability to Leech Health. A lesser amount of Passive Points will come from Lich, focusing purely on Intelligence gains. Each Passive Tree and their points are broken down below.
Lich Passive Points
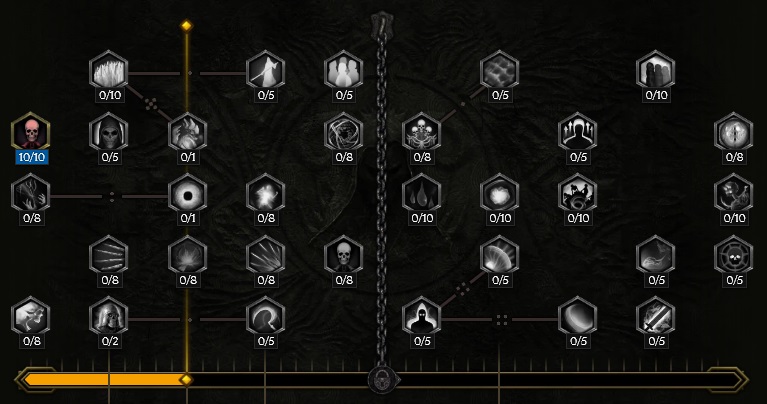
- 10 points into Apocrypha: Taken for the Intelligence gains.
Our base class is Acolyte, which fills the role of mixed spell caster and minion summoner in Last Epoch. Upon finishing Act 1 in the campaign, your character will be offered an opportunity to select an Advanced Mastery. Each base class has three possible Masteries to choose from. For Acolyte, you can choose between Passive Trees for Lich, Necromancer, and Warlock. Upon selecting a Mastery and placing 20 Passive Points into the Mage Tree, you'll then be able to place Passive Points into the Mastery Trees.
Necromancer is the Advanced Class used for this build, and also where the majority of our Passive Points will come from. The Necromancer Tree will focus around picking nodes that increase our minion's Health, Cast Speed, Cold Damage, and it's ability to Leech Health. A lesser amount of Passive Points will come from Lich, focusing purely on Intelligence gains. Each Passive Tree and their points are broken down below.
Necromancer Passive Points
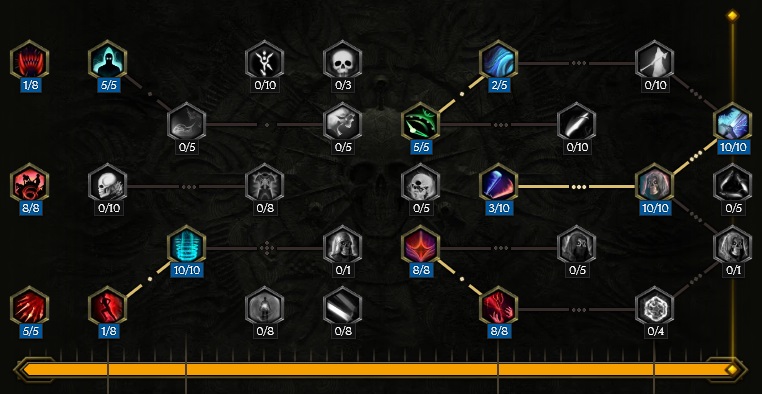
- 1 point into Elixir of Hunger: Traversal node.
- 8 points into Risen Army: Minion Damage and Cast Speed.
- 5 points into Grave Thorns: Huge boost to minion survivability.
- 1 point into Blood Armour: Traversal node.
- 5 points into Reclamation of Souls: Taken specifically for Ward Retention.
- 10 points into Mortal Tether: Significant boost to the Cryomancer's Health.
- 5 points into Frantic Summons: Minion Cast Speed boost.
- 8 points into Tyrant: 24% increased Health, converted into Ward.
- 8 points into Cling To Life: Vitality, used for Ward, and extra Resistances for the Cryomancer.
- 3 points into Moonlight Pyre: Traversal node.
- 2 points into River of Bones: Very useful for Minion Leech Rate, but Critical Chance is unnecessary due to nodes in skill trees.
- 10 points into Rite of Undeath: Major increases to Resistances and Cold Damage for minions.
- 10 points into Blades of the Forlorn: Crit Multipler and Cold Damage increases for the Cryomancer.
In this section, we will break down each skill and highlight the key passives we have selected to make the skill shine in the build. While some of these skills do allow for some variation to exist depending on your own custom choices, we recommend utilizing the skill trees as presented until you have a strong understanding of the build itself.
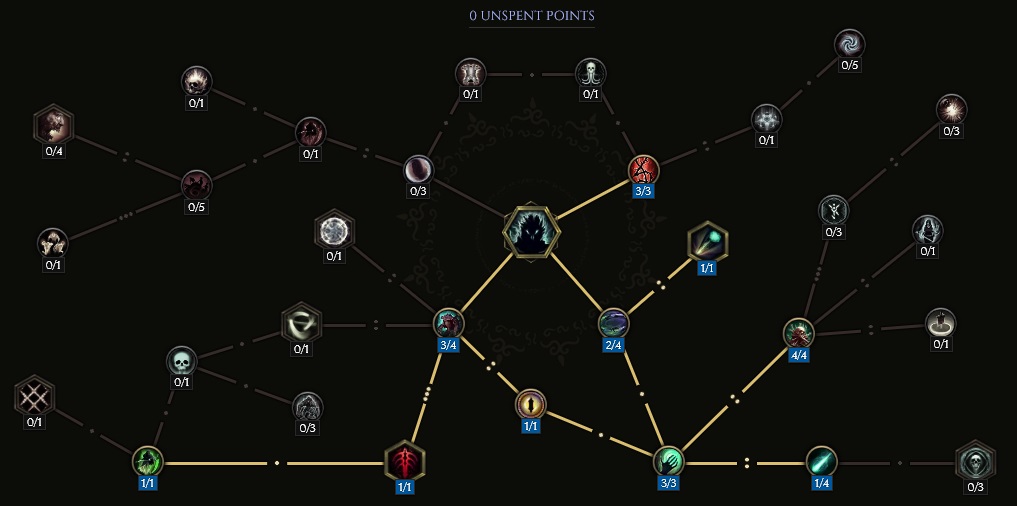
Summon Skeletal Mage
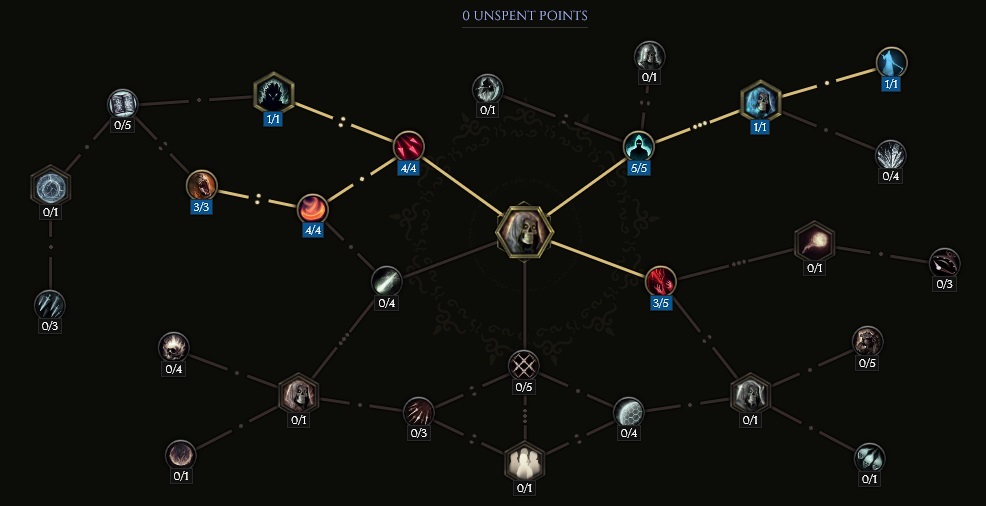
![]() Summon Skeletal Mage is the main skill in the build, and everything that we do is focused around it.
The tree in particular will focus around the initial boosts to the Skeletal Mage, as well as converting it into a Frost Mage,
or rather Cryomancer. Dread Shade will not drain the Health of Cryomancer (due to nodes we take in the skill tree), however
any node that would otherwise drain Health will instead increase the damage Cryomancer takes.
Summon Skeletal Mage is the main skill in the build, and everything that we do is focused around it.
The tree in particular will focus around the initial boosts to the Skeletal Mage, as well as converting it into a Frost Mage,
or rather Cryomancer. Dread Shade will not drain the Health of Cryomancer (due to nodes we take in the skill tree), however
any node that would otherwise drain Health will instead increase the damage Cryomancer takes.
Order of Skill Points
- 5 points into Gravetide: Increases base Spell Damage for the Skeletal Mage.
- 1 point into Cryomancers: Converts all Skeletal Mages into Cryomancers, and changes their skill used into
 Ice Shard.
 - 1 point into Frost Lich: Removes other types of Mages from the summon pool, but significantly boosts the damage the Cryomancer does.
- 4 points into Splintered Dominion: Adds two projectiles to Ice Shard.
- 1 point into Archmage: Doubles Ice Shard projectiles and significantly boosts your Cryomancer, but
only allows for a single Cryomancer to be summoned.
- 4 points into Argonautic Speed: Cast Speed increase.
- 3 points into Ossein Frenzy: 30% Chance for the Cryomancer to gain Frenzy on hit.
- 4 points into Leech Life: Huge boost in Health, and decent gain to Health Leech.
If you lack the extra 2 points this build requires, remove them from Ossein Frenzy.
In this section, we will break down each skill and highlight the key passives we have selected to make the skill shine in the build. While some of these skills do allow for some variation to exist depending on your own custom choices, we recommend utilizing the skill trees as presented until you have a strong understanding of the build itself.
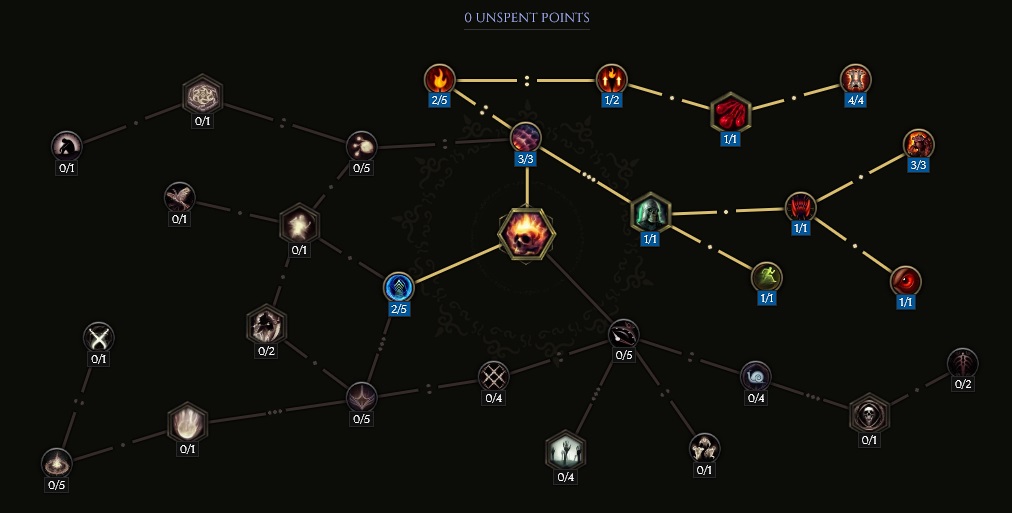
Dread Shade
![]() Dread Shade is one of two boosts we'll place onto our Cryomancer to increase its damage.
Dread Shade is the more important buff, as this provides a 100% Critical Hit Chance to the Cryomancer
when under its effect. It is important to note, the Necrotic Damage gained from this skill tree is converted
to Cold Damage by the gear we chose, namely the
Dread Shade is one of two boosts we'll place onto our Cryomancer to increase its damage.
Dread Shade is the more important buff, as this provides a 100% Critical Hit Chance to the Cryomancer
when under its effect. It is important to note, the Necrotic Damage gained from this skill tree is converted
to Cold Damage by the gear we chose, namely the ![]() Lich's Scorn we use in the off-hand slot.
Lich's Scorn we use in the off-hand slot.
Order of Skill Points
- 3 points into Lingering Doom: Spell Damage gain.
- 1 point into All For One: We do not need an aura as there is only one Cryomancer. 60% boost without a drawback.
- 1 point into Egoism: Forces a 100% Critical Hit Rate.
- 1 point into Blind Fury: Blind normally halves Critical Hit Rate, however this does not apply due to the previous node. Simply an increase in Cast Speed.
- 2 points into Spectral Presence: Traversal node.
- 1 point into Lone Watcher: Again, we only want to buff a single minion, so this node does not have a drawback. Removes Health drain and doubles the duration of Dread Shade.
- 3 points into Dying Coven: Cast Speed.
- 1 point into Grim Fate: Area does not matter, however this does provide a nice boost to overall damage.
- 1 points into Duskheart: Chance to apply Damned.
- 3 point into Flesh Harvest: This will ramp Cryomancer's damage based upon the amount of
health it is missing. This synergizes well with the next skill tree,
 Infernal Shade.
In this section, we will break down each skill and highlight the key passives we have selected to make the skill shine in the build. While some of these skills do allow for some variation to exist depending on your own custom choices, we recommend utilizing the skill trees as presented until you have a strong understanding of the build itself.
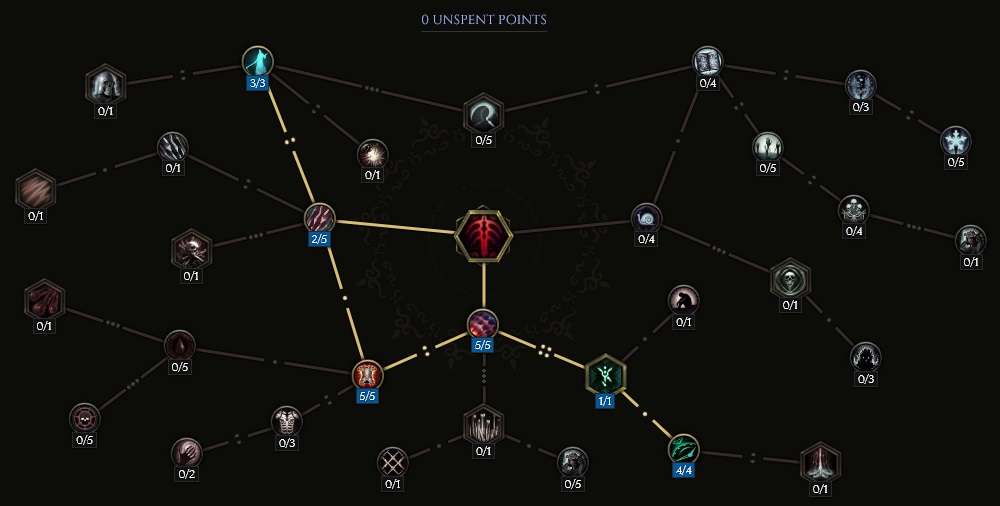
Infernal Shade
The other Shade, ![]() Infernal Shade, drains Cryomancer's Health in return for boosting stats.
Unlike
Infernal Shade, drains Cryomancer's Health in return for boosting stats.
Unlike ![]() Dread Shade, Infernal Shade will deal a chunk of damage to the Cryomancer every second. This is
amplified by the fact that Dread Shade increases the amount of damage Cryomancer takes.
Dread Shade, Infernal Shade will deal a chunk of damage to the Cryomancer every second. This is
amplified by the fact that Dread Shade increases the amount of damage Cryomancer takes.
Order of Skill Points
- 3 points into Influence: Traversal node.
- 1 point into Devour in Flames: Infernal Shade only attaches to our minions, so no need to worry about misclicks. However, the Infernal Shade will damage the minion it is attached to.
- 1 point into Burn Trail: Increases Cryomancer's Movement Speed.
- 1 point into Subjugation: Traversal node, but does ramp the damage Infernal Shade deals to Cryomancer. This means that if kept on long enough, Cryomancer will die. This can be resolved by refreshing Infernal Shade on Cryomancer, resetting the ramp damage.
- 1 points into
 Soulfire: Infernal Shade will no longer disappear, its duration infinite. The only thing limiting
the duration of this spell now is the Health and Health Leech of Cryomancer, and its ability to maintain uptime on a target.
Soulfire: Infernal Shade will no longer disappear, its duration infinite. The only thing limiting
the duration of this spell now is the Health and Health Leech of Cryomancer, and its ability to maintain uptime on a target. - 3 point into Manic Pyre: Movement Speed and Cast Speed.
- 2 points into Torment Beacon: Traversal node.
- 2 point into Baneful: Traversal node.
- 1 points into Blood Shade: Traversal node.
- 4 points into Corrosion: Nearby enemies will be afflicted with stacks of Shred Armor
- 2 points into Ignition: Reduces the Mana cost of Infernal Shade.
In this section, we will break down each skill and highlight the key passives we have selected to make the skill shine in the build. While some of these skills do allow for some variation to exist depending on your own custom choices, we recommend utilizing the skill trees as presented until you have a strong understanding of the build itself.
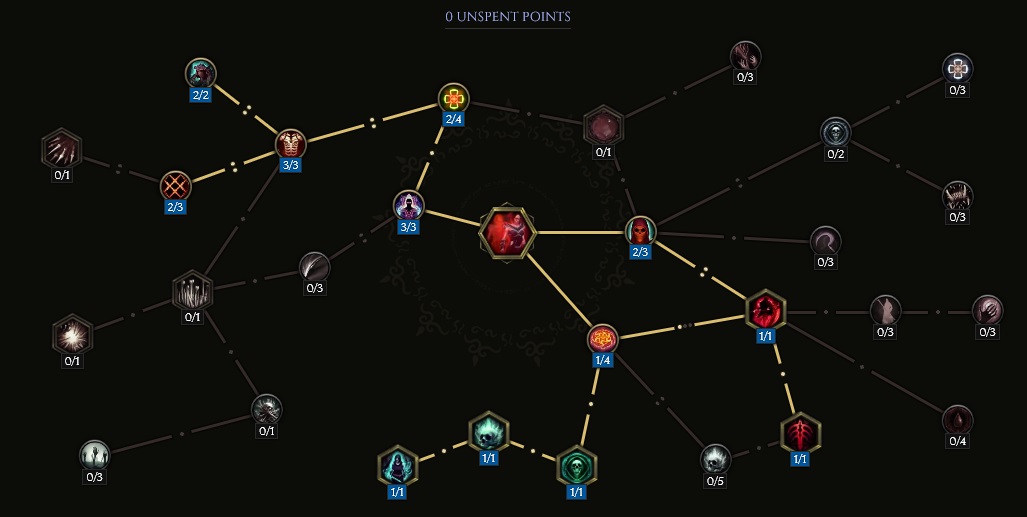
Bone Curse
![]() Bone Curse boosts the damage Cryomancer does by afflicting enemies hit with Shred Armor
and Marked For Death. While it would be wise to reapply it manually if needed, this build automates
Bone Curse with
Bone Curse boosts the damage Cryomancer does by afflicting enemies hit with Shred Armor
and Marked For Death. While it would be wise to reapply it manually if needed, this build automates
Bone Curse with ![]() Transplant, allowing for more aggressive and mobile gameplay and avoiding the cast time associated
with Bone Curse itself. On top of this, Bone Curse comes with a Kill Threshold of 12%, which becomes increasingly more
valuable the higher in Corruption you go.
Transplant, allowing for more aggressive and mobile gameplay and avoiding the cast time associated
with Bone Curse itself. On top of this, Bone Curse comes with a Kill Threshold of 12%, which becomes increasingly more
valuable the higher in Corruption you go.
Order of Skill Points
- 5 points into Conflation: Forced for pathing, but increases the size of Bone Curse, making it beneficial.
- 1 point into Sigil of Mortality: Marks enemies for death for 2 seconds.
- 4 points into Reaper's Mark: Doubles the duration for Mark for Death to 4 seconds.
- 5 points into Defile Defenses: Applies Shred Armor stacks on application of Bone Curse.
- 2 points into Iron Maiden: Traversal node.
- 3 points into Brittle Bones: 12% Kill Threshold.
In this section, we will break down each skill and highlight the key passives we have selected to make the skill shine in the build. While some of these skills do allow for some variation to exist depending on your own custom choices, we recommend utilizing the skill trees as presented until you have a strong understanding of the build itself.
Transplant
![]() Transplant is more than just a mobility skill; it automates
Transplant is more than just a mobility skill; it automates ![]() Bone Curse,
applies Bone Armor, activates Haste and Frenzy
and Fears enemies at both the departure and arrival points of the teleport. Since this build is
played at near 0 Health anyway, Transplant costs next to nothing to use.
Bone Curse,
applies Bone Armor, activates Haste and Frenzy
and Fears enemies at both the departure and arrival points of the teleport. Since this build is
played at near 0 Health anyway, Transplant costs next to nothing to use.
Order of Skill Points
- 1 point into Scarlet Rain: Traversal node.
- 1 point into Reign of Blood: Traversal node.
- 1 point into Doom Bringer: Automates
 Bone Curse, which allows us to apply Marked For Death when using Transplant.
 - 1 point into Ethereal Body: Traversal node.
- 1 point into Squeamish: Fear on departure.
- 1 point into Thanatophobia: Fear on arrival.
- 2 points into Acolyte's Fervor: Grants Haste and Frenzy for a short period of time.
- 3 points into Fleeting Form: Reduced cooldown.
- 2 points into Anemia: Traversal node.
- 3 points into
 Bone Armor: Allows for safety when playing a bit more risky by adding Armor and Damage Reduction when Transplant is used.
 - 2 points into Apostasy: Increases Bone Armor's duration by 50%.
- 2 points into Plated Bone: 20% bonus to Bone Armor.
Build Mechanics and Playstyle
The entire playstyle around this build is just allowing your Cryomancer to wreck havoc on enemies. There is slight
buff upkeep between ![]() Dread Shade (which periodically needs to be reapplied and should never be allowed to
fall off) and
Dread Shade (which periodically needs to be reapplied and should never be allowed to
fall off) and ![]() Infernal Shade (which has infinite duration, but the longer it stays on, the more damage it deals, and ideally we do not
let the Cryomancer die from this), but otherwise there is not much to do than just stay alive.
Infernal Shade (which has infinite duration, but the longer it stays on, the more damage it deals, and ideally we do not
let the Cryomancer die from this), but otherwise there is not much to do than just stay alive. ![]() Bone Curse should be maintained at all
times to boost the damage of our Cryomancer, and this can be applied manually or through
Bone Curse should be maintained at all
times to boost the damage of our Cryomancer, and this can be applied manually or through ![]() Transplant usage directed onto an enemy.
Transplant usage directed onto an enemy.
Cryomancer Information
Since we care very little about our own character with this build, its probably best we include some information
about the star of the show, the Cryomancer. As mentioned above, ![]() Infernal Shade and
Infernal Shade and ![]() Dread Shade will both,
over a period of time, kill your minion. With a constant enemy to hit, and while taking no other damage than
the self inflicted damage our Shade's cause, the Cryomancer will live for about 15 minutes. That's a long time, considering
not a single fight in this game is going to take that long. Through the nodes taken in passive trees and some of the gear affixes we
have chosen, Cryomancer's HP sits around 15,000, making it quite tanky, even if you just completely disregard the Resistances it has.
Dread Shade will both,
over a period of time, kill your minion. With a constant enemy to hit, and while taking no other damage than
the self inflicted damage our Shade's cause, the Cryomancer will live for about 15 minutes. That's a long time, considering
not a single fight in this game is going to take that long. Through the nodes taken in passive trees and some of the gear affixes we
have chosen, Cryomancer's HP sits around 15,000, making it quite tanky, even if you just completely disregard the Resistances it has.
Real enemies deal damage though, and it should be noted that while ideally Cryomancer's Health sits around the halfway point
to capitilize on Flesh Harvest, this won't always be optimal for keeping him alive. Use your best judgement on when
to refresh ![]() Infernal Shade to make sure your Cryomancer won't need to be resummoned in the middle of tha fight.
Infernal Shade to make sure your Cryomancer won't need to be resummoned in the middle of tha fight.
Equipment and Gear Affixes
For this build, we will be focusing on several main affixes for each piece of non-unique gear, as well as working towards acquiring the specific Uniques needed to make this build operate correctly. Our equipment will focus on these specific affixes for the Implicits and Modifier stats.
| Gear Slot | Implicits | Modifiers |
|---|---|---|
| One-Handed Sword | Prefixes Minion Melee Damage, Minion Spell Damage Cold Penetration, Minion Cold Penetration |
|
| Off-Hand Catalyst | - | |
| Head | Armor | Prefixes Increased Skeletal Mage Damage Intelligence Suffixes Health Critical Strike Avoidance |
| Amulet | Prefixes Increased Minion Damage |
|
| Chest | Prefixes Flat Health |
|
| Belt | Mana | Prefixes Increased Minion Damage Increased Minion Health Suffixes Health Hybrid Health |
| Gloves | Prefixes Increased Cast Speed |
|
| Rings | Increased Minion Damage Minion Critical Strike Multiplier Increased Minion Health |
Prefixes Increased Minion Damage Intelligence Suffixes Critical Strike Avoidance Needed Resistances |
| Feet | Prefixes Intelligence |
|
| Relic | Increased Minion Damage Increased Minion Movement Speed Increased Minion Health |
Prefixes Increased Minion Damage +2 Levels of Summon Skeletal Mage, Increased Minion Damage Suffixes Health Needed Resistances |
A loot filter made specifically for the gear table above may be copied by pressing the button below. Once in the Loot Filter portion of the in-game menu, choose the "Paste Clipboard Contents" option to import the code.
Copy Loot Filter to Clipboard
Uniques
Below is the list of required uniques to play the build. Unlike some other builds, these items are absolutely required to ensure Cryomancer functiones properly and we have enough defensive layers ourselves to live boss encounters. While its always suggested to dodge AoE telegraphs as much as possible, its inevitable that you will be hit.
Lich's Scorn
![]() Lich's Scorn: Converts
Lich's Scorn: Converts ![]() Dread Shade to deal Cold Damage while also synergizing with
Dread Shade to deal Cold Damage while also synergizing with ![]() Infernal Shade usage.
Based on an average amount of Intelligence, this also boosts Cold Penetration for the Cryomancer by around 70%.
This off-hand can be target farmed by killing Formosus the Undying.
Infernal Shade usage.
Based on an average amount of Intelligence, this also boosts Cold Penetration for the Cryomancer by around 70%.
This off-hand can be target farmed by killing Formosus the Undying.
Exsanguinous
![]() Exsanguinous: One part of how we will generate Ward, this chest piece drains Health while converting the amount of missing
Health we have into Ward. This unique chest piece can be target farmed in the Monolith Timeline "Blood, Frost, and Death".
Exsanguinous: One part of how we will generate Ward, this chest piece drains Health while converting the amount of missing
Health we have into Ward. This unique chest piece can be target farmed in the Monolith Timeline "Blood, Frost, and Death".
Last Steps of the Living
![]() Last Steps of the Living: Just as
Last Steps of the Living: Just as ![]() Exsanguinous does, these boots also drain Health in exchange for supplying Ward
for the amount of missing Health. When both of these items are combined, they will be converting around 30% of your Health per second into
Ward. Target farm on the Monolith Timeline "Blood, Frost, and Death".
Exsanguinous does, these boots also drain Health in exchange for supplying Ward
for the amount of missing Health. When both of these items are combined, they will be converting around 30% of your Health per second into
Ward. Target farm on the Monolith Timeline "Blood, Frost, and Death".
Julra's Obsession
![]() Julra's Obsession: You will need to farm the Temporal Sanctum for these, but they always come with Legendary Potential.
All modifiers on these gloves are reflected onto the Cryomancer, meaning so is the Legendary Potential affix. Aim for Increased Cast Speed.
Julra's Obsession: You will need to farm the Temporal Sanctum for these, but they always come with Legendary Potential.
All modifiers on these gloves are reflected onto the Cryomancer, meaning so is the Legendary Potential affix. Aim for Increased Cast Speed.
Death Rattle
![]() Death Rattle: Simply put, this amulet provides a lot of bonuses for Cryomancer, with the most important one being a potential
for an increased 100% Critical Hit Multiplier on a good roll. This amulet can be target farmed in the Timeline Monolith "The Age of Winter".
Death Rattle: Simply put, this amulet provides a lot of bonuses for Cryomancer, with the most important one being a potential
for an increased 100% Critical Hit Multiplier on a good roll. This amulet can be target farmed in the Timeline Monolith "The Age of Winter".
Chronostasis
![]() Chronostasis: Since we do none of the damage ourselves in this build, Chronostasis is perfect. Intelligence boost, and Ward per second. Nothing
in this build deals Melee Damage, so you won't need to worry about randomly dropping a massive chunk of Ward. This sword can be farmed in the Monolith
Timeline "Reign of Dragons".
Chronostasis: Since we do none of the damage ourselves in this build, Chronostasis is perfect. Intelligence boost, and Ward per second. Nothing
in this build deals Melee Damage, so you won't need to worry about randomly dropping a massive chunk of Ward. This sword can be farmed in the Monolith
Timeline "Reign of Dragons".
Optional Gearing
![]() Strands of Souls is a belt you may use in order to remove the clunkiness of Health Potions depleting your Ward when they're picked up. Not
only that, but this belt will also increase your overall Ward cap. Keep in mind, if you run this, you will have to drop some Minion stats and/or
Health pool for yourself without having Legendary Potential. This item is not mandatory, but should be considered. It will only drop from the
Empowered Monolith Timeline fight against the Abomination in "Fall of the Outcasts".
Strands of Souls is a belt you may use in order to remove the clunkiness of Health Potions depleting your Ward when they're picked up. Not
only that, but this belt will also increase your overall Ward cap. Keep in mind, if you run this, you will have to drop some Minion stats and/or
Health pool for yourself without having Legendary Potential. This item is not mandatory, but should be considered. It will only drop from the
Empowered Monolith Timeline fight against the Abomination in "Fall of the Outcasts".
Idols
Idol slots are gained through the campaign, unlocking small bonuses and unique affixes for the player to discover and augment their builds with. The Idol screen consists of a grid system for the player to fill out with different sized Idols, eventually filling in every part of the grid. As the Idol shape increases (1x1, 1x2, 1x3, 1x4, etc.) the stronger an affix you might find for your build.
Grand Bone Idols should be sought out, specifically with the affixes Increased Minion Cold Damage. Any open spots can be filled with Resistances or Health depending on what you need. Note that Health gains will translate into a higher static amount of Ward from our gearing selection.
Blessing
Blessings are permanent buffs that are applied to your character. These come in two different powers, Standard and Grand. Grand blessings are significantly stronger than the Standard Blessings. In total, there are 10 Blessing Slots, one for each Monolith Timeline. When you complete a Monolith and defeat the final boss you will be awarded a choice of three blessing with a random value.
| Blessing Name | Affix | Timeline |
|---|---|---|
| Flat Health | The Black Sun | |
| Ward per Second | Ending the Storm | |
| + All Resistances | Reign of Dragons | |
| Increased Minion Damage | Spirits of Fire |
For The Age of Winter, you have two options. Either take ![]() Grand Resolve of Grael
or
Grand Resolve of Grael
or ![]() Grand Protection of Heorot, depending on which you are lacking from gear.
Grand Protection of Heorot, depending on which you are lacking from gear.
Changelog
- 13 Mar. 2024: Build Planner added.
- 12 Jan. 2024: Loot Filter added.
- 30 Nov. 2023: Guide added.

GhazzyTV is a professional content creator that knows all about theory crafting builds in Path of Exile and Last Epoch and has been teaching players how to build their characters for over 9 years. He is a huge Blizzard fan with thousands of hours invested into Diablo 3 and 4 and is a frequent World of Warcraft Classic player. His builds will be helpful content for new players and veterans alike. You can find his PoE Vault Guide Hub here and his LE Guide Hub here. You can follow him on Twitch, YouTube or Twitter.
- Patch 1.0.7 Update: Multiplayer, Skills and More!
- Patch 1.0.6 Update: Camera Setting, Controller Keybinds, Bug Fixes, and More!
- Eleventh Hour Games on Real-Money Trading and Exploits in Last Epoch
- Patch 1.0.5 Update: Many Bug Fixes, Including Loot Filter Toggle Sensitivity, and Other Improvements!
- The First 30 Days of Last Epoch!
- 1.0 Launch Retrospective: A Message From Eleventh Hour Games
- Patch 1.0.4 Update: More In-Game Changes, Bug Fixes, and Improvements
- Last Epoch Mid-Cycle Balance Survey Recap