Paladin Lightning Smite Meteor Endgame Build for Last Epoch (Patch 1.1)
Welcome to our Last Epoch Paladin Lightning Smite Meteor build guide for the Sentinel class. Here you will learn everything about the Paladin play style, passives, skills, strengths, and weaknesses to conquer the world of Eterra.
Build Introduction
Summon a lightning storm to electrify your foes while energized meteors rain down upon them, eradicating all enemies in your path. This build utilizes high Critical Hit Chance alongside some choice Unique items in order to create a build that will shock your opponents, while at the same time filling your screen with an electric light show.
This build was created by Brau, an active member of the Last Epoch theorycrafting community.
 Deals amazing AoE damage
- Mobile
- High uptime and multiple sources of
 Smite
Smite

 Requires specific gear and affixes to function properly
- Mana requirements

Skill Selection
The main damage skill in this build will be ![]() Smite. This spell
is converted to deal Lightning Damage, and through both the Passive Tree
and our gearing selection, is set to have a 100% Critical Hit Rate. This is
perfect, as we bank on what is normally a Mage spell,
Smite. This spell
is converted to deal Lightning Damage, and through both the Passive Tree
and our gearing selection, is set to have a 100% Critical Hit Rate. This is
perfect, as we bank on what is normally a Mage spell, ![]() Meteor, to enhance
our AoE damage with this build through the use of the Unique Belt Harbinger of Stars.
Beyond this interaction, all other skills are taken to provide support or facilitate more
casts of Smite.
Meteor, to enhance
our AoE damage with this build through the use of the Unique Belt Harbinger of Stars.
Beyond this interaction, all other skills are taken to provide support or facilitate more
casts of Smite. ![]() Javelin will cast its own Smites in an area around where you've placed it,
and
Javelin will cast its own Smites in an area around where you've placed it,
and ![]() Lunge, while also our Traversal Skill, will also automate Smite on use depending on
the distance we covered when using it.
Lunge, while also our Traversal Skill, will also automate Smite on use depending on
the distance we covered when using it. ![]() Healing Hands will heal us with every manual cast of
Smite for a substantial amount, while
Healing Hands will heal us with every manual cast of
Smite for a substantial amount, while ![]() Holy Aura will increase our Critical Hit Rate and Multiplier
and help round out our Resistances.
Holy Aura will increase our Critical Hit Rate and Multiplier
and help round out our Resistances.

Class and Skill Passive Trees
Our base class is Sentinel, which fills the role of a knight in Last Epoch. Upon finishing Act 1in the campaign, your character will be offered an opportunity to select an Advanced Mastery. Each base class has three possible Masteries to choose from. For Sentinel, you can choose between Passive Trees for Paladin, Forge Guard, and Void Knight. Upon selecting a Mastery and placing 20 Passive Points into the Sentinel Tree, you'll then be able to place Passive Points into the Mastery Trees.
Paladin is the Advanced Class used for this build, and also where the majority of our Passive Points will come from. The Paladin Tree will focus around picking nodes that increase Lightning Damage, enhance our Critical Multiplier, provide bonuses to our Healing effectiveness, and boost our Movement Speed. Forge Guard and Void Knight will not be used at all.
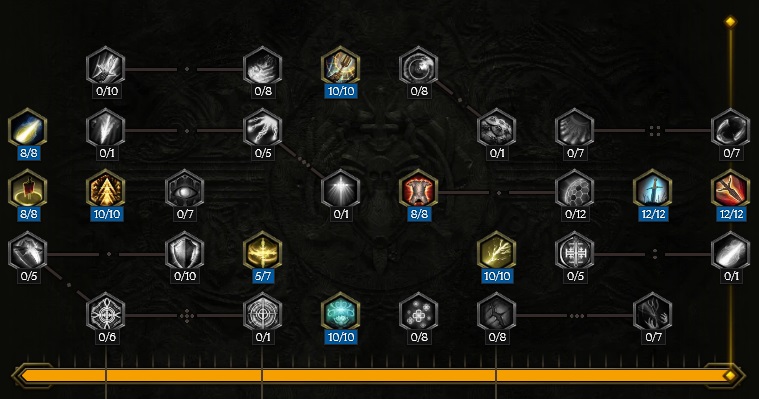
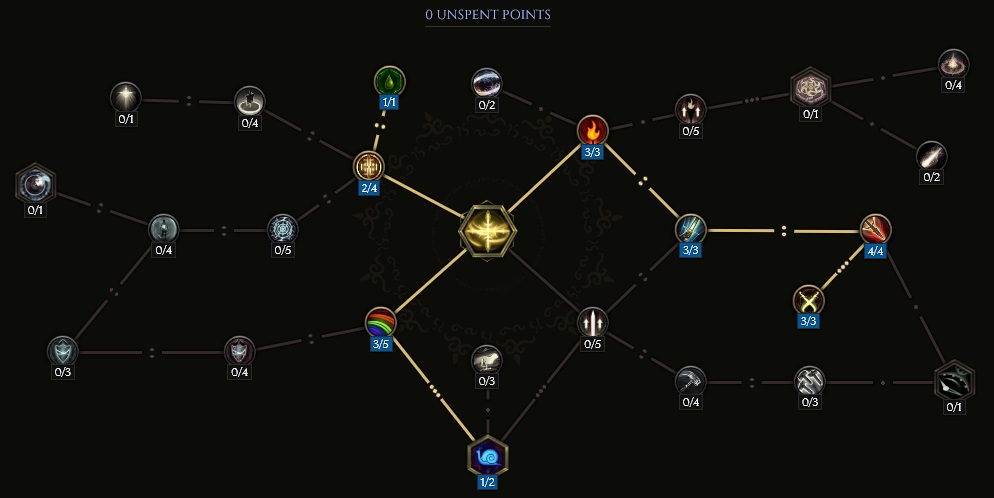
Sentinel Passive Points

- 5 points into Juggernaut: Taken for a bit of extra Resistances.
- 5 points into Armour Clad: This is huge for our defensive aspect, as it provides a flat 10% reduction in damage taken for being in melee range.
- 5 points into Valiant Charge: Cooldown reduction for
 Lunge.
 - 5 points into Time and Faith: Smite will not replenish Mana on manual cast.
Our base class is Sentinel, which fills the role of a knight in Last Epoch. Upon finishing Act 1in the campaign, your character will be offered an opportunity to select an Advanced Mastery. Each base class has three possible Masteries to choose from. For Sentinel, you can choose between Passive Trees for Paladin, Forge Guard, and Void Knight. Upon selecting a Mastery and placing 20 Passive Points into the Sentinel Tree, you'll then be able to place Passive Points into the Mastery Trees.
Paladin is the Advanced Class used for this build, and also where the majority of our Passive Points will come from. The Paladin Tree will focus around picking nodes that increase Lightning Damage, enhance our Critical Multiplier, provide bonuses to our Healing effectiveness, and boost our Movement Speed. Forge Guard and Void Knight will not be used at all.
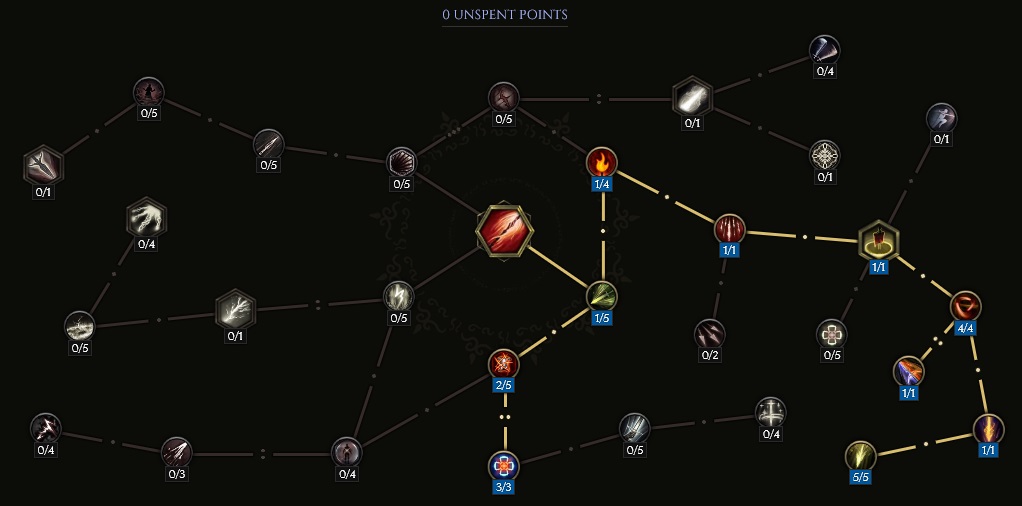
Paladin Passive Points
- 5 points into Defiance: 15% Resistance for Cold, Fire, and Lightning. This is taken to
unlock access to
 Healing Hands.
 - 10 points into Valor: Huge boost to Health, and increases the effectiveness of Healing Hands.
In this section, we will break down each skill and highlight the key passives we have selected to make the skill shine in the build. While some of these skills do allow for some variation to exist depending on your own custom choices, we recommend utilizing the skill trees as presented until you have a strong understanding of the build itself.
Smite
![]() Smite is the main spam skill used for this build. This is how we will automate
Smite is the main spam skill used for this build. This is how we will automate ![]() Healing Hands and
also proc casts of
Healing Hands and
also proc casts of ![]() Meteor to fall on groups of enemies. Smite will be converted to Lightning in order to take
advantage of damage modifiers on gear and the Paladin Passive Tree.
Meteor to fall on groups of enemies. Smite will be converted to Lightning in order to take
advantage of damage modifiers on gear and the Paladin Passive Tree.
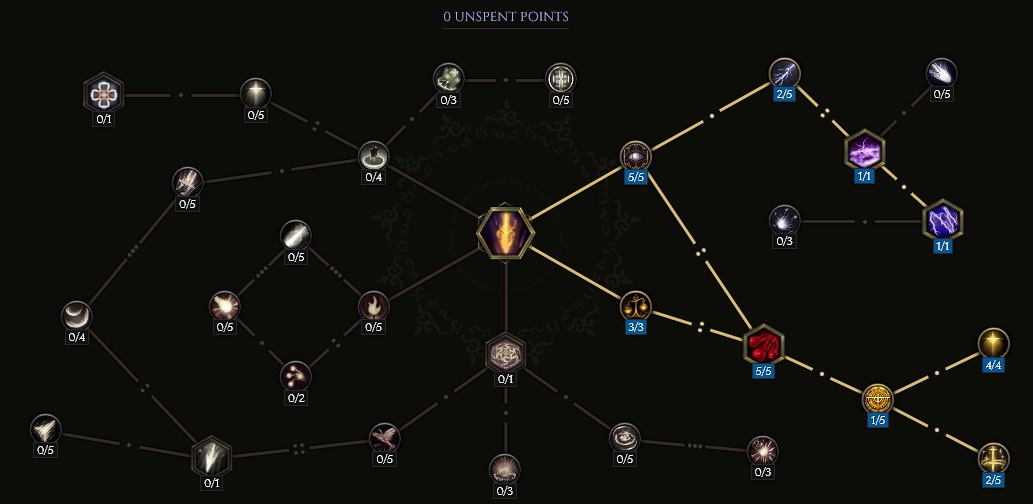
Order of Skill Points
- 3 points into Pillars of Light: 36% chance to double cast. This allows for more chances to crit, which means more Meteors.
- 5 points into Sacrifice: Smite deals 250% more damage, but consumes a portion of our Health on each use.
- 1 points into Atonement: This cuts the Health drain down a bit, but it still exists. It is nullified through Healing Hands
and the innate healing on Smite.
- 2 points into Conviction: Adds 4% to your base Critical Hit Rate for Smite.
- 4 points into Deep Impact: Adds 100% extra Critical Multiplier.
- 5 points into Blinding Flash: Smite now has a 50% chance to Blind, which is used as a way to bump the damage by 50%.
- 2 points into Piety: Pathing node.
- 1 point into Order of Lagon: Converts Smite into a Lightning skill, as well as all Ignite is now converted to Electrify.
- 1 point into Unbalanced Scale: Increases Mana cost, but Smite now deals damage to multiple targets.
In the event you do not have the extra 4 Skill Points from the Relic, drop 4 points from Blinding Flash. This will lose you damage, but the build will still function as intended.
In this section, we will break down each skill and highlight the key passives we have selected to make the skill shine in the build. While some of these skills do allow for some variation to exist depending on your own custom choices, we recommend utilizing the skill trees as presented until you have a strong understanding of the build itself.
Healing Hands
![]() Healing Hands is how we sustain our Health this with build, as
Healing Hands is how we sustain our Health this with build, as ![]() Smite will constantly be draining
our Health as we use it. The amount we heal with Healing Hands is much higher than the life drain on Smite, so this
will also cover damage taken by enemies. While you will almost never need to manually use Healing Hands, it should still
be on your bar for emergencies, such as DoT ailments and there are no enemies to attack.
Smite will constantly be draining
our Health as we use it. The amount we heal with Healing Hands is much higher than the life drain on Smite, so this
will also cover damage taken by enemies. While you will almost never need to manually use Healing Hands, it should still
be on your bar for emergencies, such as DoT ailments and there are no enemies to attack.
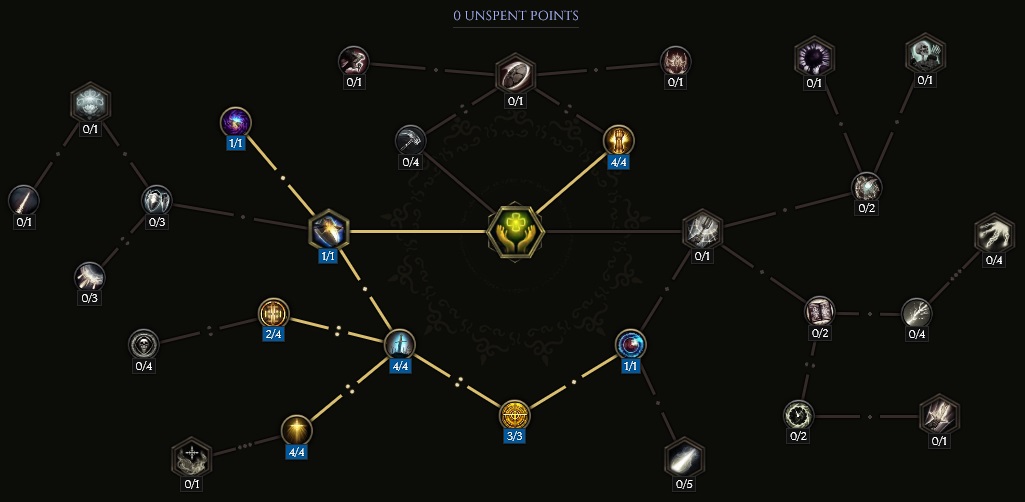
Order of Skill Points
- 4 points into Hand of Aurelus: Directly casting Smite will now trigger an instance of Healing Hands.
- 1 point into Divine Barrier: Taking for pathing.
- 1 point into Homeward: This node is required! If you alter this tree, do not remove this. This will force Healing Hands to center on your character rather than where Smite lands. This is important, as you no longer need to be in melee range to make sure you're healing, but on larger bosses (Reign of Dragons) it is impossible to make Healing Hands hit you consistently due to the hitbox of the boss.
- 4 points into Prayer of the Fallen: 100% Increased Healing Effectiveness.
- 3 points into Blessed Parish: Drops the Mana cost for Healing Hands by 6.
- 1 point into Purity of Thought: Reduces the Mana cost by 5.
- 4 points into Urgent Healing: Adds an initial 140 Health to the heal.
- 2 points into Vow of Restoration: Healing Hands heals more over time.
In this section, we will break down each skill and highlight the key passives we have selected to make the skill shine in the build. While some of these skills do allow for some variation to exist depending on your own custom choices, we recommend utilizing the skill trees as presented until you have a strong understanding of the build itself.
Lunge
![]() Lunge will be used as our main way of getting around maps, allowing us to drop
extra casts of
Lunge will be used as our main way of getting around maps, allowing us to drop
extra casts of ![]() Smite as we do so. Using Lunge will grant you Frenzy
for a short period of time as well. Lunge for this build will come on a charge system,
allowing you to Lunge twice if needed without needing to wait for the cooldown to
recharge.
Smite as we do so. Using Lunge will grant you Frenzy
for a short period of time as well. Lunge for this build will come on a charge system,
allowing you to Lunge twice if needed without needing to wait for the cooldown to
recharge.
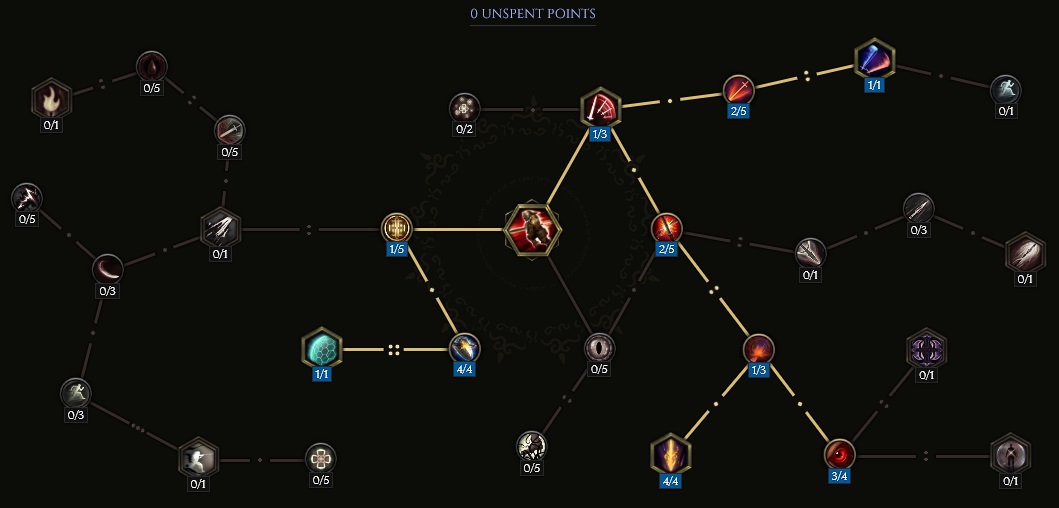
Order of Skill Points
- 1 point into Dawn Charge: Pathing node.
- 4 points into Juggernaut Dash: You have a 100% Block Chance while Lunging.
- 1 point into Unstoppable: You are invulnerable while Lunging. This is necessary for dashing through things like Lagon's eye beam. While good gameplay avoids this anyway, its always nice to have a back-up option.
- 1 point into Warrior's Renewal: Pathing node.
- 2 points into Initiate's Onslaught: Pathing node.
- 1 point into Cull the Weak: Pathing node.
- 4 points into Holy Incursion: Will now cast Smite up to three times, with the chance scaling off
the distance traveled with Lunge.
- 3 points into Reckless Skirmish: Applies Frenzy on Lunge usage for three seconds.
- 2 points into Ambuscade: Pathing node.
- 1 point into Double Strike: Lunge now has an additional charge.
In this section, we will break down each skill and highlight the key passives we have selected to make the skill shine in the build. While some of these skills do allow for some variation to exist depending on your own custom choices, we recommend utilizing the skill trees as presented until you have a strong understanding of the build itself.
Javelin
![]() Javelin only has one real purpose here, and that is to automate more casts of
Javelin only has one real purpose here, and that is to automate more casts of ![]() Smite,
which can then be used to proc more casts of
Smite,
which can then be used to proc more casts of ![]() Meteor. This does mean that Javelin is a great
tool for map zoning; place Javelin down in one direction, and focus your own efforts elsewhere.
Meteor. This does mean that Javelin is a great
tool for map zoning; place Javelin down in one direction, and focus your own efforts elsewhere.
Order of Skill Points
- 1 point into Mighty Delivery: Pathing node.
- 1 point into Burning Strength: Pathing node.
- 1 point into Siege Barrage: Increases the Mana cost significantly.
- 1 point into Battle Standard: Turns Javelin into a Battle Standard.
- 4 points into Ardent Symbol: Increases the duration Javelin is active by 8 seconds.
- 1 point into Capture the Flag: If an enemy touches Javelin, it will latch onto that enemy and move with it.
- 1 point into Divine Intervention: Javelin will now automate Smite, casted at nearby enemies while it is active.
- 5 points into Righteous Descend: Increases Smite frequency. This does add base Crit Chance as well, but it is mostly overkill if you have the proper gear.
- 2 points into Serrated Javelin: Pathing node.
- 3 points into Excellent Balance: Reduces the Mana cost on Javelin.
In this section, we will break down each skill and highlight the key passives we have selected to make the skill shine in the build. While some of these skills do allow for some variation to exist depending on your own custom choices, we recommend utilizing the skill trees as presented until you have a strong understanding of the build itself.
Holy Aura
![]() Holy Aura exists mostly to provide us with Resistances and take the burden off suffixes in our gear.
It will also provide us with a nice boost to Critical Hit Chance and Critical Hit Multiplier. In most cases,
the extra Ignite chance will be converted to Electrify. All benefits from Holy Aura
double for a short period of time if the skill is pressed.
Holy Aura exists mostly to provide us with Resistances and take the burden off suffixes in our gear.
It will also provide us with a nice boost to Critical Hit Chance and Critical Hit Multiplier. In most cases,
the extra Ignite chance will be converted to Electrify. All benefits from Holy Aura
double for a short period of time if the skill is pressed.
Order of Skill Points
- 2 points into Rahyeh's Devotion: Adds Ignite Chance to all of our actions.
- 3 points into Fanaticism: Increased Cast Speed.
- 4 points into True Strike: Increased Critical Strike Chance.
- 3 points into Extreme Zeal: Increased Critical Multiplier.
- 2 points into Vital Boon: Pathing node.
- 1 point into Purification: Increased Poison Resistance, and Holy Aura now becomes a cleanse when activated.
- 3 points into Shelter from the Storm: Increased Elemental Resistance and additional Endurance.
- 1 point into Demoralizing Aura: Provides a chance to Slow enemies while active.
Build Mechanics and Playstyle
This build plays very similarly to a regular ![]() Smite build, but adds a fun and rewarding gimmick by
using the Unique Belt, Harbinger of Stars to proc casts of
Smite build, but adds a fun and rewarding gimmick by
using the Unique Belt, Harbinger of Stars to proc casts of ![]() Meteor in order to deal more AoE damage.
Meteor has dual purpose in this build, as not only does it add more damage to the build, but it also forcibly drops
our Mana which then increases the damage we deal with Smite. Due to Attunement stacking, this leaves us with a
massive Mana pool; Meteor has an extremely high Mana cost, so this balances things out. The build, if used with
identical skill nodes as we have laid out, will run into Mana issues fairly quickly if you do not have the helmet
suffix Mana Gained When You Directly Cast Smite. If unable to acquire this on Peak of the Mountain, an
Exalted Helmet will do just fine while you farm for one.
Meteor in order to deal more AoE damage.
Meteor has dual purpose in this build, as not only does it add more damage to the build, but it also forcibly drops
our Mana which then increases the damage we deal with Smite. Due to Attunement stacking, this leaves us with a
massive Mana pool; Meteor has an extremely high Mana cost, so this balances things out. The build, if used with
identical skill nodes as we have laid out, will run into Mana issues fairly quickly if you do not have the helmet
suffix Mana Gained When You Directly Cast Smite. If unable to acquire this on Peak of the Mountain, an
Exalted Helmet will do just fine while you farm for one.
Between manually casted ![]() Smite, the Smite casts off
Smite, the Smite casts off ![]() Lunge, and the
Lunge, and the ![]() Meteor procs off
Harbinger of Stars, this build will entirely fill your screen with Lightning explosions.
Meteor procs off
Harbinger of Stars, this build will entirely fill your screen with Lightning explosions.
Equipment and Gear Affixes
For this build, we will be focusing on several main affixes for each piece of non-unique gear, as well as working towards acquiring the specific uniques needed to make this build operate correctly. Our equipment will focus on these specific affixes for the Implicits and Modifier stats.
| Gear Slot | Implicits | Modifiers |
|---|---|---|
| Two-handed Staff | Vilatria's Downfall | - |
| Head | Peak of the Mountain | Legendary Potential Attunement Mana Gained When You Directly Cast Smite |
| Amulet | Devotion | Legendary Potential Increased Spell Critical Strike Chance |
| Chest | Armor Armor Mitigation also applies to Damage Over Time |
Prefixes Attunement Vitality Suffixes Health Increased Health |
| Belt | Harbinger of Stars | Legendary Potential Increased Lightning Damage |
| Gloves | Armor Armor Mitigation also Applies to Damage Over Time |
Prefixes Increased Cast Speed Attunement Suffixes Health Hybrid Health |
| Ring | Increased Critical Strike Chance | Prefixes Increased Lightning Damage Increased Critical Strike Chance Suffixes Health Endurance Threshold |
| Ring | Increased Critical Strike Chance | Prefixes Increased Lightning Damage Increased Critical Strike Chance Suffixes Health Endurance |
| Feet | Transient Rest | Legendary Potential Attunement Hybrid Health |
| Relic | Increased Fire Damage Increased Healing Effectiveness |
Prefixes +4 Levels of Smite Attunement Suffixes Health Needed Resistances |
A loot filter made specifically for the gear table above may be copied by pressing the button below. Once in the Loot Filter portion of the in-game menu, choose the "Paste Clipboard Contents" option to import the code.
Copy Loot Filter to Clipboard
Uniques
Aside from the items listed below, there is the opportunity to use the Unique Relic, Stormcarved Testament. We have not included it in the table or our recommended options simply because the Tier 7 to Levels of Smite is more important. However, if you're looking to take this build above and beyond and you can manage to snag one of these with Legendary Potential and the correct affixes, feel free to swap to it.
Peak of the Mountain
Peak of the Mountain: This helmet is great for scaling Critical Strike Chance, and it is incredibly easy to secure, as it drops from all difficulties of Lightless Arbor.
Devotion
Devotion: This amulet will help scale our damage based on how much Mana we're missing. ![]() Meteor
acts as a great tool to drop our Mana, while
Meteor
acts as a great tool to drop our Mana, while ![]() Smite will replenish it per cast. There are a bunch of other useful effects
on this item, such as Endurance, Healing Effectiveness, and Lightning Penetration as well. This item can
drop from anywhere, but can also be target farmed in the Monolith Timeline "The Age of Winter".
Smite will replenish it per cast. There are a bunch of other useful effects
on this item, such as Endurance, Healing Effectiveness, and Lightning Penetration as well. This item can
drop from anywhere, but can also be target farmed in the Monolith Timeline "The Age of Winter".
Harbinger of Stars
Harbinger of Stars: Normally used on Mage builds, this belt will allow us to drop Lightning Meteors on
targets, proc'd off crits from any other source. This adds a good chunk of DPS to the build, and really bumps up
the AoE damage when clearing maps. It does also have a defensive aspect, as you will take less damage for recent
![]() Meteor casts, up to a maximum of 18%. You can find this belt anywhere, but it may also be target farmed
in the Monolith Timeline "Fall of the Empire".
Meteor casts, up to a maximum of 18%. You can find this belt anywhere, but it may also be target farmed
in the Monolith Timeline "Fall of the Empire".
Transient Rest
Transient Rest: These boots were taken almost entirely for the Resistance gains it brings to the table, however since this is a caster build, we will quite often be stopping to deal damage. Since we scale Attunement, our Mana pool will be high, meaning these boots will grant us quite a bit of Ward when we stop moving. These can be farmed from the Monolith Timeline "Spirits of Fire".
Idols
Idol slots are gained through the campaign, unlocking small bonuses and unique affixes for the player to discover and augment their builds with. The Idol screen consists of a grid system for the player to fill out with different sized Idols, eventually filling in every part of the grid. As the Idol shape increases (1x1, 1x2, 1x3, 1x4, etc.) the stronger an affix you might find for your build.
The Idols for this build will be split between offense and defense gains. Prioritize four Large Rahyeh Idols with Increased Damage with Smite and Health. The remaining slots can be used for further Health gains, or to cover for any Resistances you may be missing.
Blessing
Blessings are permanent buffs that are applied to your character. These come in two different powers, Standard and Grand. Grand blessings are significantly stronger than the Standard Blessings. In total, there are 10 Blessing Slots, one for each Monolith Timeline. When you complete a Monolith and defeat the final boss you will be awarded a choice of three blessing with a random value.
| Blessing Name | Affix | Timeline |
|---|---|---|
| Critical Strike Avoidance | Reign of Dragons | |
| Increased Armor | The Age of Winter | |
| Armor | Spirits of Fire | |
| Chance to apply Shred Lightning Resistance on Hit | Ending the Storm |
Changelog
- 18 Mar. 2024: Guide Added.

GhazzyTV is a professional content creator that knows all about theory crafting builds in Path of Exile and Last Epoch and has been teaching players how to build their characters for over 9 years. He is a huge Blizzard fan with thousands of hours invested into Diablo 3 and 4 and is a frequent World of Warcraft Classic player. His builds will be helpful content for new players and veterans alike. You can find his PoE Vault Guide Hub here and his LE Guide Hub here. You can follow him on Twitch, YouTube or Twitter.
- Last Epoch’s New Paradox: From “All Future Content Free” to Paid Classes
- Last Epoch Confirms Paid DLC Classes With Free Expansion
- Last Epoch Season 3 Overhauls Skills, UI, Monster Behavior & More
- Last Epoch Season 3 Adds Smarter Minions & Big Changes
- Lich & Necromancer Get New Skill, Buffs, and Dark New Builds in Last Epoch!
- Last Epoch Season 3 Explores the Ancient Era!
- Last Epoch Reveals Major Content for Season 3!
- Last Epoch Season 3 Trailer Reveals Major Changes!