Runemaster Flame Hydra Endgame Build for Last Epoch
Welcome to our Last Epoch Runemaster Flame Hydra build guide for the Mage class. Here you will learn everything about the Runemaster play style, passives, skills, strengths, and weaknesses to conquer the world of Eterra.
Build Introduction
This build is all about the fire turrets created by Runemasters called Hydrahedrons. Our Hydrahedron will be created in several different ways, allowing us to constantly have one at our side while we zip across the battlefield. Even our hands will ignite with flame and release gusts of fireballs to chase down our enemies, all while we stand under an orb of magical protection.

 Hydrahedron acts like a turret, killing enemies for you
 - Fast and engaging rotation
- Great damage for both clearing maps and dealing with Boss enemies

 Rotation required
 - Unique gear required

Skill Selection
Our skill selection for this build focuses on Fire Damage and keeping our
defenses up with our ![]() Flame Ward. We have several other skills that will
buff our character, including
Flame Ward. We have several other skills that will
buff our character, including ![]() Flame Rush and
Flame Rush and ![]() Frost Wall, these two
skills will provide us with some needed Ward and Haste abilities to help with our
survivability. This build is all about moving through the battlefield quickly with
Frost Wall, these two
skills will provide us with some needed Ward and Haste abilities to help with our
survivability. This build is all about moving through the battlefield quickly with ![]() Flame Rush,
and producing Hydrahedron's as much as we can, taking advantage of our unique relic
Flame Rush,
and producing Hydrahedron's as much as we can, taking advantage of our unique relic
![]() Box of Hydrae to amp up our Hydrahedron's damage.
Box of Hydrae to amp up our Hydrahedron's damage.

Class and Skill Passive Trees
Our base class is the Mage, which acts as a generic spell caster. Our character will be offered an opportunity to select a Mastery class once we have completed the first act of the campaign. Each base class has three possible masteries to choose from. For the Mage, we have access to the Mastery Tree Passives for Sorcerer, Runemaster and Spellblade. Upon selecting a Mastery and placing a minimum of 20 Passive Points into the Mage Tree, you'll then be able to place Passive Points into the Mastery Trees.
For this Hydra build, Runemaster is our advanced class. We will utilize the majority of our Passive Points for the Runemaster Passive tree, with a smaller investment into Sorcerer to round out the build. Our passive points will be targeting augments for Fire Damage and boosting our survivability. Each of the Passive Trees and their points are broken down below.
Mage Passive Points
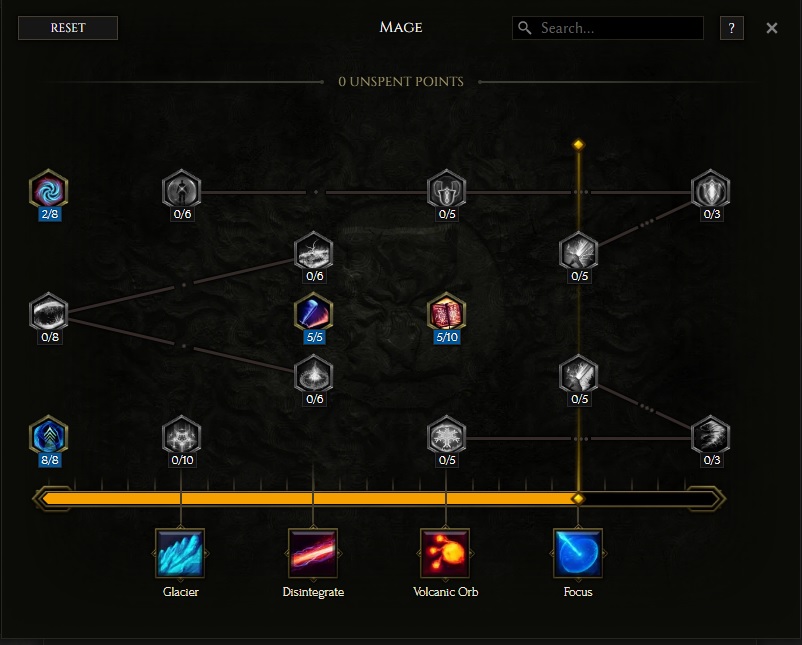
- 2 points into Scholar: Increases Health and Mana.
- 8 points into Arcanist: Increases Intelligence and Resistances.
- 5 points into Mage Flurry: Increases Attack and Cast Speed.
- 5 points into Knowledge of Destruction: Increases Critical Strike Chance and Multiplier.
Our base class is the Mage, which acts as a generic spell caster. Our character will be offered an opportunity to select a Mastery class once we have completed the first act of the campaign. Each base class has three possible masteries to choose from. For the Mage, we have access to the Mastery Tree Passives for Sorcerer, Runemaster and Spellblade. Upon selecting a Mastery and placing 20 Passive Points into the Mage Tree, you'll then be able to place Passive Points into the Mastery Trees.
For this Hydra build, Runemaster is our advanced class. We will utilize the majority of our Passive Points for the Runemaster Passive tree, with a smaller investment into Sorcerer to round out the build. Our passive points will be targeting augments for Fire Damage and boosting our survivability. Each of the Passive Trees and their points are broken down below.
Sorcerer Passive Points

- 6 points into Calculated Destruction: Increases Intelligence and Increases our Critical Strike Chance by 3% per Intelligence.
- 5 points into Arcane Momentum: Grants us Arcane Momentum Stacks.
- 6 points into Essence of Celerity: Increases Spell Damage per stack and increases Arcane Momentum Duration.
Our base class is the Mage, which acts as a generic spell caster. Our character will be offered an opportunity to select a Mastery class once we have completed the first act of the campaign. Each base class has three possible masteries to choose from. For the Mage, we have access to the Mastery Tree Passives for Sorcerer, Runemaster and Spellblade. Upon selecting a Mastery and placing 20 Passive Points into the Mage Tree, you'll then be able to place Passive Points into the Mastery Trees.
For this Hydra build, Runemaster is our advanced class. We will utilize the majority of our Passive Points for the Runemaster Passive tree, with a smaller investment into Sorcerer to round out the build. Our passive points will be targeting augments for Fire Damage and boosting our survivability. Each of the Passive Trees and their points are broken down below.
Runemaster Passive Points
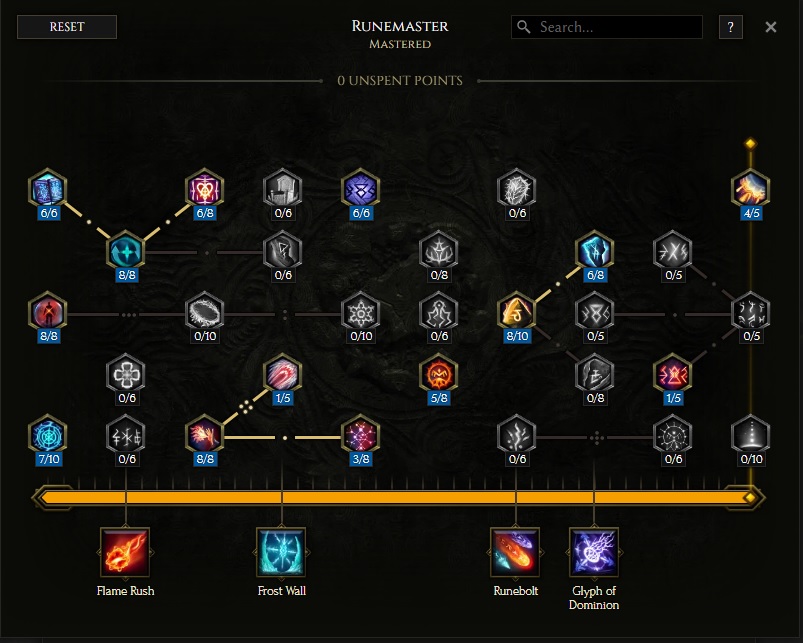
- 8 points into Sphere of Protection: Increases your Health and take less damage from ailments.
- 7 points into Quintessence of Triumph: Increases your Spell Damage.
- 6 points into Unsealed Mana: Grants us a buff for Mana and Cast Speed when we use three skills with zero mana cost.
- 8 points into Arcane Focus: Increases our Intelligence and gain Ward on cast.
- 6 points into Transcendence: Increases Health and Ward gains.
- 8 points into Never Late: After using a traversal skill increase your Spell Damage and Critical Strike Chance.
- 1 point into Nimbus Walk: Gain Ward on Traversal skill.
- 3 points into Rune of Dilation: After using a Traversal skill we gain a Cast and Movement Speed buff.
- 6 points into Inscribed Instruments: Increases Critical Strike Multiplier while using a Wand.
- 5 points into Decree of the Burning Wind: Increases our damage against Elites and Bosses.
- 8 points into Ancient Inscriptions: Increases our Intelligence and Recovery Cooldown.
- 6 points into Cerulean Runestones: Increases our Endurance and Mana.
- 1 point into Runeword: Inferno: Grants us a buff for an increase in Fire Damage and Armor when casting a Fire Skill.
- 4 points into Jagged Veil: Grants Ward on Critical Strike.
In this section, we will break down each skill and highlight the key passives we have selected to make the skill perform as best as possible in the build. While some of these skills do allow for some variation to exist depending on your own custom choices, we recommend utilizing the skill trees as presented until you have a strong understanding of the build itself.
Flame Ward

This skill is just full of bonuses, mainly increasing our Fire Damage on top of the Damage Reduction it already provides. It is easy to keep up and adds a big buff to our survivability.
Order of Skill Points
- 2 points into Stalwart Defense: Increases your Ward with Flame Ward.
- 5 points into Barrier: You take less damage under Flame Ward.
- 3 points into Dilation: Increases Flame Ward's Duration and Efficiency.
- 5 points into Infusion: Increases our Fire Damage.
- 1 point into Desperate Defense: Additional Ward based on our missing Health.
- 1 point into Astonish: Flame Ward automatically casts when we get stunned.
- 2 points into Fuel The Flames: Flame Ward grants more ward, but has a longer cooldown.
- 1 point into Dual Aegis: Grants an additional charge to Flame Ward, so you can cast it twice.
Any additional points you acquire can go into Stalwart Defense.
In this section, we will break down each skill and highlight the key passives we have selected to make the skill perform as best as possible in the build. While some of these skills do allow for some variation to exist depending on your own custom choices, we recommend utilizing the skill trees as presented until you have a strong understanding of the build itself.
Frost Wall
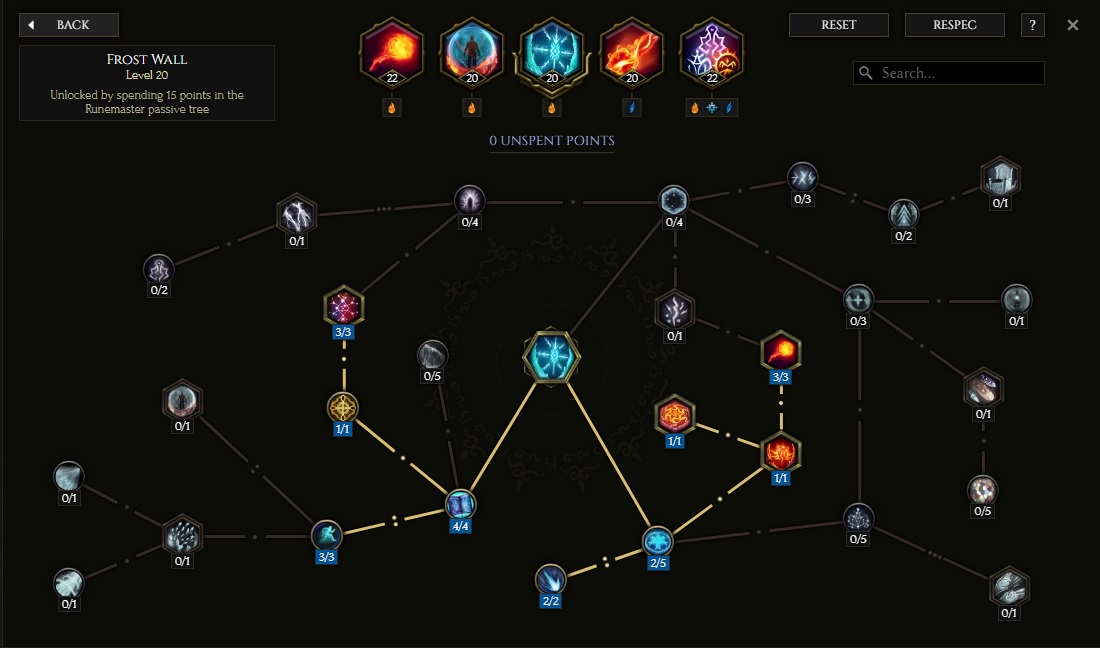
First, our Frost wall is converted into Lightning in this build, so we can trigger a lightning skill
for our ![]() Runic Invocation to make Hydrahedrons. It also grants us Haste and Frenzy whenever we pass
through it and adds Ward to us whenever an enemy comes into contact with it.
Runic Invocation to make Hydrahedrons. It also grants us Haste and Frenzy whenever we pass
through it and adds Ward to us whenever an enemy comes into contact with it.
Order of Skill Points
- 4 points into Crystals of Protection: Increases the gains of Ward and Mana when you walk through Frost Wall.
- 1 point into Purifying Gate: Cleanses Ailments off of us when we touch the wall.
- 3 points into Aspirant's Arrival: Reduces the cost of your next
 Runic Invocation and increases its damage.
 - 3 points into Boosted Kickoff: Grants Frenzy and Haste buffs when we touch the wall.
- 2 points into Marching Winter: Increases our Area of Effect and Duration of our Frost Wall.
- 2 point into Chilled Touch: More damage to Chilled while Frost Wall is up. Make sure you have a source of Chill, such as on your weapon, for this passive.
- 1 point into Biting Limit: Frost Wall has chance to inflict Frostbite
- 1 point into Crackling Barrier: Converts Frost Wall to Lightning, so we can generate a lightning Rune for Hydrahedron.
- 3 points into Flames Unchained: Chance to cast Fireball at enemies that pass through Frost Wall. If you prefer using Runebolt over Fireball in the build, you could put these into The Dark Cold instead.
In this section, we will break down each skill and highlight the key passives we have selected to make the skill perform as best as possible in the build. While some of these skills do allow for some variation to exist depending on your own custom choices, we recommend utilizing the skill trees as presented until you have a strong understanding of the build itself.
Flame Rush
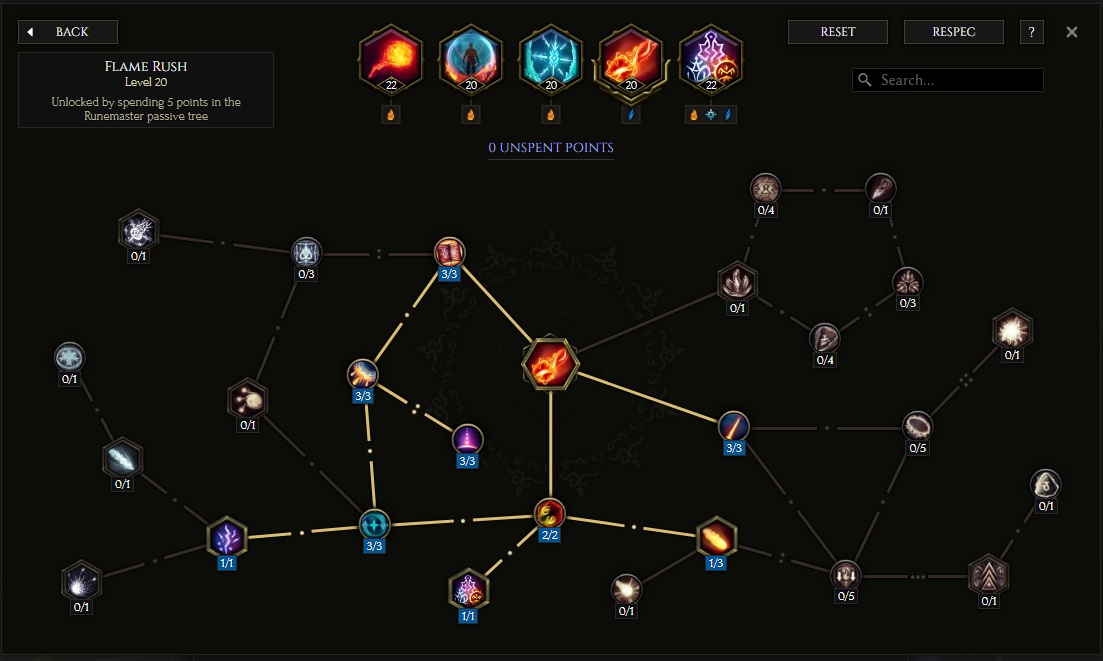
Flame Rush is our traversal skill for zipping around the map, but we have also added some utility to the
skill. First, we have included several buffs that will stay after the skill is used for 45%
of the time we were in Flame Rush. These buffs include bonus Wards, Frenzy and Damage Reduction. We also have
added the ability to increase our Fire Damage whenever we use our ![]() Fireball then
Fireball then ![]() Flame Rush.
Flame Rush.
Order of Skill Points
- 3 points into Blazing Flux: Increases Mana Efficiency and Cooldown Reduction.
- 3 points into Runic Eclipse: Take less damage during Flame Rush.
- 3 points into Celestial Guidance: All buff effects from Flame Rush stay afterwards.
- 3 points into Lunar Protection: Gain Ward when the skill ends.
- 1 point into Energy Equivalence: Converts to Lightning, so we have a way to generate a Lightning Rune to create Hydrahedron.
- 2 points into Fiery Overload: Grants a Frenzy buff after the skill is used.
- 1 point into Epilogue: Allows us to use Runic Invocation on exit; very important so we cast a Hydra right after
 Flame Rush.
 - 1 point into Guidance of Flames: Casting
 Fireball then using Flame Rush will buff its damage.
 - 3 points into Solar Rush: Extra speed and range for Flame Rush. You could take some points from here and put them into Guidance of Flames, based on personal preference.
If you get extra levels on gear, you can put up to 3 in Smolder and Burn and then 1 more into Fire Eater
In this section, we will break down each skill and highlight the key passives we have selected to make the skill perform as best as possible in the build. While some of these skills do allow for some variation to exist depending on your own custom choices, we recommend utilizing the skill trees as presented until you have a strong understanding of the build itself.
Runic Invocation
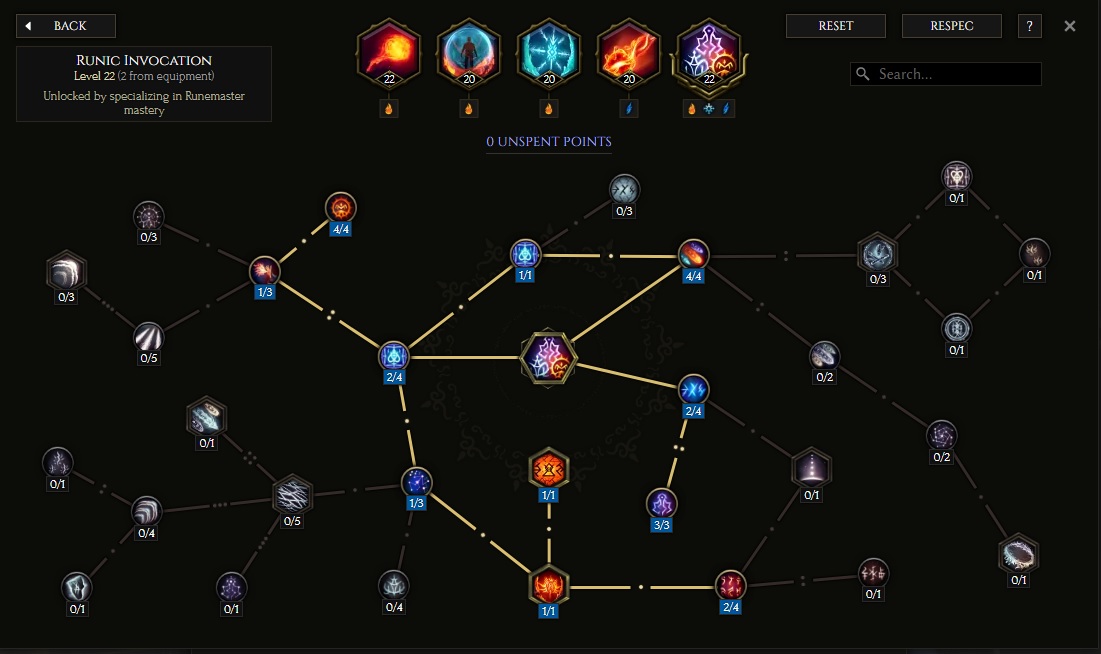
![]() Runic Invocation is the specialty of Runemasters by using a combination of skills to trigger a unique spell.
For this build, we will be using the combination: Fire skill, Fire skill and Lightning skill then activate Runic Invocation.
This will trigger our Hydrahedron creation, which is the largest component of our DPS, so we want to create as many of these
as possible while we move through out the battlefield. One of the unique components we have included in this skill tree is
the Immutable Order which will use our skill bar to determine our spell cast for Runic Invocation, this means every
time we cast three skills regardless of order or element, we will produce a Hydrahedron.
Runic Invocation is the specialty of Runemasters by using a combination of skills to trigger a unique spell.
For this build, we will be using the combination: Fire skill, Fire skill and Lightning skill then activate Runic Invocation.
This will trigger our Hydrahedron creation, which is the largest component of our DPS, so we want to create as many of these
as possible while we move through out the battlefield. One of the unique components we have included in this skill tree is
the Immutable Order which will use our skill bar to determine our spell cast for Runic Invocation, this means every
time we cast three skills regardless of order or element, we will produce a Hydrahedron.
Order of Skill Points
- 2 points into Attuned Approach: Grants ward for every rune consumed.
- 1 point into Inscribed Patterns: Select runes grants different effects, we use this as a step to the next node.
- 1 point into Author of Arcana: Directly casting Runic Invocation will now refund your Mana and increase your damage.
- 1 point into Immutable Order: This is really important to this build, it uses the first three slots of your skill bar to define your Rune order.
You will want Flame Rush as the first skill on your hotbar, as we've converted it to Lightning, followed by two of your abilities that generate fire runes.
Don't forget, you can always change your keybindings in the options if you normally prefer your traversal skill on a different button.
- 1 point into Rune Slinger: This increases our casting speed and using Invocation grants us 5% of our mana value as ward.
- 4 points into Word of Rahyeh: Grants more Fire Damage and Ignite Chance.
- 1 point into Elemental Lore: Grants Elemental Penetration per 3 Intelligence.
- 4 points into Unbridled Ruin: Increases our damage per Rune consumed.
- 2 points into Transcriber of Power: Grants a Spell Damage buff when you use Invocation.
- 3 points into Word of Lagon: Grants increased Critical Strike Chance for Gon Runes (fire).
- 2 points into Adept Runescribing: Increased Cooldown Recovery for Runic Invocation.
In this section, we will break down each skill and highlight the key passives we have selected to make the skill perform as best as possible in the build. While some of these skills do allow for some variation to exist depending on your own custom choices, we recommend utilizing the skill trees as presented until you have a strong understanding of the build itself.
Fireball
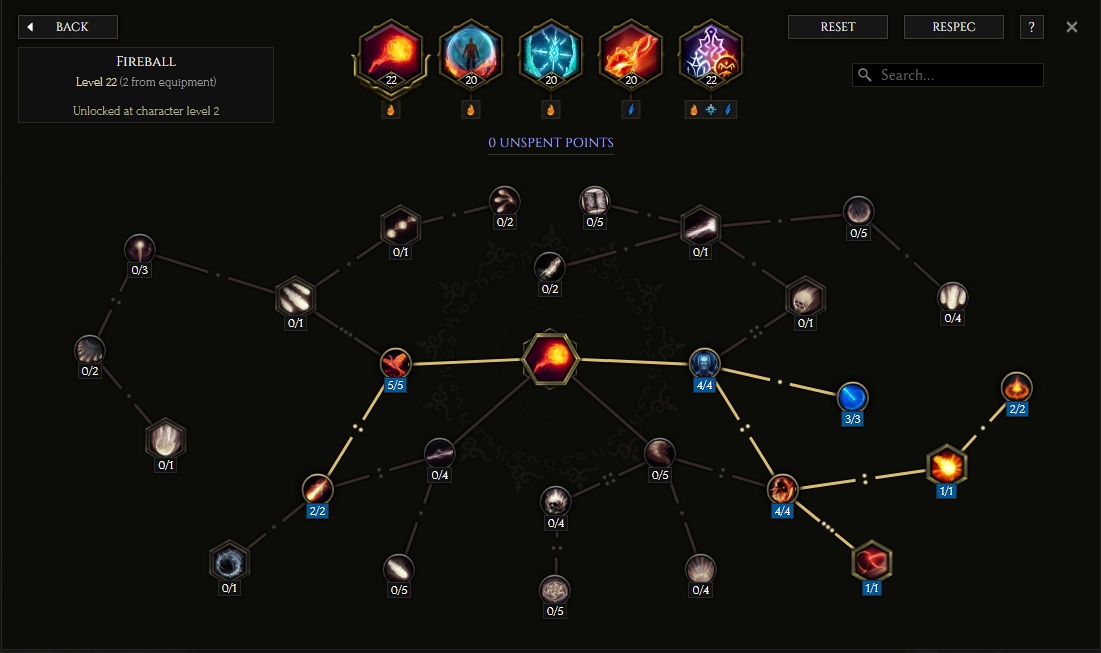
This is our main spam skill, however, it is not our primary source of DPS - that will be our ![]() Hydrahedron. This skill is used to
trigger our Immutable Order for producing Hydrahedrons, so we can spam it while using
Hydrahedron. This skill is used to
trigger our Immutable Order for producing Hydrahedrons, so we can spam it while using ![]() Flame Rush and
Flame Rush and ![]() Frost Wall,
to constantly make Hydrahedrons. Fireball will do some damage on its own, and with no need to target its locations, its super fun to spam.
Frost Wall,
to constantly make Hydrahedrons. Fireball will do some damage on its own, and with no need to target its locations, its super fun to spam.
Order of Skill Points
- 4 points into Adept: Increases our Cast Speed.
- 4 points into Flammability: Increases our chance to shred Fire Resistance.
- 1 point into Seeker's Ash: Grants Fireball the ability to follow targets.
- 1 point into Flame Burst: Fireball now explodes on the target after a set number of hits.
- 2 points into Volatile flames: Lowers the required number of hits for Fireball's burst to happen.
- 3 points into Mana Sphere: Lowers Mana cost and increases damage.
- 5 points into Winged Fire: Increases our Speed, Range and damage of our fireballs. You can trim 2 points here if you don't have any extra Levels on gear for Fireball yet.
- 2 points into Orb of Destruction: Increases our base Critical Strike Chance.
Build Mechanics and Playstyle
This build has a very simple setup for the basic rotation - First, we make sure to have our three runes (Lightning, Fire, Fire) up
before engaing the enemy. We do this by casting one ![]() Fireball followed by placing
Fireball followed by placing ![]() Frost Wall down on enemies. The final rune is generated by
Frost Wall down on enemies. The final rune is generated by
![]() Flame Rushing; when possible, try to go through
Flame Rushing; when possible, try to go through ![]() Frost Wall to get an extra damage buff, both Frenzy
and Haste, as well as cleansing you of any ailments. However, you also want to place it to hit as many enemies as possible, as it
will do damage and proc Fireball on them when they pass through. Don't be afraid to recast Frost Wall in the
middle of combat, or whenever needed, to hit the largest group of enemies. Exiting Flame Rush will automatically cast
Frost Wall to get an extra damage buff, both Frenzy
and Haste, as well as cleansing you of any ailments. However, you also want to place it to hit as many enemies as possible, as it
will do damage and proc Fireball on them when they pass through. Don't be afraid to recast Frost Wall in the
middle of combat, or whenever needed, to hit the largest group of enemies. Exiting Flame Rush will automatically cast
![]() Hydrahedron, which is our main source of damage.
Hydrahedron, which is our main source of damage.
Once you've completed the initial sequence to create a ![]() Hydrahedron, we will spam
Hydrahedron, we will spam ![]() Fireball
three times to build up our Runes again. We've taken nodes in the skill tree to allow Fireball to auto target and
home in, so no targeting necessary. Thanks to the Immutable Order passive in
the
Fireball
three times to build up our Runes again. We've taken nodes in the skill tree to allow Fireball to auto target and
home in, so no targeting necessary. Thanks to the Immutable Order passive in
the ![]() Runic Invocation tree, we always generate the correct runes regardless of what abilities we actually use.
Runic Invocation tree, we always generate the correct runes regardless of what abilities we actually use.
If you aren't generating the correct Runes, make sure ![]() Flame Rush is the first ability on your hotbar
(the furthest to the left), it's been converted to Lightning with Energy Equivalence, and the next
two abilities are both Fire abilities, or any combination of Frost Wall, Fireball or Flame Ward.
Flame Rush is the first ability on your hotbar
(the furthest to the left), it's been converted to Lightning with Energy Equivalence, and the next
two abilities are both Fire abilities, or any combination of Frost Wall, Fireball or Flame Ward.
If ![]() Flame Rush is still on cooldown, you can direct cast
Flame Rush is still on cooldown, you can direct cast ![]() Runic Invocation to proc a new Hydrahedron, and vice versa,
as when Runic Invocation is on cooldown, Flame Rush should now be up.
Runic Invocation to proc a new Hydrahedron, and vice versa,
as when Runic Invocation is on cooldown, Flame Rush should now be up.
Equipment and Gear Affixes
For this build, we will be focusing on several main affixes for each piece of non-unique gear, as well as working towards acquiring the specific Uniques needed to make this build operate correctly. Our equipment will focus on these specific affixes for the Implicits and Modifier stats.
| Gear Slot | Implicits | Modifiers |
|---|---|---|
| Wand | Spell Damage Cast Speed Spell Cost Reduction |
Prefixes Increased Cast Speed Critical Strike Multiplier Suffixes Shared Fire Penetration Chance to Chill on Hit |
| Off-hand Catalyst | Intelligence Spell Critical Strike Chance Ward Retention |
Prefixes Increased Cast Speed Critical Strike Multiplier Suffixes Needed Resistances |
| Head | Armor Increased Cooldown Recovery Increasecd %Mana |
Prefixes Fire Penetration with Fire Invocations, Armor per Rah Rune Intelligence Suffixes Critical Strike Avoidance Increased Health |
| Amulet | Less Damage Over Time taken | Prefixes Critical Strike Multiplier Increased Fire Damage Suffixes Flat Health Health, Stun Avoidance |
| Chest | Increased Cast Speed Flat Spell Damage |
Prefixes Fire Penetration with Fire Invocations Increased Levels of Fireball Suffixes Flat Health Increased Health |
| Belt | Cold Resistance Poison Resistance |
Prefixes Increased Fire Damage Increased Mana Regen Suffixes Hybrid Health Increased Health Mana gained on Potion Use |
| Ring | Necrotic Resistance Ward Decay Threshold |
Prefixes Intelligence Increased Fire Damage Suffixes Flat Health Needed Resistances |
| Ring | Necrotic Resistance Ward Decay Threshold |
Prefixes Intelligence Increased Fire Damage Suffixes Flat Health Needed Resistances |
| Gloves | Armor Void Resistance |
Prefixes Increased Cast Speed Intelligence Suffixes Hybrid Health Flat Health |
| Feet | Armor Movement Speed Fire Resistance |
Prefixes Movement Speed Intelligence Suffixes Hybrid Health Flat Health |
| Relic | Legendary Potential Critical Strike Multiplier |
A loot filter made specifically for the gear table above may be copied by pressing the button below. Once in the Loot Filter portion of the in-game menu, choose the "Paste Clipboard Contents" option to import the code.
Copy Loot Filter to Clipboard
Uniques
Now, let's look at the required Uniques for this build.
Box of Hydrae
![]() Box of Hydrae is our Unique relic that grants us some skill tree
points for
Box of Hydrae is our Unique relic that grants us some skill tree
points for ![]() Runic Invocation and some nice bonuses to the
Runic Invocation and some nice bonuses to the ![]() Hydrahedron itself,
including Cast Rate and increased Area. The major bonus this relic provides us is the
chance to summon a Hydrahedron on kill with fire skills. This can go up to 18%, which
means close to a 1 in 5 chance on every single kill to summon a new Hydrahedron. This
Unique relic can be target farmed on the timeline "The Last Ruin" from the
"Unique or Set Relic" echo reward.
Hydrahedron itself,
including Cast Rate and increased Area. The major bonus this relic provides us is the
chance to summon a Hydrahedron on kill with fire skills. This can go up to 18%, which
means close to a 1 in 5 chance on every single kill to summon a new Hydrahedron. This
Unique relic can be target farmed on the timeline "The Last Ruin" from the
"Unique or Set Relic" echo reward.
Throne of Ambition
![]() Throne of Ambition is a pretty incredible Idol that grants you a buff every time you
hit an Elite or Boss. This stacks up to 20 times and each stack increases our Fire Damage and
Armor, granting us a total of 40% for each at maximum stacks. These stack will vanish if you go
4 seconds without gaining another stack. While this Idol only plays a small role while we are
mapping, on Bosses this Idol is easy to ramp up and benefit from. This Unique Idol can be target
farmed from the boss "God Hunter Argentus" from the "The Stolen Lance" timeline.
Throne of Ambition is a pretty incredible Idol that grants you a buff every time you
hit an Elite or Boss. This stacks up to 20 times and each stack increases our Fire Damage and
Armor, granting us a total of 40% for each at maximum stacks. These stack will vanish if you go
4 seconds without gaining another stack. While this Idol only plays a small role while we are
mapping, on Bosses this Idol is easy to ramp up and benefit from. This Unique Idol can be target
farmed from the boss "God Hunter Argentus" from the "The Stolen Lance" timeline.
Idols
Idol slots are gained throughout the campaign, unlocking small bonuses and unique affixes for the player to discover and augment their builds with. The Idol screen consists of a grid system for the player to fill out with different sized idols, eventually filling in every part of the grid. As the Idol shape increases (1x1, 1x2, 1x3, 1x4, etc.) it will open up different affixes for you to use. This can be a great way to add some more customization to your build.
For this particular build, we will be focusing on increasing our Fire Damage for our character. Below, you will see the idols we are targeting.
Size: 2×2
Modifiers
- Ward Retention
- Increased Fire Damage. This effect is doubled if you have 300 or more maximum Mana.
We also use a Unique Adorned Idol for this build which grants us a buff for each stack we have.
Size: 2×2
Modifiers
 Throne of Ambition
The remaining open spots on Idol grid can be filled with 1x1 idols focused on increasing our Maximum Mana and Health, or any Resistances you may still need.
Blessing
Blessings are permanent buffs that are applied to your character. These come in two different powers, Standard and Grand. Grand blessings are significantly stronger than the Standard Blessings. In total, there are 10 Blessing Slots, one for each Monolith Timeline. When you complete a Monolith and defeat the final boss you will be awarded a choice of three blessing with a random value. For the purpose of this guide, we are highlighting 5 major slots that can be filled with our recommendations, leaving the addition 5 for some personal preference.
| Blessing Name | Affix | Timeline |
|---|---|---|
| Spell Damage Leeched as Health | The Black Sun | |
| + Total Mana | Ending the Storm | |
| + Physical Resistance | The Age of Winter | |
| % Endurance | Spirits of Fire | |
| + Critical Strike Avoidance | Reign of Dragons |
If you have enough Endurance on gear, or simply prefer more damage, you could replace the Endurance Blessing with the Increased Fire Damage or Fire Resistance Shred blessings instead.
Changelog
- 13 Mar. 2024: Updated for 1.0.
- 30 Oct. 2023: Guide Added.

Lexyu is a professional content creator focused on theorycrafting and playtesting many ARPGS. He is also known for his skillful gameplay, such as playing Bazooka Wizard in Diablo 3. Since 2013, he has been creating in-depth guides to teach gamers how to succeed. Check out his social platforms through Discord to join the discussion in the community!
- Patch 1.0.7 Update: Multiplayer, Skills and More!
- Patch 1.0.6 Update: Camera Setting, Controller Keybinds, Bug Fixes, and More!
- Eleventh Hour Games on Real-Money Trading and Exploits in Last Epoch
- Patch 1.0.5 Update: Many Bug Fixes, Including Loot Filter Toggle Sensitivity, and Other Improvements!
- The First 30 Days of Last Epoch!
- 1.0 Launch Retrospective: A Message From Eleventh Hour Games
- Patch 1.0.4 Update: More In-Game Changes, Bug Fixes, and Improvements
- Last Epoch Mid-Cycle Balance Survey Recap