Runemaster Static Rush Endgame Build for Last Epoch (Patch 1.0)
Welcome to our Last Epoch Runemaster Static Rush build guide for the Mage class. Here you will learn everything about the Runemaster play style, passives, skills, strengths, and weaknesses to conquer the world of Eterra.
Build Introduction
Being lightning fast and explosive in nature is the core concept of this build. This build is fun to play and
is exciting to watch. Not the traditional Runemaster, a player will not have to worry about summoning a
specific set of runes to invoke a spell. This build does not require a unique, but a single set item, ![]() The Invoker's Static Touch.
Our core offense is driven from
The Invoker's Static Touch.
Our core offense is driven from ![]() Frost Wall,
Frost Wall, ![]() Flame Rush and
Flame Rush and ![]() Static Orb. All skills are converted to
lightning with very high Critical Strike Chance and Multiplier that can get near or above 500%.
Static Orb. All skills are converted to
lightning with very high Critical Strike Chance and Multiplier that can get near or above 500%.
 Exciting visuals
 - Fantastic clear speed
- Defensively sound
- Automations make build simple to play

 Gear must reach 90% Crit Chance to be effective
 - Min/Max Idols needed to push deep Corruption

Skill Selection
A simple to run Runemaster, with minimal button manipulation. However, do
not confuse simple, with versatile. Cycling of skills is simple and can
be ran with a three button mouse. This is built with maximum Critical Strike Chance
in mind and VERY high Critical Strike Multipliers, causing mundane skills to hit extremely hard.
![]() Frost Wall has been altered to scale with Lightning Damage through the Crackling Barrier
node. We have also made the wall use our
Frost Wall has been altered to scale with Lightning Damage through the Crackling Barrier
node. We have also made the wall use our ![]() Lightning Blast, and have turned the
wall into a lightning bomb with Runic Conclusion. We also have converted our
Lightning Blast, and have turned the
wall into a lightning bomb with Runic Conclusion. We also have converted our ![]() Flame Rush
into lightning and with this, we automate
Flame Rush
into lightning and with this, we automate ![]() Static Orb with the
Beta Decay node. This causes four smaller orbs from Scatter Blast, as well as the
primary orb, to circle us causing explosions and tendrils from our highly scaled
Lightning Damage.
Static Orb with the
Beta Decay node. This causes four smaller orbs from Scatter Blast, as well as the
primary orb, to circle us causing explosions and tendrils from our highly scaled
Lightning Damage.
Defensively, this build generates significant amounts of Ward via ![]() The Invoker's Static Touch,
our armor's Mage Penetration with Lightning Invocations, Unsealed Mana,
and Arcane Focus. Since all of our attacks have a significant Chance to Shock, this will
build up plenty of Ward to have a strong defensive lineup.
The Invoker's Static Touch,
our armor's Mage Penetration with Lightning Invocations, Unsealed Mana,
and Arcane Focus. Since all of our attacks have a significant Chance to Shock, this will
build up plenty of Ward to have a strong defensive lineup.

Class and Skill Passive Trees
Our base class is the Mage, which acts as a generic spell caster. Our character will be offered an opportunity to select an Advanced Mastery once we have completed the first act of the campaign. Each base class has three possible masteries to choose from. For the Mage, we have access to the Mastery Tree Passives for Sorcerer, Runemaster and Spellblade. Upon selecting a Mastery and placing 20 Passive Points into the Mage Tree, you'll then be able to place Passive Points into the Mastery Trees.
For this caster build, Runemaster is our advanced class. We will utilize the majority of our Passive Points the Runemaster Passive tree, with a smaller investment of points into Sorcerer to round out the build. Our passive points will be targeting a well rounded blend of damage and defensive generators, with some investments in mana regeneration. This will ensure we can not only maximize our damage output, but also generate significant defensive layering while we clear and kill. Each of the Passive Trees and their points are broken down below.
Mage Passive Points
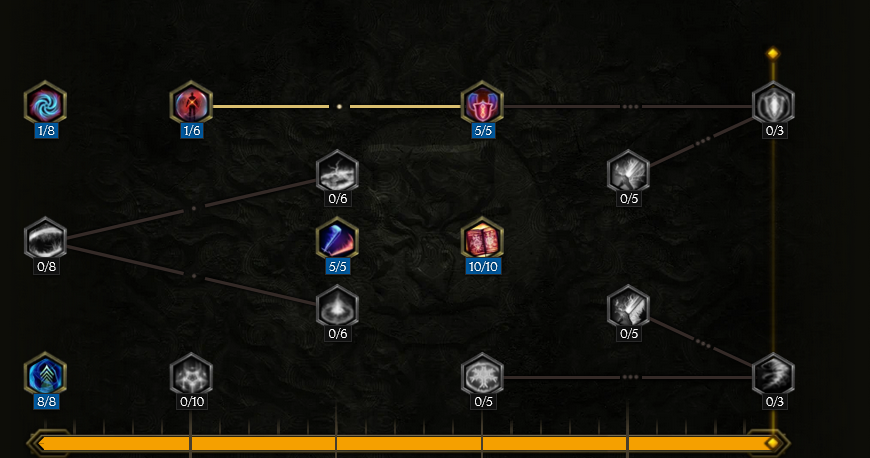
- 8 points into Arcanist: This will increase our Spell Damage and give us additional Ward Retention, as well as miscellanious resistances.
- 1 point into Scholar: Provides base Health and Mana.
- 1 point into Reactive Ward: A travel point to reach Warden.
- 5 points into Mage Flurry: This gives us an increase to Cast Speed.
- 5 points into Warden: This gives our build additional Ward Retention.
- 10 points into Knowledge of Destruction: This will give us a large boost to not only our Critical Strike Chance, but the Critical Strike Multiplier as well.
Our base class is the Mage, which acts as a generic spell caster. Our character will be offered an opportunity to select an Advanced Mastery once we have completed the first act of the campaign. Each base class has three possible masteries to choose from. For the Mage, we have access to the Mastery Tree Passives for Sorcerer, Runemaster and Spellblade. Upon selecting a Mastery and placing 20 Passive Points into the Mage Tree, you'll then be able to place Passive Points into the Mastery Trees.
For this caster build, Runemaster is our advanced class. We will utilize the majority of our Passive Points the Runemaster Passive tree, with a smaller investment of points into Sorcerer to round out the build. Our passive points will be targeting a well rounded blend of damage and defensive generators, with some investments in mana regeneration. This will ensure we can not only maximize our damage output, but also generate significant defensive layering while we clear and kill. Each of the Passive Trees and their points are broken down below.
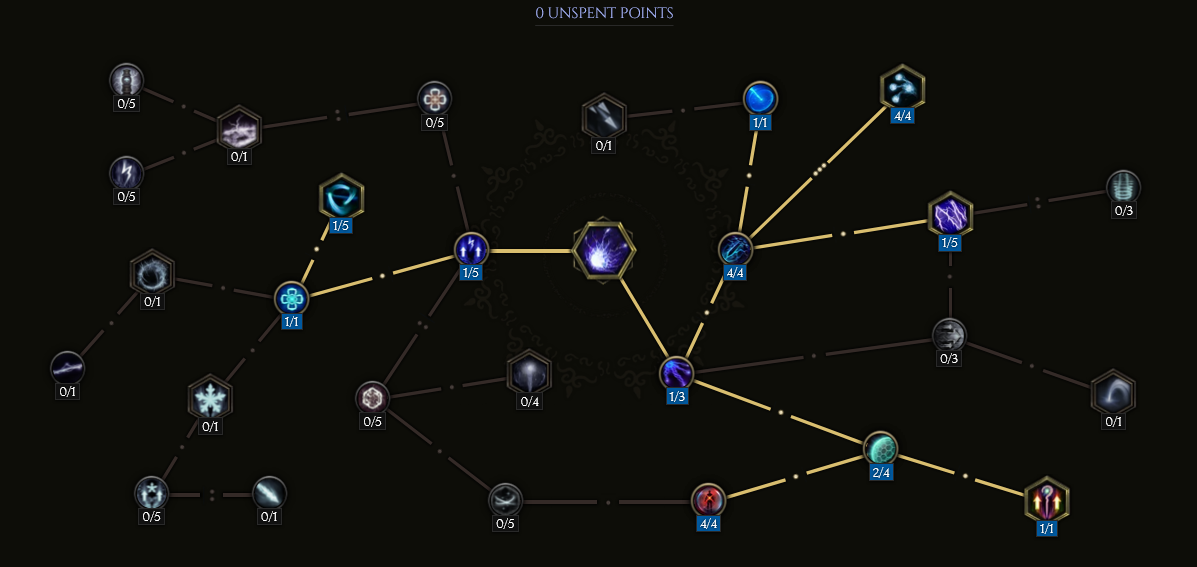
Runemaster Passive Points
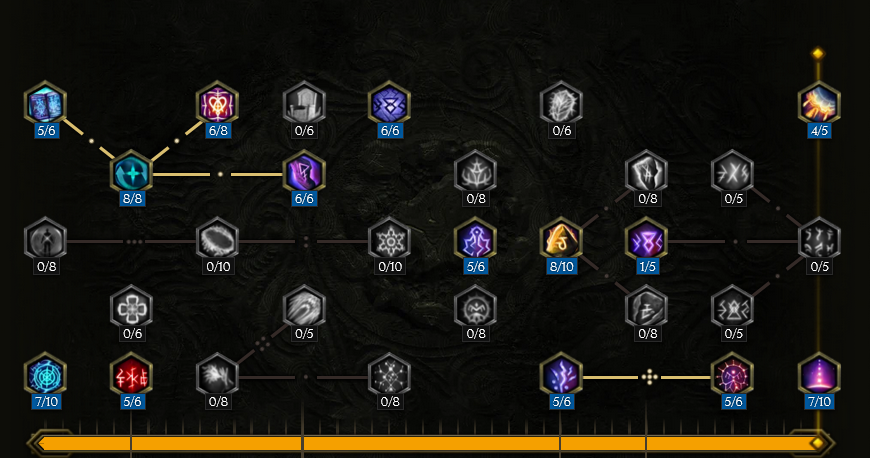
- 5 points into Unsealed Mana: Whenever we manually cast
 Lightning Blast three times in a row, we will gain Ward and Mana. This has a 3 second cooldown.
 - 7 points into Quintessence of Triumph: This will give us increased Spell Damage, but more importantly, we will do 7% more damage if we have more Ward than the enemy has health.
- 8 points into Arcane Focus: Flat Ward gain on every cast we do, as well as Intelligence. Intelligence is the primary method of increasing our Ward Retention, our primary defensive modifier.
- 5 points into Runeword: Cataclysm: This node will increase our Critical strike chance, but also gives us 15% more damage to enemies with low health. This effect is only triggered once we critically strike an enemy. This effect lasts for 6 seconds.
- 6 points into Transcendence: We get flat health from this node, but we will also get 36 Ward per second if we have at least 60 Intelligence. The build is scaled to be above this threshold.
- 6 points into Mental Catalysis: We gain additional Intelligence when using an Off-hand Catalyst. This also helps protect us from Critical Strike Damage.
- 6 points into Inscribed Instruments: This node will give us a significant boost to our Critical Strike Multiplier, adding 72% to it.
- 5 points into Decree of the Bountiful Ocean: This node gives us 15% increased to Mana Regen, however, this value is doubled, as we will always have a Gon rune active.
- 5 points into Brand of Deception: We take this in order to apply the Brand to the enemy. All skills except Lightning Blast will trigger this effect.
- 8 points into Ancient Inscriptions: This node will give us much needed Intelligence, but will also reduce all cooldowns by 1% for every 4 Intelligence we have. (Ex:20 Intel = 5% Cooldown Reduction)
- 1 points into Runeword: Hurricane: All but gaurentees we get a flat increase to our spell lightning damage. This is imperative, as we only do spell lightning damage.
- 5 points into Order's Imposition: This enables us to do 10% more damage to enemies the have been Branded by our Brand of Deception, however it also increased the damage the Brand does. Adding 1% more damage for each % of Chance to Shock we have scaled. This should be around 100% or more.
- 4 points into Jagged Veil: This gives us up to 20% more Critical Strike Multiplier. Having at least 2000 Ward will cap this. This also gives you a flat 8 Ward for every critical strike you land.
- 7 points into Celestial Doom: This node will add an addition flat 7 Spell Damage to our spells. This will also increase the damage done to rares and bosses.
Our base class is the Mage, which acts as a generic spell caster. Our character will be offered an opportunity to select an Advanced Mastery once we have completed the first act of the campaign. Each base class has three possible masteries to choose from. For the Mage, we have access to the Mastery Tree Passives for Sorcerer, Runemaster and Spellblade. Upon selecting a Mastery and placing 20 Passive Points into the Mage Tree, you'll then be able to place Passive Points into the Mastery Trees.
For this caster build, Runemaster is our advanced class. We will utilize the majority of our Passive Points the Runemaster Passive tree, with a smaller investment of points into Sorcerer to round out the build. Our passive points will be targeting a well rounded blend of damage and defensive generators, with some investments in mana regeneration. This will ensure we can not only maximize our damage output, but also generate significant defensive layering while we clear and kill. Each of the Passive Trees and their points are broken down below.
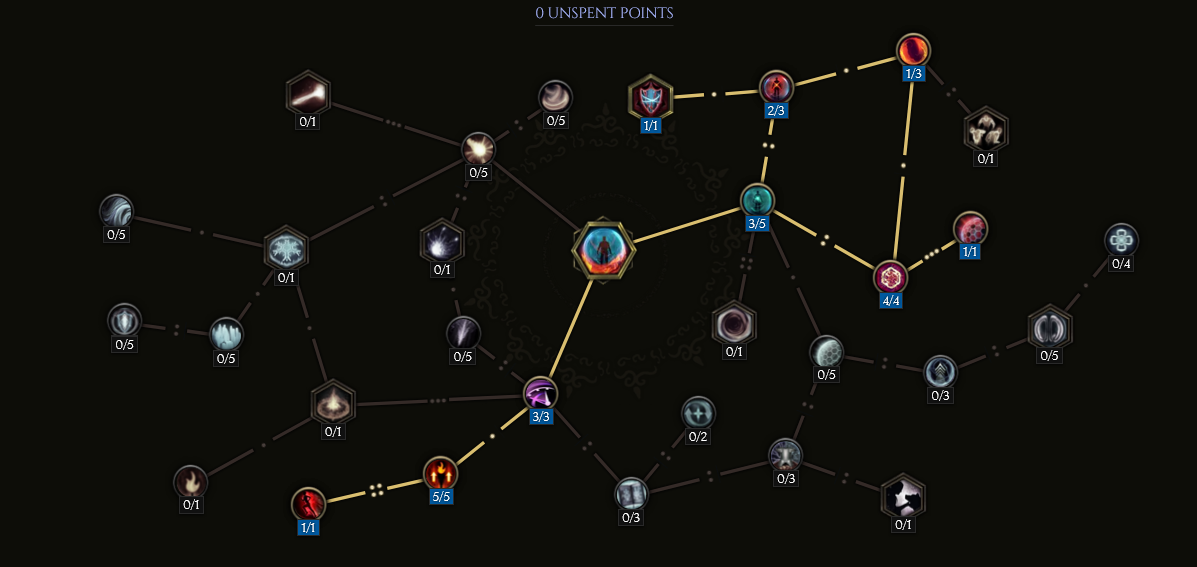
Sorcerer Passive Points
- 5 points into Calculated Destruction: Provides Intel and an additive increase to our spells to critically strike.
In this section, we will break down each skill and highlight the key passives we have selected to make the skill shine in the build. While some of these skills do allow for some variation to exist depending on your own custom choices, we recommend utilizing the skill trees as presented until you have a strong understanding of the build itself.
Frost Wall
It wont be uncommon to clear packs with a single cast of ![]() Frost Wall, considering this skill is automated with
Frost Wall, considering this skill is automated with ![]() Lightning Blast.
Not only will you gain Ward when you cross the walls threshold, but enemies will be evaporated by several hard hitting blasts of lightning as well.
Lightning Blast.
Not only will you gain Ward when you cross the walls threshold, but enemies will be evaporated by several hard hitting blasts of lightning as well.
Order of Skill Points
- 1 point into Biting Limit: This is a travel node.
- 1 point into Crackling Barrier: We convert our Frost Wall to be lightning Damage, the only element we scale for damage.
- 4 points into Lightning Rod: This will enable our Frost Wall to now cast our scaled Lightning Blast when an enemy walks through it.
- 1 point into Charged Pylons: This adds the additional ability for the Wall to cast Lightning Blast even if they do not walk through it.
- 2 points into Amplified Currents: This increases the rate at which the Wall will cast Lightning Blast.
- 4 points into Crystals of Protection: We enable our wall to give us 120 Ward and 12 Mana when we pass through. Values are doubled if the Wall is casted 2 meters away from you.
- 3 points into Boosted Kickoff: This node will give you Haste and Frenzy when you walk through the wall.
- 1 point into Runic Conclusion: This will cause the Wall to create three instances of
 Runic Detonation. This skill does have a hit
component, thus can critically strike.
Runic Detonation. This skill does have a hit
component, thus can critically strike. - 1 Point into Glyph of Direfrost: We empower the previous node Runic Conclusion, to do have more damage and a significantly larger area. This effect only works if you are FACING AWAY FROM THE WALL.
- 1 Point into Shattered to Pieces: We further empower the Runic Conclusion node, by adding even more damage and increasing the area again.
- 2 Point into Marching Winter: We finish off the skill, by putting the last point to have the Wall be larger, and last longer.
In this section, we will break down each skill and highlight the key passives we have selected to make the skill shine in the build. While some of these skills do allow for some variation to exist depending on your own custom choices, we recommend utilizing the skill trees as presented until you have a strong understanding of the build itself.
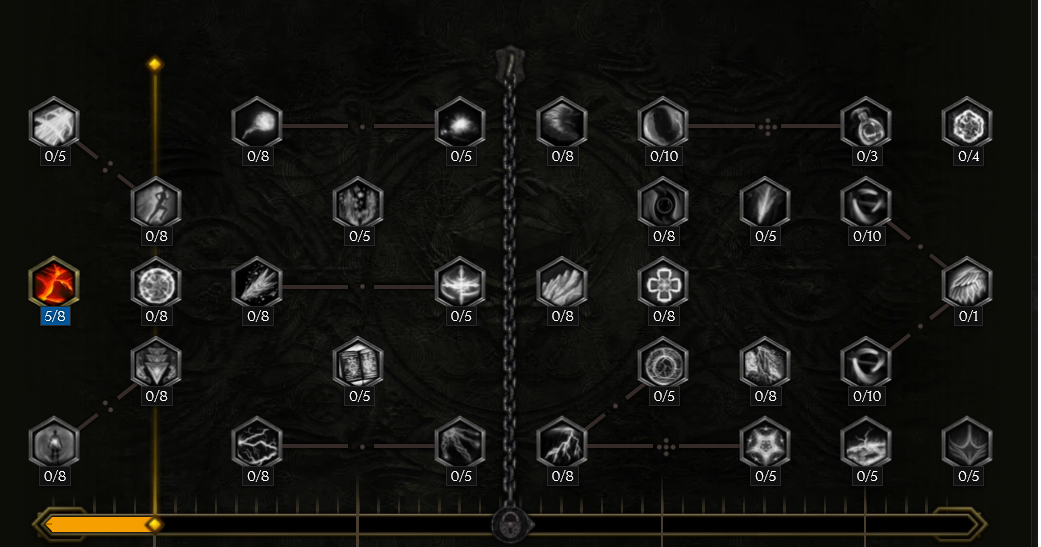
Flame Rush

![]() Flame Rush is a traversal skill, but do not use it arbitrarily. We will need this skill to be off of cooldown when we move into packs.
We use rush to apply our Brand of Deception, adding significant damage to any enemy unforunate enough to be caught in its path. We also
work in unison with our
Flame Rush is a traversal skill, but do not use it arbitrarily. We will need this skill to be off of cooldown when we move into packs.
We use rush to apply our Brand of Deception, adding significant damage to any enemy unforunate enough to be caught in its path. We also
work in unison with our ![]() Frost Wall, in order to "Double-Dip" on massive explosions. It is fair to note, that
Frost Wall, in order to "Double-Dip" on massive explosions. It is fair to note, that ![]() Flame Rush has two seperate
hit components, the base attack, which is when you "hit" and enemy while in the "ball". The other is the end explosion, the explosion has double the base
damage and twice the damage scaling. Both are hits, thus both will have a chance to critically strike an enemy.
Flame Rush has two seperate
hit components, the base attack, which is when you "hit" and enemy while in the "ball". The other is the end explosion, the explosion has double the base
damage and twice the damage scaling. Both are hits, thus both will have a chance to critically strike an enemy.
Order of Skill Points
- 2 points in Fiery Overload: This node gives us frenzy when we finish our
 Flame Rush.
 - 3 points in Lunar Protection: We generate 90 Ward per second while in our "Ball" during the cast. Upon completion of the cast, we gain 180 Ward.
- 1 point in Energy Equivalence: Here, we convert our Flame Rush to be Lightning Damage, the only element we scale for damage.
- 1 point in Beta Decay: This node adds automation to the build. Upon casting Flame Rush, we will automatically cast
 Static Orb and gain all of its benefits.
 - 3 points in Blazing Flux: Reduces the cooldown and provides mana efficiency. This effect can be doubled if you manage your Idols and resistances carefully, getting your fire resistance to 150%. This isn't a requirement for the build, just a bonus to have the additional cooldown reduction and mana efficiency.
- 3 points in Manafused Current: Adds significant damage based on our current Mana.
- 1 point in Solar Rush: This is a travel node to obtain both Blazeborn and Gas Powered.
- 5 points in Blazeborn: Adds significant damage and area to Flame Rush, to both the hit and explosion instaces of the cast.
- 1 point in Gas Powered: This is the node that enables us to combo with
 Frost Wall. When in the "ball" and passing through the wall, you almost double
the area of the explosion from Flame Rush and all but gaurentee it will critically strike.
Frost Wall. When in the "ball" and passing through the wall, you almost double
the area of the explosion from Flame Rush and all but gaurentee it will critically strike. - 1 point into Runic Eclipse Will give us damage reduction while in the ball.
In this section, we will break down each skill and highlight the key passives we have selected to make the skill shine in the build. While some of these skills do allow for some variation to exist depending on your own custom choices, we recommend utilizing the skill trees as presented until you have a strong understanding of the build itself.
Static Orb
![]() Static Orb will be completely automated, and used in conjunction with
Static Orb will be completely automated, and used in conjunction with ![]() Flame Rush. This skill will add significant damage output, as well
as significant defensive scaling with Lightning Aegis. Orbs will orbit you and will explode when they come into contact with an enemy, dealing significant damage.
Flame Rush. This skill will add significant damage output, as well
as significant defensive scaling with Lightning Aegis. Orbs will orbit you and will explode when they come into contact with an enemy, dealing significant damage.
Order of Skill Points
- 1 point into Shocking Conduit: This is a travel node, in order to get to Orbital Fulmination.
- 1 point into Insidious Focus: We continue the pathing to Orbital Fulmination.
- 1 point into Orbital Fulmination: This will allow the Static Orb and its smaller orbs to orbit us, making it feasible to use with Beta Decay.
- 1 points into Forking Surge: This causes the explosions from the orbs to hit additional enemies.
- 2 points into Static Armor: This is one of our major defensive scalers. This node will allow you to take 25% reduced damage while Lightning Aegis is active, and It increase all of your Lightning Damage by 50%.
- 1 points into Storm Burst: This will add 30% more damage and area to the explosions.
- 4 points into Open Circuit: We add 20% more damage to our Static Orb.
- 4 points into Scatter Blast: This will add four additional, but smaller, orbs to revolve around you when you cast Flame Rush.
- 1 points into Overcharged Detonation: This will add 1% more damage per Mana cost of the skill.
- 4 points into Critical Trajectory: We finalize this skill by adding 100% to the skill Critical Strike Multiplier.
- 1 point into Fusionblast: We shoot and additional Lightning Blast, after we have used Static Orb.
In this section, we will break down each skill and highlight the key passives we have selected to make the skill shine in the build. While some of these skills do allow for some variation to exist depending on your own custom choices, we recommend utilizing the skill trees as presented until you have a strong understanding of the build itself.
Flame Ward
![]() Flame Ward is one of our primary defensive scalers in this build. This skill is coupled alongside the passive Ward generation from gear, skills, and
Flame Ward is one of our primary defensive scalers in this build. This skill is coupled alongside the passive Ward generation from gear, skills, and ![]() The Invoker's Static Touch
to generate mass amounts of Ward. However, we also rely on the 25% damage reduction from Lightning Aegis as well as our gear rolled with Armour and Reduced Bonus Damage From Crits.
These together, with our significant Ward generation, will put our EHP into the 10,000 to 15,000 range.
The Invoker's Static Touch
to generate mass amounts of Ward. However, we also rely on the 25% damage reduction from Lightning Aegis as well as our gear rolled with Armour and Reduced Bonus Damage From Crits.
These together, with our significant Ward generation, will put our EHP into the 10,000 to 15,000 range.
Order of Skill Points
- 3 points into Dilation: Adds duration and mana efficiency to the skill.
- 3 points into Stalwart Defense: Adds more Ward to
 Flame Ward.
 - 2 points into Desperate Defense: This node works depending on your current health, adding significantly Ward when you are low on life.
- 1 point into Astonish: This automates Flame Ward to trigger any time that you are stunned and Flame Ward is not on cooldown.
- 5 points into Through Flames: We add 10 base damage to all of our skills while Flame Ward is active.
- 4 points into Concentrated Shielding: This node adds even more ward, but reduces the duration of Flame Ward active effects.
- 1 point into Fortification: We do not use Flame Ward for its damage, so we eliminate the retaliation component, but recieve ample Ward in its place.
- 1 point into Fuel The Flames: We increase the amount of Ward granted by 10% with this node, but add a cooldown.
- 1 point into Flame Runner: Provides bonus haste when Flame Ward is active.
In this section, we will break down each skill and highlight the key passives we have selected to make the skill shine in the build. While some of these skills do allow for some variation to exist depending on your own custom choices, we recommend utilizing the skill trees as presented until you have a strong understanding of the build itself.
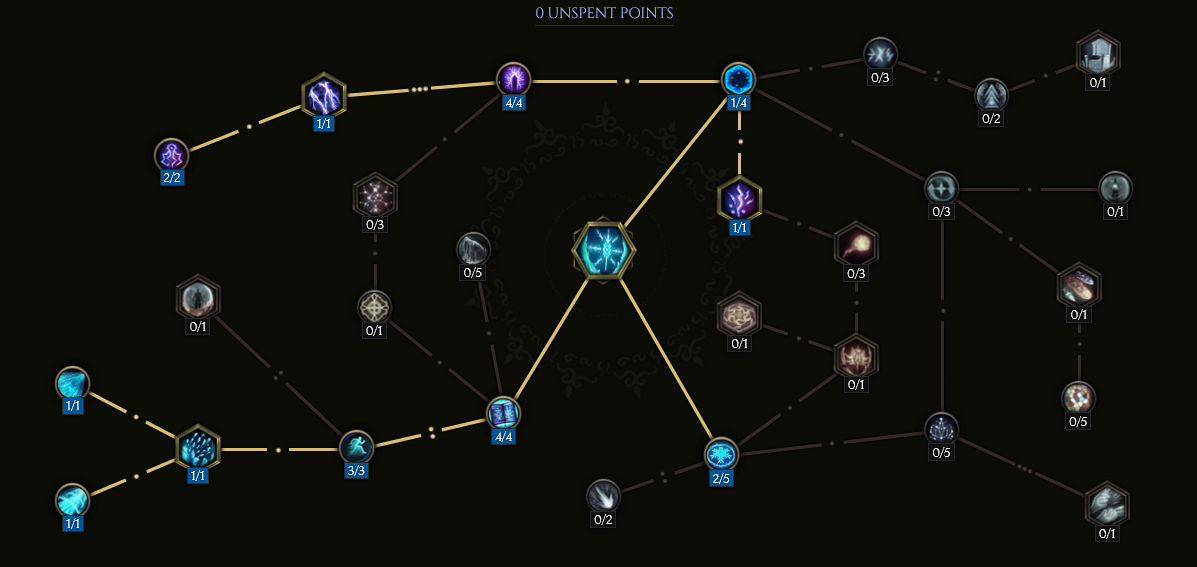
Lightning Blast

![]() Lightning Blast is a versatile skill we rely on for mana generation through Unsealed Mana,
and a significant source of damage when used through our
Lightning Blast is a versatile skill we rely on for mana generation through Unsealed Mana,
and a significant source of damage when used through our ![]() Frost Wall.
It will not be uncommon to see anything but critical strikes come from
Frost Wall.
It will not be uncommon to see anything but critical strikes come from ![]() Lightning Blast after you are
moderately geared, even low-level gear could see significant chances to
critically strike. But do keep in mind, this is the least of all of our damage. This
can be used for generic trash clear, when mana use is not justified for small simple packs.
Lightning Blast after you are
moderately geared, even low-level gear could see significant chances to
critically strike. But do keep in mind, this is the least of all of our damage. This
can be used for generic trash clear, when mana use is not justified for small simple packs.
Order of Skill Points
- 4 points into Arcing Power: With this node, every time you cast Lightning Blast manually,
you will add an additional chain, up to a maximum of four.
- 3 point into Storm Razor: This node will add 3% to the base Critical Strike Chance of Lightning Blast,
and add 15% more damage to the cast. (This also applies when Frost Wall uses this skill)
- 1 point into Surging Influence: This increases the range at which Lightning Blast can chain.
(This also applies when Frost Wall uses this skill)
- 4 points into Crackling Speed: This adds cast speed when manually casting Lightning Blast.
- 3 point into Shattershock: This adds 36% more damage with Lightning Blast when the enemy is
shocked. (This also applies when Frost Wall uses this skill)
- 5 point into Frontloaded: This node add 100% more damage to the first chain, but does 25% less damage
with each bounce. (This also applies when Frost Wall uses this skill)
- 1 points into Closed Circuit: This node allows us a chance to have Lightning Blast chain off of you.
Granting you increased damage and critical strike chance. (This also applies when Frost Wall uses this skill)
Build Mechanics and Playstyle
Lightning is the only element we care about, keep this in mind when gearing.
Our ![]() Frost Wall and
Frost Wall and ![]() Flame Rush will clear just about any
kind of pack you run into. There may be a few enemies that will require a few
shots with
Flame Rush will clear just about any
kind of pack you run into. There may be a few enemies that will require a few
shots with ![]() Lightning Blast. Bigger enemies can be dropped by using our
unscaled
Lightning Blast. Bigger enemies can be dropped by using our
unscaled ![]() Runic Invocation's
Runic Invocation's ![]() Ball Lightning. From time to time you
may want to pop off a dispersed pack of ranged enemies with Sea of Sparks.
You can do this easily with two casts of
Ball Lightning. From time to time you
may want to pop off a dispersed pack of ranged enemies with Sea of Sparks.
You can do this easily with two casts of ![]() Lightning Blast or a well timed
release of
Lightning Blast or a well timed
release of ![]() Flame Rush.
Flame Rush.
Defensively, we rely on our offense to generate significant amounts of Ward. If you are lucky enough to find boots with Experimental Ward Gained on Traversal, this number for our Ward will grow exponentially higher. This is due to the fact our Traversal skill is also our damage skill.
We will almost always have Lightning Aegis on as well, providing a
25% Damage Reduction value. This buff applies for four seconds after casting
![]() Flame Rush because it casts
Flame Rush because it casts ![]() Static Orb with Static Armor.
Our chest gear should have the Penetration With Lightning Invocations, which will give
you up to 180 Ward per second while having the Gon runes active.
Static Orb with Static Armor.
Our chest gear should have the Penetration With Lightning Invocations, which will give
you up to 180 Ward per second while having the Gon runes active.
The ideal engagment would be to find a target and put ![]() Frost Wall
between you and them. Cast
Frost Wall
between you and them. Cast ![]() Flame Rush into the enemies, releasing the cast once you
have cleared the wall. This will cause the
Flame Rush into the enemies, releasing the cast once you
have cleared the wall. This will cause the ![]() Frost Wall to explode via
Runic Conclusion and our
Frost Wall to explode via
Runic Conclusion and our ![]() Flame Rush will have a significantly larger blast
radius with Blazeborn and Gas Powered. Pick off any trash with
Flame Rush will have a significantly larger blast
radius with Blazeborn and Gas Powered. Pick off any trash with
![]() Lightning Blast. During all of this,
Lightning Blast. During all of this, ![]() Static Orb would have casted, orbiting you
and desolving whatever enemies it came into contact with.
Static Orb would have casted, orbiting you
and desolving whatever enemies it came into contact with.
This build is designed to be simple in functionality and fun in playstyle.
Equipment and Gear Affixes
For this build, we will be focusing on several main affixes for each piece of non-unique gear, as well as working towards acquiring the specific Uniques needed to make this build operate correctly. Our equipment will focus on these specific affixes for the Implicits and Modifier stats.
| Gear Slot | Implicits | Modifiers |
|---|---|---|
| Wand | Spell Damage Mana -3 Spell Mana Cost |
Prefixes Critical Strike Multiplier Increased Cast Speed Suffixes Chance to Shock on Hit +#% Lightning Penetration |
| Off-Hand Catalyst | Intelligence Spell Critical Strike Chance Ward Retention |
Prefixes Increased Spell Critical Stirke Chance Critical Strike Multiplier SuffixesWard Per Second Needed Resistance |
| Helmet | Armor Increased Critical Strike Chance |
Prefixes Lightning Critical Strike Multiplier Increased Critical Strike Chance Suffixes+ Health Increased Health |
| Chest | Armor Increased Cast Speed + Spell Damage |
Prefixes +% Lightning Critical Strike Multiplier +% Lightning Penetration with Lightning Invocations/Ward per Second per Gon Rune Suffixes + Health % Increased Health |
| Amulet | Resistance +# Spell Lightning Damage |
Prefixes Critical Strike Multiplier Mana Suffixes Needed Resistance Chance to apply Shock on Hit |
| Belt | Ward Decay Threshold +4 Potion Slots |
Prefixes Increased Mana Regen Increased Lightning Damage Suffixes Armor/Reduced Bonus Damage Taken from Crits Hybrid Health |
| Ring | Increased Critical Strike Chance | Prefixes Increased Mana Regen Increased Critical Strike Chance Suffixes Needed Resistances Needed Resistances |
| Ring | - | |
| Gloves | Increased Critical Strike Chance Armor |
Prefixes Mana Increased Cast Speed Suffixes Increased Leech Rate Needed Resistances |
| Feet | Movement Speed Cold Resistance Armor |
Prefixes Increased Movement Speed Intelligence Suffixes Hybrid Health + Health Bonus:Experimental Ward Gained when you use a Traversal Skill |
| Relic | Critical Strike Multiplier Increased Cast Speed |
A loot filter made specifically for the gear table above may be copied by pressing the button below. Once in the Loot Filter portion of the in-game menu, choose the "Paste Clipboard Contents" option to import the code.
Copy Loot Filter to Clipboard
Uniques
There are no uniques in this build, however there is a singular set item. For significant late game corruption, one should use the unique relic which we will list below.
The Invoker's Static Touch
![]() The Invoker's Static Touch: Provides a significant boost to base Lightning
Damage, but will also give you Shock chance. When you hit a shocked enemy with any skill, you have
a 5-10% chance to gain 75 ward. It can be target farmed on the Monolith timeline "The Age of Winter".
The Invoker's Static Touch: Provides a significant boost to base Lightning
Damage, but will also give you Shock chance. When you hit a shocked enemy with any skill, you have
a 5-10% chance to gain 75 ward. It can be target farmed on the Monolith timeline "The Age of Winter".
Twisted Heart of Uhkeiros
![]() Twisted Heart of Uhkeiros: This relic can replace your exalted relic once you get into
significantly higher corruption. It will sacrifice life in order to generate a significant amount of Ward.
It can be target farmed from The Emperor of Corpses in the Reign of Dragons Timeline.
Twisted Heart of Uhkeiros: This relic can replace your exalted relic once you get into
significantly higher corruption. It will sacrifice life in order to generate a significant amount of Ward.
It can be target farmed from The Emperor of Corpses in the Reign of Dragons Timeline.
Idols
Idol slots are gained through the campaign, unlocking small bonuses and unique affixes for the player to discover and augment their builds with. The Idol screen consists of a grid system for the player to fill out with different sized idols, eventually filling in every part of the grid. As the Idol shape increases (1x1, 1x2, 1x3, 1x4, etc.) the stronger an affix you might find for your build.
For this particular build, we will be focusing on increasing our Lightning Damage. We do this with 4 large 2x2 Adorned Idols. If a player is noticing they are lacking resistances, or some other defensive mechanic, they should first look to change idols until proper defensive balancing can be made.
Most of these Idols have two main affixes: % Increased Lightning Damage while you have Lightning Aegis and Increased Lightning Damage (Doubled with 300 or more mana). There are a few miscellanious smaller idols which provile +Health and Mana as well.
Blessing
Blessings are buffs that are permanently applied to your character until you decide to select another blessing, by re-running that same coresponding Monolith Timeline. These come in two different powers, Standard and Grand. Grand blessings are significantly stronger than the Standard Blessings, and can only be obtained by defeating the Monolith Timeline boss in Empowered Monoliths. In total, there are 10 Blessing Slots, one for each Monolith Timeline. When you complete a Monolith and defeat the final boss you will be awarded a choice of three blessing with a random value.
| Blessing Name | Affix | Timeline |
|---|---|---|
| #% of Spell Damage Leeched as Health | The Black Sun | |
| % Increased Lightning Damage | Ending the Storm | |
| % Physical Resistance | The Age of Winter | |
| % Fire Resistance | Spirits of Fire | |
| % Necrotic resistance | Reign of Dragons |
The Blessings listed above cover the most important slots, with the remaining Blessing Slots being filled with whatever the player may be lacking for stats.
Changelog
- 08 Mar. 2024: Updated for 1.0. Added new loot filter. No major Changes
- 21 Jan. 2024: Loot Filter added.
- 15 Nov. 2023: Guide Added.

EMP1241 is a Marine veteran who is currently pursuing higher education in Aerospace Engineering. He spends much of his time outside of his studies playing ARPGs, Builders, and MOBAs. He is frequently seen on his Twitch channel discussing science, space, or video games.
- Patch 1.0.7 Update: Multiplayer, Skills and More!
- Patch 1.0.6 Update: Camera Setting, Controller Keybinds, Bug Fixes, and More!
- Eleventh Hour Games on Real-Money Trading and Exploits in Last Epoch
- Patch 1.0.5 Update: Many Bug Fixes, Including Loot Filter Toggle Sensitivity, and Other Improvements!
- The First 30 Days of Last Epoch!
- 1.0 Launch Retrospective: A Message From Eleventh Hour Games
- Patch 1.0.4 Update: More In-Game Changes, Bug Fixes, and Improvements
- Last Epoch Mid-Cycle Balance Survey Recap