Shaman Tempest Strike Totem Master Endgame Build for Last Epoch (Patch 1.0)
Welcome to our Last Epoch Shaman Totem Master build guide for the Primalist class. Here you will learn everything about the Shaman play style, passives, skills, strengths, and weaknesses to conquer the world of Eterra.
Build Introduction
A fun and mobile shaman build with great screen clear that is good even before endgame. Feel your inner Thor as you leap around, wielding the power of the lightning to demolish your foes, while your totems and companion help clear the screen and provide support for you.
 Solid damage and survivability
 - Good clear speed
- Can be played well from Level 1 to 100

 Boss fights can take a bit
 - Unlikely to push high Corruption

Skill Selection
This build uses ![]() Tempest Strike as its main spam skill, along
with
Tempest Strike as its main spam skill, along
with ![]() Summon Storm Totem and
Summon Storm Totem and ![]() Upheaval; Upheaval being converted to a Totem, triggering
off
Upheaval; Upheaval being converted to a Totem, triggering
off ![]() Fury Leap. The build gains fantastic sustain and survivability through the constant healing from
our support companion,
Fury Leap. The build gains fantastic sustain and survivability through the constant healing from
our support companion, ![]() Summon Spriggan, on-hit heal effects and our Endurance and Health pool.
Summon Spriggan, on-hit heal effects and our Endurance and Health pool.

Class and Skill Passive Trees
Our base class is the Primalist, which is often an 'in your face' melee-caster hybrid that uses companions or Totems to support them. Our character will be offered an opportunity to select an Advanced Mastery once we have completed the first act of the campaign. Each base class has three possible masteries to choose from. For the Primalist, we have access to the Mastery Tree Passives for Beastmaster, Druid and Shaman. Upon selecting a Mastery and placing 20 Passive Points into the Primalist Tree, you'll then be able to place Passive Points into the Mastery Trees.
For this build, Shaman is our mastery class. This gives us the passive bonuses of -5 Totem Mana cost, +10 Attunement and +50% Elemental Resistances
while you control a Totem. While we put the most points into the Shaman tree, Beastmaster and Druid nodes will also be utilized, as they synergize well
with this build. We gain defensive bonuses for us and our Spriggan in Beastmaster, generic damage and defense in Druid, and generic damage in Primalist.
Shaman provides amazing bonuses for both ![]() Tempest Strike itself and our totems, which is why the most points will be spent there.
Tempest Strike itself and our totems, which is why the most points will be spent there.
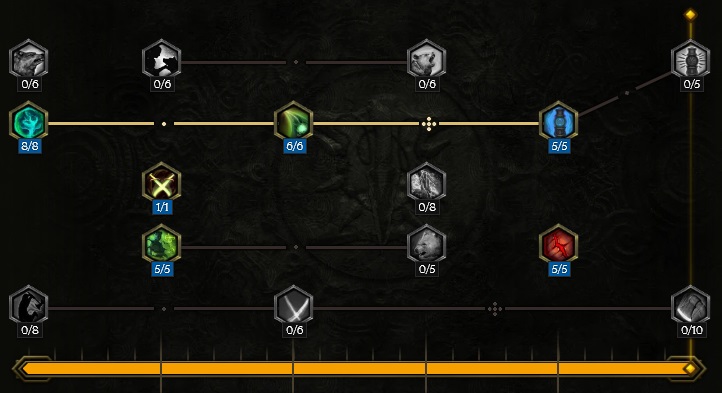
Primalist Passive Points
- 8 points in Natural Attunement: Boosts Attunement as well as Lightning and Cold Resistance.
- 5 points in Hunter's Restoration: Increased Health and an on-hit heal effect every 3 seconds.
- 1 point in Harmony of Blades: Allows us to dual wield with a Sword or Axe in offhand. You can still use other weapon types in main hand.
- 6 points in Wisdom of the Wild: Increases both ours and our Minions Spell Damage by a percentage.
- 5 points in Elder Branch: Provides flat Spell Damage to us and our Totems, and this bonus is tripled while wielding at least one Axe.
- 5 points in Berserker: Increases our Melee Damage and reduces damage taken while on low health. This is mostly taken for the damage reduction, as when combined with Endurance it makes us hard to one-shot.
Our base class is the Primalist, which is often an 'in your face' melee-caster hybrid that uses companions or totems to support them. Our character will be offered an opportunity to select an Advanced Mastery once we have completed the first act of the campaign. Each base class has three possible masteries to choose from. For the Primalist, we have access to the Mastery Tree Passives for Beastmaster, Druid and Shaman. Upon selecting a Mastery and placing 20 Passive Points into the Primalist Tree, you'll then be able to place Passive Points into the Mastery Trees.
For this build, Shaman is our mastery class. This gives us the passive bonuses of -5 Totem Mana cost, +10 Attunement and +50% Elemental Resistances
while you control a Totem. While we put the most points into the Shaman tree, Beastmaster and Druid nodes will also be utilized, as they synergize well
with this build. We gain defensive bonuses for us and our Spriggan in Beastmaster, generic damage and defense in Druid, and generic damage in Primalist.
Shaman provides amazing bonuses for both ![]() Tempest Strike itself and our totems, which is why the most points will be spent there.
Tempest Strike itself and our totems, which is why the most points will be spent there.
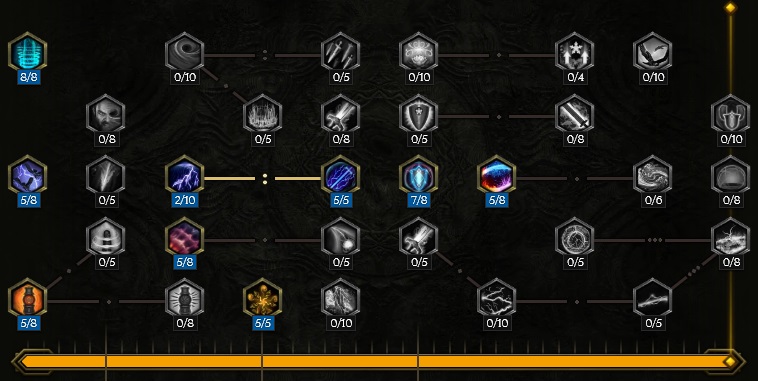
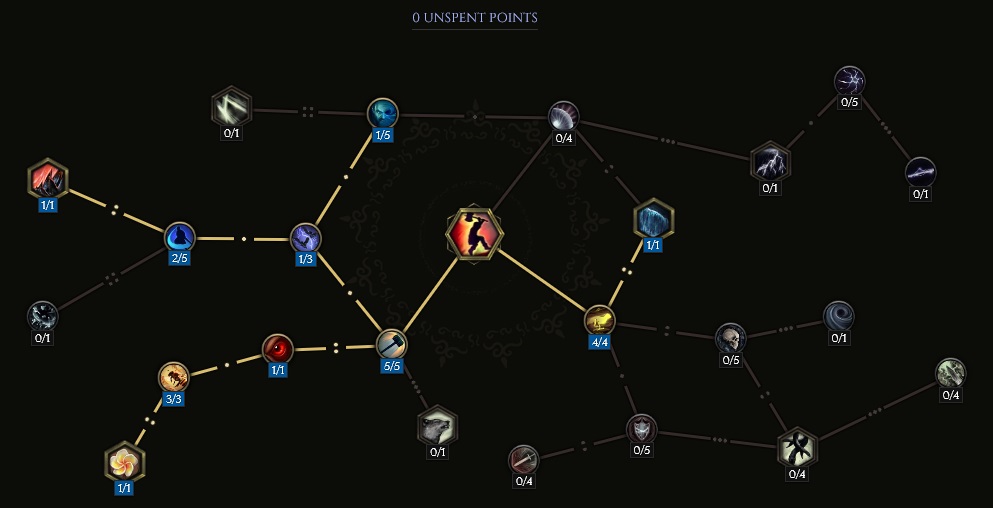
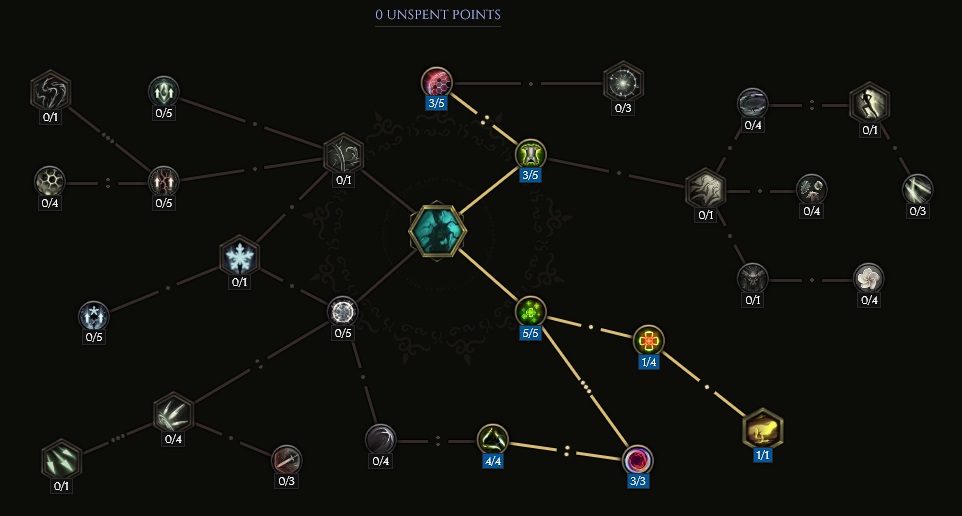
Shaman Passive Points
- 8 points into Shamanic Infusion: Increases Attunement and Penetration.
- 5 points into Sky Warrior: Increase damage and minion damage, and at 5 points lowers Cooldown Recovery Speed for Fury Leap.
- 5 points into Silent Protector: Increases your Armor and Mana Regeneration while you have a totem active.
- 5 points into Earthern Supremacy: Increases Attunement, which is the most important, but also increases stun chance and stun avoidance.
- 2 points into Storm Bringer: Increases lightning damage and resistance for us and our minions (totems).
- 5 points into Ancestral Speed: Increased Totem Cast Speed and chance to gain Haste when we directly summon a totem.
- 5 points into Avatar of Thunder: Adds flat spell lightning damage to us and our minions (totems).
- 7 points into Rune of Awe: Flat spell damage for us and our minions (totems).
- 5 points into Elemental Shrines: Gives Attunement and at 5 points it gives 2% mana regen for every 3 Attunement we have in total.
Our base class is the Primalist, which is often an 'in your face' melee-caster hybrid that uses companions or totems to support them. Our character will be offered an opportunity to select an Advanced Mastery once we have completed the first act of the campaign. Each base class has three possible masteries to choose from. For the Primalist, we have access to the Mastery Tree Passives for Beastmaster, Druid and Shaman. Upon selecting a Mastery and placing 20 Passive Points into the Primalist Tree, you'll then be able to place Passive Points into the Mastery Trees.
For this build, Shaman is our mastery class. This gives us the passive bonuses of -5 totem mana cost, +10 attunement and +50% elemental resistances while you control a totem. While we put the most points into the Shaman tree, we take some points in all 3 of the other trees as well, as there are nice synergies available for us to take advantage of early in each. We gain some nice defensive bonuses for us and our companion in Beastmaster, some generic damage and defense in Druid and some generic damage in Primalist. Shaman gives some amazing bonuses for both Tempest Strike itself and our totems, which is why the most points will be spent there.
Beastmaster Passive Points
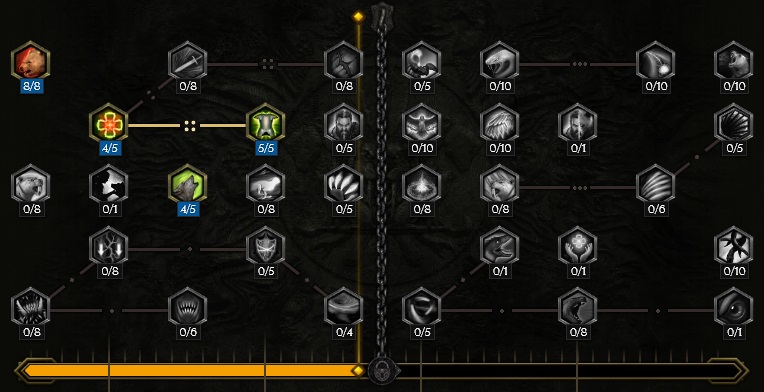
- 8 points into Ursine Strength: Gain Strength and Damage Reduction.
- 4 points into Boar Heart: Grants us Aspect of the Boar when we are hit by a melee attack, which reduces incoming damage by 15%.
- 4 points into Call of the Pack: Increases our Health and Companion Health.
- 5 points into Porcine Constitution: Increases the Damage Reduction of Aspect of the Board and now adds Health regen.
Our base class is the Primalist, which is often an 'in your face' melee-caster hybrid that uses companions or totems to support them. Our character will be offered an opportunity to select an Advanced Mastery once we have completed the first act of the campaign. Each base class has three possible masteries to choose from. For the Primalist, we have access to the Mastery Tree Passives for Beastmaster, Druid and Shaman. Upon selecting a Mastery and placing 20 Passive Points into the Primalist Tree, you'll then be able to place Passive Points into the Mastery Trees.
For this build, Shaman is our mastery class. This gives us the passive bonuses of -5 totem mana cost, +10 attunement and +50% elemental resistances while you control a totem. While we put the most points into the Shaman tree, we take some points in all 3 of the other trees as well, as there are nice synergies available for us to take advantage of early in each. We gain some nice defensive bonuses for us and our companion in Beastmaster, some generic damage and defense in Druid and some generic damage in Primalist. Shaman gives some amazing bonuses for both Tempest Strike itself and our totems, which is why the most points will be spent there.
Druid Passive Points
- 7 points into Chitinous Plating: Increases our Endurance and Armor.
- 7 points into Druidic Prowess: Increases our base stats.
- 1 point into Spirit Warden: Increases our base Health and Mana.
In this section, we will break down each skill and highlight the key passives we have selected to make the skill perform as best as possible in the build. While some of these skills do allow for some variation to exist depending on your own custom choices, we recommend utilizing the skill trees as presented until you have a strong understanding of the build itself.
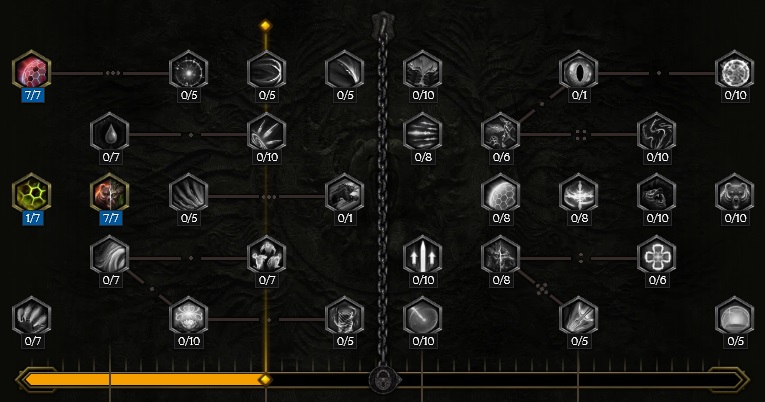
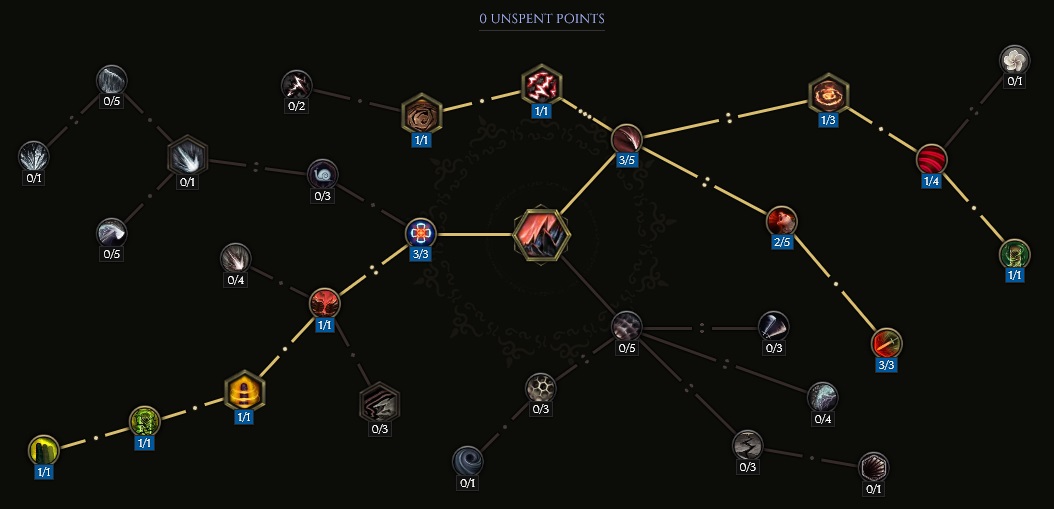
Fury Leap
![]() Fury Leap is used to provide mobility and survivability. You want to cast this almost
as often as you can, as it will remove ailments and heal you and your companions. This skill is also
how we automate
Fury Leap is used to provide mobility and survivability. You want to cast this almost
as often as you can, as it will remove ailments and heal you and your companions. This skill is also
how we automate ![]() Upheaval Totems; Leaping will automate Upheaval which has been converted into a
Totem through the Upheaval Skill Tree.
Upheaval Totems; Leaping will automate Upheaval which has been converted into a
Totem through the Upheaval Skill Tree.
Order of Skill Points
- 4 points into Panther Strike: Increases damage and Cooldown Recovery
- 1 point into Heorot's Protection: Makes us Immune while Leaping, allowing you to avoid some oneshot abilities.
- 5 points into Warrior's Entrance: Provides a flat Melee and Spell damage buff for you and your minions when landing.
- 1 point into Frenzied Onslaught: Applies Frenzy to you and your minions.
- 3 points into Wings of Endurance: Heals you and your minions on landing.
- 1 point into Battle Bloom: Cures ailments off you and your minions when you land.
- 1 point into Wind Hammer: Damage per meter traveled.
- 2 points into Brutal Impact: Increase Critical Strike Multiplier
- 1 point into Violent Upheaval: Casts
 Upheaval upon landing, which we will turn into a totem thru upheaval's tree.
 - 1 point into Savage Impact: Increase damage and grants leech from damage dealt with Leap. While this planner only has 1 point placed into the node, your own personal playstyle may prefer a higher Leech rate. In the event this is the case, feel free to divert points from Panther Strike into this node. If you're lucky enough to get +2 Levels as an Affix on your relic, you can move into Aspect of the Mantis as well, providing a full reset on the cooldown when you kill with Fury Leap and have only jumped a short distance.
In this section, we will break down each skill and highlight the key passives we have selected to make the skill perform as best as possible in the build. While some of these skills do allow for some variation to exist depending on your own custom choices, we recommend utilizing the skill trees as presented until you have a strong understanding of the build itself.
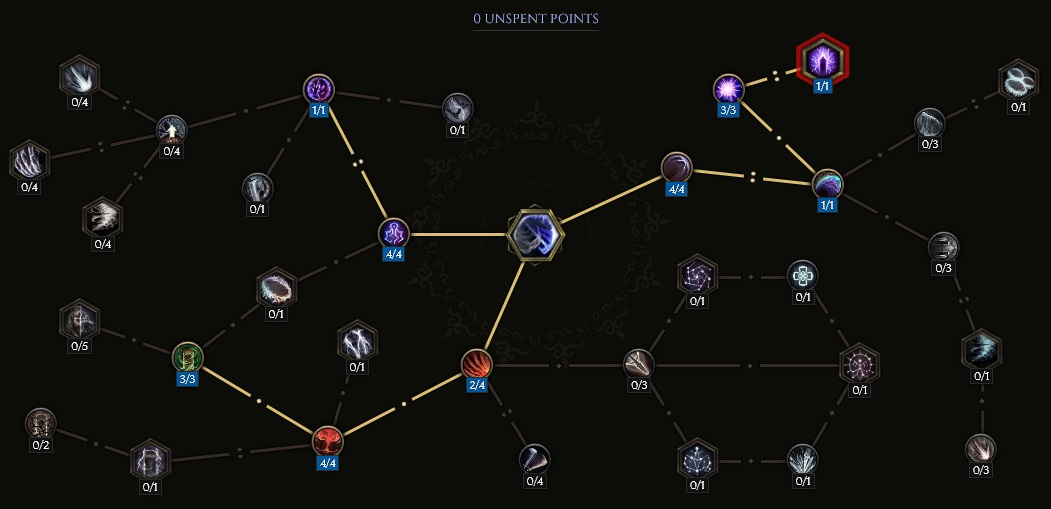
Tempest Strike
Tempest Strike is the bread and butter of our build. We use it to ramp up damage from Gladiator of Lagon for us and our minions, both Totems and Companions. If you are leveling with the build, you may have mana issues with it early, but it shouldn't be an issue once the full skill tree is filled out or you have decent gear.
Order of Skill Points
- 4 points into Ancestral Swiftness: Increases Attack Speed and lowers Mana Cost.
- 4 points into Gladiator of Lagon: Gives a stacking shared spell damage buff from Melee hits.
- 5 points into Lagonian Shamanism: Increases the rate we generate stacks for Gladiator of Lagon.
- 2 points into Windfury Force: Gives more damage and increases Area size.
- 4 points into Attuned Slam: Gives 4% more damage per Mana spent to cast Tempest Strike.
- 3 points into Bulwark of Nature: Regain 3% of Endurance Threshold as Health when you cast a Tempest.
- 1 point into Soaring Blows: Gives Penetration for our uncapped (over 75%) Physical, Cold and Lightning Resistances. This node is why we don't mind having extra Lightning Resistance in the build, as it translates to some Lightning Penetration.
- 3 points into Fulminating Strikes: Adds a shock to Thunder Tempests and increases damage done to Shocked targets.
- 1 point into Cloudburst Conduit: Adds Thunder Tempest around your Storm Totem.
In this section, we will break down each skill and highlight the key passives we have selected to make the skill perform as best as possible in the build. While some of these skills do allow for some variation to exist depending on your own custom choices, we recommend utilizing the skill trees as presented until you have a strong understanding of the build itself.
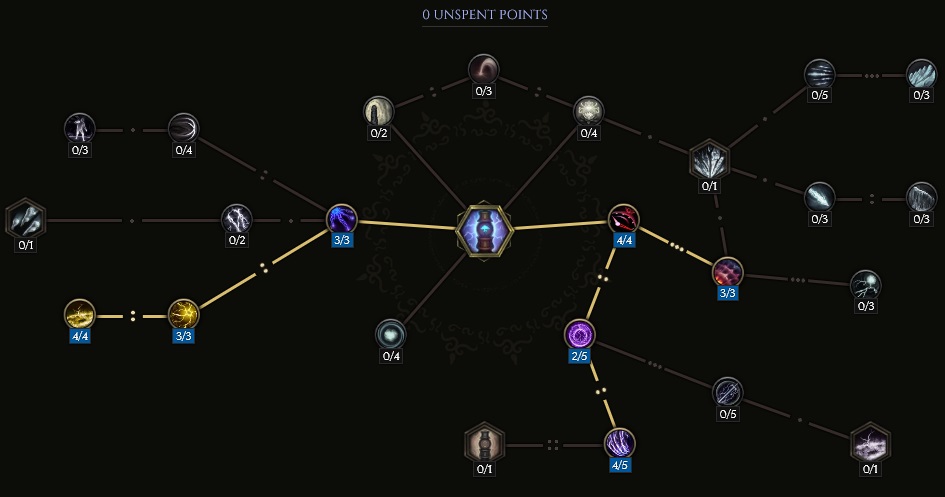
Summon Storm Totem
This is the hard hitter of our Totems. ![]() Summon Storm Totem can often clear
smaller mob packs by itself, allowing you to keep moving towards the next pack. For tough
packs, drop the Totem,
Summon Storm Totem can often clear
smaller mob packs by itself, allowing you to keep moving towards the next pack. For tough
packs, drop the Totem, ![]() Fury Leap into the middle, and use
Fury Leap into the middle, and use ![]() Tempest Strike
to stack up the damage from Gladiator of Lagon passive to buff you and your totems!
Tempest Strike
to stack up the damage from Gladiator of Lagon passive to buff you and your totems!
Order of Skill Points
- 4 points into Lightning Raider: Increases Cast Speed of the totem.
- 3 points into Static Field: Increases Shock chance of the totem.
- 3 points into Exploit Weaknesses: Totem deals more damage to shocked targets.
- 4 points into Press Your Advantage: Totem gains additive Critical Strike Chance against Shocked enemies.
- 3 points into Direct Current: Improves Storm Totem's base Critical Strike Chance.
- 2 points into Storm's Reach: Increases the area it can hit enemies.
- 4 points into Intensity: Adds more damage, but also increases the Mana cost of Storm Totem.
In this section, we will break down each skill and highlight the key passives we have selected to make the skill perform as best as possible in the build. While some of these skills do allow for some variation to exist depending on your own custom choices, we recommend utilizing the skill trees as presented until you have a strong understanding of the build itself.
Upheaval
![]() Upheaval is mostly a support skill. It doesn't do a ton of damage on it's own and there is
currently a bug with the Master of the Totem node where it is not applying the buffs
correctly. It should be fixed soon, which will make the build even stronger. Regardless,
it still adds some buffs and the totems are automatically cast when we
Upheaval is mostly a support skill. It doesn't do a ton of damage on it's own and there is
currently a bug with the Master of the Totem node where it is not applying the buffs
correctly. It should be fixed soon, which will make the build even stronger. Regardless,
it still adds some buffs and the totems are automatically cast when we ![]() Fury Leap
anyway.
Fury Leap
anyway.
Order of Skill Points
- 3 points into Inexhaustible: Reduced Mana cost and Armor Shred Chance.
- 1 point into Mantle Strike: Additive Critical Strike Chance and Upheaval cannot be dodged.
- 1 point into Upheaval Totems: Changes Upheaval into a Totem that constantly casts the ability.
- 1 point into Stonethorn Pillars: If you can generate Thorn Totems, this can add some damage, but we mostly take it for the extra charge.
- 1 point into Mountain Fortress: Allows us to have a second Upheaval Totem down, and adds an extra charge.
- 3 points into Unstoppable Strength: Adds more damage and increased Stun chance.
- 1 point into Excavating Blow: Adds two more fault lines, increasing the area Upheaval covers with its attack.
- 1 point into Erupting Earth: Adds two more fault lines, making it cast in a star pattern.
- 1 points into Sundering Strike: Adds a shockwave when upheaval hits an enemy.
- 1 point into Rock Upsurge: Adds a shockwave when upheaval hits one of our Totems.
- 1 point into Master of the Totem: Buffs our Totems with Armor and damage.
- 2 points into Brutish Engagement: Deals more damage to closer targets.
- 3 points into Hindering Tremors: Applies Frailty and gives Physical Penetration, but reduces range.
In this section, we will break down each skill and highlight the key passives we have selected to make the skill perform as best as possible in the build. While some of these skills do allow for some variation to exist depending on your own custom choices, we recommend utilizing the skill trees as presented until you have a strong understanding of the build itself.
Summon Spriggan
Your Spriggan is a great support companion. This Companion adds passive healing to you and your Totems along with an active heal, a ton of Critical Strike Avoidance, some much needed base Critical Strike Chance for you and your Totems, flat Spell Damage, as well as Dodge Rating for you and your Totems. It's also pretty tanky compared to other options, though it can still die sometimes if it gets stuck in a one-shot ability.
Order of Skill Points
- 5 points into Aura of Life: Increases the passive and active healing of the Spriggan.
- 3 points into Aura of Kinship: Adds flat Spell Damage to allies.
- 4 points into Aura of Retribution: Grants allies a lot of Critical Strike Avoidance as well as some much needed base crit.
- 1 point into Aura of Loyalty: Increases the passive healing for minions.
- 1 point into Aura of Evasion: Grants allies Dodge Rating based on your Attunement.
- 3 points into Arboreal Vitality: Increases the Health of the Spriggan, to help it survive.
- 3 point into Warding Bark: Adds Armor and Physical Resistance to the Spriggan.
Build Mechanics and Playstyle
You will often cast a ![]() Summon Storm Totem near a pack before using
Summon Storm Totem near a pack before using ![]() Fury Leap to jump into
the middle of the most monsters. That way, the
Fury Leap to jump into
the middle of the most monsters. That way, the ![]() Upheaval totem that is triggered will hit the
most enemies. Start wailing away at enemies with
Upheaval totem that is triggered will hit the
most enemies. Start wailing away at enemies with ![]() Tempest Strike to stack up your Gladiator of Lagon
buffs for you and your minions and watch the monsters start melting. For clearing, you'll want to leave the last
few monsters at low health and let your totems finish them off, and Fury Leap into the next pack. Use the active heal from
Tempest Strike to stack up your Gladiator of Lagon
buffs for you and your minions and watch the monsters start melting. For clearing, you'll want to leave the last
few monsters at low health and let your totems finish them off, and Fury Leap into the next pack. Use the active heal from
![]() Summon Spriggan whenever needed as a free healing potion.
Summon Spriggan whenever needed as a free healing potion.
The defenses for this build come from Health and Endurance, as well as passive healing from the Spriggan and some heal on hit effects. We also get a decent amount of Armor and some Dodge making this a pretty tanky character overall. You can't facetank one-shot abilities, but you should be able to get into the thick of things without much trouble.
Equipment and Gear Affixes
As our ![]() Tempest Strike does three kinds of damage, as well as Melee and Spell, and our Totems require their own damage modifiers,
it is hard to scale the damage efficiently. This is why we stack a lot of Attunement and generic damage increases, though we do favor Lightning
Damage and Shock as our
Tempest Strike does three kinds of damage, as well as Melee and Spell, and our Totems require their own damage modifiers,
it is hard to scale the damage efficiently. This is why we stack a lot of Attunement and generic damage increases, though we do favor Lightning
Damage and Shock as our ![]() Summon Storm Totem has synergy with these. Elemental damage, shared Critical Strike Chance, shared Critical Multiplier
and shared damage modifiers are all ways we try to scale both our damage and our minions.
Summon Storm Totem has synergy with these. Elemental damage, shared Critical Strike Chance, shared Critical Multiplier
and shared damage modifiers are all ways we try to scale both our damage and our minions.
For defenses, we'll be prioritizing additive Health, % Health, Endurance, Endurance Threshold, and Armor wherever we can. In order to cap Resistances, we will be relying on the Shaman-specific Mastery Passive that increases all Elemental Resistance by 50% when a Totem is active.
| Gear Slot | Implicits | Modifiers |
|---|---|---|
| Axe | Legendary Potential Minion Spell Damage, Minion Bow Damage Minion Melee Damage, Minion Spell Damage |
|
| Axe | Legendary Potential Minion Spell Damage, Minion Bow Damage Minion Melee Damage, Minion Spell Damage |
|
| Head | Armor Endurance Max Health as Endurance Threshold |
Prefixes Attunement +3 Level to Storm Totem Increased Damage for Totems Suffixes Endurance Threshold Increased Health |
| Amulet | Less Damage Over Time Taken | Prefixes Increased Minion Damage Increased Minion health Suffixes Needed Resistances Health |
| Chest | Armor Spell Damage Minion Spell Damage |
Prefixes +3 Level of Tempest Strike Increased Spell Damage Suffixes Health Increased % Health |
| Belt | Armor Potion Slots |
Prefixes Increased Mana Regen Increased Minion Damage Suffixes Hybrid Health Increased Health |
| Gloves | Endurance Armor |
Prefixes Attunement Increased Minion Damage Suffixes Endurance Threshold Hybrid Health |
| Ring | Increased Minion Damge and Health Minion Critical Strike Multiplier |
Prefixes Attunement Increased Minion Damage Suffixes Endurance Threshold Needed Resistances |
| Ring | Necrotic Resistance Ward Decay Threshold |
Prefixes Attunement Increased Minion Damage Suffixes Endurance Threshold Health |
| Feet | Armor Movement Speed Needed Resistances |
Prefixes Attunement Increased Movement Speed Suffixes Increased Cooldown Recovery Speed Hybrid Health |
| Relic | Legendary Potential Increased Minion Damage |
A loot filter made specifically for the gear table above may be copied by pressing the button below. Once in the Loot Filter portion of the in-game menu, choose the "Paste Clipboard Contents" option to import the code.
Copy Loot Filter to Clipboard
Uniques
Listed below are the best Uniques for the build. Both uniques we use, ![]() Tempest Maw
and
Tempest Maw
and ![]() Stormcarved Testament, are not required uniques for the build to function, but
they will give quite a power boost.
Stormcarved Testament, are not required uniques for the build to function, but
they will give quite a power boost.
Tempest Maw
![]() Tempest Maw: Dual wielding this axe will be the best option for this build, as they provide modifiers that you can
not normally find on an axe base. They come with lower Totem Mana cost, Strength Attunement, as well as the ability to
proc Storm Sprites when we cast a Totem. This unique can can be target farmed on the Monolith Timeline
"Reign of Dragons" from the Unique or Set Weapons echo reward.
Tempest Maw: Dual wielding this axe will be the best option for this build, as they provide modifiers that you can
not normally find on an axe base. They come with lower Totem Mana cost, Strength Attunement, as well as the ability to
proc Storm Sprites when we cast a Totem. This unique can can be target farmed on the Monolith Timeline
"Reign of Dragons" from the Unique or Set Weapons echo reward.
Stormcarved Testament
![]() Stormcarved Testament: This relic gives a ton of useful stats for us. Even the Lightning Resistance
is useful, as it turns into more Lightning Penetration through our Soaring Blows passive.
The chance to summon a Storm Totem on hit is also extremely powerful. This unique can can be target
farmed on the Monolith Timeline "Ending the Storm" from Lagon, God of Storms.
Stormcarved Testament: This relic gives a ton of useful stats for us. Even the Lightning Resistance
is useful, as it turns into more Lightning Penetration through our Soaring Blows passive.
The chance to summon a Storm Totem on hit is also extremely powerful. This unique can can be target
farmed on the Monolith Timeline "Ending the Storm" from Lagon, God of Storms.
Idols
Idol slots are gained throughout the campaign, unlocking small bonuses and unique affixes for the player to discover and augment their builds with. The Idol screen consists of a grid system for the player to fill out with different sized idols, eventually filling in every part of the grid. As the Idol shape increases (1x1, 1x2, 1x3, 1x4, etc.) it will open up different affixes for you to use. This can be a great way to add some more customization to your build.
The best Idols for this build will be either Large Nomad Idols, Adorned Heorot Idols, or a mix between them. The specific affix we're looking for will be Increased Minion Critical Strike Chance or Shared Increased Lightning Critical Strike Chance. Any remaining slots can be filled in with Stout Lagonian Idols fixated on Health increases or to fill in missing Resistances.
Blessing
Blessings are permanent buffs that are applied to your character. These come in two different powers, Standard and Grand. Grand blessings are significantly stronger than the Standard Blessings. In total, there are 10 Blessing Slots, one for each Monolith Timeline. When you complete a Monolith and defeat the final boss you will be awarded a choice of three blessing with a random value. For the purpose of this guide, we are highlighting five major slots that can be filled with our recommendations, leaving the other for some personal preference.
| Blessing Name | Affix | Timeline |
|---|---|---|
| Void Resistance | The Black Sun | |
| Mana | Ending the Storm | |
| Endurance Threshold | The Age of Winter | |
| Increased Minion Damage | Spirits of Fire | |
| Critical Strike Avoidance | Reign of Dragons |
Where a specific resistance Blessing has been suggested, it is not required, but at the high end it may be one of the best places you can get that specific Resistance. Feel free to swap Blessings for other resistances as needed, depending on your gear.
Changelog
- 02 Mar. 2024: Guide added.

Lexyu is a professional content creator focused on theorycrafting and playtesting many ARPGS. He is also known for his skillful gameplay, such as playing Bazooka Wizard in Diablo 3. Since 2013, he has been creating in-depth guides to teach gamers how to succeed. Check out his social platforms through Discord to join the discussion in the community!
- Patch 1.0.7 Update: Multiplayer, Skills and More!
- Patch 1.0.6 Update: Camera Setting, Controller Keybinds, Bug Fixes, and More!
- Eleventh Hour Games on Real-Money Trading and Exploits in Last Epoch
- Patch 1.0.5 Update: Many Bug Fixes, Including Loot Filter Toggle Sensitivity, and Other Improvements!
- The First 30 Days of Last Epoch!
- 1.0 Launch Retrospective: A Message From Eleventh Hour Games
- Patch 1.0.4 Update: More In-Game Changes, Bug Fixes, and Improvements
- Last Epoch Mid-Cycle Balance Survey Recap