Sorcerer Black Hole Armageddon Endgame Build for Last Epoch (Patch 1.0)
Welcome to our Last Epoch Sorcerer Blackhole Armageddon build guide for the Mage class. Here you will learn everything about the Sorcerer play style, passives, skills, strengths, and weaknesses to conquer the world of Eterra.
Build Introduction
Due to the changes seen with 1.0 and the increased difficulty scaling, we can no longer suggest this build or concepts related to it. It has been tested and can clear 200 Corruption, but it struggles to go further than that. We will update this page in the future when a better defensive approach can be found, since the addition of the frostwall cooldown when activating flame ward.
Call forth the power of a collapsing cosmos with this Black Hole Armageddon build. We utilize the destructive power of a Black Hole to pull the shards of broken worlds down upon enemies, but not before electrifying them. The build has great AOE clear, sizzling enemies with bolts of lightning crackling from both you and your trusty wall. If you were looking for a visually exciting, simple to run mage, you have likely found a build to enjoy.
 Massive clear ability
 - Stong bossing potential
- Visually exciting

 Requires multiple unique/set items
 - Cannot face tank

Skill Selection
Our skill selection for this build focuses on Lightning Damage, while capitalizing on
gaining Intelligence, a significant driver in our base damage. We utilize two skills in their unscaled
form; ![]() Teleport and
Teleport and ![]() Focus. Both of these will
serve their purpose unscaled and, thanks to significant automation design in this build, we
are able to open up these two slots in our skill bar.
Focus. Both of these will
serve their purpose unscaled and, thanks to significant automation design in this build, we
are able to open up these two slots in our skill bar.

Class and Skill Passive Trees
Our base class is the Mage, which acts as a generic spell caster. Our character will be offered an opportunity to select a Mastery class once we have completed the first act of the campaign. Each base class has three possible Masteries to choose from. For the Mage, we have access to the Mastery Tree Passives for Sorcerer, Runemaster and Spellblade. Upon selecting a Mastery and placing 20 Passive Points into the Mage Tree, you'll then be able to place Passive Points into the Mastery Trees.
For this Black Hole Armageddon build, Sorcerer is our chosen Mastery. We will utilize the majority of our Passive Points for the Sorcerer Passive tree, with a strong investment of points into Runemaster to round out the build. Our passive points will be targeting augments for Lightning Damage and boosting our survivability. Each of the Passive Trees and their points are broken down below.
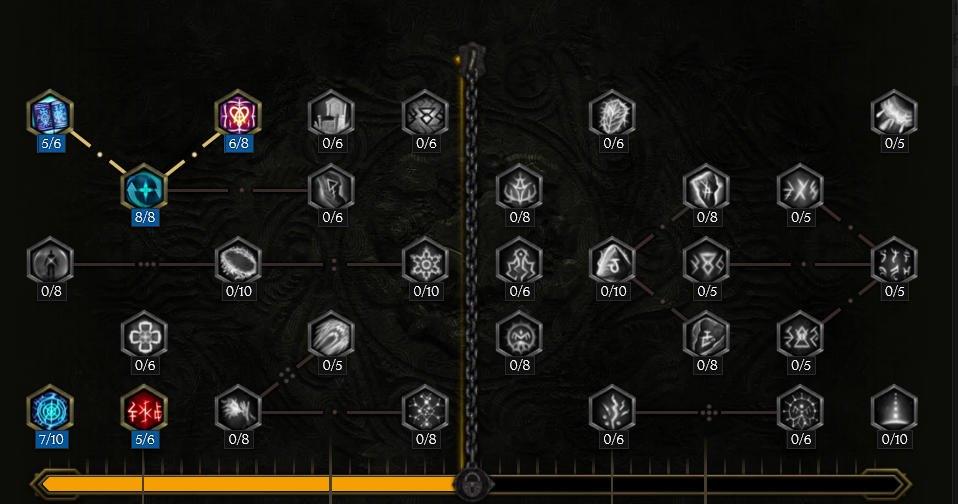
Mage Passive Points
- 1 point into Scholar: Increases Health and Mana.
- 8 points into Arcanist: Increases Intelligence and Resistances.
- 1 point into Reactive Ward: Traversal node to move further in the tree.
- 5 points into Mage Flurry: Increases Attack and Cast speed.
- 5 points into Warden: Adds a 50% base to our ward retention.
Our base class is the Mage, which acts as a generic spell caster. Our character will be offered an opportunity to select a Mastery class once we have completed the first act of the campaign. Each base class has three possible Masteries to choose from. For the Mage, we have access to the Mastery Tree Passives for Sorcerer, Runemaster and Spellblade. Upon selecting a Mastery and placing 20 Passive Points into the Mage Tree, you'll then be able to place Passive Points into the Mastery Trees.
For this Black Hole Armageddon build, Sorcerer is our chosen Mastery. We will utilize the majority of our Passive Points for the Sorcerer Passive tree, with a strong investment of points into Runemaster to round out the build. Our passive points will be targeting augments for Lightning Damage and boosting our survivability. Each of the Passive Trees and their points are broken down below.
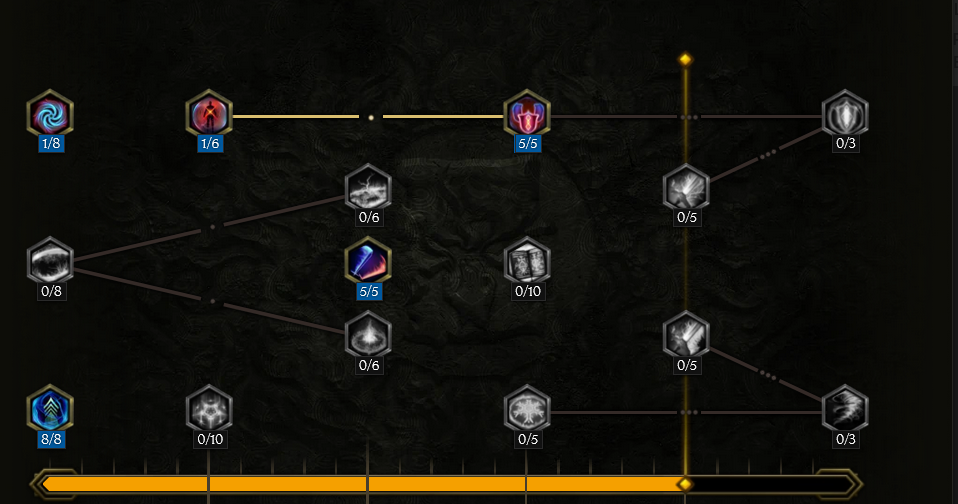
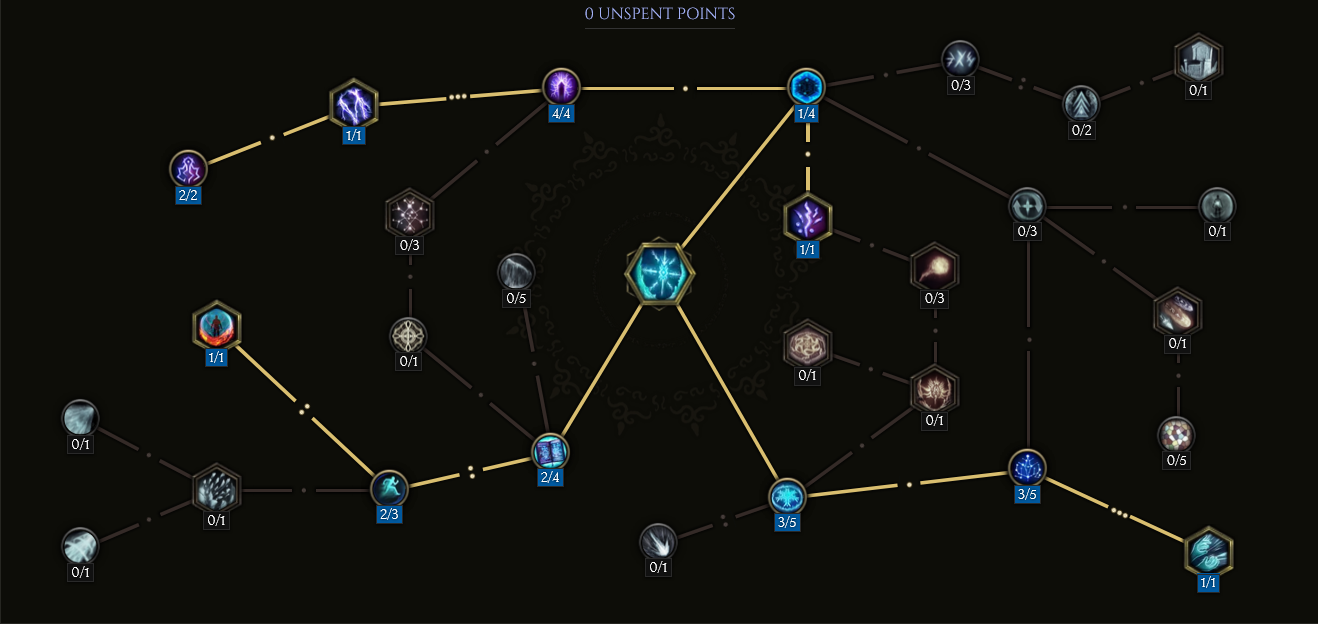
Sorcerer Passive Points
- 5 points into Calculated Destruction: Increases Intelligence and Increases our Critical Strike Chance by 3% per Intelligence.
- 5 points into Arcane Momentum: Grants us Arcane Momentum Stacks.
- 2 points into Afterglow: Increases Spell Damage and Ward Retention.
- 8 points into Ceraunomancer: Increases our Lightning Damage, but also adds a chance to shock when we use our lightning skills.
- 5 points inot Rift Bolt: This node will add Lightning Penetration and allow us to Leech 1.5% of the Lightning Damage we deal as Health.
- 8 points into Crackling Precision: Increases Critical Strike Chance.
- 5 points into Arcane Obliteration: Increases Spell Critical Multiplier.
- 8 points into Arcane Insight: This node will further increase our Intelligence.
- 10 points into Dragon Mage: We need to immidiately grab Mirror Breath in order to take advantage of this node.
- 1 point into Mirror Breath: This will allow us to take advantage of the Dragon Mage, with a 100% increase to our Lightning Damage when we use
 Black Hole.
 - 5 points into Archmage: Increases Spell Damage by a base of 5, triple this if you are over 200 mana.
Our base class is the Mage, which acts as a generic spell caster. Our character will be offered an opportunity to select a Mastery class once we have completed the first act of the campaign. Each base class has three possible Masteries to choose from. For the Mage, we have access to the Mastery Tree Passives for Sorcerer, Runemaster and Spellblade. Upon selecting a Mastery and placing 20 Passive Points into the Mage Tree, you'll then be able to place Passive Points into the Mastery Trees.
For this Black Hole Armageddon build, Sorcerer is our chosen Mastery. We will utilize the majority of our Passive Points for the Sorcerer Passive tree, with a strong investment of points into Runemaster to round out the build. Our passive points will be targeting augments for Lightning Damage and boosting our survivability. Each of the Passive Trees and their points are broken down below.
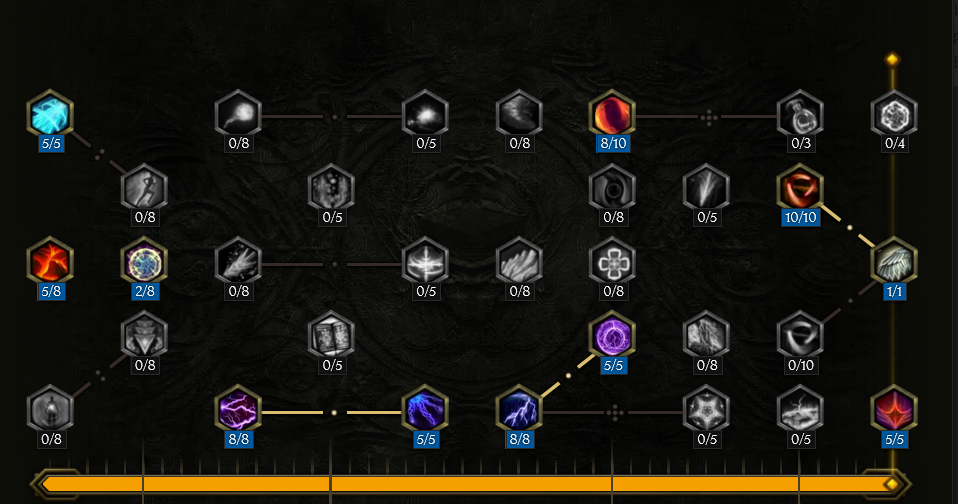
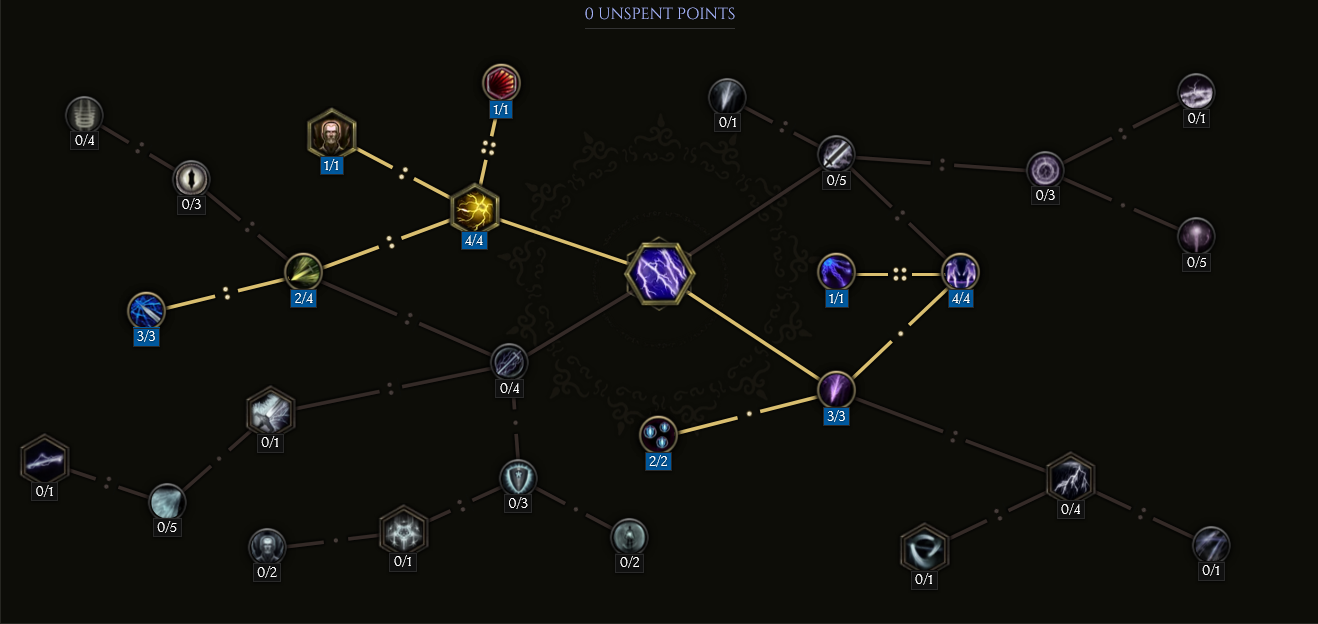
Runemaster Passive Points
- 5 points into Unsealed Mana: Increases your Health and reduces damage from ailments.
- 7 points into Quintessence of Triumph: Increases your spell damage.
- 8 points into Arcane Focus: Further pushing our intel, and gaining ward whenever we cast a spell.
- 6 points into Transcendence: We add to our base health pool with this node, but also 36 ward per second if we have at least 60 Intel.
- 5 points into Runeword: Cataclysm: Increases your Critical Chance and grants stacks of Runeword.
In this section, we will break down each skill and highlight the key passives we have selected to make the skill perform as best as possible in the build. While some of these skills do allow for some variation to exist depending on your own custom choices, we recommend utilizing the skill trees as presented until you have a strong understanding of the build itself.
Flame Ward
The ![]() Flame Ward will be a significant gain to our Ward and Mana generation. It will also boost some of our offensive capabilities as well.
NOTE: This skill is not on our skill bar, as
Flame Ward will be a significant gain to our Ward and Mana generation. It will also boost some of our offensive capabilities as well.
NOTE: This skill is not on our skill bar, as ![]() Frost Wall will be able to cast
Frost Wall will be able to cast ![]() Flame Ward for us.
Flame Ward for us.
Order of Skill Points
- 5 points into Stalwart Defense: Increases your Ward with
 Flame Ward.
 - 2 points into Barrier: You take less damage under Flame Ward.
- 2 points into Shrewd Shielding: Reduces the Mana cost of Flame Ward.
- 2 points into Dilation: Increases Flame Ward's Duration and reduces Mana cost.
- 1 point into Mental Aegis: Allows Mana to absorb 15% of the damage you receive, instead of Health.
- 4 points into Warmth: Increases our Mana Regeneration by 100%.
- 1 point into Infusion: Increase our Lightning Damamge (once converted by Lightning Ward) by 50%.
- 1 point into Lightning Ward: Converts the damage type of Flame Ward to Lightning.
- 3 points intoThrough Flames: Adds 6 to our base Lightning Damage while Flame Ward is active.
Please note, you may not have as many skill points to use until you have the required targeted unique ![]() Vilatria's Storm Crown.
All the player must do is remove a single point from the Through Flames node.
Vilatria's Storm Crown.
All the player must do is remove a single point from the Through Flames node.
In this section, we will break down each skill and highlight the key passives we have selected to make the skill perform as best as possible in the build. While some of these skills do allow for some variation to exist depending on your own custom choices, we recommend utilizing the skill trees as presented until you have a strong understanding of the build itself.
Frost Wall
![]() Frost Wall will be used as an offensive machine and a defensive safegaurd. This skill carries several automations,
as it will utilize our scaled
Frost Wall will be used as an offensive machine and a defensive safegaurd. This skill carries several automations,
as it will utilize our scaled ![]() Lightning Blast and give us our scaled
Lightning Blast and give us our scaled ![]() Flame Ward. Be sure to read in the Defesive section
for further details.
Flame Ward. Be sure to read in the Defesive section
for further details.
Order of Skill Points
- 2 points into Crystals of Protection: Increases the gains of Ward and Mana when walk through our
 Frost Wall.
 - 2 points into Boosted Kickoff: Grants Frenzy and Haste buffs when we touch the wall.
- 1 point into Prepared Wards: Activates Flame Ward when we pass through the wall.
- 1 point into Biting Limit: Shocks enemies that come in contact with the wall, once converted with Crackling Barrier.
- 1 point into Crackling Barrier: This converts are Frost Wall from Cold into Lightning.
- 1 point into Purifying Gate: This node ensures we are purged from any negative ailments upon passing through the wall.
- 3 points into Lightning Rod: This node will allow the Frost Wall to cast scaled
 Lightning Blast when we pass through the wall.
 - 1 point into Charged Pylons: This will now allow the Frost Wall to freely cast our scaled Lightning Blast, even if we do not pass through the walll.
- 2 points into Amplified Currents: This allows the wall to cast Lightning Blast more often, scaling up with the amount of time it has existed.
- 3 points into Marching Winter: This will increase Frost Wall's Area and Duration.
- 3 points into The Dark Cold: This causes the wall to deal more damage, per second it exists. This applies only to the wall, not the subskills that cast Lightning Blast.
- 1 point into Howling Rift: This allows you to regain 50% of the Mana cost of Frost Wall if you recast it with more than 50% of its duration remaining. (Recast in 3.5 Seconds or less to gain this benefit)
Please note, you may not have as many skill points to use until you have the required targeted unique ![]() Vilatria's Storm Crown.
All the player must do is remove a single point from the Marching Winter node.
Vilatria's Storm Crown.
All the player must do is remove a single point from the Marching Winter node.
In this section, we will break down each skill and highlight the key passives we have selected to make the skill perform as best as possible in the build. While some of these skills do allow for some variation to exist depending on your own custom choices, we recommend utilizing the skill trees as presented until you have a strong understanding of the build itself.
Lightning Blast
The ![]() Lightning Blast skill will be our generic trash killer. However, this is not because it lacks effectiveness, it is because it is quick and has no Mana cost.
This skill is double dipped from our
Lightning Blast skill will be our generic trash killer. However, this is not because it lacks effectiveness, it is because it is quick and has no Mana cost.
This skill is double dipped from our ![]() Frost Wall, as it will be utilizing this massive DPS skill as well. This skill will hit very hard because of the set pieces we
are using.
Frost Wall, as it will be utilizing this massive DPS skill as well. This skill will hit very hard because of the set pieces we
are using.
Order of Skill Points
- 3 points into Storm Razor: This gives the skill +3% Critical Strike Chance and adds more damage to the base of the skill.
- 2 points into Lightning Attunement: Because we and the Frost Wall cast the same Lightning Blast, it will not be uncommon to walk
around with Lightning Aegis almost all the time. This is a massive boost to damage when used in cohession with our Idols. Lightning Aegis will also
give us a massive defensive boost as well, allowing us to take 25% less damage across the board.
- 4 points into Overcharge: This adds a 40% Crit Multiplier and gives us a 24% chance to double cast.
- 1 point into Hypercharge: This node will give Lightning Blast a 25% chance to quad cast.
- 4 points into Arcing Power: We take this so progressively add more chains to our Lightning Blast. Adding another chain (up tp 4) everytime we cast Lightning Blast.
- 1 point into Surging Influence: This node increases the chain range by 50%.
- 1 point into Closed Circuit: This node is incredibly helpful in traffic. When Lightning Blast is used, it can chain off of you, giving you damage in critical strike chance.
- 2 points into Crackling Speed: Increases the cast speed of Lightning Blast.
- 3 points into Shattershock: Since virtually everything you hit will be under the effect Shock, this adds more damage when hit by Lightning Blast.
Please note, you may not have as many skill points to use until you have the required targeted unique ![]() Vilatria's Storm Crown.
All the player must do is remove a single point from the Closed Circuit node.
Vilatria's Storm Crown.
All the player must do is remove a single point from the Closed Circuit node.
In this section, we will break down each skill and highlight the key passives we have selected to make the skill perform as best as possible in the build. While some of these skills do allow for some variation to exist depending on your own custom choices, we recommend utilizing the skill trees as presented until you have a strong understanding of the build itself.
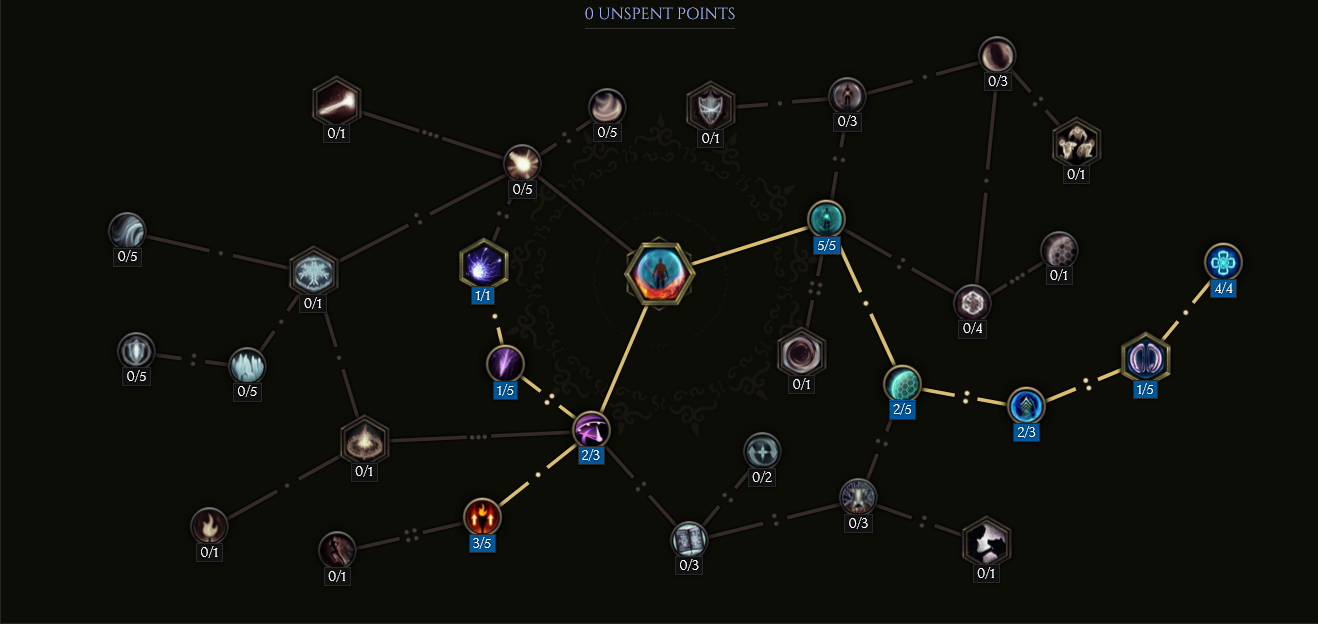
Black Hole
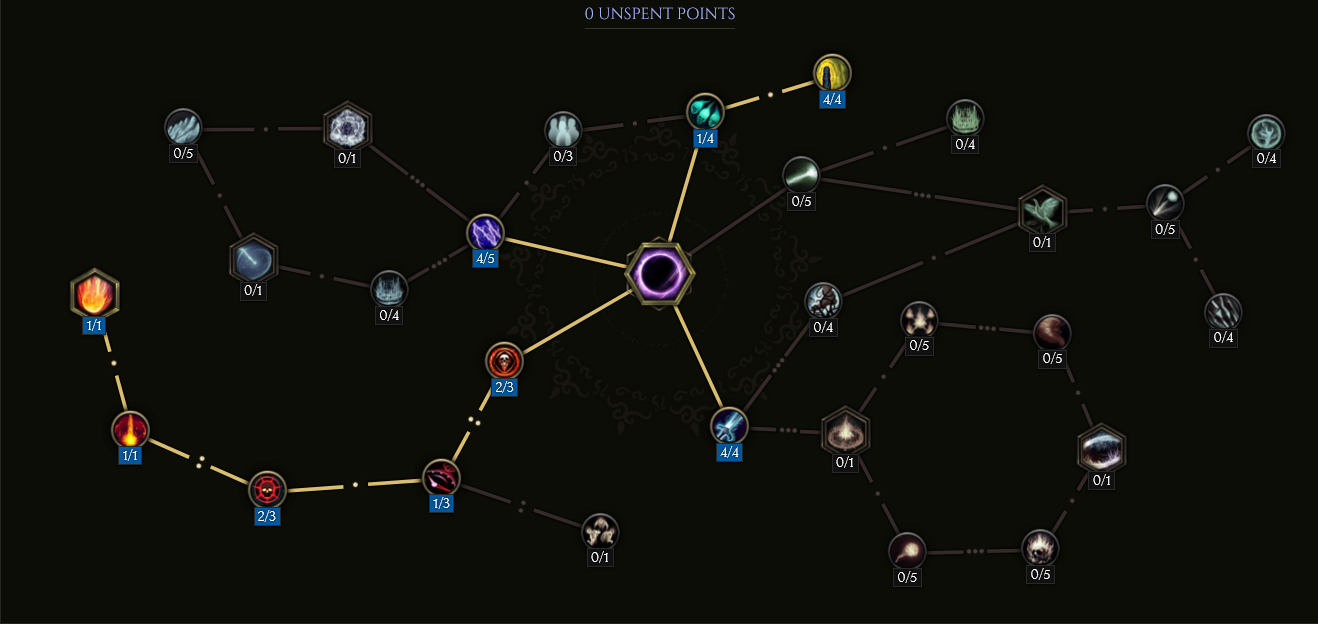
This is our boss killer, as ![]() Black Hole will cast multiple instances of
Black Hole will cast multiple instances of ![]() Meteor. We scale it to reduce the cooldown,
and increase the amount of damage it can do (it was alot).
Meteor. We scale it to reduce the cooldown,
and increase the amount of damage it can do (it was alot).
Order of Skill Points
- 2 points into Stability: This increases the duration of the Black Hole, thus increasing the amount of
 Meteor's that will fall.
 - 1 point into Endless Maw: Further increasing the duration, but adding a longer cooldown.
- 2 points into Weakened Reality: This causes enemies with 1 meter from the center to take 40% more damage.
- 1 point into
 Singularity: Causes the Black Hole to do 50% more damage.
 - 1 point into Armageddon: This is where the magic happens. Several Meteors will fall around the location of the Black Hole.
- 1 point into Time Dilation: This is a traversal node.
- 4 points into Rifts: We all but destroy the pull area and strength of the pull, to massively reduce the cooldown and mana cost.
- 4 points into Catalyst: A massive increase in damage, at the cost of pull strength.
- 4 points into Umbral Core: Further adds damage to the Black Hole.
Please note, you may not have as many skill points to use until you have the required targeted unique ![]() Vilatria's Storm Crown.
All the player must do is remove a single point from the Umbral Core node.
Vilatria's Storm Crown.
All the player must do is remove a single point from the Umbral Core node.
In this section, we will break down each skill and highlight the key passives we have selected to make the skill perform as best as possible in the build. While some of these skills do allow for some variation to exist depending on your own custom choices, we recommend utilizing the skill trees as presented until you have a strong understanding of the build itself.
Meteor
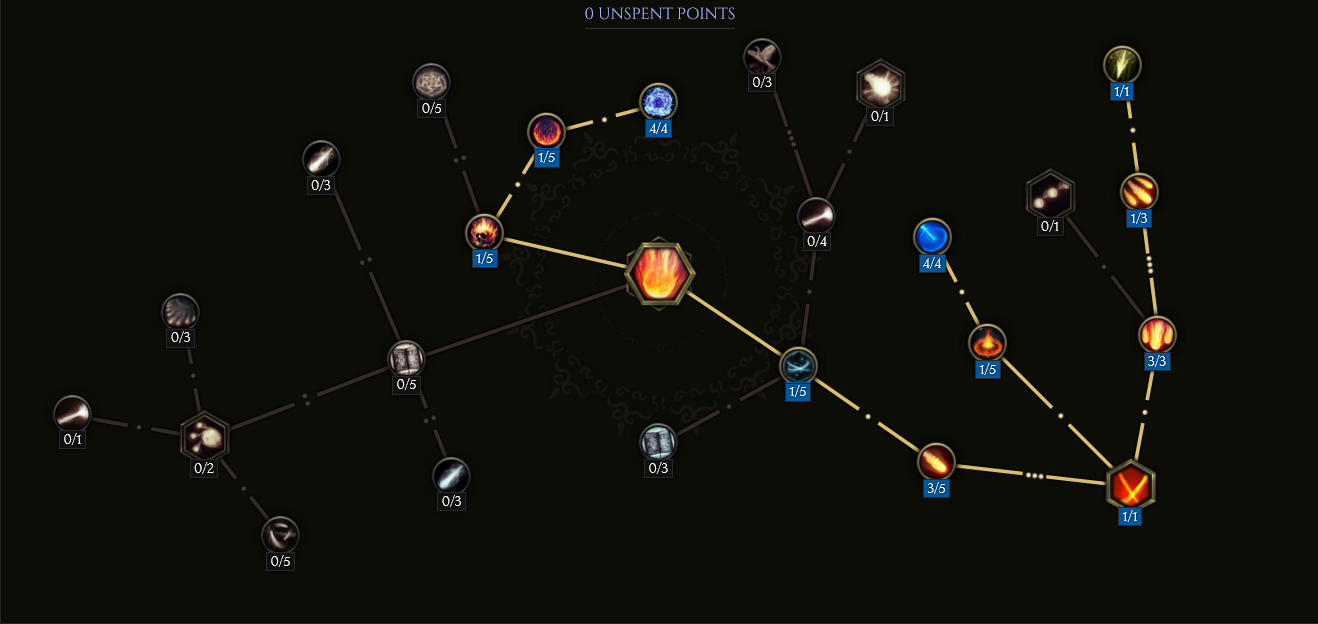
This is the automated skill with ![]() Black Hole, and being said, should be reserved for bossing or difficult encounters. The mana use is exponential
but proper mitigation of mana is taken care of.
Black Hole, and being said, should be reserved for bossing or difficult encounters. The mana use is exponential
but proper mitigation of mana is taken care of.
Order of Skill Points
- 1 point into Force of Impact: Increases our Stun chance.
- 3 points into Rapid Descent: Causes the meteor to fall faster.
- 1 point into Twin Meteors: Adds another meteor at a great mana cost.
- 1 point into Distant Craters: This is a traversal node.
- 4 points into Mana Fall: This is a must, at drastically reduces mana cost.
- 3 points into Meteor Shower: Adds an additional three meteors to every cast.
- 1 point into Rapid Impacts: This shortens the amount of time it takes between meteors falling.
- 1 point into Rain of Fire: This adds an additional meteor to the cast.
- 1 points into Crushing Force: Increases overall damage and damage against Healthy mobs.
- 1 points into Infernal Descent: Increases damage, but lowers Cast Speed.
- 4 points into Stardust: This will almost double the damage, because our meteors will have a base of lightning.
Please note, you may not have as many skill points to use until you have the required targeted unique ![]() Vilatria's Storm Crown.
All the player must do is remove a single point from the Stardust node. (although this node should not be taken unless you
have the set item)
Vilatria's Storm Crown.
All the player must do is remove a single point from the Stardust node. (although this node should not be taken unless you
have the set item)
Build Mechanics and Playstyle
![]() Lightning Blast is free to cast and has a 25% chance to quad cast thanks to Hypercharge. This spell hits hard, and with our
Lightning Blast is free to cast and has a 25% chance to quad cast thanks to Hypercharge. This spell hits hard, and with our
![]() Frost Wall also utilizing Lightning Blast, it begins to wipe mobs near the vicinity of you or it. This method of using
Frost Wall in conjunction with Lightning Blast will not only keep our ward numbers at a comfortable level, but we can utilize
Frost Wall also utilizing Lightning Blast, it begins to wipe mobs near the vicinity of you or it. This method of using
Frost Wall in conjunction with Lightning Blast will not only keep our ward numbers at a comfortable level, but we can utilize
![]() Black Hole at any time for a more difficult pack. Be aware, that we have all but killed the pull strength of the
Black Hole at any time for a more difficult pack. Be aware, that we have all but killed the pull strength of the ![]() Black Hole,
so it will not crowd control very well (unless you are stunning with the lightning-converted
Black Hole,
so it will not crowd control very well (unless you are stunning with the lightning-converted ![]() Meteor). With the right gear, our damage calculator in practice and
on paper puts the DPS of the
Meteor). With the right gear, our damage calculator in practice and
on paper puts the DPS of the ![]() Meteor in the multiple millions of DPS, not including the Black Hole damage.
Meteor in the multiple millions of DPS, not including the Black Hole damage. ![]() Lightning Blast
can, and will, easily hit the 70k's.
Lightning Blast
can, and will, easily hit the 70k's.
This build was meant to be played with minimal button manipulation. However, in times of dire Mana situations, ![]() Focus can be used.
We can do this by
Focus can be used.
We can do this by ![]() Teleporting away and using
Teleporting away and using ![]() Focus for a minimum of 1 second to get a burst of Mana. It works out very well to
channel
Focus for a minimum of 1 second to get a burst of Mana. It works out very well to
channel ![]() Focus while the
Focus while the ![]() Black Hole is going off, allowing you to minimize Mana loss.
Black Hole is going off, allowing you to minimize Mana loss.
Noteable Defensive Mechanics
We rely on our ability to spam ![]() Frost Wall for Ward generation, as well as 100% Critical Strike Avoidance. We also utilize Unsealed Mana,
Arcane Focus, Transcendence, and our
Frost Wall for Ward generation, as well as 100% Critical Strike Avoidance. We also utilize Unsealed Mana,
Arcane Focus, Transcendence, and our ![]() The Invoker's Static Touch to generate ample amounts of ward as well. Dodging obvious high-damage
mechanics will keep you safe, the ward will be more than enough to protect you from miscellaneous incoming damage.
The Invoker's Static Touch to generate ample amounts of ward as well. Dodging obvious high-damage
mechanics will keep you safe, the ward will be more than enough to protect you from miscellaneous incoming damage.
For a further explanation of how ![]() Frost Wall works, it is good to understand that it generates Ward through both Prepared Wards
and Crystals of Protection. Having this trigger,
Frost Wall works, it is good to understand that it generates Ward through both Prepared Wards
and Crystals of Protection. Having this trigger, ![]() Flame Ward will double our Mana Regeneration with Warmth.
We also recoup decent Mana if we can place
Flame Ward will double our Mana Regeneration with Warmth.
We also recoup decent Mana if we can place ![]() Frost Wall again before 3.5 seconds, refunding half the Mana cost back to us.
Frost Wall again before 3.5 seconds, refunding half the Mana cost back to us.
Equipment and Gear Affixes
For this build, we will be focusing on several main affixes for each piece of non-unique gear. This build uses absolutely no unique items, so the table below lists all of the required gear.
| Gear Slot | Implicits | Modifiers |
|---|---|---|
| Two-Handed Staff | - | |
| Head | - | |
| Amulet | Increased Cast Speed | Prefixes Critical Strike Multiplier Lightning Penitration Suffixes Shred Armor on Hit Added HP |
| Belt | Armor Potion slots |
Prefixes Increased Lightning Damage Increased Mana Regen Suffixes Increased HP Critical Strike Avoidance |
| Ring | - | |
| Ring | - | |
| Gloves | Necrotic Resistance Ward Retention |
Prefixes Intelligence Increased Spell Damage Suffixes Needed Resistance |
| Feet | Armor Movement Speed Resistances |
Prefixes Movement Speed Intelligence Hybrid Health Suffixes Needed Resistance |
| Relic | Elemental Critical Strike Multiplier | Prefixes Increased Cast Speed Intelligence Suffixes Flat Health Needed Resistances |
Uniques
Now, let's look at the required Uniques for this build.
Vilatria's Downfall
![]() Vilatria's Downfall is one of two unique set items needed to run this build.
This build will not function very well without both of these. The set bonus is a massive boost
to base lightning damage. As we will get +1 spell lightning damage per Intelligence we have.
Easily adding a 100 or more to our base lightning damage from almost all of our skills. This staff
also converts our
Vilatria's Downfall is one of two unique set items needed to run this build.
This build will not function very well without both of these. The set bonus is a massive boost
to base lightning damage. As we will get +1 spell lightning damage per Intelligence we have.
Easily adding a 100 or more to our base lightning damage from almost all of our skills. This staff
also converts our ![]() Meteor to lightning, giving it the massive bonus from the set.This Unique set
item can be target farmed from the timeline "The Stolen Lance" at the "Unique or Set Staff
or Sceptre" echo rewards.
Meteor to lightning, giving it the massive bonus from the set.This Unique set
item can be target farmed from the timeline "The Stolen Lance" at the "Unique or Set Staff
or Sceptre" echo rewards.
Vilatria's Storm Crown
![]() Vilatria's Storm Crown is the rarest of the 3 set items to aquire and only once obtained, should
the build be created. This set helmet will add +1 passive points to all but our
Vilatria's Storm Crown is the rarest of the 3 set items to aquire and only once obtained, should
the build be created. This set helmet will add +1 passive points to all but our ![]() Black Hole skill.
This will also add a 1% shock chance per Intelligence, which at 100%, ensures we shock anything we hit.
This will also add a decent portion or our already well scaled lightning penetration, which will push our
DPS further.
Black Hole skill.
This will also add a 1% shock chance per Intelligence, which at 100%, ensures we shock anything we hit.
This will also add a decent portion or our already well scaled lightning penetration, which will push our
DPS further.
The Invoker's Static Touch
![]() The Invoker's Static Touch is a major defensive and offensive driver in the build. Since
The Invoker's Static Touch is a major defensive and offensive driver in the build. Since ![]() Vilatria's Storm Crown
is already giving us significant chance to shock, we then have a 5-10% chance to gain 75 ward per hit on a
shocked enemy. Since all the enemies will be shocked, and multiple enemies can be hit, several times per
second, the ward generation can really start to take off. Add this to our
Vilatria's Storm Crown
is already giving us significant chance to shock, we then have a 5-10% chance to gain 75 ward per hit on a
shocked enemy. Since all the enemies will be shocked, and multiple enemies can be hit, several times per
second, the ward generation can really start to take off. Add this to our ![]() Flame Ward that we can
stack ontop of this freely with
Flame Ward that we can
stack ontop of this freely with ![]() Frost Wall, ward should be able to sit in the few thousands easily.
Frost Wall, ward should be able to sit in the few thousands easily.
Alternate Scaling
Twisted Heart of Uhkeiros
The ![]() Twisted Heart of Uhkeiros is a good selection for deep Corruption pushing as this will create
massive amounts of Ward generation. This unique relic will also give +1 to all of our skills, which would
open up some more scaling for them. Although there would likely be a loss in our over all DPS due to the
drop in Intelligence and Elemental Critical Strike Multiplier implicits, it would be possible to
LP this unique. This unique would be best with Intelligence and Increased Cast Speed. Critical Strike
Multiplier would serve you well if these two Prefixes were not available. Be aware of the loss in whatever
Resistances were in the relic prior, albeit, the gain in Ward would make up for the loss of EHP anyway.
Twisted Heart of Uhkeiros is a good selection for deep Corruption pushing as this will create
massive amounts of Ward generation. This unique relic will also give +1 to all of our skills, which would
open up some more scaling for them. Although there would likely be a loss in our over all DPS due to the
drop in Intelligence and Elemental Critical Strike Multiplier implicits, it would be possible to
LP this unique. This unique would be best with Intelligence and Increased Cast Speed. Critical Strike
Multiplier would serve you well if these two Prefixes were not available. Be aware of the loss in whatever
Resistances were in the relic prior, albeit, the gain in Ward would make up for the loss of EHP anyway.
Idols
Idol slots are gained throughout the campaign, unlocking small bonuses and unique affixes for the player to discover and augment their builds with. The Idol screen consists of a grid system for the player to fill out with different sized idols, eventually filling in every part of the grid. As the Idol shape increases (1x1, 1x2, 1x3, 1x4, etc.) it will open up different affixes for you to use. This can be a great way to add some more customization to your build.
For this particular build, we will be focusing on increasing our Meteor Damage for our character. Below, you will see the idols we are targeting.
Size: 2×2
Modifiers
- Increased Lightning Damage while you have Lightning Aegis
- Increased lightning damage. This effect is doubled if you have 300 or more maximum mana.
Size: 3×1
Modifiers
- Ward gained when you cast Flame Ward
- Increased lightning damage. This effect is doubled if you have 300 or more maximum mana.
The remaining open spots on Idol grid can be filled with Idols focused on increasing our Maximum Mana, Health Regen, or missing Resistances.
Blessing
Blessings are permanent buffs that are applied to your character. These come in two different powers, Standard and Grand. Grand blessings are significantly stronger than the Standard Blessings. In total, there are 10 Blessing Slots, one for each Monolith Timeline. When you complete a Monolith and defeat the final boss you will be awarded a choice of three blessing with a random value. For the purpose of this guide, we are highlighting five major slots that can be filled with our recommendations, with the rest being left for some personal preference.
| Blessing Name | Affix | Timeline |
|---|---|---|
| +#%Void Resistance | The Black Sun | |
| +#%Increased Lightning Damage | Ending the Storm | |
| +#% Physical Resistance | The Age of Winter | |
| +#%Fire Resistance | Spirits of Fire | |
| +#% Critical Strike Avoidance | Reign of Dragons |
The Blessings listed above cover the most important slots for this build, with the remaining Blessing Slots being filled with whatever the player may be lacking for stats.
Changelog
- 15 Mar. 2023: Build Retired.
- 30 Nov. 2023: Guide added.

EMP1241 is a Marine veteran who is currently pursuing higher education in Aerospace Engineering. He spends much of his time outside of his studies playing ARPGs, Builders, and MOBAs. He is frequently seen on his Twitch channel discussing science, space, or video games.
- Patch 1.0.7 Update: Multiplayer, Skills and More!
- Patch 1.0.6 Update: Camera Setting, Controller Keybinds, Bug Fixes, and More!
- Eleventh Hour Games on Real-Money Trading and Exploits in Last Epoch
- Patch 1.0.5 Update: Many Bug Fixes, Including Loot Filter Toggle Sensitivity, and Other Improvements!
- The First 30 Days of Last Epoch!
- 1.0 Launch Retrospective: A Message From Eleventh Hour Games
- Patch 1.0.4 Update: More In-Game Changes, Bug Fixes, and Improvements
- Last Epoch Mid-Cycle Balance Survey Recap