Sorcerer Meteor Endgame Build for Last Epoch (Patch 1.0)
Welcome to our Last Epoch Sorcerer Meteor build guide for the Mage class. Here you will learn everything about the Sorcerer play style, passives, skills, strengths, and weaknesses to conquer the world of Eterra.
Build Introduction
Wade directly into battle, striking your foes while Meteors constantly rain from the sky! Generate tons of ward from your abilities, keeping you protected while your constant spell triggers wipe your enemies from the face of the Earth. Unlike most Sorcerer builds, this one gets into the thick of it, attacking enemies with blazing speed from melee range.
Great AoE, quick map clear
Enjoyable and fun to play
Easy, single button rotation
Squishy in Empowered Monoliths before swapping into the Low Life variant
Average damage on bosses
Skill Selection
The core of this build revolves around the unique belt ![]() Harbinger of Stars, which causes Meteors to have a chance to autocast
whenever we crit with any ability. As
Harbinger of Stars, which causes Meteors to have a chance to autocast
whenever we crit with any ability. As ![]() Meteor costs a hefty amount of mana, this can drain your mana pool in a hurry.
To fix this, the main ability we use to proc everything is
Meteor costs a hefty amount of mana, this can drain your mana pool in a hurry.
To fix this, the main ability we use to proc everything is ![]() Mana Strike, which refills our mana quite quickly. When in the thick of it, your
mana will jump up and down wildly. Additionally, we have quite a few other effects that will proc off of
Mana Strike, which refills our mana quite quickly. When in the thick of it, your
mana will jump up and down wildly. Additionally, we have quite a few other effects that will proc off of ![]() Mana Strike, such
as
Mana Strike, such
as ![]() Frost Claw, to increase the chances of a
Frost Claw, to increase the chances of a ![]() Meteor proc when any of them crit.
For survivability, we have added a ton of ward generation, either through skill passives or 'mana spent gained as ward' mods on our gear. As well as the damage reduction on
Meteor proc when any of them crit.
For survivability, we have added a ton of ward generation, either through skill passives or 'mana spent gained as ward' mods on our gear. As well as the damage reduction on
![]() Harbinger of Stars and a respectable amount of armor.
Harbinger of Stars and a respectable amount of armor.

Class and Skill Passive Trees
Our base class is the Mage, which acts as a generic spell caster. Our character will be offered an opportunity to select a Mastery class once we have completed the first act of the campaign. Each base class has three possible masteries to choose from. For the Mage, we have access to the Mastery Tree Passives for Sorcerer, Runemaster and Spellblade. Upon selecting a Mastery and placing 20 Passive Points into the Mage Tree, you'll then be able to place Passive Points into the Mastery Trees.
For any Meteor build, you must choose Sorcerer as your mastery or you will not have access to the spell. We put the majority of our points into the Sorcerer tree, but we also have a fair amount into the base Mage tree and the Spellblade tree. Each of the Passive Trees and their points are broken down below.
Mage Passive Points
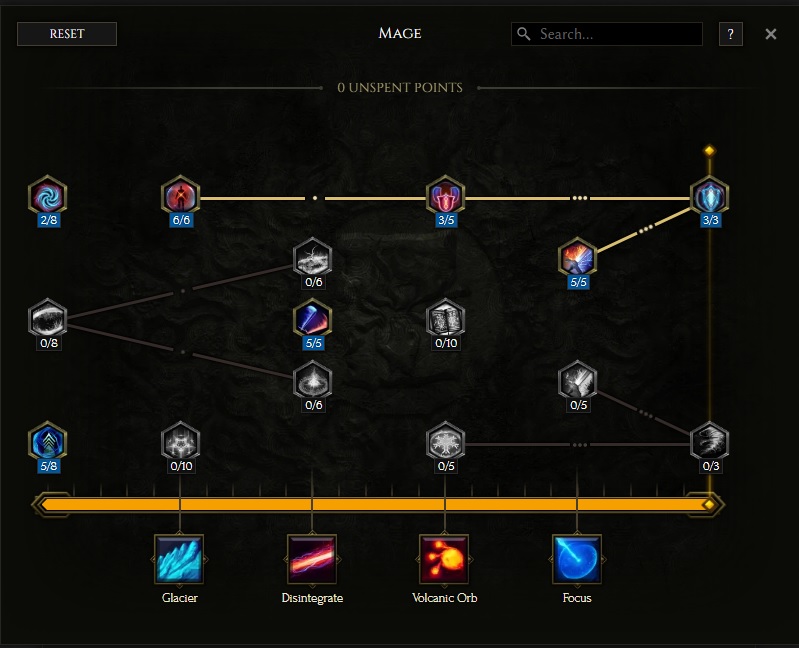
- 5 points into Arcanist: Increases Intelligence and Fire/Lightning Resistances.
- 2 points into Scholar: Adds Flat Health and Mana.
- 6 points into Reactive Ward: Gives us a burst of Ward when we drop below 70% health.
- 5 points into Mage Flurry: Increases Attack/Cast speed and lowers cooldown for
 Teleport.
 - 3 points into Warden: Increases Ward Retention.
- 5 points into Sun and Storms : Increased Fire/Lightning damage, as well as gaining us Ward when we use Fire/Lightning skills.
- 3 points into Silver Rune: Increases Ward gained and reduces cooldown of previous nodes. This makes Sun and Storms much better.
Our base class is the Mage, which acts as a generic spell caster. Our character will be offered an opportunity to select a Mastery class once we have completed the first act of the campaign. Each base class has three possible masteries to choose from. For the Mage, we have access to the Mastery Tree Passives for Sorcerer, Runemaster and Spellblade. Upon selecting a Mastery and placing 20 Passive Points into the Mage Tree, you'll then be able to place Passive Points into the Mastery Trees.
For any Meteor build, you must choose Sorcerer as your mastery or you will not have access to the spell. We put the majority of our points into the Sorcerer tree, but we also have a fair amount into the base Mage tree and the Spellblade tree. Each of the Passive Trees and their points are broken down below.
Sorcerer Passive Points
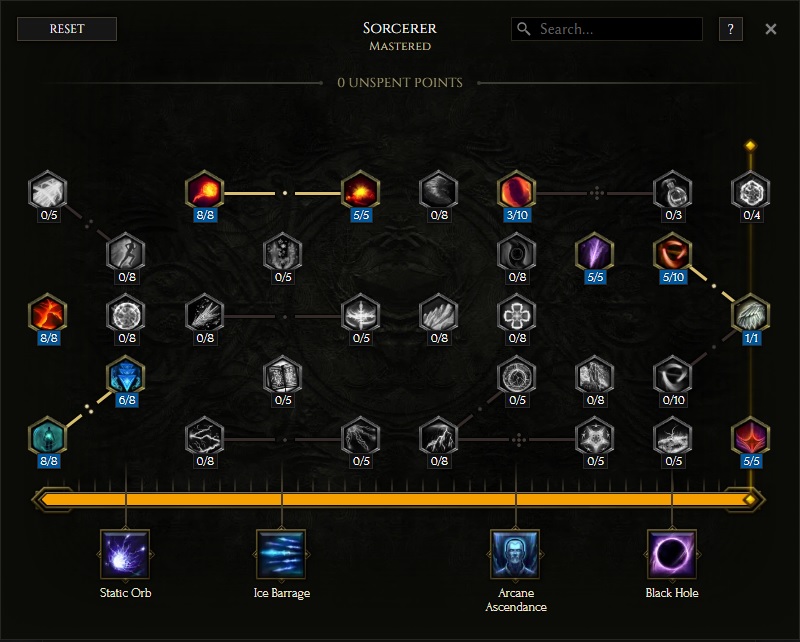
- 8 points into Calculated Destruction: Adds Intelligence and 3% Increased Critical Strike Chance per Intelligence.
- 8 points into Mana Shell: Adds Flat Mana and Armor.
- 6 points into Wisdom: Adds flat Mana and increased Mana Regen.
- 8 point into Pyromancer: Increases Fire Damage and Ignite Chance for Fire Skills.
- 5 points into Lavamancer: Increases Fire penetration and adds fire damage leech.
- 3 points into Arcane Insight: Adds Intelligence and a chance to gain Insight (granting 20% elemental damage and ward retention)
- 5 points into Spell Slinger: Adds Flat Spell Damage and increased Mana Regen.
- 5 points into Dragon Mage: Increases Elemental Damage based on which skill you used.
- 1 point into Mirror Breath: Swaps the effects of previous node around, so that our Lightning Skills now give a bonus to Fire instead.
- 5 points into Archmage: Adds flat Spell Damage, tripled if we are over 200 Mana.
Our base class is the Mage, which acts as a generic spell caster. Our character will be offered an opportunity to select a Mastery class once we have completed the first act of the campaign. Each base class has three possible masteries to choose from. For the Mage, we have access to the Mastery Tree Passives for Sorcerer, Runemaster and Spellblade. Upon selecting a Mastery and placing 20 Passive Points into the Mage Tree, you'll then be able to place Passive Points into the Mastery Trees.
For any Meteor build, you must choose Sorcerer as your mastery or you will not have access to the spell. We put the majority of our points into the Sorcerer tree, but we also have a fair amount into the base Mage tree and the Spellblade tree. Each of the Passive Trees and their points are broken down below.
Runemaster Passive Points
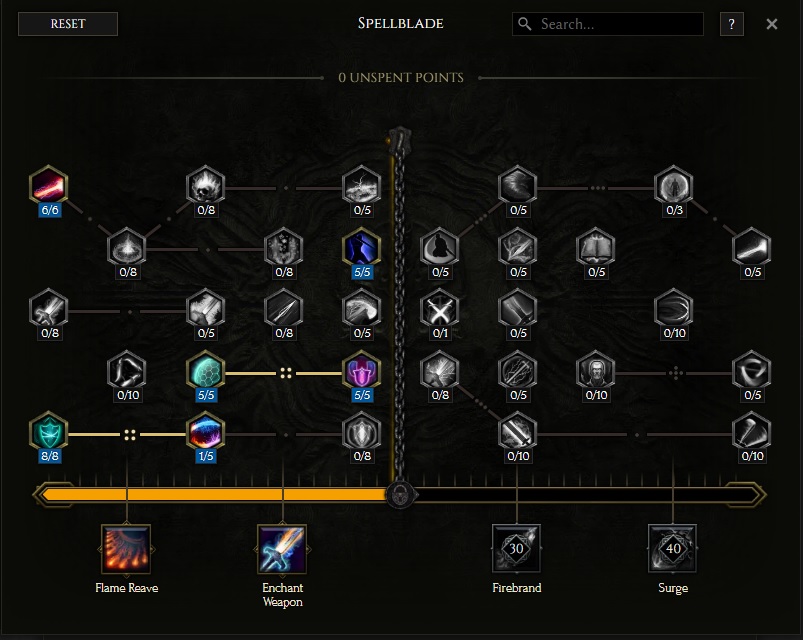
- 8 points into Arcane Warden: Gives us a flat amount of Ward whenever we hit with an Elemental Melee Attack.
- 6 points into Elemental Affinity: Increased Elemental Damage and Elemental Resistance.
- 1 point into Warden's Echo: Chance to create an Elemental Burst when we gain ward from previous node. Mostly taken because we needed to spend 1 more point in tree to unlock later nodes.
- 5 points into Arcane Shielding: Reduces damage taken and adds Ward per second when you land a Melee Attack.
- 5 points into Shattered Aegis: Changes Arcane Shielding to be less effective, but can stack up to four times. At max stacks, we gain 6% more damage mitigation, 12 Ward per second and 80% increased Armor over the base ability.
In this section, we will break down each skill and highlight the key passives we have selected to make the skill perform as best as possible in the build. While some of these skills do allow for some variation to exist depending on your own custom choices, we recommend utilizing the skill trees as presented until you have a strong understanding of the build itself.
Meteor
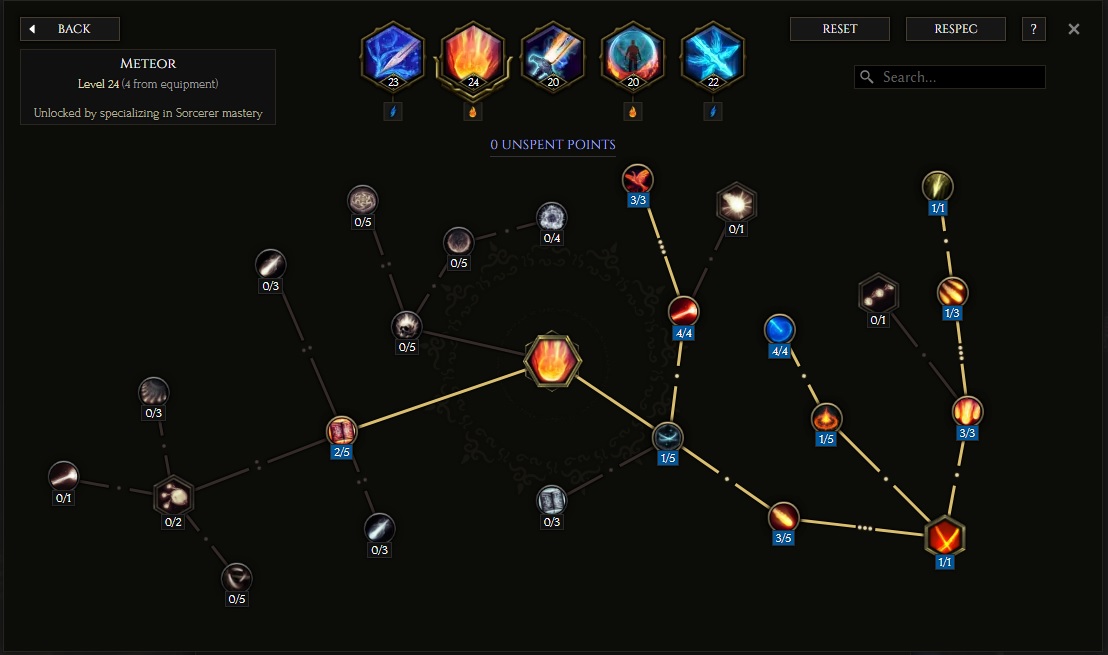
The main damaging ability of our build. We are looking to improve it's damage and reduce the Mana cost of the spell, as it is quite expensive by default. To improve damage, we want as many meteors to fall as possible and to boost the critical multiplier, as we will be very close to crit cap for spells. Meteor has one of the highest damage effectiveness ratios in the game, so we also try to get as much flat spell damage as possible elsewhere.
Order of Skill Points
- 1 point into Force of Impact: Increased Stun chance and Duration.
- 3 points into Rapid Descent: Increases fall speed of the Meteors.
- 1 point into Twin Meteors: Adds another Meteor, but increases Mana cost.
- 3 points into Meteor Shower: Adds three more meteors, but reduces the radius that they deal damage.
- 1 point into Rapid Impacts: Increases Meteor Fall frequency.
- 1 point into Rain of Fire: Adds one more meteor.
- 1 point into Distant Craters: Adds damage, but causes Meteors to fall further apart.
- 4 points into Mana Fall: Reduces the Mana cost of Meteor.
- 4 points into Extinction: Adds flat Critical Chance to Meteor and 40% chance for a Large Meteor to fall. This node is very important for helping us to get to 100% Critical Strike Chance for Meteor.
- 3 points into Astral Cataclysm: Increases Critical Multiplier for Meteor.
- 2 points into Craterborn: Gives us a buff that adds some Fire Penetration, as well as
increasing Cast Speed, though this is less relevant as we are mostly melee attacking with
 Mana Strike.
If you do not have all the points from gear yet, you can trim from Craterborn or Astral Cataclysm.
In this section, we will break down each skill and highlight the key passives we have selected to make the skill perform as best as possible in the build. While some of these skills do allow for some variation to exist depending on your own custom choices, we recommend utilizing the skill trees as presented until you have a strong understanding of the build itself.
Frost Wall
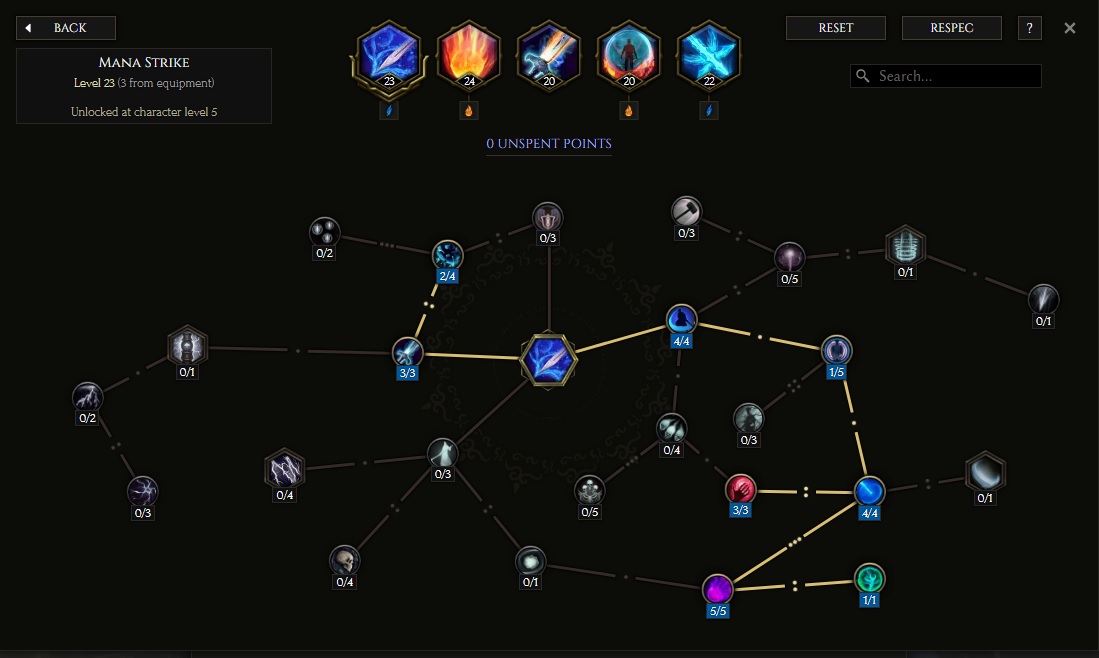
![]() Mana Strike is our main ability used. However, this is not our main damage ability.
Its main purpose is to recover Mana and proc our other spells. Therefore, we focus on increasing the
utility of Mana Strike as much as possible, especially how much Mana it generates for us.
Mana Strike is our main ability used. However, this is not our main damage ability.
Its main purpose is to recover Mana and proc our other spells. Therefore, we focus on increasing the
utility of Mana Strike as much as possible, especially how much Mana it generates for us.
Order of Skill Points
- 4 points into Swift Sap: Increases Mana Strike's Attack speed.
- 1 point into Sprite Blade: Increases the Area Mana Strike hits.
- 4 points into Mana Drain: Increases the Mana gained.
- 5 points into Critical Mana: Adds flat Mana gained on Criticals.
- 1 point into Critical Rejuvenation: Massively increases the base critical chance of Mana Strike, but it no longer deals extra damage on Crits. This is hardly a drawback for the build.
- 3 points into Reclamation: Adds more flat Mana gained when we are below zero mana.
- 3 points into Arcanist's Blade: More flat Mana gained on hit.
- 2 points into Transfusion: Gives us Ward gain on hit based on how much Mana gained on hit. This should be over 20 Ward per hit, and upwards of 30 when below 0 Mana.
If you do not have the 3 extra points from gear yet. You can trim points from Transfusion and/or Critical Mana, depending on if you feel you need more mana or more survivability.
In this section, we will break down each skill and highlight the key passives we have selected to make the skill perform as best as possible in the build. While some of these skills do allow for some variation to exist depending on your own custom choices, we recommend utilizing the skill trees as presented until you have a strong understanding of the build itself.
Frost Claw
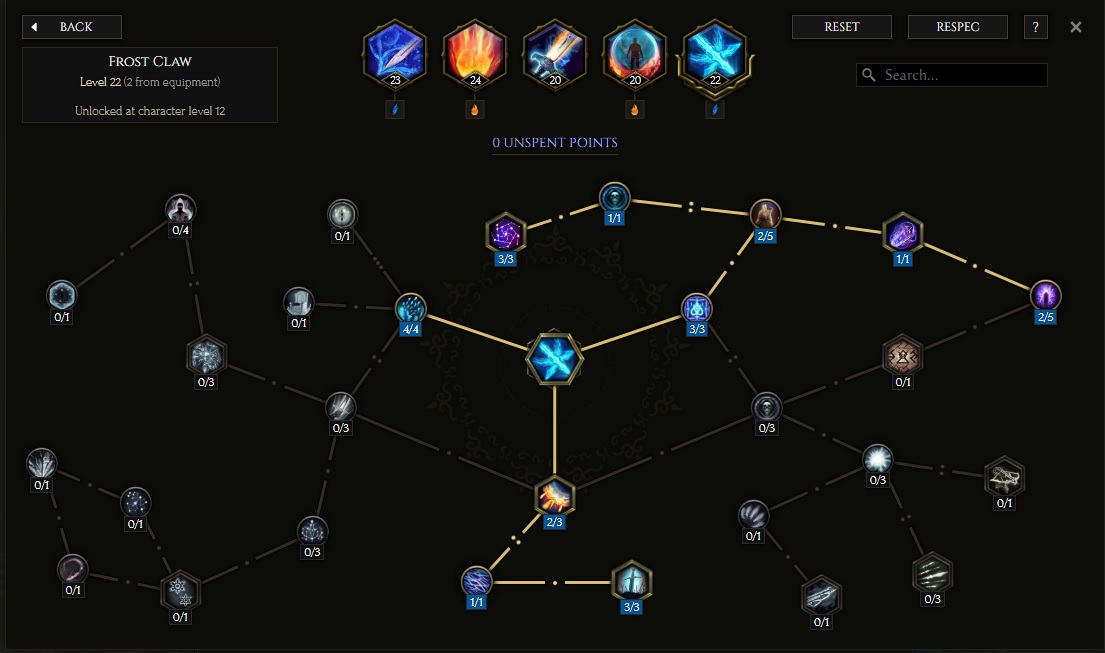
While we have specialized into ![]() Frost Claw, it will not be on our skill bar. We use that slot for an un-specced
Frost Claw, it will not be on our skill bar. We use that slot for an un-specced ![]() Teleport for mobility.
It automatically triggers off
Teleport for mobility.
It automatically triggers off ![]() Mana Strike on 30% of hits. When attacking three or more enemies, this is almost guaranteed to trigger.
With the amount of Attack Speed we are stacking, it will also trigger quite often even on single targets. However, we are not trying to boost
the damage of
Mana Strike on 30% of hits. When attacking three or more enemies, this is almost guaranteed to trigger.
With the amount of Attack Speed we are stacking, it will also trigger quite often even on single targets. However, we are not trying to boost
the damage of ![]() Frost Claw but rather use it as another way to proc
Frost Claw but rather use it as another way to proc ![]() Meteor on crits, and as a secondary mana generator.
Meteor on crits, and as a secondary mana generator.
Order of Skill Points
- 3 points into Shiver Shell: Gives a chance to cast Frost Claw when hit, and generates Ward whenever Frost Claw is triggered.
- 1 point into Reowyn's Veil: Generates Ward based on Freeze Rate Multiplier.
- 3 points into Macuahuitl: The most important node we take, as this is what triggers Frost Claw when are attacking.
- 4 points into Rending Cascade: Gives Frost Claw higher base Critical Chance, very important for hitting 100% critical chance, and increased Freeze Rate Multiplier.
- 3 points into Gift of Winter: Reduces the Mana cost of Frost Claw and a chance to gain extra Mana on cast.
- 2 points into Artor's Sceptre: More Damage and Frostbite chance.
- 1 point into Frost Beyond Time: Increased Ailment Duration inflicted by Frost Claw.
- 3 points into Celestial Conflux: Chance to cast
 Elemental Nova when Frost Claw's projectiles reach a target.
This spell can crit and then proc
  Meteor as well.
 - 1 point into Spark Artillery: Converts Frost Claw to Lightning.
- 2 points into Spark of Celerity: Increased projectile speed and Mana efficiency.
If you do not have the 2 extra points from gear yet, you have two options. If you are finding yourself at negative Mana all the time, you could trim them from Celestial Conflux. If you feel like you are at full Mana all the time and not proccing tons of Meteors, then you may trim them from Spark of Celerity instead.
In this section, we will break down each skill and highlight the key passives we have selected to make the skill perform as best as possible in the build. While some of these skills do allow for some variation to exist depending on your own custom choices, we recommend utilizing the skill trees as presented until you have a strong understanding of the build itself.
Flame Ward
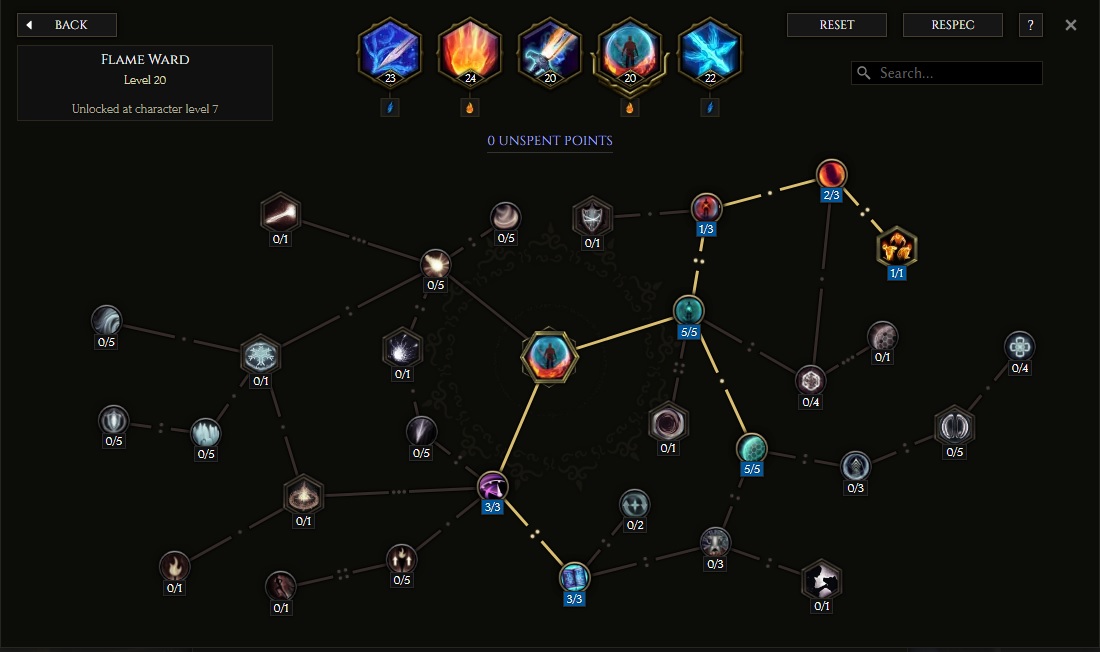
To increase our survivability, we specialize into ![]() Flame Ward. Most notably, we take the node to autocast it whenever we get stunned.
If you prefer, you could even leave it off your skill bar and use some un-specced skill there instead. Relying on it to only proc when stunned.
However, it is nice to have it on there as a panic button for when you get low. We are focusing our points on taking nodes that increase the amount of
Ward and survivability it will provide us.
Flame Ward. Most notably, we take the node to autocast it whenever we get stunned.
If you prefer, you could even leave it off your skill bar and use some un-specced skill there instead. Relying on it to only proc when stunned.
However, it is nice to have it on there as a panic button for when you get low. We are focusing our points on taking nodes that increase the amount of
Ward and survivability it will provide us.
Order of Skill Points
- 5 points into Stalwart Defense: Adds a flat amount of Ward gained.
- 1 point into Desperate Defense. A percent of missing health is added as Ward.
- 3 points into Fuel The Flames: Increased Ward granted, but adds time to the cooldown.
- 1 point into Dual Aegis: Gives an extra charge of
 Flame Ward, allowing us to cast it twice.
 - 5 points into Barrier: Less hit damage taken while
 Flame Ward is active.
 - 3 points into Dilation: Increased duration and mana efficiency.
- 3 points into Energize: Adds Ward per second while
 Flame Ward is active.
In this section, we will break down each skill and highlight the key passives we have selected to make the skill perform as best as possible in the build. While some of these skills do allow for some variation to exist depending on your own custom choices, we recommend utilizing the skill trees as presented until you have a strong understanding of the build itself.
Enchant Weapon
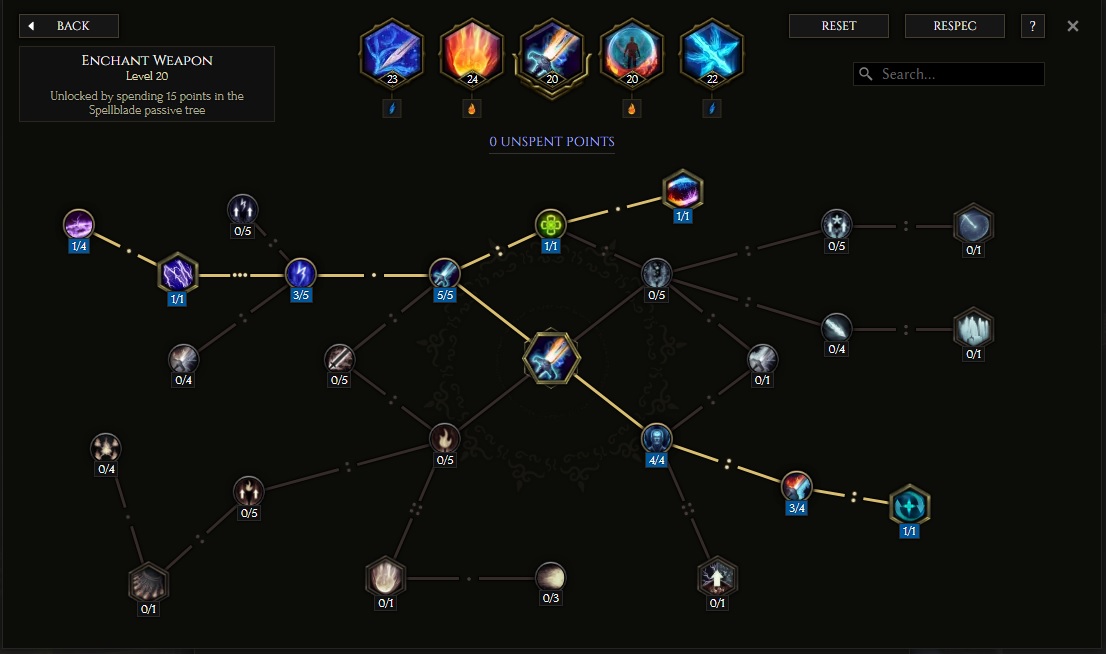
Much like ![]() Frost Claw and
Frost Claw and ![]() Flame Ward, we will be automating the casting of this. However, unlike those two, this must to be on your skill bar.
It will not cast automatically otherwise.
Flame Ward, we will be automating the casting of this. However, unlike those two, this must to be on your skill bar.
It will not cast automatically otherwise. ![]() Enchant Weapon adds a ton of nice bonuses to our build, such as cleansing ailments and casting
Enchant Weapon adds a ton of nice bonuses to our build, such as cleansing ailments and casting ![]() Elemental Nova.
However, most importantly, it increases our attack speed for
Elemental Nova.
However, most importantly, it increases our attack speed for ![]() Mana Strike.
Mana Strike.
Order of Skill Points
- 5 points into Celerity: Large increase to Melee Attack Speed while active.
- 4 points into Concentration: Increases the active duration by 4 seconds.
- 3 points into Efficacy: Reduces the Mana cost and increases Melee Elemental Damage.
- 1 point into Kindling Blade: Automatically casts whenever it's off cooldown, but has to be on the hotbar to work.
- 1 point into Cleansed by the Elements: Cleanses ailments whenever cast, but increases Mana cost.
- 1 point into Unstable Enchantment: Casts
 Elemental Nova whenever activated, giving us another potential
  Meteor trigger.
 - 3 points into Fulminate: Increases Melee Shock Chance.
- 1 point into Conduit: Casts
 Zap at nearby enemies while active, giving us more potential
  Meteor triggers.
 - 1 point into Capacitance: Increase the frequency of
 Zap.
Zap.
If you happen to have additional points from gear pieces, you can put them into Capacitance.
Build Mechanics and Playstyle
The basic rotation for this build is a one-button playstyle that plays closer to a Spellblade. You simply get to close to enemies and
hold down the button for ![]() Mana Strike. For optimal damage on single target bosses, you should manually cast a
Mana Strike. For optimal damage on single target bosses, you should manually cast a ![]() Meteor whenever
you are at full mana. Self-cast Meteors can proc
Meteor whenever
you are at full mana. Self-cast Meteors can proc ![]() Harbinger of Stars for more Meteors. However, any Meteors cast off the trigger
cannot continue this chain.
Harbinger of Stars for more Meteors. However, any Meteors cast off the trigger
cannot continue this chain.
Despite being a "fragile Sorcerer", we are quite tanky when in combat. Our Melee Attack Speed is very fast, especially when ![]() Enchant Weapon
is active, and we are constantly generating Ward from these attacks and casts. Whenever there is multiple enemies to hit, you'll rain a huge parade
of Meteors on their heads. It's quite fun to see in action, though it can be hard to see what is going on through the fiery meteor storm occuring
around you. When in doubt, just keep attacking with
Enchant Weapon
is active, and we are constantly generating Ward from these attacks and casts. Whenever there is multiple enemies to hit, you'll rain a huge parade
of Meteors on their heads. It's quite fun to see in action, though it can be hard to see what is going on through the fiery meteor storm occuring
around you. When in doubt, just keep attacking with ![]() Mana Strike or
Mana Strike or ![]() Teleport out of harm's way if you are low on Ward and Health.
Teleport out of harm's way if you are low on Ward and Health.
Equipment and Gear Affixes
For this build, we will be focusing on several main affixes for each piece of gear. The Exalted mod on any piece of gear is the most important affix, but you do not have to match the exact tiers if you are unable. Same for Uniques and their Legendary Potential mods. It is not required for the build to function, but it is something to aim for.
| Gear Slot | Implicits | Modifiers |
|---|---|---|
| Sceptre | Spell Damage Melee Damage |
Prefixes Melee Attack Speed Increased Spell Damage/Minus Mana cost of Spells Suffixes Fire Penetration Chance to Ignite on hit Sealed Affix Increased Critical Strike Chance |
| Off-hand Catalyst | Intelligence Spell Critical Strike Chance Ward Retention |
Prefixes Increased Critical Strike chance Critical Strike Multiplier Suffixes Cold Resistance Needed Resistances |
| Head | Armor Mana spent gained as Ward %Mana Regen |
Prefixes Mana spent gained as Ward Chance to apply Spark Charge on Melee Hit Suffixes %Health %Armor |
| Amulet | Melee Attack Speed Increased Throwing Attack Speed |
Prefixes Fire Penetration Critical Strike Multiplier Suffixes Cold Resistance Needed Resistances |
| Belt | Legendary Potential Hybrid Health |
|
| Rings | Necrotic Resistance Ward Retention |
Prefixes Intelligence Increased Mana Regen Suffixes Cold Resistance Needed Resistances |
| Gloves | Legendary Potential Hybrid Health |
|
| Feet | Armor Movement Speed Reduced Bonus Damage taken from Critical Strikes |
Prefixes Movement Speed Intelligence Suffixes Hybrid Health Armor/Reduced Bonus Damage from Criticals |
| Relic | Elemetal Critical Strike Multiplier | Prefixes Critical Strike Chance +2 levels of Frost Claw/Increased Spell Damage Suffixes Flat Health Chance to Apply Frailty on hit |
A loot filter made specifically for the gear table above may be copied by pressing the button below. Once in the Loot Filter portion of the in-game menu, choose the "Paste Clipboard Contents" option to import the code.
Copy Loot Filter to Clipboard
Low Life Variant
This version of the build should take you up to Empowered Monos easily. However, at some point after that you will want to swap to the Low Life version of the build, as it will eventually feel a bit squishy otherwise. This version of the build is very similar, but there are a handful of passives that should be changed (you no longer want any Leech, for example) and it requires some different gearing options. Some of the pieces might be very rare and/or expensive, especially with the Legendary Potential suggested. It's fine to settle for less LP on the uniques, we simply wanted to provide a goal to aim for.
Uniques
Now, let's look closer at the required Uniques for this build.
Harbinger of Stars
The core item of the build. Without this belt, you cannot play the build. It only has a level requirement of 36, however, so you could start playing the build pretty early if you got your hands on one. Please note, you want a max roll on the chance to trigger meteors. That is, you want a 9% roll in that mod. It is not recommended to settle for a lower roll, as this will dramatically decrease the number of Meteors you are able to trigger.
Frostbite Shackles
A key piece of gear for our survivability, as it gives us a massive increase to Ward Retention from stacking Cold Resistance on our gear. However, if you are leveling with the build or still acquiring the gear pieces, the build can be played without it. Simply replace the extra Cold Resistance affixes on gear with whatever other resistances you need or more Health and Armor whenever possible.
Throne of Ambition
![]() Throne of Ambition is an amazing Idol for any mage build that can utilize it.
It gives us a stack of Ambition whenever we hit a boss or rare. Since we attack very fast, and trigger
many different spells, this should stack to max extremely quickly. It stacks up to 20 times
and each stack increases our Fire Damage and Armor, granting us a total of 40% for each
at maximum stacks. While this Idol only plays a small role while we are clearing echoes,
we are already very strong at that and the extra power on Bosses is appreciated.
This Unique Idol can be target farmed from the boss "God Hunter Argentus" from the "The
Stolen Lance" timeline.
Throne of Ambition is an amazing Idol for any mage build that can utilize it.
It gives us a stack of Ambition whenever we hit a boss or rare. Since we attack very fast, and trigger
many different spells, this should stack to max extremely quickly. It stacks up to 20 times
and each stack increases our Fire Damage and Armor, granting us a total of 40% for each
at maximum stacks. While this Idol only plays a small role while we are clearing echoes,
we are already very strong at that and the extra power on Bosses is appreciated.
This Unique Idol can be target farmed from the boss "God Hunter Argentus" from the "The
Stolen Lance" timeline.
Idols
Idol slots are gained throughout the campaign, unlocking small bonuses and unique affixes for the player to discover and augment their builds with. The Idol screen consists of a grid system for the player to fill out with different sized idols, eventually filling in every part of the grid. As the Idol shape increases (1x1, 1x2, 1x3, 1x4, etc.) it will open up different affixes for you to use. This can be a great way to add some more customization to your build.
For this particular build, we will be focusing on increasing our Mana pool, Armor, and Ward generation. As well as filling in any resistance gaps needed. Below, you will see the idols we are targeting.
Size: 3×1
Modifiers
- Flat Mana
- %Armor and %Mana.
Size: 3x1
Modifiers
- Flat Mana
- Mana spent gained as Ward
Size: 1x2
Modifiers
- %Health
- Needed Resistances
- Cold Resistance (if no other needed resistances)
Size: 2×2
Modifiers
- You gain a stack of Ambition when you hit a boss or rare enemy (1 second cooldown)
- If you have multiple Thrones of Ambition equipped you still only gain 1 stack
- 2% more Fire Damage per stack of Ambition
- 2% more Cold Damage per stack of Ambition
- 2% more Armor per stack of Ambition
- 20 Maximum Stacks of Ambition
- You lose all stacks of Ambition if you go 4 seconds without gaining a stack
Blessing
Blessings are permanent buffs that are applied to your character. These come in two different powers, Standard and Grand. Grand blessings are significantly stronger than the Standard Blessings. In total, there are 10 Blessing Slots, one for each Monolith Timeline. When you complete a Monolith and defeat the final boss you will be awarded a choice of three blessing with a random value. For the purpose of this guide, we are highlighting 5 major slots that can be filled with our recommendations, leaving the addition 5 for some personal preference.
| Blessing Name | Affix | Timeline |
|---|---|---|
| Void Resistance | The Black Sun | |
| Flat Mana | Ending the Storm | |
| Cold Resistance | The Age of Winter | |
| Shred Fire Resistance | Spirits of Fire | |
| Poison Resistance | Reign of Dragons |
Changelog
- 18 Apr. 2024: Guide updated for 1.0. Overhauled the old Fireball set up.
- 30 Nov. 2023: Guide added.

Lexyu is a professional content creator focused on theorycrafting and playtesting many ARPGS. He is also known for his skillful gameplay, such as playing Bazooka Wizard in Diablo 3. Since 2013, he has been creating in-depth guides to teach gamers how to succeed. Check out his social platforms through Discord to join the discussion in the community!
- Patch 1.0.7 Update: Multiplayer, Skills and More!
- Patch 1.0.6 Update: Camera Setting, Controller Keybinds, Bug Fixes, and More!
- Eleventh Hour Games on Real-Money Trading and Exploits in Last Epoch
- Patch 1.0.5 Update: Many Bug Fixes, Including Loot Filter Toggle Sensitivity, and Other Improvements!
- The First 30 Days of Last Epoch!
- 1.0 Launch Retrospective: A Message From Eleventh Hour Games
- Patch 1.0.4 Update: More In-Game Changes, Bug Fixes, and Improvements
- Last Epoch Mid-Cycle Balance Survey Recap

