Void Knight Time Bubble Warpath Endgame Build for Last Epoch (Patch 1.0)
Welcome to our Last Epoch Void Knight Time Bubble build guide for the Sentinel class. Here you will learn everything about the Void Knight play style, passives, skills, strengths, and weaknesses to conquer the world of Eterra.
Build Introduction
Summon a void bubble and cleave the armor and resistances off all who oppose you with this build. A twist on the iconic spin-to-win playstyle, harness the powers of the Void and time manipulation to crush your enemies and progress through The End of Time!
 Fantastic mobbing damage and fast map clearing
 - Leech makes the build able to tank multi-hit attacks from bosses without issue
- Accessible playstyle

 Must be within melee range to deal damage
 - Requires resource and buff management

Skill Selection
This build takes advantage of Void Shred
through ![]() Anomaly and Armor Shred through
Anomaly and Armor Shred through
![]() Abyssal Echoes. The former will need to be cast manually by the
player about every 10 seconds or so, while the latter is an automated
cast off of
Abyssal Echoes. The former will need to be cast manually by the
player about every 10 seconds or so, while the latter is an automated
cast off of ![]() Warpath every 5 seconds. To finish the build off,
Warpath every 5 seconds. To finish the build off,
![]() Sigils Of Hope is taken and should be maintained when applicable
to provide a boost in Void and Melee Damage.
Sigils Of Hope is taken and should be maintained when applicable
to provide a boost in Void and Melee Damage.

Class and Skill Passive Trees
Our base class is Sentinel, which fills the role of a knight in Last Epoch. Upon finishing Act 1in the campaign, your character will be offered an opportunity to select an Advanced Mastery. Each base class has three possible Masteries to choose from. For Sentinel, you can choose between Passive Trees for Paladin, Forge Guard, and Void Knight. Upon selecting a Mastery and placing 20 Passive Points into the Sentinel Tree, you'll then be able to place Passive Points into the Mastery Trees.
Void Knight is the Advanced Class used for this build, and also where the majority of
our Passive Points will come from. The Void Knight Tree will
focus around picking nodes that increase Void Damage, Leech Rate, and Vitality.
Paladin is taken for one purpose, and that's to unlock ![]() Sigils Of Hope
The Forge Guard and is not used for this build. Each Passive Tree and their points
are broken down below.
Sigils Of Hope
The Forge Guard and is not used for this build. Each Passive Tree and their points
are broken down below.
Sentinel Passive Points
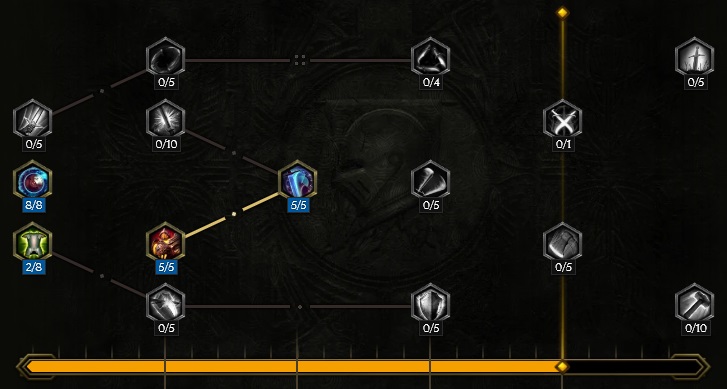
- 8 points into Fearless.
- 2 points into Juggernaut.
- 5 points into Armour Clad: This is huge for our defensive aspect, as it provides a flat 10% reduction in damage taken for being in melee range.
- 5 points into Valiant Charge: Not taken just out of necessity, this greatly improves the mobility
of the build through
 Lunge.
Our base class is Sentinel, which fills the role of a knight in Last Epoch. Upon finishing Act 1in the campaign, your character will be offered an opportunity to select an Advanced Mastery. Each base class has three possible Masteries to choose from. For Sentinel, you can choose between Passive Trees for Paladin, Forge Guard, and Void Knight. Upon selecting a Mastery and placing 20 Passive Points into the Sentinel Tree, you'll then be able to place Passive Points into the Mastery Trees.
Void Knight is the Advanced Class used for this build, and also where the majority of
our Passive Points will come from. The Void Knight Tree will
focus around picking nodes that increase Void Damage, Leech Rate, and Vitality.
Paladin is taken for one purpose, and that's to unlock ![]() Sigils Of Hope
The Forge Guard and is not used for this build. Each Passive Tree and their points
are broken down below.
Sigils Of Hope
The Forge Guard and is not used for this build. Each Passive Tree and their points
are broken down below.
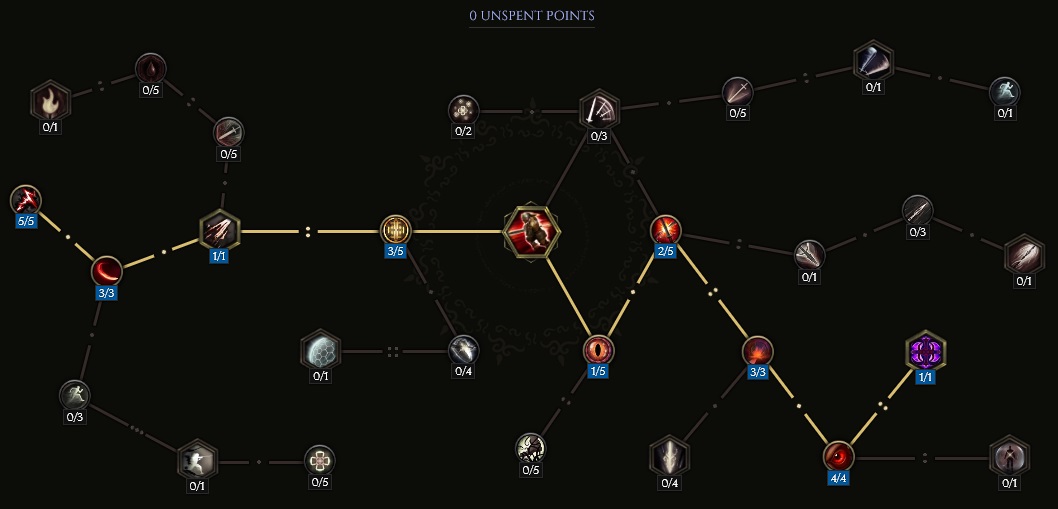
Void Knight Passive Points
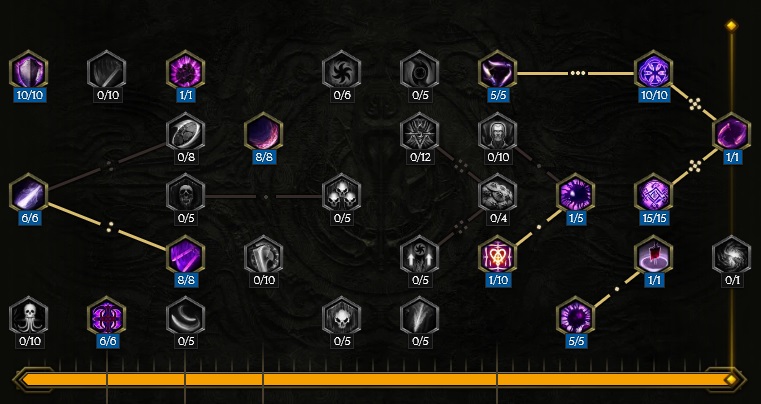
- 6 points into Temporal Corruption: Taken for the added Void Damage.
- 10 points into Abyssal Endurance.
- 6 points into World Eater: Melee and Void Leech, important for survival.
- 8 points into Void Blades.
- 1 point into Void Corruption: For every point in Void Knight, we gain 1% Critical Multiplier, totaling 78% extra Critical Damage.
- 10 points into Doom Knight:
 Warpath scales off Strength, making this node valid.
 - 5 points into Echoing Strikes: Taken specifically for Warpath echoes.
- 1 point into Time Legion: Taken mainly for echo chance, but Attack Speed is also useful.
- 15 points into Dread: Huge node, amps up damage and significantly increases Movement Speed.
- 1 point into Avatar of Regret: Echo chance, once again. This slows our attacks down a bit, and also increases Mana cost, but this is fine. Mana is solved in this build's skill trees.
- 5 points into Essence of the End: Void Essence is great for mobbing, boosting Warpath's damage by 30% per stack.
- 1 point into Void Well: In the event you run out of resources, mostly while killing mobs, this node will refund Mana in exchange for Void Essence.
- 1 point into Eternal Form: Taken for pathing.
- 1 point into
 Void Aegis: With only a single point left, a small chance to activate Void Aegis is
not a bad thing. Free mitigation if it goes off.
Void Aegis: With only a single point left, a small chance to activate Void Aegis is
not a bad thing. Free mitigation if it goes off.
Our base class is Sentinel, which fills the role of a knight in Last Epoch. Upon finishing Act 1in the campaign, your character will be offered an opportunity to select an Advanced Mastery. Each base class has three possible Masteries to choose from. For Sentinel, you can choose between Passive Trees for Paladin, Forge Guard, and Void Knight. Upon selecting a Mastery and placing 20 Passive Points into the Sentinel Tree, you'll then be able to place Passive Points into the Mastery Trees.
Void Knight is the Advanced Class used for this build, and also where the majority of
our Passive Points will come from. The Void Knight Tree will
focus around picking nodes that increase Void Damage, Leech Rate, and Vitality.
Paladin is taken for one purpose, and that's to unlock ![]() Sigils Of Hope
The Forge Guard and is not used for this build. Each Passive Tree and their points
are broken down below.
Sigils Of Hope
The Forge Guard and is not used for this build. Each Passive Tree and their points
are broken down below.
Void Knight Passive Points
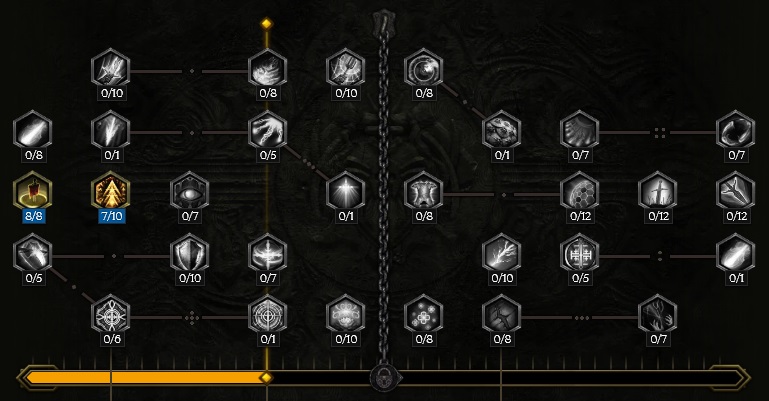
- 6 points into Defiance: Elemental Resistance taken to balance out the negative effect from Reckless Spin.
- 10 points into Abyssal Endurance: We need to unlock
 Sigils Of Hope, and this is
our best option in this tree to acheive that goal.
Sigils Of Hope, and this is
our best option in this tree to acheive that goal.
In this section, we will break down each skill and highlight the key passives we have selected to make the skill shine in the build. While some of these skills do allow for some variation to exist depending on your own custom choices, we recommend utilizing the skill trees as presented until you have a strong understanding of the build itself.
Warpath
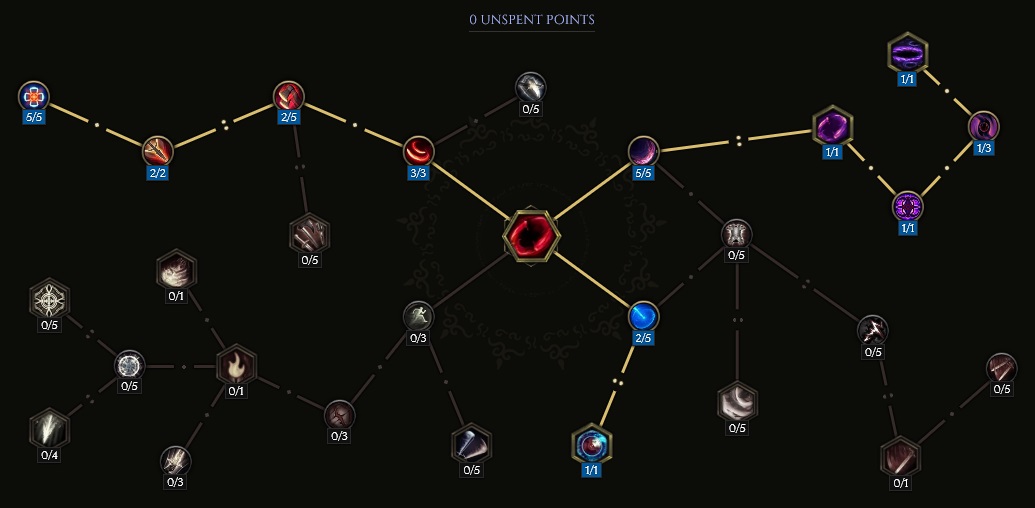
![]() Warpath is the main action of this build. This skill is how we will deal most of our damage, as
well as automate
Warpath is the main action of this build. This skill is how we will deal most of our damage, as
well as automate ![]() Abyssal Echoes. By itself, the damage off Warpath is nothing to write home
about. To make Warpath viable, a ton of points must be dropped into it to reduce the Mana cost. By doing
this, the options we have for the remaining points are limited. However, by creating echoes with Warpath
and stacking Armor Shred, we can turn this skill into a destroyer of Corruption.
Abyssal Echoes. By itself, the damage off Warpath is nothing to write home
about. To make Warpath viable, a ton of points must be dropped into it to reduce the Mana cost. By doing
this, the options we have for the remaining points are limited. However, by creating echoes with Warpath
and stacking Armor Shred, we can turn this skill into a destroyer of Corruption.
Order of Skill Points
- 2 points into Unchained: Required Mana cost reduction.
- 1 points into Reckless Spin: Required Mana cost reduction. The reduction in Elemental Resistance is accounted for to make sure we don't just get one shot by a cold breeze.
- 3 point into Iron Reach: Increases the area for Warpath.
- 2 point into Whirling Steel: Traversal node.
- 2 points into Battlemaster's Blade: More area increases. Important for managing uptime against enemies you may not want to be super close to but still need to hit.
- 5 point into Dark Nexus: Required Mana gain. This is how you'll maintain Warpath's channel and still
be able to cast
 Anomaly, Sigils Of Hope, and
  Abyssal Echoes.
 - 5 points into Void Spiral: Simple Melee Void Damage increase. Doubled, due to using a two-handed axe.
- 1 point into Echo Knight: Creates echoes off Warpath as well as boosts all of our damage for channeling the skill. Creating echoes requires constant movement!
- 1 points into Apocalypse Whirl: Converts Warpath from Physical to Void.
- 1 point into Maw of the Deep: Traversal node.
- 1 point into Abyssal Tempest: Automates Abyssal Echoes once every 5 seconds. Abyssal
Echoes is used mostly to apply Shred Armor stacks.
This build uses 24 points for Warpath, however it can be played with 21 comfortably, but any less and you will start losing damage. Remove the optional points from both Battlemaster's Blade and Iron Reach if you need to. If you only have 20 points, remove a point in Void Spiral. Be aware, losing these points means Warpath will deal damage in a much smaller area. While this is fine in early Corruption, it may be your downfall against harder enemies that require higher amounts of uptime.
In this section, we will break down each skill and highlight the key passives we have selected to make the skill shine in the build. While some of these skills do allow for some variation to exist depending on your own custom choices, we recommend utilizing the skill trees as presented until you have a strong understanding of the build itself.
Lunge
![]() Lunge is typically not very interesting. We can say with confidence, that is not the case in this build.
Explained later on in the gearing section,
Lunge is typically not very interesting. We can say with confidence, that is not the case in this build.
Explained later on in the gearing section, ![]() Paranoia enables Lunge to be used without a target. Combined
with an extremely low cooldown timer (sub-3 seconds is possible with gear), this is some of the most mobile gameplay you can
experience while playing as a Sentinel. Not all for show, Lunge serves an even bigger purpose; providing us with tons of Void
Penetration.
Paranoia enables Lunge to be used without a target. Combined
with an extremely low cooldown timer (sub-3 seconds is possible with gear), this is some of the most mobile gameplay you can
experience while playing as a Sentinel. Not all for show, Lunge serves an even bigger purpose; providing us with tons of Void
Penetration.
Order of Skill Points
- 1 points into Disarming Blow: Traversal node.
- 2 points into Initiate's Onslaught: Traversal node.
- 3 points into Cull the Weak: 15% Kill Threshold is huge, and only becomes more important as you push Corruption.
- 4 points into Reckless Skirmish: Great for getting around maps. Using Lunge on weak mobs is a good way to activate this.
- 1 point into Voidbringer: Converts Lunge from Physical to Void.
- 2 points into Dawn Charge: Free healing.
- 1 point into Blade Stream: Deal damage to all enemies between the starting and ending point of the dash. Important detail for a later node.
- 3 points into Broadside: Increases the width of Lunge by 45%; synergizes with the previous node very well.
- 5 points into Crusader's Fury: What this entire tree builds up to. For every enemy that you deal damage to when Lunge is used, you will be granted a stack that boosts Void Penetration for 4 seconds. Since our cooldown on Lunge is less than this, you can easily maintain at least one stack at all times.
If needed due to lacking passive points, remove two points from Reckless Skirmish.
In this section, we will break down each skill and highlight the key passives we have selected to make the skill shine in the build. While some of these skills do allow for some variation to exist depending on your own custom choices, we recommend utilizing the skill trees as presented until you have a strong understanding of the build itself.
Anomaly
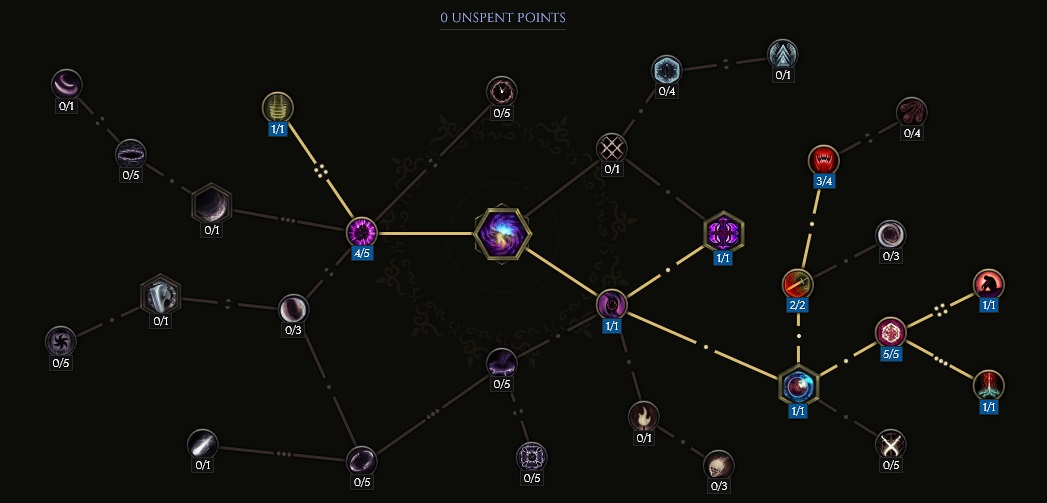
![]() Anomaly is used as a support skill in this build. It's the "void bubble" that was mentioned
at the start of this page. The bubble will follow us for 10 seconds; while active, it will shred the
Void Resistance of any nearby enemy, increase our Attack Speed, and boost how much Health we Leech when using
Void attacks.
Anomaly is used as a support skill in this build. It's the "void bubble" that was mentioned
at the start of this page. The bubble will follow us for 10 seconds; while active, it will shred the
Void Resistance of any nearby enemy, increase our Attack Speed, and boost how much Health we Leech when using
Void attacks.
Order of Skill Points
- 4 point into Emission: Traversal node.
- 3 points into Borrowed Time: Required! Allows for the casting of Anomaly without stopping the channel on Warpath.
- 1 point into Void Touched: Traversal node.
- 2 points into Immediacy: Removes the combo aspect from Anomaly, and no longer makes enemies disappear for a short period of time.
- 1 point into
 Time Bubble: Casts a bubble that Shreds the Void Resistance of
any nearby enemy and Slows them as well.
Time Bubble: Casts a bubble that Shreds the Void Resistance of
any nearby enemy and Slows them as well. - 5 points into Temporal Mastery: Doubles how long the Time Bubble stays active.
- 1 point into Time Lord: The Time Bubble now centers on the player and follows as they move.
- 2 points into Manipulation: Attack Speed increase.
- 3 points into Time Eater: Further boosts to Leech. Especially effective for Void Damage.
- 1 point into Lingering Memory: Keeps the effects from Time Bubble active even after it disappears. This is good for the small downtime in between casts for full uptime.
In this section, we will break down each skill and highlight the key passives we have selected to make the skill shine in the build. While some of these skills do allow for some variation to exist depending on your own custom choices, we recommend utilizing the skill trees as presented until you have a strong understanding of the build itself.
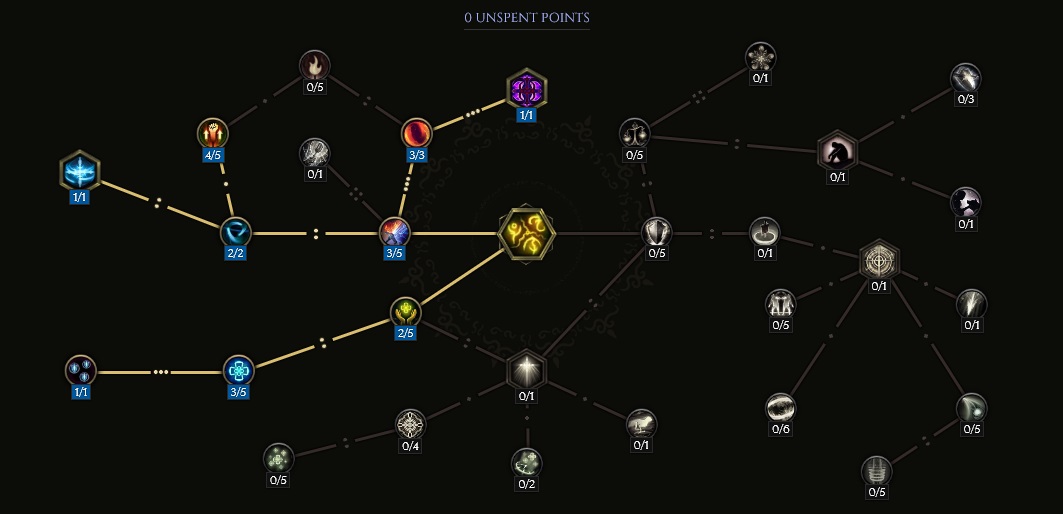
Abyssal Echoes
![]() Abyssal Echoes is never manually casted. Instead, we rely on close proximity to mobs and activation
when using
Abyssal Echoes is never manually casted. Instead, we rely on close proximity to mobs and activation
when using ![]() Warpath. This skill serves one purpose, really; applying extra effective
Shred Armor stacks.
Warpath. This skill serves one purpose, really; applying extra effective
Shred Armor stacks.
Order of Skill Points
- 1 point into Vorpal Reverberation: Traversal node.
- 5 points into Rippling Corrosion: Applies 5 stacks of Armor Shred when activated.
- 5 points into Tides of Rust: The 5 stacks of Armor Shred effectively become 10 stacks.
- 2 points into Deep Expanse: Area increase, ensures we hit all nearby enemies.
- 5 points into Crippling Waves: Applies Slow on hit.
- 1 points into Freedom of Movement: Removes any possibility of being Slowed, and instead turns it into Haste.
In this section, we will break down each skill and highlight the key passives we have selected to make the skill shine in the build. While some of these skills do allow for some variation to exist depending on your own custom choices, we recommend utilizing the skill trees as presented until you have a strong understanding of the build itself.
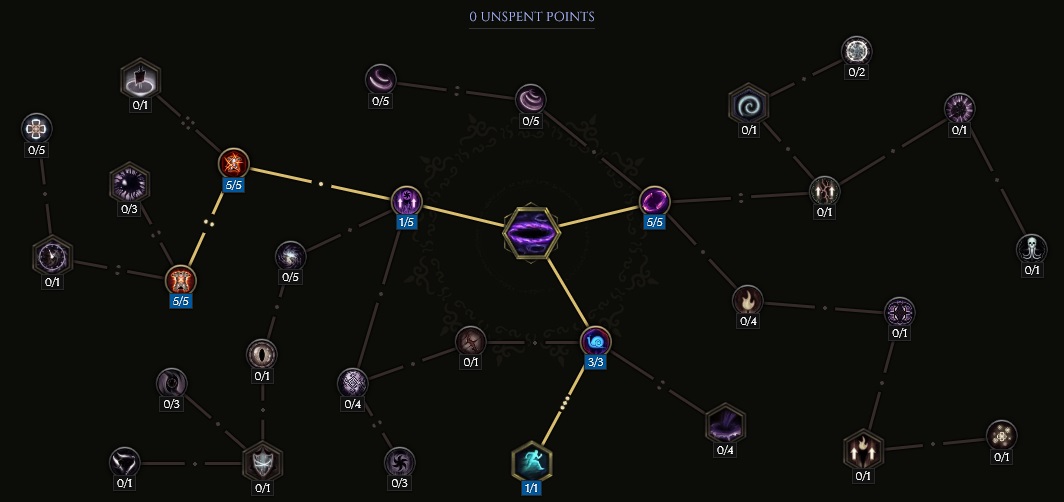
Sigils of Hope
![]() Sigils Of Hope will provide even more buffs to our Void Damage. Just like
Sigils Of Hope will provide even more buffs to our Void Damage. Just like ![]() Anomaly, this will
be forced into being instant cast, allowing us to use it while we channel
Anomaly, this will
be forced into being instant cast, allowing us to use it while we channel ![]() Warpath.
Warpath.
Order of Skill Points
- 2 points into Empowering Sigils: Boost in damage.
- 2 points into Decree of Flame: Flat bonus to Void Damage (converted in the next node).
- 1 point into Sigils of Despair: Converts all bonuses in this tree from Fire to Void Damage, while also boosting Void Damage by 15% per Sigil.
- 4 points into Word of Alacrity: Traversal node.
- 4 points into Exigency: Turns Sigils into an instant cast.
- 1 point into Invigorate: Traversal node.
- 5 point into Quiet Mind: Mana cost reduction.
- 1 point into Polygram: Allows for the summoning of one extra Sigil.
- 4 points into Word of Power: Increase to Melee Damage. This buff lasts 3 seconds, so ideally you spread the summoning of the Sigils out so this is maintained at 100% uptime when possible.
Build Mechanics and Playstyle
As simple as it gets; spin-to-win. At least at the surface, that's all there is to it. However, this
build does require resource management in the form of Mana upkeep, managing the cooldown timer on
![]() Time Bubble, and managing
Time Bubble, and managing ![]() Sigils Of Hope to ensure we have as much uptime on Decree of Flame,
Empowering Sigils, and Word of Power as possible.
Sigils Of Hope to ensure we have as much uptime on Decree of Flame,
Empowering Sigils, and Word of Power as possible.
This build utilizes the echo function of Void Knight to generate what look like "void clones" of
your character that will reuse a previously used skill. In this case, that echo is ![]() Warpath.
Every second there's a chance to leave behind an echo that will spin in a location and deal damage to all
nearby enemies. These echoes are scaled off affixes to deal more damage than we deal ourselves, and
become quite powerful. While mobbing, this enables us to quickly spin through the map without stopping,
as enemies will just walk through the echoes and die as they do. For boss fights, ensure you stand close
enough to the boss for the echo to deal damage, but also maintain constant movement. If you stop moving,
you will not generate echoes.
Warpath.
Every second there's a chance to leave behind an echo that will spin in a location and deal damage to all
nearby enemies. These echoes are scaled off affixes to deal more damage than we deal ourselves, and
become quite powerful. While mobbing, this enables us to quickly spin through the map without stopping,
as enemies will just walk through the echoes and die as they do. For boss fights, ensure you stand close
enough to the boss for the echo to deal damage, but also maintain constant movement. If you stop moving,
you will not generate echoes.
While not terribly important for lower Corruption, the ![]() Lunge comes with Cull the Weak, providing
a massive 15% Kill Threshold. This is extremely important for higher Corruption as enemies gain larger health pools.
Lunge comes with Cull the Weak, providing
a massive 15% Kill Threshold. This is extremely important for higher Corruption as enemies gain larger health pools.
Mobility
![]() Lunge, while normally a great skill, is made even better thanks to
Lunge, while normally a great skill, is made even better thanks to ![]() Paranoia, the unique helm
used in this build. Normally, Lunge requires a target, which can make it mildly dangerous to keep full
uptime on the Penetration coming off Crusader's Fury. This helm makes it so we no longer need
a target, which means we can zip past dangerous attacks and still gain Void Penetration in the process.
It also means Lunge can be used to dodge away from a boss, making this skill just as much a defensive
skill as it is one of mobility.
Paranoia, the unique helm
used in this build. Normally, Lunge requires a target, which can make it mildly dangerous to keep full
uptime on the Penetration coming off Crusader's Fury. This helm makes it so we no longer need
a target, which means we can zip past dangerous attacks and still gain Void Penetration in the process.
It also means Lunge can be used to dodge away from a boss, making this skill just as much a defensive
skill as it is one of mobility.
Equipment and Gear Affixes
For this build, we will be focusing on several main affixes for each piece of non-unique gear, as well as working towards acquiring the specific uniques needed to make this build operate correctly. Our equipment will focus on these specific affixes for the Implicits and Modifier stats.
| Gear Slot | Implicits | Modifiers |
|---|---|---|
| Two-handed Sword | Legendary Potential Melee Critical Strike Chance Increased Melee Attack Speed |
|
| Head | - | |
| Amulet | Fire Resistance Lightning Resistance |
Prefixes Void Penetration Increased Critical Strike Chance Suffixes Health Chance to Shread Armor on Hit |
| Chest | Armor Stun Avoidance Increased Echo Damage when a skill is Echoed |
Prefixes +Level of Warpath Increased Echo Damage Suffixes Armor |
| Belt | Prefixes Increased Void Damage |
|
| Gloves | Armor Armor Mitigation also applies to Damage Over Time |
Prefixes Increased Critical Strike Chance Melee Damage Leeched as Health Suffixes Health Armor |
| Ring | Prefixes Increased Critical Strike Chance |
|
| Ring | Increased Critical Strike Chance | Prefixes Increased Critical Strike Chance Increased Void Damage Suffixes Health Needed Resistances |
| Feet | Armor Increased Movement Speed Reduced Bonus Damage Taken from Critical Hits |
Prefixes Strength Increased Movement Speed Suffixes Health Cooldown Recovery Speed |
| Relic | Melee Void Damage Spell Void Damage |
Prefixes Increased Critical Strike Chance Increased Void Damage Suffixes + to all Resistances While Channeling Health |
A loot filter made specifically for the gear table above may be copied by pressing the button below. Once in the Loot Filter portion of the in-game menu, choose the "Paste Clipboard Contents" option to import the code.
Copy Loot Filter to Clipboard
Uniques
The uniques in this build will focus around providing a significant buff to Void Damage and Leeching capability, while
also transforming ![]() Lunge into an more mobile version of itself.
Lunge into an more mobile version of itself.
Apathy's Maw
![]() Apathy's Maw: Best in slot for the build. There are a couple other options
that deal good damage as well, but this one does the job best. It also synergizes with
our belt for an even larger boost to Melee Damage. This weapon will drop from Orobyss
if you're at atleast 50 Corruption, meaning it can be obtained before going to Empowered
Monoliths.
Apathy's Maw: Best in slot for the build. There are a couple other options
that deal good damage as well, but this one does the job best. It also synergizes with
our belt for an even larger boost to Melee Damage. This weapon will drop from Orobyss
if you're at atleast 50 Corruption, meaning it can be obtained before going to Empowered
Monoliths.
Siphon of Anguish
![]() Siphon of Anguish: This ring provides ample Leech Rate, but also allows us to apply Doom to enemies,
which help scale Melee Damage alongside
Siphon of Anguish: This ring provides ample Leech Rate, but also allows us to apply Doom to enemies,
which help scale Melee Damage alongside ![]() Shattered Chains. This can be target farmed by killing Orobyss.
Shattered Chains. This can be target farmed by killing Orobyss.
Shattered Chains
![]() Shattered Chains: Scales
Shattered Chains: Scales ![]() Warpath damage and synergizes with the Doom applied by
Warpath damage and synergizes with the Doom applied by
![]() Apathy's Maw and
Apathy's Maw and ![]() Siphon of Anguish. This belt will drop from Orobyss as long as he's killed
at 120 Corruption or higher.
Siphon of Anguish. This belt will drop from Orobyss as long as he's killed
at 120 Corruption or higher.
Paranoia
![]() Paranoia: This helmet makes it so
Paranoia: This helmet makes it so ![]() Lunge no longer needs a target, which enables a very
fun playstyle where you're free to zip around the arena to avoid damage or gain Void Penetration, without worrying
that Lunge will kill you from Lunging to the enemy during a lethal AoE mechanic. This is a rare drop from the
Monolith Timeline "The Black Sun".
Lunge no longer needs a target, which enables a very
fun playstyle where you're free to zip around the arena to avoid damage or gain Void Penetration, without worrying
that Lunge will kill you from Lunging to the enemy during a lethal AoE mechanic. This is a rare drop from the
Monolith Timeline "The Black Sun".
Idols
Idol slots are gained through the campaign, unlocking small bonuses and unique affixes for the player to discover and augment their builds with. The Idol screen consists of a grid system for the player to fill out with different sized Idols, eventually filling in every part of the grid. As the Idol shape increases (1x1, 1x2, 1x3, 1x4, etc.) the stronger an affix you might find for your build.
For this build, two Grand Solar Idols should be taken, preferring Increased Area for Warpath and Chance to Shred Armor on Hit, as well as two Ornate Solar Idols, preferring Increased Echo Damage and Increased Armor. All other Idols can focus Health, Armor, or Resistances.
Blessing
Blessings are permanent buffs that are applied to your character. These come in two different powers, Standard and Grand. Grand blessings are significantly stronger than the Standard Blessings. In total, there are 10 Blessing Slots, one for each Monolith Timeline. When you complete a Monolith and defeat the final boss you will be awarded a choice of three blessing with a random value.
| Blessing Name | Affix | Timeline |
|---|---|---|
| Critical Strike Multiplier | The Black Sun | |
| Critical Strike Avoidance | Reign of Dragons | |
| Mana | Ending the Storm | |
| Increased Armor | The Age of Winter | |
| Armor | Spirits of Fire |
Changelog
- 27 Mar. 2024: Updated for 1.0.
- 12 Jan. 2024: Loot Filter added.
- 21 Dec. 2023: Guide added.

GhazzyTV is a professional content creator that knows all about theory crafting builds in Path of Exile and Last Epoch and has been teaching players how to build their characters for over 9 years. He is a huge Blizzard fan with thousands of hours invested into Diablo 3 and 4 and is a frequent World of Warcraft Classic player. His builds will be helpful content for new players and veterans alike. You can find his PoE Vault Guide Hub here and his LE Guide Hub here. You can follow him on Twitch, YouTube or Twitter.
- Patch 1.0.7 Update: Multiplayer, Skills and More!
- Patch 1.0.6 Update: Camera Setting, Controller Keybinds, Bug Fixes, and More!
- Eleventh Hour Games on Real-Money Trading and Exploits in Last Epoch
- Patch 1.0.5 Update: Many Bug Fixes, Including Loot Filter Toggle Sensitivity, and Other Improvements!
- The First 30 Days of Last Epoch!
- 1.0 Launch Retrospective: A Message From Eleventh Hour Games
- Patch 1.0.4 Update: More In-Game Changes, Bug Fixes, and Improvements
- Last Epoch Mid-Cycle Balance Survey Recap