Warlock Profane Veil Minion Eater Endgame Build for Last Epoch (Patch 1.03)
Welcome to our Last Epoch Warlock Profane Veil Minion Eater build guide for the Acolyte class. Here you will learn everything about the Warlock play style, passives, skills, strengths, and weaknesses to conquer the world of Eterra.
Build Introduction
Drop down into a necrotic puddle and consume your Minions, absorbing their life force as your own, leaving Volatile Zombies in your wake. This build focuses around a never-ending supply of Minions that will be used to generate Ward, but deal a ton of AoE damage through Minion explosions.
This build was created by Sinity, an active member of the ARPG theorycrafting community.
 Amazing defensive layering between Ward generation and dodging with
  Profane Veil
 - Full Minion automation, Minions tank for you
 Soul Feast allows for grabbing mobs from off-screen

 Build is heavily reliant on gear to function

Skill Selection
This build operates off of two main skills; ![]() Chthonic Fissure, used as our main source of personal damage
which will scale off a combination of damage from Torment and the Unique Staff
Chthonic Fissure, used as our main source of personal damage
which will scale off a combination of damage from Torment and the Unique Staff ![]() Wheel of Torment,
and
Wheel of Torment,
and ![]() Profane Veil, which will be used as a Ward generator and a creator of Minions. Profane Veil will summon
Volatile Zombies which will explode when near enemies, casting
Profane Veil, which will be used as a Ward generator and a creator of Minions. Profane Veil will summon
Volatile Zombies which will explode when near enemies, casting ![]() Sacrifice on nearby Minions and summoning
Skeleton Vanguards when they die. This creates more Minions for us to absorb through Profane Veil, creating a
never-ending Minion loop for us to deal damage and keep ourselves healthy with.
Sacrifice on nearby Minions and summoning
Skeleton Vanguards when they die. This creates more Minions for us to absorb through Profane Veil, creating a
never-ending Minion loop for us to deal damage and keep ourselves healthy with. ![]() Summon Skeleton is mainly
used as a support action. They will be used as a source of Inceased Spell Damage and act as a Mana battery for the build,
on top of also being consumed through Profane Veil.
Summon Skeleton is mainly
used as a support action. They will be used as a source of Inceased Spell Damage and act as a Mana battery for the build,
on top of also being consumed through Profane Veil.
![]() Soul Feast and
Soul Feast and ![]() Transplant will be used on the action bar, however they will not be specialized in.
Soul Feast is used to apply Haste to ourselves and apply Torment when needed, as well
as auto-cast
Transplant will be used on the action bar, however they will not be specialized in.
Soul Feast is used to apply Haste to ourselves and apply Torment when needed, as well
as auto-cast ![]() Chthonic Fissure on Bosses.
Chthonic Fissure on Bosses. ![]() Transplant is taken for a singular purpose, which is as a
mobility tool.
Transplant is taken for a singular purpose, which is as a
mobility tool.

Class and Skill Passive Trees
Our base class is the Acolyte, which acts as a generic spell caster and summoner. Our character will be offered an opportunity to select an Advanced Mastery once we have completed the first act of the campaign. Each base class has three possible masteries to choose from. For the Acolyte, we have access to the Mastery Tree Passives for Necromancers, Lich and Warlock. Upon selecting a Mastery and placing 20 Passive Points into the Acolyte Tree, you'll then be able to place Passive Points into the Mastery Trees.
Warlock is our advanced class for the build. We will utilize the majority of our Passive
Points for the Warlock Passive Tree, with a minimal amount of points taken within Necromancer and Lich. The Warlock passives will
focus on increasing the Spell Damage for Curses, increases to Intelligence, and
provide a significant increase to Haste. The points in Necromancer will be used as a way to increase
Minion Health, but are mostly taken to unlock access to ![]() Sacrifice. The Lich Passive Tree is used for extra
Intelligence and increased Necrotic Damage.
Sacrifice. The Lich Passive Tree is used for extra
Intelligence and increased Necrotic Damage.
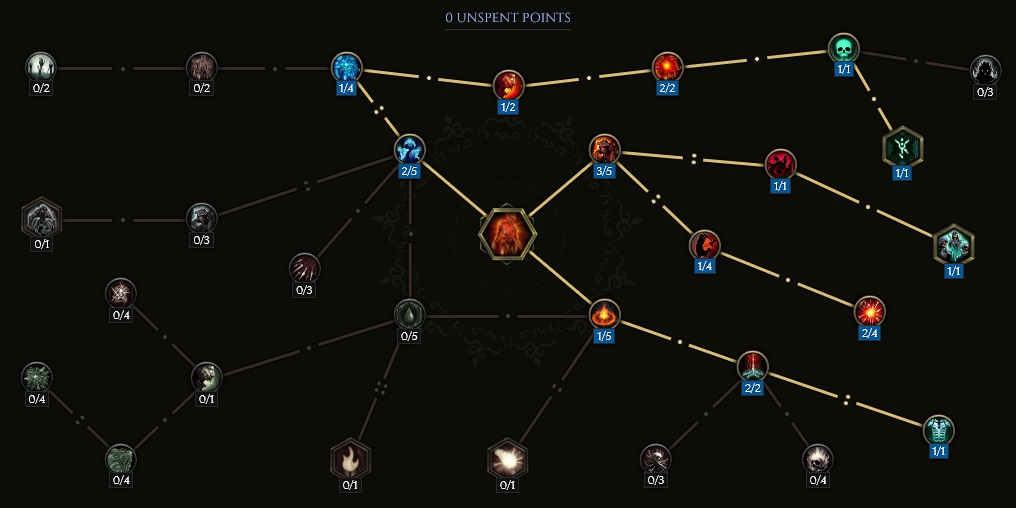
Acolyte Passive Points
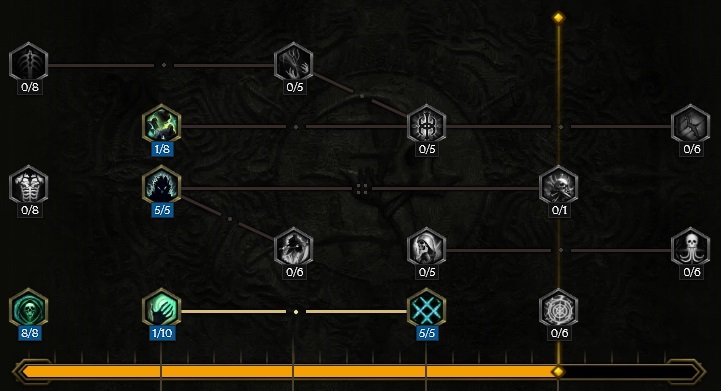
- 8 points into Forbidden Knowledge: Intelligence and Necrotic Resistance.
- 1 points into Blood Aura: Taken to proceed through the tree.
- 1 point into Mania of Mortality: Taken to proceed through the tree.
- 5 points into Stolen Vitality: Vitality gain and Increased Minion Health.
- 5 points into Unnatural Preservation: Large gains to Ward Retention, Necrotic Resistance, and Poison Resistance.
Our base class is the Acolyte, which acts as a generic spell caster and summoner. Our character will be offered an opportunity to select an Advanced Mastery once we have completed the first act of the campaign. Each base class has three possible masteries to choose from. For the Acolyte, we have access to the Mastery Tree Passives for Necromancers, Lich and Warlock. Upon selecting a Mastery and placing 20 Passive Points into the Acolyte Tree, you'll then be able to place Passive Points into the Mastery Trees.
Warlock is our advanced class for the build. We will utilize the majority of our Passive
Points for the Warlock Passive Tree, with a minimal amount of points taken within Necromancer and Lich. The Warlock passives will
focus on increasing the Spell Damage for Curses, increases to Intelligence, and
provide a significant increase to Haste. The points in Necromancer will be used as a way to increase
Minion Health, but are mostly taken to unlock access to ![]() Sacrifice. The Lich Passive Tree is used for extra
Intelligence and increased Necrotic Damage.
Sacrifice. The Lich Passive Tree is used for extra
Intelligence and increased Necrotic Damage.
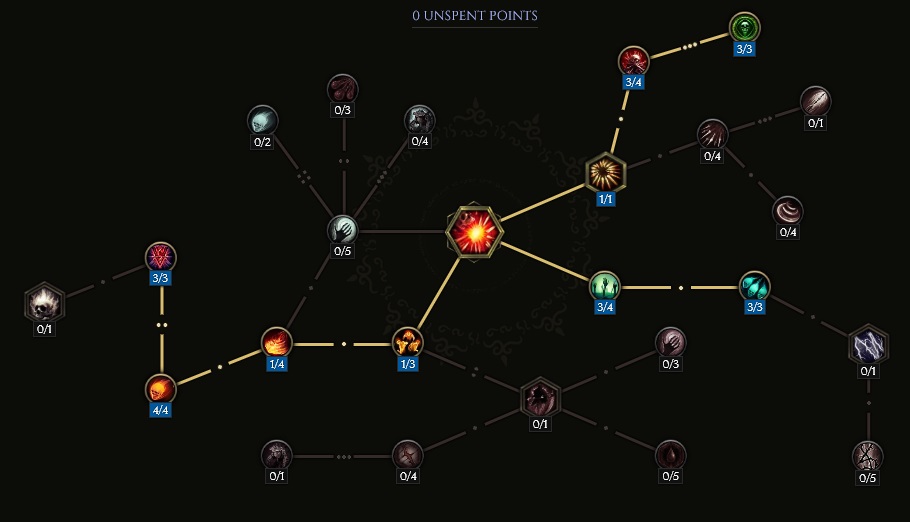
Warlock Passive Points
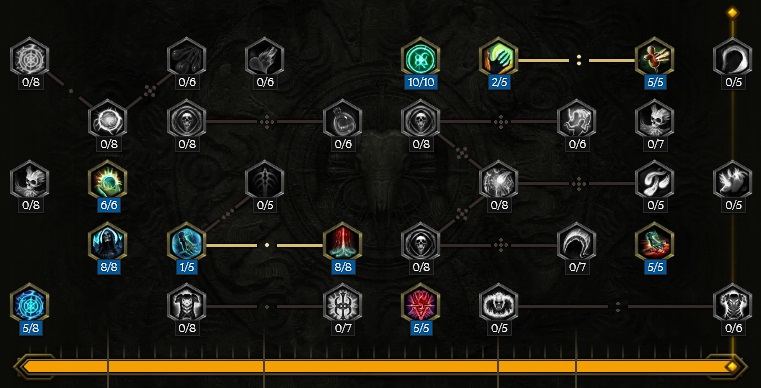
- 5 points into Soul Stealer: Increased Mana Regen, plus extra Mana gain against Cursed enemies. This secondary effect has a cooldown.
- 6 points into Unholy Torment: Increases the Spell Damage and Area for Curse skills.
- 8 points into Occultist's Mind: Added Intelligence, and allows your Mana to scale with every point of Intelligence you have.
- 1 point into Ward of Malevolence: Taken to path to the next node.
- 8 points into Doom Herald: You take less damage, and deal more damage, while channeling. This applies to Profane Veil for this build.
- 10 points into Malefic Body: Added Vitality and Intelligence.
- 5 points into Wither: Applies Withering on hit, and you now take less damage from enemies afflicted with Withering.
- 2 points into Chaotic Strikes: Taken for pathing, but does provide a small chance to deal double damage.
- 5 points into Wreak Havoc: Increased Critical Multiplier.
- 5 points into Fleeting Crone: Provides a significant boost to all Haste applied to us. Haste is gained through
casting Soul Feast for this build.
Our base class is the Acolyte, which acts as a generic spell caster and summoner. Our character will be offered an opportunity to select an Advanced Mastery once we have completed the first act of the campaign. Each base class has three possible masteries to choose from. For the Acolyte, we have access to the Mastery Tree Passives for Necromancers, Lich and Warlock. Upon selecting a Mastery and placing 20 Passive Points into the Acolyte Tree, you'll then be able to place Passive Points into the Mastery Trees.
Warlock is our advanced class for the build. We will utilize the majority of our Passive
Points for the Warlock Passive Tree, with a minimal amount of points taken within Necromancer and Lich. The Warlock passives will
focus on increasing the Spell Damage for Curses, increases to Intelligence, and
provide a significant increase to Haste. The points in Necromancer will be used as a way to increase
Minion Health, but are mostly taken to unlock access to ![]() Sacrifice. The Lich Passive Tree is used for extra
Intelligence and increased Necrotic Damage.
Sacrifice. The Lich Passive Tree is used for extra
Intelligence and increased Necrotic Damage.
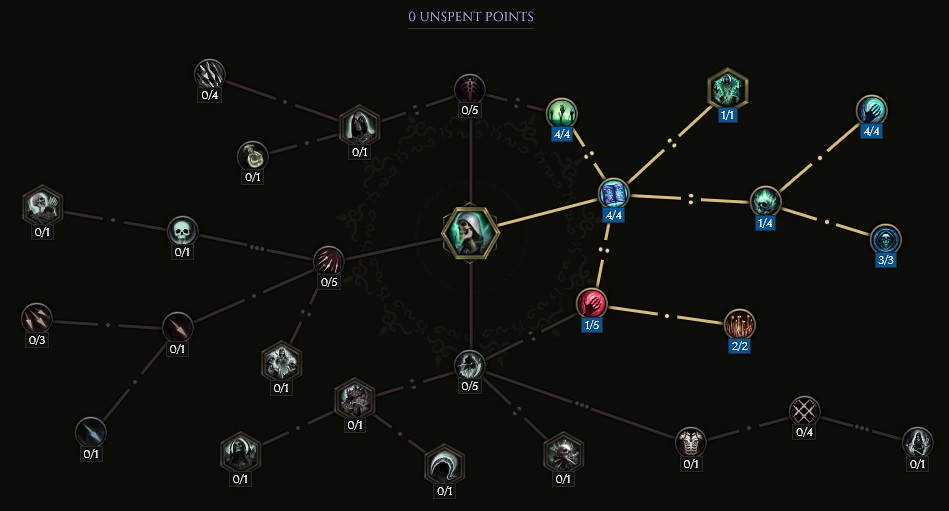
Necromancer Passive Points
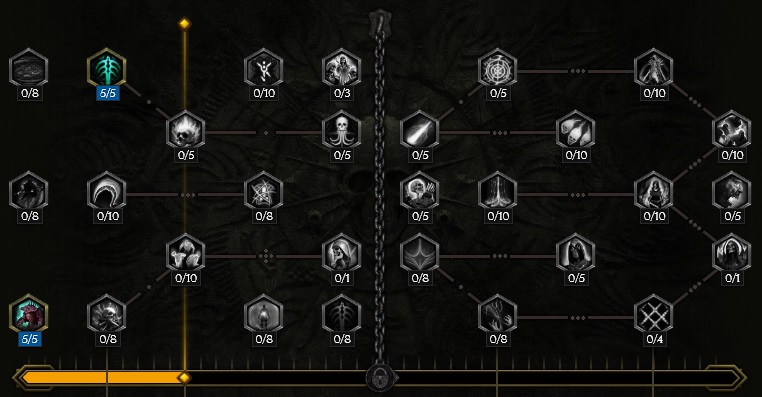
- 5 points into Grave Thorns: Increases to Minion Health.
- 5 points into Reclamation of Souls: Extra Ward Retention.
Our base class is the Acolyte, which acts as a generic spell caster and summoner. Our character will be offered an opportunity to select an Advanced Mastery once we have completed the first act of the campaign. Each base class has three possible masteries to choose from. For the Acolyte, we have access to the Mastery Tree Passives for Necromancers, Lich and Warlock. Upon selecting a Mastery and placing 20 Passive Points into the Acolyte Tree, you'll then be able to place Passive Points into the Mastery Trees.
Warlock is our advanced class for the build. We will utilize the majority of our Passive
Points for the Warlock Passive Tree, with a minimal amount of points taken within Necromancer and Lich. The Warlock passives will
focus on increasing the Spell Damage for Curses, increases to Intelligence, and
provide a significant increase to Haste. The points in Necromancer will be used as a way to increase
Minion Health, but are mostly taken to unlock access to ![]() Sacrifice. The Lich Passive Tree is used for extra
Intelligence and increased Necrotic Damage.
Sacrifice. The Lich Passive Tree is used for extra
Intelligence and increased Necrotic Damage.
Lich Passive Points
- 10 points into Apocrypha: Increased Intelligence and Mana Regen.
- 5 points into Dance with Death: Increased damage, more if we end up entering Low Life territory.
- 5 points into Grasp of Fate: Increased Necrotic Damage.
- 8 points into Crippling Insight: Large Intelligence gain.
In this section, we will break down each skill and highlight the key passives we have selected to make the skill shine in the build. While some of these skills do allow for some variation to exist depending on your own custom choices, we recommend utilizing the skill trees as presented until you have a strong understanding of the build itself.
Chthonic Fissure

![]() Chthonic Fissure is used mostly to deal damage through Torment, which we inflict onto targets hit by the Spirits coming off Fissure.
Torment damage is scaled through several interactions, including the Unique Staff we're using,
Chthonic Fissure is used mostly to deal damage through Torment, which we inflict onto targets hit by the Spirits coming off Fissure.
Torment damage is scaled through several interactions, including the Unique Staff we're using, ![]() Wheel of Torment, the enemy having stacks of
Ignite active, as well as our own Necrotic Resistance, which can easily be scaled up to around 600% or higher. While clearing maps,
Chthonic Fissure should be casted manually, and should be used frequently, as this build will be moving through maps quite quickly. For boss fights,
Chthonic Fissure may be auto-casted by using
Wheel of Torment, the enemy having stacks of
Ignite active, as well as our own Necrotic Resistance, which can easily be scaled up to around 600% or higher. While clearing maps,
Chthonic Fissure should be casted manually, and should be used frequently, as this build will be moving through maps quite quickly. For boss fights,
Chthonic Fissure may be auto-casted by using ![]() Soul Feast, however this will only activate is there is currently no active Fissure.
Soul Feast, however this will only activate is there is currently no active Fissure.
Order of Skill Points
- 2 points into Fragile Crust: Reduces the Mana spent if there is a Cursed Boss or Rare enemy nearby. This also works if you yourself are Cursed.
- 1 point into Spirit Gale: Enemies who died with a stack of Torment now have a chance to release a Spirit.
- 2 points into Damned Waters: Spirits now apply Damned.
- 3 points into Twisted Waves: Torment damage now scales off Necrotic Resistance.
- 1 point into Grim Tide: All Necrotic Damage from Chthonic Fissure scales with your Critical Multiplier stat.
- 2 points into Severed Wards: Spirits will now shred Necrotic Resistance on hit.
- 2 points into Stygian Current: Increases Spirit frequency.
- 1 point into Of Gloom and Flames: Chthonic Fissure now shoots out twice, once at the target location and again in the reverse direction.
- 2 points into Death from Below: Chthonic Fissure deals more damage if you're Cursed.
- 1 point into Fell Fire: Torment will now spread any Ignite stacks on a target.
- 3 points into Tombgorger: Torment deals more damage to Ignited, Poisoned and Bleeding targets.
- 3 points into Eradication: Fissure now deals more damage to Rare and Boss enemies.
In this section, we will break down each skill and highlight the key passives we have selected to make the skill shine in the build. While some of these skills do allow for some variation to exist depending on your own custom choices, we recommend utilizing the skill trees as presented until you have a strong understanding of the build itself.
Summon Volatile Zombie
![]() Summon Volatile Zombie is the glue that connects the skills in this build together. Between
Summon Volatile Zombie is the glue that connects the skills in this build together. Between ![]() Profane Veil and
the two Unique Rings (
Profane Veil and
the two Unique Rings (![]() Cycle of Putrescence) we use, you will have a constant supply of these necrotic ghouls at your side,
dealing damage for you and creating Minions for you to absorb for Ward. Volatile Zombies will do four things for us upon death:
Cycle of Putrescence) we use, you will have a constant supply of these necrotic ghouls at your side,
dealing damage for you and creating Minions for you to absorb for Ward. Volatile Zombies will do four things for us upon death:
- Zombie Health is converted to Ward for us when they die.
- When a Zombie dies, it will cast
 Sacrifice at a nearby Minion.
 - The explosion from Volatile Zombies applies Marked For Death to enemies hit.
- When a Zombie dies, it creates a Skeleton Vanguard in its place.
The Mana cost for Volatile Zombies does not matter. We will never manually cast ![]() Summon Volatile Zombie with this set up.
Additionally, Zombies come with a 16% Kill Threshold, which is great for finishing Boss fights quickly.
Summon Volatile Zombie with this set up.
Additionally, Zombies come with a 16% Kill Threshold, which is great for finishing Boss fights quickly.
Order of Skill Points
- 2 points into Forceful Commander: Taken to path to further nodes.
- 1 point into Daunting Blast: Increased Stun Chance, but overall unimportant for the purposes of this build.
- 1 point into Ravenous : Volatile Zombies deal extra damage to Bosses and Rare enemies.
- 2 points into Pull of the Grave: Adds a 16% Kill Threshold to the skill.
- 1 point into Horrific Vessels: Zombies are converted to deal Necrotic Damage, scaling with the rest of the build.
- 1 point into Corpse Bane: Zombie explosions now inflict Marked for Death onto enemies it hits.
- 3 points into Fervor: Zombies deal more damage and now move faster.
- 1 point into Ferocious Horde: Mostly taken for pathing, but Zombies will move faster as their health decays.
- 1 point into Shepherd of Thralls: When a Zombie dies, it now summons a Skeleton Vanguard. These are used as Ward fodder for Profane Veil.
- 1 point into Leap Attack: Zombies will now leap at targets.
- 2 points into Grand Sacrifice: When Volatile Zombies die, they will have a chance to cast Sacrifice on a nearby Minion.
- 1 point into Path of Destruction: Taken for pathing, but does slightly increase the explosion size.
- 2 points into Necromantic Fervor: The maximum Health of a zombie is converted into healing for us when they die.
- 1 point into Vital Ward: The healing from the previous node is converted into Ward.
In this section, we will break down each skill and highlight the key passives we have selected to make the skill shine in the build. While some of these skills do allow for some variation to exist depending on your own custom choices, we recommend utilizing the skill trees as presented until you have a strong understanding of the build itself.
Sacrifice
![]() Sacrifice will never get used manually in this build. We rely on Volatile Zombies to automate this for us when they die.
Aside from dealing a decent damage on its own, Sacrifice will also provide a substantial boost to our DoT damage as well. This
is used specifically to boost the damage dealt with Torment. This also creates a consistent source of both
Ignite and Bleed, two ailments that boost the damage Torment deals. This was explained in
the
Sacrifice will never get used manually in this build. We rely on Volatile Zombies to automate this for us when they die.
Aside from dealing a decent damage on its own, Sacrifice will also provide a substantial boost to our DoT damage as well. This
is used specifically to boost the damage dealt with Torment. This also creates a consistent source of both
Ignite and Bleed, two ailments that boost the damage Torment deals. This was explained in
the ![]() Chthonic Fissure Skill Tree.
Chthonic Fissure Skill Tree.
Order of Skill Points
- 1 point into Bone Nova: Sacrificing a Minion causes the explosion to deal damage with Bone Nova.
- 3 points into Lacerating Bones: Bone Nova has a chance to apply Bleed.
- 3 points into Avatar of Decay: A recent cast of Sacrifice increases your Damager Over Time by 60% for all applications.
- 1 point into Pontifex: Sacrifice deals more damage per Minion currently under your control.
- 1 point into Altar of Flames: Taken for pathing.
- 4 points into Burning Offering: Adds 100% chance to Ignite on hit.
- 3 points into Infernal Vindication: Increases global Damage Over Time after using Sacrifice.
- 3 points into Temple of Awe: Sacrifice hits in a much wider area.
- 3 points into Necrotic Audience: Sacrifice now deals more damage in a wider area as long as you control at least three Minions.
In this section, we will break down each skill and highlight the key passives we have selected to make the skill shine in the build. While some of these skills do allow for some variation to exist depending on your own custom choices, we recommend utilizing the skill trees as presented until you have a strong understanding of the build itself.
Summon Skeleton
![]() Summon Skeleton is taken as a way to replenish our Mana while also serving as a source of Ward through
Summon Skeleton is taken as a way to replenish our Mana while also serving as a source of Ward through
![]() Profane Veil consumption. Prior to getting the Experimental Affix Volatile Zombies Summoned on Pation Use,
which comes on the Belt, you will need to manually summon Skeletons and consume them to start generating Zombies in
the first place. After this Affix is acquired, you may still self-summon them periodically, if only ensure your Minion
count stays above three for the bonus to Sacrifice damage and to make sure the Spell Damage buff is applied through
Memory Catcher.
Profane Veil consumption. Prior to getting the Experimental Affix Volatile Zombies Summoned on Pation Use,
which comes on the Belt, you will need to manually summon Skeletons and consume them to start generating Zombies in
the first place. After this Affix is acquired, you may still self-summon them periodically, if only ensure your Minion
count stays above three for the bonus to Sacrifice damage and to make sure the Spell Damage buff is applied through
Memory Catcher.
Order of Skill Points
- 4 points into Unbound Necromancy: Cuts the Mana cost of Skeletons nearly in half.
- 4 points into Immortal: Skeletons have a 40% chance to resummon after death.
- 1 point into Grave Walkers: Increases Skeleton count by one.
- 1 point into Soul Catcher: Small Ward gain when a Skeleton dies.
- 3 points into Mind Catcher: Refunds 15 Mana upon Skeleton death. This solves Mana problems for the entire build.
- 4 points into Memory Catcher: When a Skeleton dies, the player recieves a 100% Spell Damage increase.
- 1 point into Marrow Tap: Taken for pathing.
- 2 points into Empty the Graves: When you directly summon a Skeleton, you now summon three of them.
In this section, we will break down each skill and highlight the key passives we have selected to make the skill shine in the build. While some of these skills do allow for some variation to exist depending on your own custom choices, we recommend utilizing the skill trees as presented until you have a strong understanding of the build itself.
Profane Veil
![]() Profane Veil will be used to consume Minions and generate Volatile Zombies, creating a never ending cycle of
explosions from both these Zombies and casts of
Profane Veil will be used to consume Minions and generate Volatile Zombies, creating a never ending cycle of
explosions from both these Zombies and casts of ![]() Sacrifice. When the Zombies die, they will create Skeleton Vanguards
who will then get consumed on your next cast of Profane Veil, creating a rotational loop for the build. While this does supply
the build with a ton of damage, it will also generate Ward for us based on the maximum Health of the Minions we consume.
Sacrifice. When the Zombies die, they will create Skeleton Vanguards
who will then get consumed on your next cast of Profane Veil, creating a rotational loop for the build. While this does supply
the build with a ton of damage, it will also generate Ward for us based on the maximum Health of the Minions we consume.
Order of Skill Points
- 2 points into Eternal Blasphemy: Increases the duration and speed of Profane Veil.
- 5 points into Vampiric Pool: Consumes two Minions and converts a portion of their Health into Ward for the player, while also extending the duration you can stay in Profane Veil per Minion consumed.
- 5 points into Apocalypse: The two minions consumed from Vampriric Pool will summon Volatile Zombies, dealing increased damage based on your own Intelligence.
- 1 point into Loose Tongue: Drops the mana cost by 15.
- 1 point into Harsh Words: Decreased Mana cost, and Profane Veil now deals more damage.
- 1 point into Forked Tongue: Creates a second pool that detaches and seeks out enemies. This can also consume Minions.
- 1 point into Discourage: Taken for pathing.
- 5 points into Scorn: You deal more damage to Cursed enemies while in the puddle. This applies to every source of damage, not just Profane Veil.
- 2 points into Stream of Profanity: Using either Soul Feast or
 Chthonic Fissure will reduce the cooldown on
Profane Veil.
Chthonic Fissure will reduce the cooldown on
Profane Veil.
Build Mechanics and Playstyle
With the vast majority of this build being automated, the rotation loop for this build is quite laid back.
Minions are summoned, we consume them through ![]() Profane Veil, and from there we create Volatile Zombies.
Volatile Zombies will seek out enemies and explode when they're within damage range. When they die, they will
create Skeleton Vanguards. We can then consume the Vanguards and create more Zombies, creating a never ending
loop of Minion damage. As an extra added measure, this build uses two
Profane Veil, and from there we create Volatile Zombies.
Volatile Zombies will seek out enemies and explode when they're within damage range. When they die, they will
create Skeleton Vanguards. We can then consume the Vanguards and create more Zombies, creating a never ending
loop of Minion damage. As an extra added measure, this build uses two ![]() Cycle of Putrescence, ensuring
we will always have two Volatile Zombies at any given point.
Cycle of Putrescence, ensuring
we will always have two Volatile Zombies at any given point.
While the interactions from ![]() Profane Veil and
Profane Veil and ![]() Summon Volatile Zombie will continue to supply the build
with a massive amount of Ward alongside consistent damage through both Zombie explosions and
Summon Volatile Zombie will continue to supply the build
with a massive amount of Ward alongside consistent damage through both Zombie explosions and ![]() Sacrifice,
Sacrifice,
![]() Chthonic Fissure can not be ignored. Many if the interactions going on, including Skeleton death, actively
being inside of Profane Veil, and Sacrifice use, will further boost the damage dealt by the Spirits coming off Fissure.
This is further boosted by our Unique Staff,
Chthonic Fissure can not be ignored. Many if the interactions going on, including Skeleton death, actively
being inside of Profane Veil, and Sacrifice use, will further boost the damage dealt by the Spirits coming off Fissure.
This is further boosted by our Unique Staff, ![]() Wheel of Torment, as the Necrotic Penetration for Torment
will apply to the Spirits' application. Fissure should be placed down for every mob pack (if Profane doesn't just kill
everything immediately), as well as during every boss fight with 100% uptime. It should be noted as well, that Torment
is unlike typical DoTs in this game; the scaling tags for Torment are Spell, Damage Over Time, and Curse. This is important,
as Spell Damage from our gear and Mastery Passives will increase the damage for Torment.
Wheel of Torment, as the Necrotic Penetration for Torment
will apply to the Spirits' application. Fissure should be placed down for every mob pack (if Profane doesn't just kill
everything immediately), as well as during every boss fight with 100% uptime. It should be noted as well, that Torment
is unlike typical DoTs in this game; the scaling tags for Torment are Spell, Damage Over Time, and Curse. This is important,
as Spell Damage from our gear and Mastery Passives will increase the damage for Torment.
In between ![]() Profane Veil and
Profane Veil and ![]() Chthonic Fissure uses, feel free to use
Chthonic Fissure uses, feel free to use ![]() Soul Feast. This is the equivalent of
throwing your running shoes on, as the Haste you gain has been boosted through the roof through the interactions off Fleeting Crone
and
Soul Feast. This is the equivalent of
throwing your running shoes on, as the Haste you gain has been boosted through the roof through the interactions off Fleeting Crone
and ![]() Wheel of Torment. The range on Soul Feast is rather large, enabling you to pull enemies from the edge of your screen and even slightly further, depending on
the size of your monitor. All of these things combine to create a build thats extremely efficient in both Monolith Echoes as well
as Boss killing.
Wheel of Torment. The range on Soul Feast is rather large, enabling you to pull enemies from the edge of your screen and even slightly further, depending on
the size of your monitor. All of these things combine to create a build thats extremely efficient in both Monolith Echoes as well
as Boss killing.
Equipment and Gear Affixes
The gear listed below offers a suggestion for what gear should be aimed for to recreate this build. The most important
aspects here is the Unique Staff, ![]() Wheel of Torment, and access to effects or affixes that alter how Volatile Zombies
are summoned.
Wheel of Torment, and access to effects or affixes that alter how Volatile Zombies
are summoned.
| Gear Slot | Implicits | Modifiers |
|---|---|---|
| Two-handed Staff | Legendary Potential Increased Spell Damage Critical Strike Multiplier |
|
| Head | Legendary Potential Increased Minion Health Spell Curse Damage |
|
| Amulet | Physical Resistance Necrotic Resistance |
Prefixes Increased Minion Health Critical Strike Multiplier Suffixes Necrotic Resistance Needed Resistances Sealed Affix Necrotic Penetration |
| Chest | Armor All Resistances Minion All Resistances |
Prefixes Increased Minion Health Intelligence Suffixes Necrotic Resistance Needed Resistances Sealed Affix +1 Level to Chthonic Fissure, Increased Damage Over Time |
| Belt | Poison Resistance Cold Resistance |
Prefixes Increased Minion Health Increased Mana Regen Suffixes Increased Cooldown Recovery Critical Strike Avoidance Sealed Affix 2 Volatile Zombies Summoned on Potion Use |
| Gloves | Armor Increased Cooldown Recovery |
Prefixes Increased Minion Health Intelligence Suffixes Needed Resistances Sealed Affix Increased Cast Speed |
| Ring | Legendary Potential Increased Minion Health Intelligence |
|
| Ring | Legendary Potential Increased Minion Health Intelligence |
|
| Feet | Armor Increased Movement Speed Fire Resistance |
Prefixes Increased Movement Speed Intelligence Suffixes Increased Cooldown Recovery Needed Resistances Sealed Affix Increased Minion Damage, 2 Minions teleported around you after you use a Traversal Skill |
| Relic | Fire Resistance Increased Curse Damage |
Prefixes Increased Minion Health Increased Mana Regen Suffixes Necrotic Resistance Needed Resistances Sealed Affix +1 Level to Profane Veil, Increased Damage Over Time |
A loot filter made specifically for the gear table above may be copied by pressing the button below. Once in the Loot Filter portion of the in-game menu, choose the "Paste Clipboard Contents" option to import the code.
Copy Loot Filter to Clipboard
Uniques
The items listed below are used in order to enable the build to climb Corruption, as well as automate ![]() Summon Volatile Zombie. A portion
of the Uniques will cater to our Ward generation, and while they are not mandatory, they should still be acquired in order to build a layer of
defense for the build.
Summon Volatile Zombie. A portion
of the Uniques will cater to our Ward generation, and while they are not mandatory, they should still be acquired in order to build a layer of
defense for the build.
Wheel of Torment
![]() Wheel of Torment: This staff provides extra Necrotic Penetration for Torment and grants our character Haste for a
short period of time when
Wheel of Torment: This staff provides extra Necrotic Penetration for Torment and grants our character Haste for a
short period of time when ![]() Soul Feast is used. This is also how we Curse ourselves, which activates extra Spell Damage and reduced Mana cost for Chthonic Fissure, through
its Skill Tree. This weapon can be target farmed in the Monolith Timeline "The Stolen Lance".
Soul Feast is used. This is also how we Curse ourselves, which activates extra Spell Damage and reduced Mana cost for Chthonic Fissure, through
its Skill Tree. This weapon can be target farmed in the Monolith Timeline "The Stolen Lance".
Boneclamor Barbute
![]() Boneclamor Barbute: This Helmet scales perfectly with how we're scaling Torment stacks, through Necrotic Resistance. It allows
us to double dip, where Necrotic Resistance isn't just increasing our damage but also actively scaling the stable Ward this build will have.
You can farm for this Helmet in the Monolith Timeline "The Black Sun".
Boneclamor Barbute: This Helmet scales perfectly with how we're scaling Torment stacks, through Necrotic Resistance. It allows
us to double dip, where Necrotic Resistance isn't just increasing our damage but also actively scaling the stable Ward this build will have.
You can farm for this Helmet in the Monolith Timeline "The Black Sun".
Cycle of Putrescence
![]() Cycle of Putrescence: The unique effect of this ring is additive, meaning if you have two of them, you will have a 100% chance to resummon two
Volatile Zombies, with a lessened chance for further Zombies. We want two of these rings to really make the build pop off. This has a bonus of increasing
both the damage Zombies deal when they explode and the damage dealt when they cast
Cycle of Putrescence: The unique effect of this ring is additive, meaning if you have two of them, you will have a 100% chance to resummon two
Volatile Zombies, with a lessened chance for further Zombies. We want two of these rings to really make the build pop off. This has a bonus of increasing
both the damage Zombies deal when they explode and the damage dealt when they cast ![]() Sacrifice. You may farm this in the Monolith Timeline
"The Age of Winter" within Unique or Set Reward Echoes.
Sacrifice. You may farm this in the Monolith Timeline
"The Age of Winter" within Unique or Set Reward Echoes.
Idols
Idol slots are gained through the campaign, unlocking small bonuses and unique affixes for the player to discover and augment their builds with. The Idol screen consists of a grid system for the player to fill out with different sized idols, eventually filling in every part of the grid. As the Idol shape increases (1x1, 1x2, 1x3, 1x4, etc.) the stronger an affix you might find for your build.
Prioritize Grand Bone Idols with Spell Curse Damage and Necrotic Resistance on them. You will be able to fit four of these onto your Idol board. The remaining slots should be filled in with Small Eterran Idols focusing on Increased Damage Over Time and Necrotic Resistance.
Blessing
Blessings are permanent buffs that are applied to your character. These come in two different powers, Standard and Grand. Grand blessings are significantly stronger than the Standard Blessings. In total, there are 10 Blessing Slots, one for each Monolith Timeline. When you complete a Monolith and defeat the final boss you will be awarded a choice of three blessing with a random value.
| Blessing Name | Affix | Timeline |
|---|---|---|
| Critical Strike Multiplier | The Black Sun | |
| Armor | Spirits of Fire | |
| Increased Armor | The Age of Winter | |
| Critical Avoidance | Reign of Dragons | |
| Mana | Ending the Storm |
Changelog
- 22 Mar. 2024: Updated for Profane Veil fix. Several affixes adjusted, along with skill points.
- 13 Mar. 2024: Build Planner added.
- 09 Mar. 2024: Guide Added.

GhazzyTV is a professional content creator that knows all about theory crafting builds in Path of Exile and Last Epoch and has been teaching players how to build their characters for over 9 years. He is a huge Blizzard fan with thousands of hours invested into Diablo 3 and 4 and is a frequent World of Warcraft Classic player. His builds will be helpful content for new players and veterans alike. You can find his PoE Vault Guide Hub here and his LE Guide Hub here. You can follow him on Twitch, YouTube or Twitter.
- Patch 1.0.7 Update: Multiplayer, Skills and More!
- Patch 1.0.6 Update: Camera Setting, Controller Keybinds, Bug Fixes, and More!
- Eleventh Hour Games on Real-Money Trading and Exploits in Last Epoch
- Patch 1.0.5 Update: Many Bug Fixes, Including Loot Filter Toggle Sensitivity, and Other Improvements!
- The First 30 Days of Last Epoch!
- 1.0 Launch Retrospective: A Message From Eleventh Hour Games
- Patch 1.0.4 Update: More In-Game Changes, Bug Fixes, and Improvements
- Last Epoch Mid-Cycle Balance Survey Recap