Warlock Soul Feast Torment Endgame Build for Last Epoch (Patch 1.0)
Welcome to our Last Epoch Warlock Soul Feast Torment build guide for the Acolyte class. Here you will learn everything about the Warlock play style, passives, skills, strengths, and weaknesses to conquer the world of Eterra.
Build Introduction
Feast on the souls of your enemies! Curse those who stand against you and crack open the earth beneath their feet to unleash a chaotic flurry of necrotic fire. Your foes will be tormented and tortured before their untimely demise. This build relies on sucking the ailments out of enemies in order to deal damage.
 Fully automated off a single button
 - Large Ward generation for defensive layering
- Accessible gearing to begin playing

 Needs an extremely high amount of Necrotic Resistance to climb Corruption
 - Stat requirements in order to enable automation

Skill Selection
This entire build runs off a single button, ![]() Soul Feast. This Curse is used
in tandem with the Unique Staff
Soul Feast. This Curse is used
in tandem with the Unique Staff ![]() Wheel of Torment. This staff works by giving you
a chance to cast
Wheel of Torment. This staff works by giving you
a chance to cast ![]() Chthonic Fissure when you hit either a Rare or Boss enemy. This will
only work if there is not currently an active Fissure on the field, however Fissure will
also automate the rest of this build. Chthonic Fissure's Spirits have a chance to convert themselves
into
Chthonic Fissure when you hit either a Rare or Boss enemy. This will
only work if there is not currently an active Fissure on the field, however Fissure will
also automate the rest of this build. Chthonic Fissure's Spirits have a chance to convert themselves
into ![]() Chaos Bolts, and from there we can automate
Chaos Bolts, and from there we can automate ![]() Rip Blood and
Rip Blood and ![]() Bone Curse on
enemies. Through several layers of automation, this build has an extremely accessible playstyle
that is capable of both clearing maps and killing bosses in style.
Bone Curse on
enemies. Through several layers of automation, this build has an extremely accessible playstyle
that is capable of both clearing maps and killing bosses in style.

Class and Skill Passive Trees
Our base class is the Acolyte, which acts as a generic spell caster and summoner. Our character will be offered an opportunity to select an Advanced Mastery once we have completed the first act of the campaign. Each base class has three possible masteries to choose from. For the Acolyte, we have access to the Mastery Tree Passives for Necromancers, Lich and Warlock. Upon selecting a Mastery and placing 20 Passive Points into the Acolyte Tree, you'll then be able to place Passive Points into the Mastery Trees.
For this build, Warlock is our advanced class. We will place every non-base class Passive Point into the Warlock Passive tree. The nodes taken in Acolyte and Warlock will focus on Intelligence, Ward Generation, and augmenting our ability to abuse Curses. On top of that, we will be using Witchfire, allowing us to scale both Fire and Necrotic Damage through Ignite and Damned Chance. Each of the Passive Trees and their points are broken down below.
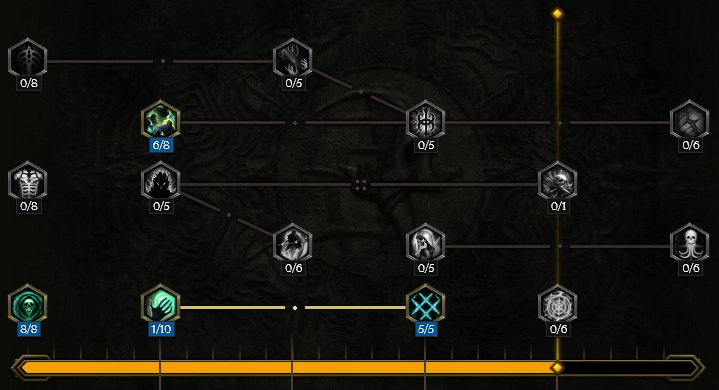
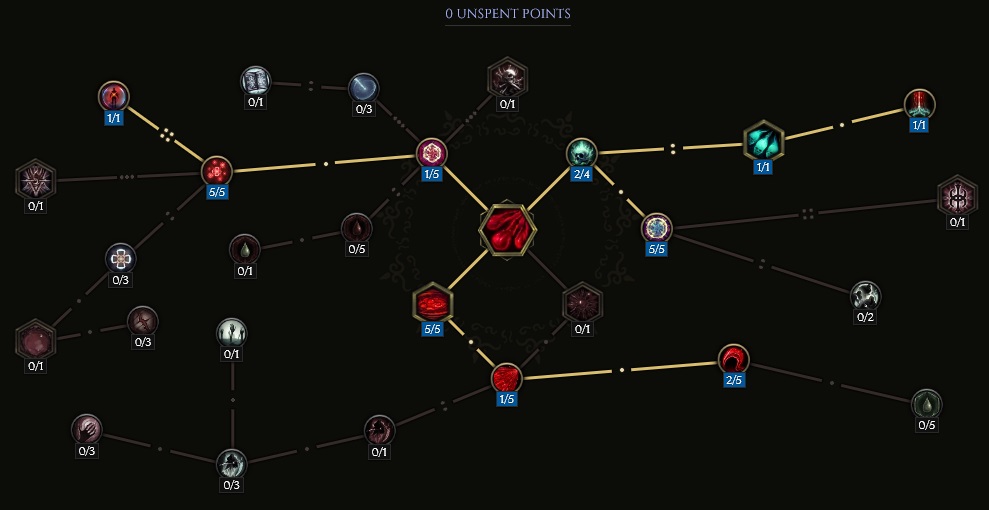
Acolyte Passive Points
- 8 points into Forbidden Knowledge: Increases Intelligence and Necrotic Resistance.
- 6 points into Stolen Vitality: Increases Health pools for both the player and minions.
- 1 point into Mania of Mortality: Gain Ward from any nearby death.
- 5 points into Unnatural Preservation: Increases Ward Retention and Resistances.
Our base class is the Acolyte, which acts as a generic spell caster and summoner. Our character will be offered an opportunity to select an Advanced Mastery once we have completed the first act of the campaign. Each base class has three possible masteries to choose from. For the Acolyte, we have access to the Mastery Tree Passives for Necromancers, Lich and Warlock. Upon selecting a Mastery and placing 20 Passive Points into the Acolyte Tree, you'll then be able to place Passive Points into the Mastery Trees.
For this build, Warlock is our advanced class. We will place every non-base class Passive Point into the Warlock Passive tree. The nodes taken in Acolyte and Warlock will focus on Intelligence, Ward Generation, and augmenting our ability to abuse Curses. On top of that, we will be using Witchfire, allowing us to scale both Fire and Necrotic Damage through Ignite and Damned Chance. Each of the Passive Trees and their points are broken down below.
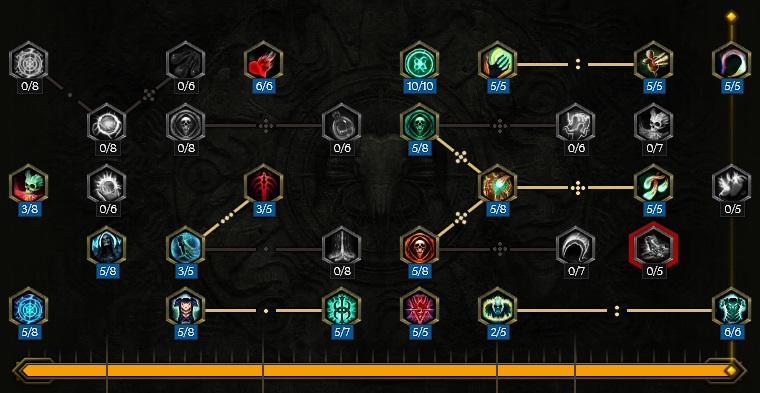
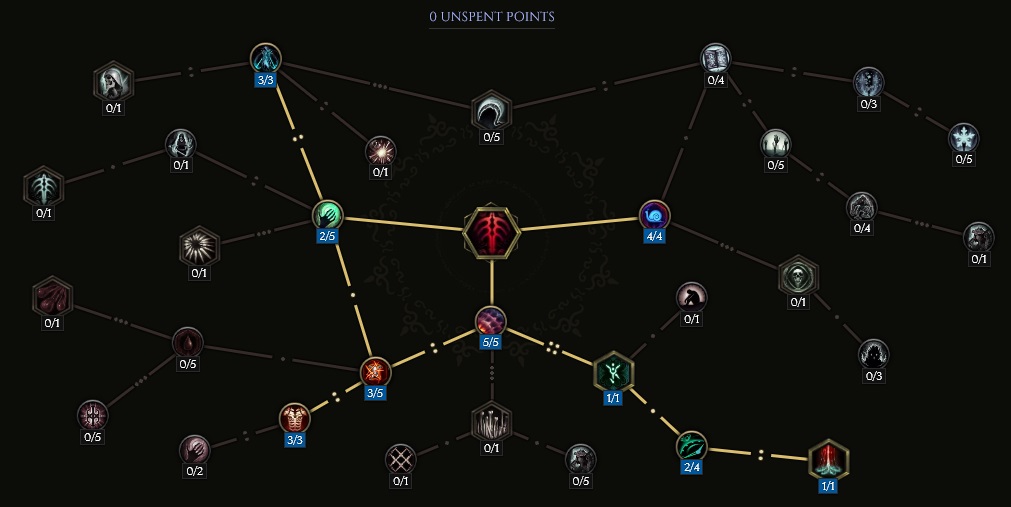
Warlock Passive Points
- 3 points into Chaos Flames: Increases Fire and Necrotic Damage, increases the chance to Ignite and Damned on hit.
- 5 points into Soul Stealer: Increases Mana Regen and at 5 points provides a bonus of Mana gain when you hit Cursed enemies.
- 5 points into Occultist's Mind: Increases your Intelligence and scales your Mana off Intelligence.
- 5 points into Harrowing Armor: Increases Health and Armor, scales Armor off the amount of Curses on an enemy.
- 3 points into Ward of Malevolence: Increases Ward Decay Threshold and Ward gained on kill.
- 6 points into Spirit Leech: Grants Health Leech, with extra for hits on Cursed enemies.
- 3 points into Imperishable: Grants more Vitality and Ward Decay Threshold scaled through Necrotic Resistance.
- 5 points into Dark Protections: Gain Ward per second, as well as less damage taken from Cursed enemies.
- 10 points into Malefic Body: Increases Intelligence and Vitality.
- 5 points into Chains of Ruin: Casting a Necrotic Skill has a chance to put Damned on enemies. At 5 points, allows you to chain Damned enemies with Damned Overload.
- 5 points into Infernal Lash: Casting a Fire Skill has a chance to put Ignite on enemies. At 5 points, allows you to chain Ignited enemies with Ignite overload.
- 5 points into Wither: Applies Withering on hit. Enemies inflicted with this deal less damage.
- 5 points into Chaotic Strikes: Your hits have a chance to do double damage.
- 5 points into The Ashen One: Increases Necrotic and Elemental damage. At 5 points, allows you to inflict enemies with Witchfire.
- 2 points into Encroaching Darkness: If you cast a Curse you will afflict Anguish on enemies around the target.
- 3 points into Wreak Havoc: Increases Critical Multiplier for Chaotic Strikes.
- 5 points into Grimhilde's Domain: When you have Ignite or Damned Overload your hits spread Witchfire.
- 5 points into Aspect of Death: Increases Health and provides a boost to damage for every negative stack of ailment on you, to a cap of 90. Ths node enables us to inflict Damned on ourselves every time an enemy dies or any time you or your minions take a hit.
- 6 points into Duskbringer: Adds Spell damage for Curses.
In this section, we will break down each skill and highlight the key passives we have selected to make the skill perform as best as possible in the build. While some of these skills do allow for some variation to exist depending on your own custom choices, we recommend utilizing the skill trees as presented until you have a strong understanding of the build itself.
Soul Feast
![]() Soul Feast is the enabler for the build, automating several skills and Curses to make
the build work. This spell will be used as the main spam skill, capable of killing low Health mobs by itself
through Necrotic Damage and inflicting Damned and Torment on nearby enemies,
so long as you have the Unique Staff
Soul Feast is the enabler for the build, automating several skills and Curses to make
the build work. This spell will be used as the main spam skill, capable of killing low Health mobs by itself
through Necrotic Damage and inflicting Damned and Torment on nearby enemies,
so long as you have the Unique Staff ![]() Wheel of Torment. Soul Feast doesn't just stop at killing enemies and
making the build operate, but also acts as a defensive layer by generating Ward on every cast.
Wheel of Torment. Soul Feast doesn't just stop at killing enemies and
making the build operate, but also acts as a defensive layer by generating Ward on every cast.
It should be mentioned, when ![]() Wheel of Torment is equipped and
Wheel of Torment is equipped and ![]() Soul Feast is used, you will
inflict Torment on yourself. This pairs well with the Warlock node Aspect of Death,
where it boosts our damage per stack of ailment on us.
Soul Feast is used, you will
inflict Torment on yourself. This pairs well with the Warlock node Aspect of Death,
where it boosts our damage per stack of ailment on us.
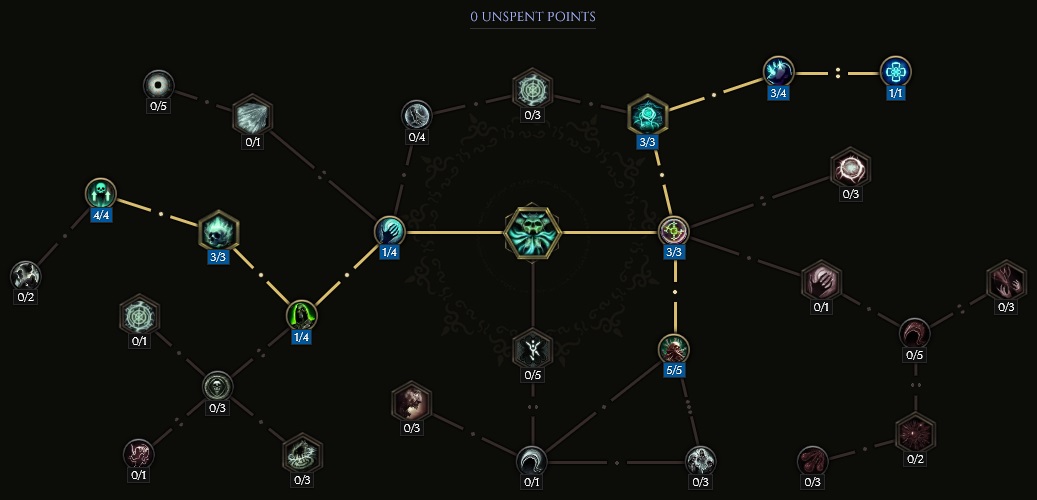
Order of Skill Points
- 3 points into Soul Seeker: Soul Fragments generate Ward, scaling off Intelligence.
- 3 points into Engorged: Lowers the Mana Cost and increases the Ward granted by casting Soul Feast through Greater Soul Fragments.
- 3 points into Wrest: Rare and Boss enemies now generate much more Ward than normal mobs.
- 1 point into Usurp: Soul Feast now grants Mana per Soul Fragment.
- 1 point into Hunger: Traversal node.
- 1 point into Poisoned Husks: Traversal node.
- 3 points into Hellmind: Soul Feast inflicts stacks of Damned based upon your own Intelligence.
- 4 points into Waning Life: Damned inflicted by Soul Feast now penetrates the Necrotic Resistance of enemies.
- 5 points into Bones of the Accursed: Increases Damage and Ward Generation based on how many Curses are on an enemy.
In this section, we will break down each skill and highlight the key passives we have selected to make the skill perform as best as possible in the build. While some of these skills do allow for some variation to exist depending on your own custom choices, we recommend utilizing the skill trees as presented until you have a strong understanding of the build itself.
Chthonic Fissure
![]() Chthonic Fissure is both used through automation and manually for this build. As stated above,
Chthonic Fissure is both used through automation and manually for this build. As stated above, ![]() Wheel of Torment
has a chance to spawn a Fissure when hitting a Rare or Boss enemy with
Wheel of Torment
has a chance to spawn a Fissure when hitting a Rare or Boss enemy with ![]() Soul Feast. While bossing, this is more than enough to
get Fissure on the ground, however when dealing with larger packs of mobs that may not have one of these enemy types in them,
and Soul Feast is not enough to deal with them, manual casting of Chthonic Fissure may be required. Regardless of how it is
cast, the rest of the build functions off Fissure. This includes automation of
Soul Feast. While bossing, this is more than enough to
get Fissure on the ground, however when dealing with larger packs of mobs that may not have one of these enemy types in them,
and Soul Feast is not enough to deal with them, manual casting of Chthonic Fissure may be required. Regardless of how it is
cast, the rest of the build functions off Fissure. This includes automation of ![]() Chaos Bolts which can then force casts of
both
Chaos Bolts which can then force casts of
both ![]() Rip Blood and
Rip Blood and ![]() Bone Curse.
Bone Curse.
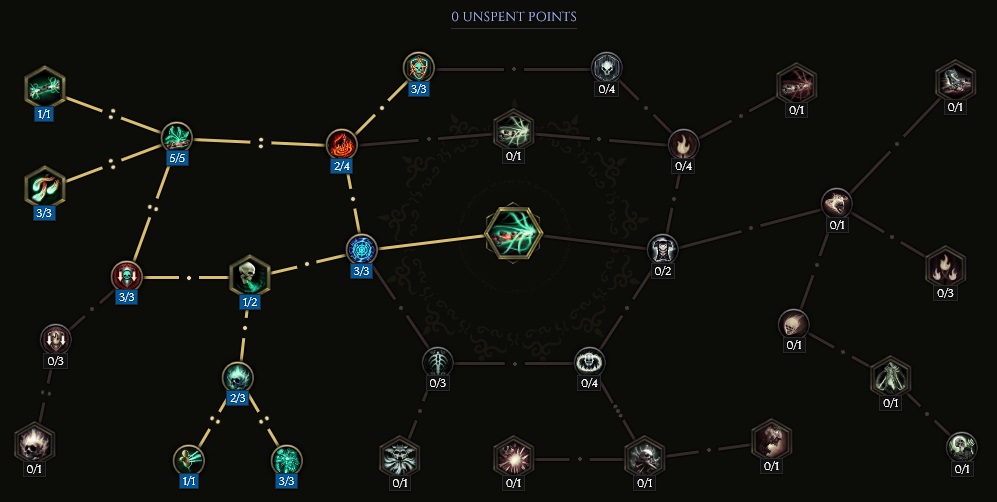
Order of Skill Points
- 3 points into Fragile Crust: Lowers the Mana Cost as long as a Cursed enemy exists when casted.
- 2 points into Fell Fire: Torment spreads Ignite stacks.
- 5 points into Stygian Current: Increases frequency of Spirits.
- 1 point into Of Gloom and Flames: Chthonic Fissure is now casted twice; once in front of you, once behind. It now requires more Mana to cast.
- 3 points into Chaotic Rupture: Grants a 60% chance to converts Summoned Spirits into Chaos Bolts.
- 3 points into Severed Wards: Spirits now Shred Necrotic Resistance when they hit.
- 1 point into Spirit Gale: When enemies inflicted with Torment die, they can release Spirits.
- 2 points into Damned Waters: Increases Damned stacks on Spirit hit.
- 3 points into Twisted Waves: Increases damage, scaling off Necrotic Resistance.
- 1 point into Grim Tide: Necrotic damage increases per 1% Critical Multiplier.
- 3 point into Tombgorger: Increases Torment's Damage.
In this section, we will break down each skill and highlight the key passives we have selected to make the skill perform as best as possible in the build. While some of these skills do allow for some variation to exist depending on your own custom choices, we recommend utilizing the skill trees as presented until you have a strong understanding of the build itself.

Chaos Bolts
![]() Chaos Bolts are the middle step for automation in the build, creating a bridge from
Chaos Bolts are the middle step for automation in the build, creating a bridge from
![]() Chthonic Fissure to both
Chthonic Fissure to both ![]() Rip Blood and
Rip Blood and ![]() Bone Curse. Chaos Bolts are not
only used for the automation effect, as they do considerable damage on their own. The damage on
these necrotic fireballs is scaled by Curses and by hitting enemies that have been inflicted with
stacks of either Ignite, Bleed, Frostbite, and Damned.
If all five of these prerequisites are met, this comes out to 64% more damage dealt to enemies.
Bone Curse. Chaos Bolts are not
only used for the automation effect, as they do considerable damage on their own. The damage on
these necrotic fireballs is scaled by Curses and by hitting enemies that have been inflicted with
stacks of either Ignite, Bleed, Frostbite, and Damned.
If all five of these prerequisites are met, this comes out to 64% more damage dealt to enemies.
In order to proc ![]() Rip Blood off
Rip Blood off ![]() Chaos Bolts, it requires a substantial amount
of Intelligence. 1 Intelligence is equal to a 1% chance to cast Rip Blood when Chaos Bolts hits.
We absolutely want this as close to 100% as possible, ensuring consistent casting of Rip Blood and a reliable
source of Ward.
Chaos Bolts, it requires a substantial amount
of Intelligence. 1 Intelligence is equal to a 1% chance to cast Rip Blood when Chaos Bolts hits.
We absolutely want this as close to 100% as possible, ensuring consistent casting of Rip Blood and a reliable
source of Ward.
To proc ![]() Bone Curse, it is required that
Bone Curse, it is required that ![]() Chaos Bolts hit a Cursed enemy. This is free in this
build, as Soul Feast will be applying curses on hit and all enemies should already have Torment applied
to them.
Chaos Bolts hit a Cursed enemy. This is free in this
build, as Soul Feast will be applying curses on hit and all enemies should already have Torment applied
to them.
Order of Skill Points
- 2 points into Abrupt Chaos: Increases Cast Speed and Projectile Speed.
- 4 points into Doom's Vindication: Increases damage dealt to Cursed enemies.
- 1 point into Exacted Libation: Automates
 Rip Blood when Chaos Bolts hits an enemy,
based on a percent chance scaled off Intelligence.
Rip Blood when Chaos Bolts hits an enemy,
based on a percent chance scaled off Intelligence. - 2 points into Devour the Damned: Health and Mana gain when Chaos Bolts hits a Cursed enemy.
- 1 point into Cursed Blood: Hits with Chaos Bolts now refresh Curses on hit, and also provide a larger Health gain.
- 1 point into Another Affliction: Automates
 Bone Curse when Chaos Bolts hit a Cursed enemy. This
can only happen every 6 seconds.
Bone Curse when Chaos Bolts hit a Cursed enemy. This
can only happen every 6 seconds. - 5 points into Condemned to Chaos: 100% Chance to apply Damned.
- 5 points into Mania in Flames: 100% Chance to apply Ignite.
- 3 points into Exult in Misery: Chaos Bolts deal more damage to enemies who have been inflicted with Damned, Ignite, Bleed, and Frostbite.
In this section, we will break down each skill and highlight the key passives we have selected to make the skill perform as best as possible in the build. While some of these skills do allow for some variation to exist depending on your own custom choices, we recommend utilizing the skill trees as presented until you have a strong understanding of the build itself.
Rip Blood
![]() Rip Blood is casted automatically through our
Rip Blood is casted automatically through our ![]() Chthonic Fissure
triggering
Chthonic Fissure
triggering ![]() Chaos Bolts. This skill is setup as one of our skill trees,
but is not apart of our skill bar as we do not need to manually cast it. Inside
the tree we focus on Blood Splatter and converting the skill to deal Necrotic
Damage in order to gain Ward instead of Health.
Chaos Bolts. This skill is setup as one of our skill trees,
but is not apart of our skill bar as we do not need to manually cast it. Inside
the tree we focus on Blood Splatter and converting the skill to deal Necrotic
Damage in order to gain Ward instead of Health.
Order of Skill Points
- 5 points into Splatter: Rip Blood will now cause Blood Splatters.
- 1 point into Crimson Flood: Increases Blood Splatter area.
- 2 points into Revile: Increases damage of Blood Splatter and allows it to Stun.
- 2 points into Arcane Absorption: Increases Spell Damage.
- 5 points into Run Dry: Rip Blood deals more damage.
- 1 point into Rip Spirit: Converts the skill to Necrotic.
- 1 point into Arcane Fortress: All Health gained through Blood Orbs is converted to Ward.
- 1 point into Hemomancer: Traversal node.
- 5 points into Quenching: Blood Orbs return more Ward.
- 1 point into Hematology: Ward returned is now scaled off Intelligence.
In this section, we will break down each skill and highlight the key passives we have selected to make the skill perform as best as possible in the build. While some of these skills do allow for some variation to exist depending on your own custom choices, we recommend utilizing the skill trees as presented until you have a strong understanding of the build itself.
Bone Curse
![]() Bone Curse is triggered through
Bone Curse is triggered through ![]() Chaos Bolts, but only gets used if
an enemy already has a pre-existing curse on them. This can happen through either
Chaos Bolts, but only gets used if
an enemy already has a pre-existing curse on them. This can happen through either
![]() Soul Feast or
Soul Feast or ![]() Chthonic Fissure and Torment. Bone Curse
can only be automated once every 6 seconds through Chaos Bolts.
This curse will make enemies Slow, add a Kill Threshold,
inflict Shred Armor and applies
Marked For Death.
Chthonic Fissure and Torment. Bone Curse
can only be automated once every 6 seconds through Chaos Bolts.
This curse will make enemies Slow, add a Kill Threshold,
inflict Shred Armor and applies
Marked For Death.
Order of Skill Points
- 4 points into Crippling Anguish: Applies Slow.
- 2 point into Iron Maiden: Increases damage.
- 3 points into Brittle Bones: Grants an increase in damage and adds Kill Threshold.
- 3 points into Defile Defenses: Grants Armor Shred.
- 3 points into Marrow Thief: Grants a chance to gain Bone Armor.
- 5 points into Conflation: Increases Area of skill.
- 1 point into Sigil of Mortality: Grants Marked For Death on cast.
- 2 points into Reaper's Mark: Increases the duration of Marked for Death.
- 1 points into Misery: Converts the skill to Necrotic.
Build Mechanics and Playstyle
This build can technically be played with a single button, ![]() Soul Feast.
This spell is capable of automating our entire skill set as long as you're hitting
a Rare or Boss type enemy. Through
Soul Feast.
This spell is capable of automating our entire skill set as long as you're hitting
a Rare or Boss type enemy. Through ![]() Wheel of Torment, this provides a chance
to cast
Wheel of Torment, this provides a chance
to cast ![]() Chthonic Fissure which will then begin auto-casting
Chthonic Fissure which will then begin auto-casting ![]() Chaos Bolts in place
of Spirits, and from there automating casts of
Chaos Bolts in place
of Spirits, and from there automating casts of ![]() Rip Blood and
Rip Blood and ![]() Bone Curse. When
not dealing with Boss enemies, Soul Feast alone should be enough to deal with them. If not,
a single manual cast of Chthonic Fissure should do the job.
Bone Curse. When
not dealing with Boss enemies, Soul Feast alone should be enough to deal with them. If not,
a single manual cast of Chthonic Fissure should do the job.
This build scales a large portion of its damage and defensive layers through two things, self-cursing and uncapped Necrotic Resistance, both explained below.
- Self-cursing happens in this build through the Unique Staff
 Wheel of Torment and
through the Warlock Mastery Passive Aspect of Death. This passive is actually
what provides the DPS gain, as every stack of an ailment on us is converted into a 0.5% more
damage gain. This can stack up to 90 times, and boost damage by 45%.
Wheel of Torment and
through the Warlock Mastery Passive Aspect of Death. This passive is actually
what provides the DPS gain, as every stack of an ailment on us is converted into a 0.5% more
damage gain. This can stack up to 90 times, and boost damage by 45%. - Necrotic Resistance is used as a way to generate a ton of Ward per second. With
even just mid-rolls, you will be looking at around Ward per second for the build, providing a large
amount of "Stable Ward" for your character without even attacking mobs. Ward is increased further through the
Unique Relic in the build,
 Twisted Heart of Uhkeiros, granting Ward per cast in exchange for Health. Health is then
refunded through Leech from the node Spirit Leech.
Twisted Heart of Uhkeiros, granting Ward per cast in exchange for Health. Health is then
refunded through Leech from the node Spirit Leech.
Equipment and Gear Affixes
Until the release of full gear information on 1.0 and we are able to update the build accordingly, we will only be providing stat and attribute goals to make the build function. This build has been tested in an early access version of the game, within the Closed Testing Client. This portion of the guide will be updated with specific gear affixes and a loot filter as soon as possible.
In order to run this build smoothly, the following stat thresholds should be met:
- As close to 100 Intelligence as you can get.
- Max Necrotic Resistance on every item possible.
- A high Health pool. This is used to scale the Ward gain with Twisted Heart of Uhkeiros.
- The Unique items
 Boneclamor Barbute, Wheel of Torment and Twisted Heart of Uhkeiros.
| Gear Slot | Implicits | Modifiers |
|---|---|---|
| Staff | Legendary Potential Increased Cast Speed |
|
| Head | Legendary Potential Increased Health |
|
| Amulet | Less Damage Over Time Taken | Prefixes Necrotic Penetration Critical Strike Multiplier Suffixes Necrotic Resistance Health |
| Chest | Armor Ward Decay Threshold Ward Gain on Kill |
Prefixes Intelligence +2 Level to Chthonic Fissure, Increased Damage Over Time Suffixes Necrotic Resistance Increased Health |
| Belt | Poison Resistance Cold Resistance |
Prefixes Increased Mana Regen Increased Necrotic Damage Suffixes Necrotic Resistance Hybrid Health |
| Gloves | Endurance | Prefixes Intelligence Increased Cast Speed Suffixes Necrotic Resistance Hybrid Health |
| Ring | Necrotic Resistance Ward Decay Threshold |
Prefixes Intelligence Increased Necrotic Damage Suffixes Necrotic Resistance Cold Resistance |
| Ring | Necrotic Resistance Ward Decay Threshold |
Prefixes Intelligence Increased Necrotic Damage Suffixes Necrotic Resistance Critical Strike Avoidance |
| Feet | Armor Movement Speed Fire Resistance |
Prefixes Intelligence Increased Movement Speed Suffixes Necrotic Resistance Hybrid Health |
| Relic | Legendary Potential Necrotic Resistance |
A loot filter made specifically for the gear table above may be copied by pressing the button below. Once in the Loot Filter portion of the in-game menu, choose the "Paste Clipboard Contents" option to import the code.
Copy Loot Filter to Clipboard
Uniques
Listed below are the Uniques required to make the build to work.
Both ![]() Twisted Heart of Uhkeiros and
Twisted Heart of Uhkeiros and ![]() Boneclamor Barbute are taken for
defensive options, so the build will technically work without them, however
climbing Corruption in Empowered Monoliths without them may prove daunting.
Boneclamor Barbute are taken for
defensive options, so the build will technically work without them, however
climbing Corruption in Empowered Monoliths without them may prove daunting.
Boneclamor Barbute
![]() Boneclamor Barbute: Provides Ward per second for our uncapped
Necrotic Resistance. This is a huge component to our survivability and with the
amount of Necrotic Resistance we are stacking in this build, you will notice
the difference. This unique can can be target farmed on the Monolith Timeline
"The Black Sun" from the "Unique or Set Helmet" echo reward.
Boneclamor Barbute: Provides Ward per second for our uncapped
Necrotic Resistance. This is a huge component to our survivability and with the
amount of Necrotic Resistance we are stacking in this build, you will notice
the difference. This unique can can be target farmed on the Monolith Timeline
"The Black Sun" from the "Unique or Set Helmet" echo reward.
Wheel of Torment
![]() Wheel of Torment: This weapon is what allows us to automate the
entire build off
Wheel of Torment: This weapon is what allows us to automate the
entire build off ![]() Soul Feast. It also provides a way to self-curse, which
in turn boosts our damage output, and provides the ability for you to gain Haste when
you cast Soul Feast. On top of all this, this staff also increases
the skill points for all Acolyte skills, which includes all three Masteries and
their associated skills. Farm for this staff in the Timeline Monolith "The
Stolen Lance" with Unique or Set Echo Rewards.
Soul Feast. It also provides a way to self-curse, which
in turn boosts our damage output, and provides the ability for you to gain Haste when
you cast Soul Feast. On top of all this, this staff also increases
the skill points for all Acolyte skills, which includes all three Masteries and
their associated skills. Farm for this staff in the Timeline Monolith "The
Stolen Lance" with Unique or Set Echo Rewards.
Twisted Heart of Uhkeiros
![]() Twisted Heart of Uhkeiros: In order to create additional defensive layering
with this build, we utilize this relic. It drains Health on cast and converts that Health
into Ward. The larger your Health pool, the higher the Ward generation will be. In order to
sustain this, Leech is required in the build, which has been added through the Warlock Passive Tree.
This relic drops from the Emperor of Corpses Boss in the Monolith Timeline
"Reign of Dragons".
Twisted Heart of Uhkeiros: In order to create additional defensive layering
with this build, we utilize this relic. It drains Health on cast and converts that Health
into Ward. The larger your Health pool, the higher the Ward generation will be. In order to
sustain this, Leech is required in the build, which has been added through the Warlock Passive Tree.
This relic drops from the Emperor of Corpses Boss in the Monolith Timeline
"Reign of Dragons".
Idols
Idol slots are gained throughout the campaign, unlocking small bonuses and unique affixes for the player to discover and augment their builds with. The Idol screen consists of a grid system for the player to fill out with different sized idols, eventually filling in every part of the grid. As the Idol shape increases (1x1, 1x2, 1x3, 1x4, etc.) it will open up different affixes for you to use. This can be a great way to add some more customization to your build.
The Idols used for this build will focus entirely on Health gains, making them the easiest part of the build to gear. All Idol affixes should be either Increased Health or Added Health, which can be found on both Large Idols and Stout Idols.
Blessing
Blessings are permanent buffs that are applied to your character. These come in two different powers, Standard and Grand. Grand blessings are significantly stronger than the Standard Blessings. In total, there are 10 Blessing Slots, one for each Monolith Timeline. When you complete a Monolith and defeat the final boss you will be awarded a choice of three blessing with a random value. For the purpose of this guide, we are highlighting five major slots that can be filled with our recommendations, leaving the other for some personal preference.
| Blessing Name | Affix | Timeline |
|---|---|---|
| Void Resistance | The Black Sun | |
| Lightning Reistance | Ending the Storm | |
| Physical Resistance | The Age of Winter | |
| Endurance | Spirits of Fire | |
| Critical Strike Avoidance | Reign of Dragons |
While normally Reistances can be interchanged depending on gear drops, you will want to stick to the suggestions above. Most suffix slots are being used for Necrotic Resistance on gear, and as such the build lacks the ability to build Resistances through those options, relying on Blessings instead.
Changelog
- 27 Feb. 2024: Guide Added.

GhazzyTV is a professional content creator that knows all about theory crafting builds in Path of Exile and Last Epoch and has been teaching players how to build their characters for over 9 years. He is a huge Blizzard fan with thousands of hours invested into Diablo 3 and 4 and is a frequent World of Warcraft Classic player. His builds will be helpful content for new players and veterans alike. You can find his PoE Vault Guide Hub here and his LE Guide Hub here. You can follow him on Twitch, YouTube or Twitter.
- Patch 1.0.7 Update: Multiplayer, Skills and More!
- Patch 1.0.6 Update: Camera Setting, Controller Keybinds, Bug Fixes, and More!
- Eleventh Hour Games on Real-Money Trading and Exploits in Last Epoch
- Patch 1.0.5 Update: Many Bug Fixes, Including Loot Filter Toggle Sensitivity, and Other Improvements!
- The First 30 Days of Last Epoch!
- 1.0 Launch Retrospective: A Message From Eleventh Hour Games
- Patch 1.0.4 Update: More In-Game Changes, Bug Fixes, and Improvements
- Last Epoch Mid-Cycle Balance Survey Recap