


Build Introduction
This is your comprehensive guide for building a barbarian who leaps into the air and crashes back down to the ground with a thunderous explosion of raw power. Welcome to our  Leap Quake Barbarian! This build is pure fun – leaping across the map, crushing enemies beneath your boots each time you land, and leaving behind an earthquake of molten rock. Incredibly mobile, with both strong defensive and offensive capabilities, this build is a blast to play solo or in a group.
Strengths and Weaknesses
- Great AoE Damage
- Constant Berserking
- Great Defenses
- High “Fun Factor”
- Cooldown reliant
- Mobile enemies can be harder to kill
- Can sometimes be stuck without a leap
To see how this build compares to the other builds on our site, you can check out our build tier lists.
Build Requirements
 Earthquake Aspect
 Aspect of Giant Strides
Skill Tree Points and Skill Bar
Leap  War Cry
  Challenging Shout
  Wrath of the Berserker
  Kick
Kick  Rallying Cry
 Follow the points allocated in the image above for the complete 58 point build. The additional 10 skill points are completed using the Renown system.
Weapon Technique and Weapon Expertise
For this Leapquake build, we will be using the Two-Handed Axe Technique for its increase to Vulnerable enemies.
Barbarians have a unique mechanic in Diablo 4 where you can assign a weapon type to certain skills. For the Leapquake Barb, we want to assign ![]() Leap to our Dual-Wield Weapons in order to benefit from
Leap to our Dual-Wield Weapons in order to benefit from ![]() Ramaladni’s Magnum Opus.
Ramaladni’s Magnum Opus.
Paragon Board
We recommend using these Legendary Nodes and Rare Glyphs to truly take this build into the endgame. Note that each Rare Glyph’s information listed below is for the Level 21 version.
Starting Board

Warbringer
Rotate this board three times before attaching it.

Carnage
Rotate this board twice before attaching it.

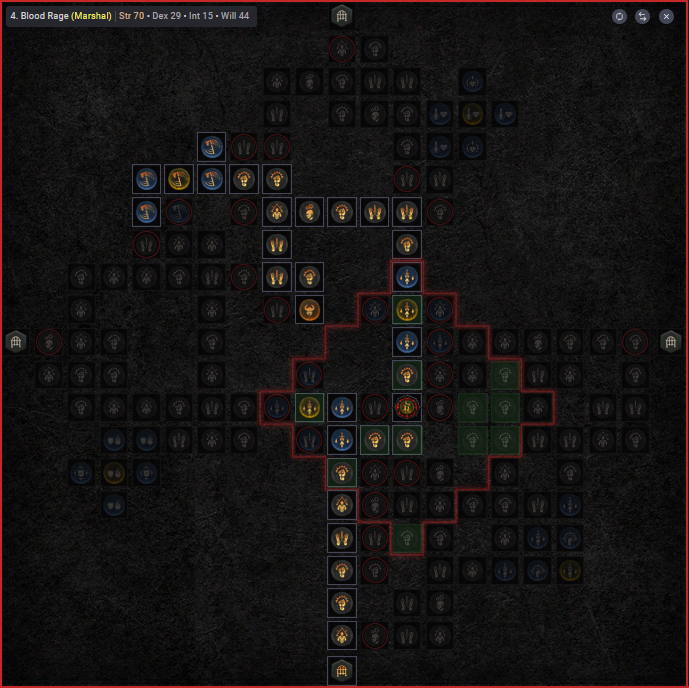
Blood Rage
We attach this to the Northern Gate of the Carnage board. Do not rotate this board before attaching it.
Decimator
We attach this to the Eastern Gate of the Carnage board. Rotate this board three times before attaching it.

Hemorrhage
We attach this final board to the Southern Gate on the Carnage board. Rotate this board three times before attaching it.

To see all of the paragon boards in full CLICK HERE.
Legendary Aspects
Below you will find all of the best-in-slot Aspects found on Legendary items that are important for this build. Remember that with Patch 1.4.0 all Legendary powers can be added into your Codex once you salvage or extract the item. You can still find some aspects through dungeons as you could in previous seasons but now you have the option to upgrade these affixes if you find a higher roll of that affix. Let us go over what aspects you will need.
| Slot | Gems | Legendary Aspects / Unique Items | Aspect / Unique Effects |
| Helm |  Aspect of Bul-Kathos Aspect of Bul-Kathos | – | |
| Chest | Juggernaut’s Aspect | – You gain [X] Armor, but your Evade has a 100% increased Cooldown | |
| Gloves | N/A | Aspect of Elements | – Grant + [20-30%] increased damage to a set of damage types for 7 seconds. This effect alternates between 2 sets: Fire, Lightning, and Physical. Cold, Poison, and Shadow |
| Pants | – You deal [10-20%] increased damage while Unstoppable and for 5 seconds after. When you become Unstoppable, gain 50 of your Primary Resource | ||
| Boots | N/A |  Aspect of Perpetual Stomping Aspect of Perpetual Stomping | – |
| Amulet | Edgemaster’s Aspect | – Skills deal up to [5-20%] increased damage based on your available Primary Resource when you cast, receiving the maximum benefit while you have full primary resource | |
| Ring 1 | Aspect of Giant Strides | – Reduces the Cooldown of | |
| Ring 2 | Bold Chieftain’s Aspect | – Whenever you cast a Shout Skill, its Cooldown is reduced by [1.0-2.0] seconds per nearby enemy up to a maximum of 6 seconds. | |
| 2-Handed Bludgeoning Weapon | Earthquake Aspect | – | |
| 2-Handed Slashing Weapon | Aspect of Retribution | – Distant enemies have a 10% chance to be Stunned or 2 seconds when they hit you. You deal [15-30%] increased damage to Stunned and Knocked Down enemies | |
| Dual Wield Weapon 1 | Aspect of Berserk Ripping | – Dealing direct damage while Berserking inflicts [15-30%] of the base damage as additional Bleeding damage | |
| Dual Wield Weapon 2 | – Skills using this weapon deal [0.2-0.4%] increased damage per point of Fury you have, but you lose 2 Fury every second. |
Gems
Listed below are the best gems to socket into gear for each slot type.
| Weapon Gems | Armor Gems | Jewelry Gems |
For your jewelry, it may be necessary to change the ![]() Royal Diamond for another gem for a specific type such as
Royal Diamond for another gem for a specific type such as ![]() Royal Sapphire to ensure all of your resistances are capped at 70%
Royal Sapphire to ensure all of your resistances are capped at 70%
Elixirs and Health Pots
Visit the Alchemist in any main town to craft helpful Elixirs that increase stats, and experience gain for 30 minutes. Make sure to forage plants and pick up the necessary crafting materials during your adventures; they randomly spawn around the world. Use ![]() Elixir of Resource at the highest level you can craft due to its increase to maximum fury thereby empowering our
Elixir of Resource at the highest level you can craft due to its increase to maximum fury thereby empowering our ![]() Power Kick
Power Kick
Return to the Alchemist again when you reach Level 20, 30, 45, 60, 70, 80 and 90, to upgrade your potion. The extra healing is essential to survival.
Gear, Stats, Tempering and Masterworking
Below are the affixes to prioritize on gear. Each line of affixes is listed in order of importance. Tempering Manuals and their recommended affixes are provided in the second column, and the bolded yellow affixes are the most important targets for Masterworking upgrades. To masterwork, you will need rare materials that only drop from The Pit. Be sure to check our Tempering guide, our Masterworking guide, as well as our guide about The Pit for more details about these topics.
| Gear Slot | Gear Affixes | Tempering Affixes |
|---|---|---|
| Helm | 1. Cooldown Reduction 2. Maximum Life 3. Maximum Resource | 1. Challenging Shout Cooldown Reduction 2. + Ranks to Concussion |
| Chest | 1. Strength 2. Maximum Life 3. Needed Resistance | 1. Challenging Shout Cooldown Reduction 2. + Ranks to Concussion |
| Gloves | 1. Critical Strike Chance 2. Lucky Hit Chance 3. Strength | 1. Damage While Berserking 2. + Ranks to Concussion |
| Pants | 1. Strength 2. Maximum Life 3. Needed Resistance | 1. Challenging Shout Cooldown Reduction 2. + Ranks to Concussion |
| Boots | 1. Movement Speed 2. Ranks to 3. Maximum Life | 1. Leap Cooldown Reduction 2. + Ranks to Concussion |
| Amulet | 1. Cooldown Reduction 2. Critical Strike Chance 3. Maximum Resource | 1. Damage to Close Enemies 2. Leap Cooldown Reduction |
| Rings | 1. Critical Strike Chance 2. Lucky Hit Chance 3. Strength | 1. Damage to Close Enemies 2. Resource Generation with Dual-Wielded Weapons |
| 2-Handed Bludgeoning Weapon | 1. Strength 2. Damage 3. Maximum Life | 1. Damage to Close Enemies 2. Earthquake Duration |
| 2-Handed Slashing Weapon | 1. Strength 2. Damage 3. Maximum Life | 1. Damage to Close Enemies 2. Earthquake Duration |
| Dual-Wield Weapons | 1. Strength 2. Damage 3. Maximum Life | 1. Damage While Berserking 2. Leap Slam Size |
Rotation and Playstyle
Let’s examine the typical rotation to stomp your way through the demonic hordes
- Use
 Leap until you cannot anymore to jump into the fray
 - Use
 Kick only when at full fury to reset Leap
 - Use your
 War Cry and
  Rallying Cry on cooldown for resource and damage
 - Use
 Wrath of the Berserker on tough elites or bosses
 - Use
 Challenging Shout when you need defense or to survive a particularly damaging attack
Unique Items
Below you will find the unique items useful to this build. Let’s dive in:
 Ramaladni’s Magnum Opus – A powerful one-handed sword that we will use to amplify our damage by assigning our dual-wield weapons to Leap. Once you acquire this sword, replace Aspect of Inner Calm.
 Tibault’s Will – Though nerfed in Patch 1.4.0 these pants are still very powerful for many builds. They come with a damage reduction affix, something that is a premium in Season 4 with the itemization changes. Replace your pants and Aspect of Numbing Wrath once you acquire these
Uber Uniques
Here you will find the uber unique items that are useful to this build. If an uber unique is NOT listed here, it is not useful to this build and does not provide any meaningful increase or effect.
 Harlequin Crest – The most coveted helm in all of Diablo 4. It remains powerful even in season 4. If you manage to acquire one of these, drop Bold Chieftain’s Aspect from your second ring, move Aspect of Bul-Kathos to your Amulet and move Edgemaster’s Aspect to your second ring.
 The Grandfather – The most powerful two-handed sword in the game. Its massive multiplier remains incredibly potent for this build. If you’re lucky enough to find one, drop Aspect of Retribution and enjoy wielding this monster instead
Season 4: Loot Reborn
Unlike past seasons there is no overarching theme for season 4 as Blizzard are focused on the absolutely massive loot overhaul which is sure to change the game in big ways. There will also be a reputation to be gained with the new Ironwolves during Helltides and this faction grants several tempering manuals and even a resplendent spark! Below are the changes relevant to this build
- Barbarian’s innate 10% Damage Reduction has been removed
- Legendary powers that require
 Call of the Ancients to be equipped no longer have that requirement.
 - Kick damage range increased from 2.2 to 3 meters
- Power Kick Damage per 10 Fury consumed increased from 20% to 25%
- Two-Handed Axe Technique’s increased to Vulnerable damage reduced from 15% to 10%
 Marshal Cooldown reduction reduced from 4 seconds to 2 seconds
 Blood Rage Damage increased by Berserking bonus reduced from 25% to 10% and caps at 30%
- Aspect of Giant Strides – Now reduces the cooldown of Leap by [2.5-5] seconds per enemy hit up to 9 seconds. Hitting a boss with Leap provides the maximum cooldown reduction.
- Tibault’s Will Damage bonus reduced from 20-40% to 10-20%, damage increase persists for 1 second longer after being Unstoppable
- Aspect of Retribution Chance of stun increased from 8% to 10%, now increases damage to Stunned and Knocked down enemies
- Aspect of Inner Calm Now causes you to deal [5-10%] increased damage. Triple this bonus after standing still for 3 seconds.
Advanced Information
Mechanics and Playstyle
There is only one opening for this build, and that’s to use Leap! We use a particular rotation of skills to keep resetting our Leap‘s Cooldown using the Aspect of Perpetual Stomping and Aspect of Giant Strides. We spec into ![]() Kick and specifically the newly buffed
Kick and specifically the newly buffed ![]() Power Kick which consume all of our Fury and reset our
Power Kick which consume all of our Fury and reset our ![]() Leap through Aspect of Perpetual Stomping. The shout skills are used whenever we need Unstoppable or an on-demand access to Berserking through
Leap through Aspect of Perpetual Stomping. The shout skills are used whenever we need Unstoppable or an on-demand access to Berserking through ![]() Wrath of the Berserker or
Wrath of the Berserker or ![]() Enhanced War Cry which allow us to benefit from our key passive
Enhanced War Cry which allow us to benefit from our key passive ![]() Unconstrained.
Unconstrained.
Berserking
This buff is almost always activated on our character, and there is very little we do to manage it. The  Battle Fervor is our trigger for Berserking and because we will be constantly using our
  Brawling Skills (Leap and Kick), to auto-renew our Berserking State. We will also have our Ultimate skill available, Wrath of the Berserker, for high-health targets; this will speedup our movement and damage.
Paragon Details
Let’s break down each of these beneficial nodes and where our Paragon Points are positioned in each of the Paragon Boards we use. This part of the build is presented in order of importance. If you do not have enough Paragon Points for use in your Paragon Tree, just slowly work towards each step.
Important Notes:
- Make sure you select the correct Legendary Boards and rotate them into the correct orientation to match the images shown below.
- Attach the boards in the order shown as bonus requirements of Rare Nodes increase with their placement order
- Additional bonuses on Rare Glyphs may not be obtainable until they gain the increased radius at level 15.
| Rare Glyph and Legendary Nodes | Effect |
| – For every 5 Dexterity purchased within range, you deal + [8%] increased damage to Vulnerable targets – Additional Bonus once 25 Dexterity points are purchased within the glyph’s range: When an enemy is damaged by you, they become Vulnerable for 3 seconds. This cannot happen more than once every 20 seconds per enemy | |
| – For every 5 Dexterity purchased within range, you deal + [10%] increased damage to Close targets – Additional Bonus once 25 Dexterity points are purchased within the glyph’s range: You gain a 15% Damage Reduction against Close enemies | |
| – For every 5 Strength purchased within range, your Earthquakes deal + [39.6%] increased damage. – Additional Bonus once 40 Strength points are purchased within the glyph’s range: You deal x10% increased damage to Bosses and Crowd Controlled enemies for each active Earthquake | |
| – For every 5 Strength purchased within range, you deal + [5.3%] increased damage while Berserking – Additional Bonus once 40 Strength points are purchased within the glyph’s range: While Berserking you take 10% reduced damage from Elites | |
| – Grants + [125%] bonus to all Magic Nodes within range – Additional Bonus once 40 Strength points are purchased within the glyph’s range: After casting a Shout Skill, the active Cooldown of every other Non-Shout Skill is reduced by 2 seconds | |
| – Grants + [125%] bonus to all Magic Nodes within range – Additional Bonus once 40 Strength points are purchased within the glyph’s range: You deal x8% increased damage while wielding One-Handed Weapons | |
| – For every 75 Fury you spend, you gain 15% of your Maximum Life as Fortify | |
| – While Berserking, Critical Strikes increase your Attack Speed +2%, up to 16% for 6 seconds. | |
| – Killing a Bleeding enemy has a 10% chance to grant Berserking for 5 seconds. Your damage is increased by x10% of your Damage While Berserking bonus up to a maximum of x30% | |
| – Each time you make an enemy Vulnerable, your damage is increased by 10% for 5 seconds. Overpowering a Vulnerable enemy grans x10% bonus for 5 seconds. |
Starting Board
- We begin by going right and grabbing
 Brawn and the Magic nodes around it and then head up.
 - Next we unlock the socket here and slot in
 Exploit. We pick up the Dexterity nodes nearby to activate it.
 - Once activated, we head up again through
 Iron Strength and make our way to the north gate where we will connect the Warbringer board.
Warbringer
- We start this board off by going left and grabbing
 Hungering Fury and the surrounding max fury nodes to boost our Power Kick.
 - We then head up and around to the right to make our way the legendary node, Warbringer.
- Next we head back to the start and head right to the socket and slot in Territorial.
- We grab enough Dexterity nodes to unlock its bonus and grab
 Conditioned and Raw Power.
 - Before we connect a new board, we head up and slightly left to snag Core Reserve and the surrounding Magic Nodes.
- Finally we exit the board and connect our most central board, Carnage.
Carnage
- Carnage can be a complicated board as it will be central with 4 boards connected to it. We will leave this board and return several times. Just follow the steps. To begin we head straight in and take the lower path right.
- We make our way to the glyph socket and slot in Rumble which will massively boost our quake damage.
- Next up is to grab as much strength around it as possible for more damage. Grab the rare nodes
 Fierce and
  Brash as well.
 - After that, we take a route out to the southern right of the glyph radius and grab the legendary node Carnage.
- Then we go back to the radius and make our way north grabbing Enraged and the three berserk boosting Magic nodes in front of it.
- We exit north and connect the Blood Rage Board.
- Once the Blood Rage board is complete, we return and from the legendary node, we head right through Berserker and out to the east connecting the Decimator board.
- Finally once the Decimator board is finished, return here one final time and make your way south to connect the Hemorrhage board.
Blood Rage
- We begin by heading straight up, take a small left detour to grab
 Revel and then the glyph socket.
 - Socket in Marshal and continue northward through Grit.
- Take a left turn and then down to grab the legendary node Blood Rage.
- Lastly, head back up and left and snag Enraged and the surrounding Magic nodes for more berserk damage.
Decimator
- Begin by heading in and taking the top path right to the glyph socket, slot in Ire.
- Begin grabbing all the Strength nodes as well as
 Arrogance and Demolish.
 - Lastly make your way out to the right and grab the legendary node, Decimator.
Hemorrhage
- We begin our final board by heading immediately left and grabbing Grit.
- Next we head down to the socket and unlock it slotting in Ambidextrous.
- We head left to grab Butcher and finish by grabbing every other Strength node possible in the glyph range that we have points to spare to activate it and that’s it, we’ve completed our paragon journey!
Obol Gambling
A final point on acquiring gear in Season 4 and beyond is using your Obols to target farm specific slots instead of randomly spending them on random drops. Similar to Kadala in Diablo 3, you can use Obol vendors in town to try and get what you’re missing. With Patch 1.4.0 when a level 100 Character spends Obols, all gear from that vendor will be 925 item power, the highest in the game, allowing you to fill out gear with the affixes or Legendary Aspects you need.
Check out our Obol Gambling Tool HERE!
Changelog
- May 9th 2024: Ownership of page transferred, guide restructured, updated for Season 4.
- March 5th 2024: Updates for Patch 1.3.3.
- January 21st 2024: Season 3 speculative changes.
- October 26th 2023: Build Revamped for Season 2.
- October 13th 2023: Build adjusted to prepare for Season 2 launch.
- August 8th 2023: Added notes about Patch 1.1.1.
- August 5th 2023: Malignant Hearts and Paragon updated for clarity.
- July 27th, 2023: Build creation Season 1.
