General Leveling Tips
To find out more general information about leveling as a Barbarian in Diablo 4, you can check out our main Barbarian Leveling guide. You can also go to our Barbarian Builds page for a list of other leveling and endgame Barbarian builds for you to choose from.
In regard to leveling up on the Seasonal Realm, you might also want to check out our season checklist, as it will give you some useful tips and tricks for Season 4 of Diablo 4. Don’t miss this chance to make the most out of your leveling journey!
Build Introduction
The point of this leveling guide is to quickly take your character from level 1 to 50 while using ![]() Rend and prepare for your transition into our Rend Barbarian Endgame Build. This guide will walk you through the skill point placement for levels 1-50 and give some insight on how each passive and skill work together to create synergy able to tackle whatever form of leveling you choose to take. We will also give some insight on Legendary Aspects, Affixes, Gems, and Elixirs we can utilize to accelerate our journey.
Rend and prepare for your transition into our Rend Barbarian Endgame Build. This guide will walk you through the skill point placement for levels 1-50 and give some insight on how each passive and skill work together to create synergy able to tackle whatever form of leveling you choose to take. We will also give some insight on Legendary Aspects, Affixes, Gems, and Elixirs we can utilize to accelerate our journey.
Our primary skill will be ![]() Lunging Strike for our Fury Generator. We’ll be augmenting this skill with:
Lunging Strike for our Fury Generator. We’ll be augmenting this skill with:
 Enhanced Lunging Strike – Which will provide some minor healing and damage to healthy enemies as we chase them down.
 Battle Lunging Strike – To provide a source of Bleeding in addition to our
  Rend
Rend
Our Core Skill of course will be ![]() Rend. Our primary spender. We’ll be augmenting this skill with the following:
Rend. Our primary spender. We’ll be augmenting this skill with the following:
 Enhanced Rend – Which allows us to extend the Vulnerable state on our enemies to make them take more damage from our bleeds.
 Furious Rend – To help
  Rend restore some of its cost when we’re hitting a large group of demons with it so we can cast the skill more frequently and stack its bleed up and up on everything around us.
Now that we know our two most basic skills, let’s have a deeper look at how we will allocate our skill points while we level up.
Allocation of Skill points
Let’s take a loot at how we will allocate our skill points as we level
Your complete skill bar will look like this:
Skill Tree
Here is the completed skill tree for the build:
Skill Clusters
Let’s review each cluster in the Skill Tree and discuss our reasons behind each passive and skill choice, so we have a good understanding of the build before we transition into the Rend Endgame Build Keep in mind, if you are leveling a new seasonal character, you will have some additional skill points to spend at the beginning.
Basic Skills
For this build we’ll be using the tried and true ![]() Lunging Strike for our generator. Upon first impressions you may be wondering why we are not choosing
Lunging Strike for our generator. Upon first impressions you may be wondering why we are not choosing ![]() Flay and that is because
Flay and that is because ![]() Lunging Strike has a bleed component through
Lunging Strike has a bleed component through ![]() Battle Lunging Strike and provides much needed mobility to help us chase down our targets. We’ll be relying on
Battle Lunging Strike and provides much needed mobility to help us chase down our targets. We’ll be relying on ![]() Rend and
Rend and ![]() Death Blow to do most of the heavy lifting anyway.
Death Blow to do most of the heavy lifting anyway.
Core Skills
Our core skill of choice is of course, ![]() Rend for which the build is named after. It is a powerful bleed that extends the Vulnerable status through
Rend for which the build is named after. It is a powerful bleed that extends the Vulnerable status through ![]() Enhanced Rend and can return most of its own Fury cost through
Enhanced Rend and can return most of its own Fury cost through ![]() Furious Rend. This means with the right setup this spender is mostly spammable and can rack up a hefty enough bleed to eat through most health bars on its own. It does require that you wait for the Damage Over Time (DoT) effect to happen for them to die.
Furious Rend. This means with the right setup this spender is mostly spammable and can rack up a hefty enough bleed to eat through most health bars on its own. It does require that you wait for the Damage Over Time (DoT) effect to happen for them to die.
Defensive Skills
Here we pick up a few passives and our main active skill in this cluster is ![]() Rallying Cry which will increase our movement speed and resource gain. We can become unstoppable through
Rallying Cry which will increase our movement speed and resource gain. We can become unstoppable through ![]() Enhanced Rallying Cry and gain more fury on-demand through
Enhanced Rallying Cry and gain more fury on-demand through ![]() Tactical Rallying Cry. For passives we take the following:
Tactical Rallying Cry. For passives we take the following:
 Imposing Presence – This gives us a large chunk of health which will be vital in season 4 while leveling
 Martial Vigor – Which gives us some tankiness against Elite monster and bosses.
Brawling Skills
In this cluster we will take ![]() War Cry for our active skill and then a number of passives which we will go over shortly.
War Cry for our active skill and then a number of passives which we will go over shortly. ![]() War Cry gives us a damage amp on-demand for when we run into tough packs.
War Cry gives us a damage amp on-demand for when we run into tough packs. ![]() Enhanced War Cry gives us an on-demand button for Berserking, a Barbarian unique status that will be detailed further in this guide but needless to say it is quite important. It also gives us some Fortify through
Enhanced War Cry gives us an on-demand button for Berserking, a Barbarian unique status that will be detailed further in this guide but needless to say it is quite important. It also gives us some Fortify through ![]() Mighty War Cry which enhances our survival. Let us dive into the passives we take:
Mighty War Cry which enhances our survival. Let us dive into the passives we take:
 Swiftness – Provides some movement speed which is always a good thing in Diablo games. The faster we can chase things down, the faster we can bleed them to death with
  Rend
Rend Booming Voice – Increases the duration of our Shout Skills, this means
  War Cry and
  Rallying Cry so we gain more benefit from both skills
 Aggressive Resistance – Gives us a bit of damage reduction, something that comes at a premium in season 4, whenever we’re in the Berserking state
 Prolific Fury – Helps give us even more resource generation while we’re Berserking so we can continue to spam
  Rend
Rend
Weapon Mastery Skills
Our skill of choice here is ![]() Death Blow which compliments the playstyle wonderfully.
Death Blow which compliments the playstyle wonderfully. ![]() Enhanced Death Blow gives us a big hit when fighting against bosses which can be a bit of a pain with this build.
Enhanced Death Blow gives us a big hit when fighting against bosses which can be a bit of a pain with this build. ![]() Warrior’s Death Blow gives us an easy way to trigger Berserking giving us easier access to this powerful aspect of the Barbarian class. Let’s take a look at the passives we pick up in this cluster:
Warrior’s Death Blow gives us an easy way to trigger Berserking giving us easier access to this powerful aspect of the Barbarian class. Let’s take a look at the passives we pick up in this cluster:
 Pit Fighter – A no nonsense damage amp and damage reduction against close targets. Since we are a melee class, that is essentially every enemy we want to be fighting.
 Hamstring – Provides us with an easy slow application to chase things down easier
 Cut to the Bone – Our big bleed damage amplifier skill which is why making things Vulnerable is important.
  Thick Skin – Will give us another source of Fortify whenever we’re in combat
 Counteroffensive – Is a powerful passive that gives a big damage boost as long as more than half of our life is Fortified.
 No Mercy – Grants us more damage against stunned, slowed, or immobilized enemies. Thanks to
  Hamstring we have easy access to a slow as long as a healthy enemy is bleeding.
 Expose Vulnerability – Is a critical passive that gives us easy access to apply the Vulnerable status to our enemies which further increases our damage and our bleeds.
Ultimate Skill
Our ultimate skill of choice is ![]() Call of the Ancients. We choose this for its damage amplifier from
Call of the Ancients. We choose this for its damage amplifier from ![]() Prime Call of the Ancients and thanks to the new buffs in Patch 1.4.0 this skill is quite powerful while leveling. We also gain some resources from
Prime Call of the Ancients and thanks to the new buffs in Patch 1.4.0 this skill is quite powerful while leveling. We also gain some resources from ![]() Supreme Call of the Ancients as well as stuns and slows which will further apply
Supreme Call of the Ancients as well as stuns and slows which will further apply ![]() No Mercy for us.
No Mercy for us.
Key Passive
Since we will be in the Berserking state quite frequently, we take full advantage by choosing ![]() Unconstrained. To address the elephant in the room – we are opting not to take
Unconstrained. To address the elephant in the room – we are opting not to take ![]() Gushing Wounds which would be a useful key passive to bleed based builds like this one, but as of the Patch 1.4.0 PTR this key passive was still bugged and not functioning properly to give our
Gushing Wounds which would be a useful key passive to bleed based builds like this one, but as of the Patch 1.4.0 PTR this key passive was still bugged and not functioning properly to give our ![]() Rend Build the boost needed to be effective.
Rend Build the boost needed to be effective. ![]() Unconstrained makes Berserking easier to maintain with a longer duration and gives us a massive damage amplifier while we’re in that state making it the much better choice. If things change and
Unconstrained makes Berserking easier to maintain with a longer duration and gives us a massive damage amplifier while we’re in that state making it the much better choice. If things change and ![]() Gushing Wounds is ever fixed to be function, we will update this guide accordingly.
Gushing Wounds is ever fixed to be function, we will update this guide accordingly.
Mechanics and Playstyle
The build is a pretty straight forward playstyle. We engage using ![]() Lunging Strike to build up our Fury. We spend our Fury on
Lunging Strike to build up our Fury. We spend our Fury on ![]() Rend to get large bleeds on enemies and then we use
Rend to get large bleeds on enemies and then we use ![]() Death Blow to finish things off or against strong single targets once they have
Death Blow to finish things off or against strong single targets once they have ![]() Rend applied. We can summon our squad through
Rend applied. We can summon our squad through ![]() Call of the Ancients whenever we encounter a powerful boss, The Butcher, or strong Elites as we make our way towards the endgame.
Call of the Ancients whenever we encounter a powerful boss, The Butcher, or strong Elites as we make our way towards the endgame.
Bleeding
The majority of our damage comes from Bleeding enemies, we do this through our skills, but also trigger some enhancements from our Legendary Aspects. See the list below:
Defenses
The majority of our Defenses come from our Legendary Aspects and Passives. See the list below:
Weapon Expertise
For the Rend Leveling build, we will be focus on using Two-handed axes for the increase to Vulnerable enemies.
Leveling Options
There are many options to level your character: kill monsters, do quests in each region if you need the Renown, follow a Seasonal story line, farming dungeons, or participating in regional events. With so many methods at your disposal we’ve chosen some methods that will accelerate your path to the endgame. As always check out our Barbarian Leveling Guide for the best options.
Open World Activities
The open world is full of monsters and activities, you are welcome to find your own path or leveling areas but if you are looking for some great options, here are two great suggestions for this build:
Helltide
With the revamp to Helltide coming in Patch 1.4.0 it will be available right from World Tier 1 and 2. It comes with a new coat of paint and massive amount of loot and experience. For more details check out our Barbarian Leveling Guide.
Questing
Questing is a necessary evil if you are still grinding out your renown levels for each zone. If you need to complete your Renown, it can be a relatively easy way to get some quick experience along the way. If this is something you need to do, take as many quests as you can from one area and complete them all in one go. It may not feel necessarily faster, but going back and forth for each one is a waste of time.
Gear Affixes
In the early levels, targeting affixes on your gear can be very challenging. Part of the reason is we will be playing in World Tier 2 and the best opportunity for rare gear is a maximum of two affixes. We will show three recommended affixes to give you some flexibility in gear selection, as well as list a Tempering Affix for each slot. Keep in mind that tempering is more of an end-game system and with the frequency of gear replacements may not be the optimal thing to do while leveling. As a final reminder, non-ancestral items can only have one temper applied to them so we will be listing the best temper for each slot should you want to apply it.
| Gear Slot | Targeted Affixes | Tempering Affixs |
|---|---|---|
| Helm | 1. Cooldown Reduction 2. Attack Speed 3. Maximum Life | 1. Lucky Hit: Chance to Immobilize for 2 Seconds |
| Chest | 1. Strength 2. Maximum Life 3. Needed Resistance | 1. Lucky Hit: Chance to Immobilize for 2 Seconds |
| Gloves | 1. Critical Strike Chance 2. Ranks of  Rend Rend3. Attack Speed 4. Strength | 1. Death Blow Damage |
| Pants | 1. Strength 2. Maximum Life 3. Needed Resistance | 1. Lucky Hit: Chance to Immobilize for 2 Seconds |
| Boots | 1. Movement Speed 2. Strength 3. Fury Per Second | 1. Movement Speed |
| Amulet | 1. Cooldown Reduction 2. Attack Speed 3. Ranks to 4. Critical Strike Chance | 1. Death Blow Cooldown Reduction |
| Rings | 1. Attack Speed 2. Critical Strike Chance 3. Fury on Kill | 1. Death Blow Cooldown Reduction |
| Weapons | 1. Fury on Kill 2. Strength 3. Maximum Life | 1. Rend Size |
Gems
Listed below are the best gems to socket into gear for each slot type.
- Weapon:
 Amethyst for the increase to Damage over Time effects.
 - Armor:
 Ruby for the increase to Maximum Life.
 - Jewelry:
 Diamond for the All Resistances.
Legendary Aspects
The Legendary Aspects chosen below are all available from the Codex of Power, so each Aspect can be found from Dungeons in the open world. If possible, finding each of these Aspect on a piece of Legendary gear will offer you a better roll compared to the Codex of Power.
| Gear Slot | Legendary Aspect | Legendary Aspect Power |
|---|---|---|
| Helm |  Aspect of Might Aspect of Might | Basic Skills grant 20% Damage Reduction for [2.0-6.0] seconds. |
| Chest |  Aspect of Disobedience Aspect of Disobedience | You gain [0.6 – 1.1%] increased Armor for 4 seconds when you deal any form of damage, stacking up to [36 – 66%]. |
| Gloves |  Aspect of Anemia Aspect of Anemia | Lucky Hit: Direct damage against Bleeding enemies has up to a [20-30%] chance to Stun them for 2 seconds. |
| Pants |  Iron Blood Aspect Iron Blood Aspect | Gain [2.0-4.0%] Damage Reduction for each Nearby Bleeding enemy up to [10-20%] maximum. |
| Boots |  Ghostwalker Aspect Ghostwalker Aspect | While Unstoppable and for 4 seconds after, you gain [10- 25%] increased Movement Speed and can move freely through enemies. |
| Amulets(50% bonus) |  Slaking Aspect Slaking Aspect | Lucky Hit: You have up to a [40-60%] chance to gain 20 Fury when |
| Ring |  Aspect of Berserk Fury Aspect of Berserk Fury | You gain [1-6] Fury per second while Berserking |
| Ring |  Aspect of Voracious Rage Aspect of Voracious Rage | Killing an enemy with a Core Skill refunds [10.0-20.0%] of its base Fury cost. Can only happen once per Skill cast. |
| Bludgeoning Weapon (200% bonus) |  Aspect of the Expectant Aspect of the Expectant | Attacking enemies with a Basic Skill increases the damage of your next Core Skill cast by [5-10%], up to 30%. |
| Slashing Weapon (200% bonus) |  Edgemaster’s Aspect Edgemaster’s Aspect | Skills deal up to [10- 20%] increased damage based on your available Primary Resource when cast, receiving the maximum benefit while you have full Primary Resource. |
| Dual-Wield Weapon 1 |  Rapid Aspect Rapid Aspect | Basic Skills gain [15-30%] Attack Speed. |
| Dual-Wield Weapon 2 |  Aspect of Berserk Ripping Aspect of Berserk Ripping | Whenever you deal direct damage while Berserking, inflict [20-30%] of the Base damage dealt as additional Bleeding damage over 5 seconds. |
Capstone Dungeon and Early Paragon
Once you hit Level 50 with this leveling build, you will be ready to complete your first Capstone Dungeon and unlock World Tier 3. This will open up the true endgame and allow you to collect new Sacred Rares and Legendary Aspects you will need to transition into the Endgame Upheaval Build. Once you upgrade your build to the Endgame build, you will be ready to push into Nightmare dungeons, World Tier 3 Capstone Dungeon, the Paragon Board system and so much more.
Here are some starter Paragon Boards for you to try.
Starting Board

- We begin by going right and grabbing
 Brawn and some magic nodes nearby, then we head up and unlock the glyph socket.
 - We slot in
 Exploit to give us some vulnerable damage and a quick way to apply it as we attack. The glyph at this point is unlikely to be level 15, but we have enough Dexterity nearby to activate it regardless.
 - Swing up right and grab
 Iron Strength and then head left on the board towards
  Raw Power and its magic nodes.
 - Finally head up and out and connect the Warbringer board
Warbringer
Rotate this board three times before attaching.

- We head up and to the right, towards the glyph socket grabbing the extra strength nodes on the way.
- We slot in
 Ire for the berserking damage bonus and grab
  Conditioned and
  Raw Power for their strength and power. Our glyph is unlikely to be level 15 at this point, but we have enough strength to activate its secondary effects here
 - We grab the last remaining strength nodes to turn on the glyph and then we make our way up and out to the right where we will connect the Carnage board
Carnage
Rotate this board twice before attaching it.
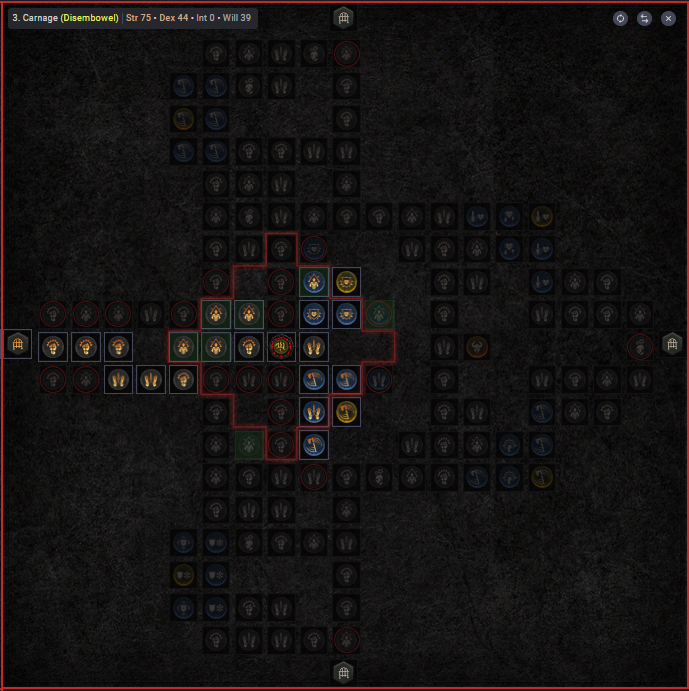
- We dive straight in and head on the down path to the right and run to the glyph socket where we will put in
 Disembowel for the bleed damage amp.
 - Next we grab
 Brash and the Willpower nodes nearby before heading south and grabbing
  Fierce
 - We pick up the last few Willpower nodes to activate the secondary effect of our glyph since it is unlikely to be level 15 at this point. From this point, we will want to transition to the Rend Endgame Barbarian Build or another endgame build of your choice!
Paragon Board images courtesy of d4builds.gg.
Elixirs and Health Pots
Visit the Alchemist in any main town to craft helpful Elixirs that increase stats, and experience gain for 30 minutes. Make sure to forage plants and pick up the necessary crafting materials during your adventures; they randomly spawn around the world. We recommend using ![]() Elixir of Advantage for the increased attack speed or any elixir that provides a needed resistance or toughness advantage. Elixirs grant anywhere from 5% to 8% increased experience while leveling to help you reach further into the endgame even faster, so you should worry less about specific elixirs and always have at least one active while leveling.
Elixir of Advantage for the increased attack speed or any elixir that provides a needed resistance or toughness advantage. Elixirs grant anywhere from 5% to 8% increased experience while leveling to help you reach further into the endgame even faster, so you should worry less about specific elixirs and always have at least one active while leveling.
Return to the Alchemist again when you reach Level 20, 30, 45, 60, 70, 80 and 90, to upgrade your potion. The extra healing is essential to survival.
Changelog
- May 8th 2024: Ownership of page transferred, guide restructured and updated for season 4
- January 21st 2024: Season 3 speculative changes.
- October 23rd 2023: Revamped build for season 2.
- October 13th 2023: Build Adjusted to prepare for Season 2 launch.
- September 16th 2023: Leveling Guide revamp


