


Build Introduction
Welcome to the comprehensive guide for the ![]() Bash Cleave Barbarian for the endgame of Diablo 4. This new build, made possible by changes in Patch 1.4.0 and the new tempering system, is a powerful generator build with tons of damage, survivability, and speed. You will be able to smash your way through nightmare dungeons, the pit, and uber bosses with ease while not having to worry about managing your resources giving you full damage uptime. With that in mind, let us dive in.
Bash Cleave Barbarian for the endgame of Diablo 4. This new build, made possible by changes in Patch 1.4.0 and the new tempering system, is a powerful generator build with tons of damage, survivability, and speed. You will be able to smash your way through nightmare dungeons, the pit, and uber bosses with ease while not having to worry about managing your resources giving you full damage uptime. With that in mind, let us dive in.
- Powerful generator based damage
- Fast attack speed
- Great defensive power
- Requires specific tempers on items
- Cooldown management
- Another triple shout build
To see how this build compares to the other builds on our site, you can check out our build tier lists.
Build Requirements
 Aspect of the MoonriseAspect of Accursed Touch
Skill Bar and Skill Tree Points
 Bash
Bash  Wrath of the Berserker
  Rallying Cry
  War Cry
  Challenging Shout
  Kick
Kick Follow the points allocated in the image above for the complete 58-point build. The additional 10 skills are completed using the Renown system.
Arsenal System and Weapon Selection
For this ![]() Bash build, we will be using 2-Handed Axe expertise for its bonus to Vulnerable damage. Even nerfed to 10% in Patch 1.4.0 this is still our strongest option. For this build, we will be assigning the following weapons to our skills
Bash build, we will be using 2-Handed Axe expertise for its bonus to Vulnerable damage. Even nerfed to 10% in Patch 1.4.0 this is still our strongest option. For this build, we will be assigning the following weapons to our skills
 Bash – Dual Wield Weapons to make use of
  Ramaladni’s Magnum Opus
 Kick – Either 2Handed Bludgeoning or 2H Slashing since its damage is irrelevant, it is only used to dump Fury.
Paragon Board
We recommend using the following Legendary nodes and Rare Glyphs to truly take this build into the endgame. Note that each Rare Glyph’s information and radius listed below is for the Level 21 version.
Starting Board

Carnage
Do not rotate this board when attaching it.
Blood Rage
This board is attached to the Western gate of Carnage. Do not rotate this board when attaching it.

Warbringer
We attach this board to the Northern gate of the Carnage board. Do not rotate this board when attaching it.

Flawless Technique
We attach this board to the Western gate of the Warbringer board. Rotate this board twice before attaching it.
Decimator
We attach this board to the Northern gate of Flawless Technique. Rotate this board once before attaching it.

To see the Paragon Board in its entirely, CLICK HERE
Gear, Gems, Elixirs, and Stats
The Season of Loot Reborn brings us an incredible shift in how gear and itemization are done. It is a major and will affect the game beyond Season 4’s confines. For further details, make sure to read our Tempering and Masterworking section below.
Legendary Aspects
Below, you will find all of the BiS (best-in-slot) Aspects found on Legendary Items that are important for this build. Remember that with Patch 1.4.0 all Legendary powers can be added into your Codex once you salvage or extract the item. You can still find some aspects through dungeons as you could in previous seasons but now you have the option to upgrade these affixes if you find a higher roll of that affix. Let us go over what aspects you will need.
| Slot | Gems | Legendary Aspect / Unique Item | Aspect / Unique Power |
| Helm | – When you gain Berserking while already Berserk, you have a [40-60%] chance to become more enraged granting x15% increased damage, 2 Fury Per Second, and 10% Cooldown Reduction | ||
| Chest |  Juggernaut’s Aspect Juggernaut’s Aspect | – Gain [X] Armor, but your Evade has a 100% increased Cooldown | |
| Gloves | N/A | Aspect of Accursed Touch | – Lucky Hit: Up to a [20-35%] chance to inflict Vampiric Curse on enemies. Enemies with Vampiric Curse are also Vulnerable. Vampiric Curse’s stored souls deal [20-50%] increased damage |
| Pants | Aspect of Might | – Basic Skills grant 20% Damage Reduction for [2.0-6.0] seconds | |
| Boots | N/A |  Hectic Aspect Hectic Aspect | – After casting 5 Basic Skills, one of your active Cooldowns is reduced by [1-2] seconds |
| Amulet |  Aspect of Adaptability Aspect of Adaptability | – Basic Skills generate 3 additional resource when cast below 50% Maximum Resource and deal [20-80%] increased damage when cast above 50% Maximum Resource | |
| Ring 1 | Edgemaster’s Aspect | – Skills deal up to [5-20%] increased damage based on your available Primary Resource when cast, receiving the maximum benefit while you have full Primary Resource | |
| Ring 2 | Bold Chieftain’s Aspect | – Whenever you cast a Shout Skill, its Cooldown is reduced by [1.0-2.0] seconds per nearby enemy up to a maximum of 6 seconds | |
| 2H Bludgeoning Weapon | Aspect of the Moonrise | – Damaging an enemy with a Basic Skill grants you 4% Attack Speed for 10 seconds, stacking up to 5 times. Upon reaching maximum stacks you enter a Vampiric Bloodrage gaining [40-80%] Basic Skill damage and 15% Movement Speed for 10 seconds. | |
| 2H Slashing Weapon | Rapid Aspect | – Basic Skills gain [15-30%] Attack Speed | |
| Dual Wield Weapon 1 | Aspect of Berserk Ripping | – Dealing direct damage while Berserking inflicts [15-30%] of the base damage as additional Bleeding damage | |
| Dual Wield Weapon 2 | – Skills using this weapon deal [0.2-0.4%] increased damage per point of Fury you have, but you lose 2 Fury every second |
Gems
Listed below are the best gems to socket into your items for each slot type.
| Weapon Gems | Armor Gems | Jewelry Gems |
For your jewelry it may be necessary to change the Royal Diamond for another gem for a specific type such as Royal Sapphire to ensure all of your resistances are capped at 70%
Which Elixirs Should You Use?
When in town you can visit the Alchemist to craft helpful elixirs which will provide a special effect and increase your experience gain. Crafting has been simplified in Patch 1.4.0, and there are fewer specific flowers to harvest; instead, almost all herbs in the world drop as Bundles of Dried Herbs, allowing you to craft the elixirs you want. Some elixirs cannot be crafted and can only drop from things like Helltide or Nightmare Dungeons.
For this build, we recommend ![]() Elixir of Advantage for the increased attack speed so we can continue
Elixir of Advantage for the increased attack speed so we can continue ![]() Bash and cleave the hordes in front of us down faster. Craft the highest-value Elixir of Advantage you can so you can get the most attack speed possible.
Bash and cleave the hordes in front of us down faster. Craft the highest-value Elixir of Advantage you can so you can get the most attack speed possible.
Stat Priority and Tempering Affixes
With all of the new systems in mind, let us dive into what stats we will want on our gear, what tempers we would like to use, and what stat we would prefer to be pumped either through a Greater Affix, Masterworking, or both. Affixes that are bolded in yellow are the most important targets for Masterworking upgrades on the special enhancement levels. The tempering manuals needed will be linked beside the affixes we want.
| Slot | Gems | Gear Affixes | Tempering Affixes |
| Helm | 1. Maximum Life 2. Cooldown Reduction 3. Needed Resistance | 1. +Ranks to Martial Vigor 2. +Ranks to Concussion | |
| Chest | 1. Strength 2. Maximum Life 3. Needed Resistance | 1. + Ranks to Martial Vigor 2. + Ranks to Concussion | |
| Gloves | N/A | 1. Critical Strike Chance 2. Attack Speed 3. Maximum Life | 1. Damage While Berserking 2. + Ranks to Concussion |
| Pants | 1. Ranks to Bash 2. Maximum Life 3. Needed Resistance | 1. + Ranks to Martial Vigor 2. + Ranks to Concussion | |
| Boots | N/A | 1. Ranks to Kick 2. Movement Speed 3. Needed Resistance | 1. Movement Speed 2. +Ranks to Concussion |
| Amulet | 1. Cooldown Reduction 2. Movement Speed. 3. Critical Strike Chance | 1. Damage to Close Enemies 2. Wrath of the Berserker Cooldown Reduction | |
| Rings | 1. Attack Speed 2. Crititcal Strike Chance 3. Critical Strike Damage | 1. Damage to Close Enemies 2. Wrath of the Berserker Cooldown Reduction | |
| 2H Bludgeoning Weapon | 1. Strength 2. Maximum Life 3. Critical Strike Damage | 1. Bash Cleaves for (82.5-105%) Damage 2. Damage to Close Enemies | |
| 2H Slashing Weapon | 1. Strength 2. Maximum Life 3. Critical Strike Damage | 1. Bash Cleaves for (82.5-105%) Damage 2. Damage to Close Enemies | |
| Dual-Wield Weapons | 1. Strength. 2. Maximum Life 3. Critical Strike Damage | 1. Bash Cleaves for (82.5-105%) Damage 2. Damage to Close Enemies |
Rotation and Playstyle
This build uses a very straight forward generator playstyle. We have no Fury spender beyond one button and we only use that for a buff explained below in the Adavnced Information section but let’s quickly go over our skills
- Bash – Our main attacking still. We bash at all times
- Kick – Our only way to dump Fury which we do only after activating our ultimate
- Use
 War Cry and
  Rallying Cry for their buffs on cooldown
 - Use
 Challenging Shout whenever you need the defense
 - Use
 Wrath of the Berserker at max fury and then dump with Kick for a big bonus against Elites and Bosses
Unique Items and Uber Uniques
Below, you will find the useful uniques for this build. Remember, you cannot temper Unique Items to add any affixes to them but you can improve their power through Masterworking.
 Tuskhelm of Joritz the Mighty – This item provides us with attack speed, something we love, damage while Berserking in an item slot that would not normally have it, and a powerful effect when we gain Berserking while already Berserking to give us another large multiplier to our damage.
- Ramaladni’s Magnum Opus – A favorite one-hander among many builds, this gives us a powerful damage increase to our main damage skill Bash as long as we assign the Dual-Wield Weapons to the skill and we never have to worry about the downside of this item as we are a generator build so our resources do not matter as much.
 Harlequin Crest – Especially powerful in Patch 1.4.0 as damage reduction is hard to come by on gear. This will provide us with ranks to our Bash and Kick as well as easier cooldown management. If you find one of these, replace the Tuskhelm or any other Legendary helm with it.
Season 4: Loot Reborn
Unlike past seasons there is no overarching theme for season 4 as Blizzard are focused on the absolutely massive loot overhaul which is sure to change the game in big ways. There will also be a reputation to be gained with the new Ironwolves during Helltides and this faction grants several tempering manuals and even a resplendent spark! Below we will list relevant changes to the Barbarian clash for this ![]() Bash Build
Bash Build
- Barbarian’s innate 10% Damage Reduction has been removed
- Two-Handed Axe Technique has been reduced to 10% from 15%
- Hectic Aspect Cooldown reduction reduced from 2-4 seconds to 1-2 seconds.
- Kick damage range increased from 2.2 meters to 3 meters, additional damage when an enemy is knocked into a wall increased from 70% to 105%
- Power Kick Damage per 10 Fury consumed increased from 20% to 25%
 Blood Rage Damage increased by Berserking bonus reduced from 25% to 10% and caps at 30%x damage bonus
Advanced Information
Below, you will find every additional piece of information you need to know for a more in-depth look at this build.
Build Mechanics
This build plays around the ![]() Supreme Wrath of the Berserker talent and Berserking. To optimize your Bash damage, you will want to build to max fury and then pop
Supreme Wrath of the Berserker talent and Berserking. To optimize your Bash damage, you will want to build to max fury and then pop ![]() Wrath of the Berserker, and then
Wrath of the Berserker, and then ![]() Kick something. Thanks to
Kick something. Thanks to ![]() Power Kick all of your fury will be dumped, you will gain a massive damage amp from Wrath, and from then on we just
Power Kick all of your fury will be dumped, you will gain a massive damage amp from Wrath, and from then on we just ![]() Bash our way to victory! A very straightforward playstyle.
Bash our way to victory! A very straightforward playstyle.
We will have nearly infinite uptime on the Berserking state thanks to our setup and big damage amps from ![]() Unconstrained and
Unconstrained and ![]() Tuskhelm of Joritz the Mighty. We will also have a ton of cooldown reduction from gear rolls and the Hectic Aspect since we’re using a generator primarily to deal our damage. Speaking of gear, let’s move on to some in-depth talk since gear will be very important for this build in particular.
Tuskhelm of Joritz the Mighty. We will also have a ton of cooldown reduction from gear rolls and the Hectic Aspect since we’re using a generator primarily to deal our damage. Speaking of gear, let’s move on to some in-depth talk since gear will be very important for this build in particular.
Paragon
We recommend using these Legendary Nodes and Rare Glyphs to truly take this build into the endgame. Note that each Rare Glyph’s information listed below is for the Level 21 version of that glyph.
| Rare Glyph | Effect |
| – For every 5 Dexterity purchased within range, you deal + [10%] increased damage to Close targets – Additional Bonus once 25 Dexterity has been purchased within the glyph’s range: You gain 15% Damage Reduction against Close enemies | |
| – Grants + [125%] bonus to all Magic nodes within range – Additional bonus once 40 Strength has been purchased within the glyph’s range: You deal x8% increased damage while wielding One-Handed Weapons | |
| – For every 5 Dexterity purchased within range, you deal + [15%] increased Critical Strike Damage – Additional bonus once 25 Dexterity has been purchased within the glyph’s range: Skills that Critical Strike generate 3 Fury | |
| – For every 5 Strength purchased within range, you deal + [5.3%] increased damage while Berserking – Additional bonus once 40 Strength has been purchased within the glyph’s range: While Berserking, you take 10% reduced damage from Elites | |
| – For every 5 Willpower purchased within range, you deal + [8%] increased Bleeding damage. – Additional bonus once 25 Willpower has been purchased within the glyph’s range: Killing a Bleeding Enemy has a 10% chance to reduce the Cooldowns of your Non-Ultimate active Cooldowns by 1 second. | |
| – For every 5 Willpower purchased within range, you deal + [8%] increased damage while Fortified – Additional bonus once 25 Willpower has been purchased within the glyph’s range: You gain 10% damage reduction the more Fortify you have. | |
| While Berserking, Critical Strikes increase your Attack Speed by +2%, up to +16% for 6 seconds. | |
| Killing a Bleeding enemy has a 10% chance to grant Berserking for 5 seconds. Your damage is increased by x25% of your Damage While Berserking bonus. | |
| Each time you make an enemy Vulnerable, your damage is increased by 10% for 5 seconds. Overpowering a Vulnerable enemy grants an additional x10% bonus for 5 seconds. |
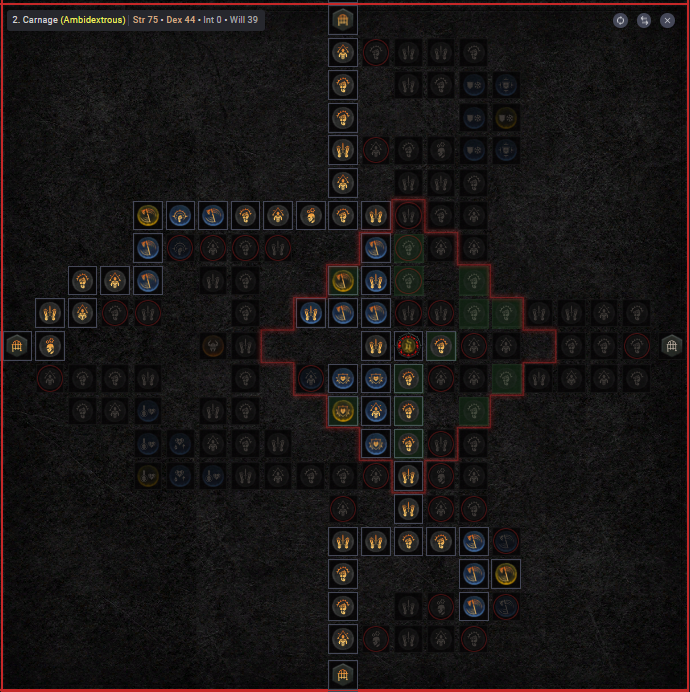
Let’s break down each of these nodes and where our Paragon Points are positioned in each of the boards we use. This part of the build guide is presented in order of importance. If you do not have enough Paragon Points for use in your Paragon Tree, just slowly work towards each step.
Important Notes
- Make sure you select the correct Legendary Boards and rotate them into the correct orientation to match the images shown below.
- Attach the boards in the order shown as bonus requirements of Rare Nodes increase with their placement order
- Additional bonuses on Rare Glyphs may not be obtainable until they gain the increased radius at level 15.
Starting Board
- We will start on the left and pick up
 Tenacity and then head up
 - Now we will unlock the glyph socket and slot in
 Territorial and grab all the dexterity nodes around it.
 - We pick up all the remaining rare nodes heading up from the socket to
 Iron Strength and then down to
  Brawn.
 - Finally we head left and pick up Raw Power and then up and out to the next board, Carnage
Carnage
- We will start heading up and then take a right to grab
 Enraged and the surrounding rare nodes for Berserk damage
 - Then we head up and head to the glyph socket and slot in
 Ambidextrous and pick up the strength nodes around it to meet the requirements including
  Brash and Fierce as rare nodes.
 - We head left towards the board’s namesake and grab the Carnage legendary node.
- We will head out to the left grabbing Berserker and its rare nodes.
- After filling out the Blood Rage board we will come back to the Carnage board and head up and out to the Warbringer board.
Blood Rage
- We rush straight left to the glyph socket and slot in
 Disembowel and grab enough willpower nodes to activate its secondary effect including
  Grit
Grit - We head up and left to grab the board’s namesake Blood Rage
- Finally we head a bit further left and pick up the last few useful nodes Enraged and its surrounding rare nodes and then we head back to the Carnage board.
Warbringer
- We head up and to the right to grab
 Core Reserve and its rare clusters for max fury and life
 - Next we go to the glyph socket and unlock it slotting in Wrath and grab as much dexterity as we can.
- We grab two rare nodes in the glyph radius that do not have dexterity for their raw power
 Conditioned for all res and Raw Power for more physical damage.
 - We head up and grab Hungering Fury and its surrounding rare nodes for more maximum fury to enhance our Kick to fuel our Supreme Wrath of the Berserker.
- Finally we head out to he left and attach the Flawless Technique board
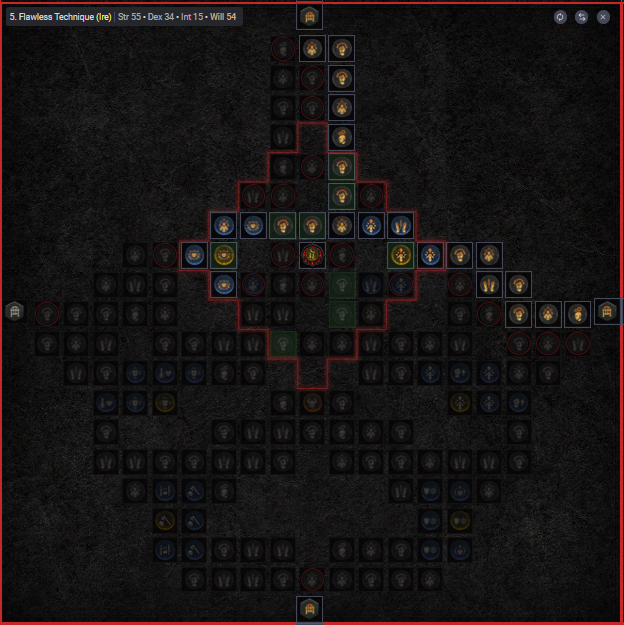
Flawless Technique
- We run to the glyph socket and slot in Ire and grab enough strength nodes to empower it including Brash and
 Heavy Blows.
 - We head north and connect the Decimator board
Decimator
- This board is our final and very straight forward. We rush up to the glyph socket and unlock it slotting in Undaunted
- We grab the rare nodes
 Demolish and Arrogance and fill out enough willpower to empower Undaunted
 - We finally head left and pick up the board’s namesake Decimator and finish out our paragon boards.
Tempering and Masterworking
Season 4 brings us an incredible shift in how gear and itemization are done. It is the major rework for Patch 1.4.0 and will affect the game beyond Season 4’s confines. Let’s dive in.
Perhaps the biggest change is the number of affixes on items. Normal items have no affixes, Magic Items have 1 affix, Rare Items have 2 affixes, Legendary Items have 3 affixes, and Unique Items have 4 affixes. Even if you use your Codex of Power to apply a Legendary Aspect onto a Rare Item, it will still only have 2 affixes. This means for season 4 and beyond, barring any patch updates, Legendary Items will be superior in all slots at the end-game.
Additionally, a new feature is being introduced on Ancestral Legendary Items, called a Greater Affix, which rolls a stat slightly higher than the normal stat ranges. An item can have 1, 2, or even 3 Greater Affixes, which makes the hunt for more powerful items more exciting than ever before.
Perhaps most important for this build, are the Tempering System and Masterworking Systems. On any Rare Item or Legendary Item, you are able to add a new affix to it, some of which are exclusive to the Tempering System. If the item is Ancestral, you can add two new affixes to it through this system, bringing the total affixes that can appear on Ancestral Legendary Items to 5! Unfortunately, Unique Items cannot be tempered and cannot have any additional affixes added to them. However, they can still be enhanced through the Masterworking System, which we will speak about below.
Once an item has all of its Tempering Slots filled out and is of Ancestral Quality, you can use the new crafting materials found in The Pit to enhance an item’s power similar to how the old Blacksmith upgrades functioned prior to Patch 1.4.0. The big differences are that there are now 12 upgrade slots per item instead of 5 and on upgrades number 4, 8, and 12 one of the affixes on the item will be chosen at random and be given a much larger boost instead of the typical 5% increase per level. The same affix can be chosen multiple times and in most cases, you will want the same affix on a piece of gear to be chosen on all three special enhancement levels during Masterworking.
Obol Gambling
A final point on acquiring gear in Season 4 and beyond is using your Obols to target farm specific slots instead of randomly spending them on random drops. Similar to Kadala in Diablo 3, you can use Obol vendors in town to try and get what you’re missing. With Patch 1.4.0 when a level 100 Character spends Obols, all gear from that vendor will be 925 item power, the highest in the game, allowing you to fill out gear with the affixes or Legendary Aspects you need.
Check out our Obol Gambling Tool HERE
Changelog
- May 4th, 2024: Guide format updated, season 4 information added.
- May 2nd, 2024: Paragon links updated and readability improved
- May 1st, 2024: Guide created
