


Telestomp Charged Bolts Sorcerer with Meteorstomp Build Variant
The Telestomp  Charged Bolts Sorcerer electrifies the entire ground with explosive lightning, leaving your foes with no safe space to survive. Piercing bolts from Aspect of Piercing Static combined with exploding lightning novas from Enhanced Charged Bolts makes this build excel clearing groups of enemies with Area of Effect (AoE) damage. Storm through endgame activities with the explosive power of the Telestomp Charged Bolts Sorcerer!
![]() Raiment of the Infinite allows this build to use 2 sources of
Raiment of the Infinite allows this build to use 2 sources of ![]() Teleport offensively. Teleporting on top of enemies to Stun and group them up is called “Telestomping”. This playstyle can quickly clear groups of enemies and keep them Crowd Controlled (CC) for safety, perfect for speed farming Nightmare Dungeons! The final version of this build, Meteorstomp Charged Bolts Sorcerer, supplements
Teleport offensively. Teleporting on top of enemies to Stun and group them up is called “Telestomping”. This playstyle can quickly clear groups of enemies and keep them Crowd Controlled (CC) for safety, perfect for speed farming Nightmare Dungeons! The final version of this build, Meteorstomp Charged Bolts Sorcerer, supplements ![]() Meteor with
Meteor with ![]() Starfall Coronet for additional damage output.
Starfall Coronet for additional damage output.
The Telestomp Charged Bolts Sorcerer requires  Raiment of the Infinite to group enemies together, in order to shotgun them with piercing bolts and exploding lightning novas. Raiment of the Infinite can be target farmed from the Uber versions of Varshan and Lord Zir. If you do not have the Unique Chest Armor yet, use the Chain Lightning Sorcerer Endgame Build.
This endgame build guide assumes your character is at least Level 50. Check the Sorcerer Leveling Guide if you need help getting there. You should also already have the Build Requirements listed in the section below.
Strengths and Weaknesses
- Explosive Area of Effect (AoE) damage for clearing groups of enemies.
- Simple playstyle.
- Multiple Defensive Skills and Crowd Controls for survivability.
- Needs specific gear to function well.
- Melee range combat.
- Lacks survivability when Defensive Skills or Crowd Controls are inactive.
To see how this build compares to the other builds on our site, you can check out our build tier lists.
Video Overview and Gameplay Footage
Build Requirements
 Prodigy’s Aspect
 Aspect of Piercing Static
Charged Bolts can quickly drain Mana and requires specific gear to perform well. Start with the Chain Lightning Leveling Guide to begin a new Sorcerer character, and then transition to the Chain Lightning Endgame Guide at Level 50. Collect the required items listed below before attempting to switch to this Charged Bolts Sorcerer build.
 Raiment of the Infinite
- A Helm with Cooldown Reduction (or
 Starfall Coronet for the Meteorstomp Build Variant).
 - Gloves with Lucky Hit Chance to Restore Primary Resource (or
 Fists of Fate with at least 280% damage value).
 - A Focus with Lucky Hit Chance to Restore Primary Resource and Cooldown Reduction. Mana Cost Reduction and Resource Generation affixes are optional.
- Boots with Mana Cost Reduction.
- An Amulet with Cooldown Reduction.
- Rings with Resource Generation and Lucky Hit Chance.
- A highly rolled Prodigy’s Aspect, preferably above 20 Mana.
While these items are minimum requirements, being prepared with all the aspects and the priority affix gear listed in this build will make the switch easier.
Season of the Construct
Season 3 Patch Updates
The following list details the changes in the Season 3 Update (Patch 1.3.0) that may pertain to Charged Bolts Sorcerers. Check the Changelog for all the other guide updates.
 Staff of Lam Esen: Increased Charged Bolt chance to be attracted to enemies from 30–50% to 40–60%.
 Lightning Spear: Critical Strikes now apply Vulnerable for 3 seconds.
- Fixed an issue where
 Ball Lightning was dealing far more damage than intended.
 - Fixed an issue where the
 Protection passive did not take into account any bonuses to Barrier generation.
 - Fixed an issue where the Static Surge legendary node would trigger from automatic casts of skills, such as the Chain Lightning enchantment.
- New Unique Helm added: Starfall Coronet
 Melted Heart of Selig
 - All Stats increased to 2x normal value.
- Core Skill Damage changed to Movement Speed.
- Damage While Healthy increased to 3x normal value.
- Unique Power Changed
- Previous: Gain 30 Maximum Resource. In addition, when you take damage, drain 3 resources for every 1% of life you would have lost instead.
- New: Gain 60 maximum Resource. 75% of incoming damage drains 2 Resource for every 1% of Life you would have lost instead.
Best Seneschal Construct Companion Powers
The Season 3 theme introduces a Seneschal Construct Companion that can deal damage or provide support to complement your character. Equip the Seneschal with two Governing Stones to activate their abilities, and then link them to three Tuning Stones each to augment the abilities. There are 12 different Governing Stones and 27 different Tuning Stones that can be found in Vaults scattered across Sanctuary. Fuse together duplicate stones to level them up, increasing the potency of Governing Stones or adding augments to Tuning Stones.
Listed below is the best Seneschal Construct Companion setup for Charged Bolts Sorcerers. The first 2 Governing Stone setups are equipped for the construct to support the player. The 3rd setup is equipped for the construct to deal high damage on its own. Although only 3 Tuning Stones can be linked to each Governing Stone, alternative options are provided and sorted in order of importance.
- Flash of Adrenaline: Administers a quick flash of adrenaline into the player, granting bonus damage for a duration.
- Genesis: Increase the effectiveness of the supported Skill.
- Tactical Support: Decrease the cooldown of the supported Skill.
- Duration Support: Supported Skills have their durations increased.
- Fortify Support: When the Seneschal Construct uses the supported Skill, you gain Fortify. Skills with slower attack speeds or skills with cooldowns will increase the amount of Fortify granted.
- Impale: Perform a line attack to all enemies in front of the Seneschal Construct dealing damage. — This attack setup is used for a supportive construct, buffing the player to deal more damage.
- Evernight: The supported Skill grants you +4 to all Skills when used.
- Burning Support (Optional): A portion of he supported Skill’s damage is applied as Burning damage over time. Burning enemies take bonus Critical Strike Damage from the Seneschal Construct. — This Tuning Stone can be used to apply Burning instead of Firebolt Enchantment.
- Resource Support: Player gains an amount of Primary Resource when the supporting Skill first deals damage.
- Efficiency Support: When the supporting skill deals damage, you gain Critical Strike Chance to the same targets hit.
- Safeguard Support: When used, the supported Skill grants Damage Reduction to you.
- Firefly: Deploy a small construct that lands on the target and explodes 3 times, dealing damage. — Replace the Impale setup to enable more damage output from the construct.
- Multishot Support: Supported Projectile skills launch additional projectiles.
- Piercing Support: The supported Projectile Skill will pierce multiple enemies.
- Seeking Support: The supported Projectile Skill will auto-seek enemies for a limited duration.
Skill Tree Points and Skill Bar
Charged Bolts  Teleport
  Frost Nova
  Ice Blades
  Flame Shield
  Unstable Currents
 The following tables show the full allocation of Skill Points for the Charged Bolts Sorcerer build. The first table has the most important 50 points to start the build. The second table has the remaining 8 points that are allocated once you obtain all Skill Points from Renown.
| Priority Skills | Cluster |
|---|---|
 Fire Bolt Level 2 (for Enchantment Slot) Fire Bolt Level 2 (for Enchantment Slot) |  Basic Skill Basic Skill |
| Charged Bolts Level 5, Enhanced Charged Bolts, Greater Charged Bolts (switch to Destructive Charged Bolts for more survivability) Devastation Level 1, Devastation Level 1,  Elemental Dominance Level 3 Elemental Dominance Level 3 |  Core Skill Core Skill |
Teleport Level 1, Enhanced Teleport, Shimmering TeleportFrost Nova Level 1, Enhanced Frost Nova, Mystical Frost Nova Flame Shield Level 1, Enhanced Flame Shield, Mystical Flame Shield Glass Cannon Level 3 Glass Cannon Level 3 Elemental Attunement Level 1 Elemental Attunement Level 1 |  Defensive Skill Defensive Skill |
 Align the Elements Level 1, Align the Elements Level 1,  Protection Level 3, Protection Level 3,  Mana Shield Level 3 Mana Shield Level 3 |  Conjuration Skill Conjuration Skill |
 Inner Flames Level 1, Inner Flames Level 1,  Devouring Blaze Level 3 Devouring Blaze Level 3 |  Mastery Skill Mastery Skill |
Unstable Currents, Prime Unstable Currents  Permafrost Level 1, Permafrost Level 1,  Hoarfrost Level 3, Hoarfrost Level 3, (Frigid Breeze is bugged and works with any damage type.) |  Ultimate Skill Ultimate Skill |
 Vyr’s Mastery Vyr’s Mastery |  Key Passives Key Passives |
| Remaining Renown Points | Cluster |
|---|---|
 Precision Magic Level 1 Precision Magic Level 1 | Conjuration Skill |
 Coursing Currents Level 1, Coursing Currents Level 1,  Electrocution Level 3, Electrocution Level 3,  Conduction Level 3 Conduction Level 3 | Ultimate Skill |
Enchantment Slots
Equip Fire Bolt in the first Enchantment Slot. This will apply Burning to enemies to activate Devouring Blaze and other bonuses from Paragon.
Equip ![]() Teleport in the second Enchantment Slot to utilize
Teleport in the second Enchantment Slot to utilize ![]() Raiment of the Infinite more often to vortex and Stun groups of enemies.
Raiment of the Infinite more often to vortex and Stun groups of enemies.
Paragon
The Paragon progression system unlocks after reaching Level 50, and offers a considerable boost to character power. Within the Paragon Board, there are many different bonuses, ranging from minor stat enhancements on Magic Nodes to more significant gains with Rare Glyphs and Legendary Nodes.
Important Notes:
- Additional Bonus requirements on Rare Glyphs may not be obtainable until they gain increased radius range at Level 15.
- Attach Legendary Boards in the correct order. Bonus requirements of Rare Nodes increase with their placement order.
- Make sure you rotate Legendary Boards into the correct orientation.
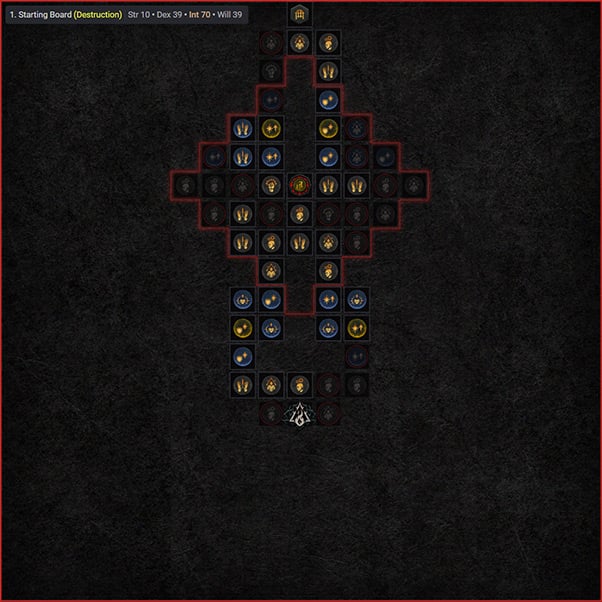
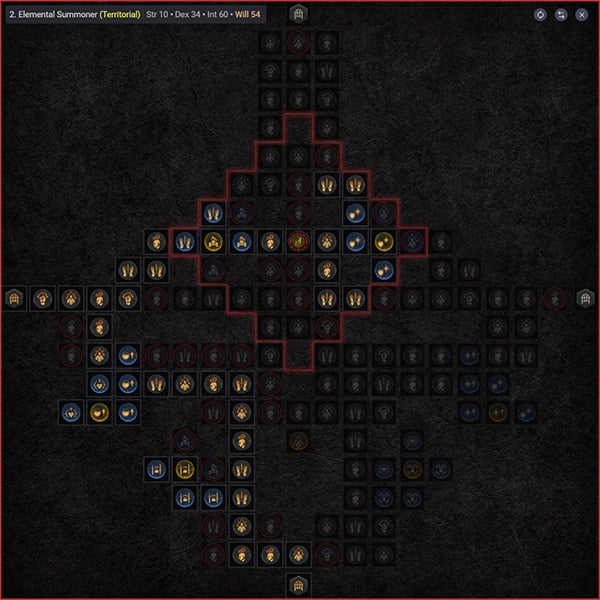
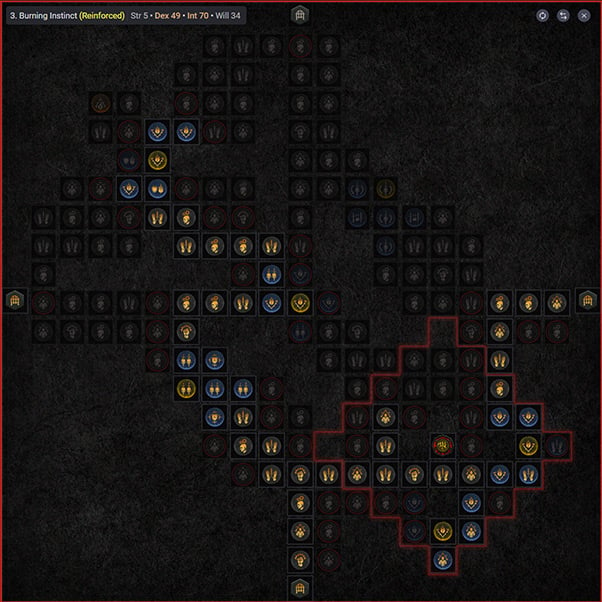
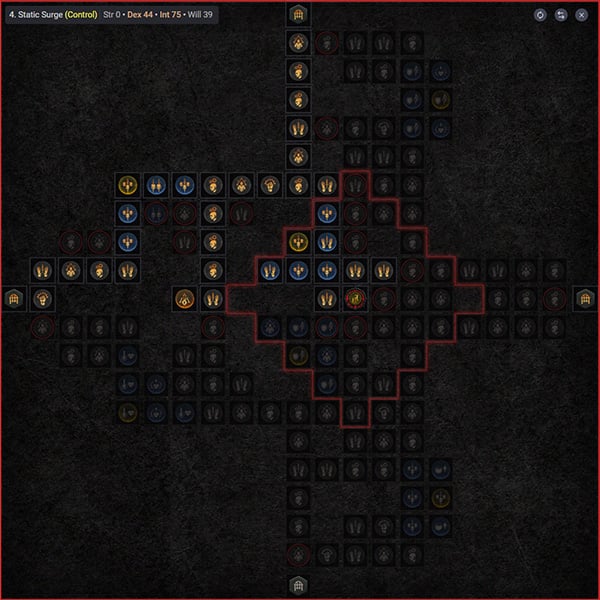
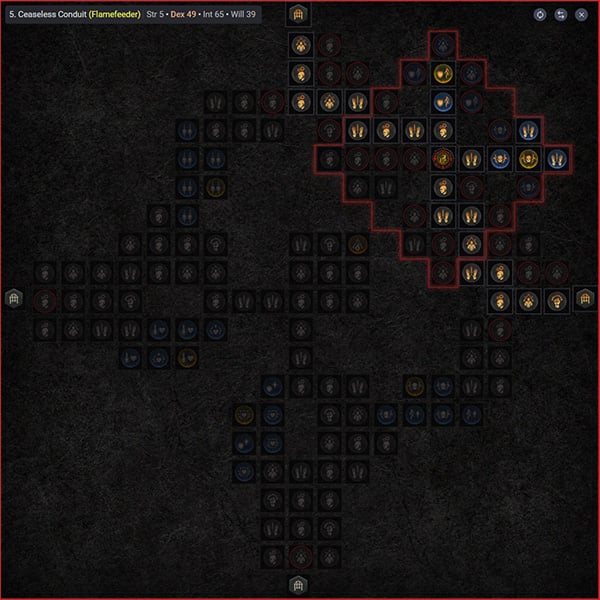
The list below contains the most beneficial Rare Glyphs and Legendary Nodes for the Charged Bolts Sorcerer build, sorted in the order obtained in the final Level 100 Paragon Tree. The images that follow provide a visual of each Paragon Board setup.
| Name | Effect |
|---|---|
 Destruction Destruction | • For every 5 Dexterity purchased within range, you deal + [19.2%] increased Critical Strike Damage. • Additional Bonus (requires 25 Dexterity purchased in radius range): Critical Strikes increase all damage the enemy takes from you by x2% for 10 seconds, up to x12%. |
 Elemental Summoner Elemental Summoner | Your Conjuration Skills have 10% reduced Cooldown or Mana cost. They also deal bonus Damage equal to x5% of the total amount of your Bonus Damage with Cold, Fire, and Lightning. (Legendary Node not used) |
| Territorial | • For every 5 Dexterity purchased within range, you deal + [9.6%] increased damage to Close targets. • Additional Bonus (requires 25 Dexterity purchased in radius range): You gain 15% Damage Reduction against Close enemies. |
| Burning Instinct | Your Burning damage deals bonus damage equal to x10% of the total amount of your Critical Strike Damage bonus, plus x1% for every 25 Intelligence you have. (Legendary Node not used) |
 Reinforced Reinforced | • Grants + [120%] bonus to all Rare nodes within range. • Additional Bonus (requires 25 Willpower purchased in radius range): You gain 15% Damage Reduction while you have an active Barrier. |
| Static Surge | After spending 100 Mana, your next cast of Chain Lightning or Charged Bolts makes enemies Vulnerable for 2 seconds and grants you 10% of your maximum Mana. This Mana cost requirement is reduced by Mana Cost Reduction bonuses. |
 Control Control | • For every 5 Dexterity purchased within range, you deal + [14.4%] increased damage to Crowd Controlled targets. • Additional Bonus (requires 25 Dexterity purchased in radius range): You deal x10% increased damage to Slowed or Chilled enemies or, instead, x20% increased damage to Stunned or Frozen enemies. |
| Ceaseless Conduit | Crackling Energy has a 25% chance to not consume a Charge when triggered. Crackling Energy’s damage is increased by x3% per 20 total Intelligence you have. (Legendary Node not used) |
| Flamefeeder | • For every 5 Dexterity purchased within range, you deal + [9.6%] increased damage to Burning targets. • Additional Bonus (requires 25 Dexterity purchased in radius range): You deal x10% increased direct damage to Burning enemies. |
| Enchantment Master | Your Enchantments are 20% stronger. (Legendary Node not used) |
| Exploit | • For every 5 Dexterity purchased within range, you deal + [7.7%] increased damage to Vulnerable targets. • Additional Bonus (requires 25 Dexterity purchased in radius range): Dealing damage to a Vulnerable enemy increases your damage by x1% for 6 seconds, up to x10%. |
1. Starting Board (Destruction)
2. Elemental Summoner (Territorial)
3. Burning Instinct (Reinforced)
4. Static Surge (Control)
5. Ceaseless Conduit (Flamefeeder)
6. Enchantment Master (Exploit)
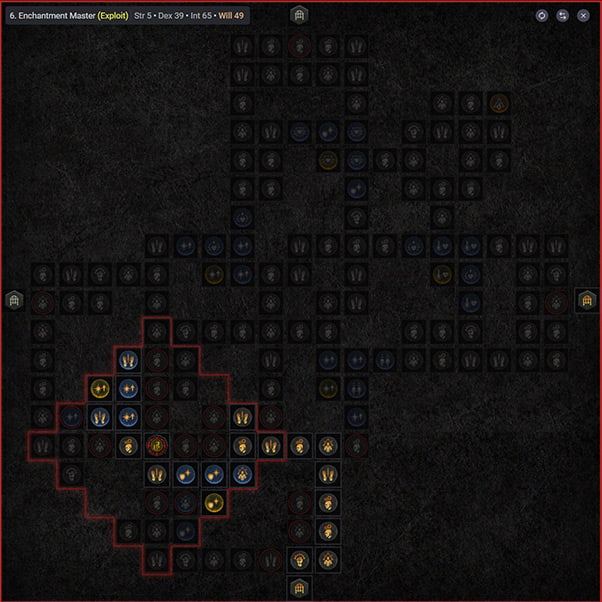
Paragon Board images courtesy of d4builds.gg. Click this link for the Paragon planner.
Mechanics and Playstyle
The Charged Bolts Sorcerer utilizes multiple Defensive Skills with cooldowns to activate Prodigy’s Aspect for Mana generation. Mystical Flame Shield also provides Mana Cost Reduction, as well as survivability.
Teleport is a powerful mobility skill that is mainly used offensively to Telestomp enemies, while providing Damage Reduction with Shimmering Teleport. Use the Evade Teleport foremost and often, as the Cooldown is quickly reduced. Get into a rhythm of Telestomping a group of enemies from a distance to engage, spamming ![]() Charged Bolts and then moving on to the next pack to repeat.
Charged Bolts and then moving on to the next pack to repeat.
Frost Nova freezes entire packs of enemies and applies Vulnerable with Mystical Frost Nova.
Unstable Currents has a 25% chance of double casting Charged Bolts while providing Attack Speed with Prime Unstable Currents.
![]() Ice Blades reduces active Skill Cooldowns and activates the Cold damage stack of
Ice Blades reduces active Skill Cooldowns and activates the Cold damage stack of ![]() Tal Rasha’s Iridescent Loop.
Tal Rasha’s Iridescent Loop.
Damage Rotation
Use the following rotation to optimize DPS.
- Engage in combat by casting Teleport into the midst of enemies (or near the boss for single-target encounters).
- (Optional) Activate Unstable Currents against tough elites and bosses.
- Cast Frost Nova to Freeze all surrounding enemies.
- Spam Charged Bolts while staying above 100 Mana for Elementalist’s Aspect.
- Use any skills with cooldowns to activate Prodigy’s Aspect for Mana gains.
Gear Choice and Stats
While farming with your Charged Bolts Sorceress, make sure to pick up all Rare Item drops that may be upgrades. Additionally, save Legendary Items that have useful aspects in your stash to be used later, or for extracting and imprinting onto well rolled Rare Items.
A One-handed Weapon and Focus setup is preferred over a Staff for more beneficial utility affixes. A Focus has a Cooldown Reduction implicit stat, as well 4 useful affix mods. A Wand is preferred over a Dagger for the Lucky Hit Chance implicit stat.
Prioritize Boots with the implicit effect, Attacks Reduce Evade’s Cooldown by 1.2 Seconds. Make sure to upgrade the Boots 5 times to get the highest effect possible. Use the Evade Teleport foremost and often, as it becomes more available. Get into a rhythm of telestomping a group of enemies from a distance to engage, spamming ![]() Charged Bolts and then moving on to the next pack to repeat.
Charged Bolts and then moving on to the next pack to repeat.
Starting Gear Requirements
Get at least 25% Cooldown Reduction and 25% Mana Cost Reduction before starting the build. There are 2 Cooldown Reduction mods on a Focus, in addition to possible affixes on Helm and Amulet.
Mana Cost Reduction is also an important stat to spam more Charged Bolts. It can be found on a Focus, Amulet, and Boots. In addition, Maximum Mana on Rings and Helm help with resource management. Maximum Mana also allows for more casts above 100 Mana for Elementalist’s Aspect. Lucky Hit Chance to Restore Primary Resource on Focus and Gloves is a good source of Mana generation.
Higher Item Level gear provides higher stat values. Replace outdated gear often, and upgrade new gear at the Blacksmith to increase Item Levels further.
Stat Priority List
Listed below are the affixes to prioritize on gear for Charged Bolts Sorcerers. Each line of affixes are listed in order of importance. Affixes on the same line are considered to be equally important, but their benefits may vary depending on how much is stacked or other character stats. Bolded stats are the most important and sometimes vital for the build to function properly.
The priority order of Resistances is Lightning > Poison > Fire > Cold > Shadow. Maximum Resistance is 70% by default for each element. Lightning and Fire Resistances are capped with ![]() Electro in Paragon and
Electro in Paragon and ![]() Keeper of Flames in the Paragon setup. Poison, Cold and Shadow Resistances need to be capped through affixes on gear or gems in jewelry.
Keeper of Flames in the Paragon setup. Poison, Cold and Shadow Resistances need to be capped through affixes on gear or gems in jewelry.
| Gear Slot | Important Affixes |
|---|---|
| Wand | + Intelligence, All Stats + Damage to Close Enemies, Core Skill Damage, Vulnerable Damage + Critical Strike Damage, Lightning Critical Strike Damage |
| Focus | + Cooldown Reduction, Lucky Hit Chance to Restore Primary Resource, Critical Strike Chance + Resource Generation, Mana Cost Reduction, Damage Reduction from Burning Enemies, Lucky Hit Chance, LHC while You Have a Barrier |
| Helm | + Cooldown Reduction, Armor, Resistances + Barrier Generation, Maximum Life + Lucky Hit Chance while you Have a Barrier |
| Chest | + Armor, Damage Reduction, DR from Close Enemies, DR from Burning Enemies + Resistances, Maximum Life, Barrier Generation |
| Gloves | + Ranks of Charged Bolts, Attack Speed, Critical Strike Chance, Lucky Hit Chance to Restore Primary Resource + Lucky Hit Chance |
| Pants | + Armor, Damage Reduction, DR from Burning Enemies, DR from Close Enemies + Maximum Life, Resistances |
| Boots | + Movement Speed, Mana Cost Reduction, Resistances + Ranks of Frost Nova, Ranks of Teleport, Damage Reduction while Injured |
| Amulet | + Cooldown Reduction, Mana Cost Reduction, Ranks of the Devouring Blaze Passive, Ranks of All Defensive Skills + Movement Speed, Armor + Damage Reduction, DR from Burning Enemies, DR from Close Enemies + % Intelligence, Lucky Hit Chance while You Have a Barrier |
| Rings | + Critical Strike Chance, Maximum Life, Resource Generation, Lucky Hit Chance + Barrier Generation + Vulnerable Damage, Damage to Close Enemies |
Legendary Aspects and Codex of Power
Listed below are all the best-in-slot Aspects found on Legendary Items that are important for the Charged Bolts Sorcerer build. Aspects from the Codex of Power can be used if you cannot find the proper Legendary drops, but they have weaker effects. Extract Aspects from lower level Legendary Items and imprint them onto better Rare Items with preferred stats.
Prodigy’s Aspect is used early-on to refill Mana above 100 to keep Elementalist’s Aspect active. With enough Mana Cost Reduction, Resource Generation and Lucky Hit Chance to Restore Primary Resource affixes on gear, Prodigy’s Aspect can be removed for Conceited Aspect or Edgemaster’s Aspect.
| Gear Slot | Aspect or Unique Item | Effect |
|---|---|---|
| Amulet (+50% bonus effect) | Elementalist’s Aspect | Core or Mastery Skills cast at or above 100 Mana gain a [20.0 – 40.0%] increased Critical Strike Chance. |
| Wand, Focus or Gloves | Aspect of Piercing Static | Charged Bolts pierce, but deal [60 – 40%] less damage to targets hit after the first. |
| Wand, Focus or Gloves | Storm Swell Aspect | You deal x [21 – 30%] increased damage to Vulnerable enemies while you have a Barrier. |
| Ring Slot #1 | Prodigy’s Aspect | Using a Cooldown restores [15 – 25] Mana. |
| Ring Slot #2 (optional replacement with | Edgemaster’s Aspect | Skills deal up to [10 – 20%] increased damage based on your available Primary Resource when cast, receiving the maximum benefit while you have full Primary Resource. |
| Gloves (optional replacement with | Conceited Aspect | Deal [15 – 25%] increased damage while you have a Barrier active. |
| Helm (replaced by |  Mage-Lord’s Aspect Mage-Lord’s Aspect | The Vyr’s Mastery Key Passive also grants x [6.0 – 9.0%] Damage Reduction for each Close enemy, up to x [18 – 27%]. |
| Chest | Raiment of the Infinite | After using Teleport, Close enemies are Pulled to you and Stunned for [2 – 3] seconds, but Teleport’s cooldown is increased by 20%. |
| Pants | Aspect of Disobedience | You gain [0.6 – 1.1%] increased Armor for 4 seconds when you deal any form of damage, stacking up to [36 – 66%]. |
Boots (optional replacement with Penitent Greaves or Penitent Greaves or |  Aspect of the Bounding Conduit Aspect of the Bounding Conduit | Gain [25 – 30%] Movement Speed for 3 seconds after Teleporting. |
Unique Items
Listed below are the recommended and optional Unique Items for this build.
- Raiment of the Infinite (Required): This Unique Chest Armor is required to effectively vortex and stun enemies for
 Charged Bolts to shotgun with piercing bolts and exploding lightning novas.
 - Starfall Coronet (Highly Recommended): This Unique Helm enables a hybrid build setup with
 Meteor to supplement Charged Bolts for additional damage output. Check the Meteorstomp Variant section for more details.
  Harlequin Crest (Optional Uber Unique): This powerful Uber Unique provides a high amount of damage and defense, if you are lucky enough for it to drop from Uber Duriel. Only equip this helm if you do not want to play with Meteors.
 Tal Rasha’s Iridescent Loop (Recommended for Maximum DPS): This Malignant Unique Ring can provide a 45% multiplier with 3 elemental damage stacks for a maximum DPS setup.
 Fists of Fate – A perfect 300% value on the unique effect increases overall damage by 50%, and the Lucky Hit Effect synergize well with the high Lucky Hit Chance in this build. Only equip a Fist of Fate with at least 280% value, or you will lose total DPS compared to well-rolled Legendary Gloves with +4 Ranks to Charged Bolts, Attack Speed, Critical Strike Chance and an Offensive Aspect.
 Flickerstep (Optional): These Unique Boots can be useful for more Unstable Currents uptime.
- Melted Heart of Selig (Optional Build Variant): This Uber Unique is used in the Immortal Build Variant to survive difficult content.
Not Recommended Unique items
Listed below are the Unique Items not recommended for this build and the reasons they are not worthwhile.
 Staff of Lam Esen (Optional): This Unique Staff allows piercing Charged Bolts to hit enemies multiple times, but does not provide more DPS than a Legendary One-handed Weapon and Focus setup with 2 Offensive Aspects. In addition, you lose Cooldown and Mana affixes from a Legendary Focus.
 The Oculus – The random Teleport location is a major downside. The unique affix, Attacks Reduce Evade’s Cooldown, can be obtained as an implicit affix on Legendary Boots instead. The Teleport Enchantment setup already allows for permanent stun-locking and non-random Teleport locations. In addition, a Legendary Weapon provides much more DPS with damage affixes and an Offensive Aspect.
 Tibault’s Will: The unique effect provides a huge separate damage multiplier if rolled at 40%. Unfortunately, too much survivability is lost compared to Legendary Pants with 4 well-rolled defensive affixes and a Defensive Aspect.
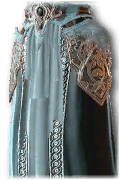 Iceheart Brais – The occasional Frost Nova on enemy death should not be needed, and it does not help while moving from pack to pack. Legendary Pants provide more important Damage Reduction affixes and a Defensive Aspect.
- Penitent Greaves: These Unique Boots provide a damage increasing effect in a gear slot that does not allow for Offensive Aspects. The Chill effect also provides an alternative activation of Hoarfrost for more damage outside of Frost Nova. Unfortunately, they do not have the preferred implicit effect, Attacks Reduce Evade’s Cooldown, for Telestomp and Meteorstomp builds.
Gems
Listed below are the best Gems to socket into gear for each slot type.
- Weapon:
 Royal Emerald for Critical Strike Damage to Crowd Controlled enemies.
 - Armor:
 Royal Ruby for Maximum Life or
  Royal Topaz to prevent deaths from chain Crowd Controls.
 - Jewelry:
 Royal Skull for Armor or Individual Resistance Gems for Resistances that are not already capped at 70%. The priority order of Resistances is Lightning > Poison > Fire > Cold > Shadow.
Elixirs and Health Potions
Visit the Alchemist in any main town to craft helpful Elixirs that increase stats and experience gain for 30 minutes. Make sure to forage plants and pick up the necessary crafting materials during your adventures; they randomly spawn around the world.
Listed below are the best Elixirs to consume, ranked by importance. Elixirs that are not available at the Alchemist can only be found as drops. Open Splitting Steel and Mystery Chests in Helltides to farm non-craftable Elixirs.
 Iron Skin Elixir (non-craftable): Essential to cap Armor against high level enemies, especially in Tier 100 Nightmare Dungeons. Alternatively, Heady Iron Barb Elixir can be crafted at the Alchemist.
 Elixir of Resourcefulness (non-craftable): Maximum Mana provides more buffer for casts above 100 Mana for Elementalist’s Aspect and Life protection with Melted Heart of Selig.
 Elixir of Fortitude (non-craftable): Maximum Life increases Barrier amount and reduces Mana drain from Melted Heart of Selig.
 Heady Assault Elixir (craftable): Attack Speed allows for faster spamming of Charged Bolts.
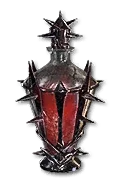 Elixir of Cruelty (non-craftable): Provides the highest source of Critical Strike Chance from an Elixir, if not already capped at 100%. Alternatively,
  Heady Precision Elixir can be crafted at the Alchemist.
- Elixir of Combatant Fortune (non-craftable): Only use if utilizing Lucky Hit effects.
Return to the Alchemist again when you reach Level 20, 30, 45, 60, 70, 80 and 90, to upgrade your potion. The extra healing is essential to survival.
Meteorstomp Charged Bolts Sorcerer Build Variant
Meteorstomp is a variant build that supplements the Telestomp build created by Lexyu with ![]() Meteor. It is designed to speed farm Normal or Nightmare Dungeons even faster for more experience and loot. The Meteorstomp Charged Bolts Sorcerer build Telestomps enemies to group them up, and then dumps Meteors while casting
Meteor. It is designed to speed farm Normal or Nightmare Dungeons even faster for more experience and loot. The Meteorstomp Charged Bolts Sorcerer build Telestomps enemies to group them up, and then dumps Meteors while casting ![]() Charged Bolts for maximum damage output.
Charged Bolts for maximum damage output.
![]() Starfall Coronet is required for this build variant, which can be target farmed from Uber Beast in Ice for the best chances of it dropping. Once the Unique Helm is obtained, continue with the changes listed below to transform Telestomp Charged Bolts Sorcerer into Meteorstomp Charged Bolts Sorcerer!
Starfall Coronet is required for this build variant, which can be target farmed from Uber Beast in Ice for the best chances of it dropping. Once the Unique Helm is obtained, continue with the changes listed below to transform Telestomp Charged Bolts Sorcerer into Meteorstomp Charged Bolts Sorcerer!
- Equip Starfall Coronet to enable the Meteor hybrid build.
- Take all Skill Points out of
 Frost Nova, including its modifier nodes. Reallocate those Skill Points into Meteor Level 1, Enhanced Meteor, Wizard’s Meteor. Move 2 Skill Points from
  Hoarfrost Level 3 to
  Precision Magic Level 3. Meteor replaces Frost Nova on the Skill Bar.
 - Replace
 Fire Bolt with Meteor in the Enchantment slots to proc additional Meteors from Starfall Coronet. Meteor Enchantment is procced often due to high Lucky Hit Chance and multiple hits from piercing bolts and exploding lightning novas.
Immortal Charged Bolts Sorcerer Build Variant
The Immortal Charged Bolts Sorcerer requires ![]() Melted Heart of Selig, an Uber Unique Amulet that has an extremely low chance to drop from Uber Duriel. The Unique effect turns Mana into a defensive resource that protects your Life, in addition to Barrier. Combined with Maximum Mana and Resource Generation, this setup makes you insanely tanky. The Immortal build variant is highly recommended to survive difficult content, such as Tier 100 Nightmare Dungeons or endgame seasonal content. If you are lucky enough to find the Melted Heart of Selig, continue with the following changes to the original version of the Charged Bolts Sorcerer!
Melted Heart of Selig, an Uber Unique Amulet that has an extremely low chance to drop from Uber Duriel. The Unique effect turns Mana into a defensive resource that protects your Life, in addition to Barrier. Combined with Maximum Mana and Resource Generation, this setup makes you insanely tanky. The Immortal build variant is highly recommended to survive difficult content, such as Tier 100 Nightmare Dungeons or endgame seasonal content. If you are lucky enough to find the Melted Heart of Selig, continue with the following changes to the original version of the Charged Bolts Sorcerer!
- Equip Melted Heart of Selig.
- Replace Edgemaster’s Aspect, Storm Swell Aspect or Conceited Aspect with Elementalist’s Aspect (previously on the Legendary Amulet).
- Replace Prodigy’s Aspect with Aspect of Concentration. Damage taken while Melted Heart of Selig is equipped does not remove the Mana Regeneration effect, as long as you have Mana to drain instead of losing Life.
- Utilize Damage Reduction while Injured affixes on Pants and Boots. You can drop below 35% life, before regaining Mana and applying Barrier to stay Injured (also known as low life).
- Make sure you prioritize Resource Generation affixes on Rings and Focus.
Changelog
- February 5th, 2024: Seneschal Construct Companion Powers section updated with an optional setup for construct damage.
- February 1st, 2024: Video guide added.
- January 28th, 2024
- Guide reworked to require Raiment of the Infinite, as Telestomp is necessary for Charged Bolts to be effective at clearing groups of enemies.
- Meteorstomp Charged Bolts Sorcerer Build Variant section added.
- Seneschal Construct Companion Powers section updated.
- Guide reworked to require
- January 22nd, 2024: Guide updated for Season 3 (Patch 1.3.0).
- Seneschal Construct Companion Powers section added.
- Barrier Generation updated in the Stat Priority List due to the Protection passive bug fix.
- December 6th, 2023: Tears of Blood Unique Glyph added to Paragon section.
- December 4th, 2023:
- Harlequin Crest and Melted Heart of Selig added to Unique Item section.
- Immortal Build Variant section added.
- November 15th, 2023: Paragon Board images added.
- November 11th, 2023: Barrier Bug mentioned and Barrier Generation affix lowered in Stat Priority List.
- November 9th, 2023: Tal Rasha’s Iridescent Loop added to Unique Item section.
- November 1st, 2023: Resistances added to Stat Priority List and Gem sections.
- October 29th, 2023: Paragon video added.
- October 27th, 2023: Paragon setup optimized for improvements.
- Tactician switched to Reinforced in the Paragon setup for more survivability.
- 6th Paragon Board added for Exploit.
- October 26th, 2023:
- Minor adjustment to Aspect priority.
- New items, Flickerstep and Tibault’s Will, added to Unique Item section.
- October 23th, 2023:
- Vampiric Power setup reevaluated.
- Stat Affixes for Rings reevaluated.
- October 17th, 2023: Guide updated for Season 2 (Patch 1.2.0).
- August 15th, 2023:
 Caged Heart of Tal’Rasha fixed in Patch 1.1.2 to be correctly calculated as multiplicative instead of additive. Malignant Heart Tier List adjusted accordingly.
 - August 9th, 2023: Malignant Heart rankings reevaluated for Patch 1.1.1 changes.
 Caged Heart of The Barber no longer prevents “on hit” effects and Lucky Hit chance from working.
 Caged Heart of Spellbreaking now reduces all damage taken, instead of providing resistances to individual elements.
- Caged Heart of Tal’Rasha bonus was found to be additive with other damage increases, instead of separate multiplier.
- July 18th, 2023: Guide updated for Season 1.
