The Unending Coil of Bahamut (Ultimate) Twintania and Nael deus Darnus Guide
This page contains detailed information and strategy about the high-end Duty "The Unending Coil of Bahamut (Ultimate)", commonly abbreviated as UCoB, specifically for the portion of the fight dealing with Twintania and Nael deus Darnus.
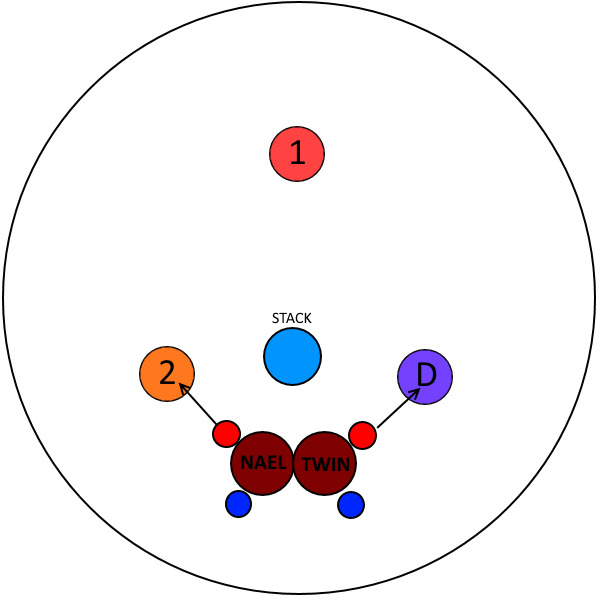
Phase 4: Twintania and Nael
- Nael and Twintania become targetable.
- One tank per boss. Can be tanked back to back.
- Duty Gauge for an ultimate attack. 100 = wipe.
- Need to kill both bosses at roughly the same time, as upon death the other casts their ultimate. (Twintania: Twin Fury and Nael: White Fury)
Bahamut Prime Toolbox Resource
The following Toolbox should be used in tandem with the following guide. Slides #54 - #76 are specifically for Bahamut Prime.
The phase begins with Bahamut charging Aethertrail Attunement in the duty gauge, and Nael and Twintania becoming targetable, spawning at 45% and 40% HP respectively. They have all the same abilities they had in the earlier phases. They share the same enmity table as Bahamut. Have the tank who was not tanking Bahamut provoke one of the two bosses off the other. They can both be tanked in the same place, stacked on each other.
Have players in position to bait Liquid Hells (ideally the same player who baited in Phase 1). I recommend placing a waymark down somewhere (ideally a location easily reachable by everyone) to use as an indicator of where to soak Thermionic Beam, and assigned positions to spread for Raven's Dive. Keep in mind the bosses must die at the same time, or they will cast Twin Fury/White Fury, fully healing the boss and giving them a damage up, as well as a vulnerability down. This is essentially a raid wipe. (you have a grace period of ~3 seconds).
The bosses will both begin by using their mini-busters (Plummet for Twintania, Bahamut's Claw for Nael). Twintania will then do her baitable Liquid Hells, identical to the ones in Phase 1. She will immediately follow up with a Generate + Twister combo, this time targeting three random DPS. As you have three Neurolinks, each hatch must go in one and only one Neurolink.
Assign a Neurolink to each of the melee (one takes left flank, one takes right flank), one to the ranged, and have the second ranged be a floater. If you are soaking Hatch on a melee Neurolink, you can bait twisters after resolving Hatch. If you are using the ranged Neurolink, bait your twister before resolving Hatch. Of course, use your best judgement if positioning is not perfect.
Immediately after Twister resolves, Nael will say one of four quotes:
- "From hallowed moon I descend, upon burning earth to tread!" – Lunar Dynamo > Raven's Dive > Thermionic Beam
- "From hallowed moon I bare iron, in my descent to wield!" – Lunar Dynamo > Iron Chariot > Raven's Dive
- "Unbending iron, take fire and descend! " – Iron Chariot > Thermionic Beam > Raven's Dive
- "Unbending iron, descend with fiery edge!" – Iron Chariot > Raven's Dive > Thermionic Beam
If Nael's quote indicates her first move to be Lunar Dynamo, then when the cycle repeats she will always say a quote indicating Iron Chariot, and vice-versa.
Nael will very quickly cycle through her three-move rotation. Keep in mind that Twintania is still using auto attacks, so take special care of your Twintania tank. Immediately after Nael finishes her rotation, Twintania will use another Twister, so make sure to dodge it. Nael will then follow up with a Megaflare, dealing a lot of raid-wide magic damage with must be mitigated. After Megaflare resolves, both Twintania and Nael will use their respective tankbusters (Death Sentence and Ravensbeak), which still inflict either a slashing or a piercing vulnerability, and therefore still force a tank swap. The easiest way is to just have each tank provoke the boss off of the other. You do not need to shirk each other.
Their rotation will then repeat once, all the way until after the final Twister. Instead of Nael starting off with the Megaflare, the bosses instead will use their tankbusters first, and then follow up with the Megaflare. You have these two cycles before Aethertrail Attunement reaches 100, causing a raid wipe. I would highly recommend saving a caster or ranged Limit Break, in order to kill both bosses at the same time.
If Aethertrail Attunement is lower than 100 when you kill Nael and Twintania, Teraflare will still 'kill' you. However, Phoenix will cast Flames of Rebirth and revives you with full HP, no weakness, full Limit Break gauge, and the buff Phoenix's Blessing. This buff doubles all damage dealt by players. However, this buff does not persist across death, so staying alive throughout this last phase is imperative to kill before enrage. You will have no statuses on you when you raise, so make sure you take care of that during the small downtime you get before Golden Bahamut is targetable.
Note that if you were dead with weakness, or finish Teraflare with weakness, your weakness timer will reset. Consider not rezzing a player who died at the very end of Teraflare so they do not gain a refresh on weakness, as all players will be raised regardless.
Changelog
- 13 Apr. 2022: Guide added.
More Final Fantasy XIV Content
To be added...
- FFXIV - Dawntrail Benchmark Update From Yoshi-P!
- FFXIV - The Yo-Kai Return to Eorzea!
- FFXIV - A Realm Resplendent With Warriors of Light!
- FFXIV - New and Returning Promotional Items!
- FFXIV - Possible New Ultimate Weapons for Viper in Dawntrail
- FFXIV: Dawntrail - Benchmark Sweepstakes!
- FFXIV: Live Letter LXXX - Deep Dive!
- FFXIV - Dawntrail Benchmark Available Soon!