Necromancer Golemancer Endgame Build for Last Epoch (Patch 1.0)
Build Introduction
The build is a Juggernaut, taking advantage of one of the tankiest Minions
in the game, the Bone Golem. The build focuses around creating
multiple Bone Golems by using the Unique chestpiece ![]() Aaron's Will in
combination with
Aaron's Will in
combination with ![]() Hollow Finger to gain the ability to summon an
additional two Golems for a total of three. The rest of our skills focus on building
an army of DPS minions to back up our Bone Golems while they tank and beat down
anything in their path.
Hollow Finger to gain the ability to summon an
additional two Golems for a total of three. The rest of our skills focus on building
an army of DPS minions to back up our Bone Golems while they tank and beat down
anything in their path.
 Multiple Bone Golems result in safer gameplay and high damage output
 - Great AoE and single target damage
- Accessible gameplay; minions do all the work

 Reliant on minions for protection
 - Low defensive layers
- Heavy unique gear requirements
- Requires many extra skill points for an optimal setup

Skill Selection
The main focus of this build is ![]() Summon Bone Golem; Bone Golems are built specifically
for tanking, keeping high-level threats focused on them and protecting the summoner. The other skills
selected in the build will focus around supporting our Bone Golems with an army of melee-based attackers.
This creates a devastating amount of damage, coming specifically from our skeletal army. To enhance our
minion onslaught, we add
Summon Bone Golem; Bone Golems are built specifically
for tanking, keeping high-level threats focused on them and protecting the summoner. The other skills
selected in the build will focus around supporting our Bone Golems with an army of melee-based attackers.
This creates a devastating amount of damage, coming specifically from our skeletal army. To enhance our
minion onslaught, we add ![]() Dread Shade into the build to enhance each of our Minion’s damage and
Attack Speed even further.
Dread Shade into the build to enhance each of our Minion’s damage and
Attack Speed even further.

Class and Skill Passive Trees
Our base class is the Acolyte, which acts as a generic spell caster and summoner. Our character will be offered an opportunity to select an Advanced Mastery once we have completed the first act of the campaign. Each base class has three possible masteries to choose from. For the Acolyte, we have access to the Mastery Tree Passives for Necromancers, Lich and Warlock. Upon selecting a Mastery and placing 20 Passive Points into the Acolyte Tree, you'll then be able to place Passive Points into the Mastery Trees.
For this Golemancer build, Necromancer is our advanced class. We will utilize the majority of our Passive Points for the Necromancer Passive tree, with a smaller investment of points into Lich to round out the build. Our passive points will be targeting augments for our Minions and boosting their survivability and damage output. Each of the Passive Trees and their points are broken down below.

Acolyte Passive Points
- 8 points into Forbidden Knowledge: Increases Intelligence and Necrotic Resistance.
- 7 points into Stolen Vitality: Increases Health pools for both the player and minions.
- 5 points into Dark Rituals: Increases Minion Attack Speed.
- 1 point into Soul Aegis: Scales Minion Armor per your own character level.
Our base class is the Acolyte, which acts as a generic spell caster and summoner. Our character will be offered an opportunity to select an Advanced Mastery once we have completed the first act of the campaign. Each base class has three possible masteries to choose from. For the Acolyte, we have access to the Mastery Tree Passives for Necromancers, Lich and Warlock. Upon selecting a Mastery and placing 20 Passive Points into the Acolyte Tree, you'll then be able to place Passive Points into the Mastery Trees.
For this build, Necromancer as our advanced class. We will utilize the majority of our Passive Points for the Necromancer Passive tree, with a smaller investment of points into Lich to round out the build. Our passive points will be targeting augments for our Minions and boosting their survivability and damage output. Each of the Passive Trees and their points are broken down below.
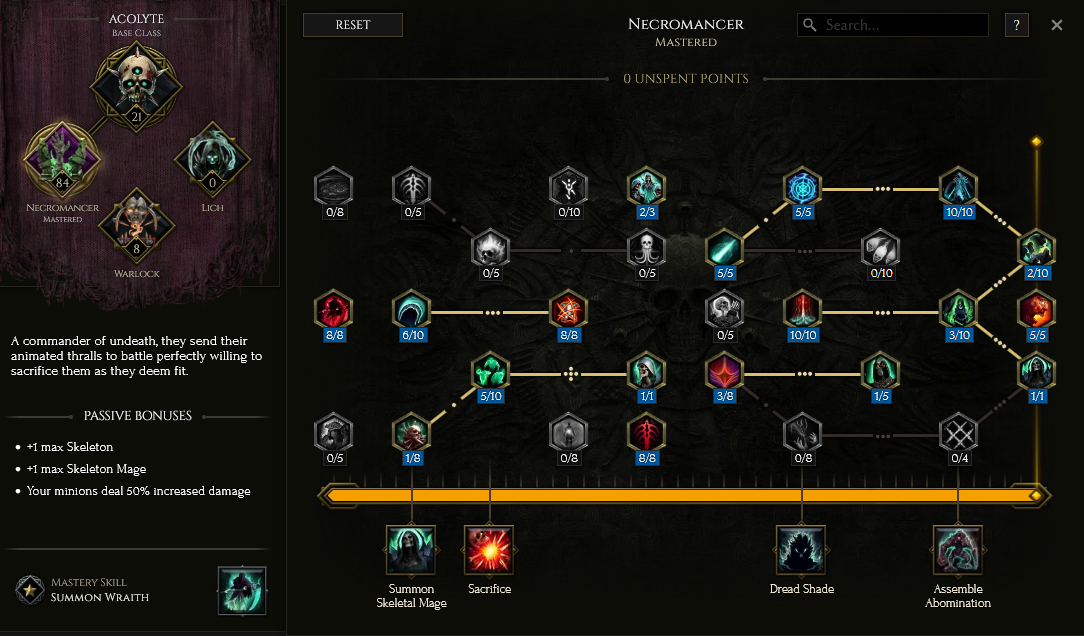
Necromancer Passive Points
- 8 points into Risen Army: Minion Damage and Attack Speed.
- 6 points into Cursed Blood: Increases Minion Damage, but also opens the pathway to the next passive.
- 8 points into Aegisfall: This is critical to our build, allowing all minions to inflict Armor Shred.
- 1 point into Blood Armour: Taken for pathing to the next node.
- 5 points into Mortal Tether: Increases Minion Health.
- 1 point into Unbound Necromancy: Maximum Number of Skeletons +1.
- 2 points into Dark Retribution: This allows us to summon Skeleton Vanguards when a minion dies, giving us three free minions.
- 8 points into Unearthed Arms: More damage to our minions.
- 5 points into Frantic Summons: Gives us and our minions increased Casting and Attack Speed.
- 5 points into River of Bones: Increased Critical Hit Rate, Leech based off critical hits, and improves overall Minion Leech Rate.
- 3 points into Tyrant: Traversal node; the node attached to this is taken to increase Skeleton count.
- 10 points into Moonlight Pyre: Increases Minion Fire and Necrotic Damage.
- 1 point into Tyrant's Legion: Increases Maximum Skeleton count by 1.
- 10 points into Heresy: Increases Intelligence and Minion Critical Strike Chance.
- 3 points into Rite of Undeath: Increases Resistance for both our character and Minion.
- 2 points into Blades of the Forlorn: Increases Minion Critical Multiplier and adds Chill Chance.
- 1 point into Disciples of Necromancy: Adds an extra Death Knight to the pool of minions.
- 5 points into Veins of Malice: This grants our minions Haste and Frenzy every time we cast a spell. This works with the
Traversal skill we use from
 Summon Skeletal Mage.
Our base class is the Acolyte, which acts as a generic spell caster and summoner. Our character will be offered an opportunity to select an Advanced Mastery once we have completed the first act of the campaign. Each base class has three possible masteries to choose from. For the Acolyte, we have access to the Mastery Tree Passives for Necromancers, Lich and Warlock. Upon selecting a Mastery and placing 20 Passive Points into the Acolyte Tree, you'll then be able to place Passive Points into the Mastery Trees.
For this Golemancer build, Necromancer as our advanced class. We will utilize the majority of our Passive Points for the Necromancer Passive tree, with a smaller investment of points into Lich to round out the build. Our passive points will be targeting augments for our Minions and boosting their survivability and damage output. Each of the Passive Trees and their points are broken down below.
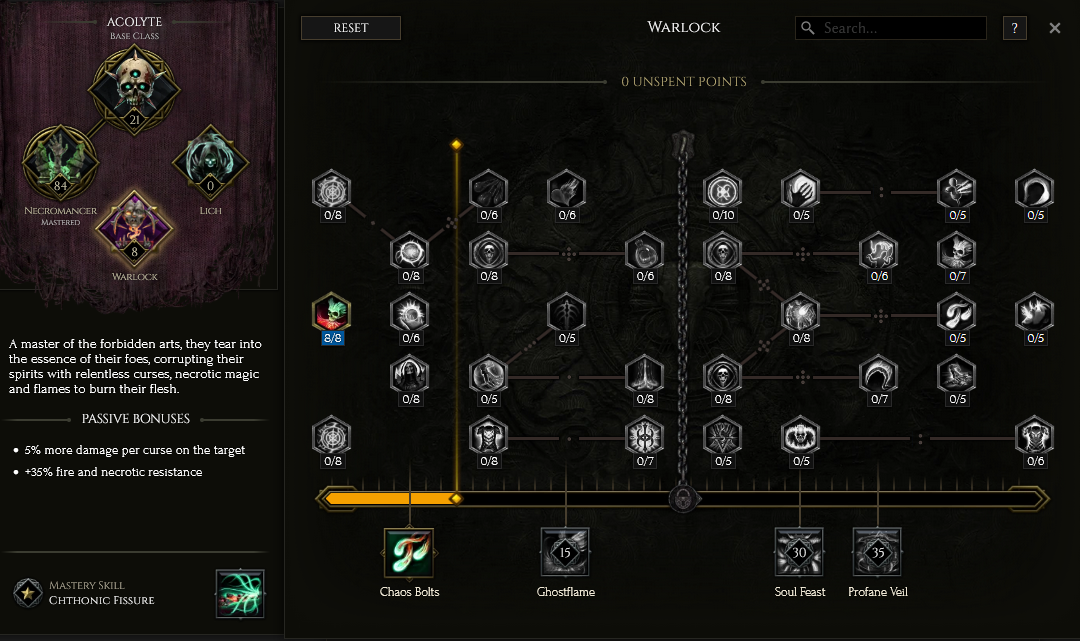
Warlock Passive Points
- 8 points into Chaos Flames: This boosts our Fire and Necrotic damage for our minions and has a change to inflict Damned.
In this section, we will break down each skill and highlight the key passives we have selected to make the skill perform as best as possible in the build. While some of these skills do allow for some variation to exist depending on your own custom choices, we recommend utilizing the skill trees as presented until you have a strong understanding of the build itself.
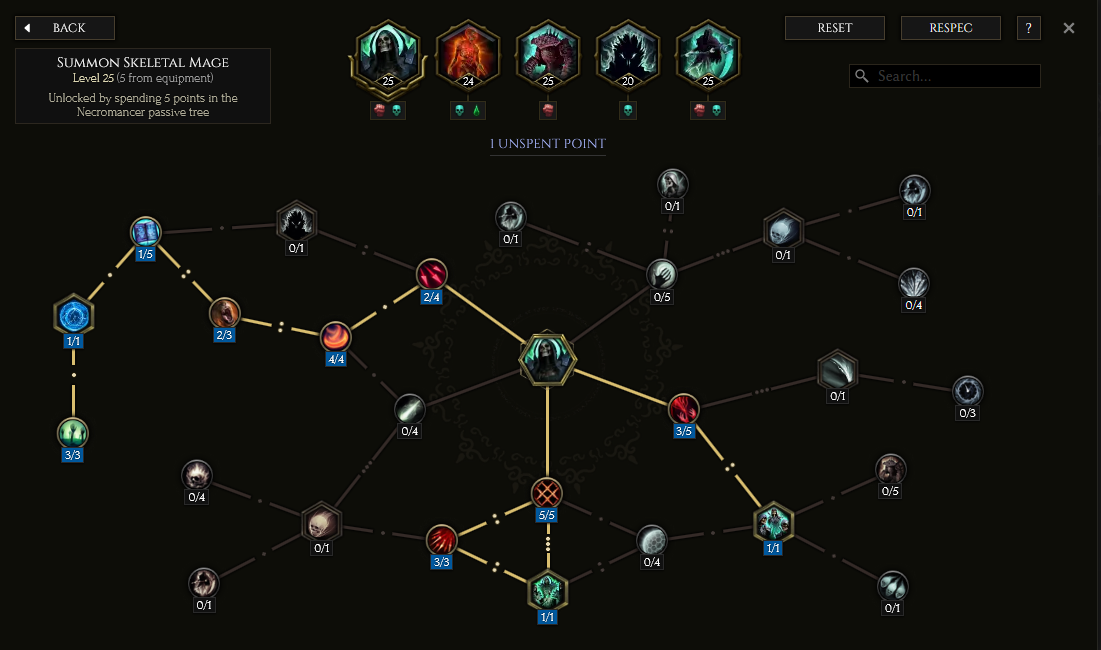
Summon Skeletal Mage
![]() Summon Skeletal Mage has two unique opportunities to transform the skill using the Passive Tree. The skill is converted into a traversal
skill through Grave Passage, and further augmented through the passive tree to allow us
to transport up to nine Minions with us when used. We then convert the Skeletal Mages to Death Knights to fit the melee theme and
create frontline attackers.
Summon Skeletal Mage has two unique opportunities to transform the skill using the Passive Tree. The skill is converted into a traversal
skill through Grave Passage, and further augmented through the passive tree to allow us
to transport up to nine Minions with us when used. We then convert the Skeletal Mages to Death Knights to fit the melee theme and
create frontline attackers.
Order of Skill Points
- 2 points into Splintered Dominion: Increases the range of the Death Knight's AoE.
- 4 points into Argonautic Speed: Increases Minion Attack Speed.
- 2 points into Ossein Frenzy: Chance to trigger Frenzy on hit.
- 1 point into Forbidden Arcana: Increases our Minions Damage per 25 maximum Mana.
- 1 point into Grave Passage: This changes the skill to not only summon Death Knights, but it can now be used as a Traversal skill.
- 3 points into Death's Cavalry: This allows us to take our minions with us every time we teleport with Grave Passage.
- 3 points into Leech Life: Increases the Death Knight's Health and allows them to Life Leech on hit.
- 1 points into Death Knights: Creates Death Knights instead of Skeletal Mages.
- 5 points into Celer Mortis: Increases Death Knight base Critical Strike Chance and Movement Speed.
- 3 point into Grey Merchant: Grants Death Knights Critical Multiplier and Health gained on Critical Strike.
- 1 point into Order of Death: Increases Maximum Death Knights by 1.
Due to our gear, we have more points than the standard allocation of 20 points. The nodes Celer Mortis, Grey Merchant and Argonautic Speed can all be lowered until you have more Skill points available from your gear, specifically your Relic prefix.
In this section, we will break down each skill and highlight the key passives we have selected to make the skill perform as best as possible in the build. While some of these skills do allow for some variation to exist depending on your own custom choices, we recommend utilizing the skill trees as presented until you have a strong understanding of the build itself.
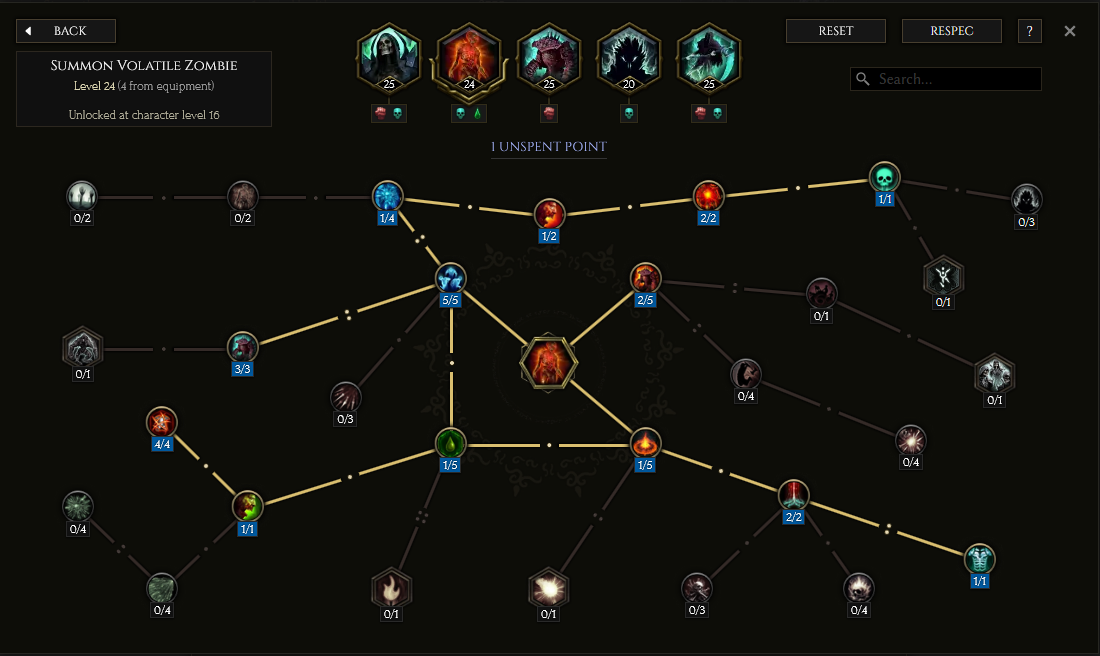
Summon Volatile Zombie
This skill summons Zombies, which spread Poison to enemies by puking on them and self-destructing. We will be spamming this skill, summoning these as Zombies as part of our DPS spam while the rest of our Minion army holds back the tide of enemies.
Order of Skill Points
- 5 points into Forceful Commander: Increases summoning speed and Mana Efficiency.
- 1 point into Daunting Blast: Grants the Zombie's explosion a chance to Stun.
- 1 points into Ravenous: Increases damage against Elites and Bosses.
- 2 points into Pull of the Grave: Zombies gain a Kill Threshold at 16% Health on enemies.
- 1 point into Horrific Vessels: Converts the skill into Necrotic Damage.
- 3 Points into Grave Attunement: Increases Damage and Health Decay, but Zombies move slower.
- 1 point into Army of Rot: Traversal node.
- 1 point into Repulsive Vomit: Adds the ability to Vomit on enemies.
- 4 points into Corrosive Guts: Vomit will now Shred Armor every second.
- 1 point into Path of Destruction: Increases Zombie explosion Area.
- 2 points into Necromantic Fervor: Your character is healed by a portion of the Zombie's explosion.
- 1 point into Vital Ward: Grants Ward instead of Health from Necromantic Fervor.
Due to our gear, we have more points than the standard allocation of 20 points. The nodes Ravenous and Pull of the Grave can be lowered until you have more Skill points available from your gear, specifically your Helmet prefix.
In this section, we will break down each skill and highlight the key passives we have selected to make the skill perform as best as possible in the build. While some of these skills do allow for some variation to exist depending on your own custom choices, we recommend utilizing the skill trees as presented until you have a strong understanding of the build itself.
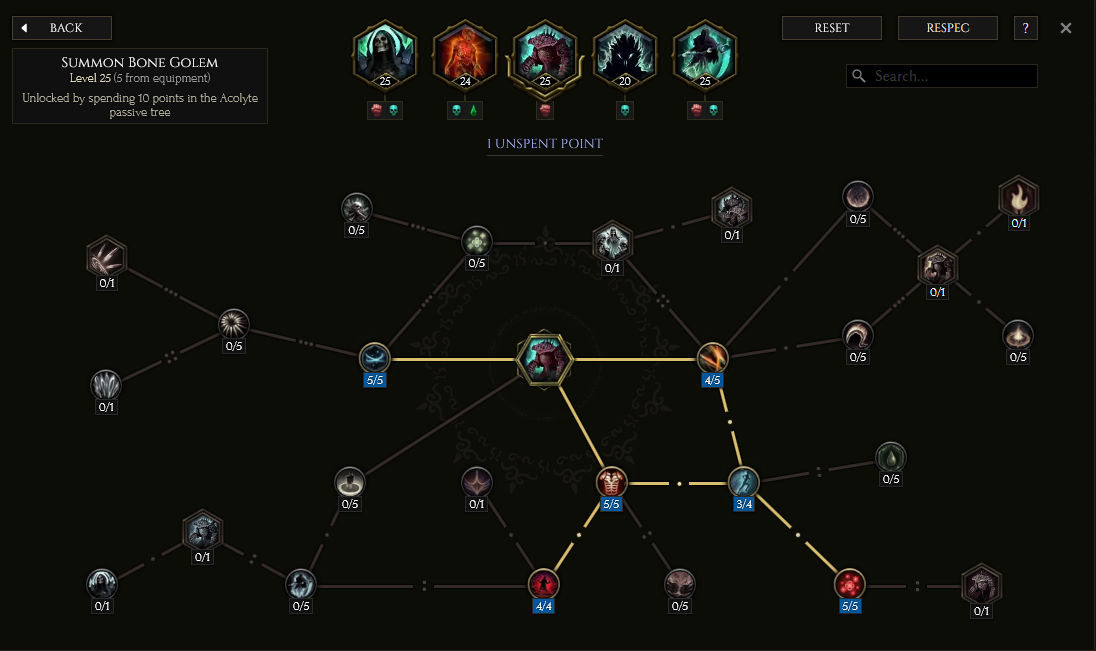
Summon Bone Golem
![]() Summon Bone Golem is the focus of this build. Summoned to serve as
our tanks, we have built Bone Golems to last with a strong defense and high
Health pool. With three Bone Golems on the battlefield, your character should be
quite safe from the majority of enemies.
Summon Bone Golem is the focus of this build. Summoned to serve as
our tanks, we have built Bone Golems to last with a strong defense and high
Health pool. With three Bone Golems on the battlefield, your character should be
quite safe from the majority of enemies.
Order of Skill Points
- 5 points in Amalgam of Mages: More damage for our Golem and increased Stun chance.
- 4 points in Amalgam of Rogues: Increases the Golem's Attack Speed and Movement Speed.
- 3 points in Unnatural Speed: Increases Golem's Movements and buffs other nearby Minion's Movement Speed as well.
- 5 points in Hunger: Golem's gain Health on hit.
- 5 points in Amalgam of Sentinels: Increases Armor and Maximum Health of Golems.
- 4 points in Tower of Bones: Increases their threat generation and size.
Due to our gear, we have more points than the standard allocation of 20 points. The node Amalgam of Sentinels can be lowered until you have more Skill points available from your gear, specifically your Helmet prefix.
In this section, we will break down each skill and highlight the key passives we have selected to make the skill perform as best as possible in the build. While some of these skills do allow for some variation to exist depending on your own custom choices, we recommend utilizing the skill trees as presented until you have a strong understanding of the build itself.
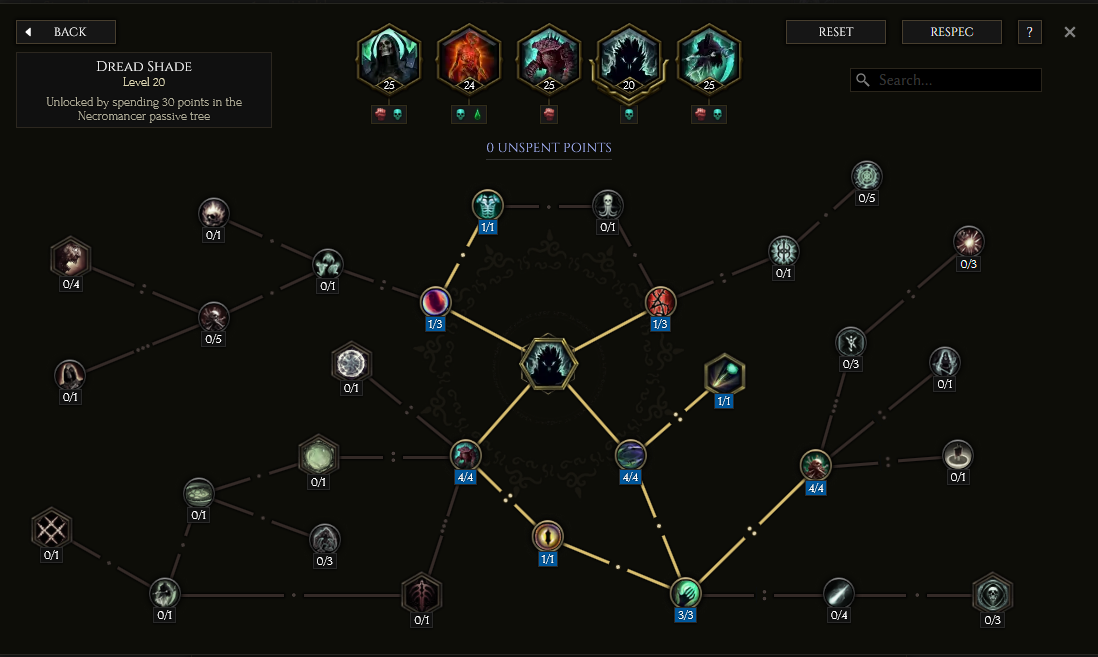
Dread Shade
![]() Dread Shade is a fairly straight forward skill that will attach to a Minion and buff their damage for a period of time. Once the buff fades,
we simply reapply the skill to renew the buff. This skill boosts Attack Speed and Damage for all minions within range of the
minion afflicted by Dread Shade. Since all of our minions are melee-based, it should buff all summoned minions.
Dread Shade is a fairly straight forward skill that will attach to a Minion and buff their damage for a period of time. Once the buff fades,
we simply reapply the skill to renew the buff. This skill boosts Attack Speed and Damage for all minions within range of the
minion afflicted by Dread Shade. Since all of our minions are melee-based, it should buff all summoned minions.
Order of Skill Points
- 4 points into Spectral Presence: Increases buff area.
- 1 point into Lone Watcher: Eliminates decay on the minion, but only one Dread Shade can be active at a time.
- 3 points into Dying Coven: Increases Attack Speed.
- 4 points into Grim Fate: Increases buff Area and Damage buff.
- 1 point into Blind Fury: Increases minion Attack Speed.
- 4 points into Lingering Doom: Reduces Health Decay and increases Necrotic damage.
- 1 point into Wisdom of the Dead: Increases Mana Efficiency.
- 1 point into Martyrdom: Grants Minions Armor based off of your characters Vitality.
- 1 points into Flesh Harvest: Increases all buffs depending on how much Health your Minion is missing.
In this section, we will break down each skill and highlight the key passives we have selected to make the skill perform as best as possible in the build. While some of these skills do allow for some variation to exist depending on your own custom choices, we recommend utilizing the skill trees as presented until you have a strong understanding of the build itself.
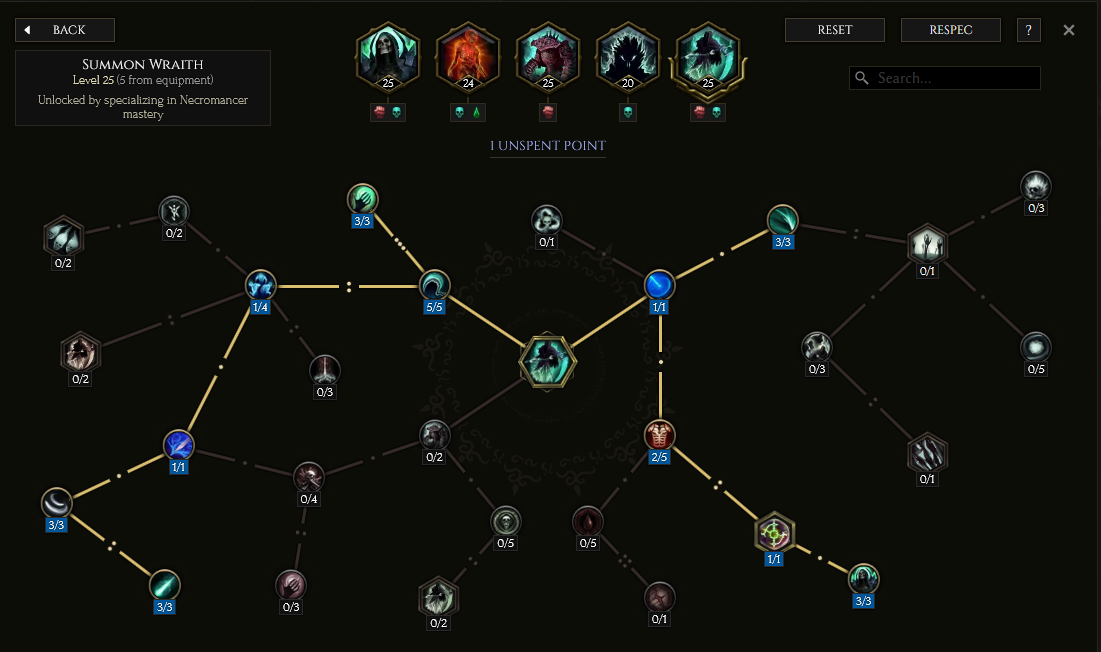
Summon Wraith
![]() Summon Wraith is built for high damage, good survivability and allows
a hands-off playstyle. We will be limiting ourselves to summoning only two
Wraiths at a time and eliminating the Health decay against them. Wraith's nodes
will focus entirely on amplifying their Critical Hit Damage.
Summon Wraith is built for high damage, good survivability and allows
a hands-off playstyle. We will be limiting ourselves to summoning only two
Wraiths at a time and eliminating the Health decay against them. Wraith's nodes
will focus entirely on amplifying their Critical Hit Damage.
Order of Skill Points
- 1 point into Locus Of Resurrection: Minions appear at target location.
- 2 points into Haunting: Increases Health.
- 1 point into Twin Spirits: Limits you to only summoning two Wraiths, but removes their Health decay.
- 3 points into Sequel of Avarice: Amplifies the Wraith's damage.
- 3 points into Dark Scythe: Increases Melee Attack Speed.
- 5 points into Reapers: Increases Necrotic Damage.
- 3 points into Necrotic Hunger: Increases Necrotic Damage and adds a Necrotic Health leech.
- 1 point into Wraith Bringer: Increases summoning speed.
- 1 point into Spirit Link: Increases Critical Strike Chance.
- 3 points into Dawn of the Fall: Increases Critical Strike chance and grants health leech on Critical Hit.
- 3 points into Dusk of the Living: Increases Critical Multiplier.
Due to our gear, we have more points than the standard allocation of 20 points. The nodes Necrotic Hunger or Dusk of the Living can be lowered until you have more Skill points available from your gear, specifically your Chest's Legendary Potential.
Build Mechanics and Playstyle
This build is the end result of the Minion Army build, relying on multiple
Bone Golems to deal damage and hold threat on enemies.
The most difficult challenge to this build is simply keeping
your character alive; this build doesn't allow us to do any personal
damage, and as such it can not defend itself. The only tool we have access to
is ![]() Summon Skeletal Mage, which can be used to jump out of danger and take
your nine minion bodyguards with you.
Summon Skeletal Mage, which can be used to jump out of danger and take
your nine minion bodyguards with you.
There is no set rotation of skills, just work on keeping your Minion Army refreshed if you lose any minions while moving throughout the battlefield. This will be very important to manage during Boss fights, as some of them may take heavy damage from Boss skills. Overall, this build is very relaxed, and when lined up with exceptional gear, can make for a hugely rewarding playthrough.
Equipment and Gear Affixes
For this build, we will be focusing on several main affixes for each piece of non-unique gear, as well as working towards acquiring the specific Uniques needed to make this build operate correctly. Our equipment will focus on these specific affixes for the Implicits and Modifier stats.
| Gear Slot | Implicits | Modifiers |
|---|---|---|
| Two-Handed Weapon | Legendary Potential Increased Minion Melee Damage, Increased Minion Spell Damage |
|
| Head | Armor Increased Critical Strike Chance Increased Minion Critical Strike Chance |
Prefixes + Levels to Bone Golem, Minion Armor + Levels to Summon Volatile Zombie, Increased Minion Damage Suffixes Health % Flat Health |
| Chest | Legendary Potential + to Level of Summon Wraith, Increased Minion Damage |
|
| Amulet | Legendary Potential Increased Minion Health Increased Minion Damage |
|
| Gloves | Armor Void Resistance |
Prefixes Increased Minion Damage Increased Minion Health SuffixesHybrid Health Armor, Reduced Bonus Damage from Critical Strikes |
| Belt | Mana | Prefixes Increased Minion Damage Mana Regen Increased Minion Health Suffixes Hybrid Health Health % Flat Health |
| Ring | Legendary Potential Increased Minion Damage Intelligence |
|
| Ring | Legendary Potential Increased Minion Damage Intelligence |
|
| Feet | Armor Movement Speed Reduced Bonus Damage from Critical Strikes |
Prefixes Movement Speed Intelligence Vitality Suffixes Hybrid Health Fire Resistance |
| Relic | Minion Damage Minion Speed Minion Health |
Prefixes + Levels to Skeletal Mage, Increased Minion Damage Increased Minion Health Suffixes Flat Health Needed Resistances |
A loot filter made specifically for the gear table above may be copied by pressing the button below. Once in the Loot Filter portion of the in-game menu, choose the "Paste Clipboard Contents" option to import the code.
Copy Loot Filter to Clipboard
Uniques
Now, let's look at the required uniques for this build.
Usurper's Mandate
![]() Usurper's Mandate is our recommended weapon. This unique Bone Scythe
will give us a lot of offensive and defensive stats and is perfect for the Golemancer.
We get extra levels of our Acolyte Minion Skills, chance to gain health on Minion hit and Minion
death, Necrotic penetration, and our Minions can't be stunned.
This unique can can be target farmed on the Monolith Timeline "Reign of Dragons"
from the "Unique or Set Axe Mace or Spear" echo reward.
Usurper's Mandate is our recommended weapon. This unique Bone Scythe
will give us a lot of offensive and defensive stats and is perfect for the Golemancer.
We get extra levels of our Acolyte Minion Skills, chance to gain health on Minion hit and Minion
death, Necrotic penetration, and our Minions can't be stunned.
This unique can can be target farmed on the Monolith Timeline "Reign of Dragons"
from the "Unique or Set Axe Mace or Spear" echo reward.
Aaron's Will
![]() Aaron's Will is the key to adding multiple Bone Golems to this build,
there no other way to add addition Bone Golems without this unique. This chestpiece also grants
Bone Golems the chance to Ward. While this chance is only 6%, it is still quite
helpful. The drawback to using this unique item is our
Aaron's Will is the key to adding multiple Bone Golems to this build,
there no other way to add addition Bone Golems without this unique. This chestpiece also grants
Bone Golems the chance to Ward. While this chance is only 6%, it is still quite
helpful. The drawback to using this unique item is our ![]() Summon Skeletal Mage
loses the ability to summon Warriors, Archers and Rogues, which is fine as we use Death Knights.
This unique can can be target farmed on the Monolith Timeline "Blood, Frost and
Death" from the "Unique or Set Body Armour" echo reward.
Summon Skeletal Mage
loses the ability to summon Warriors, Archers and Rogues, which is fine as we use Death Knights.
This unique can can be target farmed on the Monolith Timeline "Blood, Frost and
Death" from the "Unique or Set Body Armour" echo reward.
Hollow Finger
![]() Hollow Finger is what is going to increase our maximum Skeleton
count, without having to spec into the skill. This is key to getting our
increased maximum
Hollow Finger is what is going to increase our maximum Skeleton
count, without having to spec into the skill. This is key to getting our
increased maximum ![]() Summon Bone Golem up to three using the
Summon Bone Golem up to three using the ![]() Aaron's Will
bonus. These rings can be target farmed on the timeline "The Age of Winter
" from the "Unique or Set Ring" echo reward.
Aaron's Will
bonus. These rings can be target farmed on the timeline "The Age of Winter
" from the "Unique or Set Ring" echo reward.
Idols
Idol slots are gained throughout the campaign, unlocking small bonuses and unique affixes for the player to discover and augment their builds with. The Idol screen consists of a grid system for the player to fill out with different sized idols, eventually filling in every part of the grid. As the Idol shape increases (1x1, 1x2, 1x3, 1x4, etc.) it will open up different affixes for you to use. This can be a great way to add some more customization to your build.
For this particular build, we will hoping to find a 1x4 Large Immortal Idol that has the unique affix: Chance to Marked For Death on Minion Hit. The other idol we want to keep an eye out for is a Grand Bone Idol with the affix: Critical Strike Chance for Skeletons and Skeletal Mages. Most of these Idols have two main affixes: +Health and +% Health.
Blessing
Blessings are permanent buffs that are applied to your character. These come in two different powers, Standard and Grand. Grand blessings are significantly stronger than the Standard Blessings. In total, there are 10 Blessing Slots, one for each Monolith Timeline. When you complete a Monolith and defeat the final boss you will be awarded a choice of three blessing with a random value. For the purpose of this guide, we are highlighting five major slots that can be filled with our recommendations, leaving the other for some personal preference.
| Blessing Name | Affix | Timeline |
|---|---|---|
| Void Resistance | The Black Sun | |
| Total Mana | Ending the Storm | |
| Endurance | Spirits of Fire | |
| All Resistances | Reign of Dragons |
The Blessings listed above cover the most important slots for this build, with the remaining Blessing Slots being filled with whatever the player may be lacking for stats.
Changelog
- 29 Mar. 2024: Build optimized with proper gear choices. Increased survivability through slight affix and implicit changes, as well as Blessings. Loot Filter updated and Build Planner added.
- 26 Feb. 2024: Guide Updated for 1.0.
- 15 Feb. 2024: Guide Added.

Lexyu is a professional content creator focused on theorycrafting and playtesting many ARPGS. He is also known for his skillful gameplay, such as playing Bazooka Wizard in Diablo 3. Since 2013, he has been creating in-depth guides to teach gamers how to succeed. Check out his social platforms through Discord to join the discussion in the community!
- Patch 1.0.7 Update: Multiplayer, Skills and More!
- Patch 1.0.6 Update: Camera Setting, Controller Keybinds, Bug Fixes, and More!
- Eleventh Hour Games on Real-Money Trading and Exploits in Last Epoch
- Patch 1.0.5 Update: Many Bug Fixes, Including Loot Filter Toggle Sensitivity, and Other Improvements!
- The First 30 Days of Last Epoch!
- 1.0 Launch Retrospective: A Message From Eleventh Hour Games
- Patch 1.0.4 Update: More In-Game Changes, Bug Fixes, and Improvements
- Last Epoch Mid-Cycle Balance Survey Recap