Necromancer Minion Army Endgame Build for Last Epoch (Patch 1.0)
Build Introduction
The Ultimate Lazy Necromancer build is here! Summon your Minion army and let them wreck havoc on your enemies, while you are focused on staying out of harm's way. This build is designed to auto summon Volatile Zombies, which allows for consistent damage as your minions self-destruct and reassemble themselves as you charge forward on the battlefield.
 Auto Summon Zombies
 - Great AoE and single target damage
- High stacking potential with Shred Armor and Poison

 Reliant on minions for protection
 - Low defensive layers

Skill Selection
Our skill selection for this build focuses around maximizing the number of
melee minions we can have out on the battlefield at once. We also have a
built-in auto summon for our ![]() Summon Volatile Zombie. This provides us
with a huge layer of protection and spacing while our minions keep the enemies'
attention on them and not us. Our
Summon Volatile Zombie. This provides us
with a huge layer of protection and spacing while our minions keep the enemies'
attention on them and not us. Our ![]() Summon Bone Golem will help to keep any
high-level threats (Bosses or Elites) focused specifically on them. Each of
these minions focuses their damage through Melee Poison Damage and Armor Shred,
creating a devastating amount of stacks against your enemies. Let's take a
closer look at the build.
Summon Bone Golem will help to keep any
high-level threats (Bosses or Elites) focused specifically on them. Each of
these minions focuses their damage through Melee Poison Damage and Armor Shred,
creating a devastating amount of stacks against your enemies. Let's take a
closer look at the build.

Class and Skill Passive Trees
Our base class is the Acolyte, which acts as a generic spell caster and summoner. Our character will be offered an opportunity to select a Mastery class once we have completed the first act of the campaign. Each base class has three possible masteries to choose from, for the Acolyte we have access to the Mastery Tree Passives for Necromancer, Lich and Warlock. Upon selecting a Mastery and placing 20 Passive Points into the Acolyte Tree, you'll then be able to place Passive Points into the Mastery Trees.
For this build, Necromancer is our chosen mastery. We will be utilizing the majority of our Passive Points in the Necromancer Passive tree. Our passive points will be targeting augments for our Minions and boosting their survivability and damage output. Each of the Passive Trees and their points are broken down below.
Acolyte Passive Points
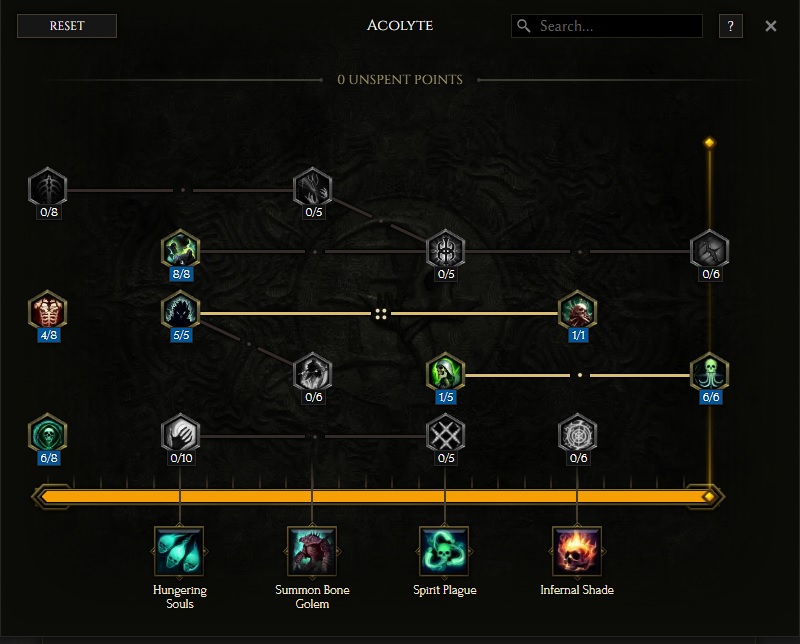
- 6 points into Forbidden Knowledge: Intelligence and Necrotic Resistance.
- 4 points into Bone Aura Armour for us and our Minions
- 8 points into Stolen Vitality: Increased Health pools for both us and our minions.
- 5 points into Dark Rituals: increases our minion's Attack Speed.
- 1 point into Putrid Demise: opens up our pathway to Dominion of Rot.
- 1 point into Soul Aegis: this grants our minions Armor.
- 6 points into Dominion of Rot: this increases our Poison Damage and increases our minion's chance to inflict Poison.
Our base class is the Acolyte, which acts as a generic spell caster and summoner. Our character will be offered an opportunity to select a Mastery class once we have completed the first act of the campaign. Each base class has three possible masteries to choose from, for the Acolyte we have access to the Mastery Tree Passives for Necromancer, Lich and Warlock. Upon selecting a Mastery and placing 20 Passive Points into the Acolyte Tree, you'll then be able to place Passive Points into the Mastery Trees.
For this build, Necromancer is our chosen mastery. We will be utilizing the majority of our Passive Points in the Necromancer Passive tree. Our passive points will be targeting augments for our Minions and boosting their survivability and damage output. Each of the Passive Trees and their points are broken down below.
Necromancer Passive Points
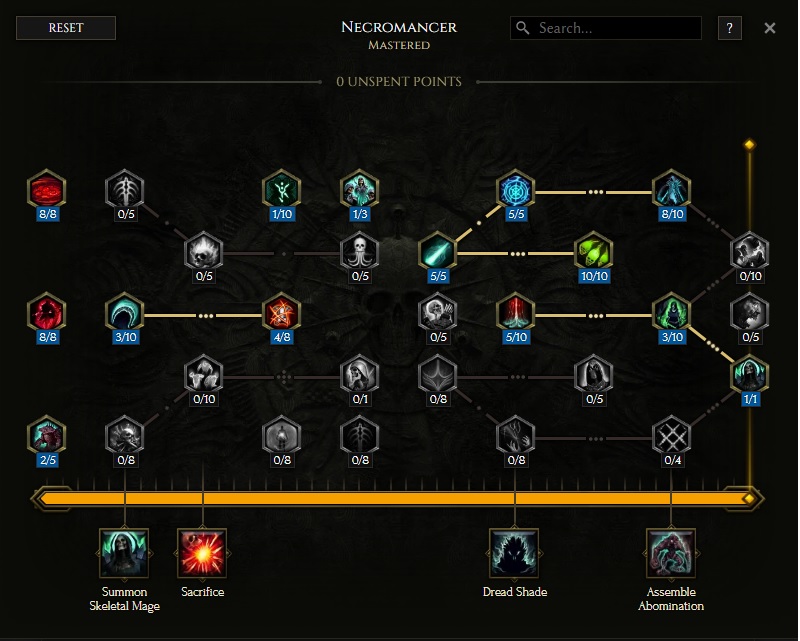
- 8 points into Elixir of Hunger: Hunger buff for our minions.
- 8 points into Risen Army: Minion damage and Attack Speed.
- 2 points into Grave Thorns: More Health, Armor and some damage reflection for our minions
- 3 points into Cursed Blood: Increases our Minion Damage, but also opens the pathway to the next passive.
- 4 points into Aegisfall: This is critical to our build, allowing all Minions to gain Armor Shred for 200%. We only take 4 points, as 3-5 is the sweet spot for applying Armor Shred stacks with this many minions. See the Mechanics and Playstyle section for more notes on this node and Armor Shred.
- 1 point into Mark of Punishment: This will allow our Zombies to keep up Marked For Death on bosses.
- 1 point into Dark Retribution: This allows us to summon Skeleton Vanguards when a minion dies, giving us three free minions. 1 point should be enough to keep three Vanguards up, though it may take a minute to initially summon them after a death.
- 5 points into Frantic Summons: Gives us and our minions increased Casting and Attack Speed.
- 10 points into Rotting Army: increases our minion's chance to Poison.
- 5 points into River of Bones: Increases our Critical Strike Chance for Minions and grants them Health Leech on Critical Strikes.
- 5 points into Moonlight Pyre: Flat Fire and Necrotic Damage for our Minions.
- 8 points into Heresy: Increases Intelligence and Minion Critical Strike Chance.
- 3 points into Rite of Undeath: More Necrotic/Elemental Resistance for us, and increased Necrotic/Elemental Damage for our minions.
- 1 point into Disciples of Necromancy: Increases our minion count for Death Knights.
Our base class is the Acolyte, which acts as a generic spell caster and summoner. Our character will be offered an opportunity to select a Mastery class once we have completed the first act of the campaign. Each base class has three possible masteries to choose from, for the Acolyte we have access to the Mastery Tree Passives for Necromancer, Lich and Warlock. Upon selecting a Mastery and placing 20 Passive Points into the Acolyte Tree, you'll then be able to place Passive Points into the Mastery Trees.
For this build, Necromancer is our chosen mastery. We will be utilizing the majority of our Passive Points in the Necromancer Passive tree. Our passive points will be targeting augments for our Minions and boosting their survivability and damage output. Each of the Passive Trees and their points are broken down below.
Lich Passive Points
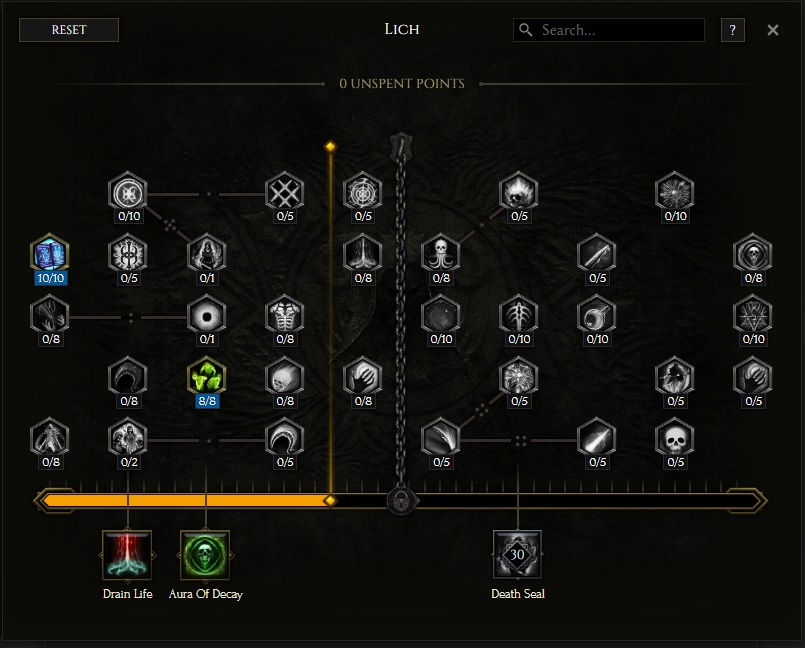
- 10 points into Apocrypha: This boosts our Intelligence and Mana Regen.
- 8 points into Desolation: This boosts our Minion's Damage Over Time, as much of their damage comes from Poison.
In this section, we will break down each skill and highlight the key passives we have selected to make the skill perform as best as possible in the build. While some of these skills do allow for some variation to exist depending on your own custom choices, we recommend utilizing the skill trees as presented until you have a strong understanding of the build itself.
Summon Volatile Zombie
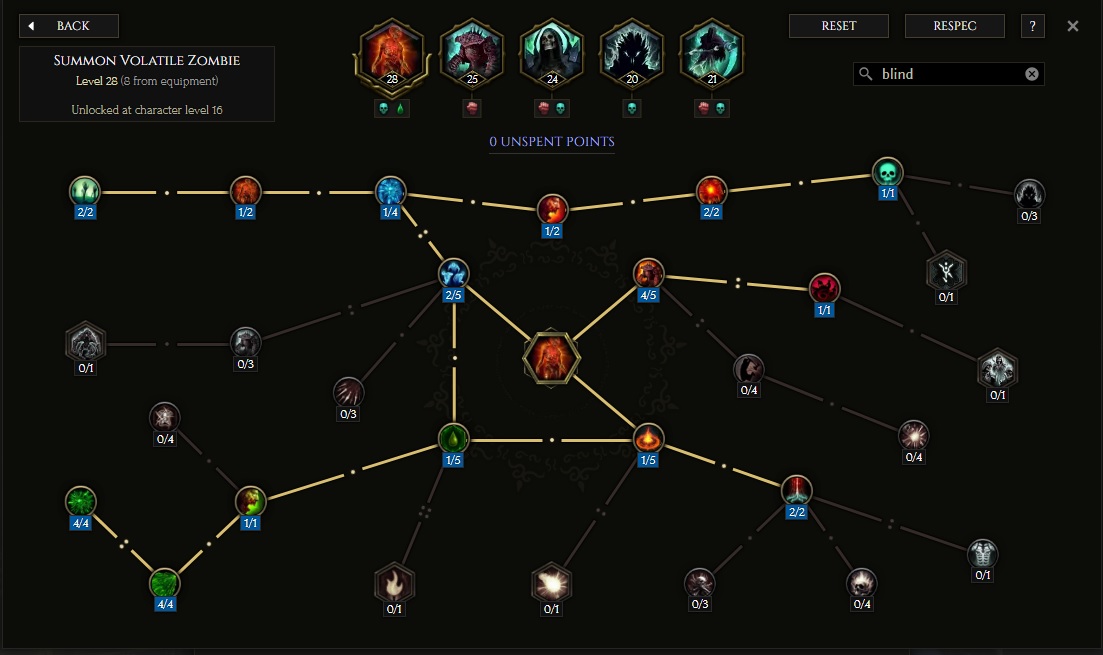
This skill is setup to auto summon our Zombies, which spread Poison to
enemies by puking on them and self-destructing. To do this, the build requires
you to run two Unique rings, both of them being ![]() Cycle of Putrescence, for
it to work.
Cycle of Putrescence, for
it to work.
Order of Skill Points
- 2 points into Forceful Commander: Increased Summoning Speed and Mana Efficiency.
- 1 point into Daunting Blast: Explosion has increased Stun Chance.
- 1 point into Dreadful Horde: Spawns two Zombies on cast.
- 2 points into Vile Force: Parasites are mini-minions that spawn when the Zombie explodes, used to stack up Poison.
- 1 point into Ravenous : Increased explosion damage against Boss or Rare enemies.
- 2 points into Pull of the Grave: Our zombies gain a Kill Threshold; extremely helpful on Boss or Rare enemies.
- 1 point into Horrific Vessels: Converts the Zombie's explosion damage to Necrotic.
- 1 point into Path of Destruction: Increased explosion area of effect, but we're taking this mostly to unlock next passive.
- 2 points into Necromantic Fervor: Healing for the player whenever a zombie explodes.
- 1 point into Army of Rot: Poison Chance on hit.
- 1 point into Repulsive Vomit: Gives our Zombies a melee-range attack that stacks Poison quickly before they explode.
- 4 points into Wretched Innards: A large damage multiplier for their Vomit attack.
- 4 points into Putridity: Vomit can now Poison enemies every second when they touch it.
- 4 points into Fervor: A damage multiplier and increased Movement Speed for our Zombies. Slow Zombies don't reach their targets quick enough, which is a damage loss.
- 1 point into Ferocious Horde: Increased Movement Speed for Zombies scaling off their missing Health. This can cause low Health Zombies to zoom to a target before exploding, increasing their effective damage.
You may not have as many skill points to use until you have the required gear affixes. You can skip the last 5 points in the tree, as well as trimming points from the Putridity and Wretched Innards nodes until you have acquired more skill points from your gear.
In this section, we will break down each skill and highlight the key passives we have selected to make the skill perform as best as possible in the build. While some of these skills do allow for some variation to exist depending on your own custom choices, we recommend utilizing the skill trees as presented until you have a strong understanding of the build itself.
Summon Bone Golem
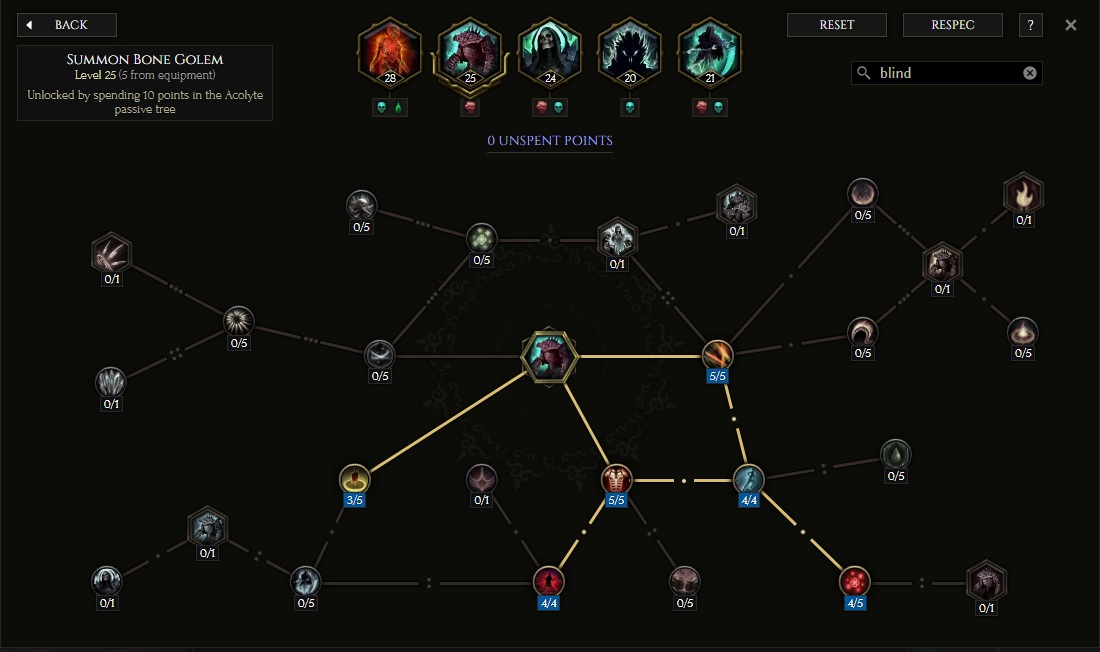
![]() Summon Bone Golem summons our tanks, which grant us the space to fight
without too much worry about being directly targeted. Golems are built to last
with a strong defense and high Health pool, and include the ability to Taunt.
Summon Bone Golem summons our tanks, which grant us the space to fight
without too much worry about being directly targeted. Golems are built to last
with a strong defense and high Health pool, and include the ability to Taunt.
Order of Skill Points
- 5 points in Amalgam of Rogues: Increased Melee Attack Speed and Movement Speed for Golems.
- 4 points in Unnatural Speed: Movement Speed for the Golem and a smaller bonus to other nearby minions.
- 5 points in Amalgam of Sentinels: Flat Health and Armor as well as Increased Health and Armor for our Golems.
- 4 points in Hunger: Passive healing for both you and the Golem whenever it hits.
- 4 points in Tower of Bones: Our Golems will be bigger, which helps to block projectiles, and generate more threat.
- 3 points in Amalgam of Primalists: Flat armor for Nearby Minions, including itself.
Due to our gear, we have more points than the standard allocation of 20 points. If you don't have the required points, you can first take 3 out of Amalgam of Primalists and if you still need points, you can take 1 out of Amalgam of Rogues and Hunger as well.
In this section, we will break down each skill and highlight the key passives we have selected to make the skill perform as best as possible in the build. While some of these skills do allow for some variation to exist depending on your own custom choices, we recommend utilizing the skill trees as presented until you have a strong understanding of the build itself.
Summon Skeletal Mage
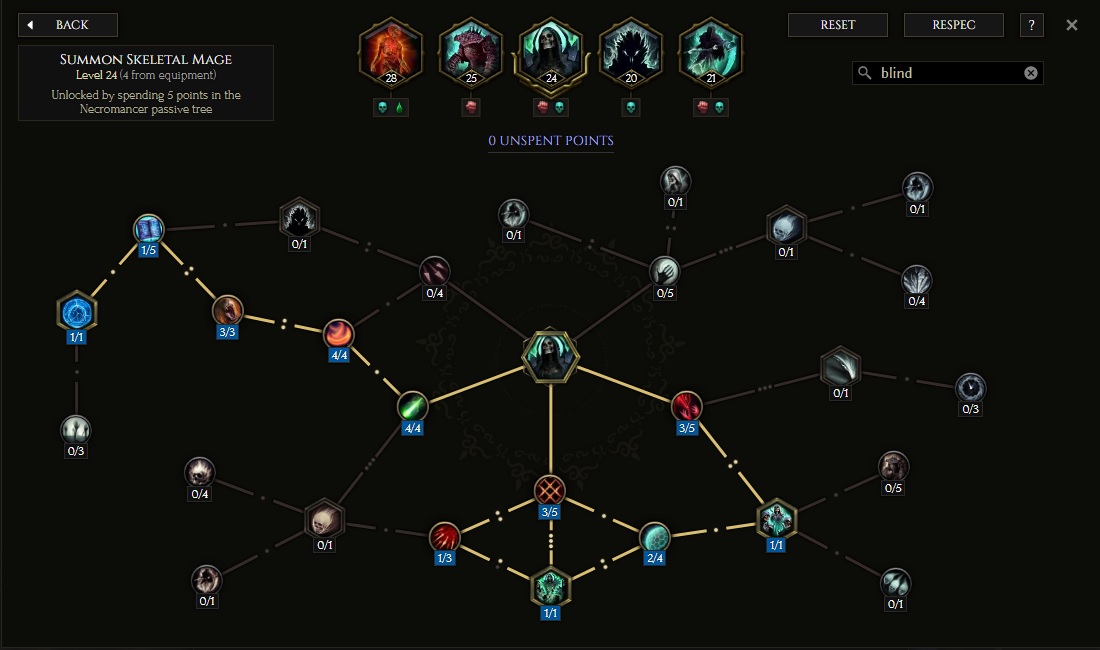
![]() Summon Skeletal Mage is more than just a minion skill in this build. On top of summoning
Death Knights, which are melee-based minions rather than the normal casters this skill typically summons,
it is also used as a Traversal Skill.
Summon Skeletal Mage is more than just a minion skill in this build. On top of summoning
Death Knights, which are melee-based minions rather than the normal casters this skill typically summons,
it is also used as a Traversal Skill.
Order of Skill Points
- 4 points into Putrid Essence: Gives Death Knights a guaranteed Poison Chance on hit.
- 4 points into Argonautic Speed. Attack Speed increase.
- 3 points into Ossein Frenzy: Chance to trigger a Frenzy on hit.
- 1 point into Forbidden Arcana: Increase to their damage based on our total Mana pool.
- 1 point into Grave Passage: This changes the skill to not only summon minions, but it can now be used as a Traversal skill. It will give it a cooldown, so it will take longer resummon all your minions after a death.
- 3 points into Leech Life: Increased Health and a Health Leech for Death Knights.
- 1 points into Death Knights: Converts Skeletal Mages into Death Knights.
- 2 points into Shadow Wardens: Ward per second and Critical Strike Avoidance for Death Knights.
- 1 point into Order of Death: Allows for an extra Death Knight to be summoned.
- 3 points into Celer Mortis: Increased their Base Crit Chance and Movement Speed.
- 1 point into Grey Merchant: Increased Critical Multiplier and Death Knights now heal themselves when they land a crit.
Due to our gear, we have more points than the standard allocation of 20 points. The nodes Leech Life, Grey Merchant, Celer Mortis and Ossein Frenzy can all be lowered by 1 until you have more skill points available from your gear.
In this section, we will break down each skill and highlight the key passives we have selected to make the skill perform as best as possible in the build. While some of these skills do allow for some variation to exist depending on your own custom choices, we recommend utilizing the skill trees as presented until you have a strong understanding of the build itself.
Dread Shade
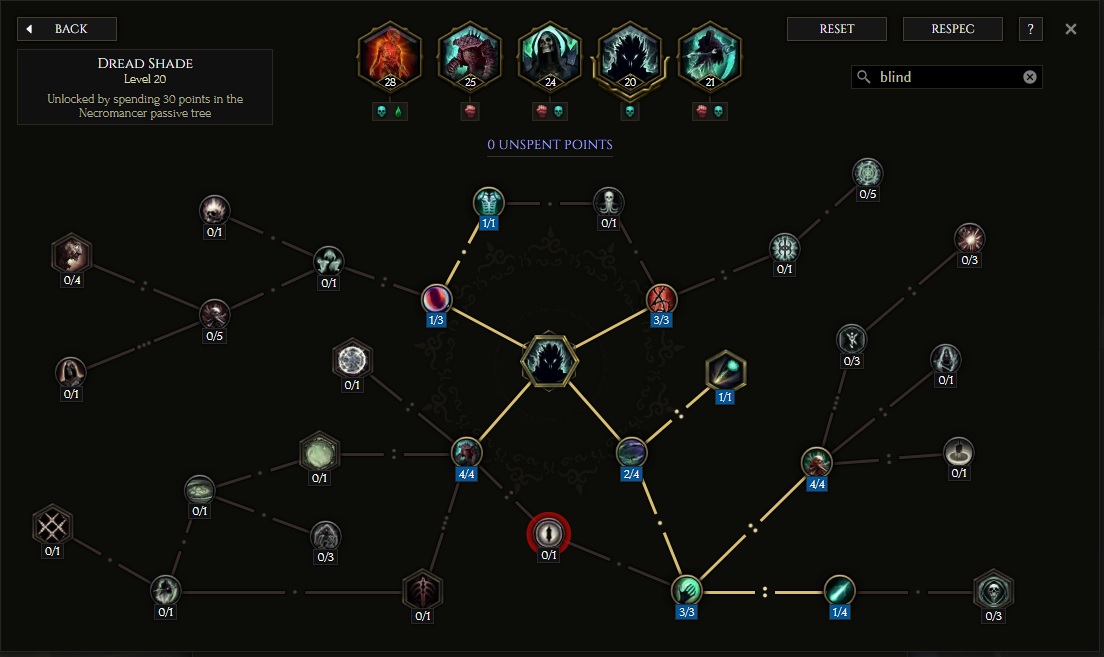
![]() Dread Shade is a fairly straightforward skill that buffs our minions'
damage for a set period of time. Once the buff fades, we simply reapply the
skill to renew the buff. This skill boosts Attack Speed and Damage for all of
our minions.
Dread Shade is a fairly straightforward skill that buffs our minions'
damage for a set period of time. Once the buff fades, we simply reapply the
skill to renew the buff. This skill boosts Attack Speed and Damage for all of
our minions.
Order of Skill Points
- 2 points into Spectral Presence: Increases the area that the buff effects, helping grant it to more of our minions.
- 1 point into Lone Watcher: Eliminates the Health drain on the minion, but converts any Health Drain increases on rest of skill tree to Increased Damage Taken by the minion.
- 3 points into Dying Coven: Increases Attack and Cast Speed.
- 4 points into Grim Fate: Huge damage and area size buff for
 Dread Shade, but increases the damage taken by the minion.
 - 1 point into Duskheart: Gives effected minions a chance to inflict Damned on hit.
- 4 points into Lingering Doom: A flat Necrotic Damage buff for our minions, and reduces the extra Damage Taken on the minion with Dread Shade cast.
- 1 point into Wisdom of the Dead: Reduces the Mana cost of Dread Shade.
- 1 point into Martyrdom: Gives an Armor buff to effected minions.
- 3 points into Flesh Harvest: As the minion that you cast Dread Shade on loses Health,
it will increase the buff effect. For this reason, and others, it's suggested you try to cast it on a Bone Golem
when possible.
In this section, we will break down each skill and highlight the key passives we have selected to make the skill perform as best as possible in the build. While some of these skills do allow for some variation to exist depending on your own custom choices, we recommend utilizing the skill trees as presented until you have a strong understanding of the build itself.
Summon Wraith
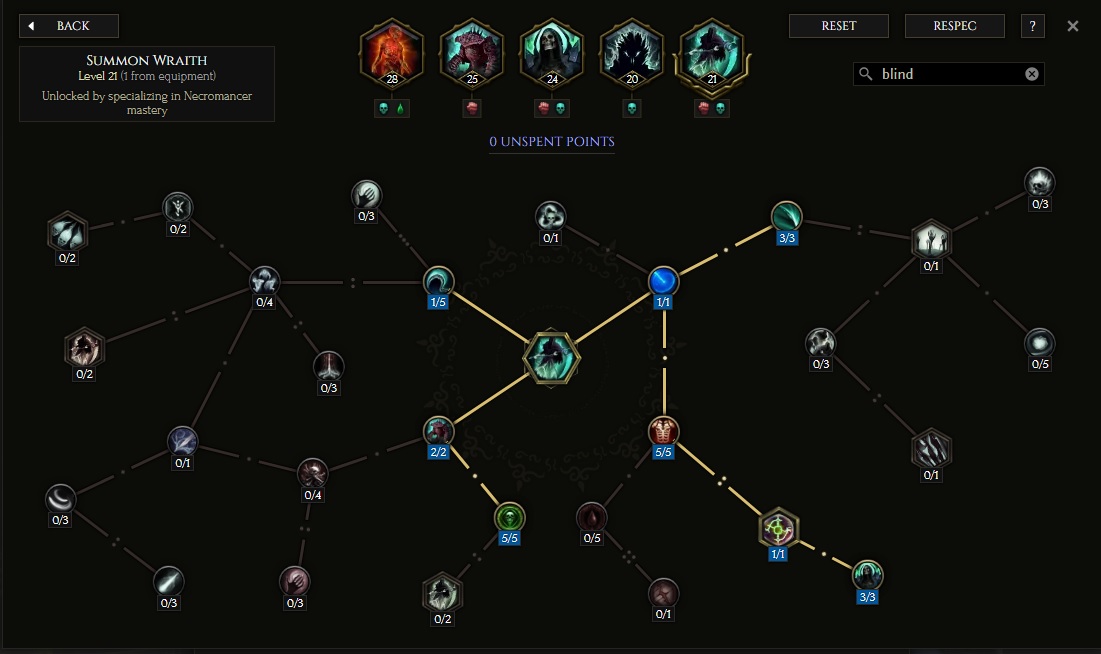
![]() Summon Wraith is built for high damage, good survivability and allows
a hands-off playstyle. We will be limiting ourselves to summoning only two
Wraiths at a time, but eliminating their Health decay so they cannot despawn.
Moreover, the Wraiths have a special skill node, Noxious Blades, for
Poison Penetration to further amplify our Poison Damage.
Summon Wraith is built for high damage, good survivability and allows
a hands-off playstyle. We will be limiting ourselves to summoning only two
Wraiths at a time, but eliminating their Health decay so they cannot despawn.
Moreover, the Wraiths have a special skill node, Noxious Blades, for
Poison Penetration to further amplify our Poison Damage.
Order of Skill Points
- 1 point into Locus Of Resurrection: Summons the Wraiths at your cursor location, and increases Mana cost.
- 5 points into Haunting: Increases Health.
- 1 point into Twin Spirits: Limits you to only summoning two Wraiths, but removes their Health decay, making them permanent minions.
- 3 points into Sequel of Avarice: Amplifies the Wraith's damage, Melee Area, Size and Health.
- 3 points into Dark Scythe: Increased Attack Speed.
- 2 points into Grave Reality: Increase Health.
- 5 points into Noxious Blades: Poison Penetration and Poison Chance on melee hit.
Should you get more than 20 points for ![]() Summon Wraith on your gear, you can put any extra points into Reapers.
Summon Wraith on your gear, you can put any extra points into Reapers.
Build Mechanics and Playstyle
The playstyle for this Minion build is as simple as summoning your minions
to full capacity and then heading into battle. This build utilizes two of the
same unique rings, ![]() Cycle of Putrescence, to keep your
Cycle of Putrescence, to keep your
![]() Summon Volatile Zombie summoning automatically. The effect on this ring applies
independently, meaning that with one Zombie out you have a 100% chance to resurrect
it twice, which would then bring two Zombies back. If you have two zombies out, and one dies, it has
a 50% chance and then another 50% to summon a Zombie, which could leave you with between one to three total Zombies.
This effect is demonstrated in the beginning of the build video linked above. If you aren't manually
summoning them, you'll have between one and three Zombies most of the time, but sometimes it can spike higher.
Summon Volatile Zombie summoning automatically. The effect on this ring applies
independently, meaning that with one Zombie out you have a 100% chance to resurrect
it twice, which would then bring two Zombies back. If you have two zombies out, and one dies, it has
a 50% chance and then another 50% to summon a Zombie, which could leave you with between one to three total Zombies.
This effect is demonstrated in the beginning of the build video linked above. If you aren't manually
summoning them, you'll have between one and three Zombies most of the time, but sometimes it can spike higher.
The most difficult challenge to this build is simply keeping your character alive, and
staying away from damage at all costs. Be sure to use the ![]() Summon Skeletal Mage skill
to jump out of danger.
Summon Skeletal Mage skill
to jump out of danger.
For those who like to min-max their builds, you may want to pay attention to the amount of Armor Shred stacks being applied on bosses. There is diminishing returns with Armor Shred, and around 50-70 stacks is the sweet spot, where it has the highest effect. If your minions are consistently keeping over 90 stacks on bosses, you could drop another point from the Aegisfall node. Conversely, if they are not reaching 50 stacks consistently, or quickly, you could add another point to the node. Tunklabs has a great Armor Shred Graph that visualizes this concept well and shows how little gain you get at higher stacks.
While there is no set rotation of skills, your main prioritiy is keeping your Minion Army
refreshed if you lose any minions while moving throughout the battlefield. You'll want to periodically
look at the numbers of each minion in the top left corner to see if you've lost any. Your second priority
is making sure ![]() Dread Shade is up on a permanent minion (i.e. not a Zombie and preferably a Bone Golem).
Much lower on the priority list, when you have a lot of Mana and nothing else to do, is to keep casting
Dread Shade is up on a permanent minion (i.e. not a Zombie and preferably a Bone Golem).
Much lower on the priority list, when you have a lot of Mana and nothing else to do, is to keep casting ![]() Summon Volatile Zombie
periodically. Even though our rings will auto summon a few at all times, having the max number out is an
increase in damage, and casting when your already at max Zombies will cause more parasites to spawn. Increasing
our parasites is a very small increase compared to everything else, so it is not worth doing unless you literally
have nothing else to do and only on a boss fight when you want to maximize damage. Overall, this build is very
relaxed, and when lined up with exceptional gear, can make for a very satisfying experience.
Summon Volatile Zombie
periodically. Even though our rings will auto summon a few at all times, having the max number out is an
increase in damage, and casting when your already at max Zombies will cause more parasites to spawn. Increasing
our parasites is a very small increase compared to everything else, so it is not worth doing unless you literally
have nothing else to do and only on a boss fight when you want to maximize damage. Overall, this build is very
relaxed, and when lined up with exceptional gear, can make for a very satisfying experience.
Equipment and Gear Affixes
For this build, we will be focusing on several main affixes for each piece of non-unique gear, as well as working towards acquiring the specific Uniques needed to make this build operate correctly. Our equipment will focus on these specific affixes for the Implicits and Modifier stats.
| Gear Slot | Implicits | Modifiers |
|---|---|---|
| Two-Handed Weapon | Minion Damage | Prefixes Mana and Mana Regen Parry Suffixes Increased Minion Damage Over Time Shared Poison Penetration |
| Head | Cooldown Recovery Increased Minion Cooldown Recovery |
Prefixes +3 Levels to Volatile Zombie +2 Levels to Bone Golem Suffixes Increased Health Armor, Reduced Bonus Damage from Critical Strikes |
| Chest | Legendary Potential Increased Health |
|
| Amulet | Less Damage over Time taken | Prefixes Increased Minion Damage Increased Minion Health Suffixes Health Needed Resistances |
| Gloves | Legendary Potential Increased Minion Damage |
|
| Belt | Armor | Prefixes Increased Minion Damage Increased Minion Health Suffixes Hybrid Health Increased Health |
| Ring | Legendary Potential Increased Minion Damage |
|
| Ring | Legendary Potential Increased Minion Damage |
|
| Feet | Movement Speed Armor Reduced Bonus Damage from Critical Strikes |
Prefixes Movement Speed Intelligence Suffixes Hybrid Health Armor, Reduced Bonus Damage from Criticals |
| Relic | Minion Damage Minion Speed Minion Health |
Prefixes +3 Levels to Skeletal Mage Increased Minion Damage Suffixes Health Needed Resistances |
A loot filter made specifically for the gear table above may be copied by pressing the button below. Once in the Loot Filter portion of the in-game menu, choose the "Paste Clipboard Contents" option to import the code.
Copy Loot Filter to Clipboard
Uniques
Now, let's look at the required uniques for this build.
Aaron's Will
![]() Aaron's Will: The key to adding multiple Bone Golems to this build,
there no other way to add additional, full strength Bone Golems without this unique.
This chestpiece also grants Bone Golems the chance to Ward. While this chance is
only 6%, it is still quite helpful. The drawback to using this unique item is our
Aaron's Will: The key to adding multiple Bone Golems to this build,
there no other way to add additional, full strength Bone Golems without this unique.
This chestpiece also grants Bone Golems the chance to Ward. While this chance is
only 6%, it is still quite helpful. The drawback to using this unique item is our
![]() Summon Skeletal Mage loses the ability to summon Warriors, Archers and Rogues, which
is fine as we use Death Knights. This unique can can be target farmed on the Monolith Timeline
"Blood, Frost and Death" from the Unique or Set Body Armour echo reward.
Summon Skeletal Mage loses the ability to summon Warriors, Archers and Rogues, which
is fine as we use Death Knights. This unique can can be target farmed on the Monolith Timeline
"Blood, Frost and Death" from the Unique or Set Body Armour echo reward.
Cycle of Putrescence
![]() Cycle of Putrescence: Two of these will be needed. These rings are what allows us to auto-summon
Volatile Zombies without the need to constantly recast the skill.
It is possible to play the build without these rings, but it requires manually casting
Cycle of Putrescence: Two of these will be needed. These rings are what allows us to auto-summon
Volatile Zombies without the need to constantly recast the skill.
It is possible to play the build without these rings, but it requires manually casting ![]() Summon Volatile Zombie
quite often, which can become quite annoying. They can be target farmed on the timeline "The Age of Winter"
from the Unique or Set Ring echo reward.
Summon Volatile Zombie
quite often, which can become quite annoying. They can be target farmed on the timeline "The Age of Winter"
from the Unique or Set Ring echo reward.
Raven's Rise
![]() Ravens' Rise: These gloves increase all of our minion-based Skill Tree
Points by 2. This build in particular stacks additional Skill Tree points for
some of our Skills all the way up to an additional 8 points with perfectly rolled
gear. This adds so much power and freedom to our build. These Unique gloves can
be target farmed on the timeline "Ending the Storm" from the Unique or
Set Gloves echo reward.
Ravens' Rise: These gloves increase all of our minion-based Skill Tree
Points by 2. This build in particular stacks additional Skill Tree points for
some of our Skills all the way up to an additional 8 points with perfectly rolled
gear. This adds so much power and freedom to our build. These Unique gloves can
be target farmed on the timeline "Ending the Storm" from the Unique or
Set Gloves echo reward.
Idols
Idol slots are gained throughout the campaign, unlocking small bonuses and unique affixes for the player to discover and augment their builds with. The Idol screen consists of a grid system for the player to fill out with different sized idols, eventually filling in every part of the grid. As the Idol shape increases (1x1, 1x2, 1x3, 1x4, etc.) it will open up different affixes for you to use. This can be a great way to add some more customization to your build.
For this particular build, we will be focusing on increasing the Health for our character; an attribute we neglected during our passive point allocation. You will ideally want four 1x3 idols and four 1x2 idols.
Most of our Idols have three main affixes: Health, Increased Health or Resistances. There is only one Idol that has a unique modifier; Minion chance to apply Marked for Death on hit. Marked For Death causes the enemy to take 25% more damage. However, this is optional, and only necessary if you want to save a Passive Point from the Necromancer Tree. You can drop the point in Mark of Punishment if you prefer to get this effect on Idols to increase your echo clear speeds. In either case, your damage on bosses will be the same.
Blessing
Blessings are permanent buffs that are applied to your character. These come in two different powers, Standard and Grand. Grand blessings are significantly stronger than the Standard Blessings. In total, there are 10 Blessing Slots, one for each Monolith Timeline. When you complete a Monolith and defeat the final boss you will be awarded a choice of three blessing with a random value. For the purpose of this guide, we are highlighting five major slots that can be filled with our recommendations, leaving the other for some personal preference.
| Blessing Name | Affix | Timeline |
|---|---|---|
| + Void Resistance | The Black Sun | |
| + Total Mana | Ending the Storm | |
| + Physical Resistance | The Age of Winter | |
| + Endurance % | Spirits of Fire | |
| + Poison Resistance | Reign of Dragons |
Changelog
- 29 Mar. 2024: Build Planner corrected; slight differences between guide and planner.
- 16 Mar. 2024: Updated for 1.0.
- 04 Oct. 2023: Guide Added.

Lexyu is a professional content creator focused on theorycrafting and playtesting many ARPGS. He is also known for his skillful gameplay, such as playing Bazooka Wizard in Diablo 3. Since 2013, he has been creating in-depth guides to teach gamers how to succeed. Check out his social platforms through Discord to join the discussion in the community!
- Patch 1.0.7 Update: Multiplayer, Skills and More!
- Patch 1.0.6 Update: Camera Setting, Controller Keybinds, Bug Fixes, and More!
- Eleventh Hour Games on Real-Money Trading and Exploits in Last Epoch
- Patch 1.0.5 Update: Many Bug Fixes, Including Loot Filter Toggle Sensitivity, and Other Improvements!
- The First 30 Days of Last Epoch!
- 1.0 Launch Retrospective: A Message From Eleventh Hour Games
- Patch 1.0.4 Update: More In-Game Changes, Bug Fixes, and Improvements
- Last Epoch Mid-Cycle Balance Survey Recap