Sorcerer Black Hole Frostbite Endgame Build for Last Epoch (Patch 1.0)
Build Introduction
The Black Hole Frostbite build is a variant off our main build, Black Hole Ignite. The idea behind the build is very similar, and they use mostly similar skills. However, the Cold version relies more on crowd control rather than pure brute force, making for a different playstyle, but with the theme remaining intact from the original build.
 Immobilizes enemies and groups them together for easy AoE
 - High Ward generation
- Black Hole suck-in effect bullies most bosses

 Lower burst potential than the main build
 - Black Hole has zero effect on enemies such as Lagon

Skill Selection
Unlike the Fire-based version of this build, ![]() Black Hole is not the main
damage dealer here. We'll use Black Hole instead to suck enemies in and keep
them locked down, setting up for us to slam foes with Frostbite
through
Black Hole is not the main
damage dealer here. We'll use Black Hole instead to suck enemies in and keep
them locked down, setting up for us to slam foes with Frostbite
through ![]() Frost Wall and
Frost Wall and ![]() Frost Claw.
Frost Claw.
![]() Flame Rush will be converted to Cold, and used for mobility, while also
applying stacks of Cold Shred to enemies we pass through.
To finish this builds skills, we'll take
Flame Rush will be converted to Cold, and used for mobility, while also
applying stacks of Cold Shred to enemies we pass through.
To finish this builds skills, we'll take ![]() Flame Ward to boost Cold Damage and
resolve add a layer od defense with Ward generation.
Flame Ward to boost Cold Damage and
resolve add a layer od defense with Ward generation.

Class and Skill Passive Trees
Our base class is Mage, which fills the role of spell caster and magic user in Last Epoch. Upon finishing Act 1 in the campaign, your character will be offered an opportunity to select an Advanced Mastery. Each base class has three possible Masteries to choose from. For Mage, you can choose between Passive Trees for Sorcerer, Spellsword, and Runemaster. Upon selecting a Mastery and placing 20 Passive Points into the Mage Tree, you'll then be able to place Passive Points into the Mastery Trees.
Sorcerer is the Advanced Class used for this build, and also where the majority of our Passive Points will come from. The Sorcerer Tree will
focus around picking nodes that increase our Cold Damage, Cold Penetration, and Mana Regen. A lesser amount of
Passive Points will come from Runemaster, focusing on Ward and Mana, but also unlocking ![]() Flame Rush and
Flame Rush and
![]() Frost Wall as a usable spells. Spellsword is not used in this build. Each Passive
Tree and their points are broken down below.
Frost Wall as a usable spells. Spellsword is not used in this build. Each Passive
Tree and their points are broken down below.
Mage Passive Points

- 8 points into Elementalist: Increases Cold Damage.
- 6 points into Arcanist: Intelligence gains and Fire and Lightning Resistance.
- 6 points into Reactive Ward: This will trigger fairly consistently since, through gearing, we will be trading Health for Ward on every cast.
- 5 points into Warden: Ward Retention.
- 3 points into Silver Rune: Increases Ward gain from the previous node and cuts the cooldown of the effect in half.
Our base class is Mage, which fills the role of spell caster and magic user in Last Epoch. Upon finishing Act 1 in the campaign, your character will be offered an opportunity to select an Advanced Mastery. Each base class has three possible Masteries to choose from. For Mage, you can choose between Passive Trees for Sorcerer, Spellsword, and Runemaster. Upon selecting a Mastery and placing 20 Passive Points into the Mage Tree, you'll then be able to place Passive Points into the Mastery Trees.
Sorcerer is the Advanced Class used for this build, and also where the majority of our Passive Points will come from. The Sorcerer Tree will
focus around picking nodes that increase our Cold Damage, Cold Penetration, and Mana Regen. A lesser amount of
Passive Points will come from Runemaster, focusing on Ward and Mana, but also unlocking ![]() Flame Rush and
Flame Rush and
![]() Frost Wall as a usable spells. Spellsword is not used in this build. Each Passive
Tree and their points are broken down below.
Frost Wall as a usable spells. Spellsword is not used in this build. Each Passive
Tree and their points are broken down below.
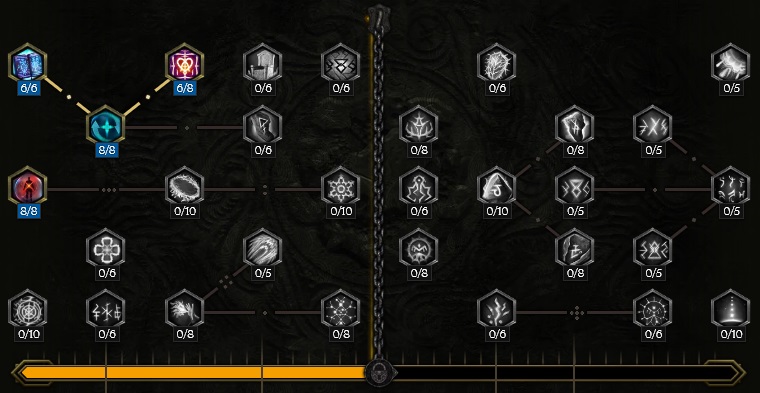
Sorcerer Passive Points

- 8 points into Mana Shell: Increased Armor and Mana.
- 5 points into Arcane Momentum: Casting a spell gives you a stack of Arcane Momentum, with each stack granting increased Cast Speed. Caps at five stacks.
- 8 points into Essence of Celerity: Increased Spell Damage and Movement Speed with Arcane Momentum.
- 8 points into Cryomancer: Cold Damage and Freeze Rate Multiplier.
- 5 points into Chill to the Bone: Invaluable Cold Penetration and Cold Damage Leech. Helps generate Ward with our gearing choices.
- 1 point into Arcane Avalanche: One point taken that allows you to Freeze bosses.
- 10 points into Arcane Insight: This has 100% uptime in combat, so think of this node as +10 Intelligence, +20% Elemental Damage, and +20% Ward Retention.
- 8 points into Elemental Ascendance: Elemental Resistance is mostly important for the Cold Resistance increase, but also increases Cold Damage.
- 4 points into Recollection: Lowers cooldown for
 Black Hole and
  Flame Ward.
Our base class is Mage, which fills the role of spell caster and magic user in Last Epoch. Upon finishing Act 1 in the campaign, your character will be offered an opportunity to select an Advanced Mastery. Each base class has three possible Masteries to choose from. For Mage, you can choose between Passive Trees for Sorcerer, Spellsword, and Runemaster. Upon selecting a Mastery and placing 20 Passive Points into the Mage Tree, you'll then be able to place Passive Points into the Mastery Trees.
Sorcerer is the Advanced Class used for this build, and also where the majority of our Passive Points will come from. The Sorcerer Tree will
focus around picking nodes that increase our Cold Damage, Cold Penetration, and Mana Regen. A lesser amount of
Passive Points will come from Runemaster, focusing on Ward and Mana, but also unlocking ![]() Flame Rush and
Flame Rush and
![]() Frost Wall as a usable spells. Spellsword is not used in this build. Each Passive
Tree and their points are broken down below.
Frost Wall as a usable spells. Spellsword is not used in this build. Each Passive
Tree and their points are broken down below.
Runemaster Passive Points
- 8 points into Sphere of Protection: Since everything we do causes Chill stacks, this effectively becomes a permanent Damage Reduction.
- 8 point into Unsealed Mana: Taken for the Cast Speed.
- 8 points into Arcane Focus: Intelligence and Ward on cast.
- 6 points into Transcendence: Bonus Health, bonus node provides 36 Ward per second.
In this section, we will break down each skill and highlight the key passives we have selected to make the skill shine in the build. While some of these skills do allow for some variation to exist depending on your own custom choices, we recommend utilizing the skill trees as presented until you have a strong understanding of the build itself.
Black Hole

![]() Black Hole is used specifically for crowd control in this build. Any and all enemies will
be sucked towards the center of the Black Hole, creating the perfect opportunity for us to drop
Black Hole is used specifically for crowd control in this build. Any and all enemies will
be sucked towards the center of the Black Hole, creating the perfect opportunity for us to drop
![]() Frost Wall on them and begin pummeling away with
Frost Wall on them and begin pummeling away with ![]() Frost Claw. The cooldown has been
reduced so it is feasible to use this in echoes without too much downtime.
Frost Claw. The cooldown has been
reduced so it is feasible to use this in echoes without too much downtime.
Order of Skill Points
- 3 points into Stability: 30% increase to the duration. In turn, reduces the downtime that the skill will not be active.
- 2 points into Endless Maw: Further increases the duration, but also increases the cooldown.
- 1 point into Scattered: Drops another Black Hole somewhere nearby, doubling the effective area we can suck mobs into.
- 1 point into Time Dilation: Mostly taken for traversal, but Black Hole also has a chance to apply Blind.
- 3 points into Rifts: Drops the cooldown, but also reduces pull strength and the effective area of Black Hole.
- 4 points into Intensity: Returns the Pull Strength we lost due to Rifts.
- 4 points into Massive: Returns the Pull Area we lost due to Rifts with a little extra.
- 3 points into Cascade Fracture: Adds a 30% chance that Black Hole will recast itself. This only applies to the original Black Hole we place, not the one created by Scattered.
In this section, we will break down each skill and highlight the key passives we have selected to make the skill shine in the build. While some of these skills do allow for some variation to exist depending on your own custom choices, we recommend utilizing the skill trees as presented until you have a strong understanding of the build itself.
Frost Claw

![]() Frost Claw is the main damage dealer for the build, and this is how we will apply
a good chunk of our stacks of Frostbite onto mobs. This is considered the spam
skill in the build. With constant uptime, you can easily hit 500 or more stacks of Frostbite
with only this skill.
Frost Claw is the main damage dealer for the build, and this is how we will apply
a good chunk of our stacks of Frostbite onto mobs. This is considered the spam
skill in the build. With constant uptime, you can easily hit 500 or more stacks of Frostbite
with only this skill.
Order of Skill Points
- 3 points into Gift of Winter: Reduces Mana cost and provides a small chance of refunding Mana on cast.
- 5 points into Artor's Sceptre: 100% chance to inflict Frostbite on each hit.
- 1 point into Frost Beyond Time: Frostbite, Slow, and Chill durations extended by 25% when applied by Frost Claw.
- 3 points into Brightfrost: Ailment cleanse on cast, and a boost to Cast Speed.
- 1 point into Hand of Morditas: Adds two extra projectiles to the cast, but increases the Mana cost at the same time.
- 1 point into Volley of Glass: The burst that happened at the end of this spell disappears. In exchange, every projectile has its own damage instance, perfect for applying Frostbite. This nearly doubles Mana cost.
- 1 point into Shiver Shell: Traversal node.
- 1 point into Rending Cascade: Traversal node.
- 1 point into Frozen Reign: Reduces Mana cost by 3.
- 1 point into Glamdring: Traversal node.
- 1 point into Cold Star: 6% damage increase. Ignore the area increase, the explosion is gone due to Volley of Glass.
- 1 point into On Through The Snow: Continues the cast beyond the first point of impact, used for clearing echoes. Increases Mana cost by 8.
In this section, we will break down each skill and highlight the key passives we have selected to make the skill shine in the build. While some of these skills do allow for some variation to exist depending on your own custom choices, we recommend utilizing the skill trees as presented until you have a strong understanding of the build itself.
Frost Wall

![]() Frost Wall is used in this variation to apply a handful of Frostbite
stacks, as well as providing a much higher chance to Freeze enemies if they touch the wall. Walking through
your Frost Wall will generate Ward and refund Mana when you walk through it, so its worth placing this down
in your walking path when possible.
Frost Wall is used in this variation to apply a handful of Frostbite
stacks, as well as providing a much higher chance to Freeze enemies if they touch the wall. Walking through
your Frost Wall will generate Ward and refund Mana when you walk through it, so its worth placing this down
in your walking path when possible.
Order of Skill Points
- 4 points into Biting Limit: Applies 8 stacks of Frostbite a second to all enemies inside of Frost Wall.
- 4 points into Crystals of Protection: Gain Ward and Mana when you walk through the Wall.
- 4 points into Marching Winter: Frost Wall stays active longer, and becomes longer.
- 5 points into The Dark Cold: Increases Frostbite damage the longer the Wall is active.
- 4 points into Biting Limit: Frost Wall applies 8 stacks of Frostbite a second to enemies within it.
- 2 points into Arch of Rimefrost: Frost Wall has higher Freeze Rate Multiplier.
- 1 point into Frigid Domination: This build will sit around 1200% Freeze Rate Multiplier, boosting the Spell Damage on Frost Wall by about 60.
- 1 point into Frozen Throne: Frost Wall now deals more damage to Frozen enemies and Freezes them for longer.
In this section, we will break down each skill and highlight the key passives we have selected to make the skill shine in the build. While some of these skills do allow for some variation to exist depending on your own custom choices, we recommend utilizing the skill trees as presented until you have a strong understanding of the build itself.
Flame Ward

![]() Flame Ward has dual purpose for this build, acting as an on-demand source of Ward, but also
as a way to open burst windows to deal damage. A charge has been added to this to allow more flexibility
in usage.
Flame Ward has dual purpose for this build, acting as an on-demand source of Ward, but also
as a way to open burst windows to deal damage. A charge has been added to this to allow more flexibility
in usage.
Order of Skill Points
- 3 points into Dilation: Increases duration.
- 5 points into Infusion: Increases all Cold damage while Flame Ward is active by 250%.
- 1 point into
 Fire Aura: Traversal node.
 - 1 point into Frost Ward: Converts spell to Cold.
- 2 points into Frostguard: While Flame Ward is active, you have an extra 400 Armor.
- 5 points into Stalwart Defense: 200 Ward gained on use.
- 1 point into Desperate Defense: We don't get much use out of this, we're almost always at full Health.
- 2 points into Fuel The Flames: Flame Ward grants 20% more Ward.
- 1 point into Dual Aegis: Adds a charge to Flame Ward.
In this section, we will break down each skill and highlight the key passives we have selected to make the skill shine in the build. While some of these skills do allow for some variation to exist depending on your own custom choices, we recommend utilizing the skill trees as presented until you have a strong understanding of the build itself.
Flame Rush

![]() Flame Rush is the mobility spell for this build, but also provides stacks of Cold Shred
to amplify burst damage when passing through enemies. Moving through enemies also applies Brand of Subjugation, which is
a heavy hitting Cold DoT that scales off Chill chance. Flame Rush can be used to move through
Flame Rush is the mobility spell for this build, but also provides stacks of Cold Shred
to amplify burst damage when passing through enemies. Moving through enemies also applies Brand of Subjugation, which is
a heavy hitting Cold DoT that scales off Chill chance. Flame Rush can be used to move through ![]() Frost Wall for efficiency.
Since mobs have collision, this is usually the best way to go about doing this and not getting stuck.
Frost Wall for efficiency.
Since mobs have collision, this is usually the best way to go about doing this and not getting stuck.
Order of Skill Points
- 2 points into Fiery Overload: Provides Frenzy when Flame Rush ends.
- 3 points into Lunar Protection: Generate Ward while using Flame Rush.
- 1 point into Energy Equivalence: Traversal node.
- 1 point into Snowballing: Turns Flame Rush into Frost Rush with a Cold conversion.
- 1 point into Branding Cold: Passing through enemies applies Brand of Subjugation. This is the reason we take Chance to Chill on our Wand, as you will see in the gearing section of the build.
- 3 points into Blazing Flux: Reduces cooldown and Mana cost.
- 3 points into Runic Eclipse: Reduces damage taken while using Flame Rush, and mitigates twice as much damage from DoTs.
- 1 point into Celestial Guidance: Mitigative buffs persist after Flame Rush ends.
- 1 point into Solar Rush: Increases the Speed and Range of Flame Rush.
- 5 points into Smolder and Burn: Applies 5 stacks of Cold Shred on enemies when you pass through them.
Build Mechanics and Playstyle
Unlike the main build, ![]() Black Hole is a support skill rather than our main source of damage.
It is used to pin enemies down (including bosses) and clump them together, making them an easy target for
Black Hole is a support skill rather than our main source of damage.
It is used to pin enemies down (including bosses) and clump them together, making them an easy target for
![]() Frost Claw and forcing them to stand inside of
Frost Claw and forcing them to stand inside of ![]() Frost Wall. To perform a proper burst window,
execute the following:
Frost Wall. To perform a proper burst window,
execute the following:
- Drop Black Hole onto a group of enemies or a boss.
- Throw down
 Frost Wall where the enemies are now stuck.
  Flame Rush through enemies and Frost Wall to apply Shred the Cold Resistance
onto anything you touch.
Flame Rush through enemies and Frost Wall to apply Shred the Cold Resistance
onto anything you touch.- Activate Flame Ward for a boost to your damage.
- Spam
 Frost Claw.
This rotation is fairly safe and can be repeated forever. Mana should not be an issue, since there is a fairly high chance to regain 12
Mana on cast with ![]() Frost Claw. The only way you could run out of Mana is if you spam
Frost Claw. The only way you could run out of Mana is if you spam ![]() Frost Wall without attacking mobs, however
doing this would not provide any gain for this build anyway, so it shouldn't be a problem.
Frost Wall without attacking mobs, however
doing this would not provide any gain for this build anyway, so it shouldn't be a problem.
When dealing with large groups of mobs, you will likely have mobs sitting in both instances of ![]() Black Hole. If this happens,
you can position yourself in such a way to where the Black Holes are both directly in front of you in a line. This
will allow the first hit of
Black Hole. If this happens,
you can position yourself in such a way to where the Black Holes are both directly in front of you in a line. This
will allow the first hit of ![]() Frost Claw to hit the first Black Hole group, and the second hit will hit the other.
Frost Claw to hit the first Black Hole group, and the second hit will hit the other.
Playing Defensively
In contrast to the main build, this build plays in a way that is much safer. ![]() Black Hole can be used defensively
in the event you need to break away from fighting and regain positioning or some health. In the event you get lucky with
Cascade Fracture, you will be able to keep Black Hole up with full uptime, keeping enemies pinned down for a minimum of
around 15 seconds.
Black Hole can be used defensively
in the event you need to break away from fighting and regain positioning or some health. In the event you get lucky with
Cascade Fracture, you will be able to keep Black Hole up with full uptime, keeping enemies pinned down for a minimum of
around 15 seconds.
Equipment and Gear Affixes
For this build, we will be focusing on several main affixes for each piece of non-unique gear, as well as working towards acquiring the specific Uniques needed to make this build operate correctly. Our equipment will focus on these specific affixes for the Implicits and Modifier stats.
| Gear Slot | Implicits | Modifiers |
|---|---|---|
| Wand | Spell Damage Mana -3 Spell Mana Cost |
Prefixes Increased Elemental Damage Over Time Increased Cold Damage Suffixes Freeze Rate Multiplier Chance to Chill on Hit |
| Off-hand Catalyst | Intelligence Ward per Second Ward Retention |
Prefixes Increased Cold Damage Increased Damage Over Time Suffixes Cold Resistance Needed Resistances |
| Head | Intelligence Ward per Second Ward Retention |
Prefixes Increased Cold Damage Over Time Increased Damage Over Time Suffixes Cold Resistance Ward per Second |
| Amulet | Freeze Rate Multiplier Cold Resistance |
Prefixes Increased Elemental Damage Over Time Cold Penetration Suffixes Needed Resistances |
| Chest | Armor Critical Strike Multiplier Frzze Rate Multiplier |
Prefixes Increased Cold Damage Over Time Chance to Apply Frostbite on Cold Hit Suffixes Health Needed Resistances |
| Belt | Armor Poison Resistance Cold Resistance |
Prefixes Increased Elemental Damage Over Time Increased Cold Damage Suffixes Cold Resistance Hybrid Health |
| Ring | Necrotic Resistance Ward Retention |
Prefixes Increased Elemental Damage Over Time Intelligence Suffixes Needed Resistances |
| Ring | Necrotic Resistance Ward Retention |
Prefixes Increased Elemental Damage Over Time Intelligence Suffixes Needed Resistances Cold Resistance |
| Gloves | Prefixes Increased Cast Speed |
|
| Feet | Prefixes Cold Resistance |
|
| Relic | Prefixes Freeze Rate Multiplier, Cold Resistance |
A loot filter made specifically for the gear table above may be copied by pressing the button below. Once in the Loot Filter portion of the in-game menu, choose the "Paste Clipboard Contents" option to import the code.
Copy Loot Filter to Clipboard
Uniques
Below we have the required uniques to make the build work. While the idea behind the build will work decently in either Normal Monoliths or low Corruption, it is suggested to have these drops to effectively play the build.
Twisted Heart of Uhkeiros
![]() Twisted Heart of Uhkeiros: This relic is by far the most important part of ensuring your survivability. It
converts current Health into Ward any time you cast an Elemental Spell. Combined with the Blessing
Twisted Heart of Uhkeiros: This relic is by far the most important part of ensuring your survivability. It
converts current Health into Ward any time you cast an Elemental Spell. Combined with the Blessing ![]() Grand Hunger of the Void,
you'll be able to continually generate Ward while also refilling your Health on each cast. This Relic can be target farmed in
Monolith Timeline "Reign of Dragons".
Grand Hunger of the Void,
you'll be able to continually generate Ward while also refilling your Health on each cast. This Relic can be target farmed in
Monolith Timeline "Reign of Dragons".
Frostbite Shackles
![]() Frostbite Shackles: Scales Frostbite, both chance and duration, as well as providing a large portion
of Ward Retention for survival. These gloves can be target farmed by killing Formosas the Undying.
Frostbite Shackles: Scales Frostbite, both chance and duration, as well as providing a large portion
of Ward Retention for survival. These gloves can be target farmed by killing Formosas the Undying.
Snowdrift
![]() Snowdrift: These boots work great with the
Snowdrift: These boots work great with the ![]() Frostbite Shackles. The Freeze
Rate Multipler off the gloves gets added to the boots for Cold Penetration with Frostbite.
Target farm on the Monolith Timeline "Spirits of Fire".
Frostbite Shackles. The Freeze
Rate Multipler off the gloves gets added to the boots for Cold Penetration with Frostbite.
Target farm on the Monolith Timeline "Spirits of Fire".
Idols
Idol slots are gained through the campaign, unlocking small bonuses and unique affixes for the player to discover and augment their builds with. The Idol screen consists of a grid system for the player to fill out with different sized Idols, eventually filling in every part of the grid. As the Idol shape increases (1x1, 1x2, 1x3, 1x4, etc.) the stronger an affix you might find for your build.
To optimize the Idols in this build, aim to collect two Ornate Glass Idols with Mana Efficiency with Frost Claw, two Grand Glass Idols with Increased Frostbite Duration, and a single Large Arcane Idol with Cold Penetration with Frostbite.
Blessing
Blessings are permanent buffs that are applied to your character. These come in two different powers, Standard and Grand. Grand blessings are significantly stronger than the Standard Blessings. In total, there are 10 Blessing Slots, one for each Monolith Timeline. When you complete a Monolith and defeat the final boss you will be awarded a choice of three blessing with a random value.
| Blessing Name | Affix | Timeline |
|---|---|---|
| Spell Damage Leeched as Health | The Black Sun | |
| Critical Strike Avoidance | Reign of Dragons | |
| Armor | Spirits of Fire | |
| Chance to Apply Frostbite on Hit | The Age of Winter | |
| Increased Cold Damage | Ending the Storm |
Changelog
- 12 Mar. 2024: Updated for 1.0.
- 24 Jan. 2024: Guide added.

GhazzyTV is a professional content creator that knows all about theory crafting builds in Path of Exile and Last Epoch and has been teaching players how to build their characters for over 9 years. He is a huge Blizzard fan with thousands of hours invested into Diablo 3 and 4 and is a frequent World of Warcraft Classic player. His builds will be helpful content for new players and veterans alike. You can find his PoE Vault Guide Hub here and his LE Guide Hub here. You can follow him on Twitch, YouTube or Twitter.
- Patch 1.0.7 Update: Multiplayer, Skills and More!
- Patch 1.0.6 Update: Camera Setting, Controller Keybinds, Bug Fixes, and More!
- Eleventh Hour Games on Real-Money Trading and Exploits in Last Epoch
- Patch 1.0.5 Update: Many Bug Fixes, Including Loot Filter Toggle Sensitivity, and Other Improvements!
- The First 30 Days of Last Epoch!
- 1.0 Launch Retrospective: A Message From Eleventh Hour Games
- Patch 1.0.4 Update: More In-Game Changes, Bug Fixes, and Improvements
- Last Epoch Mid-Cycle Balance Survey Recap